
QUASAR - Kitchen hoods FALMEC - Free user manual and instructions
Find the device manual for free QUASAR FALMEC in PDF.

| Brand | FALMEC |
| Model | QUASAR |
| Category | Kitchen hood |
| Installation type | Wall-mounted, extractor or filter version |
| Power supply | 230 V ~ 50 Hz |
| Motor power | Variable according to speed (1-3, 4th intensive speed) |
| Lighting | Halogen, max 20 W, 12 V, socket G4 |
| Controls | Push buttons with indicator lights, remote control optional |
| Motor speeds | 3 normal speeds + 1 timed intensive speed (15 min) |
| Timer | Automatic shutdown after 15 minutes |
| Metal grease filters | Dishwasher safe, clean monthly |
| Charcoal filters | Replace every 3-4 months, not washable |
| Minimum safety distance (gas) | 65 cm between cooking surface and hood |
| Exterior cleaning | Damp cloth with neutral detergent or denatured alcohol |
| Interior maintenance | Disconnect before cleaning, do not use liquids on electrical parts |
| Filter saturation alarm | Red indicator light after 30 hours of operation |
| Exhaust duct diameter | Not smaller than the hood connection |
| Maximum weight on hood | 1.5 kg |
| After-sales service | Contact an authorized center for repairs and spare parts |
| Warranty | Details on the back of the manual |
Frequently Asked Questions - QUASAR FALMEC
User questions about QUASAR FALMEC
0 question about this device. Answer the ones you know or ask your own.
Ask a new question about this device
Download the instructions for your Kitchen hoods in PDF format for free! Find your manual QUASAR - FALMEC and take your electronic device back in hand. On this page are published all the documents necessary for the use of your device. QUASAR by FALMEC.
USER MANUAL QUASAR FALMEC
INSTRUCTIONS BOOKLET
Dear Sir/Madam, congratulations!
You have purchased a prestigious range hood of guaranteed quality. For best results, we suggest that you carefully follow the operating and maintenance instructions provided in this booklet; in addition, to order spare charcoal filters, use the special coupon on the cover.
Fase/Step 3
Pase/Step 4

AVVERTENZE

This instruction booklet must be kept together with the appliance for future reference. If the appliance is sold or consigned to other parties, check that the booklet is supplied with it, to ensure that the new user has the correct information on the operation of the range hood and is aware of the warnings. These warnings have been provided for the your safety and the safety of others. As a result, please read them carefully before installing and operating the appliance.
This appliance is not intended for use by young children or infirm persons unless they have been adequately supervised by a responsible person to ensure that they can use the appliance safely. Young children should be supervised to ensure they do not play with the appliance.
The appliance must be installed by qualified personnel, in accordance with the standards in force. If the supply cord is damaged, it must be replaced by the manufacturer, its service agent or similarly qualified persons in order to avoid a hazard. Any modifications that may be required to the electrical system for the installation of the range hood must only be made by qualified electricians.
It is dangerous to modify or attempt to modify the characteristics of this system. In the event of malfunctions or if repairs are required to the appliance, do not attempt to solve the problems directly.
Repairs performed by unqualified persons may cause damage. For all repair and other work on the appliance, contact an authorised service/spare parts centre.
Always check that all the electrical parts (lights, exhaust device), are off when the appliance is not being used. Read the entire instruction booklet before performing any operations on the range hood.
The range hood must only be used for the exhaust of cooking fumes in home kitchens. The manufacturer disclaims all liability for any other use of the appliance.
The maximum weight of any object placed above the hood, or hung to it (if possible) must not exceed 1,5 kilos. After installing the stainless steel hood, clean it in order to remove any residue of the protective glue, and stains of grease or oil. The manufacturer recommends its cleaning cloth available for purchase. The manufacturer accepts no liability in case of damage caused by the use of different detergent types.

TECHNICAL SPECIFICATIONS
The technical data pertaining to the electric appliance The technical specifications of the appliance are shown on the rating plates located inside the range hood.
(Section reserved for qualified installers of the range hood)
Minimum distance: distance between the pan supports of the cooker and the bottom-most section of the hood. When the hood is positioned above a gas equipment this minimum distance must be at least 65~cm (see picture C1) or even more, if this is specified in the instructions for use of the gas cooker.
In the outside exhaust version, the diameter of the fume discharge duct must be no smaller than the range hood connection.
In the horizontal sections, the duct must slope slightly (around 10% ) upwards, so as to better convey the air outside of the room.
Avoid using angled pipes, make sure that the pipes are at least of the minimum length.
Comply with the current regulations on air discharge into the atmosphere. If a boiler, stove, fireplace, etc. that uses gas or other fuels is being used at the same time, make sure the room where the fumes are extracted is well ventilated, in compliance with the current regulations.
Mounting instruction: see section "O" of the booklet.

ELECTRICAL CONNECTIONS
(Section reserved for qualified installers)
WARNING!
Before doing any work inside the range hood, disconnect the appliance from the mains power supply.
Check that the wires inside the range hood are not disconnected or cut; if this is the case, contact your nearest service centre. The electrical connections must be performed by qualified personnel.
The connections must be performed in compliance with the legal standards in force. Check that the relief valve and the electrical system are able to support the load of the appliance (see the technical specifications in point B).
Some types of appliance are supplied with a cable without plug; in this case, "standardised" plugs must be used, keeping in mind that:
- the yellow-green wire must be used for the earth,
- the blue/white wire must be used for the neutral,
- the brown/black wire must be used for the phase; the cable must not come into contact with hot parts (over 75^ ).
- fit a plug that is suitable for the load to the power cable, and connect it to a suitable power outlet.
For appliances that come supplied with cable and plug please ensure they are plugged into a circuit suitable for this appliance.
Please refer to a qualified person. (See technical specifications in point B).
The manufacturer declines all liability if the safety standards are not observed.

RANGE HOOD WITH OUTSIDE
DISCHARGE (exhaust)
In this version, the fumes and steam from the kitchen are conveyed outside through an exhaust duct.
The exhaust conveyor that protrudes from the upper part of the range hood must be connected to a duct that carries the fumes and steam outside. In this version, the charcoal filters, if fitted, should be removed; to do this, see the instructions in point F. There must be adequate ventilation of the room when the range hood is used at the same time as appliances burning gas or other fuels, according to the standard.
Deviation for Germany:
When the range hood and appliances supplied with energy other than electricity are simultaneously in operation, the negative pressure in the room must not exceed 4 Pa (4x10 E-5 bar).

RECIRCULATING RANGE
HOOD (with filter)
In this version, the air passes through charcoal filters for purification, and is then recirculated back into the kitchen.
Check that the charcoal filters are fitted to the motor, and if not, install them as described in the instructions in point H.
If the hood is of filtering type, remove the non-return valve fitted at the motor's outlet.

For maximum efficiency, the third speed should be used when there are strong odours or a lot of steam, the second speed in normal conditions, and the first speed for keeping the air clean with minimum energy consumption.
The range hood should be switched on when starting to cook, and left on until the odours disappear.

OPERATION
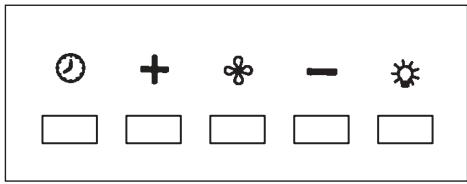
1. ELECTRONIC CONTROL PANEL (Quasar Top)
Light pushbutton
- ON: light on (the pushbutton is lit);
- OFF: light off;
Pushbutton -
Press to reduce motor speed
Speed 1, 2 and 3 are indicated by the number of LEDs that light up (excluding the light and the timer LEDs).
Pushbutton +
Press to increase motor speed
Speed 1, 2 and 3 are indicated by the number of LEDs that light up (excluding the light and the timer LEDs).
(In the 4-speed version the pushbutton + blinks. The fourth speed remains on for a set duration of time. After 15 minutes the motor returns to the third speed).
Mode pushbutton
Function: it turns hood motor on and off.
The function "desired speed" enables to start the motor at the speed that was selected before the hood was last turned off.
Optional: version with remote control (some versions only).
WARNING:
Install the hood away from sources of electromagnetic waves, as these could affect the correct operation of the electronic system.
Maximum operating distance: 5 metres. The maximum operating distance could be less than 5 metres in case of electromagnetic interference by other equipment.
Light pushbutton on remote control: light on/off.
- and + pushbutton: increase/decrease speed (to start the motor press either the + or the - pushbutton).
Timer pushbutton: see instructions below.
Instructions for changing the code (only in case of malfunctions caused by interferences):
Disconnect the hood from the power supply
Remove the cover of the remote control, change the code with the levers.
Connect the hood to the power supply and make sure the lights and the motors are off.
Press the timer pushbutton for 2 seconds. When the red LED of the control panel lights up press any of the buttons on the control panel.
Timer and 'filter clogged' alarm pushbutton
- This function allows the automatic turning off of the hood after running for 15 minutes at the speed previously set (the pushbutton shows a flickering light).
- After about 30 hours of running the pushbutton indicates the need for washing the metal filters (the pushbutton shows a solid red light). To disable the alarm press the pushbutton for a few seconds until the red light turns off. Then turn the hood off and on again to check that the alarm has disappeared.
2. ELECTRONIC CONTROL PANEL (Quasar Glass)
Mode push-button
Function: it turns hood motor on and off.
The function "desired speed" enables to start the motor at the speed that was selected before the hood was last turned off.
Push-button -
Press to reduce motor speed
Display
It indicates the current speed
Push-button +
Press to increase motor speed
Timer
This function allows the automatic turning off of the hood after running for 15 minutes at the speed previously set (the display shows a flickering light).
Light pushbutton

- ON: light on
- OFF: light off
Note: In order to maintain the correct functionality of the hood we recommend you to clean, periodically, the front part of the glass. To rinse and dry carefully use a soft cloth. Chemical and abrasive products are strictly forbidden.

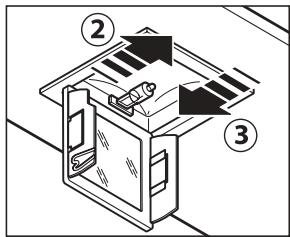
FILTERS REMOVING AND REPLACING'S INSTRUCTIONS
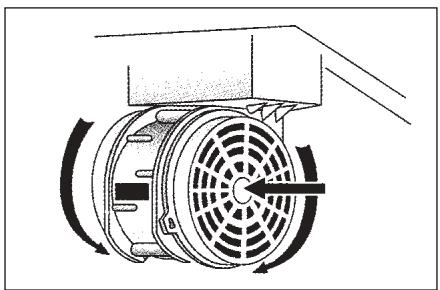
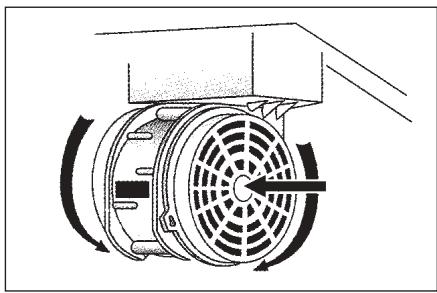
1. METAL FILTERS
Open the panel (see fig. H3). Use handle A to remove the metal grease filter.

2. CHARCOAL FILTERS
To replace the charcoal filters, proceed as follows: remove the metal filters as described above. The two filters located at the ends of the motor can now be easily accessed.
To install the new filters see picture.
To order new filters, use the coupon enclosed with this booklet or provided by the distributor.
3. INSTRUCTION FOR REMOVABLE PANEL
Follow the instructions on fig.H3 to remove the panel.

LIGHTING ASSEMBLY AND REPLACEMENT
SPOTLIGHT
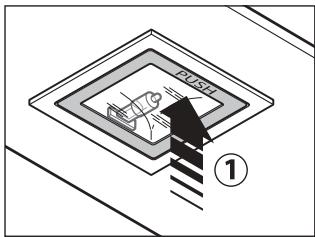
How to replace a square halogen light:
a) Check that the equipment is disconnected from the power supply.
b) Open the panel completely till 90^ (see figure) pressing the PUSH button
c) Replace the lamp with a similar one (halogen, max 20 W, 12 Volt, G4 connection).
d) Close the panel. If the panel does not close correctly repeat the operation at point b.


MAINTENANCE AND CLEANING
Constant maintenance ensures the correct operation and efficiency of the appliance over time. Special attention should be paid to the metal grease-trapping filters and the charcoal filters. Frequent cleaning of the filters and their supports will ensure that fats and grease do not accumulate on the range hood, with the consequent risk of fire.
1. METAL GREASE-TRAPPING FILTERS
These trap the fat and grease particles suspended in the air, and therefore should be washed every month in hot water and detergent, without bending them. Wait until they are completely dry before repositioning them. To remove and replace these filters, see the instructions in point H1. This operation should be performed at regular intervals.
2. CHARCOAL FILTERS
These trap the odours present in the stream of air that passes through them. The air is purified by passing a number of times through the filters and being recirculated into the kitchen. The charcoal filters cannot be cleaned, and should be replaced on average every 3-4 months (according to use). To replace the charcoal filters, see the instructions in point H2.
3. CLEANING THE OUTSIDE OF THE APPLIANCE
The aside of the range hhod should be cleaned using a damp cloth and neutral liquid detergent or denatured alcohol.
In case of fingerprint-less finish (fasteel) clean only with water and neutral soap using clean with a soft cloth, rinse and wipe dry thoroughly. Do not use products that contain abrasive substances, rough cloths or cloths specifically designed for cleaning steel. Using abrasive substances or rough
cloths will inevitably damage the finish of steel. The steel surface will be irrevocably damaged if the instructions above are not complied with. Keep these instructions together with the instructions for use of your hood.
The manufacturer accepts no liability for any damage caused by non-compliance with the instructions above.
4. CLEANING THE INSIDE OF THE APPLIANCE
The electrical parts or parts of the motor assembly inside the range hood must not be cleaned using liquids or solvents.

Do not use abrasive products.
All the above operations must be performed after having disconnected the appliance from the mains power supply.

SAFETYWARNINGS
C E

The electrical system features an earth connection in compliance with international safety standards; furthermore, it is compliant with the European standard for electromagnetic compatibility.
Do not connect the appliance to flues (from boilers, fireplaces, etc.). Make sure the mains voltage corresponds to the values on the rating plate located inside the range hood. The minimum safety distance between the cooktop and the range hood must be at least 65~cm .
Never cook on "open" flames under the range hood.
Check deep-fryers during use: superheated oil may be flammable.
- Ensure there is adequate ventilation of the room when the rangehood is used at the same time as appliances burning gas or other fuels.
- Do not flambe under the rangehood
- The exhaust air must not be discharged into a flue which is used for exhausting fumes from appliances burning gas or other fuels.
- Ensure that all regulations concerning the discharge of exhaust air have been fulfilled before you use the appliance.

Before performing any cleaning or maintenance operations, disconnect the appliance by unplugging it or using the main switch. The manufacturer disclaims all liability for any damage that may be directly or indirectly caused to people, things and animals due to the failure to follow all the instructions provided in this booklet and above all the warnings relating to the installation, operation and maintenance of the appliance.

WARRANTY
The new equipment is covered by warranty.
The warranty conditions are provided by the distributor.

The manufacturer is not liable for any inaccuracies in this booklet resulting from printing or transcription errors. The manufacturer reserves the right to modify its products as it considers necessary or in the interests of the user, without compromising their essential safety and operating characteristics.
MOUNTING INSTRUCTIONS, RANGE HOODS WITH BOX
Step 1
- Rest the support bar against the wall (A-Fig. O1) at a height from the cooktop determined by the sum of the distance X + 517.8 mm .
- Check the horizontal alignment with a spirit level and mark the 2 holes to be drilled at the ends of the bar.
- Drill the holes, insert 2 × 8mm dia. screw anchors, and fasten the bar using the corresponding screws.
Step 2
- Hook the range hood to the support bar (Fig. O2).
- Adjust the alignment of the range hood using the screws on the brack-ets (Fig. O2). The top screw (B) adjust the distance from the wall, the bottom screw (C) adjust the height.
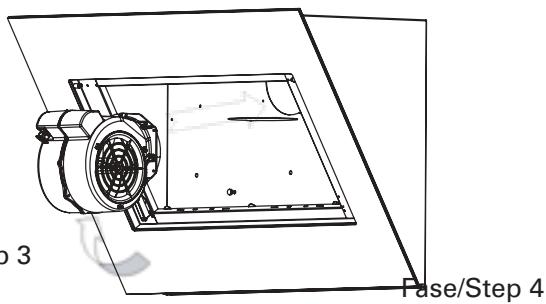
Step 3
- To prevent the range hood from detaching due to pressure from below, fasten it to the wall using a screw anchor and screw, through the corresponding hole (Fig. O3) on the rotor box or inside the mood.
- Insert the duct (E) on the ducting connection (D). Hood assembly instructions.
Step 4 (optional)
Place element (G) onto the chimney until is fully inserted.
- Fix the extension (H) to element (G), sliding it to the desired height.
- Once having found the optimum position, rest the bracket (L) against the wall, check the hori-zontal alignment using a spirit level and mark the 2 holes to be drilled at the ends.
- Drill the holes, insert 2 × 4mm dia. screw anchors and fasten the bracket (L) using the corresponding screws.
- Tighten the extension (H) to the bracket (L) using the screws (M).

HINWEISE

1. ELEKTRONISCHES BEDIENFELD (Quasar Top)
Lichtknopf
1. ELEKTRONISCHES BEDIENFELD (Quasar Glass)
Drucknopf Modus
MEPbI INPEIOCTOPOXHOCTN

OueHb BaxHo, YTO6bl DaHHoe PyKOBODCTBO NO 3KcNJIyaTaun XpaHnIOcb BmecTe c annapaTpyo JnB O3MOxHOn Heo6XoIMocTn KOHCyJbTaunn B 6yduem.
Pnp npoajke npn60pa nnn nepeaue ero pyromy nucy K npnbopy 6b3atelbno dOJXHO npnilaratbcry PyKOBODCTBO, YTO6bl HOBbI NOlb3OBaTeNB 6bl B Kypce TOrO, KaN NOlb3OBaTcBcB bItraKoN KaKne COOTBeTCTByIOUe Mebp IpeOCTOpOXHOCTH Heo6xOdmo Co6IHOdaTb.
ДанhoePykoBoDCTBO6bIIOcoCTaBNeHOДЯ6e3OnacHocTnKaBaWe,Tak n OkpykaIoUxN,No3ToMу npocmBac BnHMaTeJbHo C Hm O3HaKOMtbcr neped yctaHOBkOи 3KnJIyatauNei np6opa.
IeTAM I6OJIbHbIM JIOJAM pa3peWaeTc NOJIb3OBaTbcra npi6Opom JINUb IOd aJeKBaTHbIM KOHTPOEm OTBETCTBeHHbIX JNlC, KOTOpbIE MOryT OBeCneuBaTb 6e3oNaChoe NcNoJIb3OBaHne npi6opa.
OTBETCTBEHHOMy IInCy Heo6xOIMo CJeIITb, YTO6bl DeTn He irpaJn c np6opom.
Pa60tbl no yctaHOBKe 1OJXHbI npoBOuNTbCRA KOMPeTeHTHBIMN KBaJIncpUcnpoBaHHbIMn CpeuaJIncTAmN corglaCHO DeIeCTByUOUM HOpMaM.
JIIO6oe Heo6xOJIMOE JnY yCTaHOBKn BbITJXKN N3MeHHe B 3JIeKTPuYeCKOM 6JIOKe DoJIKHO OCyUeCTBJIaTbC TOnJBKO KOMIeTeHTbIM JINlOm.
I3MeHHeNe IJIN NONbITKa I3MeHEnHa xapaKTepncTn npnbopa onacHo! B clyuae HeKOppeKTHoI pa60TbI BbITaJIteKn He nbITaJIteCb yCTpaHHTb HencnpaBHOCTb CAMOCTOReJIbHO.
Pemont, npoBeeHHbI HeKOMPeTeHTHbIM IINcO, MoKeT Bbl3BaTb NOBpeJdeHn.
E BbITJXHOE YCTPOICTBO C BbIBPOCOM BO3ДУXA HAPYЖY
B 3toi moJn DbIM n nap OT roTOBKn Bbl6paCbIbAHTcHapyKu 3pTy6y. Tpy6a IJIy Bbl6pOca, KOTOPa BblCTynat N3 BpxHn cactN BblTjXKN DoJXHa 6bITb CoINHHa C Tpy6o, KOTOPa BblBOINT DbIM n nap BN NOMUHN, pnc. B daHHoM moJIn CNImaOTc qnlbTpbl Ha aKTINBnPOBaHHom yrI, cnI OHn YCTaHOJIbI; KaON CHmAlOTc, CM.nyHKF.Ecn kYxOHNa BblTjXKa NCNOJb3yTCs OJHOBMnHO n dnydpyrnx npnbopOB, pa6oTaHOUNx Ha ra3y INn DpyROM TOJINB, NOMUHN DOJXHO IMTB BO3MOXHOCTb DOCTaTOHORIO npOBTPNBAHn.

BbITJXHOE YCTPOIcTBOC PEUNPKUJIaIeN BO3dYXA (cФиьТраси)
B 3toi moJIn BO3dyx npoxOHT p3 fNtBtpbI c aKTHBnPOBaHHbIM yrIm, IOnuTcN BO3BpaaTcR B NOMUHN KUYHIN.
Y6DNTcb, YTO yROJbHbI QINbTpbl yCTaHOBJIHbI Ha MOTop, pnc. 6, B INpOTNBOM Cnya yCTaHOBnT nx, KAK yKa3aHO B NHT F INHCTpyKcun.
IyunuHnXapaKtpncTk PKOMHyTcN cNoB3OBaTb TptbIO CKOpocTb npHaJIuHmCINhBbIX 3anaxOB uN6OJbWORo KOJIuCTBa napa, BTOpyIO CKOpocTb HOpMaJbHbIX ycIOBnAx, pByIO CKOpocTb IJr OChCTKn BO3dyxa npn Hn3KOM paCXoIOBAHH 3IKTpO3Hpnn.
PKOMHdyTcB KJIIOUaTb BbITaKKy, KOrda Bbl HaUNHaT rOToBnTb N OCTabJrTa pa60taoui Do nC43HOBnH CNJbHbIX 3anaxOB.

PABOTA
1. KHONKIN C 3JEKTPOHhbIM YNPABJIEHNEM (Quasar Top)
KnaBnwa ocBeuHnna
- ON: ocbeueHne BliuOeHo (KhONka CBetITcra);
OFF:ocBeueHHe BbIKIIOueHo;
KnaBnsa -
KnaBnHa OcBeHEnHa NpIbTe:CBET BKn./BbIKn. (on/off).
KnaBn-a-e+ymeHbWeHne/YBeIuYeHne cKOpOCTn (JJIa3nycka MoTopa MOxHO HaaTb KaK KNaBnUy +, TaK N KNaBnUy -).
KnaBnTaTMepa:cm. HxKe INHCTpyKlNIO.
ⅡЯ yCTaHOBKn/3aMeHbICM.
ДязakazahOBbIXФиьТрOBПьь3уNTecb TaNoHaMn,PpHIOXeHHbIMN KPykoBOdCTBy nIIN o6paaaiTecb K npOdaBv.
3. CMEHHARpyPnA
CneyuTe 3a HnCTpykUmaH na pnc. H3, UTo6bI ydaIaTb rpynny.

OCBELUHNEYCTAHOBKAI3AMEHA
ГАЛОГEHоE OCBELSEнe
Дязаменилампочк "Square halogen light" Heo6xOДиMo:a) Y6eДиТьСВ TOM,чTO npi6bop OTKJIIOUeHOr OT эЛeКТрocetn;
6)Полноctью OTKpbItb naHeJIb Ha 90^ (cM. pucyHok) haxaTneM ha PUSH.
B) 3aMeHnTb IamnoUky Ha aHaIIOrUHyU (raIoreHOByU, MaKc. 20 BT, 12 B, pa3bem G4).
Д) 3akpbIb naHeIb. EcIn nAHeIb He 3akpbIbAeTcR KoppeKTHO, NOBTOpITb nyHKT 6.

YNCTKA N YXOD
CBoBmHbI yxOJ rapaHTnpyT xopoWyIO pa60Ty I 60JIbwoI cpoK cnyXbI. Oco6HHO BHMaHN H6XODIMo YdNlTB MtaJIINuCKM fNJIbTpAM JIra3axBaTa Xnpa I fNJIbTpAM C aKTNBUPOBAHbIM YrJIM, DInCTBNTlbHO, YaCTa ROnCTKa fNJIbTpOB IM CMT INX KpNJHnRA rapaHTnpyT, YTO B BbITJHK H Co6UpaTCs Xnpu, KOToPbI OnaCh N3-3a JrIKOCTn BO3RopAHnI.
1. METAJIINUÇECKNE ΦΙΝΙbTPblДЛЯ 3ADEPЖAHNY XHPA
PpHa3NaHbI DnI yIaBnBaHn YacTnJ Knpa, PKOMHdyTCaMbITb pa3 McaB BOD n C MOIOUM CpDCTBOM, H npri6a Ix. Do ycTaHOBKn DoXdntCb Ix NOnHoro BblCbIXaHn.
Iyra TOrO yTo6bI CHaTb QnJIbTp n yCTaHOBnTb Ha MCTo CM. HNcTpyKun, nyHKT I. PKOMHdyTc pryJrApo BblONHry 3Ty OnpauIO.
IaHhIbe npabnla DOJXhbl XpaHnTcBc BmEcTe C nHCTpyKuJe N O3KcnJIyaTaunn BbITJxKn. I3rOToBnTeJIb He npinHMaet HnKaKnx IpTeeH3N B cIyuae Heco6JIIODeHnna HactoUx npabnI.
4. ONUCTKA BHYPTHEHNE YACTN
OuNTKa 3JIKTPNUcKIN NII NTHOcRJUXC8 B MOTOpY cAcTbHHTPN BbITJXKN Ipn IOMOUs JNIDKoCTn n pactBOPNTIaNPHa.

H noJb3yI Tcb a6pa3nHBbIMN XmMKaTaMn.
BbINOJHMyt BC onpaun, npdBapntIbHO OTKIOUHb NpN6Op O T 3JIKTponNTaHn.

БЕЗПАСНСТВ МЕРы ПЕДОCTОPOЖHOCTN C

3NeKtpnuecka Cxema ChabxkeHa KOHTaKTOM 3a3emHeHnCOrJaCHO MExyHapOndbIM HopMaM 6e3oNaChOCTn; Kpome TORO, OHa COOTBETCTByET eBPOneCKmHOpMaM 3aunTbI OT paDInONomEX.
He noKlHouaIte npi6op K Tpy6am, OTBODaIIM DbIM OT CROPaHnT OToJIbA (KOTbl, KaMInbI n T.I.). Y6eINTEcB B TOM, YTO HApJxKeHne B CETN COOTBeTCTByET yKa3aHHomy Ha Ta6LIuChe, PpIKpeJIeHNHO BHyTpN BbITaXKn.
B ueJx 6e30nacHOCTn pacCToHHe OT BapOCHIOBepXHOCTn Do BbITaKKN DOJXHO COCTaBJTb He MeHee 65 cm.
Helenzra roTOBnTB nIuHa OTKpbITOM orHe noD BbITXKoJ. CJeInte 3a fprtnHOpHnUcAmn: nepepeTeOE macNo MoKet 3aropeTbcra.
- Y6eIntecb B TOM, UTO B NOMEUHIN IMeETcR IOCTaTOHAR BEHTNJIaCJRA, ECJIY BbITJXKA INOJIb3yeTcR COBMeCTHO C dpyrIMN pnp6OpAMn, pa6oTAIOUIMN Ha ra3e IIN dpyrom Tropouhem.
- He 3axkraTe OTKpbTbI OROH bIOB BbITaXKOJ.
- He noДКЛЮЧаTe npi6op K Tpy6aM, OTBODJIIM DbIM OT CROPANI YOJIINBA (KOTJIb, KAMHb I T.I.).
- Y6eIITecb B CO6JIOpHeH N BCEx DeIcTByIOUx HOpM IIO BBIBOy BO3DyXa HApJyN3 NOMEuEHH, IpexKDe Yem N0lb3OBaTbCBAITJAKKoI.

Ipepe npoBeHnem IIO6bIX MaHnnylaucn no QnCTKe nIy yXOdy BvIKJIOHTe pnp6op, BbITaunB BNJKy n3 PO3ETKN IIN C NOMOu bO oOeero BvIKJIOUATEJI. PpeepnTne-n3rTOBNTeJb He Hecet OTBetCTBEHOCTH 3a BO3MOxHHB BpeD, PpNCHHeHHB, PpMAO INKOCBeHHO, IIOJAM, PpeMeTAM INI DOMaSHM XINBOTbIM BCJIeDCTBNE Heco6JIHOeHn IpeDnCaHn, yKa3aHHbIX B PyKOBoDCTBE NO 3KcNlyaTaau, OOCeHNO B TOM, YTO Kacaet T npaBnI yCTaHOBKn IN 3KcNlyaTaau nPp6opa n yXoDa 3a Hm.

ГAPAHТИN
Hobii np6op haoOpTcraoDIOCTBm rapaHTn.
TapaHTnHbI yCIOBnI POJIHOCTbIO IpnVBdHbI Ha IocJdH CTpaHnC 3TOrO n3daHnI.
