USER MANUAL MANHATTAN FALMEC
INSTRUCTIONS BOOKLET
Dear Sir/Madam, congratulations!
You have purchased a prestigious range hood of guaranteed quality. For best results, we suggest that you carefully follow the operating and maintenance instructions provided in this booklet; in addition, to order spare charcoal filters, use the special coupon on the cover.
MOUNTING INSTRUCTIONS FOR THE GLASSES
MIRABILIA 67 - MIRABILIA 97
ISOLA/ISLAND 65 CENTRAL CHIMNEY
V1
A (1:1)
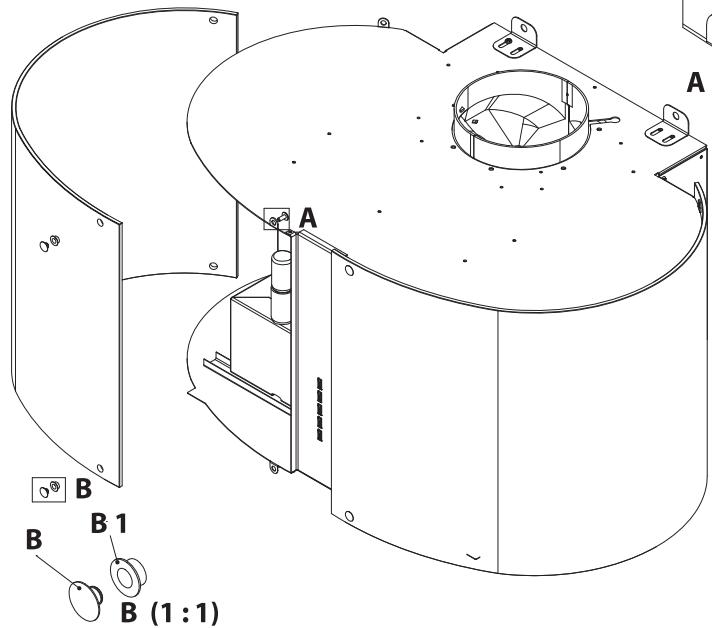

Fig.05
MIRABILIA ISOLA/ISLAND 85
MIRABILIA ISOLA/ISLAND 85 ISOLA/ISLAND 65 CENTRAL CHIMNEY
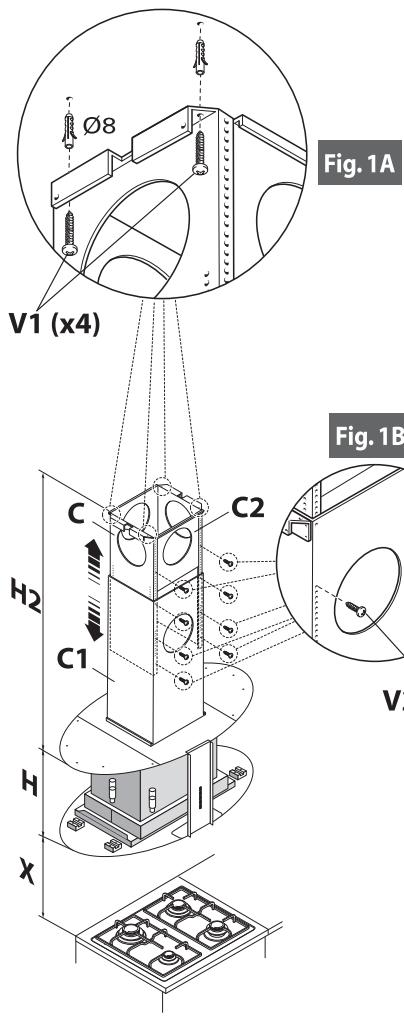
Fig.1
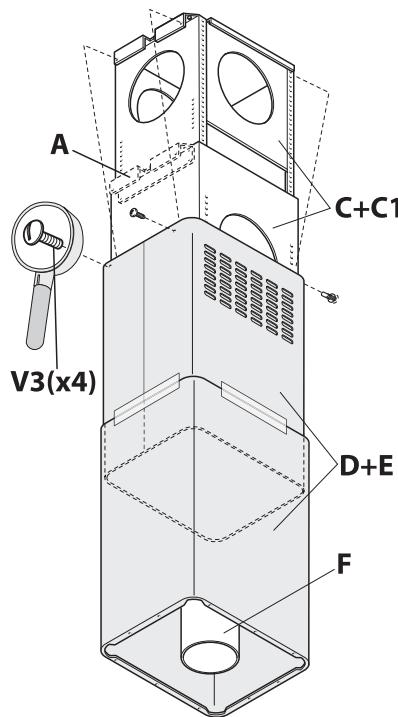
Fig.2
MIRABILIA ISOLA/ISLAND 85 - ISOLA/ISLAND 65 CENTRAL CHIMNEY
Fig.3


LIBRETTO ISTRUZIONI

AVVERTENZE

This instruction booklet must be kept together with the appliance for future reference. If the appliance is sold or consigned to other parties, check that the booklet is supplied with it, to ensure that the new user has the correct information on the operation of the range hood and is aware of the warnings. These warnings have been provided for the your safety and the safety of others. As a result, please read them carefully before installing and operating the appliance.
This appliance is not intended for use by young children or infirm persons unless they have been adequately supervised by a responsible person to ensure that they can use the appliance safely. Young children should be supervised to ensure they do not play with the appliance.
The appliance must be installed by qualified personnel, in accordance with the standards in force. If the supply cord is damaged, it must be re-placed by the manufacturer, its service agent or similarly qualified persons in order to avoid a hazard. Any modifications that may be required to the electrical system for the installation of the range hood must only be made by qualified electricians.
It is dangerous to modify or attempt to modify the characteristics of this system. In the event of malfunctions or if repairs are required to the appliance, do not attempt to solve the problems directly.
Repairs performed by unqualified persons may cause damage. For all repair and other work on the appliance, contact an authorised service/spare parts centre.
Always check that all the electrical parts (lights, exhaust device), are off when the appliance is not being used. Read the entire instruction booklet before performing any operations on the range hood.
The range hood must only be used for the exhaust of cooking fumes in home kitchens. The manufacturer disclaims all liability for any other use of the appliance.
The maximum weight of any object placed above the hood, or hung to it (if possible) must not exceed 1,5 kilos. After installing the stainless steel hood, clean it in order to remove any residue of the protective glue, and stains of grease or oil. The manufacturer recommends its cleaning cloth available for purchase. The manufacturer accepts no liability in case of damage caused by the use of different detergent types.
SAFETYWARNINGS


The electrical system features an earth connection in compliance with international safety standards; furthermore, it is compliant with the European standard for electromagnetic compatibility.
Do not connect the appliance to flues (from boilers, fireplaces, etc.). Make sure the mains voltage corresponds to the values on the rating plate located inside the range hood.
Never cook on "open" flames under the range hood.
Check deep-fryers during use: superheated oil may be flammable.
- Ensure there is adequate ventilation of the room when the rangehood is used at the same time as appliances burning gas or other fuels.
- Do not flambe under the rangehood
-
The exhaust air must not be discharged into a flue which is used for exhausting fumes from appliances burning gas or other fuels.
-
Ensure that all regulations concerning the discharge of exhaust air have been fulfilled before you use the appliance.

Before performing any cleaning or maintenance operations, disconnect the appliance by unplugging it or using the main switch. The manufacturer disclaims all liability for any damage that may be directly or indirectly caused to people, things and animals due to the failure to follow all the instructions provided in this booklet and above all the warnings relating to the installation, operation and maintenance of the appliance.
- there is a fire risk if cleaning is not carried out in accordance with the instructions.
CAUTION: Accessible parts may become hot when used with cooking appliances.
- Max. length screw for fixing the chimney is 10mm (provided by the manufacturer).
WARNING: Failure to install the screws or fixing device in accordance with these instructions may result in electrical hazards.
Warning only for Australia: hood width less than 90 cm: use max. 4 hobs

TECHNICAL SPECIFICATIONS
The technical data pertaining to the electric appliance The technical specifications of the appliance are shown on the rating plates located inside the range hood.

INSTALLATION
(Section reserved for qualified installers of the range hood)
The distance between the hob and the lowest part of the rangehood is normally at least 65~cm (see figure C1). This distance is measured in the lowest part of the rangehood not operating at safety voltage. Based on this detail provided by European Standards, the distance may be reduced in some models as specified in the general catalogue. If the instructions for installation for the gas hob specify a greater distance, this has to be taken into account.
In the outside exhaust version, the diameter of the fume discharge duct must be no smaller than the range hood connection.
In the horizontal sections, the duct must slope slightly (around 10% ) upwards, so as to better convey the air outside of the room.
Avoid using angled pipes, make sure that the pipes are at least of the minimum length.
Comply with the current regulations on air discharge into the atmosphere.
If a boiler, stove, fireplace, etc. that uses gas or other fuels is being used at the same time, make sure the room where the fumes are extracted is well ventilated, in compliance with the current regulations.
Mounting instruction: see section "0" of the booklet.

ELECTRICAL CONNECTIONS
(Section reserved for qualified installers)
WARNING!
Before doing any work inside the range hood, disconnect the appliance from the mains power supply.
Check that the wires inside the range hood are not disconnected or cut; if this is the case, contact your nearest service centre. The electrical connections must be performed by qualified personnel.
The connections must be performed in compliance with the legal standards in force. Check that the relief valve and the electrical system are able to support the load of the appliance (see the technical specifications in point B).
Some types of appliance are supplied with a cable without plug; in this case, "standardised"
plugs must be used, keeping in mind that:
- the yellow-green wire must be used for the earth,
- the blue wire must be used for the neutral,
- the brown wire must be used for the phase; the cable must not come into contact with hot parts (over 70^ ).
- fit a plug that is suitable for the load to the power cable, and connect it to a suitable power outlet.
For appliances that come supplied with cable and plug please ensure they are plugged into a circuit suitable for this appliance.
Please refer to a qualified person. (See technical specifications in point B).
The manufacturer declines all liability if the safety standards are not observed.

RANGE HOOD WITH OUTSIDE DISCHARGE (exhaust)
In this version, the fumes and steam from the kitchen are conveyed outside through an exhaust duct.
The exhaust conveyor that protrudes from the upper part of the range hood must be connected to a duct that carries the fumes and steam outside. In this version, the charcoal filters, if fitted, should be removed; to do this, see the instructions in point F. There must be adequate ventilation of the room when the range hood is used at the same time as appliances burning gas or other fuels, according to the standard.
Deviation for Germany:
When the range hood and appliances supplied with energy other than electricity are simultaneously in operation, the negative pressure in the room must not exceed 4 Pa (4x10 E-5 bar).

RECIRCULATING RANGE HOOD (with filter)
In this version, the air passes through charcoal filters for purification, and is then recirculated back into the kitchen.
Check that the charcoal filters are fitted to the motor, and if not, install them as described in the instructions in point H.
If the hood is of filtering type, remove the non-return valve fitted at the motor's outlet.

For maximum efficiency, the third speed should be used when there are strong odours or a lot of steam, the second speed in normal conditions, and the first speed for keeping the air clean with minimum energy consumption. The range hood should be switched on when starting to cook, and left on until the odours disappear.

OPERATION
ELECTRONIC CONTROL PANEL

- ON: light on (the pushbutton is lit);
- OFF: light off;
Dimmer with keyboard integrated functions: with motor off and prolonged pressing of keyboard light key (2 seconds), access is gained to the amend atmosphere light intensity (incandescent or LED lamp). By acting on the + and - keys, light intensity is adjusted. With motor started, the prolonged pressing of the key, switches the atmosphere light on or off.
Press to reduce motor speed
Speed 1, 2 and 3 are indicated by the number of LEDs that light up (excluding the light and the timer LEDs).
Press to increase motor speed
Speed 1, 2 and 3 are indicated by the number of LEDs that light up (excluding the light and the timer LEDs). (In the 4-speed version the pushbutton + blinks. The fourth speed remains on for a set duration of time. After 15 minutes the motor returns to the third speed).
Function: it turns hood motor on and off.
The function "desired speed" enables to start the motor at the speed that was selected before the hood was last turned off.
- This function allows the automatic turning off of the hood after running for 15 minutes at the speed previously set (the pushbutton shows a flickering light).
- After about 30 hours of running the pushbutton indicates the need for washing the metal filters (the pushbutton shows a solid red light). To disable the alarm press the pushbutton for a few seconds until the red light turns off. Then turn the hood off and on again to check that the alarm has disappeared.

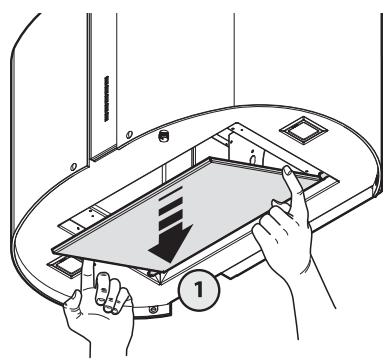
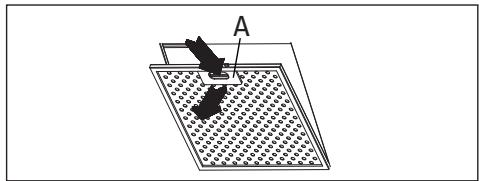
FILTERS REMOVING AND REPLACING'S INSTRUCTIONS
Open the panel (see fig. H3). Use handle A to remove the metal grease filter.
2. CHARCOAL FILTERS
To replace the charcoal filters, proceed as follows: remove the metal filters as described above. The two filters located at the ends of the motor can now be easily accessed.
To install the new filters see picture.
To order new charcoal filters contact the distributor/retailer.
VALID ONLY FOR ITALY: download the appropriate order form from: www.falmec.com (access the assistance drop-down menu).


LIGHTING ASSEMBLY AND REPLACEMENT
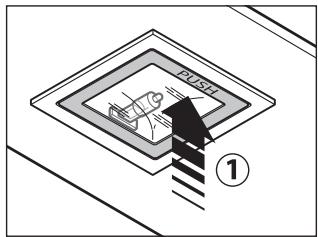
1. SPOTLIGHT
How to replace a square halogen light:
a) Check that the equipment is disconnected from the power supply.
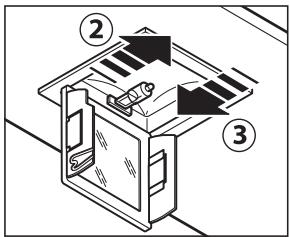
b) Open the panel completely till 90^ (see figure) pressing the PUSH button
c) Replace the lamp with a similar one (halogen, max 20 W, 12 Volt, G4 connection).
d) Close the panel. If the panel does not close correctly repeat the operation at point b.
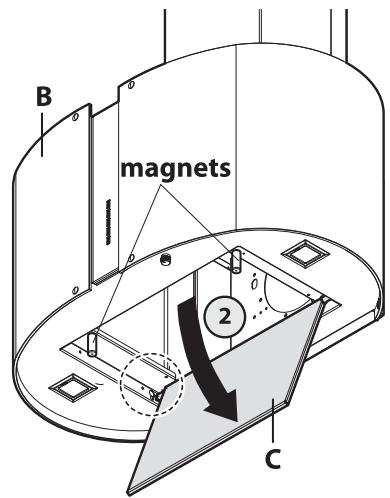
2. GLASS LIGHTING
To replace the incandescent lamp:
1) ensure the hood is disconnected from the electric mains;
2) remove the decorative glass (see sec. 0);
3) replace the lamp with one of the same model (max. 25W);
4) re-mount the glass (see fig. 05).
3. MIRABILIA LED LIGHTING
The hood is equipped with high efficiency, low power consumption LED lighting (light on the work top and decorative light on the glass panes), with high durability under normal use conditions. The LED spotlight must only be replaced by qualified technicians using original spare parts.
WARNING: Do not remove the glass if the glass LED lighting is on.

MAINTENANCE AND CLEANING
Constant maintenance ensures the correct operation and efficiency of the appliance over time. Special attention should be paid to the metal grease-trapping filters and the charcoal filters. Frequent cleaning of the filters and their supports will ensure that fats and grease do not accumulate on the range hood, with the consequent risk of fire.
These trap the fat and grease particles suspended in the air, and therefore should be washed every month in hot water and detergent, without bending them. Wait until they are completely dry before repositioning them. To remove and replace these filters, see the instructions in point H1. This operation should be performed at regular intervals.
2. CHARCOAL FILTERS
These trap the odours present in the stream of air that passes through them. The air is purified by passing a number of times through the filters and being recirculated into the kitchen. The charcoal filters cannot be cleaned, and should be replaced on average every 3-4 months (according to use). To replace the charcoal filters, see the instructions in point H2.
3. CLEANING THE OUTSIDE OF THE APPLIANCE
It is advised to clean the external hood surfaces at least every 15 days in order to avoid that oily or greasy substances affect the steel surfaces.
The aside of the range hhod should be cleaned using a damp cloth and neutral liquid detergent or denatured alcohol.
In case of fingerprint-less finish (fasteel) clean only with water and neutral soap using clean with a soft cloth, rinse and wipe dry thoroughly. Do not use products that contain abrasive substances, rough cloths or cloths specifically designed for cleaning steel. Using abrasive substances or rough cloths will inevitably damage the finish of steel. The steel surface will be irrevocably damaged if the instructions above are not complied with.
Keep these instructions together with the instructions for use of your hood.
The manufacturer accepts no liability for any damage caused by non-compliance with the instructions above.
4. CLEANING THE INSIDE OF THE APPLIANCE
The electrical parts or parts of the motor assembly inside the range hood must not be cleaned using liquids or solvents.
Do not use abrasive products. All the above operations must be performed after having disconnected the appliance from the mains power supply.


WARRANTY
The new equipment is covered by warranty.
The warranty conditions are provided by the distributor.

The manufacturer is not liable for any inaccuracies in this booklet resulting from printing or transcription errors. The manufacturer reserves the right to modify its products as it considers necessary or in the interests of the user, without compromising their essential safety and operating characteristics.

HOOD INSTALLATION
01 - INSTRUCTIONS FOR WALL-MOUNTED MIRABILIA HOODS
Phase 1
- Place the support bar next to the wall (A-Fig. 01), at a height above the cooktop which corresponds to X + 300 mm .
- With a spirit level check that the bar is horizontal. Mark a point at each end of the bar.
- Drill the holes, fit 2ø8mm expansion joints and screw in the bar.
Phase 2
- Fit the hood to the support bar (Fig. 02).
- Adjust hood alignment with the relevant screws: The top screw (B) adjusts the distance from the wall. The bottom screw (C) adjusts the vertical sliding movement.
Phase 3
- To prevent the hood from detaching if pressure is exerted from beneath, secure it to the wall with the brackets supplied (fig. 03).
- Fit pipe/hose (E) into (D).
Phase 4
Place extension (H) in the chimney (G) and fasten this assembly to the body of the hood using screws (V1).
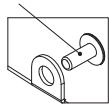
O2 - INSTRUCTIONS FOR MIRABILIA ISLAND 85/ISLAND 65 CENTRAL CHIMNEY Phase 1
- Identify the desired height for the positioning of the hood.
- Slide the lattice-works (C) and (C1) to the desired height (H2), then block them with the 8 self-threading screws (V2) (Fig.1a).
- Fasten the lattice-work (C) to the ceiling using the four 0 8 expansion plugs and relative screws(V1) (Fig.1b).
Phase 2
- Insert the extension on the flue and fasten them to each other with masking tape (Fig. 2).
- Fasten the flue-extension assembly (D + E) to the lattice-work (C) with the 4 M4 metric screws (V3) inserted in the existing holes without tightening them completely (Fig. 2).
- For suction version: identify the optimal height for the rigid or flexible exhaust pipe (F) and connect it to the motor connection.
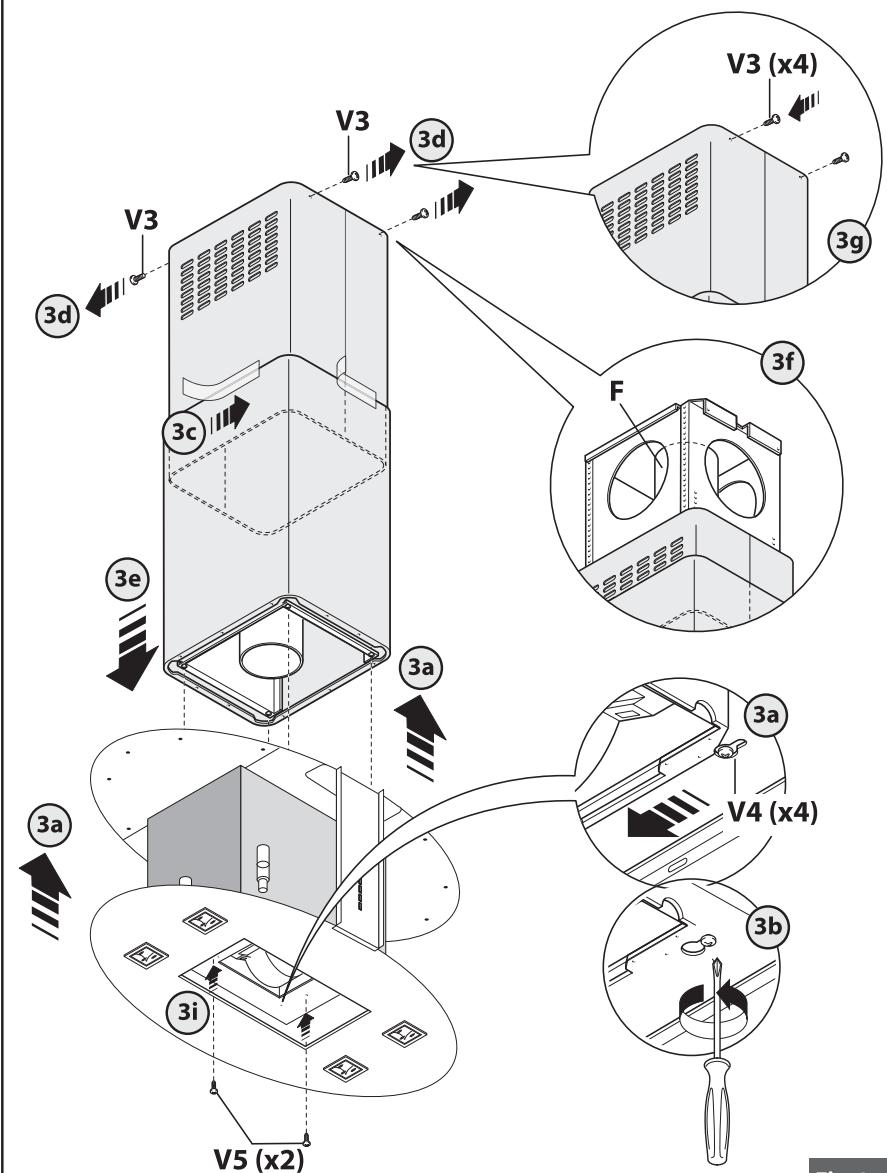
Phase 3
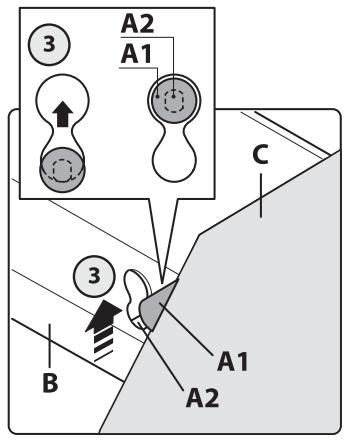
- Raise the hood, hooking it onto the 4 M5 metric screws (V4) pre-tightened to the lattice-work (C) (center the 11 holes on the slot of the inner liner and move it laterally)(Fig. 3a).
- Completely tighten the 4 M5 screws (V4) (Fig. 3b).
- Remove the masking tape (Fig. 3c), remove the four M4 metric screws (V3) previously tightened onto the lattice-work (Fig. 3d) and slide the flue-extension assembly downwards. (Fig. 3e).
- Connect the pipe to the connection of the ceiling discharge hole. (Fig. 3f).
- Make electrical connections only after having removed electrical power supply.
- Fasten the extension to the lattice-work (C) by means of the 4 M4 metric screws (V3), without tightening them completely(Fig. 3g).
- Block the extension completely to the lattice-work (C) by screwing down the 4 M4 metric screws (V3).
- Block the flue with the 2 self-threading screws (V5) (Fig. 3i).
- Use the extension support elements(A) (Fig. 2) only if the upper lattice-work is not used, or in the case of a false ceiling.
- Fit the glass panels (fig. 05).

HINWEISE

ELEKTRONISCHES BEDIENFELD
Lichtknopf
MEPbI PPEIOCTOPOXHOCTN
Ouehb Baxho, TTo6bI daHoe PykoBODCTBO no 3KcNpyaTauIN XpaHnIOcb BmecTe c annapaTpyo IJRA BO3MOXHO Heo6xODMOCTN KOHCyIbTaUIMN B6dyuem.
Pn npodaexe npnbopa nnn nepeaue ero dpyromy nucy K npnbopoy o6raTeNbHO doJHKHO npnilaratbca PykoBODCTBO, qTObbl HObbl NOnb3OBaTeNb 6bl B Kypce TOrO, KaK NOJIb3OBaTbCBAITJKKOIN KAKe COOTBETCTBYUcne MEpbI npedocTopoXHOCTH Heo6xOIMO co6NIOdaTb.
ДанhoePykoBoDCTBO 6blIO coCTaBJIeHO JЯ 6e3OnaChocTn kak BaWei, tak n okpykaIoUxH, no3ToMу npocIM Bac BHNMaTeIbHc HmO3HaKOMtbcr nepeJ yCTaHOBkoi n 3KcPnyatauNe np6opa.
IETaM I 60JIbHbIM JIOJdM pa3peaetcTPOIb3OBAtbcT npIbOpom JINb IOd aIeKbAThBIM KOHTPOJEM OTBETCTBEHHbIX NlU, KOTOpbIE MOrT ObecneHuBaTb 6e3oNaChoe IcNoJIb3ObaHnepnp6opa.
OTBETCTBEHHOMy Nluy Heo6xOdImo CneiTb, YTO6bl DeTN He IrpamC npnbopom.
Pa60tI no yctahOBke DoJXhbl npOBoNTbCk KOMPeTeHTbIMN KBaJIInΦnUpOBaHHbIMN CneuaJIncTAMn corgaCHO DeiCTByIOUHm HopMaM.
JIO6oe Heo6xOIMOE dIy yCTaHOBKn BbITXKn N3MeHHeN B 3JIeKTpUHeCKOM 6IOKe DOJXHO OCU7ECTB7BcT TOIbKO KOMTeHTbIM JINQOM.
I3meHHe IINI PONItka I3MeHHeX xaPakTepcntK np6oba onaCHO! B clyuae HeKOppeKTHO pa6Otbl BbITkN He NItaTneCb yCTpaHnTB HeNCpPaBHOCTb camOCToTeJIbHO.
PemOH, npoBeHHb HekOMPeTeHThBIM NlIcOM, MoKet Bb3BaTb IOBpeXdHnA.
TEXHINUeCKNE XAPAKTEPNUCTIKN
TxHnUcKn daHbI npIn6opApnpBdHbI Ha 3TuKTK, HaxOJaCBAByTpN BbITKaXHO yCTpoCTBa.

MOHTAX
OCHOBhbIE 3AMEUHIN
(naparpaФ npdHa3NaHдЯ KBaHnФицИрOBaHHbIX CnuaJIncTOB, MOHTnpyUOxNxBITJXHO yctpoIcTBO)
PacctoHne Mekdy KxohHO nnToH n Camo HxKHe ToKo BbTJKKn, NO cTaHdapTy D0JIHOb 6bTb He MeHee 65 cm (CMOTpeB nIJIIOCTpaunio C1). DaHoe pacctoHne n3MepaTeC B o63aTeJIbHom npraKe B camo HxKHe TOnKn pnp He6e3OpanChom HanpJKeHH. YuHTbBAH NaCToHn acNeKT, npedcMTOpeHHb EbponeckmN cTaHdApTaMn, pacctoHne Ha HeKOTopbIX MoDEnX MoKeT 6bTb COKpaueHo, KaK 3TO yKa3bIbaeTCB R flaBHOM KaTAlore. Ecnn B INHCTpykCnax Ra3OBo KxOHHO nnTbYka3bIbaeTCB 60JIbWee pacctoHne, Heo6xoDIMO yUnTBaTbeero.
B Bercn BcacbIbaIOe Tnpa DbIMooTbOndHra Tpy6a DoJXHa IMeTp He Mehblu, y naTpy6ka BblTjAkkn.
y6DnTCb, yTO BHTPN BbITJXHORO yCTPOIcTBO HOTCOINHHbI H NOBpXdHbI 3NKTpnCCKn npOBoDA; B cnya BO3HNKHOBHNA TAKNX CNTyaCNI CBAXTcB C 6JIHXaUMCpBNCbIM UHTPOM. Dn BbINONHHN 3JIKTPuCKNX COINHH N O6paTncB K KBaINΦuNPoBAHbIM
CNLJNAJINCTAM.
CoHnHHoJIoJXhbl 6bIb PpOu3BdHb B COOTBTCTBm C DnCTByUOIm 3aKoHOaTJIbCTBOM. Y6Dntc, yTO ORpaHInHTJbHb IpDOxpaHInTIN n 3IKTpOo6OpyIDoAHMOrY BblPkaTb HaRpy3Ky OT np6opac (cm. 3tNkTKcy c TXHnCCKMn XapaKtpnCTnKaMn, corlacho nyHKty B). HkoToPbI np6Opby MOr7 6bITb OchaunHb UHypom 63 BNk; B TakOM Cnya NcNoIb3yma BnIka DoJXHa 6bITb "CTaHapTHoro" Tnna C yUtom TORO, 4TO:
- JKTTO-3JHbI IPOBOID DOJXH INCNOJIb3OBaTbCRA JIN3A3MJIHNIA,
- roJy6oI npoBdOJnxH nCIOJIb3OBAtbc dIy HITpAJIbHO rnpoBda,
-KOpUHBBI INPOBOID DOJXH NcONb3OBAbC8 DJIa3bl, UHyp H DoJXH KacaTbc8 HarPbIX HaCTN,IMIOUX TMnPaTyP60J 70^
- YCTaHOBIT Ha ⅢHyp 3JIKTpOINTaHnB BUNKy, PnIroDHyIO IJIHaRpy3Kn, IN BCTaBbT B 3aUHTHyIO BUNKy.
PnHOBxOaMIOCTN pIyMO IoKJIIOHNN K CTN HOxOaMIO pa3mCTNTb MxNy PnIbOpOM n CTbIO MHOROJLpHbIM MaHHTOTPMUcckN pKJIIOuATJB C MHNMaJIbHBIM OTKpbITNM MxNy KOHTaTM 3 MM, paccHTaHHbI Ha Harpz3ky N OTBaIOUeIN DInCTByIOUeIM HopMaM. JXnTO-3JIbI pOBOD 3a3MlHnI H DoJXH PPbIBaTcB npKJIIOUaTJIM.
IIO NOKIIHnHn npi6opa K CTNJIKTpOHTaHnYbNTcB, YTO:
- Haprajkhi CTN INTahnra COOTBTCTBt Yka3aHHOMy Ha 3TNKTK C TXHcCKMm XapaKTpNCtIKaMM.
-3a3MЛHn 3ΦΦKTNBHOи BbIIOJIHHO npaBnIbHO.
- JINHIA 3JIKTPONITAHN OCHAUHa 3OΦKTHNBHbIM 3a3MJHIM NO IJCTBYIOUHM HOpMaM.
- INCNoJIb3YMbI pO3TKa IIN MHOrONoJIocHbI npKJIouaTJIb JfKO DocTyIHHbI npN yCTaHOBJIHHOM npi6Op.
ПюИЗВODИТЛьН HСТ НИКАКОЛ OTBTCTBHHOCTN B CNYA, СИN HOPMbI 63OnaCHOCTH co6JIIOДaIOTc.

B 3TOn MoDIn N bIM n nap OT rOToBKn BbI6paCbBaIOCT hApNyK yP3 Tpy6y.
Tpy6aДЯ BbIbOpa, KOTOPa BbICTynat I3 BpXH YAcTn BbITJxKn DOJXHa 6bITb COINHAc Tpy6o, KOTOPa BbIOdNT DbIM N nap BH NOMUHNIA, PNC.
B daHHoM moJIn cHIMaiOTcA qIbTpbl Ha aKTbNbPOBaHHom yJI, CIN OHn yCTaHOJIbI; KaK OHn cHIMaiOTcA, CM. pyHKT F. Ecn KycXOHHa BblTgKa NcNoJIb3yTCs OJHOBMnO IN JIpyrIX np6OpOB, pa60aIOxH Na ra3y nIIN dpyrom TOnIIIB, NOMUHN DOJXHO IMtB BO3MOXHOCTb DOCTaTOHOro pOBTPBAHn.

BbITJXHOE YCTPOICTBO C PEUNPKUJIaIeN BO3dYxA (cФиьтраи)
B 3toi moiIN Bo3dY npoxoINT y3 qnlbtpbl c aKTHBnPOBaHHbIM yIIM, rOuHuaTcN BO3BpaaTcR B nOMUHN KUYHNI.
Y6NTcB, cTO yrOJIbHbI qnJIbTpbl yCTaHOBnHbHa MOTOp, pnc. 6, B npOTNBOM Cnya yCTaHOBnT nX, KaK yKa3aHO B nyHKT F INCHtpyKuIN.
Ckopoctn 1, 2 n 3 yka3bIbaIOCTa KOJIHcEeTbOM 3aXXKeHHbIX dIOOB, He cHTaI dIOOBOCBeueHnI naMepa. (B 4-cKoPoCTHOB Bercm KJIaBnua + mraeT. Ha 4-IO cKoPoCTbUcTaHOBHeO rpaHnueHHe O BpeMa pa60tbl, n Upe3 15 MmHyT MOTop aBTOMaTHeCKnpeHexOuNT Ha 3-IO cKoPoCTb).
KnaBnua pexnma
ФунклЯ:ВКЛIOчЕнeи ВьIKЛIOчЕнe MOTOPa BbITXKKN.
Функцяжелаemajckopoctbno3BOJЯET3aNPCTnTbMOTOpHa cKopoCTn,BbIbpaHNoIpeNdPocJIeHNb BbIKJIIOUChEHHm.
KnaBua TaMepa n HacbIeHnA nnBtPOB
PekomeHdyetcA OuyuataB HeWHne NOBepxHOCTn BbITaKek He MeHee Yem KaJbIe 15 dHei, yTObi JnHPbIe BeueCTBa He NOBpeDInI CtaJIbHyIO NOBepxHOCTb. YNCTKa BbITaKKn DOnJXHa OcyUeCTBJIaTbCn POMOuB Bo BLaJXHoI TKAHn C NcNoJIb3OBAHmE M XnDKoro HNeTPaJIbHOrO YnCTraUe CpeDcTBa IIN DeHaTypata.
EcIn BbTjXka IMeet CneuaJIbHoe NOKpItne npOTnB OTNeaTKOB nIaNueB (Fasteel), HeoXIO OCUeCTBnTb YNCTKU TOJIbKO BOJOn C HeITpaJIbHbIM MbJONP INOMOUI MRAKOH TKAHN I TzAteJIbHO ONIaACKINBaTb N CyuNTb NOBExHocTB. He OyCKaETcN cIINb30BaHne cpeiCTB, CODepKaUHX abpa3INBHe BEeCTBa, rpybIe TKAHN, a TaKxe TKAHN, IMeIoUeCEB INPOdaxe IINCTKn CTaJI. IcNoIb3OBaHme abpa3INBbIX BeIeCTB INrpybIX TKAHeIN pINBeDet K Heo6paTMOMU NOBpeJDeHHIO NOKpItncaJI.
Hec6nOeHne daHHbIX npaBnI npedocTopoxKoctn BneueT 3a co6oB 6e3BO3BpaTHoe nobpeXdHne cTaII.
JaHbIe npaBnla DoJXhbl XpaHnTbC BMeCT C HcHTpyKlneI NO 3KcPnyatauIN BbITJxKN.
N3rOToBnTeJIb He npHHMaet HnKaKnx PpeTeH3N B CnYae Heco6JIODeHna HactoJux npaBnJ.
4. ONUCTKA BHYTPEHHEY UACTN

OuCTka 3JKTpUcCKNX INN OTHOcAUXxCB MOTOPy CACTB BHyTpN BbITXKN PnN NOMOUN KINKOCT N pactBOpNTJ3aNPua.
H nIb3yIc b a6pa3nBhIMN xMmKataMn.
BbInonHnT Bc Onpaun, npDvapntlbHo OTKJIouChN Ibnp6Op OT CTN3JKNTpOniTahn.

ГAPAHТИ
Hobb npnbop haoonTcno nd CTBM rapaHTn. TapaHTnHb ycNoBna noJIHOCTbIO npNBdHb Ha nocnHn cTpaHnC 3TOO n3daHn.

PpOIN3BOODNTb H OTBuat 3a BO3MOXHbI HTOUHOCTn OoHN6Kn B DaHHOM N3DaHNN, BO3HNKUn pRn PnATn INI pRnTbIBAHnn. PpON3BOODNTb OCTabJIaT 3a CO60I npABo HA T MoDInΦNkAun Co6CTBHNOHIpOpyKUn, KOTOpbl COHTT Ho6XoDNMbIMn INI NIO3HbIMn, a TAKK B INTPcAs nOJb3OBaTlA, H BJIraIOuN Ha rNaBbI ΦyHKUnOHaJIbHbI XapaKTpNCTNKn I 63OnaChocTb.

MOHTAX BbITXKN
O1 - HACTEHHOBbITJXKK «MIRABILIA»
3tan 1
-ПислониьКстеpeиу Habeckn(A-pnc.O1)Ha BbICote OT BapOuHoi NOBepxHocTn, paccHTaHHoI noФОpyMeX+300MM.
- C nOmoIyOBHЯ npOBePntb POBHOCTb pa3MeIeHnI NO rOpN3OHTaII N OTMeTNTb Ha KOHcX peKn 2 TOUKN IJRA OTBepCTNI.
-Посверпговьотьсггя,Вставпь 2 дюбелу 8 MM И зakрпгь peйку COOTBEТСТВИОМИshypуnamи.
3tan2
-Пиценты Вьтяку К peиke Habecke (pnc. O2).
- OtperynipoBaTb poBHOCTb paCIOJIOKeHnB BYIaKKn NOCpeiCTBOM COOTBeTCTBYUOHN BInHTOB: BepxHn BInHT (B) perynpyeT pacCToHne OT CTehb, a HxHn (C) nepemeueHne no BepTNkAIN.
3ran 3
-Bo n36exaHne OtpbBa BbTjAKKn NOI DeJeCTBnEM BeCA CH3y ee HxKHO npuKpeNTb K CTHe NdyuIMN B KOPMLeKeTe KpeEnKhblm NJIeMeHTamn (pnc. O3).
- HanaTpy6ok (D) Tpy6y (E).
3ran 4
BCTaBnTb ydlnHnTeIb (H) B dblMOxOJ (G) n npKpeNITb erO K KopnyCy BblTgKKn BnHTamN (V1).
- BbIDBHyTb yJInHtEnb (H) Do IOCTNXeHn Heo6xoUMo BBICOTbl.
- OnpeJeINB ONTImaJIbHoe NOJoxKeHne, npInOxKITb K cTeHe Cko6y (L), npOBepNTb Ropn3OHTaJIbHOCTb NIOJoxKeHn yPOBHeM I OTMeNTb PO KOHcAm 2 TOnk BblONHeHn OTBepCTn.
-Прocверпнь OTВерстя,ВCTaВиь B Hnx 2 ДIOБеля 0 4 MM И 3aФИКсИрОваТь сКоБу (L) COOTBETCTBYUSSIMN BИNTAMN.
-Пикртугь ВИнтами (M)удлинтель (H)ксобe(L).
- IopTaB 3JneKtpoPntaHHe Ha BbITgKky, co6JIIOJa dIeCTByIOUne HOpMaTnBbI (pa3d. D).
O2-OCTPOBHOI BbITJAKKII «MIRABILIA» 65 CENTRAL CHIMNEY
3tan 1
FILTRY INSTRUKCJE WYJMOWANIA I WYMIANY
O2 - MODEL WYSPOWY "mirabilia island 65 CENTRAL CHIMNEY"
Krok 1