AV205 - Wine cellar AVINTAGE - Free user manual and instructions
Find the device manual for free AV205 AVINTAGE in PDF.

Download the instructions for your Wine cellar in PDF format for free! Find your manual AV205 - AVINTAGE and take your electronic device back in hand. On this page are published all the documents necessary for the use of your device. AV205 by AVINTAGE.
USER MANUAL AV205 AVINTAGE
5^ CHARGEMENT
Before use, please read and follow the safety rules and operating instructions in this manual.
Firstly, we would like to thank you for purchasing a Climadiff product and hope that this appliance fully lives up to your expectations.
This appliance enables you to store your bottles or bring them to service temperature (depending on the bottles) thanks to its wide adjustment range.
1^ TECHNICAL CHARACTERISTICS
Below is an example of the nameplate:
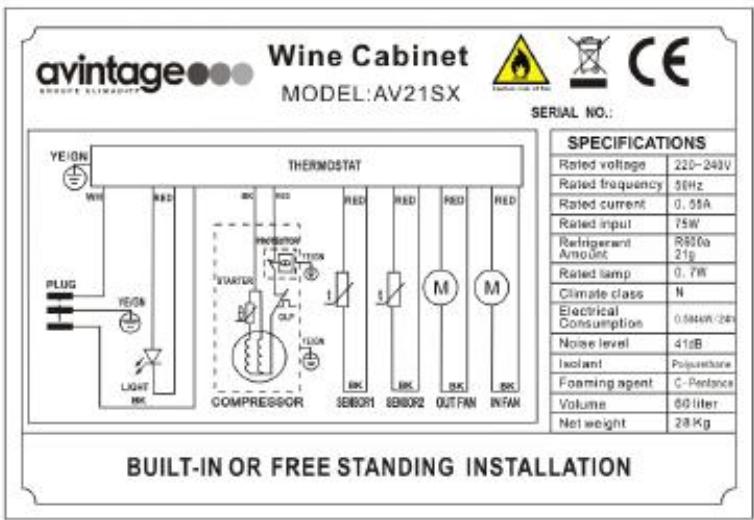
The nameplate attached to the inside or rear of the appliance (depending on the model) includes all the information specific to your wine cellar.
We recommend that you make a note of its serial number in this booklet prior to installation, so that you can refer to it later (technical work, request for assistance, etc.)

Once it is installed and loaded, access to it is not so easy.
CAUTION: No assistance can be provided without this information.
2° GENERAL SAFETY INSTRUCTIONS
Before you use your wine cellar for the first time, please read this user manual carefully. Store it carefully so that you can refer to it in future, if necessary.
Generally speaking, your appliance must be maintained by a qualified professional.
This appliance is intended exclusively for domestic use and controlling the temperature of wine, or other drinks, if you so choose. Under no circumstances is it intended for the storage of food.
Make sure that your electrical installation's voltage corresponds to that on the appliance's nameplate; the appliance must be connected to an approved, earthed system. Incorrect repairs or connections can cause safety hazards. Have your electrical installation checked by a professional, if you are in any doubt.
This unit must be correctly connected to an earthed socket for your protection. Do not cut off or remove the earth wire on the mains cable supplied.
For safety reasons, do not use an electrical extension cable.
If your appliance is damaged (e.g. a major impact) or suffers harm (power surge due to lightning, flood, fire), it may be dangerous to use. Disconnect the mains plug and have the appliance checked by an approved professional repairer.
To prevent any danger, do not replace a damaged mains cable yourself. Contact your retailer, an approved service centre or professional repairer.
This appliance must be positioned such that the mains socket is accessible. Do not move the appliance once it is full: you might distort its body beyond repair. The electrical parts must not be directly accessible.
- Keep children away from the appliance.
- Do not use this appliance outdoors.
In the event that liquid is accidentally spilled (broken bottle, etc.) on electrical components (motor, etc.), disconnect the mains plug immediately.
To prevent any risk of fire, electrocution or injury, do not immerse the mains cable, plug or the appliance itself in water or any other liquid. Do not handle the appliance with wet hands.
Keep the appliance away from any source of heat and out of direct sunlight.
Do not allow the mains cable to hang from a table or be in contact with sharp edges or hot surfaces.
Do not pull on the mains cable - take hold of the plug to disconnect the appliance.
Ensure that the area where your appliance is positioned can support its weight when loaded (a 75 cl bottle weighs approximately 1.3kg ).
Your cellar must be placed on a flat surface. If you have to position it on a rug or carpet, place a support underneath.
This appliance is not intended for use by people (particularly children) with diminished physical, sensory or mental capacities, or by people lacking experience or knowledge of such appliances, unless they are supervised by or have received instruction regarding use of the appliance from a person who is responsible for their safety.
Do not allow children to play with the appliance. Abandoned appliances are always dangerous.
Disconnect the device before performing any servicing or cleaning operation (disconnect the mains plug or trip the corresponding circuit breaker, depending on the model).
Never clean the appliance with inflammable products.
Do not store or spray any gas or inflammable liquid close to the appliance.
Prior to disposing of your wine cellar at a specific recycling site, remove the door but leave the shelves in place in such a way as to make it difficult for children to climb inside.
Climadiff disclaims any liability for damage resulting from failure to comply with connection or use instructions.

R600a
Safety regulation

Warning: Do not use mechanical devices or other means to accelerate the defrosting process, other than those recommended by the manufacturer.

Warning: Keep ventilation openings in the appliance enclosure or in the structure clear of obstruction.

Do not store explosive substances such as aerosol cans with a flammable propellant in this appliance.

Warning: Do not damage the refrigerant circuit.

Refrigerating units operating on Isobutane (R600a) may not be placed in an area with sources of ignition (e.g. unsealed electrical contacts) or where the refrigerant could gather in the event of a leak. The type of refrigerant is indicated on the cabinet's type plate.

Warning: Do not use electrical appliances inside the food storage compartments of the appliance, unless they are of the type recommended by the manufacturer.
The appliance meets the requirements of the following European Directives:
2006/95/EC on electrical safety
2004/108/EC on electromagnetic compatibility

3^ INSTALLATION INSTRUCTIONS
Before using your wine cellar
- Remove the inner and outer packaging.
- Before connecting the cellar to the electrical socket, leave it in position for 24 hours. This will reduce the possibility of malfunction of the refrigeration circuit due to transport.
- Clean the inside using a soft cloth and lukewarm water.
Using your wine cellar:
Your wine cellar must be positioned in a room with an ambient temperature between +16 and +32^ .
If the ambient temperature is higher or lower, the performance of your appliance may be affected and it may not be possible to obtain temperatures between 5 and 18 degrees.
Installing your wine cellar
- This wine cellar is designed for free-standing or built-in installation.
- Position it in a place with sufficient strength to support its weight when loaded. To ensure that it is level, adjust the height of the feet underneath.
- To get the best from your appliance with the lowest energy consumption, do not place the appliance close to a heat source (heater, cooker, etc.), do not expose it to direct sunlight, and do not place it in a room which is too cold.
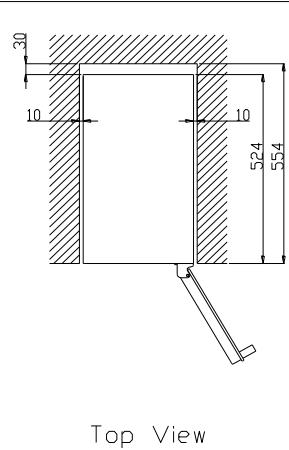
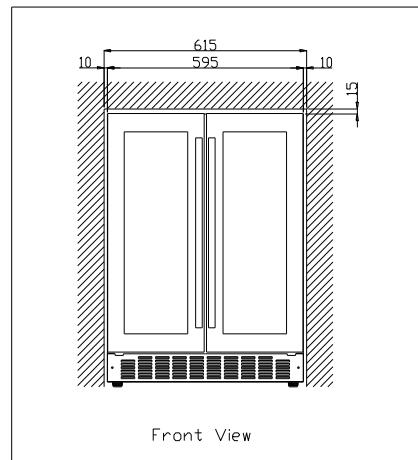
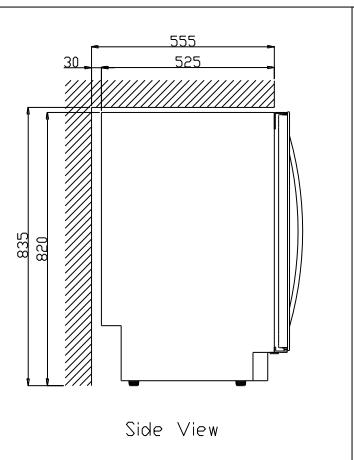
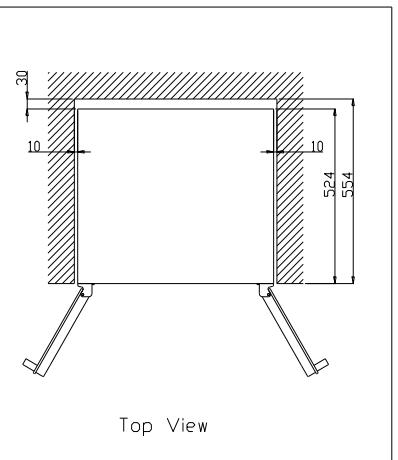
- Connect the cellar to a single socket, leaving a 10cm gap between the back of the cellar and the wall. Be careful to support it, so that your wine cellar is perfectly level. (Use of a spirit level is recommended). This will prevent any movement due to instability, causing noise and vibration, and will ensure that the door seals perfectly.
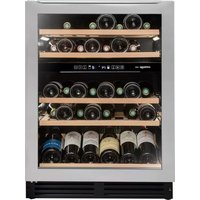
Control panel
AV7X(-1X)
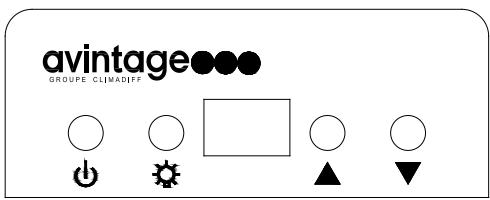
" ”Button
Lighting control button
- “ ”Button
On/Off switch
DISPLAY
Electronic temperature display
- “▲”Button
+ Temperature setting button.
- “▼”Button
- Temperature setting button.
AV21SX(-IX)/AV51SX(-IX)/PRO51C/AV41SXDP(-IX)
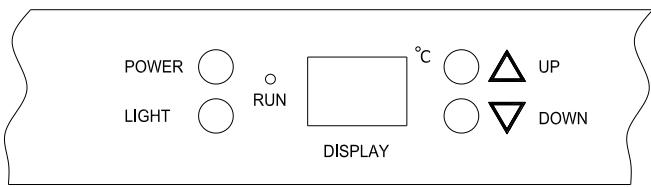
“RUN”
Power indicator
"LIGHT" Button
Lighting control button
- "POWER" Button
On/Off switch
DISPLAY
Electronic temperature display
UP"Button
+ Temperature setting button.
- "DOWN" Button
- Temperature setting button.
- You can choose the desired chamber temperature by using the “ / ”. buttons. The temperature selected increases/decreases by 1^ with each button press.
Temperatures of between 5 and 18^ can be selected. Once the desired temperature has been selected, the display will flash for 5s before showing the current internal cooler temperature. The set temperature can be viewed at any time by pressing and holding the temperature select buttons for 5s.
AV53CDZ/CV52IXDZ/AV54SXDZ(-IX)
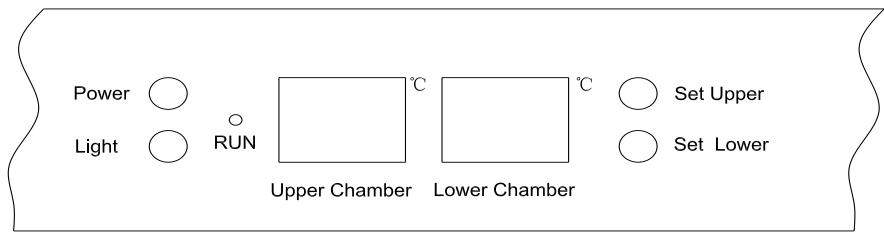
Light
Lighting control button
RUN
Power indicator
Power
On/Off switch (press and hold for 3s)
- "Set Upper" Button
Upper chamber temperature setting button.
- "Set Lower" Button
Lower chamber temperature setting button.
- "Upper Chamber"
Upper chamber electronic display
- "Lower Chamber"
Lower chamber electronic display
Press "Set Upper" to adjust the upper chamber temperature.. The relevant chamber display will start to flash and each press on the button will alter the temperature by 1^ . Once the lowest set temperature of 5^ is reached, the display automatically changes to the highest set temperature of 10^ . Once selected, the display will flash for approximately 5s before showing the current internal temperature of the cellar. The set temperature can be viewed at any time by pressing and holding the temperature select buttons.
Press "Set Lower" to set the upper chamber temperature.. The relevant chamber display will start to flash and each press on the button will alter the temperature by 1^ . Once the lowest set temperature of 10^ is reached, the display automatically changes to the highest set temperature of 18^ . Once selected, the display will flash for approximately 5s before showing the current internal temperature of the cellar. The set temperature can be viewed at any time by pressing and holding the temperature select buttons.
In the event of a power cut, all previously selected temperature settings will be deleted and each chamber will re-initialise to the factory-preset temperature of 6^ for the upper chamber and 12^ for the lower chamber.
The set temperature can be viewed at any time by pressing and holding the temperature select buttons for 5s.
4° EQUIPMENT
The climate control system
According to advice from specialists, the ideal temperature for storing wine is around 12^ , within a bracket of 10 to 14^ . Do not confuse this with service temperature, which varies between 5 and 18^ , depending on the specific nature of the wine.
It is especially important to avoid sudden changes in temperature. Designed by specialists for oenophiles, this appliance, unlike a simple refrigerator, takes into account the sensitivity of grand cru wines to sudden variations in temperature by ensuring the close control of a constant average temperature.
The anti-vibration system:
The refrigeration compressor is equipped with special dampers (silent-blocks) and the inner space is insulated from the body by a thick layer of polyurethane foam. These characteristics prevent the transmission of vibration to your wines.
The humidification system:
This appliance is fitted with a tray (according to the model) that maintains the correct level of humidity. If the humidity is too low, top up the level in the reservoir to three quarters of its capacity. Check the level from time to time and add water if necessary. Ensure that the tray always contains water.
Designed by specialists for oenophiles, Climadiff has taken into account the sensitivity of corks to too low a level of ambient humidity. This is why the tray should be placed on the shelf below the fan situated in the bottom, to provide minimum humidity. Be sure to check the water level, if you are storing wines over a long period and you are not using the appliance solely for bringing wines to service temperature (with a quick rotation of bottles).
The anti-UV system:
Light accelerates the ageing of wine. In our solid door cellars, your wines are naturally protected, on condition, of course, that the door is not opened too often. This glass-door model has been specially treated and filters out harmful ultraviolet rays, thus ensuring your wines are perfectly shielded.
Defrosting:
Your appliance is equipped with an automatic defrost cycle. When a cooling cycle finishes, the appliance's refrigerated surfaces are defrosted automatically. The defrost water is channelled into a condensates evaporation tray which is located in the back of the appliance near the compressor. The heat produced by the compressor then evaporates the condensates collected in the tray.
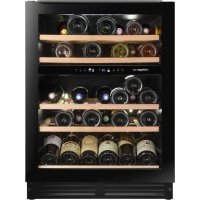
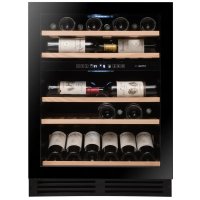
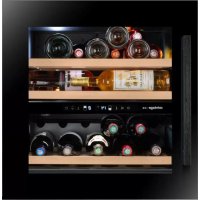
Shelves
- To prevent damage to the door seal, ensure that the door is fully open before pulling out the shelves to add or remove bottles.
- For easier access to the contents of the shelves, slide the shelf out approximately one third of the way. The shelves are, however, fitted with a stop to prevent the bottles falling out.
- To remove or reposition the shelves, incline the shelf as indicated in the diagram, then push or pull as required.
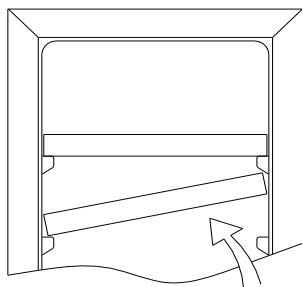
Place the shelves in the spaces provided.
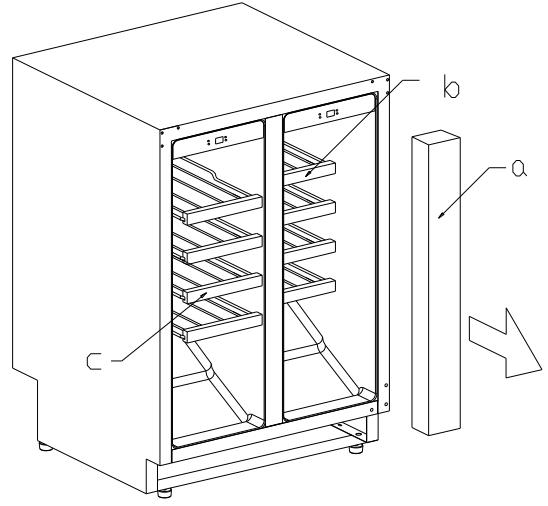
Fig.1
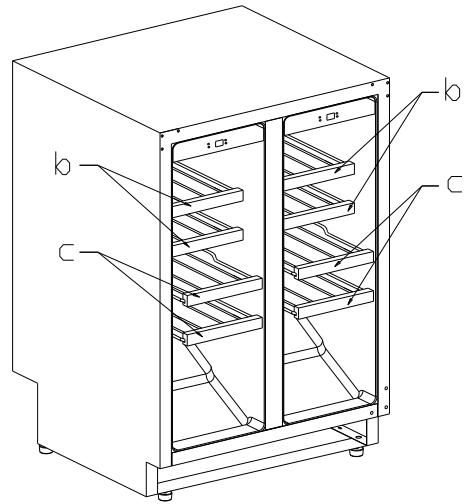
Fig.2
a. spare part cardboard box
b. small shelf
c. large shelf
- After removing the wrapping, take the spare parts cardboard box(a) out of the cabinet.
- There are four small shelves(b) in the left compartment. Remove the two lower shelves. There are four large shelves(c) in the right compartment. Remove the two upper shelve
- Swap the large and small shelves (fig 2). Place the two small shelves in the upper positions and the two large shelves in the lower positions in both compartments.
- When the shelves have been positioned correctly, you can use the wine cooler according to the instruction manual.
Enhanced safety:
Since this range of appliances is intended for storing items of value, we have been careful to select quality components and to design suitable manufacturing techniques to ensure optimum safety in operation.
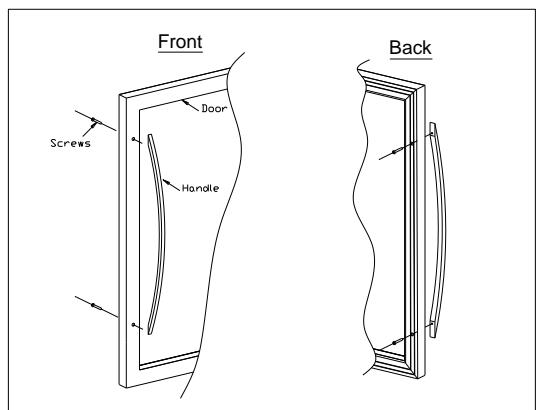
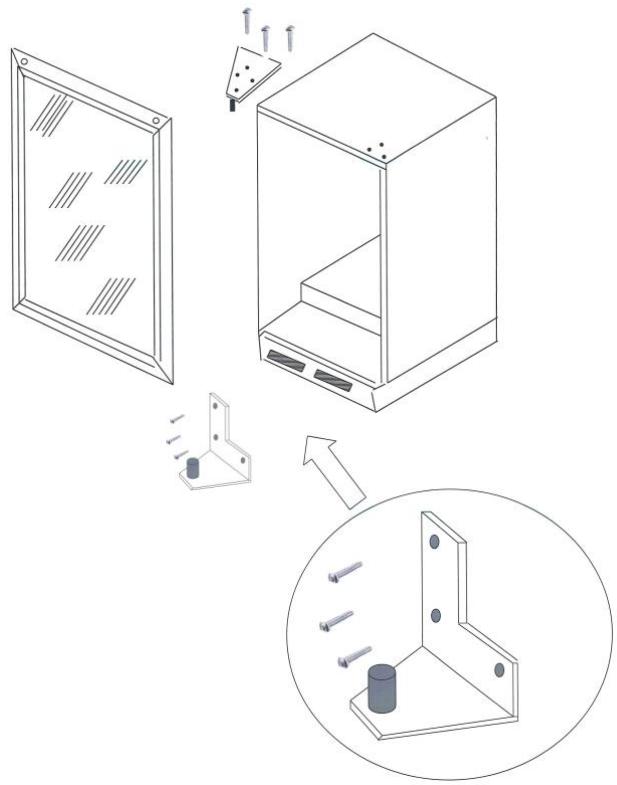
Installing the handle:
Your appliance has a stainless steel handle. To fit it, simply screw it onto the door with the screws supplied as per the diagram below, having first removed the seal.
FOR AV7X(-IX):
FOR AV21SX(-IX)/AV51SX(-IX)
- Lower hinge (right)
- Door
-
Top hinge (left)
-
Door limit device
-
Screws
- Top hinge (Right)
- Decorative nail
- Screw
3.Door axis
6. Hinge Screws
9. Lower hinge (left)
12. Plug
-
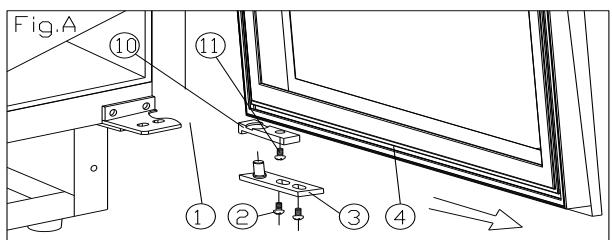
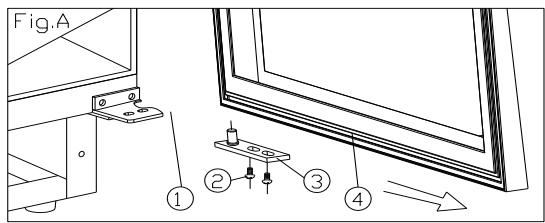
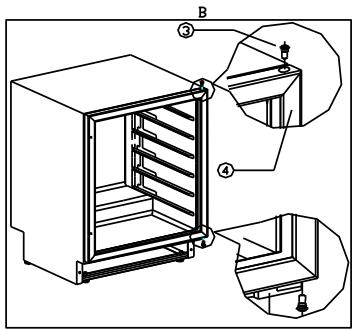
Open the door to 90 degrees, remove the two screws (2) from the lower door axis (3), remove the door (4) and door axis (Fig. A).
-
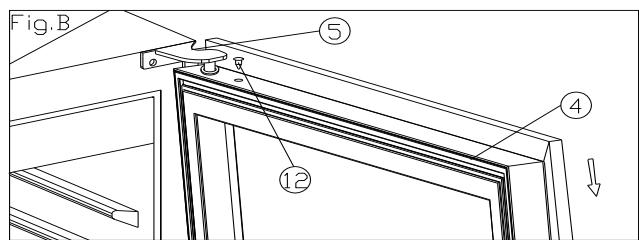
Position the door (4) safely and remove the plug (12) from the top of the door frame. Unscrew one screw (11) at the bottom and remove the door limit device (10). Install the door limit device (10) at the top of the door frame. Please use the spare plug (12) to block the hole at the top of the door frame. (Fig. A/B)
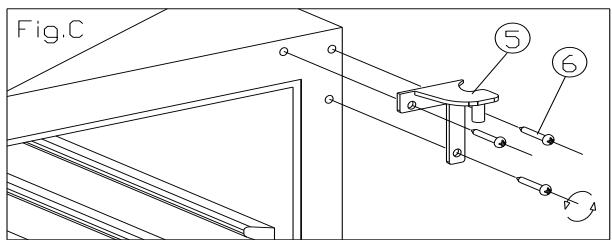
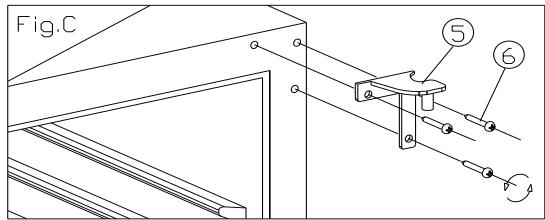
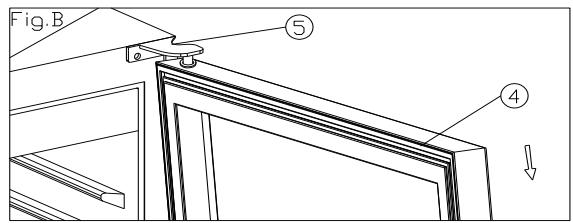
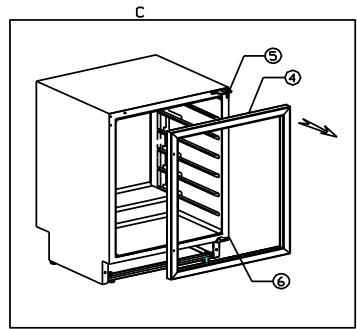
- Take out three hinge screws (6) from the upper hinge (right) (5) and remove it. (Fig. C)
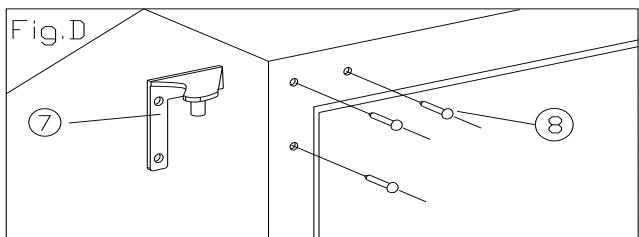
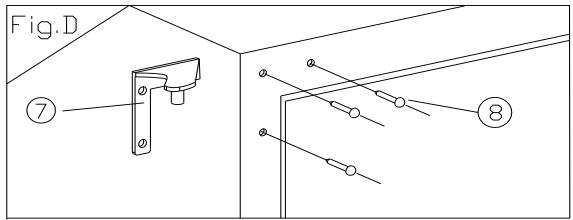
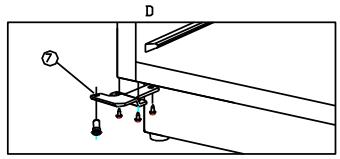
- Remove the decorative nail (8) from the top left of the cabinet and install the spare top hinge (left) (7) on the top left of the cabinet with three screws. (Fig. D)
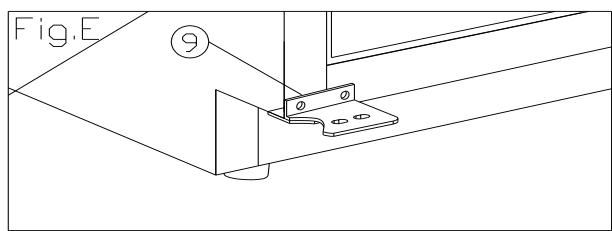
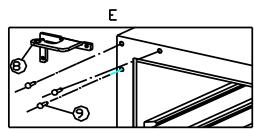
- Install the spare lower hinge (left) (9) according to the above procedure. (Fig. E)
- The door opens to 180 degrees. Install the door in the same way as it was removed and fix it so that the door is aligned.
- Block the hole at the top right of the cabinet with the spare decorative nail (8).
PRO51C/AV53CDZ/AV54SXDZ(-IX):

- Lower hinge (right)
- Door
-
Top hinge (left)
-
Screws
- Top hinge (right)
- Decorative nail
3.Door axis
6. Hinge Screws
9. Lower hinge (left)
- Open the door to 90 degrees, take out two screws (2) from the lower door axis (3), remove the door (4) and door axis (Fig. A).
- Position the door (4) safely.
- Take out three hinge screws (6) from the top hinge (right) (5) and remove it. (Fig. C)
- Remove the decorative nail (8) from the top left of the cabinet and install the spare top hinge (Left) (7) on the top left of the cabinet with three screws. (Fig. D)
- Install the spare lower hinge (left) (9) according to the above procedure. (Fig. E)
- The door opens to 180 degrees. Install the door in the same way as it was removed and fix it so that the door is aligned.
- Block the hole at the top right of the cabinet with the spare decorative nail (8).
CV52IXDZ:
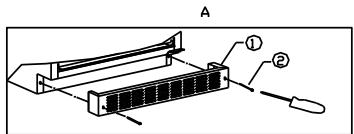
1 Remove the aeration grille (1) by undoing the screws (2).
2 Use a Phillips screwdriver to remove the top hinge. Lift the door and set it down carefully.
3 Unscrew the bottom hinge.
4 Remove the plastic cap located on the opposite side.
5 Screw the hinge back into the opposite side of the door bottom.
6 Marry up the holies in the two hinges with the cabinet holes, then screw the hinges in. (figure E)
7 Reposition the plastic caps on the other side of the cellar so as to plug the holes which are now visible.
8 Reinstall the grille and screw it in (figure A).
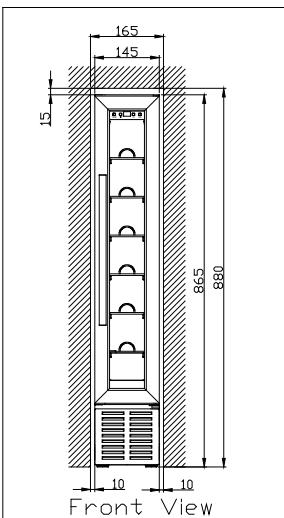
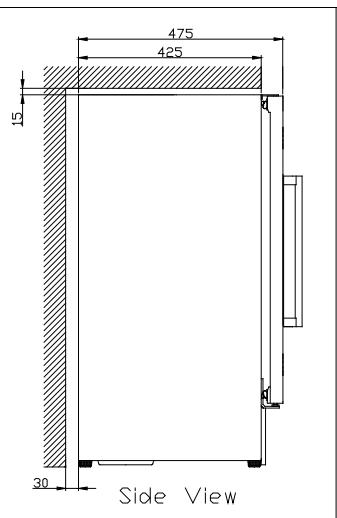
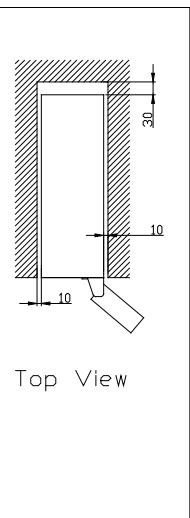
Build-in diagram:
AV7X(-1X):
AV21SX(-IX):
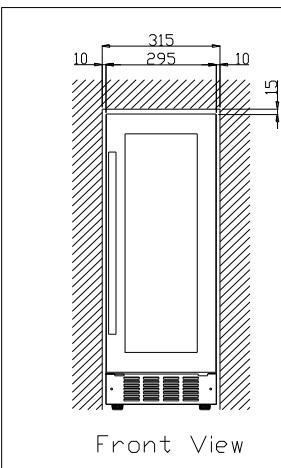
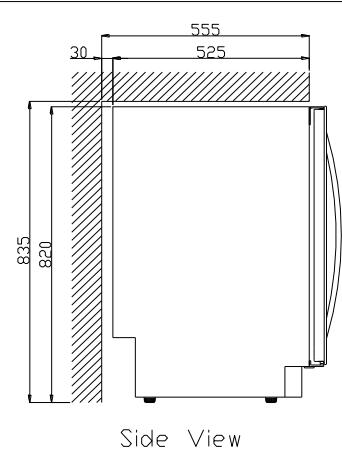
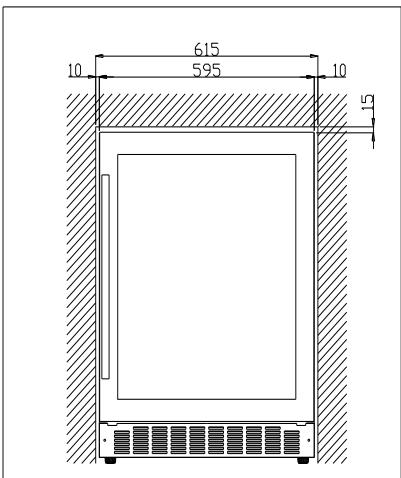
Front View
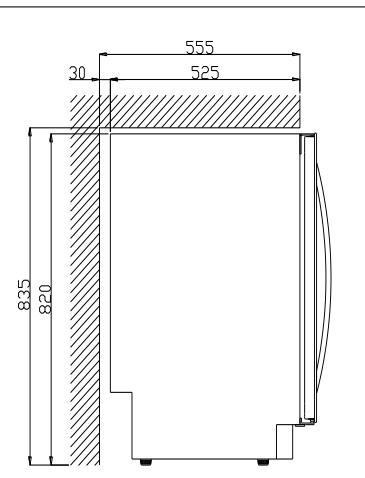
Side View
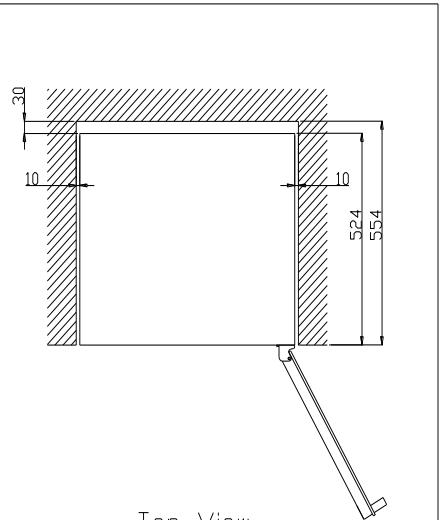
Top View
AV41SXDP(-IX):
5^ LOADING
The maximum recommended filling quantities of bottles are guidelines and are not contractual; they provide a quick estimate of the size of the appliance (similar to the litre capacities of refrigerators).
They correspond to tests conducted with a standard bottle: the standard "75 cl tradition Bordeaux" bottle - standards apply the geographical origin of each bottle shape (Bordeaux, Burgundy, Provence, etc.) and a type (traditional, heavy, light, flute, etc.), each with its own diameter and height.
In reality and in extreme cases, you could store more bottles by stacking the same type of bottle without using shelves, but a "varied cellar" comprises a wide variety of bottles and the "practical" aspect of everyday cellar management limits its capacity. You will therefore probably use a little less capacity than the recommended maximum.
How to fill and maintain your wine cellar:
Types of bottle:
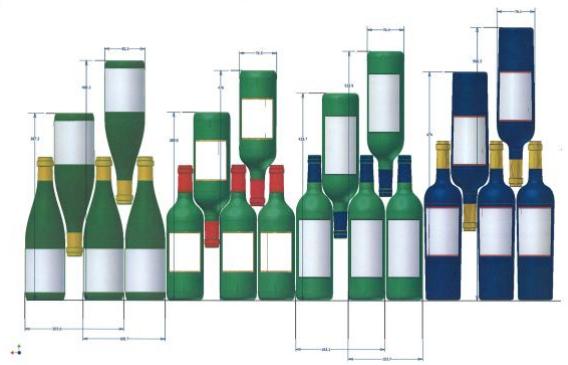
We see here 4 kinds of 75 cl wine bottles: Burgundy and Bordeaux wine bottles of different dimensions.
There are many others of all shapes and sizes.
You will note the storage differences depending on bottle heights, diameters and alternating position method.
For example, if a wine cellar is loaded only with Burgundy wine bottles, there will be approximately 30% fewer bottles than the initial quantity calculated for Bordeaux bottles.
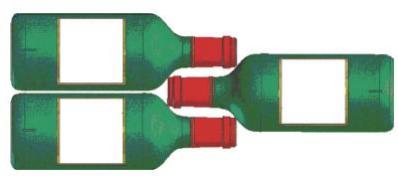
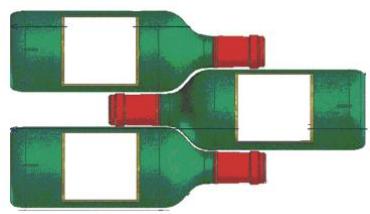
Criss-crossing types:
Top-to-bottom neck-to-neck:
Note the difference in depth!
Top-to-bottom neck between bottle bodies:
Increased loading.
Examples of serving temperatures: (to be observed when tasting, in order to avoid missing out on the rich aromas of your wines!)
Opinions vary, and the ambient temperature too, but many people agree on the following:
| Prestigious Bordeaux wines – Reds | 16 – 17°C |
| Prestigious Burgundy wines – Reds | 15 – 16°C |
| Prestigious dry white vintages | 14 – 16°C |
| Light, young, fruity reds | 11 – 12°C |
| Provence rosés, primeur wines | 10 – 12°C |
| Dry whites and vin de pays reds | 10 – 12°C |
| Vin de pays whites | 8 – 10°C |
| Champagnes | 7 – 8°C |
| Sweet wines | 6°C |
6^ MAINTENANCE
Before cleaning your appliance (something that should be done regularly), disconnect it by removing the plug or by pulling the fuse on the circuit.
Before using your appliance for the first time and regularly after that, we recommend that you clean the inside and outside (front, sides and top) with warm water mixed with a gentle cleaning product. Rinse with clean water and allow to dry before reconnecting. Do not use solvents or abrasives.
Wash the plastic coating on the steel shelves with a mild detergent solution and then dry with a soft cloth. Wooden shelves require no particular maintenance.
When the appliance is switched on for the first time, there may be a residual odour. In that case, run the appliance empty for a few hours at the coldest possible temperature. The cold will kill any odours.
7^ STORING YOUR WINE CELLAR
If you will not be using your appliance for short periods, leave the control panel with its usual settings.
During an extended shutdown:
- Remove all bottles from the appliance
Unplug the appliance - Thoroughly clean the inside and outside of the appliance
- Leave the door open to prevent condensation, unpleasant odours and mould.
8^ WHAT TO DO IN THE EVENT OF A POWER CUT
Most power cuts are resolved within a short time. A power cut of 1 or 2 hours will not affect the temperature in your cabinet. To protect your wines during a power cut, avoid opening the door as much as possible. During very long power cuts, take the necessary measures to protect your wine.
- If the appliance is disconnected or if there is a power cut, you must wait three to five minutes before restarting. If you try to re-start before this time, the compressor will only re-start after 3 to 5 minutes (if the temperature requires).
- When switching on for the first time or following a prolonged shutdown, it is possible that when re-starting, the temperatures selected and those displayed are not the same. This is normal. It will take a few hours before they stabilise.
9^ IF YOU NEED TO MOVE YOUR WINE CELLAR
First, disconnect your cellar.
Remove all the bottles from the cellar and secure moving parts.
To avoid damaging the levelling screws on the feet, screw them tightly into the base.
Move the appliance in an upright position (preferably) or take note of the direction in which the appliance may be laid down by looking at its packaging.
10^ IN THE EVENT OF A BREAKDOWN
Despite the care we take during production, a breakdown can never be totally ruled out. Before contacting your retailer's after-sales department, please check that:
- the appliance is properly plugged in;
- there is not a power cut in progress;
- the breakdown is not one of those described in the table at the end of this manual.
IMPORTANT:
If the power cable supplied is damaged, it must be replaced by the manufacturer, a service centre approved by the brand or the retailer. In all events, it must be replaced by qualified personnel in order to avoid any risk of injury.
IF THESE CHECKS REVEAL NOTHING, THEN CONTACT YOUR RETAILER'S AFTER-SALES DEPARTMENT.
CAUTION!
Unplug the appliance before carrying out any maintenance or repair work.
11° PROBLEMS AND SOLUTIONS
You can solve many simple problems with your wine cellar yourself, thus avoiding having to contact your after-sales department. Try the following suggestions.
| PROBLEM | POSSIBLE CAUSES |
| The cellar will not start. | The cellar is not plugged in. The on/off button is in the off position. The fuse in your electrical installation has blown. |
| The cellar does not cool sufficiently. | Check the temperature selected. The external temperature is beyond the cellar's operating temperature. The cellar is opened too often. The door is not properly closed. The door seal is not sealing correctly. |
| The compressor starts and stops frequently. | The external temperature is high. A large quantity of bottles has been put into the cellar. The cellar is opened frequently. The door is not properly closed. The cellar has not been correctly set. The door seal is not sealing correctly. |
| The light does not operate. | The cellar is not plugged in. The fuse in your electrical installation has blown. The LED is not working. The light switch is off. |
| Vibration. | Check and ensure that the cellar is level. |
| The cellar makes a lot of noise. | A noise resembling circulating water is produced by the coolant gas and this is normal. At the end of a cooling cycle, you can hear the noise of water circulating. Expansion and contraction of the internal walls may cause a cracking sound. The cellar is not level. |
| The door does not close correctly. | The cellar is not level. The door seal is dirty or damaged. The shelves are not positioned correctly. A part of the contents is preventing the door from closing. |
12^ ENVIRONMENT
This product complies with EU WEEE Directive 2002/96/EC.
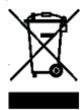
The crossed-out waste bin symbol on this appliance means that, at the end of its life, it should be recycled separately from other domestic waste.
It should therefore be disposed of at a selective collection centre for electrical and or electronic appliances or, if you are buying an equivalent product, by the retailer of the new product.
The user is responsible for taking the appliance to the appropriate collection centre at the end of its useful life. Selective and appropriate collection for the recycling of no longer used appliances and their disposal and destruction in an environmentally friendly manner, helps to prevent potential negative effects on the environment and health, and encourages the recycling of materials used to make the product.
For more detailed information about available collection systems, contact your local waste collection organisation or the retail outlet where you bought the appliance.
13^ WARNING
As we continuously improve our products, we reserve the right to modify technical characteristics without notice.
Warranties for CLIMADIFF brand products are offered exclusively by selected retailers. No part of these instructions may be considered as a supplementary guarantee.
CLIMADIFF cannot be held liable for errors or technical or editorial omissions in this document.
Non-binding document.
APPENDIX 1
| Model | Brand: Avintage Reference: AV21SX - AV21SX-IX Domestic refrigeration appliance category: 2 |
| Supply | 220-240 V~ 50 Hz |
| Dimensions (L x D x H cm) | 29.5 x 57.2 x 82 cm |
| Weight (kg) | 28 kg |
| Energy efficiency class | B |
| Annual energy consumption (AEC) | Energy consumption 184 kWh per year calculated on the basis of results obtained over 24 hours under standardised test conditions. Actual energy consumption depends on conditions of use and the location of the appliance. |
| Usable volume of the compartments (litres) | 60 L |
| Defrosting | Automatic defrost |
| Climate class: | Climate class: N This appliance is designed to be used at an ambient temperature between 16°C (lowest) and 32°C (highest). |
| Acoustic emissions in air in dB(A) re 1pW | 41 dB |
| Installation type | Free standing or/and built-in |
This appliance is intended exclusively for the storage of wine.
APPENDIX 2
| Model | Brand: Avintage Reference: AV51SX- AV51SX-IX Domestic refrigeration appliance category: 2 |
| Supply | 220-240 V~ 50 Hz |
| Dimensions (L x D x H cm) | 59.5 x 57.2 x 82 cm |
| Weight (kg) | 44 kg |
| Energy efficiency class | B |
| Annual energy consumption (AEC) | Energy consumption 186 kWh per year calculated on the basis of results obtained over 24 hours under standardised test conditions. Actual energy consumption depends on conditions of use and the location of the appliance. |
| Usable volume of the compartments (litres) | 146 L |
| Defrosting | Automatic defrost |
| Climate class: | Climate class: N This appliance is designed to be used at an ambient temperature between 16°C (lowest) and 32°C (highest). |
| Acoustic emissions in air in dB(A) re 1pW | 42 dB |
| Installation type | Free standing or/and built-in |
This appliance is intended exclusively for the storage of wine.
APPENDIX 3
| Model | Brand: Avintage Reference: PRO51C Domestic refrigeration appliance category: 2 |
| Supply | 220-240 V~ 50 Hz |
| Dimensions (L x D x H cm) | 59.5 x 57.2 x 82 cm |
| Weight (kg) | 44 kg |
| Energy efficiency class | B |
| Annual energy consumption (AEC) | Energy consumption 186 kWh per year calculated on the basis of results obtained over 24 hours under standardised test conditions. Actual energy consumption depends on conditions of use and the location of the appliance. |
| Usable volume of the compartments (litres) | 146 L |
| Defrosting | Automatic defrost |
| Climate class: | Climate class: N This appliance is designed to be used at an ambient temperature between 16°C (lowest) and 32°C (highest). |
| Acoustic emissions in air in dB(A) re 1pW | 42 dB |
| Installation type | Free standing or/and built-in |
This appliance is intended exclusively for the storage of wine.
APPENDIX 4
| Model | Brand: Avintage Reference: AV53CDZ Domestic refrigeration appliance category: 2 |
| Supply | 220-240 V~ 50 Hz |
| Dimensions (L x D x H cm) | 59.5 x 57.2 x 82 cm |
| Weight (kg) | 50 kg |
| Energy efficiency class | C |
| Annual energy consumption (AEC) | Energy consumption 235 kWh per year calculated on the basis of results obtained over 24 hours under standardised test conditions. Actual energy consumption depends on conditions of use and the location of the appliance. |
| Usable volume of the compartments (litres) | 134 L |
| Defrosting | Automatic defrost |
| Climate class: | Climate class: N This appliance is designed to be used at an ambient temperature between 16°C (lowest) and 32°C (highest). |
| Acoustic emissions in air in dB(A) re 1pW | 43 dB |
| Installation type | Free standing or/and built-in |
This appliance is intended exclusively for the storage of wine.
APPENDIX 5
| Model | Brand: Climadiff Reference: CV52IXDZ Domestic refrigeration appliance category: 2 |
| Supply | 220-240 V~ 50 Hz |
| Dimensions (L x D x H cm) | 57.2 x 59.5 x 82 cm --without handle |
| Weight (kg) | 50 kg |
| Energy efficiency class | C |
| Annual energy consumption (AEC) | Energy consumption 235 kWh per year calculated on the basis of results obtained over 24 hours under standardised test conditions. Actual energy consumption depends on conditions of use and the location of the appliance. |
| Usable volume of the compartments (litres) | 134 L |
| Defrosting | Automatic defrost |
| Climate class: | Climate class: N This appliance is designed to be used at an ambient temperature between 16°C (lowest) and 32°C (highest). |
| Acoustic emissions in air in dB(A) re 1pW | 43 dB |
| Installation type | Free standing or/and built-in |
This appliance is intended exclusively for the storage of wine.
APPENDIX 6
| Model | Brand: AVINTAGE Reference: AV41SXDP- AV41SXDP-IX Domestic refrigeration appliance category: 2 |
| Supply | 220-240 V~ 50 Hz |
| Dimensions (L x D x H cm) | 59.5 x 57.5 x 82 cm --without handle |
| Weight (kg) | 48 kg |
| Energy efficiency class | D |
| Annual energy consumption (AEC) | Energy consumption 284 kWh per year calculated on the basis of results obtained over 24 hours under standardised test conditions. Actual energy consumption depends on conditions of use and the location of the appliance. |
| Usable volume of the compartments (litres) | 2X59.5 |
| Defrosting | Automatic defrost |
| Climate class: | Climate class: N This appliance is designed to be used at an ambient temperature between 16°C (lowest) and 32°C (highest). |
| Acoustic emissions in air in dB(A) re 1pW | 42 dB |
| Installation type | Free standing or/and built-in |
This appliance is intended exclusively for the storage of wine.
APPENDIX 7
| Model | Brand: Avintage Reference: AV54SXDZ- AV54SXDZ-IX Domestic refrigeration appliance category: 2 |
| Supply | 220-240 V~ 50 Hz |
| Dimensions (L x D x H cm) | 59.5 x 57.2 x 82 cm |
| Weight (kg) | 50 kg |
| Energy efficiency class | C |
| Annual energy consumption (AEC) | Energy consumption 235 kWh per year calculated on the basis of results obtained over 24 hours under standardised test conditions. Actual energy consumption depends on conditions of use and the location of the appliance. |
| Usable volume of the compartments (litres) | 134 L |
| Defrosting | Automatic defrost |
| Climate class: | Climate class: N This appliance is designed to be used at an ambient temperature between 16°C (lowest) and 32°C (highest). |
| Acoustic emissions in air in dB(A) re 1pW | 43 dB |
| Installation type | Free standing or/and built-in |
This appliance is intended exclusively for the storage of wine.
APPENDIX 8
| Model | Brand: Avintage Reference: AV7X- AV7X-IX Domestic refrigeration appliance category: 2 |
| Supply | 220-240 V~ 50 Hz |
| Dimensions (L x D x H cm) | 47.5 x 14.5 x 86.5 cm |
| Weight (kg) | 19 kg |
| Energy efficiency class | B |
| Annual energy consumption (AEC) | Energy consumption 155 kWh per year calculated on the basis of results obtained over 24 hours under standardised test conditions. Actual energy consumption depends on conditions of use and the location of the appliance. |
| Usable volume of the compartments (litres) | 19 L |
| Defrosting | Automatic defrost |
| Climate class: | Climate class: N This appliance is designed to be used at an ambient temperature between 16°C (lowest) and 32°C (highest). |
| Acoustic emissions in air in dB(A) re 1pW | 40 dB |
| Installation type | Free standing or/and built-in |
This appliance is intended exclusively for the storage of wine.