ADVW801 - Speaker ADVENT - Free user manual and instructions
Find the device manual for free ADVW801 ADVENT in PDF.

| Product Type | Outdoor/Indoor Wireless Audio Speaker |
| Brand and Model | ADVENT ADVW801 |
| Main Power | AC Adapter 15 V DC 500 mA (included) |
| Optional Power | 8 D batteries (not included) or rechargeable NiMH/NiCad battery pack |
| Output Power | 10 watts RMS |
| Speakers | 1.75-inch dome tweeter, 5-inch woofer |
| Frequency Response | 20 Hz - 15 kHz |
| Signal-to-Noise Ratio | 60 dB |
| Harmonic Distortion | Less than 1.5% |
| Transmission Range | Up to 46 meters (150 feet) |
| Operating Frequency | 912.55 - 914.75 MHz |
| Input Connectors | 3.5mm stereo mini-jack (with 1/4 inch headphone adapter and RCA Y-cable included) |
| Water Resistance | Resistant to low humidity (drizzle, dew) but not waterproof |
| Usage | Indoor and outdoor (patio, pool, yard) |
| Warranty | 1 year limited |
Frequently Asked Questions - ADVW801 ADVENT
User questions about ADVW801 ADVENT
0 question about this device. Answer the ones you know or ask your own.
Ask a new question about this device
Download the instructions for your Speaker in PDF format for free! Find your manual ADVW801 - ADVENT and take your electronic device back in hand. On this page are published all the documents necessary for the use of your device. ADVW801 by ADVENT.
USER MANUAL ADVW801 ADVENT
Connect the Transmitter 3
Power the Speaker 5
Adjust the Transmitter 8
Tune the Speaker 10
More Helpful Information 12
Troubleshooting 14
Specifications and Features 17
Introduction
ADVENT WIRELESS SPEAKERS eliminate the hardest part of adding speakers to almost any location in your home - running and hiding hundreds of feet of speaker wire. Like FM radio, the Advent Wireless Speaker System's 900 MHz signals travel with ease through walls, floors, ceilings and other obstacles, delivering high-quality stereo sound virtually anywhere in or about the home. Resonator-controlled circuitry for drift- and static-free reception, coupled with outstanding range - up to 150 feet/46 m* - make the possibilities for your enjoyment of the Advent Wireless Speaker System nearly unlimited.
The Advent Wireless ADVW801 is a versatile outdoor/ indoor speaker designed to provide high-quality sound in challenging locations, such as pool decks, patios, and around the yard. As a water-resistant speaker,
the ADVW801 will withstand the effects of exposure to light moisture (drizzle rain, dew from grass, etc.). It is not, however, waterproof; never immerse the speaker and it is suggested the unit be protected from direct exposure to heavy rain, standing water, sprinklers, etc. The Advent Wireless ADVW801 Speaker System is compatible with most audio sources, i.e., TVs, VCRs, stereo receivers/amps, personal stereos, boom boxes, DBS receivers, and individual stereo component pieces (CD players, cassette players, etc.). The contents of this manual cover various connection options and detailed operating procedures for making the Advent Wireless ADVW801 Speaker System a valued part of your lifestyle.
*Range may vary by environment.
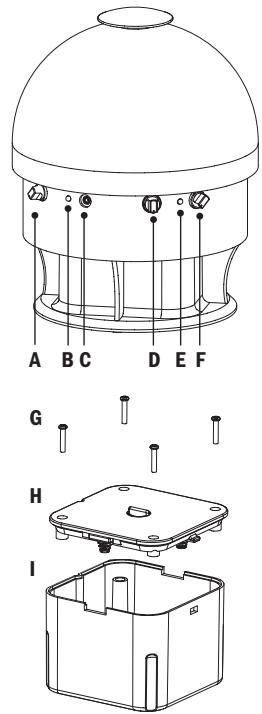
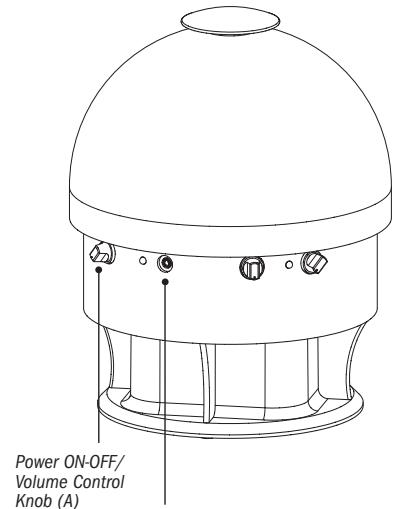
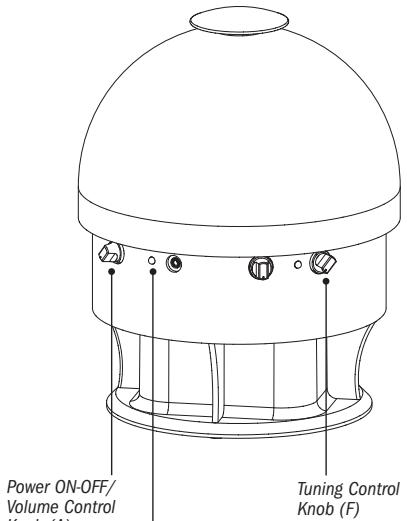
A Power ON-OFF/Volume Control Knob
B Power Indicator Light
C Speaker Power Input Jack
D Mono/Stereo Switch
E Tuning Indicator Light
F Tuning Control Knob
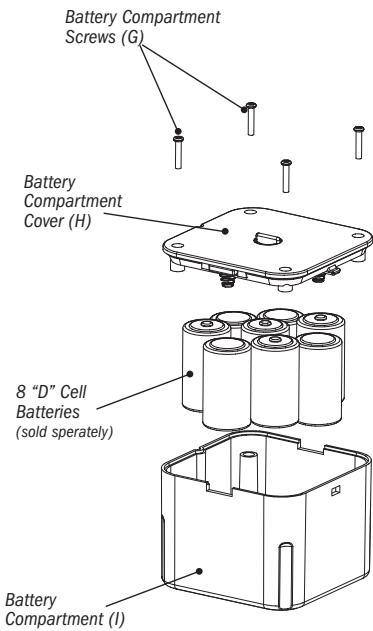
G Battery Compartment Screws
H Battery Compartment Cover
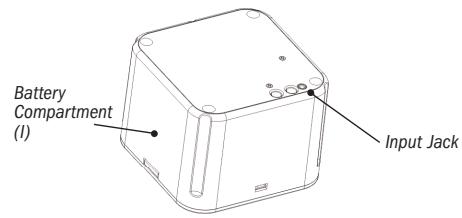
Battery Compartment
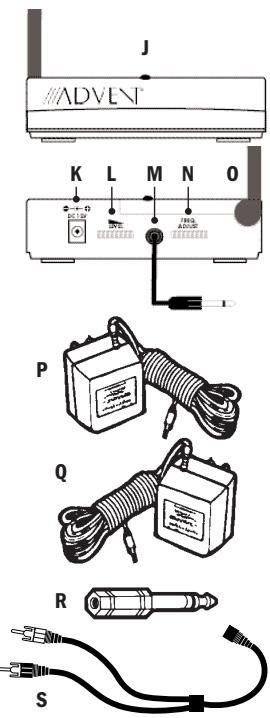
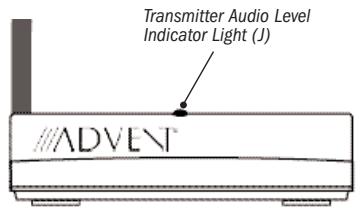
Transmitter Audio Level Indicator Light
K Transmitter Power Input Jack
Output Level Control Wheel
M Audio Input Cable
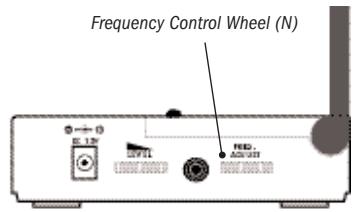
N Frequency Control Wheel
0 Antenna
P Transmitter AC Adapter - 12 V DC 100 mA
Q Speaker AC Adapter - 15 V DC 800 mA
R Headphone Adapter Plug
S "Y" Cable Adapter
Connect the Transmitter
Connect the transmitter as follows:
STEP 1 Power the Transmitter
A Insert the power cord from Transmitter AC Adapter (P) into the Transmitter Power Input Jack (K).
B Plug the Transmitter AC Adapter (P) into any
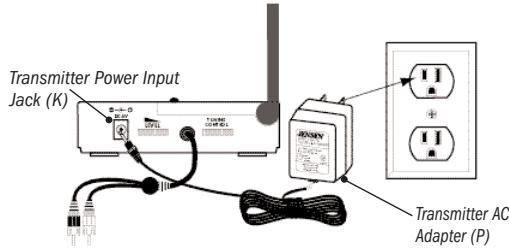
NOTE Be sure to use the AC Adapter rated 12V DC 100 mA.
NOTE There is no ON/OFF switch. The transmitter is designed to be left plugged in and powered at all times. If you will not be using the ADVW801 for an extended period of time, you may wish to unplug the Transmitter AC Adapter.
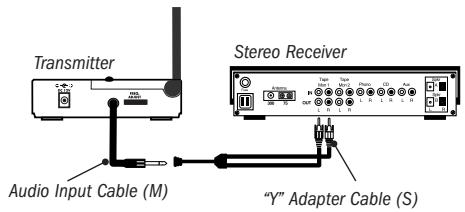
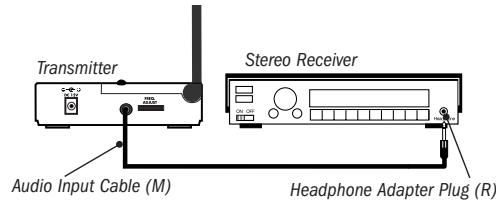
STEP 2 Connect to an Audio Source OPTION 1 CONNECTING TO A STEREO RECEIVER
A Connect the mini plug on the end of the Audio Input Cable (M) to the mini jack on the "Y" Cable Adapter (S).
B Connect the dual RCA plugs on the other end of the "Y" Cable Adapter (S) to the RCA-type audio outputs of a stereo receiver/amp or other audio source.
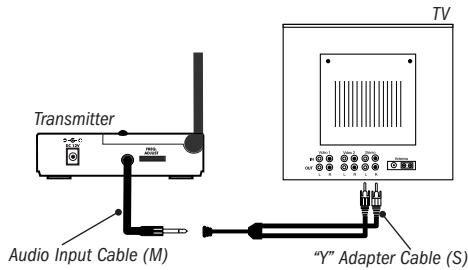
OPTION 2 CONNECTING TO A TELEVISION
A Connect the mini plug on the end of the Audio Input Cable (M) to the mini jack on the "Y" Cable Adapter (S).
B Connect the dual RCA plugs on the other end of the "Y" Cable Adapter (S) to the RCA-type audio outputs of a TV.
OPTION 3 CONNECTING TO A HEADPHONE JACK
A Plug the mini plug on the end of the Audio Input Cable (M) into the headphone jack. As needed, use the Headphone Adapter Plug (R) to convert the (3.5mm) mini plug to a full-size 1 / 4'' headphone plug.
WARNING DO NOT connect the RCA plugs of the "Y" Cable Adapter to a speaker output on the audio source. If you use the speaker output of an audio source to connect the transmitter, you will permanently damage the transmitter. It is only designed to work with RCA-type line/variable outputs or headphone outputs.
NOTE For more information on hooking up and using the transmitter with various outputs, please see More Helpful Information beginning on page 12.
Power the Speaker
Select from the following options to power the ADVW801 speaker:
POWER OPTION 1 "D" CELL BATTERIES
A Turn the speaker Power ON-OFF/Volume Control Knob (A) to the "OFF" position (all the way counterclockwise - it will "click off).
B Remove the Battery Compartment Cover (H).
C Insert eight (8) "D" batteries (sold seperately) into the speaker following the polarity (^+ + ^+ and - as diagrammed in the battery compartment.
D Replace the Battery Compartment Cover.
Recharging the Battery Pack
A Remove battery pack from speaker. Make certain the batteries in the pack (I) are rechargeable.
B Insert the power cord from the 15 V AC adapter (Q) into the battery pack input jack.
C Plug the Speaker AC Adapter (Q) in any standard wall outlet.
D Allow unit to charge for at least 8 hours for a full charge.
E Replace battery pack (l) into speaker.
NOTE If you are using rechargeable batteries NiMH or NiCad, the batteries will not recharge when the speaker is powered with the AC adapter. Please DO NOT attempt to recharge alkaline or other non-rechargeable batteries - this could cause the batteries to leak which would damage the speaker.
POWER OPTION 2 AC ADAPTER
A Turn the speaker Power ON-OFF/Volume Control Knob (A) to the "OFF" position (all the way counterclockwise - it will "click off).
B Insert the power cord from the Speaker AC Adapter (Q) into the Speaker Power Input Jack (C).
c Plug the Speaker AC Adapter (Q) into any standard wall outlet.
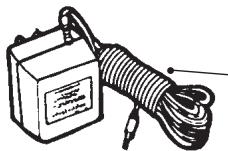
Speaker AC Adapter 15 V DC 800 mA (Q)
NOTE Be sure to use the AC Adapter rated 15 V DC 800 mA. The batteries will not recharge when the speaker is powered with the AC adapter.
Speaker Power Input Jack (C)
Adjust the Transmitter
Adjust the transmitter as follows:
STEP 1 Turn ON your Audio Source (i.e., Stereo Receiver, TV, etc.) so that you can hear sound coming from the source.
STEP 2 Pivot the Antenna (O) to the upright, vertical position.
STEP 3 Set the Transmitter "Level"
A Set the Frequency Control Wheel (N) to its midpoint.
B Turn the Output Control Level Wheel (L) all the way to the left (your left when looking at the transmitter controls), as shown.
c Check status of Transmitter Audio Level Indicator Light (J). If it flickers intermittently (about half the time), proceed to TUNE THE SPEAKERS.
D If Audio Level Indicator Light (J) is on solid red or flickering very rapidly, turn Output Control Level Wheel slowly back to the right until light flickers intermittently.
NOTE If the light does not flicker, confirm secure connection of the AC Adapter. If the light still does not flicker, confirm secure connection to the audio source output. If there is still no response, leave the Output Level Control Wheel completely turned to the left (as shown on the previous page) and see the following NOTE.
NOTE If the transmitter is connected to a variable output (i.e., headphone jack, TV audio output on the audio source, leave the Output Level Control Wheel turned all the way to the left (as shown on previous page) and adjust the volume on the audio source up or down as necessary to make the Audio Level Indicator Light flicker intermittently. If you are unclear as to the kind of output (variable or fixed) you are using, please see More Helpful Information on page 12.
Tune the Speaker
Adjust the speaker as follows:
Turn On and Tune the Speaker
A Use the speaker Power ON-OFF/Volume Control Knob (A) to turn the speaker "ON." The Power Indicator Light (B) will turn red.
B Turn the Tuning Control Knob (F) until your audio source is clearly heard through the speaker, indicating the speaker is tuned to the signal from the transmitter. With the volume up, you should now be able to hear the audio source.
c Adjust Volume (A) as desired.
NOTE Interference in the form of static and/or distortion can sometimes be heard. If this occurs, confirm the transmitter/speaker adjustments and indicators. If the problem persists, refer to the Troubleshooting section of this manual.
Power Indicator Light (B)
Mono/Stereo Operation Set-up:
A Monaural operation: The monaural mode (MONO) is recommended when using a single speaker or if using more than one speaker in different locations.
For monaural operation, set the Mono/Stereo Switch (D) to "MONO" on each speaker.
B Stereo operation: You will need an additional ADVW801 speaker in order to utilize the stereo option.
For stereo operation, set the Mono/Stereo Switch (D) to "L" on the speaker located to the left of the listener, and set the other speaker to the "R" position.
More Helpful Information
About Fixed-Level Outputs
A fixed-level, or line-level audio output is considered ideal since it provides an audio signal unchanged by adjustments to the audio source (stereo, etc.) volume control.
HINT Fixed-level audio outputs from stereo receivers/amps will typically be designated as Tape, Tape 1, and Tape 2 outputs, DAT (digital audio tape) outputs, VCR audio output connections, and auxiliary audio outputs. Tape, Tape 1, Tape 2 and DAT outputs are usually marked as 'TAPE OUTPUT,' 'TAPE OUT,' 'TAPE REC,' or 'TAPE RECORD.' Jacks designated for phono, CD, LD, DVD or tape playback (PB) are inputs and will not work for purposes of installing the transmitter.
Fixed-level outputs from TVs are usually marked as 'Constant,' 'Fixed,' or 'Select.' If they are not marked as such, they are probably variable outputs (see
About Variable-Level Outputs, page 13).
Outputs from VCRs are almost always fixed.
HINT When connecting to the fixed audio outputs of a VCR, remember that for the wireless system to work, the VCR must be active. In other words, turn the TV on to the channel you would normally use to watch a videotape (channel 3 or 4), turn the VCR on, then press the TV/VCR button on your VCR remote control one time to make the VCR the controlling piece of equipment. At this point, whatever channel is showing on the tuner for the VCR should be the channel playing on the TV. Change channels on the VCR. This configuration gives independent volume control through the TV (using the TV remote control) and at the speaker.
HINT If your VCR (or other RCA-type audio source you are connecting to) is mono (a single audio output), you need to acquire another RCA "Y" Cable. It differs from the "Y" Cable Adapter included in this kit. It will have a single male RCA plug and 2 female RCA jacks. Connect the dual RCA plugs from the "Y" Cable Adapter (S) to the 2 female RCA jacks on the second "Y" cable, then connect the single male RCA plug of the second "Y" cable to the single audio output of the VCR.
About Variable-Level Outputs
A variable-level output, such as a headphone jack or certain RCA-type outputs, provides an audio signal to the transmitter that changes in relation to volume level on the audio source. As the volume of the audio source goes up and down, so too does the audio signal strength sent to the transmitter. This can affect the quality of sound you hear at the speaker, and may require increasing or decreasing the volume level of the audio source to achieve a suitably strong audio signal for use with the ADvw801 system.
HINT On most bookshelf-type or compact stereo systems, inserting a headphone plug into the headphone jack results in automatic cutoff of the regular, or hard-wired, speakers.
HINT Most TVs, regardless of age or price, have variable outputs. If you are unsure which, if any, of your outputs are fixed, refer to the TV instruction manual. Some TVs have outputs that can switch between variable and fixed. When given a choice, fixed is always recommended.
Troubleshooting
The following troubleshooting guide takes you through some of the more common problems and corrections associated with the installation and/or operation of a wireless system.
TROUBLE
No Sound
CHECKS AND ADJUSTMENTS
- Confirm that the Transmitter AC Adapter (P) is fully inserted into the wall outlet and the power cord from the AC Adapter is firmly connected to the Transmitter Power Input Jack (K).
- Confirm that the speaker is turned ON.
- Confirm that the Speaker AC Adapter (Q) is fully inserted into the wall outlet and the power cord from the AC Adapter is firmly connected to the Speaker Power Input Jack (C). OR
- Check that the "D" cell batteries are fresh and inserted for correct polarity (+, -).
- Check that the audio source (stereo, TV, etc.) is turned on and providing sound as it normally should.
- Check that the speaker volume is turned up.
- If you are using a Tape 2 Monitor output from your receiver/amp as the audio output, check that you have pressed the Tape Monitor/Tape 2 button on the front of the receiver. This will turn on the Tape 2 outputs, which may not be active.
TROUBLE CHECKS AND ADJUSTMENTS
No Sound/Distortion/
- If using battery power, batteries may be low. Replace if necessary.
Static
- Check that the speaker Power Indicator Light (B) is illuminated red. If not, the speaker is not receiving power from the batteries or AC adapter.
- Check that the antenna (O) is in the upright position.
- Check that the Transmitter Audio Level Indicator Light (J) is flickering intermittently.
If you are using a fixed output and the light is on solid or flickering very rapidly, or if the light is not on at all, adjust the Output Level Control Wheel (L) so that the light flickers intermittently.
OR
- If you are using a variable output, make sure the Output Level Control Wheel (L) is all the way left (as shown under ADJUST THE TRANSMITTER), and adjust the volume on the audio source up or down as neccessary to make the light flicker intermittently.
- Change the position of the Frequency Control Wheel (N) to change the operating frequency. Then readjust the speaker Tuning Control Knob (F) until the Tuning Indicator Light (E) changes colour to red.
- Try changing the physical location of the transmitter. Locate it as high and free of obstruction as possible. Avoid placing directly on top of a TV, if possible.
-
Try changing the antenna (O) position, particularly if you think you may be near maximum transmitting range.
-
Try moving the transmitter and speaker closer together. Sending the signal through certain materials, such as glass, tile, and metal, can decrease the effective transmitting distance of the system.
Specifications and Features
Signal-To-Noise Ratio: 60 dB
Channel Separation: 30 dB
Distortion: Less Than 1.5%
TRANSMITTER
Omnidirectional
Effective Transmitting Range: Up to 150 feet/46 m*
Adjustable Audio Level Input
Variable Frequency Adjustment between 912.55 and 914.75 MHz
Stereo audio input with 3.5mm stereo mini-plug (1/4" headphone adapter and "Y" cable included)
UL-Listed AC Power Adapter
Auto Level Indicator
This device complies with part 15 of the Federal
Communications Commission (FCC) rules. Operation is subject to the following two conditions: 1) This device may not cause harmful interference and 2) This device must accept any interference received including interference that may cause undesired operation.
Changes or modifications not expressly approved by the party responsible for compliance could void the user's authority to operate the equipment.
Features and specifications subject to change without notice.
SPEAKER
10 Watts RMS
Acoustic Suspension Design
1.75" Dome Tweeter; 5" Woofer
Frequency Fine Tuning
Power/Tuning/Volume Control
Left/Mono/Right Switch
Frequency Response: 20Hz - 15kHz
*Range may vary according to environment.
Warranty
LIMITED ONE YEAR WARRANTY
We warrant that for one year from the date of purchase this product will be free from defects in materials or workmanship. For a prompt, no charge replacement of equivalent product, return the defective product postage prepaid to the appropriate address.
If purchased in the US:
Product Exchange Center
11721 Alameda Avenue
Socorro TX 79927
If purchased in Canada:
Thomson multimedia Ltd.
6200 Edwards Boulevard
Mississauga, Ontario
Canada L5T 2V7
François
ADVENT
SYTÉME D'ENCEINTE ACOUSTIQUE 900 MHz
EXTÉRIÉUE/INTÉRIÉUE SANS FIL
11721 Alameda Avenue
Socorro TX 79927
Thomson multimedia Ltee.
6200, boul. Edwards
Mississauga, Ontario Canada L5T 2V7
Product Exchange Center
11721 Alameda Avenue
Socorro TX 79927
10330 North Meridian Street
Indianapolis IN 46290 USA
2003
MODEL
MODELE ADVW801
MODELE
MADE IN CHINA
FABRIQUE EN CHINE
HECHO EN CHINA
REGISTERED TRADEMARKS
MARQUES DEPOSEES
MARCAS REGISTRADAS
ADVW801 NA IB REVA