MB4110 - Tondeuse à barbe REMINGTON - Free user manual and instructions
Find the device manual for free MB4110 REMINGTON in PDF.
Download the instructions for your Tondeuse à barbe in PDF format for free! Find your manual MB4110 - REMINGTON and take your electronic device back in hand. On this page are published all the documents necessary for the use of your device. MB4110 by REMINGTON.
USER MANUAL MB4110 REMINGTON
All technical modifications reserved. 07/10. TSC 10.0595
STUBBLE KIT TRIM & SHAVE YOUR 3-DAY BEARD LOOK
10/INT/MB4110 Version 01/11 Part No. T22-30412 Remington® is a Registered Trade Mark of Spectrum Brands, Inc., or one of its subsidiaries VARTA Consumer Batteries GmbH & Co. KgaA Alfred-Krupp-Str.9 090054_HC240C_UK_Cover.indd Spread 1 of 2 - Pages(1, 2, 3) 73479 Ellwangen Germany www.remington-europe.com © 2010 SBI
01.02.2009 21:00:42 Uhr
MALTA UNITED KINGDOM Central Europe
Mo.-Fr. 9 a.m. – 5 p.m. Central European Time (free call) E-Mail: service@remington-europe.com www.remington-europe.com
Tel. +353 (0) 1 460 4711
Remington Consumer Products, Unit 7C, Riverview Business Park, New Nangor Road, Dublin 22, IRELAND, www.remington.co.uk
MAGYARORSZÁG Tel. +9714 355 5474
VARTA Consumer Batteries, Khalid Bin Waleed Street, Al Jawhara Bldg 504, Dubai, U.A.E., www.remington-europe.com
CROATIA Tel. +385 12481111
Alca Zagreb d.o.o., Zitnjak bb, 10000 Zagreb, Croatia, www.remington-europe.com
CYPRUS Tel. +357 24-532220
Thetaco Traders Ltd, Eletherias Ave 75, 7100 Aradippou, Cyprus, www.remington-europe.com
ROMANIA Tel. +40 21 411 92 23
TKFexpert SRL , 4th, Drumul Taberei St., sector 6, Bucharest, Romania, www.remington-europe.com
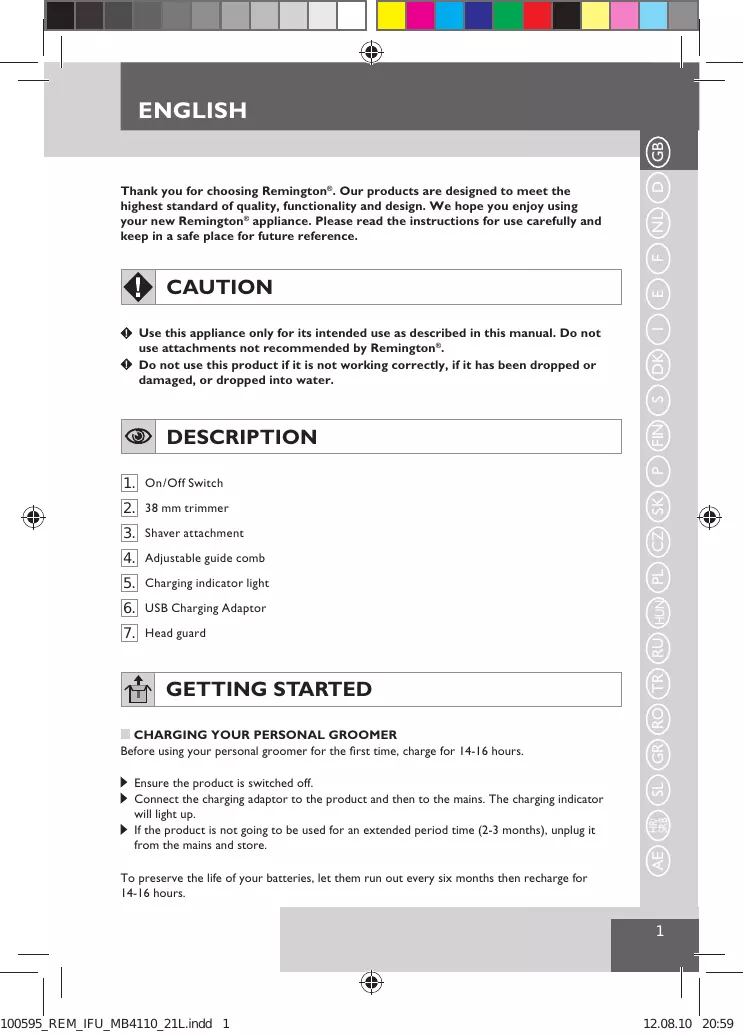
SLOVENIA Use this appliance only for its intended use as described in this manual. Do not use attachments not recommended by Remington®.
Do not use this product if it is not working correctly, if it has been dropped or damaged, or dropped into water.
DK CAUTION E F Thank you for choosing Remington®. Our products are designed to meet the highest standard of quality, functionality and design. We hope you enjoy using your new Remington® appliance. Please read the instructions for use carefully and keep in a safe place for future reference.
GETTING STARTED CHARGING YOUR PERSONAL GROOMER Before using your personal groomer for the first time, charge for 14-16 hours.
Ensure the product is switched off. Connect the charging adaptor to the product and then to the mains. The charging indicator will light up. If the product is not going to be used for an extended period time (2-3 months), unplug it from the mains and store.
6. USB Charging Adaptor
5. Charging indicator light
3. Shaver attachment
To preserve the life of your batteries, let them run out every six months then recharge for
CHARGING VIA STANDARD ELECTRICAL SOCKET Ensure the product is switched off.
Connect the charging adaptor to the product and then to the mains. When charging the LED indicator will illuminate Allow 14~16 hours for a complete charge. USB CHARGING VIA PC Ensure the product is switched off. Connect your USB cable to the USB port on the PC Connect the USB cable to your beard trimmer When charging the LED indicator will illuminate Allow 14~16 hours for a complete charge. CORDED USE Connect the charging adaptor to the product and then to the mains. When the cord is connected to the mains, a charging LED light is displayed on the beard trimmer. CAUTION: Extended mains only use will result in the reduction of the battery life. WARNING: The hair clipper can not be operated in corded mode while connected to a PC via the USB port. CORDLESS USE When the unit is switched on and fully charged, the product can be used in cordless mode for up to 40 minutes.
HOW TO USE BEFORE YOU BEGIN Always comb your beard or moustache with a fine comb before you start trimming.
0.5-5.5MM MICRO SETTING COMB The 0.5-5.5mm micro setting comb can be adjusted to give you setting of 0.2mm adjustment simply by turning the wheel to the desired setting. Turn the wheel clockwise for longer length and anticlockwise for shorter length. The setting number will appear on the length position indicator. ATTACHING AND REMOVING THE 0.5-5.5 MM MICRO SETTING COMB With the trimmer blade facing away from you, slide the guide comb on top of the clipper blade and click into position. With the trimmer blade facing away from you, carefully push the guide comb away from the trimmer blade.
NOTE: Always trim your facial hair first before shaving.
Tips for best results Beard, moustache and sideburn hairs should be dry. Avoid using lotions before using your personal groomer.
1. Turn the personal groomer off.
2. Gently brush the remaining hairs away/rinse under warm water from the guide comb and
NL F E I DK S FIN P SK CZ USING THE SHAVER (DIAGRAM 3)
Attach the shaver. Use short, well-controlled movements. Use your free hand to stretch your skin. This encourages the hair to stand upright, making it easier to shave.
RU HUN PL TRIMMING EDGE OF SIDEBURNS (DIAGRAM 2)
Hold the personal groomer with 38mm Trimmer-Blade facing you. Start with edge of sideburn, and with the trimmer blades resting lightly against your skin, use motions towards edge of sideburn line to trim to desired locations in facial area.
GR RO TR TO THIN AND TAPER THE BEARD/MOUSTACHE (DIAGRAM 1)
Attach a guide comb to the 38mm Trimmer-Blade. If you are trimming for the first time start with the maximum trimming length setting. Turn the unit on. Place the flat top of the trimmer comb against the skin. Slowly slide the personal groomer through the hair. Repeat from different directions as necessary. If hair builds up in the trimmer comb during the trimming process, switch the unit off, pull off the comb and brush/rinse off.
SL ATTACHING AND REMOVING THE HEADS To attach or remove the heads press the red release button at both sides of the product.
CLEANING CAUTIONS Only use the light-grade oil supplied or sewing machine oil on the blades. Do not use harsh or corrosive cleaners on the units or their blades. Do not submerge in water as damage will occur.
ENGLISH NOTE: Only rinse the shaver-/trimmer head under running water. Do not wash the whole product as damage will occur.
STORAGE Always store this appliance and cord in a moisture-free area. Do not store it in temperatures exceeding 140°F (60°C). Do not wrap the cord of the charging adaptor around the appliance. CLEANING Ensure the shaver is switched off and unplugged from the mains outlet. Release the head assembly from the shaver body. (DIAGRAM A) Gently tap the shaver head on a flat surface to remove the hair particles, and clean with the cleaning brush supplied. (DIAGRAM B) Never use the cleaning brush on the foils as damage may occur. Close the shaving unit. At regular intervals, put a drop of lubricant onto the shaving frame/head. REPLACING THE FOIL & CUTTER To ensure the continued highest quality performance from your shaver, we recommend that foil and cutter are replaced regularly. Signs that your foil and cutter need replacing: 1. Irritation: As foils get worn, you may experience skin irritation. 2. Pulling: As the cutters wear, your shave may not feel as close and you may feel your cutter pulling your hair. 3. Wear through: You may notice that the cutters have worn through the foils. TO REPLACE THE FOIL Remove shaving head assembly by pressing the buttons on both sides of the shaver. (DIAGRAM A) Insert fingernail between side of screen and head assembly. Pull away from notches. (DIAGRAM C) To reassemble, slide the foil into the shaving head and click into position. Only hold foil by plastic frame to prevent damage. (DIAGRAM D) TO REPLACE THE CUTTER Remove head assembly as shown. (DIAGRAM A) Grasp cutter between thumb and forefinger and pull upward. (DIAGRAM E) Snap new cutter into top of oscillator tip. Note: Do not press on the cutter ends as this may cause damage. (DIAGRAM E) Replacement cutter & foil available: SP410
For further information on recycling see www.remington-europe.com
CAUTION: Do not put in fire or mutilate your battery packs as they may burst or release toxic materials.
SRB This appliance contains an environmentally friendly rechargeable Nickel Metal Hydride battery. Do not dispose the appliance or the battery in the household waste as restrictions exist in most countries. Adhere to national or local regulations for collection and disposal that apply to your specific location. In case you are required to remove the battery from the appliance for separate disposal see the instructions in the ‘Battery Removal’ section on how to open the housing.
AE An appliance should never be left unattended when plugged into a power outlet.
WARNING: Detach the hand-held part from the supply cord before cleaning it in water. WARNING: The parts that have to be fixed must be installed so they cannot fall into water. Keep the power plug and cord away from heated surfaces. Make sure the power plug and cord do not get wet. Do not plug or unplug the product with wet hands. Do not use the product with a damaged cord. A replacement can be obtained via our International Service Centres. Charge, use and store the product at a temperature between 15°C and 35°C Always unplug from the mains when cleaning. Only use the parts supplied with the appliance. Keep this product out of reach of children. The use of this appliance by persons with reduced physical, sensory or mental capabilities or lack of experience and knowledge can give cause to hazards. Persons responsible for their safety should give explicit instructions or supervise the use of the appliance.
P WARNING – TO REDUCE THE RISK OF BURNS, ELECTROCUTION, FIRE,
OR INJURY TO PERSONS:
SK IMPORTANT SAFETY INSTRUCTIONS NL D GB ENGLISH
ENGLISH BATTERY REMOVAL To remove the battery for safe disposal, please follow the instructions below:
The battery must be removed from the appliance before it is scrapped. Turn the personal groomer on and discharge all remaining power. Remove trimmer head. Use a screwdriver to pry the lower housing cover off the unit carefully. (DIAGRAM F) Remove the 5 screws and take off the upper housing cover carefully. (DIAGRAM G) Then disconnect the lead wires from the battery and take out the batteries. (DIAGRAM H) The battery is to be disposed of safety.
SERVICE AND WARRANTY This product has been checked and is free of defects. We warrant this product against any defects that are due to the faulty material or workmanship for a 2 year period from the original date of consumer purchase. If the product should become defective within the warranty period, we will repair any such defect or elect to replace the product or any part of it without charge provided there is proof of purchase. This does not mean an extension of the warranty period.
In the case of a warranty simply call the Remington® Service Centre in your region. This warranty is offered over and above your normal statutory rights. The warranty shall apply in all countries in which our product was sold via an authorised dealer. This warranty does not include shaving heads / foils and the cutters which are consumable parts. Also, not covered is damage to the product by accident or misuse, abuse, alteration to the product or use inconsistent with the technical and/or safety instructions required. This warranty shall not apply if the product has been dismantled or repaired by a person not authorised by us.