
GXP280 - VoIP Phone GRANDSTREAM - Free user manual and instructions
Find the device manual for free GXP280 GRANDSTREAM in PDF.

| Product Type | Entry-level SIP VoIP Phone |
| Brand | GRANDSTREAM |
| Model | GXP280 |
| Display | LCD Screen |
| Programmable Buttons | 3 |
| Power Supply | 5V DC Power Adapter Included |
| Network Connectivity | 1 LAN RJ-45 port, 1 PC RJ-45 port (integrated switch) |
| Handset Port | RJ-9 |
| Headset Port | RJ-9 (handset) |
| Protocol | SIP |
| Main Features | VoIP calls, superior audio quality, automated provisioning, security, SIP interoperability |
| Configuration | Via built-in web server or keypad menu (DHCP or static IP) |
| Dimensions (approx.) | 200 x 180 x 80 mm |
| Weight (approx.) | 0.5 kg |
| Package Contents | Phone, handset, 5V power adapter, Ethernet cable, phone cable, phone stand, quick installation guide |
| Mounting | Desktop (stand) or wall-mountable (wall bracket) |
| Safety | Do not restart during firmware update; use only the provided power adapter |
| Maintenance | Clean with a soft, dry cloth; avoid any liquid |
| Spare Parts | Power adapter, cables, handset (available separately) |
| Repairability | Limited; contact technical support for repairs |
Frequently Asked Questions - GXP280 GRANDSTREAM
User questions about GXP280 GRANDSTREAM
0 question about this device. Answer the ones you know or ask your own.
Ask a new question about this device
Download the instructions for your VoIP Phone in PDF format for free! Find your manual GXP280 - GRANDSTREAM and take your electronic device back in hand. On this page are published all the documents necessary for the use of your device. GXP280 by GRANDSTREAM.
USER MANUAL GXP280 GRANDSTREAM
Grandstream Networks, Inc.
1297 Beacon Street, 2nd Floor
Brookline, MA 02446. USA
Tel: +1 (617) 566-9300
The GXP280/GXP285 is not pre-configured to support or carry emergency calls to any type of hospital, law enforcement agency, medical care unit ("Emergency Service(s)") or any other kind of Emergency Service. You must make additional arrangements to access Emergency Services. It is Your responsibility to purchase SIP-compliant Internet telephone service, properly configure the GXP280/GXP285 to use that service, and periodically test your configuration to confirm that it works as You expect. If You do not do so, it is Your responsibility to purchase traditional wireless or landline telephone services to access Emergency Services.
GRANDSTREAM DOES NOT PROVIDE CONNECTIONS TO EMERGENCY SERVICES VIA THE GXP280/GXP285. NEITHER GRANDSTREAM NOR ITS OFFICERS, EMPLOYEES OR AFFILIATES MAY BE HELD LIABLE FOR ANY CLAIM, DAMAGE, OR LOSS, AND YOU HEREBY WAIVE ANY AND ALL SUCH CLAIMS OR CAUSES OF ACTION ARISING FROM OR RELATING TO YOUR INABILITY TO USE THE GXP280/ GXP285 TO CONTACT EMERGENCY SERVICES, AND YOUR FAILURE TO MAKE ADDITIONAL ARRANGEMENTS TO ACCESS EMERGENCY SERVICES IN ACCORDANCE WITH THE IMMEDIATELY PRECEDING PARAGRAPH.
PRECAUTIONS:
WARNING: Please DO NOT power cycle the GXP280/GXP285 when the LED lights are flashing during system boot up or firmware upgrade. You may corrupt firmware images and cause the unit to malfunction.
WARNING: Use only the power adapter included in the GXP280/GXP285 package. Using an alternative non-qualified power adapter may possibly damage the unit.
OVERVIEW
The GXP280/GXP285 is a next generation entry-level SIP phone that features an LCD screen and 3 softkeys. The GXP280/GXP285 delivers superior audio quality, comprehensive telephony features, automated provisioning, security protection for privacy and broad interoperability with most 3rd party SIP devices and leading SIP telephony platforms. It is a very cost-effective choice for any business needing a feature rich basic IP phone.
PACKAGE CONTENTS:

1 X GXP280/GXP285
Main Case

1 X Handset
1X5VPowerAdapter

1x Ethernet Cable

1 X Phone Cord

1 X Phone Stand

1 X Quick Install Guide
PHONE SETUP:
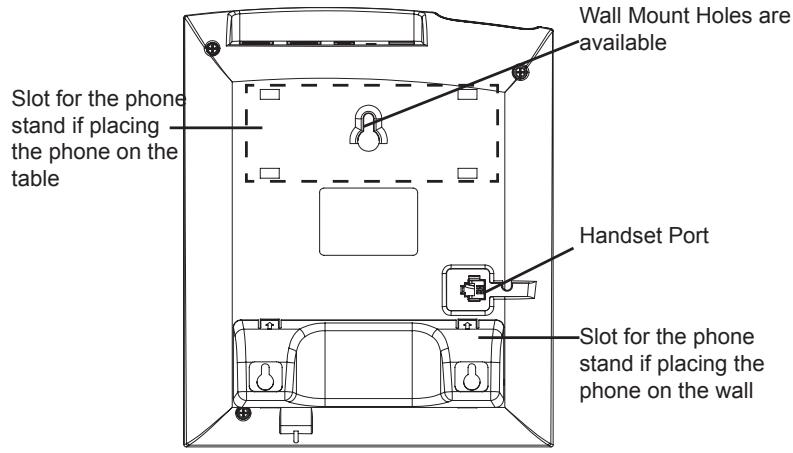
Installing the phone (Wall Mount):
- Attach the phone stand to the bottom of the phone as wall mount spacers.
- Attach the phone to the wall via the wall mount hole.
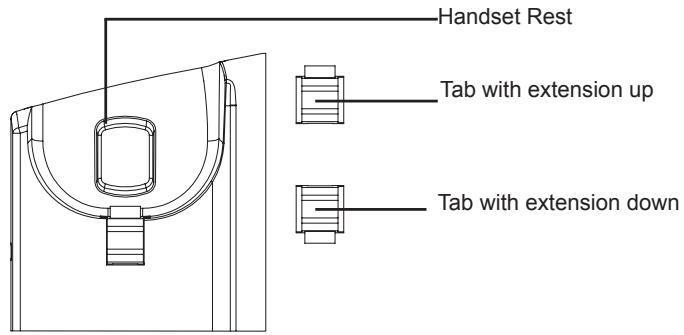
- Pull out the tab on from the handset cradle. (See figure below)
- Rotate the tab and plug it back into the slot with the extension up to hold the headset while the phone is mounted on the wall. (See figure below)
Installing the phone (Phone Stand):
For installing the phone on the table with the phone stand, attach the phone stand to the bottom of the phone where there is a slot for the phone stand. (Upper half, bottom part).
CONNECTING THE PHONE:
Refer to the illustration below when following the setup instructions.
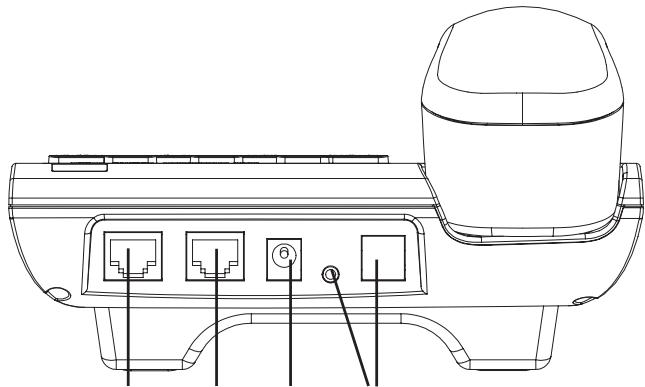
PC Port LAN Port Power Headset Port
To setup the GXP280/GXP285, follow the steps below:
- Connect the handset and main phone case with the phone cord.
- Connect the LAN port of the phone to the RJ-45 socket of a hub/switch or a router (LAN side of the router) using the Ethernet cable.
- Connect the 5V DC output plug to the power jack on the phone; plug the power adapter into an electrical outlet. (GXP280 only)
- The LCD will display provisioning or firmware upgrade information. Before continuing, please wait for the date/time display to show up.
- Using the phone embedded web server or keypad configuration menu, you can further configure the phone using either a static IP or DHCP.
Tips For Using the Keypad:
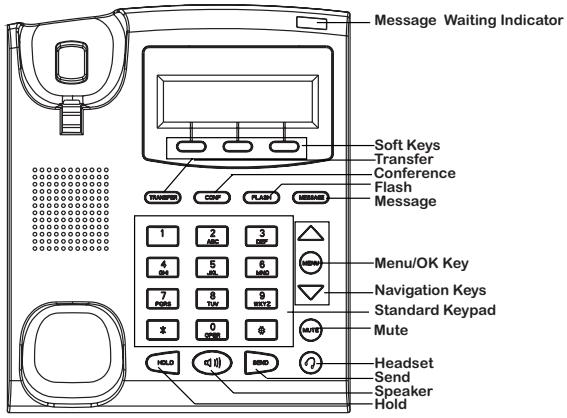
- To access the MENU, press the round MENU button.
- Navigate the menu by using the UP/DOWN and LEFT/RIGHT buttons.
- Press the round MENU button to confirm a menu selection.
- Delete an entry by pressing the MUTE button.
- The phone automatically exits MENU mode when there is an incoming call, the phone goes off-hook, or when the MENU mode is left idle for 20 seconds.
PHONE CONFIGURATION:
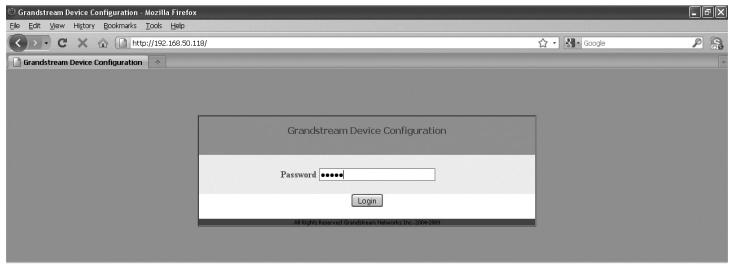
Configure the GXP280/GXP285 using a Web Browser:
- Ensure your phone is powered up and connected to the Internet.
- Press MENU button to go into menu of the phone.
- Press the "down" arrow button to "Status" and press MENU button to see the IP address.
- Type the phone's IP address in your PC browser.
- The default administrator password is "admin"; the default end-user password is "123".
Configure the GXP280/GXP285 using the Keypad:
- Make sure the phone is idle
- Press the "MENU" button to access the keypad MENU to configure the phone.
- Select MENU-> Config, to configure settings for SIP Proxy, Outbound Proxy, SIP User ID, SIP Auth ID, SIP Password.
- Follow MENU options to configure the basic features of the phone – for example: the IP address if using a static IP. For details, please check GXP Series User Manual.
- Please contact your ITSP (Internet Telephony Service Provider) for additional settings that may be necessary to configure the phone.
Note: For the detailed user manual, please download from: http://www.grandstream.com/support/gxp_series/general/gxp_support.html

1 X Unidad Principal

1X Auricular