RTG64FBIN - Cooktop ROSIERES - Free user manual and instructions
Find the device manual for free RTG64FBIN ROSIERES in PDF.
| Product type | Built-in gas hob |
| Brand | ROSIERES |
| Model | RTG64FBIN |
| Dimensions (W x D) | 595 x 510 mm |
| Number of burners | 4 |
| Burner types | 1 auxiliary (A), 1 semi-rapid (SR), 1 rapid (R), 1 quadruple crown (QC) |
| Total gas power | 9.25 kW |
| Electrical supply | 220-240 V, 50/60 Hz, 15 W |
| Compatible gas type | G20 (methane, 20 mbar), G30/G31 (butane/propane, 28-30 mbar) |
| Ignition | Integrated electronic |
| Safety | Anti-extinction thermocouple (automatic gas shut-off) |
| Installation class | 3 (built-in) |
| Hob material | Stainless steel |
| Care and cleaning | Clean with soapy water or non-corrosive detergent; do not use steam cleaner or abrasive products |
| Spare parts available | Injectors for different gases, grates, burner caps, taps |
| Repairability | Replacement of injectors and taps possible by qualified professional |
| Warranty | Manufacturer disclaims any liability in case of non-professional installation |
Frequently Asked Questions - RTG64FBIN ROSIERES
User questions about RTG64FBIN ROSIERES
0 question about this device. Answer the ones you know or ask your own.
Ask a new question about this device
Download the instructions for your Cooktop in PDF format for free! Find your manual RTG64FBIN - ROSIERES and take your electronic device back in hand. On this page are published all the documents necessary for the use of your device. RTG64FBIN by ROSIERES.
USER MANUAL RTG64FBIN ROSIERES
BAPOUHbIE NOBEPXHOCTN
HCTPYKlIy IOnb3OBATEJIa RU
CONTENU
FR
- Installation 04
1.1 Encastrement 04
1.2. Characteristiques Requires 04
2.1.Raccordement Electrique 04
2.2.Raccordement Gaz 04
2.3. Adapter La Table A Differents Types De Gaz 05
2.4. Reguler La Flamme Au Minimum 05 - Utilisation De La Table 05
3.1. Using The Gas Burner 05 - Maintenance Et Entretien 06
- Assistance Technique 06
- Protection De L'environnement 06
CONTENT
GB-IE
- Instructions For The Installer 07
1.1. Building In 07
1.2. Suitable Location 07 - Electrical Connection (For U.K. Only) 07
2.1. Electrical Connection 07
2.2. Gas Connection (For U.K. Only) 07
2.3.Adapting The Hob To Different Types Of Gas 08
2.4.Regulating The Minimum Flame 08
3.Use Of Hob-User Instructions 08
3.1. Using The Gas Burner 08 - Maintenance and Cleaning 09
- Aftercare 09
- Protection Of The Environment 09
COIDEPXAHAHE
RU
1.Инструкци no BbINONHeHNo yctaHOBKn 10
1.1.BcTpaIbAeMbIe BapOChIe NOBepXHocTn 10
1.2.Bb6op MeCTa dIy ycTaHOBKn BapOCHN IOBepxHocTn 10
2.ПодклоченkeКэльсторети(TолькоДяВелнобрпани) 10
2.1.ПодкlioчениКэл ektrpoсети 10
2.2.Подклоченke Клини ra3ochna6жени (ToIbko ДяВeIiko6pntahnii) 10
2.3.AdaTnTaunBapOuHNoIIOBepXHocTnHaIpyrHe TINbIra3a 11
2.4.PerynilpoBkaMinHmAlbHoroPnAmEHN 11
3.Инструкци по Зкплуаци варочи NOBepxHocTn 11
3.1 nCnoJIb3OBAHnE ra3OBoKoHΦOpKn 11
4.ObcIyXmbHne n Chstka 12
5.Послpenpoаджhoeобсуньане 12
6. 3aunta okpykaioe cpebl
Gas Type Tables
13-14-15
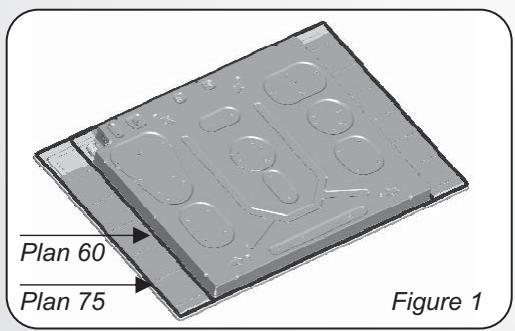
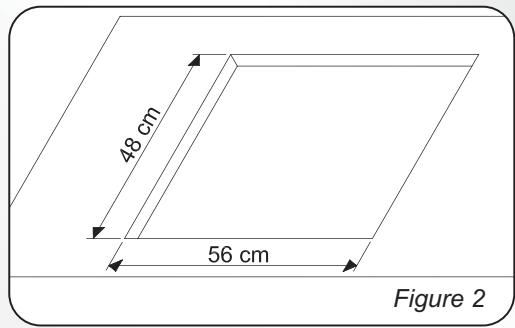
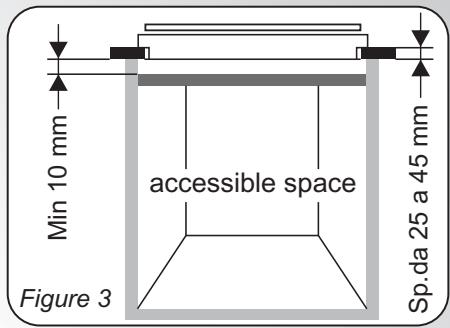
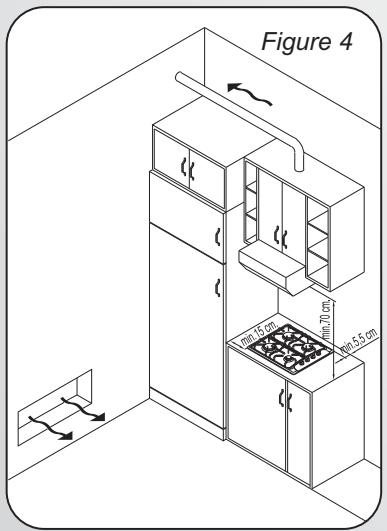
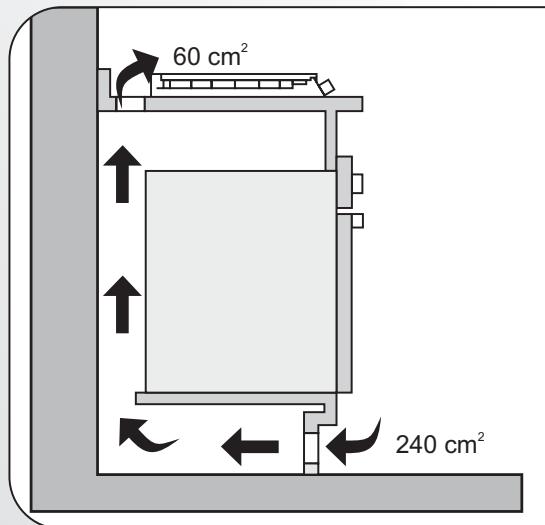
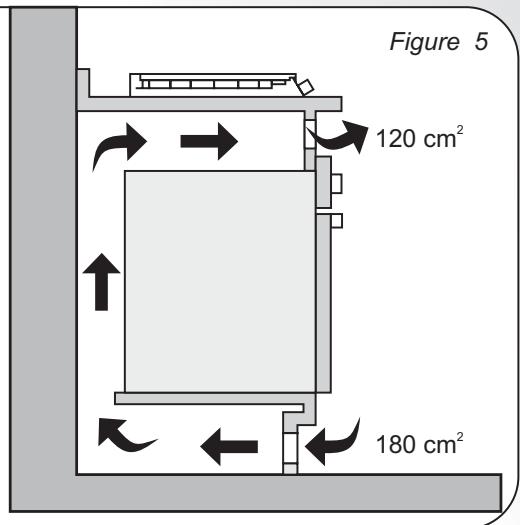
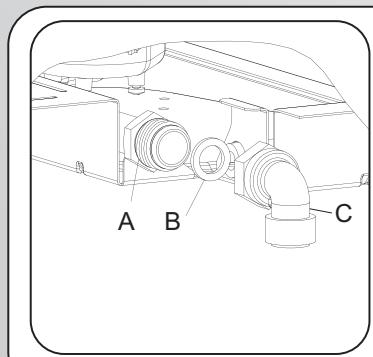
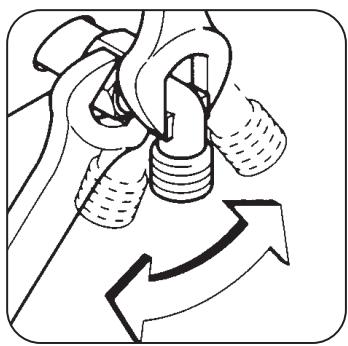
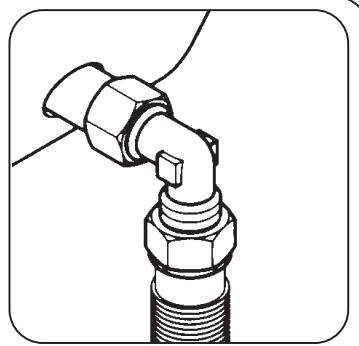
Figure 6
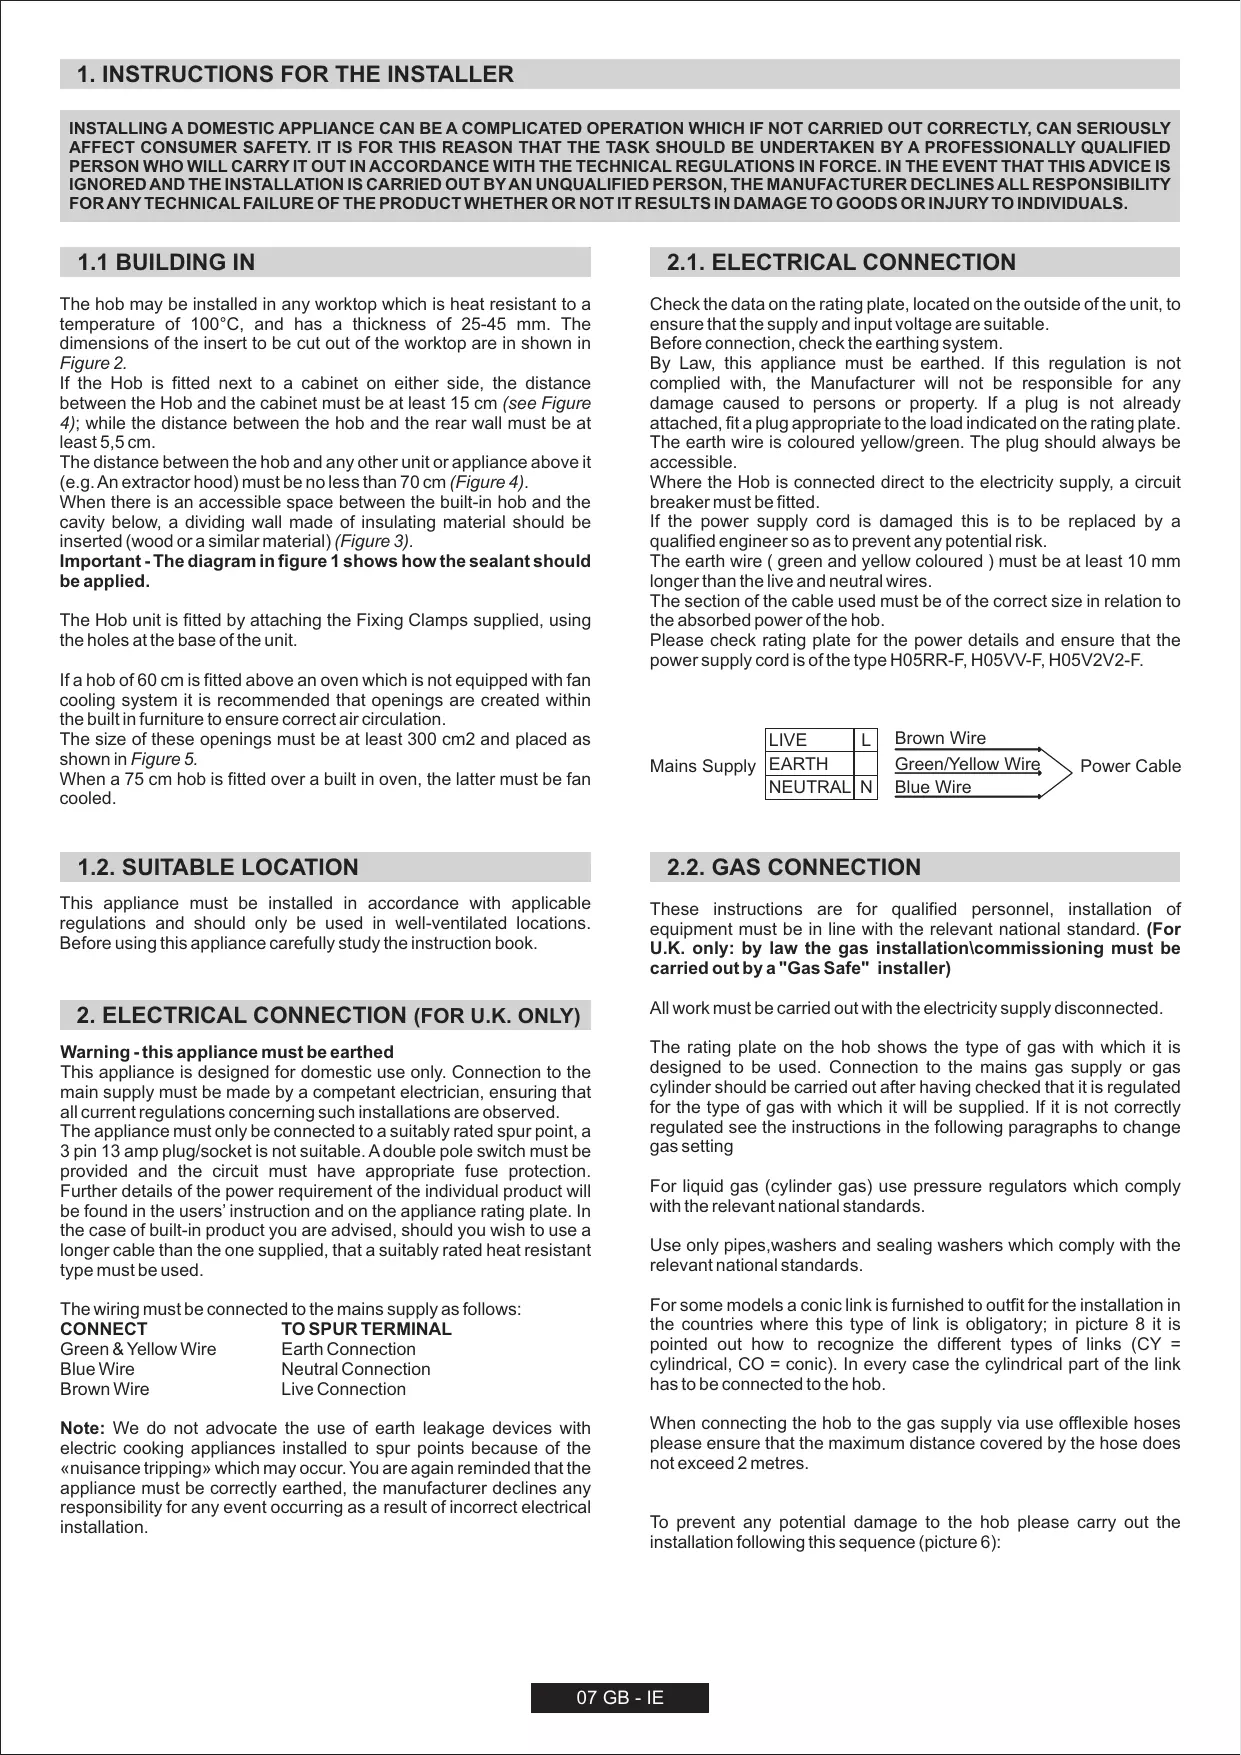
1. INSTALLATION
The hob may be installed in any worktop which is heat resistant to a temperature of 100^ , and has a thickness of 25-45 mm. The dimensions of the insert to be cut out of the worktop are in shown in Figure 2.
If the Hob is fitted next to a cabinet on either side, the distance between the Hob and the cabinet must be at least 15 cm (see Figure 4); while the distance between the hob and the rear wall must be at least 5,5 cm.
The distance between the hob and any other unit or appliance above it (e.g. An extractor hood) must be no less than 70~cm (Figure 4).
When there is an accessible space between the built-in hob and the cavity below, a dividing wall made of insulating material should be inserted (wood or a similar material) (Figure 3).
Important - The diagram in figure 1 shows how the sealant should be applied.
The Hob unit is fitted by attaching the Fixing Clamps supplied, using the holes at the base of the unit.
If a hob of 60~cm is fitted above an oven which is not equipped with fan cooling system it is recommended that openings are created within the built in furniture to ensure correct air circulation.
The size of these openings must be at least 300~cm^2 and placed as shown in Figure 5.
When a 75 cm hob is fitted over a built in oven, the latter must be fan cooled.
1.2. SUITABLE LOCATION
This appliance must be installed in accordance with applicable regulations and should only be used in well-ventilated locations. Before using this appliance carefully study the instruction book.
2. ELECTRICAL CONNECTION (FOR U.K. ONLY)
Warning - this appliance must be earthed
This appliance is designed for domestic use only. Connection to the main supply must be made by a competent electrician, ensuring that all current regulations concerning such installations are observed.
The appliance must only be connected to a suitably rated spur point, a 3 pin 13 amp plug/socket is not suitable. A double pole switch must be provided and the circuit must have appropriate fuse protection. Further details of the power requirement of the individual product will be found in the users' instruction and on the appliance rating plate. In the case of built-in product you are advised, should you wish to use a longer cable than the one supplied, that a suitably rated heat resistant type must be used.
The wiring must be connected to the mains supply as follows: CONNECT TO SPUR TERMINAL
Green & Yellow Wire
Blue Wire
Brown Wire
Earth Connection
Neutral Connection
Live Connection
Note: We do not advocate the use of earth leakage devices with electric cooking appliances installed to spur points because of the «nuisance tripping» which may occur. You are again reminded that the appliance must be correctly earthed, the manufacturer declines any responsibility for any event occurring as a result of incorrect electrical installation.
2.1. ELECTRICAL CONNECTION
Check the data on the rating plate, located on the outside of the unit, to ensure that the supply and input voltage are suitable.
Before connection, check the earthing system.
By Law, this appliance must be earthed. If this regulation is not complied with, the Manufacturer will not be responsible for any damage caused to persons or property. If a plug is not already attached, fit a plug appropriate to the load indicated on the rating plate. The earth wire is coloured yellow/green. The plug should always be accessible.
Where the Hob is connected direct to the electricity supply, a circuit breaker must be fitted.
If the power supply cord is damaged this is to be replaced by a qualified engineer so as to prevent any potential risk.
The earth wire ( green and yellow coloured ) must be at least 10 mm longer than the live and neutral wires.
The section of the cable used must be of the correct size in relation to the absorbed power of the hob.
Please check rating plate for the power details and ensure that the power supply cord is of the type H05RR-F, H05VV-F, H05V2V2-F.
| LIVE | L | Brown Wire |
| EARTH | Green/Yellow Wire | |
| NEUTRAL | N | Blue Wire |
2.2. GAS CONNECTION
These instructions are for qualified personnel, installation of equipment must be in line with the relevant national standard. (For U.K. only: by law the gas installation\commissioning must be carried out by a "Gas Safe" installer)
All work must be carried out with the electricity supply disconnected.
The rating plate on the hob shows the type of gas with which it is designed to be used. Connection to the mains gas supply or gas cylinder should be carried out after having checked that it is regulated for the type of gas with which it will be supplied. If it is not correctly regulated see the instructions in the following paragraphs to change gas setting
For liquid gas (cylinder gas) use pressure regulators which comply with the relevant national standards.
Use only pipes, washers and sealing washers which comply with the relevant national standards.
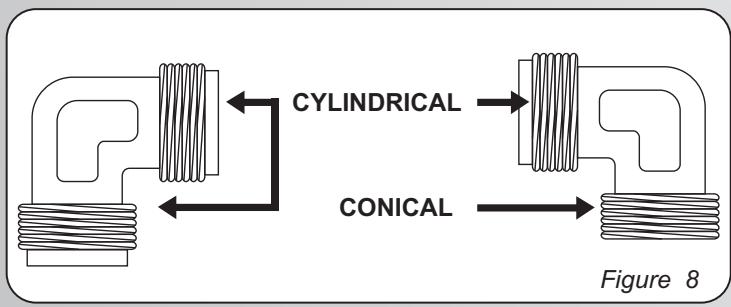
For some models a conic link is furnished to outfit for the installation in the countries where this type of link is obligatory; in picture 8 it is pointed out how to recognize the different types of links (CY = cylindrical, CO = conic). In every case the cylindrical part of the link has to be connected to the hob.
When connecting the hob to the gas supply via use offlexible hoses please ensure that the maximum distance covered by the hose does not exceed 2 metres.
To prevent any potential damage to the hob please carry out the installation following this sequence (picture 6):
1)As illustrated, assemble parts in sequence:
A: 1/2 Male Adaptor Cylindrical
B:1/2 Seal
C: 1/2 Female Gas Adaptor Conical-Cylindrical or Cylindrical-Cylindrical
2) Tighten the joints with the spanner, remembering to twist the pipes into position.
3)Attach fitting C to mains gas supply using rigid copper pipe or flexible steel pipe.
IMPORTANT: carry out a final check for leaks on the pipe connections using a soapy solution. NEVER USE A FLAME. Also, make sure that the flexible pipe cannot come into contact with a moving part of the cabinet (eg.adrawer) and that it is not situated where it could be damaged.
Warning: If gas can be smelt in the vicinity of this appliance turn off the gas supply to the appliance and call the engineer directly. Do not search for a leak with a naked flame.
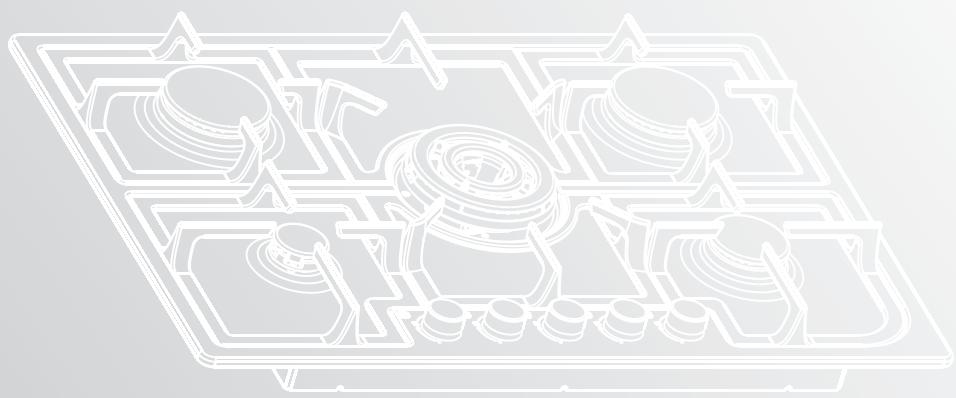
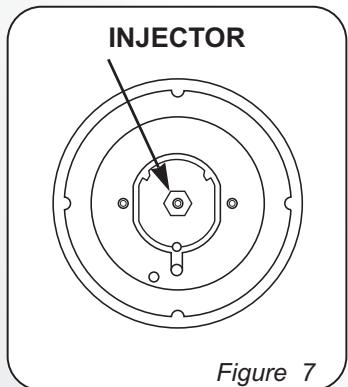
2.3. ADAPTING THE HOB TO DIFFERENT TYPES OF GAS
To adapt the Hob for use with different types of gas, carry out the following instructions:
- remove the grids and burners
- insert on hexagonal spanner (7 mm) into the burner support (Figure 7)
- Unscrew the injector and replace it with one suitable for the gas to be used (see gas type table)
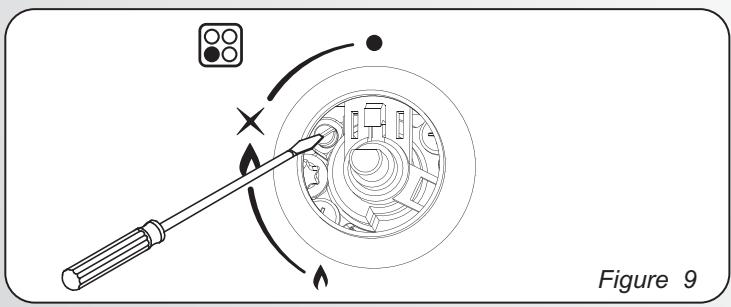
2.4. REGULATING THE MINIMUM FLAME
After lighting the burners, turn the control knob to the minimum setting and then remove the knob (this can easily be removed by applying gentle pressure).
Using a small «Terminal» type screwdriver the regulating screw can be adjusted as in Figure 9. Turning the screw clockwise reduces the gas flow, whilst turning it anticlockwise increases the flow – Use this adjustment to obtain a flame of approximately 3 to 4mm in length and then replace the control knob.
When the gas supply available is LPG - the screw to set the idle flame must be turned (clockwise) to the end stop.
When you have carried out the new gas regulation, replace the old gas rating plate on your appliance with one (supplied with hob) suitable for the type of gas for which it has been regulated.
3. USE OF HOB - USER INSTRUCTIONS
This appliance must only be used for the purpose for which it is intended, domestic cooking, and any other use will be considered improper and could therefore be dangerous. The Manufacturer will not be responsible for any damage or loss resulting from improper use.
This appliance is not intended for use by persons (including children) with reduced physical, sensory or mental capabilities, or lack of experience and knowledge, unless they have been given supervision or instruction concerning use of the appliance by a person responsible for their safety.
Children should be supervised to ensure that they do not play with the appliance.
To ignite the burners, place a lighted taper close to the burner, press in and turn the control knob anti-clockwise.
If the burners have not been used for a couple of days, wait for a few seconds before lighting the burner, this will allow any air present in the pipes to escape.
For appliances fitted with electronic ignition carry out the following:
-
push in and turn the knob anticlockwise to the ignition symbol.
-
ignite the burner by pressing the sparker button.
For hobs fitted with automatic ignition simply push in and turn the knob to the ignition symbol.
The ignition system will continue to generate sparks as long as the control knob is being pressed.
If the burner has not ignited within 5 seconds, turn the knob to the 0 position and repeat the operation.
For models fitted with a safety tap (which cuts-off the flow of gas if the flame is accidentally extinguished) the burners are ignited and described above, but care must be taken.
Prior to switching on the gas hob ensure that the burners and burner caps are correctly placed within their position.
GENERAL ADVISE
For best results, use cooking vessels with a flat surface. The size of the surface should match the gas burner side as follows. Table A.
Table A
| Burner Type | Ø pan / pot (cm) | |
| AUX | Auxiliary Burner | 12 - 18 |
| SR | Semi Rapid Burner | 18 - 24 |
| R | Rapid Burner | 24 - 26 |
| UR | Ultra Rapid Burner | 24 - 28 |
| QC | Double Ring Burner | 24 - 28 |
For smaller containers the gas burner should be regulated so that the flame does not overlap the base of the pan. Vessels with a concave or convex base should not be used.
WARNING: If a flame is accidentally extinguished, turn the knob to the off position and do not attempt to re-ignite if for at least 1 minute.
If over the years the gas taps become stiff to turn it is necessary to lubricate them.
Such operation must be carried out only by qualified Service Engineers.
4. MAINTENANCE AND CLEANING
Before cleaning the hob, ensure the appliance has cooled down. Remove the plug from the socket or (if connected directly) switch off the electricity supply.
Never use abrasives, corrosive detergents, bleaching agents or acids. Avoid any acid or alkaline substances (lemon, juice, vinegar etc.) on the enamelled, varnished or stainless steel sections.
"WARNING" - Do not use a steam cleaner to clean the hob.
When cleaning the enamelled, varnished or chrome sections, use warm soapy water or a non caustic detergent. For stainless steel use an appropriate cleaning solution.
The burners can be cleaned with soapy water. To restore their original shine, use a household stainless steel cleaner. After cleaning, dry the burners and replace.
It is important the Burners are replaced correctly.
Chromed grids and burners
Chromed grids and burners have a tendency to discolour with use. This does not jeopardize the functionality of the hob.
Our After Sales Service Centre can provide spare parts if required.
5. AFTERCARE
Before calling out a Service Engineer please check the following:
- that the plug is correctly inserted and fused;
- that the gas supply is not faulty.
If the fault cannot be detected:
Switch off the appliance and call the After Service Centre. DO NOT TAMPER WITH THE APPLIANCE.
6. PROTECTION OF THE ENVIRONMENT
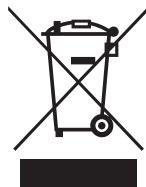
This appliance is marked according to the European directive 2002/96/EC on Waste Electrical and Electronic Equipment (WEEE).
By ensuring this product is disposed of correctly, you will help prevent potential negative consequences for the environment and human health, which could otherwise be caused by inappropriate waste handling of this product.
The symbol on the product indicates that this product may not be treated as household waste. Instead it shall be handed over to the applicable collection point for the recycling of electrical and electronic equipment.
Disposal must be carried out in accordance with local environmental regulations for waste disposal.
For more detailed information about treatment, recovery and recycling of this product, please contact your local city office, your household waste disposal service or the shop where you purchased the product.
Declaration of compliance: This equipment, in the parts intended to come into contact with food, complies with the regulations laid down in EEC directives 89/109.
CE Appliance complies with European Directives 73/23/EEC and 89/336/EEC, replaced by 2006/95/EC and 2004/108/EC, and subsequent amendments.
The Manufacturer will not be responsible for any inaccuracy resulting from printing or transcript errors contained in this brochure. We reserve the right to carry out modifications to products as required, including the interests of consumption, without prejudice to the characteristics relating to safety or function.
Table 1
| BUILT IN HOBS | ||||
| Burner | 1 | 1 | 2 | 3 |
| 4 gas QC / R / SR / AUX | 4 gas UR / R / SR / AUX | 5 gas QC / 2R / SR / AUX | 4 gas QC / R / SR / AUX | |
| Type / reference | S67 / HBGPX | S67 / HBGPX | S67 / HBGPX | S67 / HBGPX |
| Flame failure device | YES | YES | YES | YES |
| Auxiliary burner ( AUX Ø 50 mm) | 1 | 1 | 1 | 1 |
| Double ring burner ( QC Ø 135 mm) | 1 | - | 1 | 1 |
| Ultra rapid burner ( UR Ø 110 mm) | - | 1 | - | - |
| Semirapid burner ( SR Ø 75 mm) | 1 | 1 | 1 | 1 |
| Rapid burner ( R Ø 100 mm) | 1 | 1 | 2 | 1 |
| Installed Gas Type / Power: | ||||
| Power | 9.25 kW | 8.75 kW | 11.75 kW | 9.25 kW |
| G 20/20 mbar (methane) | 881 L/h | 833 L/h | 1119 L/h | 881 L/h |
| G 30/28-30 mbar (LPG) | 673 L/h | 636 L/h | 854 L/h | 673 L/h |
| Installation Class | 3 | 3 | 3 | 3 |
| Voltage / Frequency V / Hz | 220-240 V / 50-60 Hz | 220-240 V / 50-60 Hz | 220-240 V / 50-60 Hz | 220-240 V / 50-60 Hz |
| Electrical input power | 15 W | 15 W | 15 W | 15 W |
| Electric ignition | YES | YES | YES | YES |
| Product dimension | 595 x 510 | 595 x 510 | 745 x 510 | 745 x 510 |
This appliance has been designed for non-professional, i.e. domestic, use.
1.ИHCTPYKUINIIO BbIINOJIHEHNUO YCTAHOBKN
UCTAHOBKA BbITOBOY TEXHKN RBJTETC CLOXHOI PABOTOH, HEPPABINbHOE BbIOJIHEHNE KOTOPOI MOKET OTPUATEJIbHO CKA3ATbCS HA B630NACHOCTNI POB3OBATEJ. NTOI PPUNHE YCTAHOBKA Bb1TOBOY TEXHKN DOJNXBA BblONHtBcR BbICOKOBALINPHUPOBAHHBIMC NCEUANCTAMN, KOTOPBIE BbIIONHRT YCTAHOBKY COBIOJEHEM BCEX DEIECTBYOUX INPABNJ I HOPM. B TOM CUYAE, ECJN 3TO PINEOCTEPEXEHNE BYET PONIHOPINPOBAHNOY AETB BYIOLHENA JINUCOM, HE IMEQUIM IOCTATOCHOH KBALINPHKAUM, PON3BOJNTENBE HE BYET PPINHMATb HNKAKNX PIPETEH3N OTHOCNTJIbHO BbIXODA OBOPUDOBAHN I3 CTPOY HAHECEHHORI PPN 3TOM USEPBMAUMUECTBYIIN 3DOPOBBIOJIOJE.
1.1.BCTPANBAEMbIE BAPOUHbIE IOBEPXHOCTN
Bapouhna nobepxhoctb moKet yctahabnBaTcRa Ha IIO6o pa6oey nobepxHocTH KXoHHOro CTOna, KOtopa BbldepxNBAe HArpeB Do Temnepatpyb 100 C, nIMeet ToIunHy O T 25 do 40 MM. Pa3Mpebl OTBepCTn, KOTOpoe DoJIoHOb 6blb Bblpe3aHO B pa6oey nobepxHoCTN KXoHHOro CTOna, NOKa3aHbHa npC.2.
EcnB BapOuHnA NOBepxHocTb yCTaHabNtBaetc TaK, YTO NO oBe ee cTOpOHbI pacONanarOToTc WkaΦbl, To paCtOTHne Mekdy BapOuHnIOBOPxHO bIO n WkaΦom DoJnxHO 6blTb He MeHbIe 15 cm (CM. pnc. 4), a pacCToHnE Mekdy BapOuHnIOBepxHOctbIO n pacONIoXeHHo C3aDi CTeHoi DoJnxHO 6blTb He MeHbIe 5,5 cm.
PacctoarHne MeJxdu BapOCHNo NOBepXHOCTbIO u DpyrIM 3NeKTPOnpN6OpOM (HaNPImep, BbITRAHNO KOJIInaK) DOINKHO 6bITb He MeHbSe 70 cm (cm. pnc. 4).
Ecni noiB aBoUHNo IOBepxHOCTbIO UMeETcR CBO6OdHoe IpocTpaHCTBO, TOniB aBoUHNO IOBepxHOCTbIO HxKHO UCTaHOBnTb pa3JeNITeBHyIO naHeJIb, N3rTOBJIeHHyIO IN3 TeIION3OJNAUHO HmATEpHaIa (HaNPIMep, IN3 DepeBa) (cm. pnc. 3).
Baxha HOpmaun Ha pnc. 1 nokaaso, KaKaHaocntc repmetnk
Bapouhna nobepxhoctb kpeiNTcra n omoIbIO qKcnpyuOux 3aJIMOB, KOtOpBle BCTabJIyOTcBA OTBepCTnA, paNIOXKeHHbIe Ha OCHOBaHm BapouHNO nobepxHOCTn.
EcnI Bapouhna nobepxhoctb 60 cm yctanabnBaetcna Had IyXOBKO, B KOTOPH HET CNTEmbl OXnAaJdHnC B EHTINrAToPOM, TO BO BCTpAmBaEMOJI MeBEN pekomeHnyeTcCdEnaTb OTBepCTnI DnI oBeCneHnHopMaIbHOUzKpyAunu Bo3Dyxa.
Плоцадь STINx OTBepCTN DoJnxHa 6bITb He MeHbIe 300 cm2 n 3TN OTBepCTN DoJnxHbI paCnOlaRaTbCra TAK, KaK pOKa3aHo Ha pnc.5.
EcniB aBoOpHaia NoBepxHocTb 75 cm KpeiNTcHa dIyXOBKo,TO B DyXOBKe DoJxHa 6bItb CnCTema OXJaXeHnC BeHTnIaTOpOM.
1.2. BbIbOP MECTAДЛЯ UCTAHOBKNBAPOUHOJ NOBEPXHOCTN
Даннь 6ытобо 3л ekрпорбор должен устаньився в COOTBETCTBи C DeiCTByUOuMIMn npabunamm HOpMaMn DЯ 6ытOBbIX npD6OBOPи IOnJENK 3KcPnyaTnpOBAtbc TOnbKO B XopoWo BEHTINNpyeMbI nOmeueHnx. Перд Tem Кak писуNTь K 3KcPnyatauMn DAHNH BapOCHN NOBepxHOCTHn BHIMATEbHO pOQTte INHCTpyKUIO NO 3KcPnyaTaCIn.
2. ПОДКЛЮЧЕНЕ KЭЛЕКТPOCETN (TOЛьКО ДЯ BEЛИКOBРТAHИ)
BHHMaHHe DaHHbI 3NeKTpOpi6Op DoJXeH 6bITb 3a3EmJeH
Danhbl 3neKtpo np6op npedHa3haueh Tolbko dny 6bIToBbIX npimeHemn. IoknOyeHme K 3neKtpocTeN DOxHO BblOnHrTaBcTolbKO ONbTHbIM 3neKtpuKOM CcoBIOdeHHeM BCex DeIeCTByUOUX npNBIN HOPM 3neKtpo6e3oNaChOCTn.
Danhbl 3neKtpoepn6op DOnJxH NODKnIOUaTbC K OTBcTBNEHIO 3NeKTPocTeN C DoCTaTOOH HArpy3OuHO CNOC6HObTbIO. 3-NTbIpbKOBaB BnLkA/p03eTka Ha 13 A He NDOXoIN Tnla DAnHORo NODKNIOHEnH. B INHH 3NeKTPoPONtAHn I DOJxH 6bITb YcTAHOBEN DBYXNOIIOCHB BbIKOUPaTeNb, IN CEb DOnJHs KaBb 6bITb 3aunIeHa C NMOUbI NOIABKOro PpeOxoHAnTeN COOTBeCTByUcero HOMINHAp. BoJee NIOpO6Ha HNΦOpMaUN OTHOCHTeBHO Tpe6oBaHn, PpeBraBnEMyK 3NeKTPoPONtAHn DnI KOnKpeTHoro IN3dEInr, PpeCTabNEHa B INHCTpyKUn No EKcnIyatauN IN B NaCnpOPTHo TAbNueKe, ZAkpeNIIeHNo HA IN3dEInn. EcIn DnIHn Ka6en NITaHn, NOCTaBnEMoro B KOMNKeTE C BapOuHO NOBepxHOCTbU, ABnEETcN HeOcTaTOOH, TO CnDeyEt NcONlb3OBA Tb BoJee DnIHbN TeNIOCTOKN Ka6eN PbTANHc N DOCTaTOOH HArpy3OuHO cnoCO6HoCTbIO. POnKIOUeHne K 3NeKTPocTeN DoJxHO 6bITb BbINONHeO cJeDuOUM o6pa30m:
IPODCOEHNHTE
Ceyehne npoBODHnKOB Ka6eJIy NITaHnI DOJXHO COOTBeTCTByET MOUHOCTN,NOTpe6bIReMoB BApOuHOH NOBepxHOCTbIO.
PpOBepbTe 3NaueHHe MoUHocTn, NOTpe6IeMOn 3JIeKTPoPnpOpOM, yKa3aHHoe B nacopTpHO T6NlUKe, a TaKke npOBepbTe, yTo nCNoB3yeTcKa6eJb NtTaHnTuHa HO5RR-F, H05VV-F uNt HO5V2V-F.
He pa3peshaTe TETaM UrgaTb C3JeKtponpnp6opom.
3.1 NcIIOJIb3OBAHNE rA3OBOKOHΦOPKN
YTo6bI 3aKeey KOHΦopky, NOHecnTe K Hei 3aXKeHHyO CnUky, HaxMnte Ha pyuKy peYJInpOBKn BbICOTbI PJIaMeHN, INOBepHnte ee npOTNB YacOBoB CTpeKN.
EcnI KOHΦOpKn He nCnOJIb3OBaIIncB TeueHne DByx IJIn 60onee DHei, To npexKeJe yem 3aJeey KoHΦOpKy IIOJoxNITe HECKoJIbKO CekyHdIgTOrO, YTO6bl N3 Tpy6OK BblIeN BO3dyX.
YTo6bI 3aKeey KOHΦOpky BapOCHNo NOBepXHOCTN, CHa6xHeHHyUcTPOiCBVOM 3JIeKTPoONJxNIGra, BbIIOHNITE CJIeDyUOuNE ONEpaCIN:
-
HaxMMTE Ha puyykepyeIyIINPOBKN BbICOTbI PIIaMeHN I NOBepHNTe ee npOTNB YacOBoN CTpeKN B NIOJXeHne, O6O3HaueHHoe NODxNra.
-
3axgnte KOHcOpky C NOMOuHn HaxaTn KHOKN 3JeKTPoNdoXnIra.
EcInBapOuHnaIOBepxHocb Cha6KeHa ABTOMaTHueCKM3NeKtpoNoJXIGROM, npocTo HaxMMte Ha puKy peRyIINPOBKN BbICOTbI pIAmEHn UyCTAHOBtE ee B NOJoxHeME, 0603NaehHOe 3NaKOM POnJNIGra. CnCTema 3NeKtpoNoJXIGra 6yDet nOCToHHReHepinPoBaT NCKpbl, Do Tex nop, NOKa puKAppeRyIINPOBKN pIAmEHn 6yDet HAXODITBCB H HaxATOM NoJoxHeHN.
EcnKoHΦopka He 3aRopaetcB TeueHne 5 cekyH, yctahOBnTe pyky peYIpOBKn B nOIOXeHne O, n NobTopnte onncanHybIwe opepaIIO.
B MoJeIax, Cha6XeHHbIX 3aUHTbIM KJanaHOM, KOtOpbI aBTOMaTHueckn nepeKpbIbAet NODauy rAa B CJIyae BHe3aHOrO nORacAHN IINAMEH, KOHΦopKn 3aJInraTcR, KaK OINCAHO BbIe, HO npn 3TOM NocIe 3aJInraHn KOHΦopKn Heo6xOdmo Co6IIoDaTb OCTOPOKHOCTb.
IpepeBkIouHeHemra30BOB BapOCHo NOBepxHOCTn npOBepbTe,TO KOHOpOKN KpbIuKKn KOHOpOK npaBnIbHO yCTaHOBJIeHbHa BapOCHyIO NOBepxHOCTb.
NOJE3HbIE COBETbl
The manufacturer will not be responsible for any inaccuracy resulting from printing or transcript errors contained in this brochure. We reserve the right to carry out modifications to products as required, including the interests of con sumption, without prejudice to the characteri stics relating to safety or function.
RU
PpOIN3BODInTeIb He HecET OTBcETBHeHHocTn 3a OoneAtkN I HeToCHOCn, KOtOpbIE MOrY BCTpeTbC8 B DaHHO INCHpyKUIM. MbI OCTaBIAeM 3a cO6oI npABO BVOCNTb N3MeHeHnB KOKHTpyKUIO BbIyNcKaEMbIX HAIM N3DeJIi C CEbIbO yIyUHeHn KaYeCTBa BblNyCKaEMo INPOdyKUIM. Ppi 3OM OCHOBHbIE fynKUIM n3deJIin er oBe30NaChOcTb 6dyT OCTaBAcbr HEN3MeHHbIM.