BFD672MBW - Fridge BRANDT - Free user manual and instructions
Find the device manual for free BFD672MBW BRANDT in PDF.
User questions about BFD672MBW BRANDT
0 question about this device. Answer the ones you know or ask your own.
Ask a new question about this device
Download the instructions for your Fridge in PDF format for free! Find your manual BFD672MBW - BRANDT and take your electronic device back in hand. On this page are published all the documents necessary for the use of your device. BFD672MBW by BRANDT.
USER MANUAL BFD672MBW BRANDT
MANUEL D'INSTRUCTIONS - FR
INSTRUCTION MANUAL - EN
GUIA DE INSTALLACION Y USO - ES
MANUAL DE INSTRUÇÖES - PT
BRUGSVEJLEDNING - DA
NAVOD KPOUZITI-CZ
You have just purchased a BRANDT product and we thank you for your trust.
We designed and manufactured this product with you, your lifestyle and your needs in mind, in order to best meet your expectations. We have put into it our expertise, our spirit of innovation and all the passion which has driven us for over 60 years.
We make every effort to ensure our products better meet your requirements, and our Customer Relations Department is at your disposal and will be happy to hear any questions or suggestions you may have.
You may also visit our website www.brandt.com where you will find our latest innovations, as well as useful and complementary information.
BRANDT is happy to assist you in your daily life and hopes you will fully enjoy your purchase.

Important: Before switching on your appliance, please read this user guide carefully in order to familiarise yourself more quickly with its operation.
CONTENTS
Safety and warning information 4
Disposal 5
Installation 5
1/ INSTALLATION 8
2 / USING YOUR APPLIANCE 9
2 / USING YOUR APPLIANCE 10
3 / ON-GOING MAINTENANCE OF YOUR APPLIANCE 11
4 / PARTICULAR MESSAGES, INCIDENTS 12
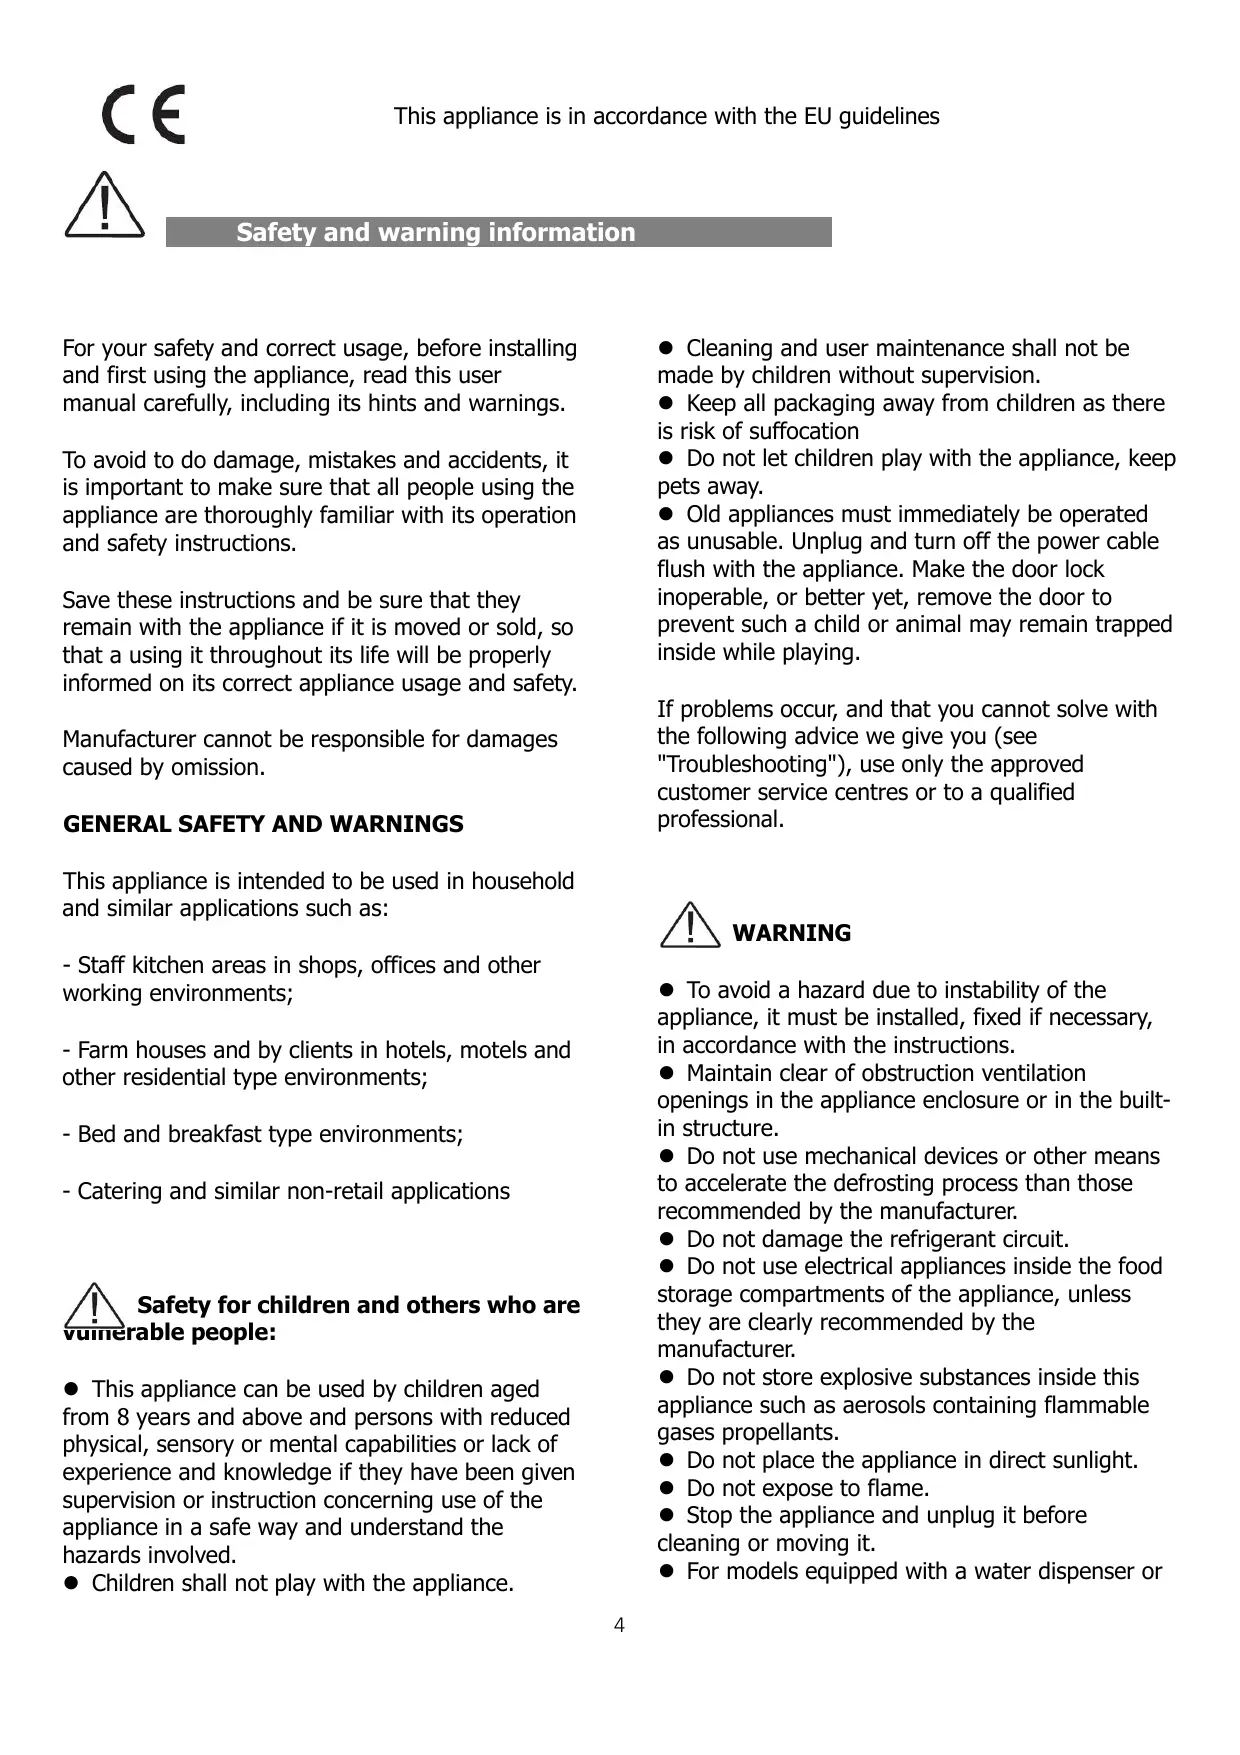
Safety and warning information
For your safety and correct usage, before installing and first using the appliance, read this user manual carefully, including its hints and warnings.
To avoid to do damage, mistakes and accidents, it is important to make sure that all people using the appliance are thoroughly familiar with its operation and safety instructions.
Save these instructions and be sure that they remain with the appliance if it is moved or sold, so that a using it throughout its life will be properly informed on its correct appliance usage and safety.
Manufacturer cannot be responsible for damages caused by omission.
GENERAL SAFETY AND WARNING
This appliance is intended to be used in household and similar applications such as:
- Staff kitchen areas in shops, offices and other working environments;
- Farm houses and by clients in hotels, motels and other residential type environments;
- Bed and breakfast type environments;
- Catering and similar non-retail applications

Safety for children and others who are unable people:
-
This appliance can be used by children aged from 8 years and above and persons with reduced physical, sensory or mental capabilities or lack of experience and knowledge if they have been given supervision or instruction concerning use of the appliance in a safe way and understand the hazards involved.
Children shall not play with the appliance. -
Cleaning and user maintenance shall not be made by children without supervision.
- Keep all packaging away from children as there is risk of suffocation
- Do not let children play with the appliance, keep pets away.
- Old appliances must immediately be operated as unusable. Unplug and turn off the power cable flush with the appliance. Make the door lock inoperable, or better yet, remove the door to prevent such a child or animal may remain trapped inside while playing.
If problems occur, and that you cannot solve with the following advice we give you (see "Troubleshooting"), use only the approved customer service centres or to a qualified professional.

WARNING
- To avoid a hazard due to instability of the appliance, it must be installed, fixed if necessary, in accordance with the instructions.
- Maintain clear of obstruction ventilation openings in the appliance enclosure or in the built-in structure.
- Do not use mechanical devices or other means to accelerate the defrosting process than those recommended by the manufacturer.
- Do not damage the refrigerant circuit.
- Do not use electrical appliances inside the food storage compartments of the appliance, unless they are clearly recommended by the manufacturer.
- Do not store explosive substances inside this appliance such as aerosols containing flammable gases propellants.
- Do not place the appliance in direct sunlight.
- Do not expose to flame.
- Stop the appliance and unplug it before cleaning or moving it.
- For models equipped with a water dispenser or
ice maker compartment, fill or connect only with a drinking water supply.
- If the supply cord is damaged, it must be replaced by the manufacturer, its after sales service or similarly qualified persons in order to avoid a hazard.
Cooling agents and insulation used in this product contain flammable gases. When you scrap the appliance, do it from an authorized collection point. Do not expose to flame
Refrigerant
Refrigerant isobutene (R600a) is contained within the refrigerant circuit of the appliance; it is a gas more environmentally friendly, which is nevertheless flammable.
During transportation and installation of the appliance, ensure that none of the components of the refrigerant circuit is damaged.
Caution: risk of fire
If the refrigerant circuit should be damaged:
- Avoid opening flames and any source of ignition.
-Thoroughly ventilate the room in which the appliance is located.
It is dangerous to alter the specifications or modify this product in any way.
Any damage to the electric cord may cause short-circuit, fire, and/or electric shock.
Disposal
This symbol indicates that this product should not be treated as household waste.
Your appliance contains recyclable materials. It is marked with this logo to indicate that used appliances must be delivered to an authorized collection point.
Check with your dealer or technical services in your area to find out the points for used appliances closest to your home. The appliance recycling organized by your manufacturer will be done under the best conditions, according to the European directive on waste electrical and electronic equipment.
Thank you for your help in protecting the environment.
Some packing materials of this device are also recyclable. Recycle them and play a role in protecting the environment by depositing them in the containers provided for this purpose.
In accordance with the most recent legislation on the protection and respect for the environment, your appliance does not contain HFC's, but a refrigerant called R600a. The exact type of refrigerant used in your appliance is also clearly indicated on the rating plate located inside the appliance, on the left wall down. R600a is a non-polluting gas that does not harm the ozone layer and whose contribution to the greenhouse effect is virtually zero.
Installation

WARNING: Correct installation of your complying with the rules that are given in installation guide and use will allow you to our food in good conditions and withized energy consumption.
-
If your appliance has wheels, remember that they are only used to facilitate small movements. Do not move on longer distance.
-
Make an initial cleaning before connecting your device to the mains. Before any maintenance, disconnect your device. Do not pull the power cord but directly enter the profile.
-
Place the unit in a dry and ventilated room.
-
Avoid balconies, porches, decks; excessive heat in summer and cold in winter could prevent proper operation of your device, or even damage.
-
Do not place it near a heat source such as radiator or oven for example.
-
Keep a minimum distance between your refrigerator and other furniture: 3 to 5 cm on the
sides and 10~cm above for good air circulation around the unit.
- Place the appliance at a suitable distance from the wall using the spacers if they provided in the accessory bag.
- Your appliance has been designed for optimum performance in a room temperature. We then say that it is designed for a special "climate class". This climate class is clearly stated on the rating plate located inside your appliance, on the left wall down. Beyond these temperatures, the performance of your appliance may be reduced.
| Classe | Temperature |
| SN | from + 10°C to + 32°C |
| N | from + 16°C to + 32°C |
| ST | from + 16°C to + 38°C |
| T | from + 16°C to + 43°C |
Advice:
After installation of your appliance, set its feet so that it is slightly tilted backwards, it will facilitate the closing of the door.
Before putting food, clean the interior and exterior of your appliance with bicarbonate of soda dissolved in water (1 tablespoon of bicarbonate for 4 litres of water). Do not use alcohol, abrasive powders or detergents which could damage the surfaces. (See chapter "Cleaning your appliance").
ELECTRICAL CONNECTION
The electrical installation must comply with the applicable standards and must be able to withstand the maximum power indicated on the rating plate.
The plug must be properly grounded.
We cannot be held responsible for any incident caused by defective electrical installation.
Electrical Installation Tips
- Do not use extension cable or adapter or power strip.
-
Never remove the grounding.
-
The socket must be easily accessible but out of reach of children.
In case of doubt, ask to your installer.
Your device is compliant with EU directives and their modifications.
ENERGY SAVING
To reduce the power consumption of your appliance:
- Install it in a suitable location (see "Installing your appliance").
- Keep doors open for as short time as possible.
- Do not put hot food in your refrigerator or freezer, particularly if they are soups or preparations which emit a large amount of steam.
- Ensure the optimal functioning of your device by not letting accumulate too much frost in the freezer (defrost it when the ice thickness exceeds 5-6 mm) and periodically cleaning the condenser (see "Maintenance your device").
- Regularly check the door seals and make sure that they always close effectively. If this is not the case, please contact service after sales service.
- Do not let it set at too low a temperature.
- Not fulfilling with drawers, bins and shelves arrangement could lead to increased energy consumption.

WARNING:
If the unit was shipped to home in a horizontal position, place it vertically and wait two hours before plugging it in. A small amount of oil may have flowed into the refrigeration circuit, you need to give it time to flow back towards the motor before connecting the appliance, otherwise you may damage it.
Before any maintenance, disconnect the power plug. Do not pull the power cable but directly enter the profile.
CLEANING AND MAINTENANCE
- Before cleaning, unplug the appliance and turn off the power.
- Do not clean the appliance with metal objects, a steam system, volatile oils, organic solvents or abrasives.
- Do not use sharp objects to remove ice. Use a
plastic scraper.
- To replace the light bulb, if operation is possible by the user himself, please refer to the "Maintenance" of this manual. Always be sure to unplug your appliance before.
WARNING: If the appliance is equipped with a LED lighting, it can only be replaced by a qualified technician.
1/ INSTALLATION
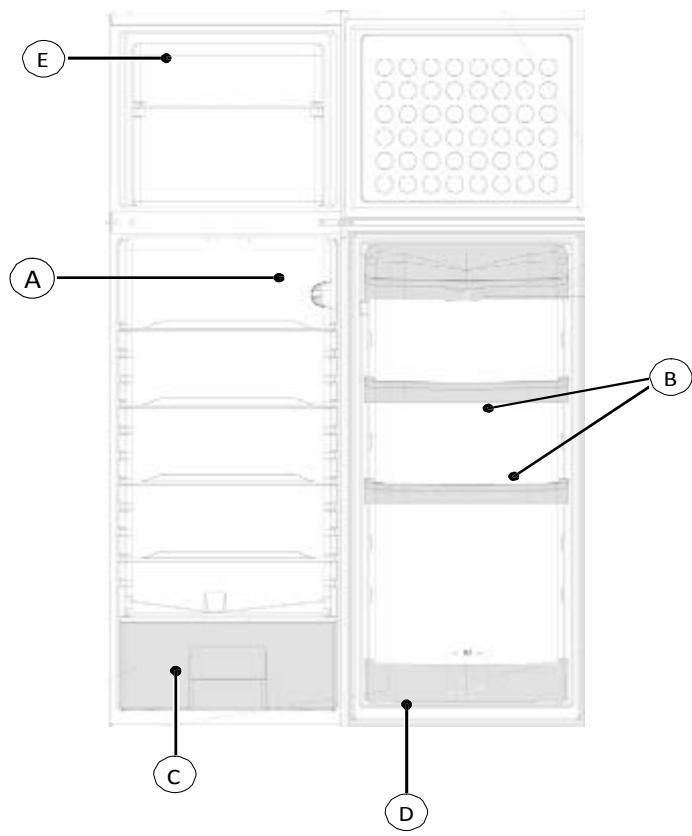
DESCRIPTION OF YOUR APPLIANCE (depending on the model)
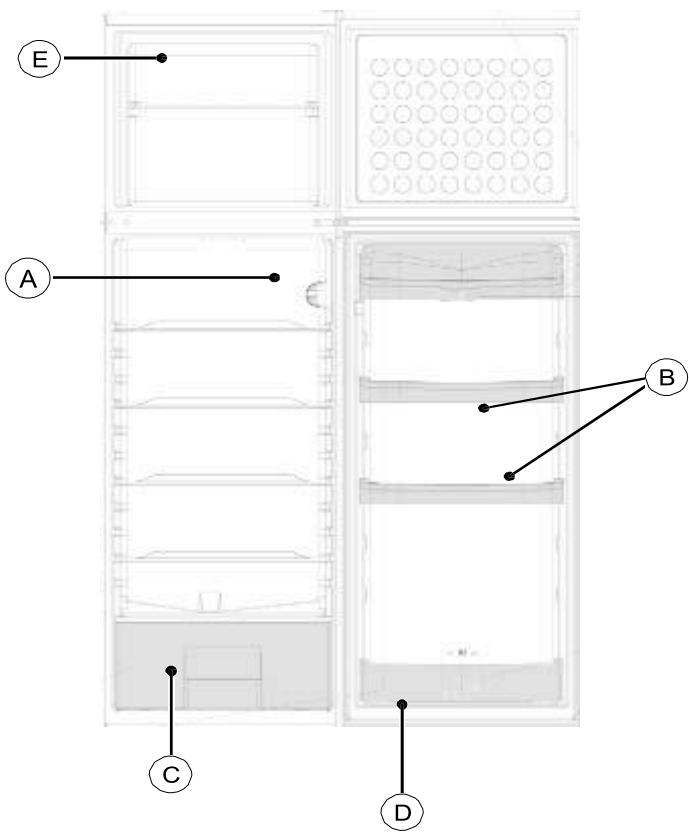
A Thermostat
B Door shelves
C Vegetable compartment
D Bottle shelf
E Freezer **** compartment
IREVERSING THE DIRECTION THE DOORS OPEN
You can alter the direction in which the doors open if you wish:

The appliance must always be disconnected from the power supply when changing the direction the doors open.
- Unscrew and take off the top cover.
- Take off the upper hinge by removing the 3 screws and then remove the upper door.
- Release the hinge from the door by removing the door hole cover
- Unscrew the middle hinge and remove the lower door
- Take off the front hole covers and fix them on the previous location of the middle hinge
- Swap over the lower hinge (foot included) and the opposite foot
- Unscrew the metal door stop located on the bottom of the lower door and screw it properly on the opposite side.
- Adjust the lower door on the hinge pin and fit the middle hinge to finish the assembling of this door
- Put the upper door on the middle hinge pin
Screw the upper hinge after having adjusted the door on it - Assemble and screw the top cover to finish the handling
- If your appliance is fitted with vertical handles, remember to move them to the opposite side.
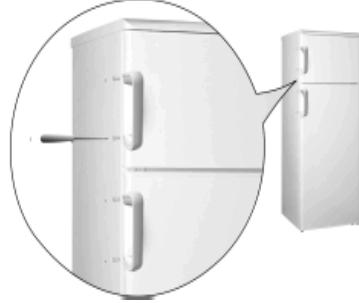
FITTING THE DOOR HANDLES (depending on the model)
The handles are located inside the refrigerator. Fit the handles on the doors, positioning them opposite the respective holes and fasten them with the screws provided as shown in the diagram below. Once the handles are in place, insert the screw covers supplied in the spaces provided for this purpose
2 / USING YOUR APPLIANCE
USING THE REFRIGERATOR COMPARTMENT
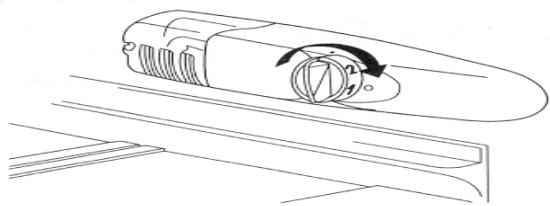
The thermostat in the refrigerator controls the temperature. To set it, you must turn the knurled wheel inside the refrigerator on the right-hand side. When set to position 0, the appliance is OFF. We recommend that you select a middle position: 2 or 3.
Advice:
- Do not put hot food or unsealed liquids into the refrigerator.
- NEVER introduce volatile, inflammable or explosive fluids such as alcohol, acetone or petrol because of the risk of explosion.
- It is advisable to wrap meat and fish to avoid odours.
- Leave sufficient space between the foodstuffs to enable air to circulate correctly between them. Similarly, when storing them, avoid putting food items in contact with each other.
- Do not place food items in contact with the cold wall at the back of the refrigerator. The shelves have a stop to avoid this.
- The door should not be left open any longer than necessary.
USING THE FREEZER COMPARTMENT
This compartment enables you to preserve frozen food, freeze fresh produce and to produce ice cubes.
Do not freeze too large an amount of food at one time; the faster the food is frozen, the longer it preserves its qualities. Similarly, ensure that your food items are well wrapped before freezing them so that they retain all their flavour and do not spoil other items.
The preservation times for frozen and deep-frozen foods depends on the type of food concerned. Please refer to the instructions on the packaging. Do not place bottles or cans in the ice box. They may split when their contents freeze. Highly carbonated drinks may even explode! NEVER keep lemonade, fruit juice, beer, wine, champagne, etc. in the freezer - ice box compartment.
2 / USING YOUR APPLIANCE
FOOD SAFETY (depending on the model)

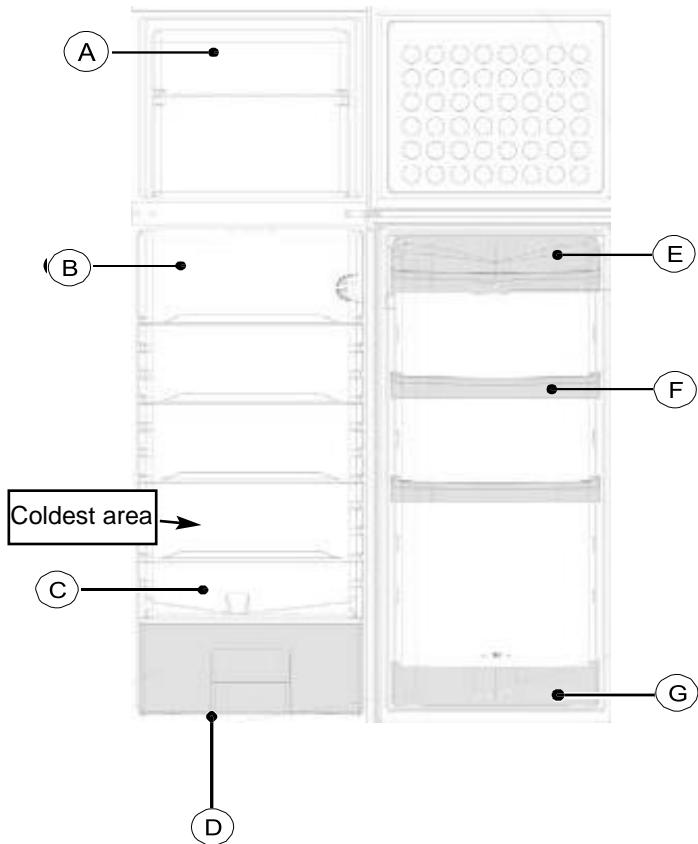
Explanation of the coldest area by means of signs.

The symbol opposite indicates the location of the coldest area in your refrigerator, whose temperature is ≤ +4^ C .
You will store here meat, poultry, fish, cooked meats, prepared dishes, ready-made salads, egg or cream-based dishes and pastries, fresh pasta, pastry, pizza/quiches, fresh produce and raw milk cheese, ready-to-use vegetables sold in plastic bags and, in general, any fresh produce whose consume-by date is associated with storage at a temperature of +4^ or below.
Temperature indicator:

Adjust your thermostat Correct temperature

The temperature indicator enables you to check that your refrigerator is working correctly.
The indicator displays "OK" when the coldest area reaches an average temperature of ± 4^ (4 hours after being switched on). If the temperature is above +4^ , the indicator remains black. The user must then lower the temperature of the refrigerator by adjusting the thermostat.

Warning:
Opening the refrigerator's door for a prolonged period causes the refrigerator's internal temperature to rise. To measure the temperature correctly, the temperature indicator must be read within 30 seconds. Similarly, it should also be taken into account that the temperature is nor completely uniform throughout the compartment, for which reason there are appropriate areas for each type of foodstuff.
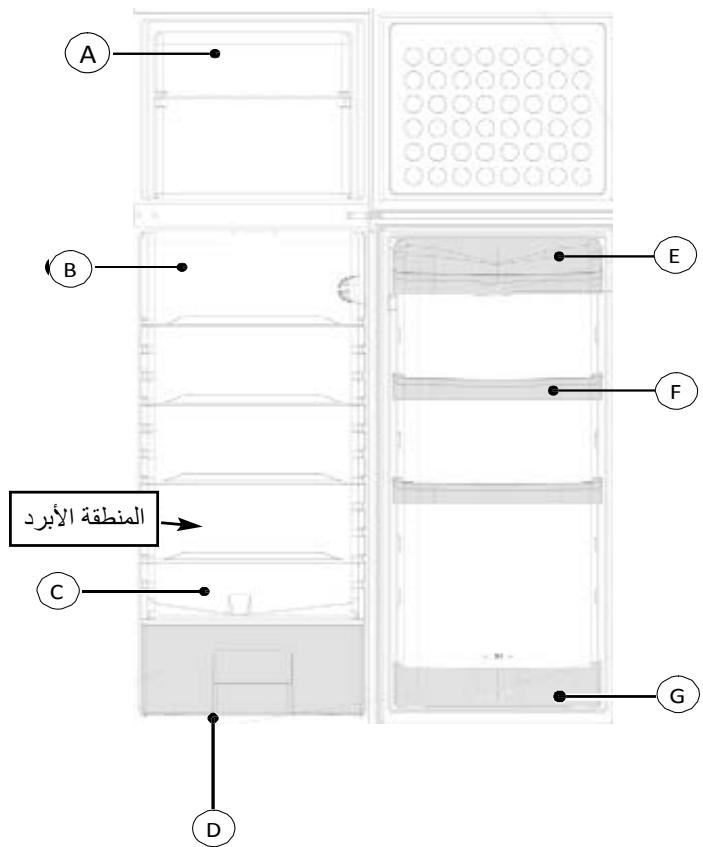
Freezing fresh foodstuffs or storing frozen foods
B Dairy products, cheese
C Meat, cooked meats, fish
D Fruit and vegetables
E Drinks, butter and eggs
F Condiments
G Drinks
3 / ON- GOING MAINTENANCE OF YOUR APPLIANCE
DEFROSTING
Your refrigerator has an automatic defrosting system. The appliance's rear surface becomes covered with frost when the compressor is working and defrosts when the compressor is off. When the frost melts, the water evaporates by itself.
The **** compartment must always be defrosted when the layer of frost is approximately 4mm thick. In any case, this compartment must be defrosted at least once a year.
You may use the plastic spatula supplied with the appliance but never use any metal item or an electrical appliance.
Disconnect your refrigerator before proceeding to defrost it.
- Pack your frozen food in a freezer bag and keep it cool.
- Leave the door open and sponge away the melt water as it forms.
- To accelerate the defrosting process, you can place a bowl of hot water in the compartment and close the door.
- Once defrosting is complete, proceed to clean your appliance.
CLEANING AND MAINTENANCE
Switch off your refrigerator before proceeding to clean it.
We recommend that you clean and disinfect your appliance regularly
- Clean the interior with water and bicarbonate of soda using a sponge or a dishcloth to prevent any bad smells occurring.
- Never, under any circumstances, use solvents or abrasive detergents because these could damage the interior of your appliance. Also do not put any of the interior's accessories in the dishwasher.
- We recommend that you dust the back of the appliance with a cloth once a year because if it is dirty, your refrigerator's output reduces and its consumption increases.
CHANGING THE LIGHT BULB
4 Disconnect your appliance before proceeding to change the light bulb.
- The bulb is behind the thermostat panel. Remove the grill.
- Remove the bulb by unscrewing it counter-clockwise.
- Insert a new bulb of the same power as its predecessor.
- Replace the grill, reconnect the appliance and switch it on.
4 / PARTICULAR MESSAGES, INCIDENTS
OPERATING PROBLEMS
There are some noises that it is quite normal for a refrigerator to make:
- The refrigerant gas can produce a gurgling sound as it travels through the circuits.
- The compressor may produce a buzzing noise, which can be more noticeable during start-up.
- The "cracking" noise produced by expansion and contraction of the materials used.
| PROBLEM | SOLUTION |
| The appliance does not work. | Check that the plug is correctly connected, that the fuse hasn't blown or that the circuit-breaker has not jumped. |
| The refrigerator vibrates or is noisy. | Check that it is level. Adjust the feet. |
| The refrigerator gets too cold or not cold enough. | Check the position of the thermostat and set it to a more suitable temperature. |
| The refrigerator's bulb does not light. | Check the bulb and replace it if necessary. If the problem persists, check that your appliance is connected. |
| The compressor does not start after a change in the temperature. | This is normal; the compressor will restart after a certain time. |
| There is water on the floor or on the shelves. | The hole for draining away the defrosting water must be blocked. Unblock it with a knitting needle. |
TECHNICAL ASSISTANCE DEPARTMENT
If you have already performed the indicated checks and your problem still persists, DO NOT ATTEMPT TO MAKE ANY REPAIRS YOUR- SELF. Contact your nearest Technical Assistance Department.

THIS APPLIANCE COMPLIES WITH EEC DIRECTIVES 2006/95, 2004/108, 96/57, 92/31, 94/62
INSTALLATION AF APPARATET 5
1 / INSTALLATION 8
2/BRUG AF ENHEDEN 9
2/BRUG AF ENHEDEN 10
3/DAGLIGPLEJEAFENHEDEN 11
4/SAERLIGEMEDDELELSER,HaENDELSER 12
INSTALLATION AF APPARATET

Vigtigt:
Det er kun en korrekt
INSTALLATIE VAN UW APPARAAT 6
VEILIGHEIDSVOORSCHRIFTEN 8
1 / INSTALLATION 9
1 / INSTALLATION 10
2 / GEBRUK VAN HET APPARAAT 11
2 / GEBRUK VAN HET APPARAAT 12
3 / NORMAAL ONDERHOUD VAN DE KOELKAST 13
3 / NORMAAL ONDERHOUD VAN DE KOELKAST 14
INSTALLATIE VAN UW APPARAAT

aaii plai jao plalj ydi ydi ydi loic bcll l
4 4aall aia bclaw o yloic laill oeraaal ayla!
g 15
法
Igaiiui 2 jsljglal gaii rall aaiuullll iuiuie
15
4
aiSiall alalolall 1gaa glaa aai lslj
aallll aaiyilblw gss sillal yall aylaac
aill 15
a a a a a a a a a a a a a a a a a a a a
j 1
a
Ciaia 1 Cuaia 100
Ji 151 151 151 151 151 151
jIbly allwe aIldall
ple j5 oj aabj jll jbj jlll jy
ailll 5
i 1

aalal alalal alal alal alal alal alal
J1
glg y glll alal l ggy glalal gla aie glll llal
1
alaaall Jaua aie gale all lgaia
iilai Iglaia 1 gaaia 1aiaia aiaiaiaiaiaiaiaiaiaiaiaiaiaiaiaiaiaiaiaiaiaiaiaiaiaiaiaiaiaiaiaiaiaiaiaiaiaiaiaiaiaiaiaiaiaiaiaiaiaia
J
1
(1)
J 1 J 1 J 1 J 1 J 1 J 1 J 1 J 1 J 1 J 1 J 1 J 1 J 1 J 1 J 1 J 1 J 1 J 1 J 1 J 1 J 1 J 1 J 1 J 1 J 1 J 1 J 1 J 1 J 1 J 1 J 1 J 1 J 1 J 1 J

A
B
C
D
aaii iiaaii aaii iaii 1 1 1 1 1 1 1 1 1 1 1 1 1 1 1 1 1 1 1 1 1 1 1 1 1 1 1 1 1 1 1 1 1 1 1 1
yLED 15:
aill
"5j 1 jlaa" J a 1 gall)
J.
1
i 1
S BCD = S COD + S BDO - S BOC

g 1
a 1 1 1 1 1 1 1 1 1 1 1 1
1 1
4
y. a y 11 11 11 11 11 11 11 11 11 11 11 11 11 11 11 11 11 11 11 11
cIolale 110xclu wJgJgJgJgJgJgJgJgJgJgJgJgJgJgJgJgJgJgJgJgJgJgJgJgJgJgJgJgJgJgJgJgJgJgJgJgJgJgJgJgJgJgJgJgJgJgJgJgJgJgJ
Lall 1
1
aill oia jui pi .aiol "aiaiaia" Jy y aaii jgi nn
aXill lld sgd gall clogkall aaldo
J 1
J 1 J 1 J 1 J 1 J 1 J 1 J 1 J 1 J 1 J 1 J 1 J 1 J 1 J 1
j j j j j j j j j j j j j j j j j j j j j j j j j j j j j j j j j j j j j j j j j j j j j j j j j j
1 5 3 0 2 4 8 9 1 1 1 1 1 1 1 1 1 1 1 1 1 1 1

1ill aiei jgssj 0j g jg jgsj gll
J 1 J 1 J 1 J 1 J 1 J 1 J 1 J 1 J 1 J 1 J 1 J 1 J 1 J 1 J 1 J 1 J 1 J 1 J 1 J 1 J 1 J 1 J 1 J 1 J 1 J 1 J 1 J 1 J 1 J 1 J 1 J 1 J 1 J 1 J
jIbJIL JIJIIL IJIg jIJIg
Jie jie lii jia laiuiu Jjaiy jiu liu ic gii jiy i jie jie jiu jiu jiu jiu jiu jiu jiu jiu
jll jie 1gai jy Jia zao jz jy Jdx jno
Jdil
J 15 J 15 J 15 J 15 J 15 J 15 J 15 J 15 J 15 J 15 J 15 J 15 J 15 J 15 J 15 J 15 J 15 J 15 J 15 J 15 J 15 J 15 J 15 J 15 J 15 J 15
J 1 J 1
j:
:
J 1
jglg jglg jglg jglg jglg -
Jbks 1
J 1
a 1
jiezilun
12 1
aai jiaaii iiaaiil
i. j. 1. i. j. 2. i. j. 3. i. j. 4. i. j. 5. i. j.
Jaae eae jsejol
i 1 1 1 1 1 1 1 1 1 1 1 1 1 1 1 1 1 1 1
jglly 11 jilb1 gio
palele aljwll jodaswnall
.
a
jgl jll jg jll lgl . jll jll jll jll jll jll jll jll jll jll jll jll jll jll jll
J 1 J 1 J 1 J 1 J 1 J 1 J 1 J 1 J 1 J 1 J 1 J 1 J 1 J 1 J 1 J 1 J 1 J 1 J 1 J 1 J 1 J 1 J 1 J 1 J 1 J 1 J 1 J 1 J 1 J 1
aIoc 1
J 1
ailll aylly
yj yj jz jz jzao jdz ayj yj 0 jzj 1 glaxi y
.
Jiuiuai jie g i jiu J. 1juiiuii jie jie jia jia jia jia jia jia jia jia
yJ 1 yJ 1 J 1 J 1 J 1 J 1 J 1 J 1 J 1 J 1 J 1 J 1 J 1 J 1 J 1 J 1 J 1 J 1 J 1 J 1 J 1 J 1 J 1 J 1 J 1 J 1 J 1 J 1 J 1 J 1 J 1 J 1 J 1
Jn Jn Jn Jn Jn Jn Jn Jn Jn Jn Jn Jn Jn Jn Jn Jn Jn Jn Jn Jn Jn Jn Jn Jn Jn Jn Jn Jn Jn Jn Jn Jn Jn Jn Jn Jn Jn Jn Jn Jn Jn Jn Jn Jn Jn Jn Jn Jn Jn Jn Jn
Jzll Jzll 1000000000000000000000000000000000000000000
1111 1
: jzss sssssssssssssssssssssssss
#
Jalai jy jn nn Jabi y jn jz Jai 12 Jaiin Jai 8 n
- 1
- 1
10 2
11 2
12 3 - 4
1
Laliligaiin gill aill oie 1e kskn BRANDT cii i d llll jll lii g Ll 10g 1000000000000000000000000000000000000000000000000000000000000000000000000000000000000000000
a 1 1

Brandt

MANUEL D'INSTRUCTIONS - FR
INSTRUCTION MANUAL - EN
GUIA DE INSTALLACION Y USO - ES
MANUAL DE INSTRUÇÖES - PT
BRUGSVEJLEDNING - DA
NAVOD KPOUZITI-CZ