
DTV-200U - TV Decoder VAOVA - Free user manual and instructions
Find the device manual for free DTV-200U VAOVA in PDF.
| Product Type | Digital TV Decoder (DTT) |
| Brand | VAOVA |
| Model | DTV-200U |
| Dimensions (approx.) | 80 x 30 x 15 mm |
| Weight (approx.) | 50 g |
| Power Supply | USB (5V, 500 mA) |
| Signal Type | Digital Terrestrial (DVB-T) |
| Recording | Yes, on hard drive (PVR) |
| Timeshift | Yes, pause and resume live |
| Electronic Program Guide (EPG) | Yes |
| Teletext | Yes (depending on channel availability) |
| Subtitles | Yes (Digital TV) |
| Screen Capture (Snapshot) | Yes |
| Channel Mosaic | Yes (browse channels in miniature) |
| Audio | AC3, DVB radio, HDTV |
| File Formats (capture) | Configurable (BMP, JPEG, etc.) |
| System Requirements | Windows 2000/XP, Pentium 4 2.0 GHz, 256 MB RAM, DirectX 9.0 |
| Maintenance and Cleaning | Clean with a soft, dry cloth. Avoid moisture. |
| Safety | Do not expose to water or excessive heat. Unplug if not in use. |
| Spare Parts and Repairability | Not applicable (sealed electronic product). |
Frequently Asked Questions - DTV-200U VAOVA
User questions about DTV-200U VAOVA
0 question about this device. Answer the ones you know or ask your own.
Ask a new question about this device
Download the instructions for your TV Decoder in PDF format for free! Find your manual DTV-200U - VAOVA and take your electronic device back in hand. On this page are published all the documents necessary for the use of your device. DTV-200U by VAOVA.
USER MANUAL DTV-200U VAOVA
Chapter 1 Introducing Presto!PVR. 1
System Requirements. 1
Features. 2
Chapter 2 Using Your Presto!PVR. 3
Installing Presto! PVR. 3
Receiving a Program 4
Choosing a Program to Watch 6
Channel Surfing Window 6
Teletext. 7
Recording a Program. 7
Scheduling Your Program Recording. 7
Adjusting the Schedule Settings. 9
Task. 10
Time. 10
Quality. 10
Using the Electronic Program Guide. 11
Time Shifting. 12
Adjusting the Volume. 13
Taking Snapshots 13
Contents
Chapter 3 Menu and Settings. 14
Main Screen. 14
Screen Menu. 16
Settings 17
Device. 18
Device. 19
Program. 19
Video. 21
Record. 22
Recording. 23
Options. 23
Time Shifting. 23
Schedule. 24
Advanced. 25
Skin. 26
Live Update. 26
Channel Surfing. 27
History. 28
Chapter 1 Introducing PRESTO! PVR
PRESTO! PVR is a video recorder for your computer. It takes television signals and records them onto your hard drive. You have all the convenience of a VCR (recording, playback, fast forwarding, rewinding, pausing) without having to rewind any tape. Here are the requirements and features of the program.
System Requirement
Features
System Requirements
- Presto! PVR will run on Microsoft Windows 2000, or Windows XP. A Pentium 4 or AMD Athlon 2.0 GHz processor is required. (Pentium 4, 2.4 GHz is recommended.)
At least 256 MB RAM is needed (512 MB is recommended).
A least 100 MB of hard disk space is required for installing the program. An additional 500 MB of space will be needed working with files.
A True Color or HiColor display card supporting DirectX 9.0, 16-bit high color mode and with at least 1024 x 768 pixel resolution.
- DirectX 9.0 or higher is installed.
An AC'97 compatible sound card.
Digital TV antenna.
Features
Record programs to your hard disk and watch them later.
Schedule your recordings for the future.
Use the EPG (Electronic Program Guide) function to get the program guide for current TV listings and add them to your recording schedule with the click of a button.
- Easily play the shows that you have already recorded. Just look in the History section.
Pause the program while watching (to do things like answer the door or make a sandwich) and then resume watching without missing any of the show.
- Watch video in a resizeable preview window. Choose to freely resize or retain the original ratio. Adjust the brightness and color. The preview window changes while the adjustments are made.
Receive digital TV programs.
Digital tuner supports AC3 audio, DVB radio, HDTV, and Subtitles.
Take snapshots of your favorite TV moments.
Browse many programs in one window with Tile mode.
Chapter 2 Using Your PRESTO! PVR
This program has everything a personal video recorder needs preview, full screen view, snapshot, channel selection, channel surfing, recording, programmed recording, time shifting, settings, help, and a link to our website. Here are explanations of how to perform the most common tasks.
Installing PRESTO! PVR
Receiving a Program
Choosing a Program to Watch
Recording a Program
Scheduling Your Program Recording
Time Shifting
Adjusting the Volume
Taking Snapshots
Installing PRESTO! PVR
Before you begin, make sure that the antenna is connected to the Presto! PVR device. Insert the Presto! PVR disc into your computer disc drive and follow the installation instructions. After the installation, the Wizard will open to let you choose what device you will be using. After selecting the device, the Settings dialog box for the selected option will open.
Click the desktop icon to start using your Presto! PVR program.
Receiving a Program
To receive a program through your network, please connect the antenna to the PRESTO! PVR device and make the proper settings.
- Click to open the Settings dialog box, and then click the Device tab.
- Choose a device from the Device list.The options will be different depending on the type of TV signal selected.

- Click the Program tab on the Settings dialog box, and then click Scan to search for programs. If a program is found, it will be included in the program list. When finished, you can choose a program and change its name. You can also import and export a list of channels and set the minimum and maximum frequencies to scan.

- Close the Settings dialog box and watch the program.
Choosing a Program to Watch
After you have installed Presto! PVR and scanned for programs, you can click and select a program from the list to watch. Click 口 or 口 to switch between programs, and 口 to goto the last program viewed.

Channel Surfing Window
Teletext
Channel Surfing Window
You can browse all the TV programs from the Channel Surfing window. PRESTO! PVR provides different options for tiling the programs in thumbnails. You can play a program by clicking the thumbnail.

To change the Channel Surfing window settings, click 山 and choose the Advanced tab.
Teletext
Teletext is a quick and easily accessible service that gives you useful information for free. As long as a signal is present at the tuner and the channels are already scanned and stored, you will see the Teletext information offered by the corresponding TV station.

This service varies for different areas. It may not be available in all the countries.
Recording a Program
When you find a good show, click to start recording. The button will change to . The recorded program will be saved in the working folder.
You can click to pause recording. If you click while you are watching, recording will stop and the preview screen will return to the live program.

When recording, you can go to full screen, minimize, and restore, but you cannot change programs, take snapshots, or close the program.
Scheduling Your Program Recording
You can add, modify, or delete items for recording shows in the future. For this, you will have to open the Settings dialog box by clicking × and selecting the Schedule tab.

- Click Add to schedule additional recording, or click Modify to change the schedule for selected recordings.
- Click Delete to cancel a selected recording, or Delete All to cancel all scheduled recordings.
- Click EPG to get an online listing to current TV programs.
For more information see:
Adjusting the Schedule Settings
Using the Electronic Program Guide
Adjusting the Schedule Settings
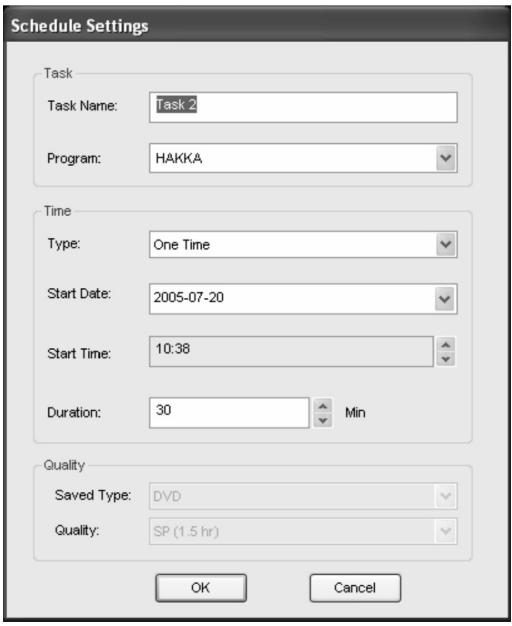
If you click Add or Modify from the Schedule tab, the Schedule Settings dialog box will open. There are three sections to pay attention to Task, Time, and Quality.
Task
Task Name: Give a name to the recording session or use the default.
Program: Choose from the available programs for the one you want.
Time
Type: You can choose to record the selected program One Time, Daily, Sunday, Monday, Tuesday, Wednesday, Thursday, Friday, Saturday, Monday to Friday, Monday to Saturday, or Saturday to Sunday. Choose Assign the Date to pick a more specific date.
Start Date: This option is available only when you have selected One Time in the Type field. Pick the day to start recording on.
Start Time: Choose what time to start recording on the selected date.
Duration: Choose how long to record. The recording will stop after the specified time period.
Quality
Saved Type: Choose what kind of recording you are scheduling.
Quality: Choose the level of quality for the selected recording.
After selecting the appropriate dialog box options, click OK to return to the Schedule list.

(1) If a scheduled task comes up when running time shifting or recording, the running task will be terminated and the scheduled task will be performed.
(2) If you have scheduled tasks that overlap, you will be reminded after you click OK. PRESTO! PVR can not record more than one show at a time.
Using the Electronic Program Guide
Use the Channel box to choose an available channel.

Select the program that you want to record, and then click Add to Schedule. The program will be added to the schedule.Click Refresh to make sure that the schedule is up-to-date.
Time Shifting
Time Shifting means that you can pause a program while watching the big game, click the pause button, and then go get another bag of chips without missing any of the action. When you come back and click the play button, you will resume watching from the point at which you paused.
- Click to pause. The preview screen will freeze, but the recording will continue.
- Click to continue watching the program from the point at which it was paused.
- Click to stop time shifting and return to the live program.


When paused, you can change the screen size and adjust the volume, but you cannot change programs, take snapshots, change the configuration, or close the program.
Adjusting the Volume

Use the plus and minus buttons to increase and decrease the volume. The indicator will reflect the changes. Clicking on the speaker button will turn the soundon and off.
Taking Snapshots
Click to capture the screen at that moment. The snapshots will be saved in the working folder. You can change the file format to save the snapshots on the Advanced tab of the Settings dialog box.
Chapter 3 Menus and Settings
For all that it does, PRESTO! PVR is very easy to use. There are only a few menus and settings that you need to worry about. Here they are in their entirety.
Main Screen
Screen Menu
Settings
Channel Surfing
History
Main Screen
The PVR screen is very compact and useful. Here is an overview of the various displays and buttons.

| a | Across the top of the presentation area will be listed the program status (Timeshifting, Recording, Playing, Forward and Backward.) as well as the signal strength and quality. The program status will only show when playing, recording or timeshifting program. |
| b | List the time along with the channel number and name. |
| c | Display the currently connected adapter and how much free space is available for recording. |
| d | These are the buttons for controlling the program. There are full screen, minimize and close |
| e | Click the NewSoftlogo to connect to Live Update. Also available is the help file and the settings button. |
| f | These are special feature buttons. EPG, Teletext, and Subtitles. |
| g | The program control buttons are used for recording programs and watching the programs that have already been recorded. |
| h | Click to capture screen at that moment and check the programs that have already been recorded |
| i | The volume controls let you turn it up and down as well as off. There is also an indication of the current volume level. |
| j | These buttons are for choosing a program to watch on TV. Either by going up or down a channel, going back to the previously viewed channel, or choosing from the program list. |
Screen Menu
When you right-click your Presto! PVR screen when a video is playing, you will see the following menu. This will give you quick control over how you watch the program.


Aspect Ratio: This selects the ratio of width and height for your PRESTO! PVR screen. You can choose Original Ratio, Free Ratio, 4:3 or 16:9. Choosing Free Ratio will allow you to distort your TV picture by dragging the lower-right corner of the screen. If you have chosen Original Ratio, the ratio will not change as you resize the picture.
Size: Click to restore the display window to the original size.
Full Screen: Click to see the program in the entire videoscreen. Press the ESC key to restore the screen to the most recently selected size.
Sound: If the program has multiple sound tracks, you can switch them here.
Mute: Click to turn the audio off and on.
EPG: Click to get a current TV schedule online.
Teletext: Click to getuseful information offered by TV station.
Channel Surfing: Click to browse TV programs in a tiled window.
Exit: Click to close the program.
About PRESTO! PVR: Click to display the program version information.
Settings
Click to see the Settings dialog box to help you personalize you PRESTO! PVR program.
Device
Program
Video
Record
Schedule
Advanced
Skin
Live Update
Device
On the Device tab, you can select how you control the PRESTO! PVR device.
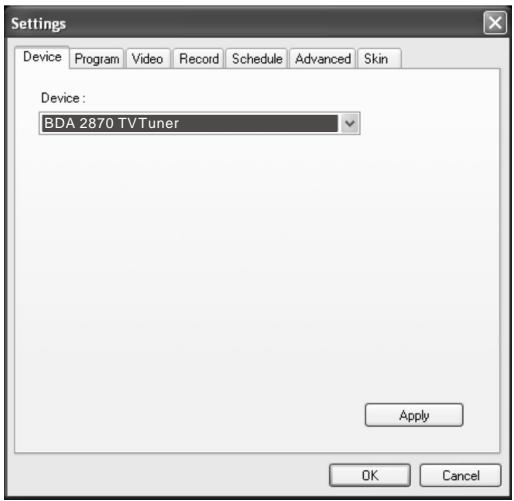
Device
Available PRESTO! PVR devices are listed here. Others settings on this tab will be disabled unless you select a device.
Program
You can set up the scan parametersto more efficiently scan for available television programs.
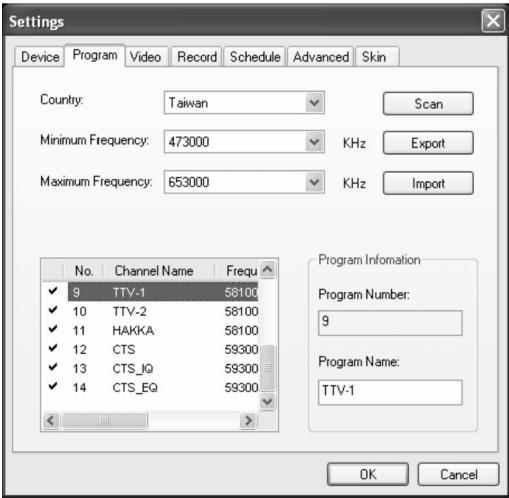
Country: Select the country you are in to have the television reception properly formatted.
Minimum Frequency, Maximum Frequency: These settings can be changed to restrict the scanning range that Scan will use to search for available programs.
Scan: Click to look for all available programs and list them. Programs will have a check mark in front of their listings. Programs that don't have a check mark will not be listed in the selection panel and won't be available when changing programs.
Export, Import: You can use these two functions to export or import the program list file so that you don't need to rescan when using other computers.
Program Number, Program Name: You can edit the name for each program. Type a name that may help you be more clear about what kind of program it is.
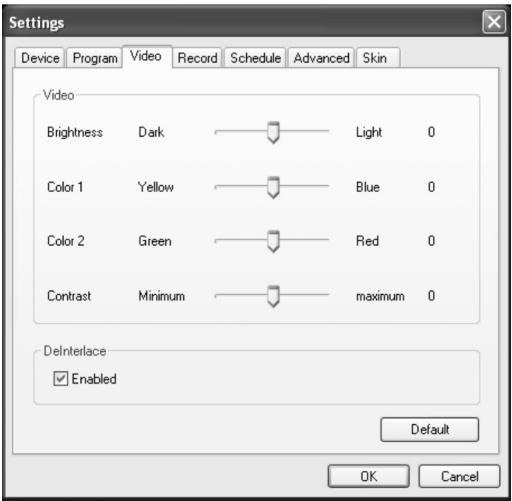
Video
On the Video tab, you can adjust the brightness and the color in the picture. Enable Deinterlace to prevent lines from appearing in the video.
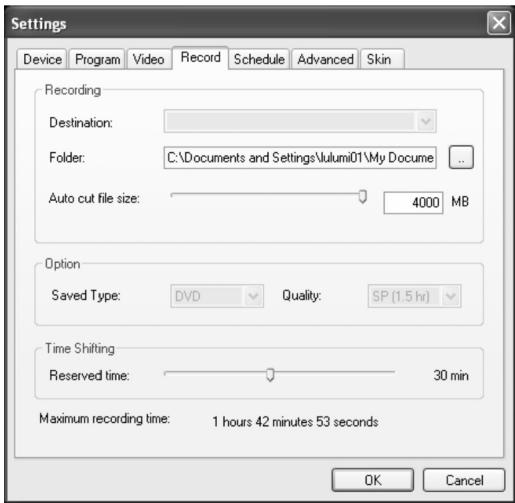
Record
This tab will let you adjust your recording preferences.
For more information see:
Recording
Options
Time Shifting
Recording
You can choose a disc drive under Destination and a Folder for saving your recorded files and snapshots. Then use the slider to adjust the Auto cut file size. The video will be automatically cut into separate files when the limit is reached. If your disk file system is FAT32, the maximum size of each file will be 4 GB. If your disk file system is NTFS, it will be equal to the space available on the specified disk.
Options
Saved type: Select the kind of recording you want to save.
Quality: Select the quality of the recording. This will affect the size of the recorded file.
Time Shifting
Use the slider to control the buffer size for time shifting. This will determine how long you can pause a program and not miss any of it. The buffer can be set for up to 60 minutes. When the limit is reached, time shifting will continue, but the buffer will be overwritten and you may lose part of the live program.

The estimated recording time will be displayed at the bottom of this dialog box as Maximum recording time.
Schedule
The schedule will display the programs that have been selected for recording at a later date. For more information, see Scheduling Your Program Recording.

Advanced
Under Snapshot, select a file format for saving the images. In the Channel Surfing section, you can select the display mode for channel surfing.

Other option includes Always on Top.
Skin
In this tab, you can change the skin. Choose a different skin from the Select list and see how it looks in the Preview window. Click OK to accept.

Live Update
In this tab, under Live Update, you can check for product updates and news.

Channel Surfing
Right-click the program viewer and select Channel Surfing from the screen menu to tile the programs in thumbnails. You can play a program by double-clicking the thumbnail. To quit this function, click Esc and back to live program.

History
Click to see the programs you have recorded, with the most recent listed first. The first frame of the selected recording will be shown in the preview area.
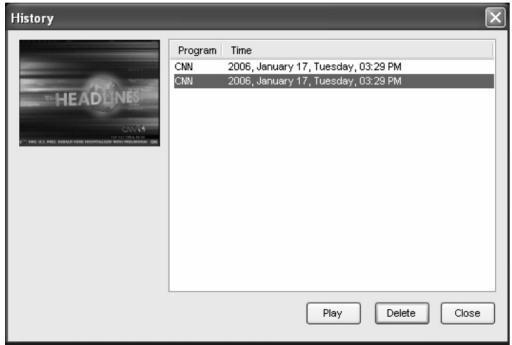
- Click Play to watch the selected program.
- Click Delete to erase a selected program from the hard disk.
- Click Close to close the History dialog box.
VAOVA
- Chapter 1 Introducing Presto!PVR. 1
- Chapter 2 Using Your Presto!PVR. 3
- Contents
- Chapter 3 Menu and Settings. 14
- Chapter 1 Introducing PRESTO! PVR
- System Requirements
- Features
- Chapter 2 Using Your PRESTO! PVR
- Installing PRESTO! PVR
- Receiving a Program
- Choosing a Program to Watch
- Channel Surfing Window
- Teletext
- Recording a Program
- Scheduling Your Program Recording
- Adjusting the Schedule Settings
- Task
- Time
- Quality
- Using the Electronic Program Guide
- Time Shifting
- Adjusting the Volume
- Taking Snapshots
- Chapter 3 Menus and Settings
- Main Screen
- Screen Menu
- Settings
- Device
- Program
- Video
- Record
- Recording
- Options
- Schedule
- Advanced
- Skin
- Live Update
- Channel Surfing
- History
- VAOVA
Brand : VAOVA
Model : DTV-200U
Category : TV Decoder