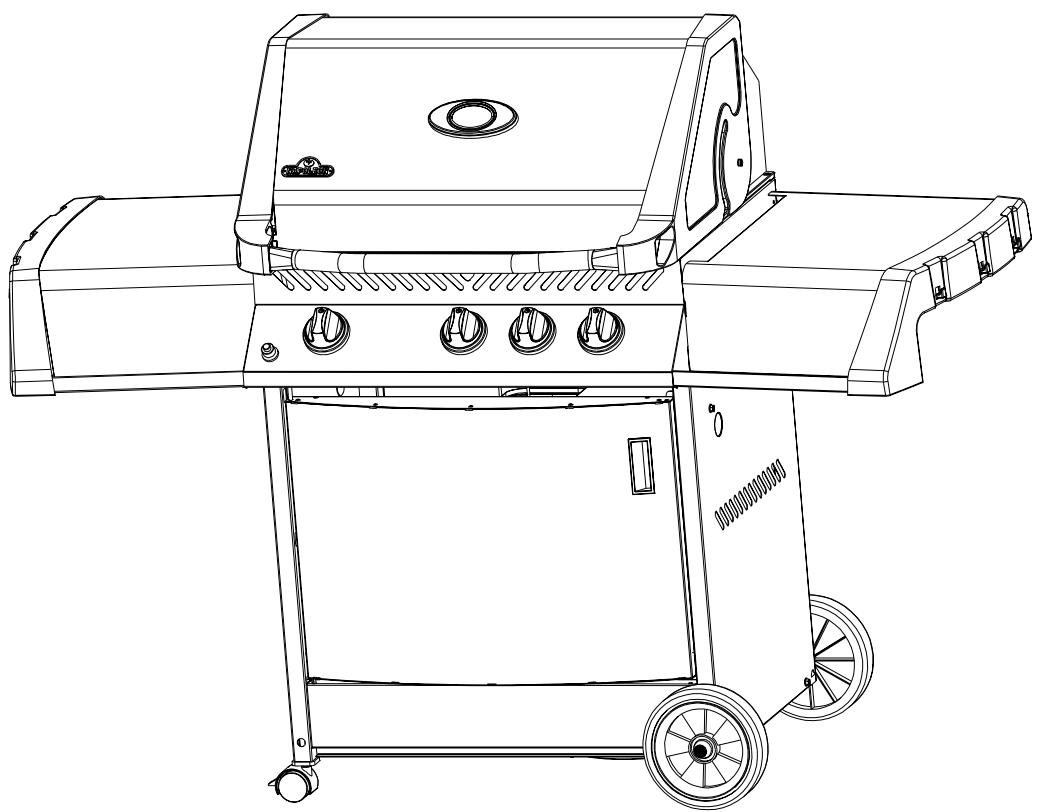
PRESTIGE II 308 - Grill NAPOLEON GRILLS - Free user manual and instructions
Find the device manual for free PRESTIGE II 308 NAPOLEON GRILLS in PDF.
User questions about PRESTIGE II 308 NAPOLEON GRILLS
0 question about this device. Answer the ones you know or ask your own.
Ask a new question about this device
Download the instructions for your Grill in PDF format for free! Find your manual PRESTIGE II 308 - NAPOLEON GRILLS and take your electronic device back in hand. On this page are published all the documents necessary for the use of your device. PRESTIGE II 308 by NAPOLEON GRILLS.
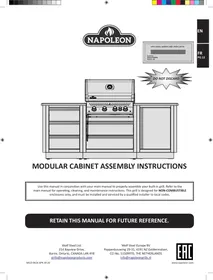
USER MANUAL PRESTIGE II 308 NAPOLEON GRILLS
Award Winning Products
PRESTIGE II 308/450
MANUFACTURED BY/MANUFACTURE PAR/VERVAARDIGD DOOR: NAPOLEON APPLIANCE CORP.
214 Bayview Dr., BARRIE, ONTARIO, CANADA L4N 4Y8 PHONE: (705)726-4278
FAX: (705)725-2564 email: care@nac.on.ca WEB SITE: www.napoleongrills.com
CE
RETAIN THIS MANUAL FOR FUTURE REFERENCE
GARDER CE LIVRE POUR RÉFERENCES FUTURES
BEWAAR DEZE HANDLEIDING VOOR REFERENTIE
BITTE BEWAHREN SIE DIESE ANLEITUNG AUF
CONSERVARE ILPRESENTE MANUALE PER RIFERIMENTI FUTURI

GOURMET GRILLS
Award Winning Products
NAPOLEON gas grills are manufactured under the strict Standard of the world recognized
ISO 9001-2000 Quality Assurance Certificate.
NAPOLEON products are designed with superior components and materials, and are assembled by trained craftsmen who take great pride in their work. The burner and valve assembly are leak tested and test-fired at a quality test station, and thoroughly inspected by a qualified technician before packaging and shipping to ensure that you, the customer, receive the quality product you expect from NAPOLEON.

NAPOLEON GAS GRILL PRESIDENT'S LIMITED LIFETIME WARRANTY
NAPOLEON warrants the following materials and workmanship in your new NAPOLEON gas grill against defects for as long as you own the gas grill. This covers: aluminum castings, stainless steel burners, stainless steel rod cooking grids, stainless steel side shelves, LUXIDIO® side shelf encaps, wheels, knobs, porcelain enamelled lids and stainless steel lids. Subject to the following conditions. During the first ten years NAPOLEON will provide replacement parts at our option free of charge. From the eleventh year to lifetime NAPOLEON will provide replacement parts at 50% of the current retail price.
Components such as regulator, casters, stainless steel warming rack, hoses and connectors, fasteners and accessories are covered and NAPOLEON will provide parts free of charge during the first year of the limited warranty.
Components such as stainless steel sear plates, igniter (excluding batteries), temperature gauge and brass valves are covered and NAPOLEON will provide parts free of charge during the first three years of the limited warranty.
NAPOLEON shall not be liable for any transportation charges, labour costs or export duties.
CONDITIONS AND LIMITATIONS
"NAPOLEON warrants its products against manufacturing defects to the original purchaser only (ie., the individual or legal entity (registered customer) whose name appears on the warranty registration card filed with NAPOLEON), provided that the purchase was made through an authorized NAPOLEON dealer and is subject to the following conditions and limitations:"
This factory warranty is non-transferable and may not be extended what-so-ever by any of our representatives.
The gas grill must be installed by a licenced, authorized service technician or contractor. Installation must be done in accordance with the installation instructions included with the product and all local and national building and fire codes.
This limited warranty does not cover damages caused by misuse, lack of maintenance, grease fires, hostile environments, accident, alterations, abuse or neglect and parts installed from other manufacturers will nullify this warranty.
This limited warranty further does not cover any scratches, dents, painted finishes, corrosion or discolouring by heat, abrasive and chemical cleaners, nor chipping on porcelain enamel parts, nor any components used in the installation of the gas grill.
Should deterioration of parts occur to the degree of non-performance within the duration of the warranted coverage, a replacement part will be provided.
In the first year only, this warranty extends to the replacement of warranted parts which are defective in material or workmanship provided that the product has been operated in accordance with the operation instructions and under normal conditions.
After the first year, with respect to this President's Limited Lifetime Warranty NAPOLEON may, at its discretion, fully discharge all obligations with respect to this warranty by refunding to the original warranted purchaser the wholesale price of any warranted but defective part(s).
NAPOLEON will not be responsible for the installation, labour or any other costs or expenses related to the re-installation of a warranted part, and such expenses are not covered by this warranty.
Notwithstanding any provision contained in this President's Limited Lifetime Warranty NAPOLEON's responsibility under this warranty is defined as above and it shall not in any event extend to any incidental, consequential, or indirect damages.
This warranty defines the obligation and liability of NAPOLEON with respect to the NAPOLEON gas grill and any other warranties expressed or implied with respect to this product, its components or accessories are excluded.
NAPOLEON neither assumes, nor authorizes any third party to assume, on its behalf, any other liabilities with respect to the sale of this product.
NAPOLEON will not be responsible for: over firing, blow outs caused by environmental conditions such as strong winds, or inadequate ventilation,
Any damages to the gas grill due to weather damage, hail, rough handling, damaging chemicals or cleaners will not be the responsibility of NAPOLEON.
The bill of sale or copy will be required together with a serial number and a model number when making any warranty claims from NAPOLEON. The warranty registration card must be returned within fourteen days to register the warranty or you can register on-line at www.napoleongrills.com.
NAPOLEON reserves the right to have its representative inspect any product or part prior to honouring any warranty claim.
NAPOLEON shall not be liable for any transportation charges, labour costs, or export duties.
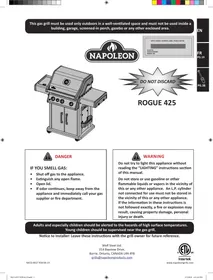
Do not try to light this appliance without reading "LIGHTING" instructions section of this manual.
WARNING
Do not store or use gasoline or other flammable liquids or vapors in the vicinity of this or any other appliance. A gas cylinder not connected for use must not be stored in the vicinity of this or any other appliance. If the information in these instructions is not followed exactly, a fire or explosion may result, causing property damage, personal injury or death.

IF YOU SMELL GAS:
- Shut off gas to the appliance.
- Extinguish any open flame.
- Open lid.
- If odor continues, keep away from the appliance and immediately call your gas supplier or your fire department
CAUTION
During unpacking and assembly it is recommended that you wear work gloves and safety glasses for your protection. Although we make every effort to make the assembly process as problem free and safe as possible, it is characteristic of fabricated steel parts that the edges and corners may be sharp and can cause cuts if handled incorrectly.
SAFE OPERATING PRACTICES
- This gas grill is not intended to be installed in or on recreational vehicles and/or boats.
- This gas grill must only be used outdoors in a well-ventilated space and must not be used inside a building, garage or any other enclosed area.
- Keep any electrical supply cord and fuel supply hose away from any heated surfaces.
- Inspect the fuel supply hose before each use. If there is evidence of excessive abrasion or wear or the hose is cut, it must be replaced, prior to using the gas grill, with a replacement hose assembly specified by the manufacturer.
- When the gas cylinder is not disconnected from the appliance, the gas grill and cylinder must be stored outdoors in a well ventilated space.
-
Do not locate in windy settings. High winds adversely affect the cooking performance of the gas grill.
-
Adults and especially children should be alerted to the hazards of high surface temperatures. Young children should be supervised near the gas grill.
- Under no circumstances should this gas grill be modified.
- Gas must be turned off at the gas cylinder when the gas grill is not in use.
- When the gas grill is to be stored indoors, the connection between the gas cylinder and the gas grill must be disconnected and the cylinder removed and stored outdoors in a well ventilated space out of reach of children. Disconnected cylinders must not be stored in a building, garage or any other enclosed area.
- The top lid is to be closed during the gas grill preheat period
- Do not use the condiment tray to store lighters, matches or other flammable materials.
- This gas grill is designed for outdoor use only.
IMPORTANT DO'S AND DON'TS
DO'S
- Read the entire instruction manual before operating the gas grill.
- Maintain proper clearance to combustibles (410mm to rear of unit, 180mm to sides). Additional clearance is recommended near vinyl siding or large panes of glass.
- Leak test the unit before initial use, annually and whenever any gas components are replaced.
- Follow lighting instructions carefully when operating grill. Burner controls must be off when turning supply cylinder valve on.
- Ensure sear plates are positioned properly according to sear plate installation instructions. The holes must be towards the front of the gas grill.
- Clean grease tray and sear plates regularly to avoid buildup which may lead to grease fires.
- Remove warming rack before lighting rear burner. (The extreme heat will damage the warming rack.)
DON'TS
- Do not route hose underneath drip pan - proper hose clearance to bottom of unit must be maintained.
- Do not use condiment tray to store lighters, matches or any other combustibles.
- Do not locate unit under unprotected combustible construction.
- Do not operate rear burner with main burners operating.
- Do not leave grill unattended when operating.
- Do not light burners with lid closed.
- Do not move grill when hot or operating.
- Do not use water to control flare-ups.
- Do not use a pressure washer to clean any part of the unit.
GAS CYLINDER

Use only gas cylinders which meet national and regional codes. The minimum cylinder size for butane units is 13kg , and for propane units is 6kg . Ensure that the cylinder can provide enough fuel to operate the appliance. If in doubt, check with your local gas supplier.
- Use caution when handling the cylinder valve.
- Never connect a cylinder which does not meet local codes.
- All cylinders 7kg or larger must be placed outside the enclosure (under the right side shelf) on level ground. Cylinders smaller than 7kg may be placed inside the enclosure, in the hole in the bottom shelf. Only cylinders connected to the appliance may be stored in the enclosure, or close to the appliance. Spare cylinders must not be stored in close proximity of an operating unit. Cylinders must not be exposed to extreme heat or direct sunlight.
IMPORTANT: Ensure that the hose is routed to maintain proper clearance to the underside of the unit. Hoses that contact high temperature surfaces may melt and leak, causing a fire.
CYLINDER CONNECTION: Ensure that the gas regulator hose is kink free. Remove the cap or plug from the cylinder fuel valve. Tighten regulator to cylinder valve. Leak test all joints prior to using the barbecue. A leak test must be performed annually, and each time a cylinder is hooked up, or if a part of the gas system is replaced.
GAS HOSE

- If the hose and regulator are not included by the manufacturer, then only hoses and regulators which meet national and regional codes are to be used.
- Do not connect the appliance to a permanent gas installation.
- Ensure that the hose does not come into contact with grease, other hot drippings, or any hot surfaces on the appliance.
- Check hose regularly. In the case of rips, melting or wear, replace hose before using the appliance.
- The recommended hose length is 0.5 m . The hose must not be longer than 1.5 m .
- Ensure that the hose is twist and kink free when installed.
- Replace the hose before expiry date printed on the hose.
DO NOT USE A FLAME TO LEAK TEST.
LEAK TESTING: This must be done before initial use, annually and whenever any gas components are replaced or serviced. No smoking while performing this test, and remove all sources of ignition. See Leak Testing Diagram for areas to check.
- Turn all burners controls to off. Turn supply valve on.
- Brush a half and half solution of liquid soap and water onto all joints and connections of the regulator, hose, manifolds and valves.
- Bubbles will indicate a gas leak. Either tighten the loose joint or replace the part with one recommended by the dealer.
- If the leak cannot be stopped, shut off the gas supply, disconnect it and have the barbecue inspected by your gas supplier or dealer. Do not use the appliance until the leak has been corrected.
- Turn off gas supply.
REGULATOR
The following tables lists input values for the appliance.
| 308 UNITS | BURNER | ORIFICE SIZE | (GROSS) HEAT INPUT (TOTAL) | GAS USAGE (TOTAL) | |
| I | II | ||||
| MAIN | 60 | 64 | 8.8 kW | 640 g/h | |
| BACK | 60 | 64 | 4.4 kW | 320 g/h | |
| SIDE | 61 | 66 | 4.0 kW | 291 g/h | |
| 450 UNITS | BURNER | ORIFICE SIZE | (GROSS)HEAT INPUT (TOTAL) | GAS USAGE (TOTAL) | |
| I | II | ||||
| MAIN | 61 | 65 | 12.3 kW | 894 g/h | |
| BACK | 58 | 63 | 4.7kW | 342 g/h | |
| SIDE | 61 | 66 | 4.0 kW | 291 g/h | |
Certified Gases / Pressures - Check rating plate to ensure that it corresponds with following list.
| Gas Category | I3B/P(30) | I3+(28-30/37) | I3B/P(50) |
| Orifice Sizes (see above) | I | I | II |
| Gases / Pressures | Butane 30mbar Propane 30mbar | Butane 28-30mbar Propane 37mbar | Butane 50mbar Propane 50mbar |
| Countries | DK, FI, NL, NO, SE | BE, ES, FR, GB, IE, IT, PT | DE, AT |
The regulators for both butane and propane 308 units must have a rating of at least 1000g / h . The regulators for both butane and propane 450 units must have a rating of at least 1500g / h . Do not tamper with or modify regulator. Use only regulators which supply the pressure listed in the table above.
LIGHTING INSTRUCTIONS
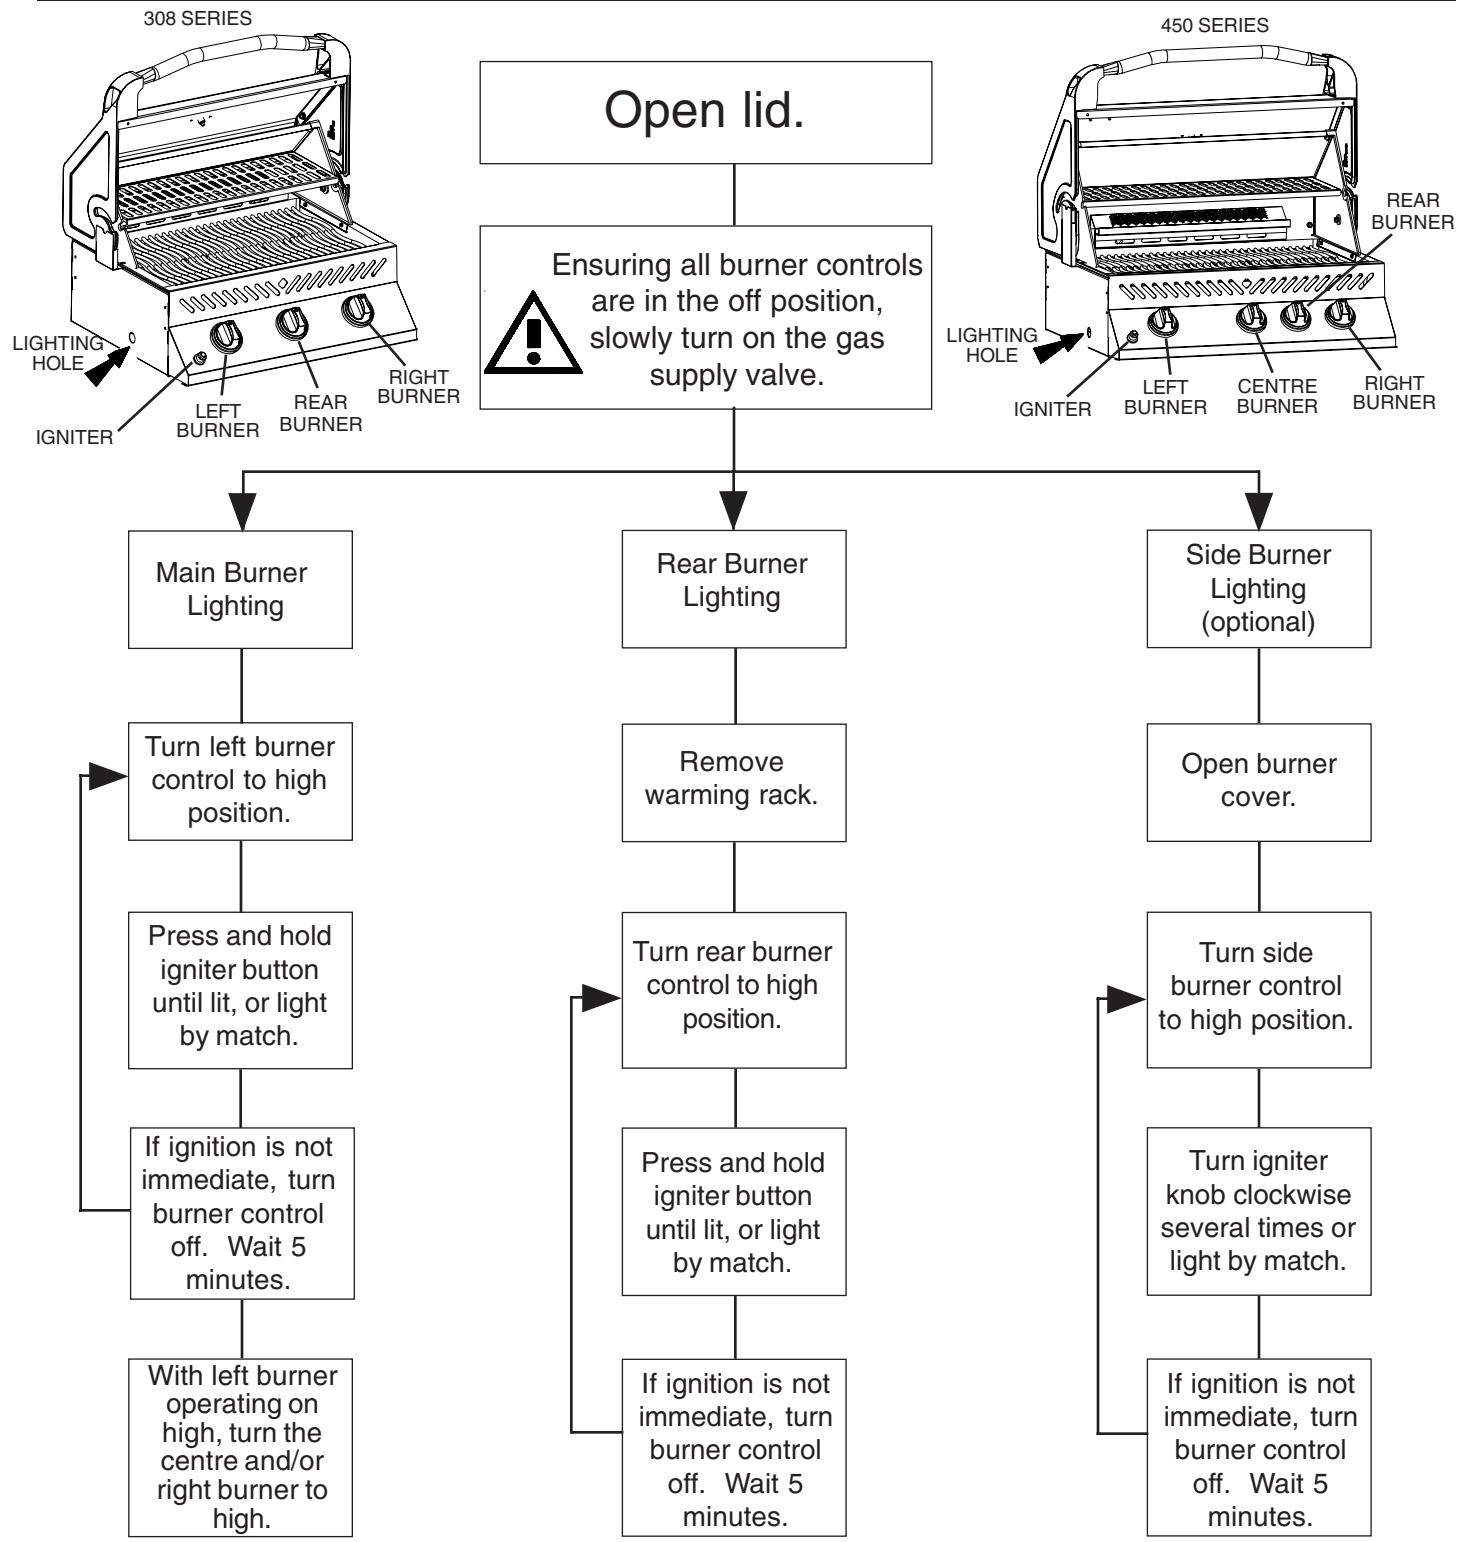

Do not use back burner while operating main burner.
COOKING INSTRUCTIONS
When lit for the first time, the gas grill will emit a slight odour. This is a normal temporary condition caused by the "burn-in" of internal paints and lubricants used in the manufacturing process and will not occur again. Simply run the main burners on high for approximately 12 hour. When cooking very lean meats, such as chicken breasts, or lean pork, the grids can be oiled before pre-heating to reduce sticking. Cooking meat with a high degree of fat content, may create flare-ups. Either trim some fat or reduce temperatures to prevent this. Should a flare-up occur, move food away from flames, reduce heat. Leave the lid open. See 'Your All Season Grill' cookbook by Napoleon for more detailed instructions.
MAIN BURNER USE: When searing foods, preheating is recommended by operating all main burners in the high position with the lid closed for approximately 10 minutes. Food cooked for a short period of time (fish, vegetables) may be grilled with the lid open. Cooking with the lid closed will ensure higher, more even temperatures that will reduce cooking time and cook meat more evenly. Food that has a cooking time longer than 30 minutes, such as roasts, may be cooked indirectly (with the burner lit opposite to the food placement). When cooking very lean meats, such as chicken breasts, or lean pork, the grids can be oiled before pre-heating to reduce sticking. Cooking meat with a high degree of fat content, may create flare-ups. Either trim some fat or reduce temperatures to prevent this. Should a flare-up occur, move food away from flames, reduce heat. Leave the lid open. See 'Your All Season Grill' cookbook by Napoleon for more detailed instructions.
REAR BURNER USE: Remove the warming rack prior to use. Cooking grids should also be removed if they interfere with the rotisserie. This gas grill is equipped with a 4.4KW rear burner (308) and 4.7KW rear burner (450). The rear burner is designed to be used in conjunction with the rotisserie kit (included with rear burner units) available from your dealer. See the rotisserie kit assembly instructions. To use the counterbalance, remove the rotisserie motor from the gas grill. Place the spit with meat being cooked across the hangers inside the grill. The meat will naturally hang with the heavy side down. Tighten the counterbalance arm and weight, so that the arm is facing up. Slide the counterweight in or out to balance the load, and tighten in place. Re-install the motor and begin cooking. Place a dish underneath to collect drippings for basting and naturally delicious gravy. Basting liquid may be added as required. To seal in juices, first operate rear burner on high until brown, then reduce the heat to thoroughly cook foods. Keep the lid closed for best results. Your roasts and fowl will brown perfectly on the outside and stay moist and tender on the inside. For example, a 3 pound chicken on the rotisserie will be done in approximately 112 hours on medium to high. See 'Your all Season Grill' cookbook by Napoleon for more detailed instructions.
SIDE BURNER USE: The side burner can be used like any range top burner, for gravies, soups etc. The gas grill should be located so that the side burner is protected from the wind, because the wind will adversely affect it's performance. The recommended pan diameter is 200 to 250mm.
CLEANING INSTRUCTIONS
Ensure that the burners are turned off prior to cleaning. Avoid unprotected contact with hot surfaces. Clean grill in an area where cleaning solutions will not harm decks, lawns or patios. Do not use oven cleaner to clean any part of this gas grill. Do not use a self cleaning oven to clean cooking grids or any other parts of the gas grill. Barbecue sauce and salt can be corrosive and will cause rapid deterioration of the gas grill components unless cleaned regularly.
GRIDS AND WARMING RACK - The grids and warming rack are best cleaned during the pre-heat period with a soft brass wire brush. Steel wool can be used for stubborn stains. Stainless grids will discolour permanently from normal usage, due to the high temperature of the cooking surface.
CLEANING INSIDE THE GAS GRILL - Remove cooking grids. Use a soft brass wire brush to clean loose debris from casting sides and insides of the lid. Scrape sear plates with a putty knife or scraper, and use a wire brush to remove ash. Remove sear plates and brush debris off of burners with a brass wire brush. Brush all debris from inside the gas grill into the removable drip pan. Ensure that the sear plates are placed properly when they are reinstalled (Check assembly instructions for proper orientation).
DRIP PAN - Slide the drip pan out for easy cleaning. It should be cleaned frequently (every 4-5 uses) to avoid grease buildup. Grease and excess drippings pass through to the drip pan, located under the gas grill, and accumulate in the disposable grease tray below the drip pan. Accumulated grease can cause a fire hazard. Do not line the drip pan with aluminum foil or sand, as it can prevent the grease from flowing properly. The pan should be scraped out with a putty knife or scraper, and all the debris should be scraped into the disposable grease tray. This tray should be replaced every two to four weeks, depending on gas grill usage. For supplies, see your Napoleon Gas Grill dealer.
CLEANING THE OUTSIDE OF THE GAS GRILL - Do not use abrasive cleaners to clean any painted, porcelain or stainless steel parts. Porcelain enamel components must be handled with additional care. The baked on enamel finish is glass like, and will chip if struck. Touch-up enamel is available from your Napoleon Gas Grill dealer. Exterior grill surfaces should be cleaned while warm to the touch, with warm soapy water. To clean stainless surfaces, use a stainless steel cleaner or a non-abrasive cleaner. Always wipe in the direction of the grain. Do not use steel wool, as it will scratch the finish. Stainless steel parts will discolour when heated, usually to a golden or brown colour. This discolouration is normal and will not affect the performance of the grill.
MAINTENANCE INSTRUCTIONS
It is recommended that this gas grill be thoroughly inspected and serviced annually by a qualified service person.
Turn off the gas at the source and disconnect unit before servicing. Maintenance should only be done when the grill is cool, to avoid the possibility of burns. A leak test must be performed annually, and whenever any component of the gas train is replaced.
HOSE - Check for abrasion, melting, cuts and cracks. If any of these conditions exist, do not use gas grill. Have part replaced by your gas grill dealer, or qualified gas installer.
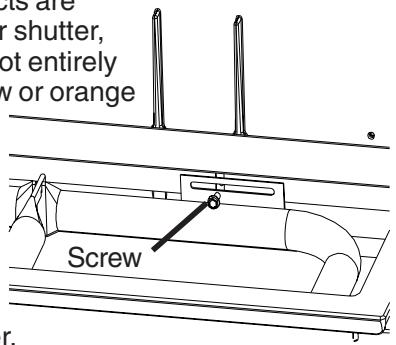
BURNER - The burner is made from heavy wall 304 stainless steel, but due to the extreme heat and corrosive environment, surface corrosion will occur. Use a brass wire brush to remove surface corrosion. Clean any blocked
ports using an opened paper clip. Do not enlarge the burner ports. Spiders and insects are attracted to the smell of gas. The burner is equipped with an insect screen on the air shutter, which will reduce the likelihood of insects building nests inside the burner, but does not entirely eliminate the problem. The nest or web will cause the burner to burn with a soft yellow or orange
flame or cause a fire (flashback) at the air shutter underneath the control panel. To clean the inside of the burner, it must be removed from the gas grill. Remove the screw(s) located either in the center of the burner on 308 models, or above the burn to the left and right of the centre of the burner on 450 models. Lift back of burner upwards to remove. Use a flexible venturi tube cleaning brush to clean out the inside of the burner. Shake any loose debris out of the burner, through the gas inlet. Ensure that the insect screen is clean, tight, and free of any lint or other debris. Check also that the valve orifices are clean. Do not enlarge the orifices. Re-install the burn
Check that the valve enters the burner when installing. Replace burner cover and mounting screws to complete installation.
ALUMINUM CASTINGS - Clean castings periodically with warm soapy water. Aluminum will not rust, but due to high temperatures and weathering, oxidation can occur on aluminum surfaces. This will appear as white spots on the castings. To refinish the castings, clean them and sand lightly with fine sandpaper. Wipe surface to remove any residue, and paint with high temperature barbecue paint. Protect surrounding areas from over-spray. Follow curing directions found on the can.
TROUBLESHOOTING
| Problem | Possible Causes | Solution |
| Low heat / Low flame when valve turned to high. | For propane - improper lighting procedure. | Ensure lighting procedure is followed carefully. All gas grill valves must be in the off position when the tank valve is turned on. Turn tank on slowly to allow pressure to equalize. See lighting instructions. |
| For natural gas - undersized supply line. | Pipe must be sized according to installation code. | |
| For both gases - improper pre-heating. | Pre-heat grill with both main burners on high for 10 to 15 minutes. | |
| Excessive flare-ups/uneven heat. | Sear plates installed incorrectly.Improper pre-heating.Excessive grease and ash build up on sear plates and in drip pan. | Ensure sear plates are installed with the holes towards the front, and the slots on the bottom. See assembly instructions.Pre-heat grill with both main burners on high for 10 to 15 minutes.Clean sear plates and drip pan regularly. Do not line pan with aluminum foil. Refer to cleaning instructions. |
| Burners burn with yellow flame, accompanied by the smell of gas. | Possible spider web or other debris, or improper air shutter adjustment. | Thoroughly clean burner by removing. See general maintenance instructions. Open air shutter slightly according to combustion air adjustment instructions. |
| Flames lift away from burner, accompanied by the smell of gas, and possibly difficulties in | Improper air shutter adjust- | Close air shutter slightly according to combustion air adjustment instructions. |
| Burner will not light with the igniter, but will light with a match. | Dead battery / or installed incorrectly.Loose electrode wire.Wrong replacement igniter.Improper gap at electrode tip.Lifting flames on burner. | Replace with heavy duty 'AAA' battery. Install with positive terminal up.Check that electrode wire is firmly pushed onto the terminal on the back of the igniter.One spark systems must use a one spark igniter.Ensure that the collector box is tight, and the gap between the electrode end and the collector box is between 1/8 - 3/16". The gap can be adjusted by bending the box in or out.Close air shutter slightly - see previous problem. |
| Humming regulator. | Normal occurrence on hot days. | This is not a defect. It is caused by internal vibrations in the regulator, and does not affect the performance or safety of the gas grill. Humming regulators will not be replaced. |
| Burners will not crosslight each other. | Plugged ports along back of burner. | Clean burner ports. See burner maintenance instructions. |
| "Paint" appears to be peeling inside lid or hood. | Grease build up on inside surfaces. | This is not a defect. The finish on the lid and hood is porcelain, and will not peel. The peeling is caused by hardened grease, which dries into paint-like shards, that will flake off.Regular cleaning will prevent this. See cleaning instructions. |
ORDERING REPLACEMENT PARTS
Before contacting the customer service department, check the NAC web site for more extensive cleaning, maintenance, troubleshooting and part replacement instructions at www.napoleongrills.com. Contact the factory directly for replacement parts and warranty claims. The customer service department is available between 9 AM and 5 PM (Eastern standard time) at 1-705-725-4258 or fax at 1-705-727-4282. In order to process a claim, we must be provided with the following information:
- Model and serial number of the unit.
- Part number and description.
- A concise description of the problem ('broken' is not sufficient).
- Proof of purchase (photocopy of the invoice).
In some cases the customer service representative may request to have the parts returned to the factory for inspection, before providing replacement parts. The parts must be shipped prepaid to the attention of the customer service department with the following information:
- Model and serial number of the unit.
- A concise description of the problem ('broken' is not sufficient).
- Proof of purchase (photocopy of the invoice).
- Return Authorization number - provided by the customer service representative.
Before contacting customer service, kindly note that the following items are not covered by the warranty:
-costs for transportation, brokerage or export duties
-labor costs for removal and re-installation
-costs for service calls to diagnose problems
-discoloration of stainless steel parts
-part failure due to lack of cleaning and maintenance, or use of improper cleaners (ovencleaner).
GOURMET GRILLS
Award Winning Products
CONDITIONS ET LIMITATIONS
Award Winning Products
GOURMET GRILLS Award Winning Products
Award Winning Products
WITH A RUBBER Mallet.
SI NÉCESSAIRE, LE BARRE DE
TRAVERSE PEUT ETRE ENFONCE
AVEC UN MAILLET EN CAOUTCH-OUC.
HET DWARSBALK KAN INDIEN
NODIG METEEN RUBBEREN
TWO PEOPLE ARE REQUIRED FOR THIS STEP.
DEUX PERSONNNES SON NÉCESSAIRES POUR CETTE ÉTAPPE.
VOOR DEZE STAP ZIJN TWEE MENSEN NODIG.
x-standard ac-accessory
x - compris
ac - accessoires
x - standard
ac - accessoire
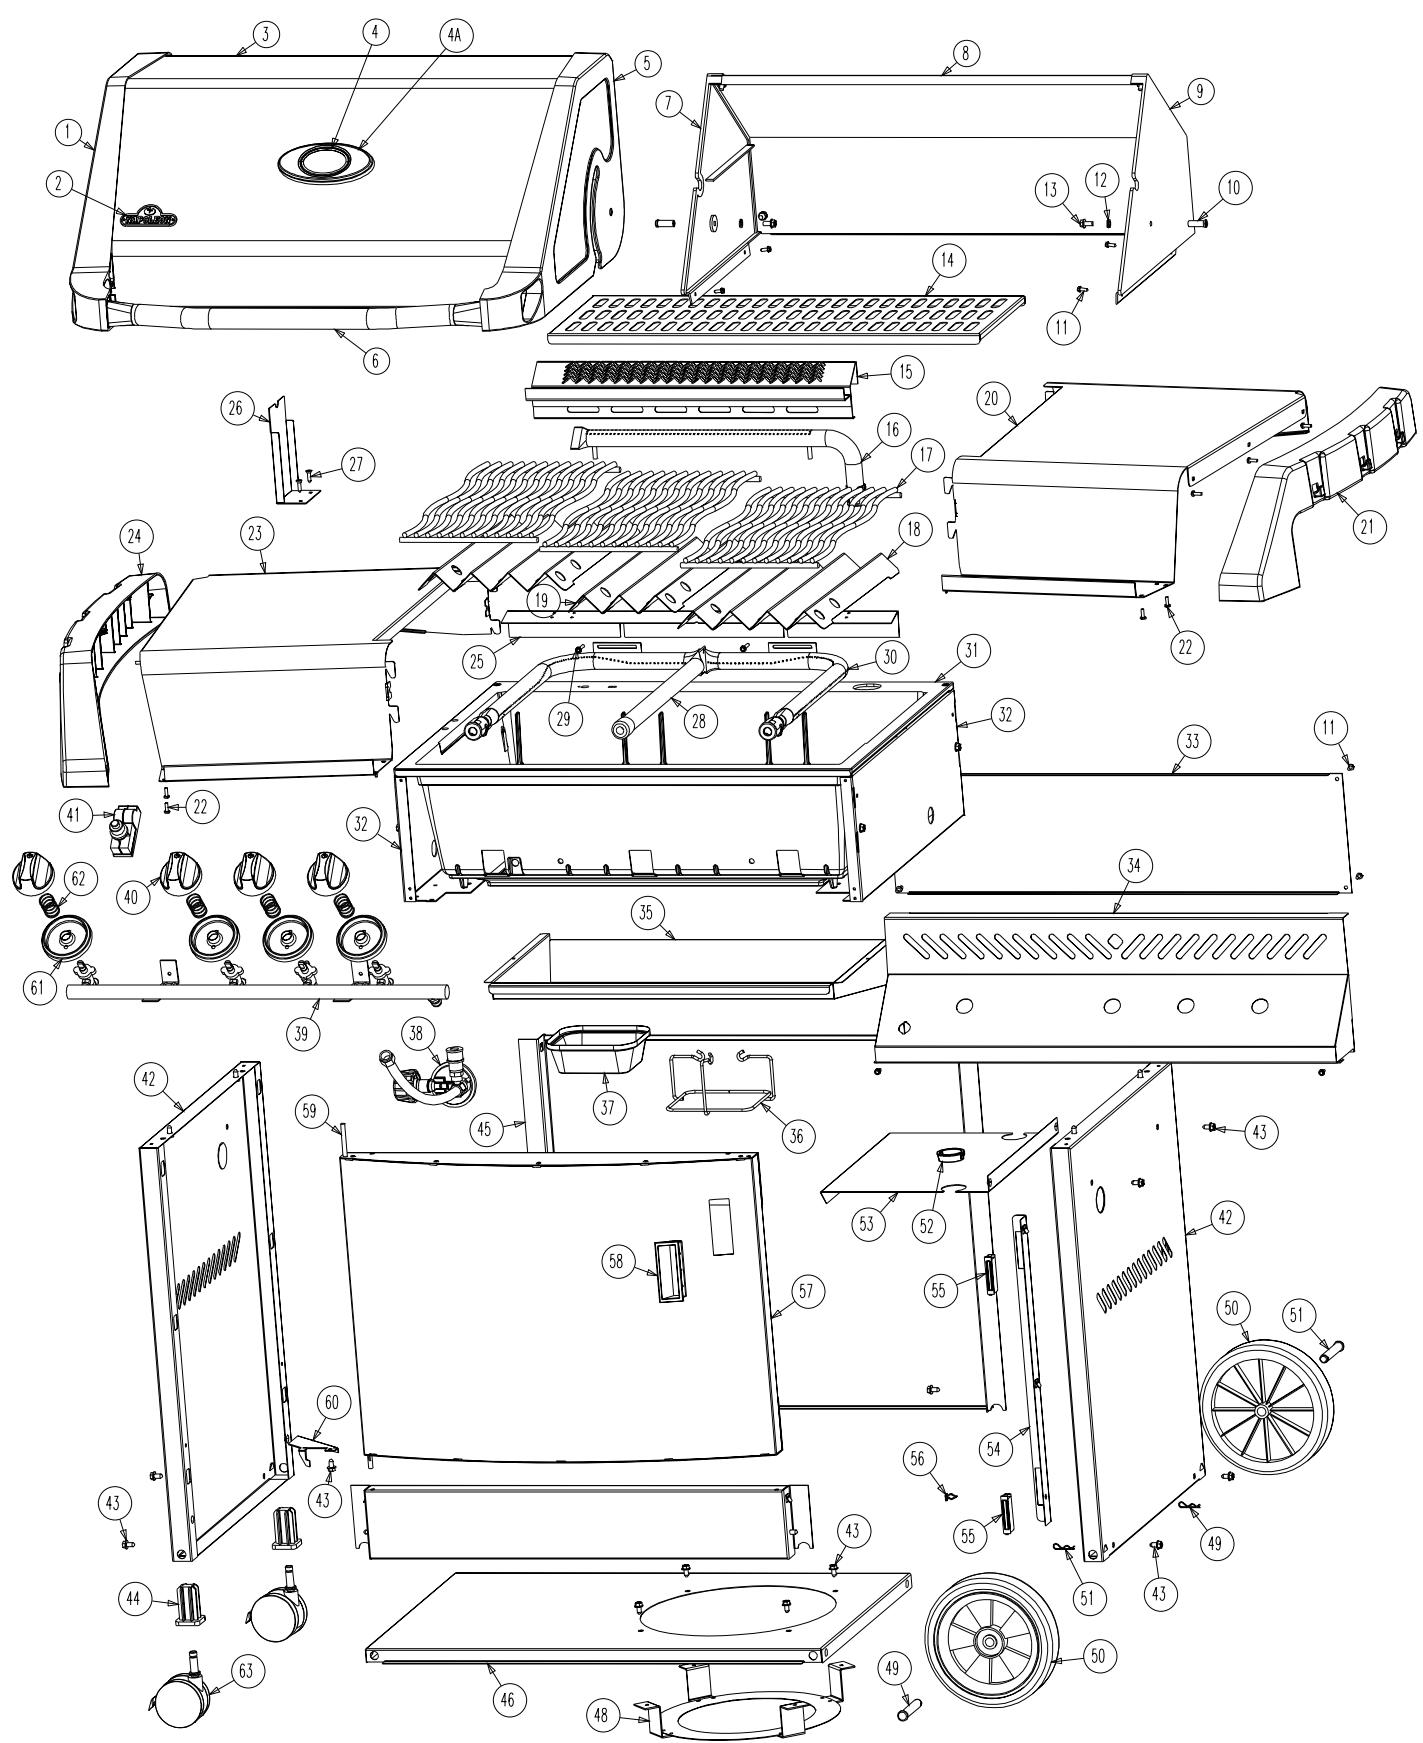
| ITEM | 308 PART # | 450 PART # | DESCRIPTION | |
| 49 | n485-0011 | - | clevis pin / clavette en | x |
| - | n015-0004 | axe / essieu | x | |
| - | n450-0023 | axe cap /,enjoliveur | x | |
| 50 | n745-0007 | n745-0007 | wheel - each / roue (unité) | x |
| 51 | n485-0012 | - | cotter pin / clavette d'arrêt | x |
| 52 | n105-0002 | n105-0002 | snap bushing / bague à pression | x |
| 53 | n585-0026p | n585-0025p | heat shield / pare-chaleur | x |
| 54 | n080-0131p | n080-0131p | magnet bracket / support à aiment | x |
| 55 | n430-0002 | n430-0002 | magnetic catch / loquet magnétique | x |
| 56 | n485-0009 | n485-0009 | push pin / clavette à pression | x |
| 57a | n010-0395k | n010-0392k | cart door - black / portepour chariot - noir | x |
| 57b | - | n010-0392b | cart door - blue / portepour chariot - bleu | x |
| 57d | n010-0395ss | n010-0392ss | cart door - stainless steel / portepour chariot - en acier inoxydable | x |
| 58 | n325-0016 | n325-0016 | snap-in door handle / poignée de portepaur pression | x |
| 59 | n555-0012 | n555-0012 | door pivot rod / tige-pivot de porte | x |
| 60 | n080-0130p | n080-0130p | door stop bracket / support d'arrêt de porte | x |
| 61 | n051-0001 | n051-0001 | control knob bezel / monture de bouton de commande | x |
| 62 | n630-0003 | n630-0003 | bezel retaining spring / ressort de retenue de monture | x |
| 63 | n130-0010 | n130-0010 | caster - each / roulettes (unité) | x |
| n240-0001 | n240-0001 | rear burner electrode / électrode du brûleur arrêté | x | |
| n240-0016 | n240-0016 | main burner electrode / électrode du brûleur principal | x | |
| n350-0054 | n350-0054 | collector box - main burner / boite du collecteur du brûleur principal | x | |
| n020-0118 | n020-0114 | main assembly baggie / prinical sac d'accessories pour le montage | x | |
| n370-0337 | n370-0337 | rotisserie kit / ensemble de la rôtissoire | x | |
| n555-0007 | n555-0006 | rotisserie spit / spit | x | |
| n435-0004 | n435-0004 | rotisserie motor DE/FR/NL / moteur de rôtissoire DE/FR/NL | x | |
| n435-0003 | n435-0003 | rotisserie motor - UK / moteur de rôtissoire UK/ | x | |
| 63161 | 63169 | vinyl cover / housse en vinyle | ac | |
| 56016 | 56018 | stainless steel griddle / plaque de cuisson en acier inoxydable | ac | |
| 67308 | 67450 | charcoal tray / support à charbon | ac | |
x-standard ac-accessory
x - compris ac - accessoires
x - standardac - accessoire
| Item | Onderdeelnr 308 | Onderdeelnr 450 | Omschrijving | |
| 1 | n135-0018p | n135-0020p | gietwerk deksel, linkerzijde / Linke Seite des Deckelgussteils | x |
| 2 | n385-0129 | n385-0129 | NAPOLEON-Logo | x |
| w 450-0005 | w 450-0005 | borqveren logo / Logohalterung | x | |
| n510-0002 | n510-0002 | zw arte silicone stootrand deksel / Deckelanschlag aus schw arzem Silicon | x | |
| 3a | n335-0018k | n335-0021k | zw art dekselinzetstuk /Deckeleinsatz aus Schw arzes | x |
| 3b | - | n335-0021b | blauw dekselinzetstuk /Deckeleinsatz aus Blau | x |
| 3d | n010-0480 | n010-0435 | roestvrijstalen dekselinzetstuk / Deckeleinsatz aus Rostfreiistahl | x |
| 4 | n685-0003 | n685-0003 | temperatuermeter / Thermometer | x |
| 4a | n051-0002 | n051-0002 | ring bedieningsknop / Deckring für thermomter | x |
| 5 | n135-0019p | n135-0021p | gietwerk deksel, rechterzijde / Rechte Seite des Haubengussteils | x |
| 6 | n325-0025 | n325-0026 | handgreep deksel / Haubengriff | x |
| 7 | n135-0012p | n135-0015p | gietwerk deksel, linkerzijde kap / Linke Seite des Deckelgussteils Haube | x |
| 8 | n335-0017k | n335-0020k | kap / Haube | x |
| 9 | n135-0013p | n135-0016p | gietwerk deksel, rechterzijde kap / Rechte Seite des Haubengussteils Haube | x |
| 10 | n570-0015 | n570-0015 | scharnierschroeif deksel / Deckeldrehstift | x |
| 11 | n570-0008 | n570-0008 | #8 x 1/2" schroeif / Schraube #8 x 1/2 Zoll | x |
| 12 | n735-0002 | n735-0002 | 1/4" sluitrig / Sicherungsscheibe, 1/4 Zoll | x |
| 13 | n570-0024 | n570-0024 | 1/4-20 x 1/2" schroeif / Schraube 1/4-20 x 1/2 Zoll | x |
| 14 | n520-0017 | n520-0018 | warmhoudrek / Warmhaltefläche | x |
| 15 | n350-0025 | n010-0229 | behuzing achterste brander / Gehäuse des hinteren Brenners | x |
| 16 | n100-0003 | n100-0003 | achterste brander / Hinterer Brenner | x |
| 17 | n305-0031 | n305-0026 | grillroosters - roestvrijstalen stang / Grillroste - Stangen aus Rostfreiistahl | x |
| 18 | n305-0055/56 | n305-0021 | kookplaat -linke/rechter / Anbratplatte Linke/Rechter | x |
| 19 | - | n305-0022 | kookplaat -middeste / Anbratplatte Mittlerer | x |
| 20 | n590-0137 | n590-0139 | roestvrijstalen zijrek, rechts / Seitenablage aus Rostfreiistahl, rechts | x |
| 21 | n120-0005 | n120-0007 | LUXIDIO-zijrek, eindstop, rechts / LUXIDIO-Endkappe der Seitenablage, rechts | x |
| 22 | n570-0076 | n570-0076 | schroeif #8 x 1/2" / Schraube #8 x 1/2 Zoll | x |
| 23 | n590-0136 | n590-0138 | roestvrijstalen zijrek, links / Seitenablage aus Rostfreiistahl,links | x |
| 24 | n120-0004 | n120-0006 | LUXIDIO-zijrek, eindstop, links / LUXIDIO-Endkappe der Seitenablage, links | x |
| 25 | n200-0026 | n200-0028 | afscheming gegen vet, brander / Fettschild für den Brenner | x |
| 26 | n475-0053 | n475-0056 | spit, montage / Drehspießhalter | x |
| 27 | n570-0039 | n570-0039 | #10 x 3/4" schroeif / Schraube, #10 x 3/4 Zoll | x |
| 28 | - | n100-0010 | middeste brander / Mittlerer Raubrenner, Haupt | x |
| 29 | n570-0021 | n570-0021 | #8 x 1" schroeif / Schraube, #8 x 1Zoll | x |
| 30 | n100-0005 | n100-0009 | buisbrander / Rohrbrenner, Haupt | x |
| 31 | n135-0011p | n135-0014p | basis / Grundrahen | x |
| 32 | n080-0136p | n080-0132p | beugel, montage apparaat / Haltew inkel | x |
| 33 | n200-0064p | n200-0063p | deksel achteraan / Rückw and | x |
| 34 | n475-0135 | n475-0131 | bedieningspaneel / Bedienbrett | x |
| 35 | n710-0037 | n710-0038 | lekbak / Troppfanne | x |
| 36 | n160-0006p | n160-0006p | houver hetkommetje / Halter der Fettschale | x |
| 37 | 62007 | 62007 | reservevetakommetjes (5 stufs) / Einweg-Fettschalen (5 Stück) | ac |
| 38 | n530-0012 | n530-0012 | gasslang / Gastroevoerslang /regelaar UK | x |
| n345-0004 | n345-0004 | gasslang / Gastroevoerslang NL | x | |
| n345-0006 | n345-0006 | gasslang / Gastroevoerslang FR | x | |
| n345-0004 | n345-0004 | gasslang / Gastroevoerslang DE | x | |
| n725-0009 | n725-0009 | klep hoofbrander / Haupt Brennerventil | x | |
| n725-0007 | n725-0007 | klep anschterste brander / Hinterer Brennerventil | x | |
| n455-0017 | n455-0013 | nr.60 opening hoofdbrander / #61Düse, Haupt brenner (30 mbar) | x | |
| n455-0014 | n455-0023 | nr.64 opening hoofdbrander / #65 Düse, Haupt brenner (50 mbar) | x | |
| n455-0021 | n455-0024 | opening achterste brander (nr. 60) / #58Düse, hinter brenner (30 mbar) | x | |
| n455-0001 | n455-0005 | opening achterste brander (nr. 64) / #63 Düse, hinter brenner (50 mbar) | x | |
| n432-0007 | n432-0008 | buis verdeltstuk met beugels / Verteilerrohr mit Halterung | x | |
| Item | Onderdeelin r 308 | Onderdeelnr 450 | Omschrijving | |
| n255-0001 | n255-0001 | elleboogstuk (90 garden) / 90 Grad Biegung 3/8 F bis 1/2 FP | x | |
| n720-0023 | n720-0026 | toevoerbuis anschterste brander / Hinterers Brennesufuhrrohr | x | |
| 40 | n380-0009 | n380-0009 | bedieningsknop, hoofdbrander / Einstellknopf, Hauptbrenner | x |
| 41 | n357-0014 | n357-0014 | elektronische ontsteking / Elektronische Zündung | x |
| 42 | n475-0163p | n475-0205p | karbehuizing, links/rechts / Wagenumfassung, links / rechts | x |
| 43 | n570-0026 | n570-0026 | #14 x 1/2" schroef / Schraube, #14 x 1/2 Zoll | x |
| 44 | n510-0006 | n510-0006 | w ieltjes / Rolle Stecker | x |
| 45 | n475-0133p | n475-0129p | achterste paneel - kar / Wagenrückw and | x |
| 46a | n590-0108p | n590-0155p | onderste rek - propaan / Bodenregal - Propan | x |
| 47 | n525-0007p | n525-0006p | dw arsbalk vooraan/achteraan / Querträger hinteren / vorn | x |
| 48 | n010-0491p | n010-0491p | steun flesring / Flaschenmontageklammern | x |
| 49 | n485-0011 | n485-0011 | Trekhaak speld | x |
| - | n015-0004 | as / Achse | x | |
| - | n450-0023 | asdop / Achsemutter | x | |
| 50 | n745-0007 | n745-0007 | w iel / Rad | x |
| 51 | n485-0012 | n485-0012 | Splitpen | x |
| 52 | n105-0002 | n105-0002 | bus klikverbinding / Einsetzbuchse | x |
| 53 | n585-0026p | n585-0025p | hitteschem / Hitzeschild | x |
| 54 | n080-0131p | n080-0131p | beugel, magneet / Türstopper magnet | x |
| 55 | n430-0002 | n430-0002 | magnetische sluiting /Magnetverschluss | x |
| 56 | n485-0009 | n485-0009 | duw stift / drücken Sie Stift | x |
| 57a | n010-0395k | n010-0392k | zw art deur karretje / Wagentür Schw arzes | x |
| 57b | - | n010-0392b | blauw deur karretje / Wagentür Blau | x |
| 57d | n010-0395ss | n010-0392ss | roestvrijstalen deur karretje / Wagentür | x |
| 58 | n325-0016 | n325-0016 | inklkbare deurhandgreep / Türgriff | x |
| 59 | n555-0012 | n555-0012 | scharnierstang deur / Türscharnierstange | x |
| 60 | n080-0130p | n080-0130p | beugel deurstuiter / Türstopper | x |
| 61 | n051-0001 | n051-0001 | bus klikverbinding / Einsetzbuchse | x |
| 62 | n630-0003 | n630-0003 | ring opsluitveer / Haltefeder für Deckring | x |
| 63 | n130-0010 | n130-0010 | zw enkw ieltje / Rolle | x |
| n240-0001 | n240-0001 | elektrode,achterste brander / Hinterer Brenner-Elektrode | x | |
| n240-0016 | n240-0016 | elektrode, buisbrander / Haupt Brenner-Elektrode | x | |
| n350-0054 | n350-0054 | behuzing - hoofdbrander / Sammelbehälter - Hauptbrenner | x | |
| n020-0118 | n020-0114 | hoofdconstructie - zakje / Packbeutel | x | |
| n370-0337 | n370-0337 | spit / Drehspieß-Baugruppe | x | |
| n555-0007 | n555-0006 | spitstang / Spießstange | x | |
| n435-0004 | n435-0004 | Drehspieß-Baugruppe Motor DE/FR/NL | x | |
| n435-0003 | n435-0003 | Drehspieß-Baugruppe Motor UK | x | |
| 63161 | 63169 | vinyl afdekhoeis / Vinylabdeckung | ac | |
| 56016 | 56018 | roestvrijstalen kookplaat / Grillblech aus Rostfreiistahl | ac | |
| 67308 | 67450 | bakje houtskool / Holzkohlenkorb | ac | |
| ARTICOLO | MOD. 308 | MOD. 450 | DESCRIZIONE | |
| 1 | n135-0018p | n135-0020p | PARTE LATERALE SINISTRA COPERCHIO | x |
| 2 | n385-0129 | n385-0129 | LOGO NAPOLEON | x |
| w 450-0005 | w 450-0005 | FISSAGGIO LOGO | x | |
| n510-0002 | n510-0002 | MANIGLIA IN SILICONE NERO COPERCHIO | x | |
| 3a | n335-0018k | n335-0021k | POMELLO NERO COPERCHIO | x |
| 3b | - | n335-0021b | POMELLO BLU COPERCHIO | x |
| 3d | n010-0480 | n010-0435 | POMELLO IN ACCIAIO INOX COPERCHIO | x |
| 4 | n685-0003 | n685-0003 | MISURA TORE DI TEMPERATUREA | x |
| 4a | n051-0002 | n051-0002 | MONTATURA PER TERMOMETRO | x |
| 5 | n135-0019p | n135-0021p | PARTE LATERALE DESTRA COPERCHIO | x |
| 6 | n325-0025 | n325-0026 | MANIGLIA COPERCHIO | x |
| 7 | n135-0012p | n135-0015p | GANCIO DELLA PARTE SINISTRA | x |
| 8 | n335-0017k | n335-0020k | GANCIO POMELLO | x |
| 9 | n135-0013p | n135-0016p | GANCIO PARTE DESTRA | x |
| 10 | n570-0015 | n570-0015 | VITE COPERCHIO PIVOT | x |
| 11 | n570-0008 | n570-0008 | VITE 8 x 1/2" | x |
| 12 | n735-0002 | n735-0002 | RONDELLA A U 1/4" | x |
| 13 | n570-0024 | n570-0024 | VITE 1/4-20 x 1/2" | x |
| 14 | n520-0017 | n520-0018 | GRIGIA DI RISCLAMENTO | x |
| 15 | n350-0025 | n010-0229 | ALLOGGIO DEL BRUCIatore POSTERIOINFRA ROSSI | x |
| 16 | n100-0003 | n100-0003 | BRUCIatore POSTERIOREXX | x |
| 17 | n305-0031 | n305-0026 | GRIGIE DI COTTURA IN ACCIAIS INROSSIDABILE | x |
| 18 | n305-0055/56 | n305-0021 | PIASTRA BRUCIatore SINISTRO / DESTRO | x |
| 19 | - | n305-0022 | PIASTRA BRUCIatore CENTRALE | x |
| 20 | n590-0137 | n590-0139 | TAVOLETTA DESTRA IN ACCIAIO INOX | x |
| 21 | n120-0005 | n120-0007 | CAPUCchio IN LUXIDIO TAVOLETTA LATERALE DESTRA | x |
| 22 | n570-0076 | n570-0076 | VITE 8 x 1/2" | x |
| 23 | n590-0136 | n590-0138 | TAVOLETTA LATERALE SINISTRA IN ACCIAO INOX | x |
| 24 | n120-0004 | n120-0006 | CAPPUCCIO IN LUXIDIO TAVOLETTA LATERALE SINISTRA | x |
| 25 | n200-0026 | n200-0028 | PLACCA DEL FORNO | x |
| 26 | n475-0053 | n475-0056 | SUPPORTO PER IL GRILL | x |
| 27 | n570-0039 | n570-0039 | VITE 10 x 3/4" | x |
| 28 | - | n100-0010 | BRUCIatore CENTRALE PRINCIPALE | x |
| 29 | n570-0021 | n570-0021 | VITE 8-32 x 3/4" | x |
| 30 | n100-0005 | n100-0009 | BRUCIatore SINISTRO/DESTRO PRINCIPALE | x |
| 31 | n135-0011p | n135-0014p | COPERCHIO BASE | x |
| 32 | n080-0136p | n080-0132p | SUPPORTO PER SFISSAGGIO DELL'UNITA' | x |
| 33 | n200-0064p | n200-0063p | COPERCHIO POSTERIORE | x |
| n385-0025 | n385-0025 | PLACCA DI OMLOGAZIONE | x | |
| 34 | n475-0135 | n475-0131 | PANELLO DI CONTROLLO | x |
| 35 | n710-0037 | n710-0038 | SGOCCIOLATOIO | x |
| 36 | n160-0006p | n160-0006p | VASSOI IN SOSTITUTZIONE (5 PEZZI)AC | x |
| 37 | 62007 | 62007 | VASSOI IN SOSTITUTZIONE (5 PEZZI)AC | ac |
| 38 | n345-0005 | n345-0005 | TUBO FLESSIBLE DELL'APPROVVISIONALimento DI GAS | x |
| n725-0009 | n725-0009 | VALVOLA PRINCIPALE DEL BRUCIatore | x | |
| n725-0007 | n725-0007 | VALVOLA POSTERIORE DEL BRUCIatore | x | |
| n455-0017 | n455-0013 | BOCCA DEL BRUCIatore PRINCIPALE (30MBAR) | x | |
| n455-0021 | n455-0024 | BOCCA DEL BRUCIatore POSTERIORE (30MBAR) | x | |
| n432-0007 | n432-0008 | COLLETTORE | x | |
| n255-0001 | n255-0001 | 90 GOMITO (3/8 F to 1/2 FP) | x | |
| n720-0023 | n720-0026 | TUBO DI RIFORNIMENTO POSTERIORE DEL BRUCIatore | x | |
| 40 | n380-0009 | n380-0009 | PULSANTE DI CONTROLLO BRUCIatore | x |
| 41 | n357-0014 | n357-0014 | ACCENDione ELETTRONICA-2 SCINTILLE | x |
| 42 | n475-0163p | n475-0205p | PANELLO PER CARRELLLO SINISTRO/DESTRO | x |
| 43 | n570-0026 | n570-0026 | VITE 14 x 1/2" | x |
| 43 | n570-0026 | n570-0026 | VITE 14 x 1/2" | x |
| 44 | n510-0006 | n510-0006 | ATTACCO PER SPIEDO - UNITA | x |
| 45 | n475-0133p | n475-0129p | PANNELLO DI CHIUSURA FRONTALE PER CARRELLO | x |
| 46a | n590-0108p | n590-0155p | TAVOLETTA INFERiore | x |
| 47 | n525-0007p | n525-0006p | BARRA TRAVERSALE POSTERiore | x |
| 48 | n010-0491p | n010-0491p | SUPPORTO PER BOMBOLA PP | x |
| 49 | n485-0011 | - | CHIAVETTA A U | x |
| - | n015-0004 | ASSE | x | |
| - | n450-0023 | PROTEZIONE DELL'ASSE | x | |
| 50 | n745-0007 | n745-0007 | RUOTA ( UNITA') | x |
| 51 | n485-0012 | - | CHIAVETTA PERNO | x |
| 52 | n105-0002 | n105-0002 | BOCCOLA A PRESSIONE | x |
| 53 | n585-0026p | n585-0025p | PARA-CALORE PP | x |
| 54 | n080-0131p | n080-0131p | SUPPORTO MAGNETICO | x |
| 55 | n430-0002 | n430-0002 | BLOCCO MAGNETICO | x |
| 56 | n485-0009 | n485-0009 | PERNO A PRESSIONE | x |
| 57a | n010-0395k | n010-0392k | PORTELLO CARRELLO-NERO | x |
| 57b | - | n010-0392b | PORTELLO CARRELLO-BLU | x |
| 57d | n010-0395ss | n010-0392ss | PORTELLO CARRELLO IN ACCIAIO INossIDABILE | x |
| 58 | n325-0016 | n325-0016 | PIGNONE A PRESSIONE PER PORTELLO | x |
| 59 | n555-0012 | n555-0012 | ASTA PORTELLO PIVOT | x |
| 60 | n080-0130p | n080-0130p | SUPPORTO FERMO PORTELLO | x |
| 61 | n051-0001 | n051-0001 | MONTANTE DEL PULSANTE COMANDO | x |
| 62 | n630-0003 | n630-0003 | INCASTONATURA PER MONTANTE | x |
| 63 | n130-0010 | n130-0010 | ROTELLA - UNITA' | x |
| n240-0001 | n240-0001 | ELETTRODO DEL BRUCIatore POSTERiore | x | |
| n240-0016 | n240-0016 | ELETTRODO DEL BRUCIatore PRINCIPALE | x | |
| n350-0054 | n350-0054 | SCATOLA COLLETTORE-BRUCAITORE PRINCIPALE | x | |
| n020-0118 | n020-0114 | SACCHETTO ACCESSORI PER MONTAGGIO | x | |
| n370-0337 | n370-0337 | KIT PER SPIEDO | x | |
| n555-0007 | n555-0006 | SPUTO ROD DI ROTISSERIE | x | |
| n435-0004 | n435-0004 | MOTORE DI ROTISSERIE | x | |
| 63161 | 63169 | COPERCHIO IN VINILE | ac | |
| 56016 | 56018 | GRIGLIA IN ACCIAIO INOX | ac | |
| 67308 | 67450 | VASSOIO PER CARBONELLA | ac | |
x-standard ac-accessori
NAPOLEON APPLIANCE CORPORATION ACCESSORIES / PARTS ORDER FORM
FAX TO: 1-705-727-4282
PLEASE PRINT CLEARLY
CUSTOMER NAME: DATE:
ADDRESS: MODEL #:
SERIAL #:
TELEPHONE:
VISA OR MASTERCARD #: EXPIRY DATE:
| QUANTITY | PRODUCT NUMBER | DESCRIPTION |
TAXES & SHIPPING CHARGES MAY APPLY