
TV ELITE XGA - TV Accessories ADS TECH - Free user manual and instructions
Find the device manual for free TV ELITE XGA ADS TECH in PDF.

User questions about TV ELITE XGA ADS TECH
0 question about this device. Answer the ones you know or ask your own.
Ask a new question about this device
Download the instructions for your TV Accessories in PDF format for free! Find your manual TV ELITE XGA - ADS TECH and take your electronic device back in hand. On this page are published all the documents necessary for the use of your device. TV ELITE XGA by ADS TECH.
USER MANUAL TV ELITE XGA ADS TECH
Turn Your TV into a Big-Screen Monitor!
User's Guide: First Edition - Revision 2
© 2003 ADS Technologies. All Rights Reserved
First Edition: Revision 2 March, 2003
Microsoft, MS-DOS, Windows, Windows 95 and Windows 98 are registered trademarks of Microsoft Corporation. IBM is a registered trademark of the International Business Machines, Inc.
ADS is a registered trademark of ADS Technologies Inc.
ADS Technologies (ADS) makes no warranty of any kind with regard to this material, including but not limited to, the implied warranties of merchantability and fitness for a particular purpose. The information furnished within this written document is for information purposes only and is subject to change without notice. ADS Technologies assumes no responsibility or liability for any errors or inaccuracies that may appear herein. ADS makes no commitment to update or to keep current information contained within this document. (rtt)
Table of Contents
A letter from the President of ADS 5
System Requirements 6
Package Contents 6
Connecting TV Elite XGA to your computer . . . . . 6
Connecting TV Elite XGA to your TV 6
Remote Control 7
Using your TV Elite XGA 8
TV Elite XGA Features and Controls 8
Remote Control Functions 12
How TV Elite XGA works 13
The best types of computer images to display on TV . . 14
The poorest types of computer images to display on TV . 14
Common uses for TV Elite XGA 14
Changing Video Resolutions on your computer . . . 15
TV Elite XGA: French Manual 17
TV Elite XGA: German Manual 28
TV Elite XGA: Spanish Manual 39
Help Resources 50
Service and Warranty 51
FCC Information 52
A Letter from the President of ADS Technologies "Connect, Create, and Store"
At ADS Technologies, Inc. we bring the best and latest multimedia technology to your PC. Our products allow you to "Connect, Create and Store".
CONNECT with our line of USB and 1394 Host and Hub devices. Today, external bus technologies such as USB and FireWire/1394 let you connect hundreds of devices to your PC or MAC. We have the connectivity solutions that allow you to get the most out of USB and 1394 technologies.
CREATE audio and video productions with our line of video capture and editing solutions. We have video editing solutions to fit everyone's needs, ranging from the novice level to the professional level.
STORE that multimedia masterpiece with one of our 1394 storage solutions. Today's multimedia files are getting larger and larger. You need solutions that help you easily and cost effectively store your work; we've got those solutions.
More than ever, my goal has been to bring new technologies to the consumer market at affordable prices and with significant value to you, our customer.
ADS products are easy to use. Most of our products are Plug-and-Play, easy to install and offer software to help get the best value out of the hardware product. And if you do need help, we will do our best to support you. We want every customer to be a happy ADS customer.
The combination of technology innovation, affordability, quality, value and support has made our products award-winners in the press and at conventions. More over they are winners with our customers.
I wish to thank you for choosing ADS Technologies and I hope you enjoy your new multimedia experience.
Sincerely,

Michael McCoy President
TV Elite XGA
User's Guide
System Requirements:
- IBM compatible PC or
MAC (Blue & White G3 or later, G3 Powerbook or later)
VGA card
- TV or VCR with video inputs (RCA or S-VHS)
Package Contents
- TV Elite XGA unit
Infra-Red Remote Control - 6 ft. VGA to 8 pin DIN connector (VGA IN Cable)
- 9 ft. RCA to RCA (Composite) video cable
- 9 ft. S-VHS to S-VHS (Y/C) 4 pin DIN video cable
- 9 ft. Audio cable - 3.5 mm stereo jack w/Y split female 3.5mm to Left (Red)+ Right (White) RCA jacks
- Wall transformer Power Supply
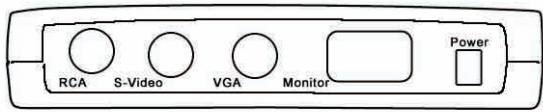
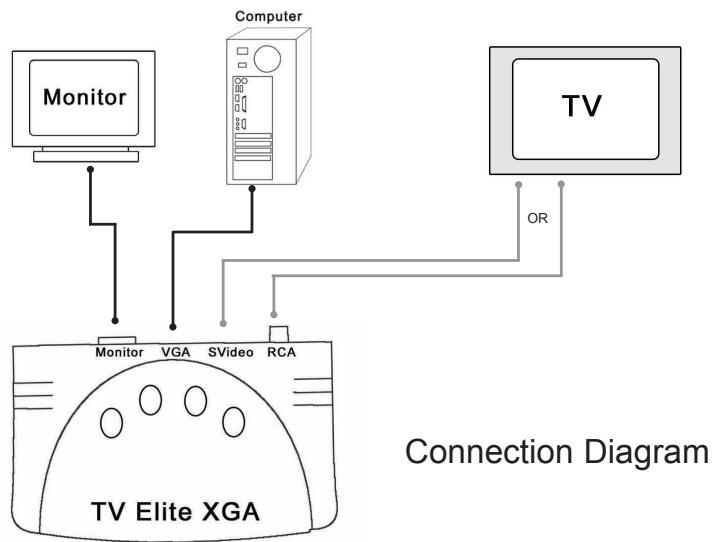
Connecting TV Elite XGA to your computer
- Disconnect the Monitor cable from your computer graphics card.
- Connect your Monitor cable to the VGA output on the TV Elite XGA
- Use the 8 pin DIN to VGA IN Cable and connect the VGA end to your computer graphics card and the 8 Pin DIN to the VGA IN on the TV Elite XGA.
- Plug in the power supply and connect the Power Jack on TV Elite XGA.
Connecting TV Elite XGA to your TV
- Connect either the RCA or S-VHS cable between the TV Elite XGA and the matching Video input jack on your TV. The S-VHS cable is recommended for use whenever possible. S-VHS connections provide improved image quality over RCA video connections.
- Disconnect your computer speakers from your sound card Speaker Jack.
- Connect the Audio Cable 3.5mm male jack to the speaker jack on your sound card.
-
Connect your speaker cable to the female 3.5mm Y connection on the Audio cable.
-
Connect the Red and White RCA jacks to the Left and Right audio input jacks on your TV.
- Turn on your TV and select the external input source (Video 1 or Input 1) on your TV to select the external device as your video source.
Remote Control
The Remote Control unit that is included with TV Elite XGA is ready to use, battery included. Remove Protective Battery Cover: The unit ships with the battery pre-installed, but has a plastic cover on the battery so it will not be discharged during shipping.
- Remove Battery compartment cover from bottom of Remote control
- Pull Plastic strip - put slight pressure on battery so it won't pop out
- Press battery snugly into place
- Replace battery compartment cover
You are now ready to use the TV Elite Remote Control.
Your TV Elite XGA is now connected and ready to use.
Using your TV Elite XGA
You connected the audio and video cables between your Computer, the TV Elite XGA and your TV, now you are ready to start using your XGA unit.
1. Turn on your computer
a. Check the VGA Resolution - TV Elite XGA can convert any resolution up to 1024 x 768 @ 60 Hz refresh rate and 32 bit color.
b. If the resolution is higher than 1024 × 768 or if the refresh rate at 1024 × 768 is higher than 60Hz , XGA will not convert the display. Higher refresh rates can be achieved at lower resolutions.
c. To learn more, see the section - Changing Video Resolutions on page 15.
2. Apply power to the TV Elite XGA
a. Be sure you have your XGA plugged in!
b. The Red Power Light will be on at all times when the power supply is plugged in, even in the low power state.
3. Turn on your TV
a. Select the video input source to which you have connected the TV Elite XGA.
You should now see your computer image on the TV.
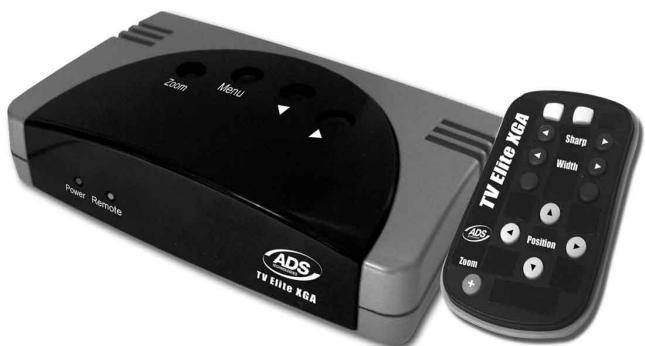
TV Elite XGA Feature and Controls
The TV Elite XGA offers many ways for you to control the computer image on your TV. You can adjust brightness and sharpness as well as position the image on the screen as well as use the 200 % zoom function and pan around the screen while the image is zoomed. These features are easy to access so you can easily control the image so you can optimize the display for business presentations; web surfing or displaying DVD or Internet streaming video on your TV screen. Remember, you can connect a VCR to the TV Elite XGA so you can record any image and sound on your computer to video tape.
TV Elite XGA has 4 control buttons and an infra-red remote control which allow you to access all the features of the device. There are 2 functions which are accessed from the Remote control only and not accessible from the 4 buttons. These features are: Freeze and Zoom.
4 Control Buttons
The TV Elite XGA has several controls accessible from the 4 buttons located on the top of the unit. Additional functions are accessible only from the Remote control.
The Buttons are Menu, Select, Right and Left. You will use these buttons to access and control most of the features of the TV Elite unit. You will be guided through the menu options via an onscreen display.
- Pressing the MENU button will cause the menu bar to be displayed on your TV screen.
- Press the Right and Left buttons to move from icon to icon across the menu bar.
- When you find the menu option you wish to activate, press the SELECT button.
- Once you press Select, the Menu will display the icon for the function you selected.
- Depending upon the function selected, you will use the Left, Right or Select Buttons to change the settings.
On Screen Menu Icons

Sharpness

Zoom

Panning
Over/underscan

Positioning


Color bar
Brightness
Home settings
Sharpness
The Sharpness control allows you to choose from 8 levels of sharpness settings. Generally with TV Scan Converters you will notice that a sharper image may induce some flicker. Flicker is induced by the interlaced nature of the TV image. Flicker reduction will cause the image to soften.
- Press MENU button.
-
Press Right or Left buttons until the Sharpness control is highlighted
-
Press SELECT button and on screen menu changes to Sharpness control.
- Press Right and Left buttons to step through 8 levels of sharpness settings.
Zoom
The Zoom control will magnify the image on your TV by 200% . In the Zoom mode you can use the Panning function to PAN around the TV image.
- Press MENU button
- Press Right or Left buttons until the Zoom control is highlighted
- Press SELECT button and on screen menu changes to Zoom control
- Press SELECT button to Zoom In
- Press SELECT button again to Zoom out to normal
Panning
This tool is especially useful when you have Zoomed the Screen. You can PAN around the image Up, Down, Left or Right.
- Press MENU button
- Press Right or Left buttons until the Panning control is highlighted.
- Press SELECT button and on screen menu changes to Pan control
- You will see the Pan icon with arrows. Pressing LEFT or RIGHT buttons will PAN the TV image horizontally.
- Press SELECT again and the PAN icon will change to show arrows.† Pressing LEFT or RIGHT buttons will PAN the TV image vertically.
Overscan/Underscan
TV has an overscanning function. This means that some of the images sent to a TV can extend past the visible area of the TV screen. You can enable or disable the Overscan function. For most computer images you will want an underscanned image so all of the screen is visible on the TV.
- Press MENU button
- Press Right or Left buttons until the OverScan/UnderScan control is highlighted.
- Press SELECT button and on screen menu changes to Overscan/Underscan control.
- Press SELECT button to OverScan
- Press SELECT button again to UnderScan to normal.
Positioning
This control allows you to easily position the computer image on the TV screen.
- Press MENU button
- Press SELECT button and on screen menu changes to Positioning control
- You will see the Position icon with arrows. Pressing LEFT or RIGHT buttons will move the TV image horizontally.
- Press SELECT again and the Position icon will change to show arrows.† Pressing LEFT or RIGHT buttons will move the TV image vertically.
Brightness
TV Elite has 4 levels of Brightness settings. You can also adjust Brightness on the TV using your TV remote control.
- Press MENU button.
- Press Right or Left buttons until the Brightness control is highlighted
- Press SELECT button and on screen menu changes to Brightness control.
- Press Right and Left buttons to step through 4 levels of Brightness settings.
Color Bars
Color Bars control to adjust Color, Picture, Brightness, Contrast and HUE settings of your Television. Make adjustments to your Television's picture while the Color Bars are displayed.
- Press MENU button.
- Press Right or Left buttons until the Color Bars control is highlighted
- Press SELECT button and on screen menu changes to Color Bars control.
- Press SELECT again to display the Color bars.
- Press SELECT again to clear Color Bars.
Home
The HOME setting will bring your image back to the normal position. If you have Zoomed and Panned and want to quickly center the computer image on the TV, Use the use the HOME function.
- Press MENU button.
- Press Right or Left buttons until the HOME control is highlighted
- Press SELECT button and your computer image will be centered on the TV.
NTSC and PAL Switch
To switch between NTSC and PAL TV systems:
- Press the MENU and SELECT buttons at the same time.
- You will notice the TV display change to accept either the NTSC or PAL signal.
- To Switch back, Press MENU and SELECT at the same time again.
Power Down mode
The Power Down mode switches the XGA to a power saving mode. The TV screen will immediately go blank when Power Down is activated. The Red Power light will remain on. This is because the system is waiting for the Full Power mode.
To Activate Power Down mode:
- Press MENU and RIGHT button at the same time.
- You will see the TV Screen go Black.
To enter Full Power mode:
- Press MENU button
- TV Screen will display computer image.
Remote Control Functions
Power - Press to Power on unit. Press again to put the unit into a low power state. Red Power light will stay on.
Brightness - Press repeatedly to select any of the 4 Brightness settings
Sharp - Press either Sharpness button to select any of the 8 sharpness settings
Width - This sets the UnderScan/OverScan mode
F = Freeze - This will Freeze the image on the TV. This allows you to make changes on the Computer without your audience watching. Press the Freeze button a second time to Un-Freeze.
- = Zoom - Zoom to 200% original size. Press again to Zoom back out to normal size.
Position keys - Up, Down, Left and Right- Use in Zoom mode to pan around the TV image. When not Zoomed, you can position the TV image Up, Down, Left or Right.
H = Home - Press the Home button to center the image on the TV.
How TV Elite XGA works
TV Elite XGA is a class of product called a Scan Converter. The video signal Frequency and the way that images are displayed on a VGA monitor and a TV are very different. TV Elite XGA converts the Progressive Scan VGA signal from your computer into an Interlaced video signal that can be displayed on standard definition televisions.
The Differences between TV and VGA
| VGA - Frequency: | Progressive Scan pixels per inch 31.5 Hz Horizontal 60 – 150 Hz Vertical |
| Lines or Pixels: | Pixels per inch; i.e. 800 x 600 |
| TV - | Horizontal lines of Interlaced video |
| Frequency: | 15.7 Hz Horizontal |
| 60 Hz Vertical | |
| Lines or Pixels: | 525 Horizontal Scan lines |
| (480 visible on the screen) | |
| Frame Rate: | 30 frames per second, but display is interlaced |
so only _ of the image is displayed in every _ second. Each _ second display is called a Field. There are 2 fields per frame, therefore 60 fields per second to make up 30 frames per second.
From the above you can see that the basic method of displaying an image on a computer screen is very different from the way televisions work. VGA is measured in pixels per inch while TV is measured in horizontal scan lines. VGA is progressive, meaning the VGA image is presented simultaneously while a TV image is Interlaced meaning that only _ of the TV image is presented every _ second. Only with the advent of Digital High Definition TV (HDTV) are we starting to see some progressive display technology on televisions.
What does this mean? While TV Elite XGA does a very good job of converting the VGA signal to display on standard definition televisions, computer images converted to be viewed on a TV will never look quite as good as the VGA image.
The Best types of computer images to display on a TV
Generally computer graphic images of any type are the best types of images to be converted from VGA to TV. These include:
Power Point Slides
Photos
- Animation and video
Computer Games
Educational software
- Computer graphics
Web graphics
Large Font text
The poorest types of computer images to display on a TV
- Single pixel lines like those in excel spreadsheets
- Small font text
Common Uses for TV Elite XGA
ADS Technologies has been making Video Scan Converter products for over ten years. Over the years we have learned how our customers have used these products. Below are descriptions and tips for using TV Elite XGA with some of the more common uses of this product.
Power Point Presentations
PowerPoint is a perfect application for TV Elite XGA. This is a great way to make presentations to small groups or classes where everyone is close enough to view a TV. The other advantage is that a TV can be easily viewed without turning off the lights in the room. This helps keep everyone's attention on the presentation and room has enough light to take notes.
You can use PowerPoint at any resolution (640 x 480, 800 x 600 or 1024 x 768), but the best viewing size is 800 x 600.
Viewing Web Pages
Viewing Web pages on a TV is an excellent application and with TV Elite XGA several people can view the page at the same time. The only drawback is that most text on web pages is quite small. Therefore we recommend using the largest text setting that your Internet Browser can display.
In Windows Explorer you set this by:
- Click View
- Select Text Size
- Select Largest
With this setting most of the text should be readable and the web graphics will look great.
DVD, Computer Video and Streaming Video
Computer Video converts great with TV Elite XGA. If you are watching a DVD movie on your PC you can display at full screen and it will fill the entire TV screen. This is a great way to get DVD video from your Computer to your TV.
Internet video is great. On many websites you can watch old TV shows, movies, news video and more. The problem is that most of the video is lower resolution (320 x 240). You can use TV Elite to get this streaming video from your computer to your Big Screen TV. If you are watching Internet Streaming video, you can Use OverScan or Zoom on the TV Elite to increase the image size on the TV. This will result in better looking video than if you were to zoom the video on the computer screen.
Computer Games and Animation
Computer games and animation look great on TV because they are very graphical in nature. Play your computer games on your 36" TV and you will have the entire neighborhood at your house playing games!
Video Conferencing
Scan Converters have long been used for Video Conferencing applications. In a meeting environment it is a great way to get the video conference onto a large display screen so everyone in the meeting room can have eye contact with the video conferencing participant.
Changing Video Resolutions on your computer
You may need to change your VGA resolution to optimize performance of the TV Elite XGA. Here are few tips on how to accomplish this:
Windows
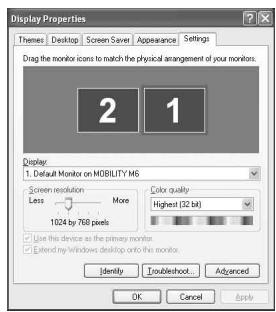
From the Desktop: From anyplace on your Windows desktop that is clear of icons or applications, Right Click and select
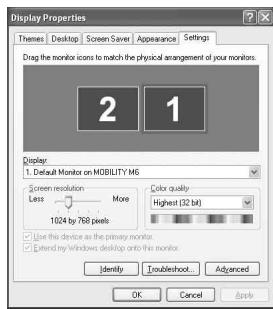
Properties. The Display Properties Box will appear. Use the Screen Resolution Slider to choose a new resolution setting, Click OK to set new resolution.
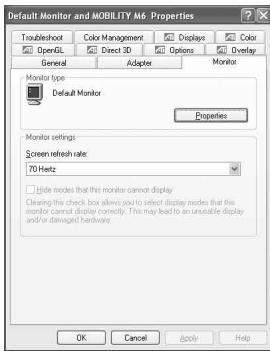
Vertical Refresh Rate:
The vertical refresh rate can be no higher than 60Hz when you are at a resolution of 1024 x 768. At lower resolutions you can have the vertical frequency as high as 90Hz . To change the refresh rate:
- Open Display Properties as described above.
- Click the Advanced Button.
- Click the Monitor Tab and change the screen refresh rate setting.
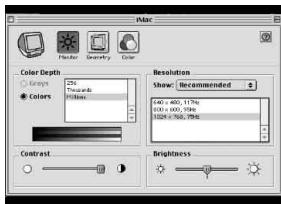
MAC
To change the monitor settings on your Mac
- Click the Apple Icon
- Select Control Panels
- Select Monitor
- The Monitor settings box will open
TV Elite XGA: French
TV Elite XGA: German
Benutzerhandbuch
TV Elite XGA: Spanish
Guía del usuario
Requisitos del sistema:
- PC compatible con IBM o MAC (Blue & White G3 o posterior, G3 Powerbook o posterior)
- Tarjeta VGA
- TV o VCR con entradas de video (RCA o S-VHS)
Whenever you want to use the Escritorio, choose the Escritorio in Windows.
donde no haya iconos o aplicaciones, haga的比例的比例比例比例比例比例比例比例比例比例比例比例比例比例比例比例比例比例比例比例比例比例比例比例比例比例比例比例比例比例比例比例比例比例比例比例比例比例比例比例比例比例比例比例比例比例比例比例比例比例比例比例比例比例比例比例比例比例比例比例比例比例比例比例比例比例比例比例比例比例比例比例比例比例比例比例比例比例比例比例比例比例比例比例比例比例比例比例比例比例比例比例比例比例比例比例比例比例比例比例比例
For Hardware questions:
Check the ADS web site: www.adstech.com
E-mail ADS for help: support@adstech.com
Call ADS for help: 1-562-926-4338
Support Hours: M-F 8:00 AM - 5:00 PM PST
Service and Warranty:
Service:
If you require assistance with the installation, operation, or application of your ADS Technologies, Inc. product there are several options available to you as described in the technical support section of this manual. Your primary source for information and assistance is always your computer store or computer parts dealer. If your ADS product needs repair or replacement, contact your dealer for on-site repair service.
The ADS Technologies technical support and customer service staff can aid in solving many problems. Our technical support department is available to repair any ADS Technologies product. You or your dealer must return products to our factory for repair or warranty replacement.
Return/Replacement:
If you need to return your ADS Technologies product you should return the product directly to the dealer or store where you purchased the product. Each individual computer store or dealer sets product returns policies for their customers. ADS Technologies, Inc. cannot be responsible for the actions or policies set by our dealers. If you desire to return the product for a refund, you must get the refund from the dealer or store you purchased the product from. If you purchased the product directly from ADS please see the "Terms and Conditions of Sale" on the reverse side of your sales invoice.
Returns to ADS Technologies, Inc. are for repair or warranty replacement only. If you need to return product to ADS Technologies, Inc. for repair or replacement you must follow these steps:
- Call our Technical Support department at (562) 926-4338 to obtain a Return Merchandise Authorization (RMA) number.
- The RMA number is valid for 30 days.
- Ship the product to the ADS factory with the RMA number marked on the inside and outside of the package. If there is no RMA number on the package or the RMA number has expired, the shipment will be refused. ADS will not be liable for lost or mis-shipped products.
- Replacement product cannot be shipped to you until the defective product has been received by ADS.
- Once the product is received at the factory it will be tested and then repaired or replaced.
- Turn around time is approximately one week. A repaired or replacement product will be shipped back to you.
Warranty:
This ADS Technologies, Inc. product comes with a One (1) year hardware warranty. ADS Technologies, Inc. (ADS) warrants this product against defects in material and workmanship for a period of One (1) year from the date of original purchase from ADS or an authorized ADS dealer. This warranty applies only to the original purchase of the product and is not
transferable. This warranty does not cover any incompatibilities due to the user's computer, hardware, software or other related system configuration in which the product interfaces. Proof of purchase will be required before any warranty consideration by ADS occurs.
This warranty does not cover any damage caused by negligence, non-authorized modifications, or parts installed without prior written permission from ADS.
This warranty does not apply if the product has been damaged by accident, abuse, or misapplication, nor as a result of service to the product by anyone other than ADS.
If your ADS product is not in working order, your only recourse is repair or warranty replacement, as described above. UNDER NO CIRCUMSTANCES will ADS Technologies, Inc. be liable for consequential damages, including but not limited to any lost savings, lost profits, or any other damages, caused by the use of any ADS Technologies, Inc. product or inability to use the product, even if the dealer or ADS Technologies, Inc. has been advised of such liability or other claims. This includes damage to property and, to the extent permitted by law, damages for personal injury. This warranty is in lieu of all other warranties including implied warranties of merchantability and fitness for a particular purpose.
FCC Information
Federal communications Commission Radio Frequency Interference Statement
Note: This equipment has been tested and found to comply with the limits for a class B digital device, pursuant to Part 15 of the FCC Rules. These limits are designed to provide reasonable protection against harmful interference when the equipment is operated in a residential installation. This equipment generates, uses and can radiate radio frequency energy and if not installed and used in accordance with the instruction manual may cause harmful interference to radio communications. However, there is no guarantee that interference will not occur in a particular installation. If this equipment does cause harmful interference to radio or television reception, which can be determined by turning the equipment off and on, the user is encouraged to try to correct the interference by one or more of the following measures:
- Reorient or relocate the receiving antenna
- Increase the separation between the equipment and receiver.
- Connect the equipment into an outlet on a circuit different from that to which the receiver is connected.
- Consult the dealer or an experienced radio TV technician for help.
Notice:
(1) The changes or modifications not expressly approved by the party responsible for compliance could void the user's authority to operate the equipment.
(2) Shielded interface cables and AC power cord, if any, must be used in order comply with the emission limits.
ADS Technologies
North America Office
12627 Hidden Creek Way
Cerritos, CA 90703
Phone: (562) 926-1928
Fax: (562) 926-0518
Technical Support: (562) 926-4338
Technical Support Hours: M-F 7am-6pm PST
European Office
Shannon Industrial Estate
Shannon Co. Clare, Ireland
Phone: +353.61.702042
Part#:128-593
