USER MANUAL TS745A & TS745 A BRAUN
Textile Protector (TS 735 TP only)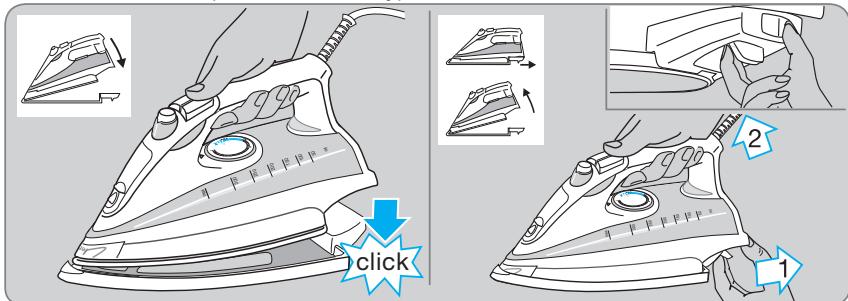
E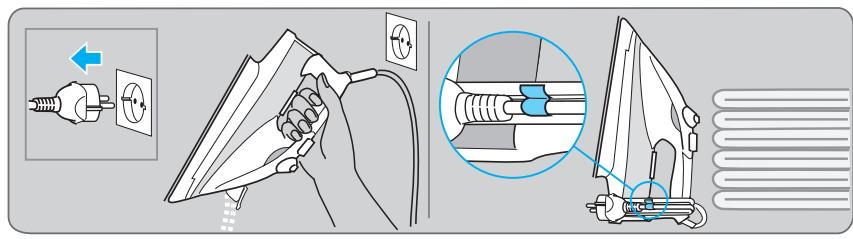
F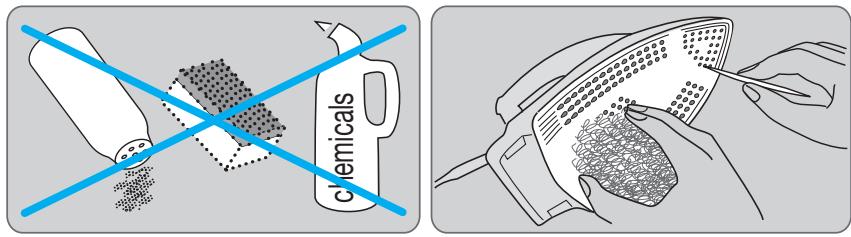
G Cleaning the anti-calc valve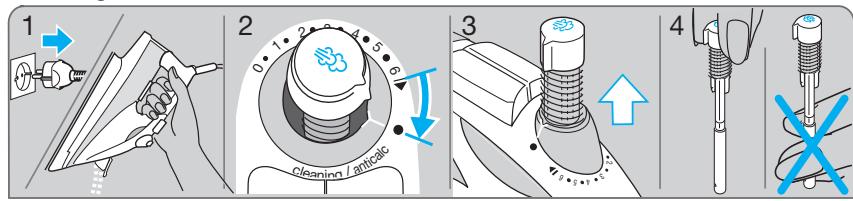
H Anticalc system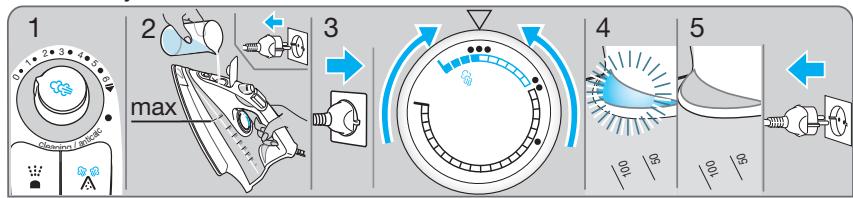
Deutsch
Before using the iron, read the use instructions completely. Keep the use instructions during the entire life of the appliance.
Important Safeguards
- Make sure your voltage corresponds to the voltage printed on the iron.
- This appliance can be used by children aged from 8 years and above and persons with reduced physical, sensory or mental capabilities or lack of experience and knowledge if they have been given supervision or instruction concerning use of the appliance in a safe way and understand the hazards involved. Children shall not play with the appliance. Cleaning and user maintenance shall not be made by children unless they are older than 8 years and supervised.
- During operation and cool-down, the appliance and its mains cord shall be kept out of reach of children under 8 years.
- Caution: Hot surfaces! Electric irons combine high temperatures and hot steam that could lead to burns. Always unplug the iron before filling with water. Always pull the plug, not the cord.
- Do not open the water tank cover during ironing.
- The cord should never come in contact with hot objects or the sole plate.
- Never immerse the iron in water or other liquids.
- The iron must be used and rested on a stable surface.
- During ironing pauses, always place the iron upright on its heel rest and ensure that the heel rest is placed on a stable surface.
- The iron must not be left unattended while it is connected to the mains supply.
- Never iron or dampen clothes while wearing them.
- The iron is not to be used if it has dropped, if there are visible signs of damage or if it is leaking. Regularly check the cord for damage.
- If the appliance (including cord) shows any defect, stop using it and take it to a Braun Service Centre for repair. Faulty or unqualified repair work may cause accidents or injury to the user. Braun electric appliances meet applicable safety standards.
A Description
1 Preconditioning nozzles 2 Spray nozzle 3 Water tank opening 4 Precision Shot button 5 Spray button 6 Steam regulator 7 Temperature selector 8 Temperature pilot light 9 «auto-off» light (only with TS 745 A model) 10 Heel rest 11 Textile Protector (only with TS 735 TP model)
B Before starting off
This iron is designed for tap water. If you have extremely hard water, we recommend that you use a mixture of 50% tap water and 50% distilled water. Fill the water tank to "max" marking. Never use distilled water exclusively. Do not add any additives (e.g. starch). Do not use condensation water from a tumble dryer.
Before filling with water, turn off the steam regulator (<<0>> = steam off). - Holding the iron slightly inclined (as shown in B), fill the water tank up to the «max» marking. - Place the iron upright on its heel rest and connect it to the mains. Select the temperature according to the ironing guide on the heel rest of the iron or on the label in your garments. The pilot light (8) goes off when the desired temperature is reached (after approx. 1 1/2 min.).
C Ironing
Vario steam
You can select the steam quantity by turning the steam regulator (6) in a range from «0» to «6».
The temperature selector has a minimum temperature level 2 (●).
We recommend a medium steam setting for all normal ironing. Only when ironing linen, thick cotton or similar fabrics we recommend the maximum steam setting.
Notice: While ironing, do not turn the steam regulator beyond setting «6».
Vario plus steam
For extra steam, press the steam regulator (6) for max. 30 seconds.
The temperature selector has a minimum temperature level 3 (***).
Precision Shot
Prior to use, press the Precision Shot button (4) 3 to 4 times to activate it. Press the Precision Shot button in intervals of at least 5 seconds for a powerful steam shot with preconditioning steam. Precision Shot can be activated when dry ironing. However, the temperature selector has a minimum temperature level 3 (***). The Precision Shot function can also be used in the vertical position for steaming hanging clothes.
Caution: Hot steam comes out from the preconditioning nozzles.
Spray function
Press the spray button (5).
Dry ironing
Set the steam regulator (6) on position «0» (= steam off).
Automatic shut-off
(only with TS 745 A model)
The «auto-off» mechanism causes a slight rattling noise during ironing. This is normal and in no case indicates a fault of the iron. The red «auto-off» light (9) will flash when the automatic shut-off is activated.
This happens when the iron has rested:
- horizontally on its sole plate for about 30 seconds or
- vertically on its heel rest for about 8 minutes.
To turn on the iron again, just move it. When the «auto-off» pilot light stops flashing, the electrical power is on again. The automatic shut-off will be activated approximately 2 minutes after the iron is plugged into a socket.
D Textile Protector
(only with TS 735 TP model
Before attaching the Textile Protector (10) for the first time, iron approximately
2 minutes without Textile Protector. The Braun Textile Protector protects delicate fabrics from heat damage and makes it possible to iron most dark fabrics without an intermediate cloth.
A special coating avoids shiny patches. However, in order not to damage the coating, avoid ironing over e.g. zippers, metal buttons/rivets or strass with the Textile Protector attached.
To check the reaction of your fabrics before you start ironing, we recommend that you iron a small section of material on the reverse side. With the Textile Protector, you are able to iron delicate fabrics with the temperature setting (***) to «max», so that you can use all steam functions your iron offers.
After having attached the Textile Protector, wait about 1 1/2 minutes before you start ironing. Always store your iron with the Textile Protector detached.
E After ironing
Unplug the iron and turn the steam regulator to position 0 . To prolong the life of the iron, empty the water tank. Store the cool iron in a dry place always standing on its heel rest.
F Maintenance and cleaning
To clean the sole plate, use steel wool. Never use a scouring pad, vinegar or other chemicals.
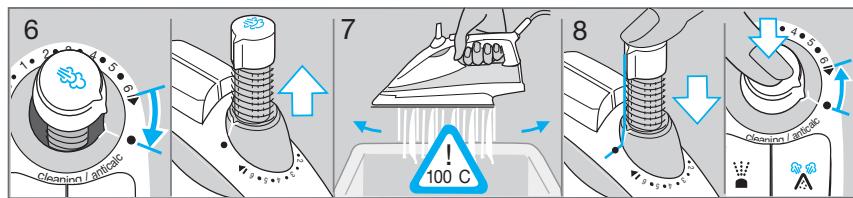
G Cleaning the anticalc valve
The anticalc valve located on the lower end of the steam regulator has to be decalcified regularly (e.g. whenever steam development is insufficient). For this, the water tank has to be empty.
Removing the steam regulator with the anticalc valve
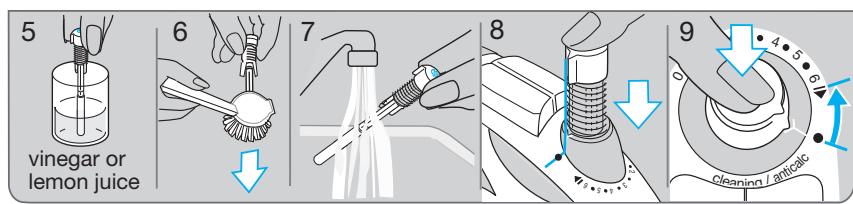
Turn the steam regulator clockwise towards the steam setting «6». Keep on turning firmly beyond the resistance until the steam regulator is lifted. When positioned at , pull it out vertically. Do not touch the anticalc valve at its lower end. Immerse the anticalc valve in vinegar (not vinegar essence) or lemon juice for a minimum of 30 minutes. Brush off remaining residues and rinse under running water (fig. G, 1-7).
Re-inserting the steam regulator
When re-inserting the steam regulator, make sure the steam regulator base still points on setting (fig. G 8). Firmly push down the steam regulator until it turns back to setting 6 (fig. G) where it catches.
Notice: The iron must never be used without steam regulator.
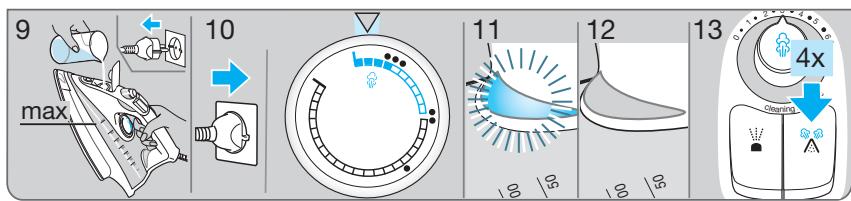
H Decalcifying/anticalc system
In order to clean the steam chamber from residues, decalcify it as shown in picture section H, 1-8.
Caution: Hot water and steam will come out from the sole plate when the steam regulator is turned clockwise beyond setting «6».
Wait for the sole plate to cool down, then clean it as described above. Then refill the tank with water, heat up the iron and press the precision shot button 4 times to rinse the iron before ironing (fig. H, 9-13).
Do not use commercial decalcifiers, they may damage the iron.
Trouble-shooting guide
| Problem | Remedy |
| Drops coming out of the steam vents. | Turn the steam regulator anti-clockwise to reduce the steam or turn it off.
Take longer intervals when pressing the Precision Shot button.
Select a higher temperature setting. |
| Less steam develops or no steam at all. | Check water level.
Clean the anticalc valve. |
| Calcium particles coming through the steam vents. | Decalcify the steam chamber. |
Subject to change without notice.
Please do not dispose of the product in the household waste at the end of its useful life. Disposal can take place at a Braun Service Centre or at appropriate collection points provided in your country.

Preparation for use
(for model TS 745 A)
The automatic shut-off mechanism emits a characteristic sound during operation. This is normal and does not indicate a malfunction. The control lamp for automatic shut-off (9) flashes when the iron switches off automatically. This function activates when the iron is left horizontal on its base for about 30 seconds, or vertical on its heel for about 8 minutes.
To switch the iron back on, simply move it. If the control lamp for automatic shut-off stops flashing, power is supplied to the appliance again. The heating element activates approximately 2 minutes after switching the iron on.
D Textile protector (for model TS 735 TP)
Before using the textile protector (10), heat the iron for about 2 minutes. The textile protector from Braun protects delicate fabrics from damage by the iron and allows you to iron most dark fabrics without an additional cloth. The special coating prevents shine on the fabric. However, to avoid damaging the coating, do not iron over metal parts such as zippers or buttons.
Metal buttons, zippers or snaps when the textile protector is attached. To check how the fabric behaves under ironing, it is advisable to iron a part of the material that is on the reverse side of the garment. With the Textile Protector you can iron delicate fabrics even at high temperature settings ( ••• ) and (max), using the steam function over the entire surface. With the textile protector attached, wait about 1.5 minutes before you can start ironing. When you are done ironing, remove the textile protector.
E Cleaning
Switch off the iron and unplug it from the mains. Turn the steam regulator to position “0”. To prolong the life of the iron, empty the water tank. Store the cool iron in a dry place, in an upright position.
F Care and maintenance
Country of origin: Hungary
Year of manufacture
To determine the year of manufacture, refer to the 5-digit production code located near the type plate. The first digit of the production code refers to the last digit of the year of manufacture. The next 2 digits refer to the calendar week in the year of manufacture. And the last 2 digits show the print date automatically calculated since 1992. Example : 30421 - The product was manufactured in week 4 of 2013.
(duu) Vario Plus Steam
(6)
a. 15 20
(7) 1
JgIe (…)3 Jd
(aiiSll aeg) Precision Shot
jz 100
(4) Precision Shot
Precision Shot
sill lll no a gg agj 0
5 5
. Precision Shot