LIVE-GSH5T - Surveillance Camera AIRLIVE - Free user manual and instructions
Find the device manual for free LIVE-GSH5T AIRLIVE in PDF.
| Product Type | 5-Port Gigabit Ethernet Switch |
| Model | LIVE-GSH5T |
| Brand | AIRLIVE |
| Dimensions (L x W x H) | 209 x 144 x 49 mm |
| Net Weight | 450 g |
| Power Supply | External power adapter 12V / 1A, 120-220V AC 50-60Hz |
| Power Consumption | 12 W max |
| Ports | 5 RJ-45 ports 10/100/1000BASE-T with auto-MDI/MDIX |
| Transmission Method | Store-and-Forward |
| Flow Control | IEEE 802.3x (full duplex), Back Pressure (half duplex) |
| Key Features | Auto-negotiation, automatic speed detection, broadcast storm control (5% threshold), non-blocking architecture, 8K MAC address table |
| LED Indicators | Power, BCST/DIAG, OvUn_Flow, 10M Link/Act, 100M Link/Act, 1000M Link/Act |
| Operating Temperature | 0°C to 50°C |
| Storage Temperature | -40°C to 65°C |
| Humidity | Up to 95% (non-condensing) |
| Cable Type | UTP/STP Cat. 3, 4, 5 or above for 10/100/1000BASE-T, max distance 100 m |
| Certifications | UL, TUV, VDE, FCC Class A, CE |
| Mounting | Desktop or wall mount (screws not included) |
| Maintenance | Clean with a dry cloth. Do not use solvents. Disconnect before cleaning. |
| Safety | Use only the provided adapter. Do not expose to water. Follow operating temperature limits. |
| Spare Parts and Repairability | Contact an authorized reseller. No user-serviceable parts. Power adapter replaceable. |
Frequently Asked Questions - LIVE-GSH5T AIRLIVE
User questions about LIVE-GSH5T AIRLIVE
0 question about this device. Answer the ones you know or ask your own.
Ask a new question about this device
Download the instructions for your Surveillance Camera in PDF format for free! Find your manual LIVE-GSH5T - AIRLIVE and take your electronic device back in hand. On this page are published all the documents necessary for the use of your device. LIVE-GSH5T by AIRLIVE.
USER MANUAL LIVE-GSH5T AIRLIVE
With Broadcast Storm Control
User's Manual
Powered by OvisLink Corp.
Trademarks
All rights reserved.
AirLive Logo is registered trademarks of OvisLink Corp. Other product names and company names are trademarks or registered trademarks of their respective owners.
FCC Warning
This equipment has been tested and found to comply with the requirements for a Class A digital device, pursuant to Part 15 of the FCC Rules. These requirements are designed for reasonable protection against harmful interference when the equipment operating in a commercial environment. This equipment can generate and radiate electromagnetic energy and, if not installed and used in accordance with this guide, may cause significant interference with radio communication. Operation of this equipment in a residential area is likely to cause interference to household appliances, in which case the user will be required to amend at his or her own expense.
CE Mark Warning
This is a Class A product. In a domestic environment, this product may cause radio interference, in which case the user may be required to take adequate preventive measures.
Disclaimer
Contents in this manual are subject to changes without prior notice.
About this User's Manual
This User's Manual aims at helping users to know the key features of Live-GSH5T Gigabit Ethernet Switch and to install it in a 10/100/1000BASE-TX Gigabit Ethernet Local Area Network (LAN).
Table of Contents
TABLE OF CONTENTS
1 PRODUCT OVERVIEW
Introduction. 1
5 × 10 / 100 / 1000 Base- T port Gigabit Ethernet Switch with Broadcast Storm Control … 1
Broadcast Storm Control 1
Store-and-Forward Architecture against Packet Loss 1
Active Flow Control 1
Non-blocking Wire Speed 2
System/Port Status Information at a Glance 2
What's Broadcast Storm Control 2
Solution for the digital media age. 2
Why Copper-wired Gigabit Connection? 2
Product Features 3
2 PREPARATION BEFORE INSTALLATION 4
Unpack the Package. 4
The Front Panel 5
The Rear Panel. 5
Station Ports 5
DC Power Jack 5
3
INSTALLATION OF THE SWITCH 6
Quick Installation. 6
3 Steps to Quick Installation 6
Desktop Installation 6
Installation on Wall 7
Cabling Requirements 7
RJ-45 station port cable requirements: 8
Straight-throughcablingrequirements 8
Portcablingrequirements 8
Connecting to Power 9
4
EXPANDING YOUR NETWORK 10
Connectivity Rules 10
10 Mbps Connection (10BASE-T) 10
Copper-wired 100/1000 Mbps Connection (100/1000BASE-T) 10
Connecting to another Switch/Hub 10
Straight-through Cable Connection 10
RJ-45 Gigabit Port Description. 11
Summary: 11
Copper-wired Gigabit Connection 12
Transmission Modes 12
Copper-wired Gigabit ports (1000BASE-T Transmission) 12
Centralized Server Farms 12
Gigabit Backbone Connections. 13
5
LED INDICATORS 14
Comprehensive LEDs 14
System LED 14
Diagnostic LEDs 14
Station Port LEDs 14
Power LED 15
Diagnostic LEDs 15
BCST/DIAG LED. 15
Gigabit Port LEDs (for Port #1 ~ 5) 15
10M/100M/1000M Link/Act LED 15
LED Summary Table. 16
APPENDIX A PRODUCT SPECIFICATIONS 17
APPENDIX B TROUBLESHOOTING 19
Figures
Fig. 2-1 Package Content 4
Fig. 2-2 Front Panel 5
Fig. 2-3 Rear Panel 5
Fig. 3-1 Desktop installation.. 6
Fig. 3-2 Bottom View of the Switch (showing mounting holes)
Fig 3-4 10/100/1000BASE-T pin assignments for RJ-45 connector. 8
Fig 3-5 Pin assignments for straight-through cabling. 8
Fig 3-6 Connecting the Switch to power outlet 9
Fig. 4-1 Connecting two switches 11
Fig. 4-4 Server Farm 13
Fig. 5-1 Front-panel LED indicators. 14
Tables
Table 3-1 Using straight-through and crossover cables. 8
Table 3-2 1000BASE-T pin assignments for RJ-45 connector 9
Table 4-1 1000BASE-T pin assignments for RJ-45 connector 11
Table 5-1 Station Port LED. 16
1 Product Overview
Introduction
5× 10/100/1000Base-T port Gigabit Ethernet Switch with Broadcast Storm Control
Live-GSH5T Gigabit Ethernet Switch is an auto-sensing and auto-negotiating Gigabit Ethernet Switch with Broadcast Storm Control capability. Its five 10/100/1000Mbps Gigabit ports provide 10/100/1000Mbps connections to PC with gigabit cards or gigabit switches
Live-GSH5T's unique switching fabric provides non-blocking full wire speed for all ports. Auto MDI/MDIX function is provided for conventional uplinking to another switch/hub using ordinary straight-through cable. Each port provides up to 2000Mbps in full duplex mode. With its auto-sensing, Live-GSH5T automatically detects the speed of the devices you plug into, and routes the incoming data to its destination. Its auto-negotiating function allows existing devices running at different speeds to communicate easily within the same network.
Broadcast Storm Control
The Live-GSH5T automatically filters out the broadcast traffic when the broadcast packets exceed 5% of the total traffic. Broadcast storm can significantly impede the performance of the network. The Live-GSH5T protects your network from such situations.
Store-and-Forward Architecture against Packet Loss
When network is under heavy traffic, the shared memory buffer in the switching devices might yield incorrect detections due to overfed memory buffer. This setback can happen either when data is transmitted in IEEE802.3x Full Duplex or Back Pressure Flow Control mode. To solve this problem, Live-GSH5T utilizes a fixed memory buffer allocation with Store-and-forward transmission to ensure an effective buffer allocation for each port.
Store-and-forward transmission controls data flow from transmitting to receiving nodes with the receiving buffer threshold adjusted to an optimal value, thus guaranteeing against all possible packet losses.
Active Flow Control
Live-GSH5T Gigabit Ethernet Switch implements in full duplex mode a flow control that is compliant to IEEE 802.3x standard. While in half duplex mode, it employs an optional Back
Pressure Flow Control to stall the incoming data when port buffers are saturated. With this flow control mechanism, it can be ensured that frames dropped during transmission are reduced to a minimum.
Non-blocking Wire Speed
Live-GSH5T's non-blocking cross-bar matrix architecture provides high-end performance for departmental and workgroup environments at a fraction of the cost of similar devices. Typically, this type of architecture was found only in high-end switches designed to handle huge corporate networks. With bandwidth needs and network efficiency concerns, Live-GSH5T's switching fabric design is the perfect answer for solution.
System/Port Status Information at a Glance
There are 2 sets of LEDs on the front panel: System LED and Station port LEDs.,. The System LEDs consist of the Power LED, the BCST(Broadcast Storm Control)/Diag and OvUn_Flow LED. The station LEDs consist of the 10M Link/Act, 100M Link/Act, 1000M Link/Act
What's Broadcast Storm Control
Broadcast Storm is the result of too much broadcast traffic in the network. Broadcast packets are sent to every stations in the network, thus increase the overall network traffic. Broadcast storm are likely to decrease the network performance significantly. Broadcast Storm occurs usually when there is a loop formed in the network or when a particular application creates unordinary amount of broadcast packets. The Live-GSH5T has built-in broadcast storm control which filter out the broadcast traffic when it exceeds 5% of total traffic.
Solution for the digital media age
In the age of digital media, the computer has become the storage center for DV, DVD video, and digital pictures. Furthermore, the majority of the worldwide TV format will turn to HDTV and other digital standard in the next few years. The demand for faster network will increase dramatically. Gigabit Ethernet will make playing DVD quality video over the network a reality. In addition, copy Gigabytes of data over network will no longer be a time consuming process. With the Live Series Gigabit Ethernet switch, building a network capable of fast large file sharing and real time play back of high quality audio/video is simple and affordable.
Why Copper-wired Gigabit Connection?
With the tremendous success of Ethernet in LAN, twisted-pair cable has become the most ubiquitous networking media all over the world. It also costs less than the fiber-optic cable. Thus, it is very convenient to choose a copper-wired gigabit switch such as Live-GSH5T, since you can easily set up a gigabit backbone using the kind of twisted-pair cable so ordinarily used in 10/100BASE-TX environment.
Product Features
The main features of Live-GSH5T 5-port Gigabit Ethernet Switch are as follows:
Gigabit Ethernet Switch with five 10/100/1000Mbps station ports
Fully compliant with Ethernet/Fast Ethernet standards:
- IEEE 802.3 (10BASE-T Ethernet)
IEEE 802.3u (100BASE-TX Fast Ethernet) - IEEE 802.3ab (1000BASE-T Gigabit Ethernet over twisted-pair)
- ANSI/IEEE Std 802.3 NWay auto-negotiation
Easy plug-and-play installation
Store and Forward transmission to prevent packet loss
- Half/Full Duplex function for both 10 and 100Mbps data rates and full duplex for 1000Mbps of stations ports
□ Auto-sensing and auto MDI-X crossover for all 10/100/1000BASE-T station ports
Active Flow control to minimize frame drops
- Half Duplex: Back Pressure control
- Full Duplex: IEEE 802.3x compliant flow control
Comprehensive LED indicators for system/port status monitoring:
System LEDs
- Power (green) to indicate power on/off status
- OvUn_flow(yellow) to indicate when a unicast packet overflow status.
- Bcst/DIAG (yellow) to indicate either filtering of broadcast frames or if the switch power on self test fails status
Station Port LEDs
For port 1~port 5
- 10M Link/Act (green) to indicate 2 status in 10Mpbs mode: (1.) linking status (2.) activity
- 100M Link/Act (green) to indicate 2 status in 100Mpbs mode: (1.) linking status (2.) activity
-
1000M Link/Act (green) to indicate 2 status in 1000Mpbs mode: (1.) linking status (2.) activity
-
Wall-mountable
Cabling distance up to 100 meters for twisted-pair cable
2 Preparation before Installation
Unpack the Package
Before you begin the installation of Live-GSH5T All Gigabit Switch, make sure that you have all the necessary accessories that come with your package. Follow the steps below to unpack your package contents:
- Clear out an adequate space to unpack the package carton.
- Open the package carton and take out the contents carefully.
- Put back all the shipping materials such as plastic bag, paddings and linings into the package carton and save them for future transport need.
After unpacking and taking out the entire package contents, you should check whether you have got the following items:
Live-GSH5T All Gigabit Switch
One AC power adapter
Rubber pads and stacking clip
Support CD-ROM (The PDF version of this User's Manual can be found within)
If any of these above items is missing or damaged, please contact your local dealer for replacement.
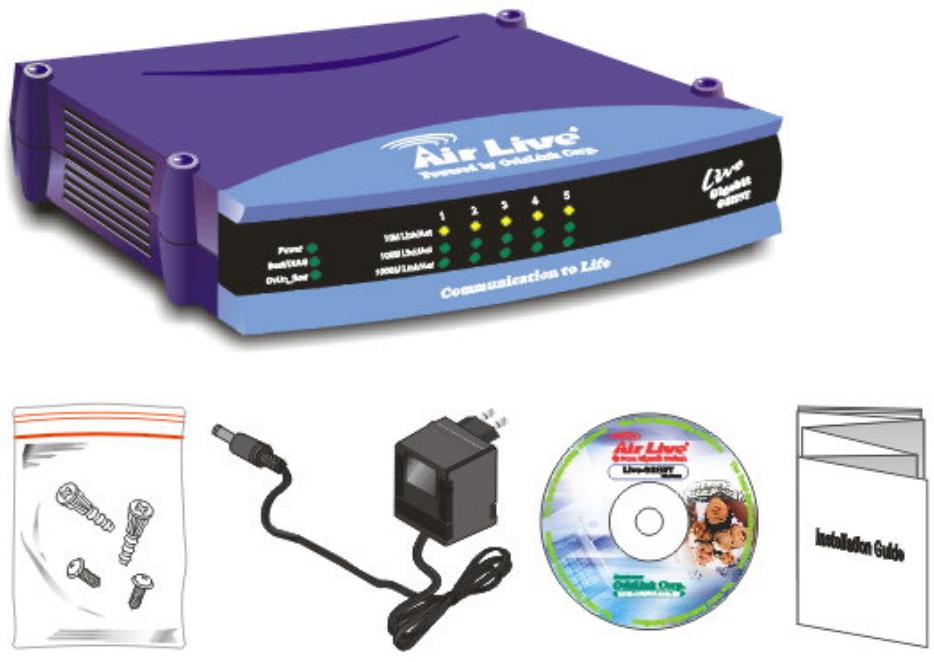
Fig. 2-1 Package Content
The Front Panel
The front panel is where you can find the LED indicators. For information concerning LED indicators, please refer to Chapter 5, LED Indicators.
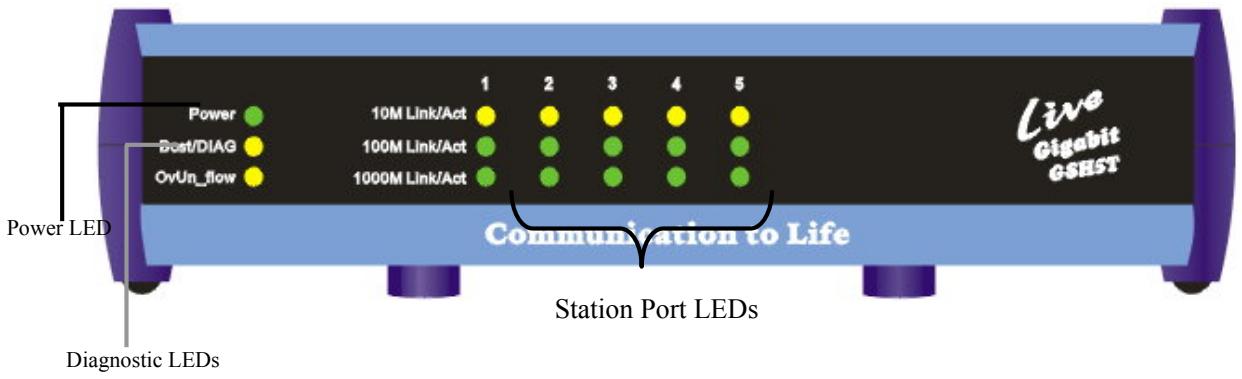
Fig. 2-2 Front Panel
The Rear Panel
The rear panel is where you can locate the DC power jack, the 16 10/100Mbps station ports. For the technical specifications of the ports, please refer to Appendix A, Product Specifications for detailed information.
Station Ports
Live-GSH5T All Gigabit Switch is equipped with 5 × 10 / 100 / 1000 Mbps auto-sensing and auto-negotiating ports. You can use these ports to connect to end stations, servers or other networking devices.
DC Power Jack
The DC Power Jack is where you should connect the DC power adapter chord.
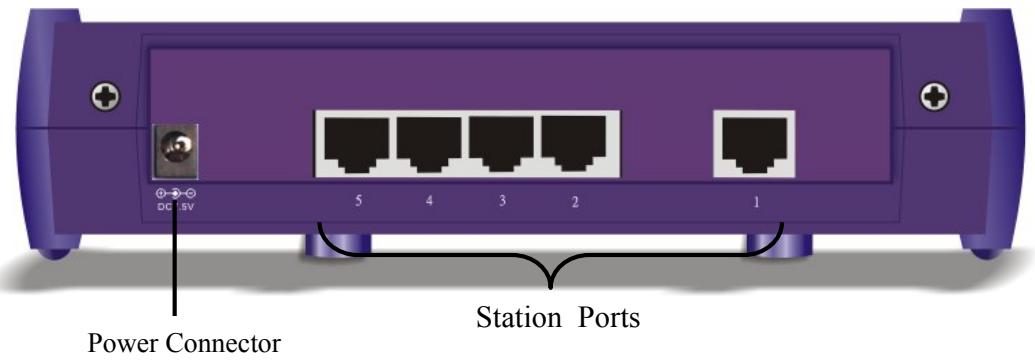
Fig. 2-3 Rear Panel
3 Installation of the Switch
Quick Installation
Live-GSH5T Gigabit Ethernet Switch is fully compliant with 10/100/1000BASE-T Gigabit Ethernet standards. Live-GSH5T is primarily designed as an ideal solution to enhance your workgroup/corporate
3 Steps to Quick Installation
Step 1. Power on the Switch: connect the power adapter to the switch and the electric outlet.
Step 2. Connect network devices to the Switch: connect either workstation, server, switch, bridge or router to the station port (10/100/1000BASE-T), using 100 ohm unshielded twisted pair (category 5E UTP) or shielded twisted-pair (STP) cable.
Step 3. Check the LED indicator check the LED indicator to make sure all the cable are properly connected.
Desktop Installation
Live-GSH5T Gigabit Switch has four rubber pads attached on each corner of its underside. These pads serve as cushions against vibration and prevent the switch from sliding off its position. They also allow adequate ventilation space when you place the switch on top of another device.
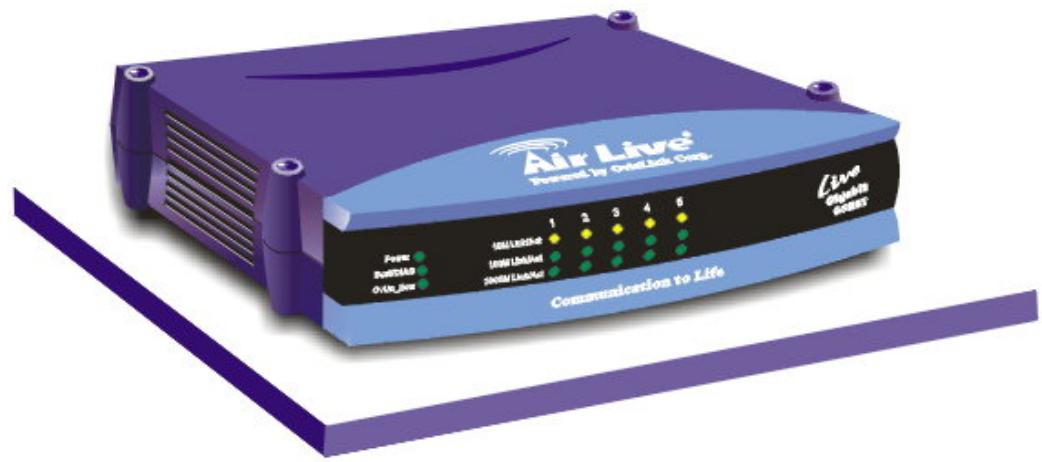
Fig. 3-1 Desktop installation
Installation on Wall
Live-GSH5T Gigabit Switch can be mounted on a wall with wall anchors and screws.
To mount the Switch on wall, please follow the steps below:
- Drill two holes, the distance between both of which should be 9cm (such as the illustration below).
- Insert wall anchors into these two holes.
Drive the screws into the top of the wall anchors. - Mount Live-GSH5T on the screws.

Fig. 3-2 Bottom View of the Switch (showing mounting holes)
Cabling Requirements
Live-GSH5T Gigabit Ethernet Switch is primarily designed as a central switching device to provide Gigabit bandwidth to your existing Ethernet/Fast Ethernet LAN. It provides you with five built-in gigabit ports to establish gigabit backbone connections, relieving your network bottleneck. It fits well into the 10/100/1000 BASE-T cabling architecture to facilitate not only 10/100Mbps half/full duplex, but also 1000Mbps full-duplex transmission speed.
The five RJ-45 station ports (Auto MDI/MDI-X) all require Cat. 5 twisted-pair UTP/STP cable for connection. When configuring within the 10/100/1000BASE-TX cabling architecture, the UTP cabling distance should be within a maximum distance of 100m .
The table below describes when to use straight-through or crossover cable:
| Connection Specification | Station Port 10/100/1000BASE-T |
| Interface | RJ-45 |
Table 3-1 Using straight-through and crossover cables
| Cable to Use | |
| To an end station | Straight-through twisted-pair cable |
| To a hub/switch | Straight-through twisted-pair cable |
| Maximum Distance | 100 meters |
RJ-45 station port cable requirements:
| 10BASE-T | 100 ohm Category 3, 4, 5 UTP/STP cable |
| 100BASE-TX | 100 ohm Category 5 UTP/STP cable |
| 1000BASE-T | 100 ohm Category 5 UTP/STP cable or better |
Straight-through cabling requirements
Under most conditions, the 5 station ports on the Switch accept normal, straight-through cables, i.e., standard UTP/STP cables, which are the only ones that can be used with a RJ-45 pin layout.
Normally, 10BASE-T networks require a straight-through Cat. 3, 4, 5 UTP/STP cabling system. The cabling system could be found in most existing Ethernet network installations. 100/1000BASE-T networks require Cat. 5 UTP/STP cabling system. The pin assignments for a straight-through cable are shown in Figure 3-5 and 3-6.
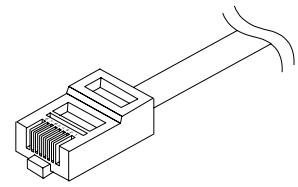
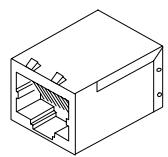
Fig 3-5 Pin assignments for straight-through cabling
Cable and Connector
| RJ-45 Connector | |
| Contact | Media Direct Interface Signal |
| 1 | Tx+(transmission) |
| 2 | Tx-(transmission) |
| 3 | Rx+(reception) |
| 4 | Not used |
| 5 | Not used |
| 6 | Rx-(reception) |
| 7 | Not used |
| 8 | Not used |
Fig 3-4 10/100/1000BASE-T pin assignments for RJ-45 connector
| Adapter | Switch |
| 1 | 1 |
| 2 | 2 |
| 3 | 3 |
| 4 | 4 |
| 5 | 5 |
| 6 | 6 |
| 7 | 7 |
| 8 | 8 |
Port cabling requirements
The 10/100/1000BASE-T port can automatically determine whether or not it needs to cross over between pairs as shown in Table 3-2 below. Therefore, the ports do not require crossover cables when connecting to another Switch.
If Live-GSH5T interoperates with a device that cannot automatically correct for crossover, it makes the necessary adjustment prior to commencing auto-negotiation. If it interoperates with a device that implements MDI/MDIX crossover, a random algorithm as described in IEEE 802.3 section 40.4.4 determines which device performs the crossover.
Table 3-2 1000BASE-T pin assignments for RJ-45 connector
| Pin Assignment | MDI | MDIX |
| MDI[0]+/- | BI_DA+/- | BI_DB+/- |
| MDI[1]+/- | BI_DB+/- | BI_DA+/- |
| MDI[2]+/- | BI_DC+/- | BI_DD+/- |
| MDI[3]+/- | BI_DD+/- | BI_DC+/- |
Connecting to Power
Live-GSH5T Gigabit Ethernet Switch features an external power supply unit, which allows a power.
To establish its power connection, simply plug the female end of the power cord into the power connector on the rear of the switch and the adapter plug into a suitable power outlet. Once you have correctly plugged in the power, the switch is on instantly.
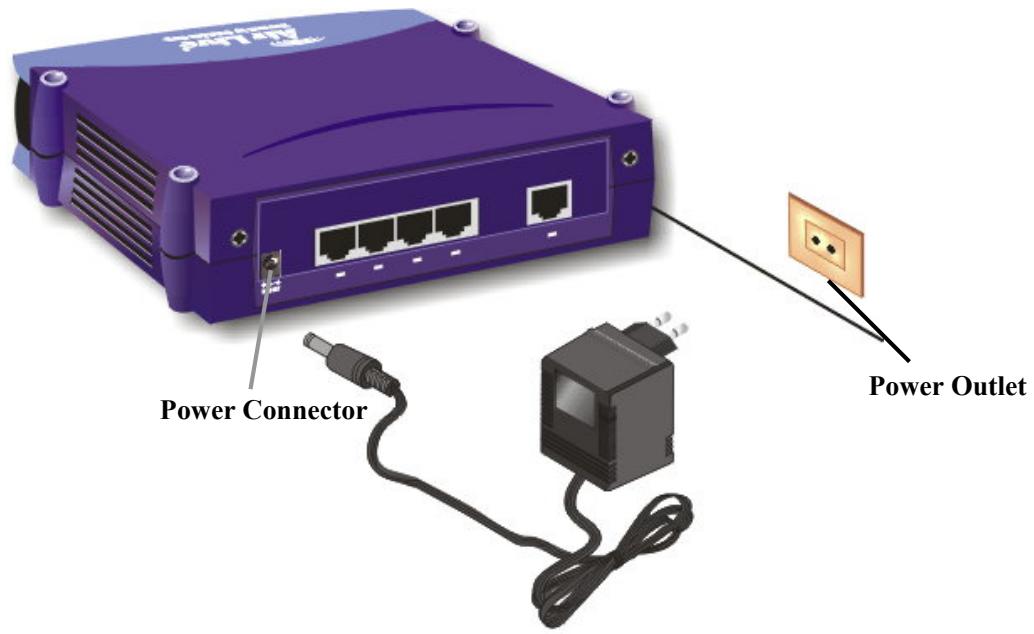
Fig 3-6 Connecting the Switch to power outlet
4 Expanding Your Network
Live-GSH5T Gigabit Ethernet Switch is primarily designed as a central switching device to manage your workgroup/departmental traffic within Ethernet/Fast Ethernet/Gigabit Ethernet.
The following section will introduce to you the basics of network connectivity in virtual workgroup computing within Ethernet/Fast Ethernet/Gigabit Ethernet environment.
Connectivity Rules
10 Mbps Connection (10BASE-T)
Ethernet connection should be configured according to the following connectivity rules:
- The maximum length for UTP cables must not exceed 100 meters from end station to a shared-access 10BASE-T hub.
- Between any two end stations in a collision domain, there may be up to five cable segments and four intermediate repeaters at most.
- If there is a path between any two end-stations containing five segments and four repeaters, then at least two of the cable segments must be point-to-point link segments (e.g. 10BASE-T or 10BASE-5), while the remaining segments may be of mixed segments (e.g.: 10BASE-2 or 10BASE-5).
Copper-wired 100/1000 Mbps Connection (100/1000BASE-T)
Copper-wired Fast Ethernet/Gigabit Ethernet connection should be configured according to the following connectivity rules:
- The maximum length for STP/UTP cable is 100 meters from end station and a shared-access 100BASE-TX hub.
- The maximum cable length is 100 meters between end station and switch/repeater; and 100 meters between switch and switch/repeater, thus making possible a maximum distance of 300 meters between two end stations.
Connecting to another Switch/Hub
Straight-through Cable Connection
Because the switch is equipped with auto-MDI/MDIX function for every port, users can use straight-thru cable for any type of connection. There is no need for crossover cables.
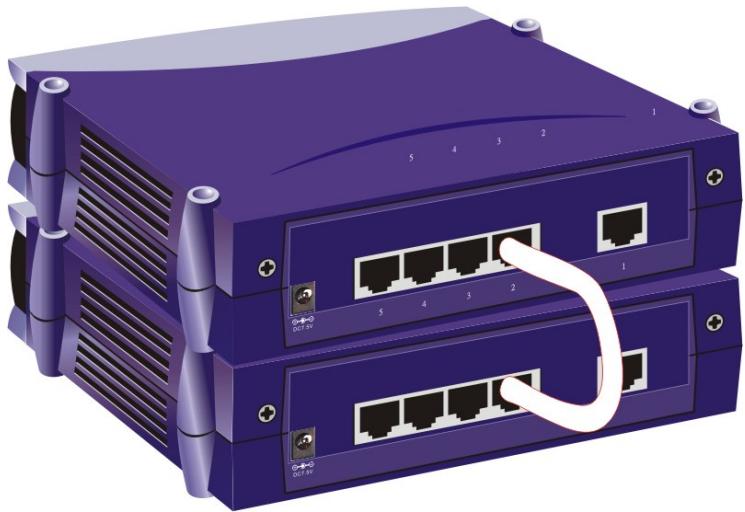
Fig. 4-1 Connecting two switches
RJ-45 Gigabit Port Description
The RJ-45 Gigabit port can automatically determine whether it needs to cross over between pairs as shown in Table 4-1. Therefore, the 1000BASE-T gigabit port does not require an external crossover cable when connecting to another Gigabit switch.
Table 4-1 1000BASE-T pin assignments for RJ-45 connector
| Pin Assignment | MDI | MDIX |
| MDI[0]+/- | BI_DA+/- | BI_DB+/- |
| MDI[1]+/- | BI_DB+/- | BI_DA+/- |
| MDI[2]+/- | BI_DC+/- | BI_DD+/- |
| MDI[3]+/- | BI_DD+/- | BI_DC+/- |
Summary:
- When connecting a computer to the station port/gigabit port of the Live-GSH5T, use a straight-through UTP cable.
- When connecting the gigabit port of Live-GSH5T to the station port of another hub/switch, use a straight-through cable.
- When uplinking Live-GSH5T to any port (MDI-X) of another hub/switch, use a straight-through cable. Please note that the cabling distance is 100 meters maximum.
- When using crossover cable, the connection can be made from any station ports (MDI-X) of Live-GSH5T to any station ports (MDI-X) of other devices.
Copper-wired Gigabit Connection
Each Gigabit port should utilize a twisted-pair straight-through cable with a RJ-45 connector to connect to another Gigabit RJ-45 port on other Gigabit networking device. Gigabit Ethernet use all 4 pairs of the UTP cable. We recommend Cat.5E or better UTP/STP cable for Gigabit connection.
Transmission Modes
Copper-wired Gigabit ports (1000BASE-T Transmission)
2000Mbps/FDX
200Mbps/FDX
100Mbps/HDX
20Mbps/FDX
10Mbps/HDX
Note:
The Gigabit port can operate both in half/full-duplex mode in 10/100BASE-TX transmission, but can only operate in full duplex mode in 1000BASE-T transmission.
Centralized Server Farms
Server farms refer to the placement of departmental servers in a data center, where they can be provided with consolidated backup uninterrupted power supply, and a proper operating environment.
The trend toward server farm architecture has accelerated recently and is expected to continue in order to ease administrative costs.
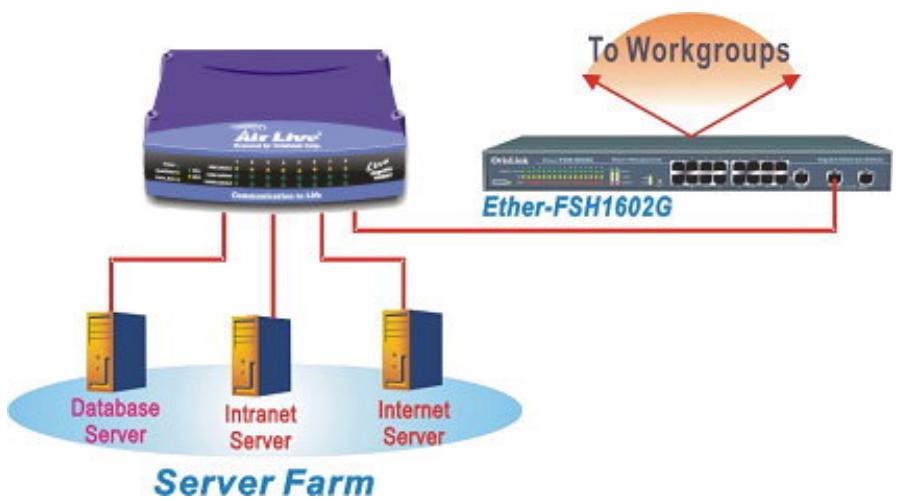
Fig. 4-4 Server Farm
Gigabit Backbone Connections
Live-GSH5T Gigabit Ethernet Switch serves primarily as a backbone switch to connect your existing Ethernet/Fast Ethernet network to Gigabit networking environment. Live-GSH5T can provide five 1000BASE-T gigabit backbone connections to another gigabit switch or high-end server. With gigabit throughput, backbone traffic can be greatly improved for the ever-increasing bandwidth demand by the internet/intranet multimedia applications.
5 LED Indicators
Before connecting any network device to Live-GSH5T Gigabit Ethernet Switch, you should take a few minutes to look over this chapter and get familiar with the front panel LED indicators of your Switch. The front-panel LED indicators of Live-GSH5T Gigabit Ethernet Switch comprise three sets of LEDs: System Status LEDs, Diagnostic LEDs, and Gigabit Port LEDs. Each set of LEDs gives specific information concerning the system status, station port status or the Gigabit port status:
Comprehensive LEDs
System LED
Power LED enables users to monitor the system power Status.
Diagnostic LEDs
The Diagnostic LEDs consist of the Bcst/DIAG and OvUn Flow LEDs. Together, they display the operating status of the switch and the traffic monitor
Station Port LEDs
Gigabit Port LEDs show the port status of the Gigabit Ports on the optional modules installed. Link/Act, 10/100 and 1000/FDX LEDs indicate the connection status of the Gigabit port.
For the layout of LED indicators, please refer to Fig. 5-1 below.
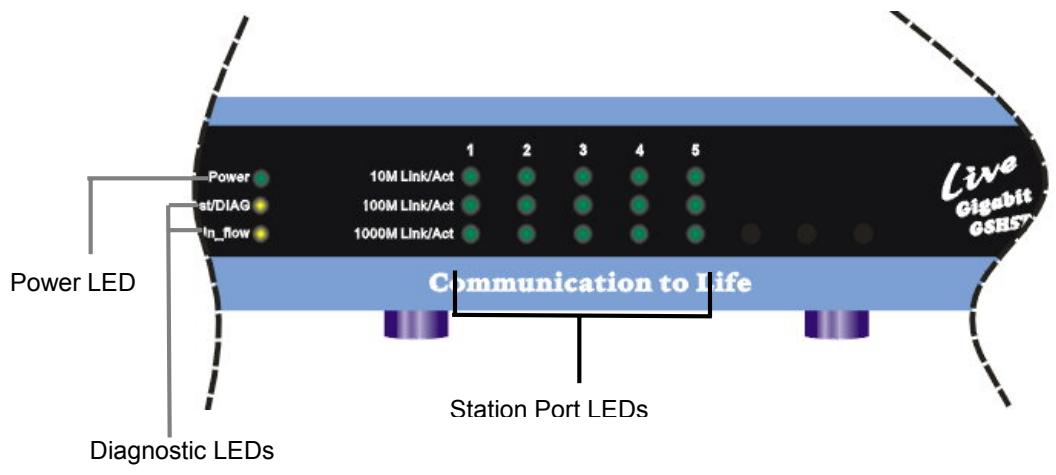
Fig. 5-1 Front-panel LED indicators
The specific function of each LED will be described in full details in the following sections:
Power LED
Power LED will give a solid green light when you turn on the Switch, and will be off when the Switch being turned off. You can simply check the Power LED to see if the Switch is being activated. Before turning on the Switch, please verify that the power cord has been properly connected to the Switch and the power outlet on the wall.
Diagnostic LEDs
The Diagnostic LEDs help you to troubleshoot the network problem.
BCST/DIAG LED
The BCST/DIAG has two functions:
Power-On Diagnostic Test:
When the switch is powered on, the system will perform a power-on diagnostic test. Under normal condition, the BCST/DIAG will flash once and remain off. If the LED remained lit after several seconds, then the switch might fail the power-on test.
□ Broadcast Storm Control
When broadcast traffic exceeds 5% of total traffic. The BCST/DIAG LED will keep on flashing to indicate that the switch is filtering out the broadcast packets. The light will be off when the broadcast traffic is below 5% again.
Gigabit Port LEDs (for Port #1 ~ 5)
10M/100M/1000M Link/Act LED
Link/Act LED giving a solid green light indicates that a full duplex data link has been established between the corresponding port and the device. If the connection is faulty, it will be off. While the port is transmitting or receiving data, you will see a blinking light.
Green 10M Link/ACT: A 10Mbps connection has been made
Green 100M Link/ACT: A 100Mbps connection has been made
Green 1000M Link/ACT: A 1000Mbps connection has been made
LED Summary Table
A summary of LED status is listed in Table 5-1 below:
Table 5-1 Station Port LED
| LED indicator | Color | Status | Meaning |
| System LEDs | |||
| Power LED | ● Green | ONOFF | Power ONPower OFF |
| Diagnostic LEDs | |||
| Bcst/DIAG | ● Yellow | ON | The System is doing Power-On test, the light should remain off after a few seconds. If stay on, the system has failed the power-on test |
| Flashing | The Broadcast Traffic has exceeded 5%, the switch is filtering out broadcast packet. | ||
| OvUn Flow | ● Yellow | OFF | The system is working normally |
| Flashing | The Unicast Buffer has overflowed | ||
| Gigabit Statoin Port LEDs | |||
| 10M Link/Act | ● Green | ONBlinkingOFF | A 10Mbps Connection is made Transmitting/ReceivingNo connection is made |
| 100M Link/Act | ● Green | ONBlinkingOFF | A 100Mbps Connection is made Transmitting/ReceivingNo connection is made |
| 1000M Link/Act | ● Green | ONBlinkingOFF | A 1000Mbps Connection is made Transmitting/ReceivingNo connection is made |
Appendix A Product Specifications
Standard Compliance
IEEE 802.3 10BASE-T Ethernet
IEEE 802.3u 100BASE-TX Fast Ethernet
IEEE 802.3ab 1000BASE-T Gigabit Ethernet over twisted-pair
ANSI/IEEE Std 802.3 NWay auto-negotiation
- Topology
Star
- Port Configuration
5× 10 / 100 / 1000 BASE-T RJ-45 MDI/MDIX Ports
Data Rate
10BASE-T Ethernet
10 Megabits/sec (half-duplex)
20 Megabits/sec (full-duplex)
100BASE-TX Fast Ethernet
100 Megabits/sec (half-duplex)
200 Megabits/sec (full-duplex)
1000BASE-T Gigabit Ethernet
2000 Megabits/sec (full-duplex only)
Transmission method
Store and Forward
Full Duplex
Auto-negotiation for 10/100/100BASE-T
Active Flow Control
- IEEE 802.3x compliant flow control for full duplex
Back Pressure for half duplex
- Filtering Address Table
8 K per device
RAM Buffer
2Mbits shared data memory buffering
- MAC Address Learning
Automatic update
Cabling Type
10BASE-T: 4-pair 100 ohm Category 3,4,5 UTP (100 m) cable
100BASE-TX: 4-pair 100 ohm Category 5 UTP/STP (100 m) cable
1000BASE-T: 4-pair 100 ohm Category 5 UTP/STP (100 m) cable
LED layout
System LEDs
Power LED
OvUn_flow LED
Best/DIAD LED
Station port LEDs for port 1 5
10M Link/Act LEDs
100M Link/Act LEDs
1000M Link/Act LEDs
- Dimensions
Desktop (209 x 144 x 49 m/m)
Net Weight
450g (pending)
Power Input
External AC/DC Adapter with +12V / 1A output 120 / 220VAC,50 60Hz to DC12V/1A
Power Output
12 Watts max, @ 12 V DC
- Operating Temperature
32 122^ / 0 50^
Storage Temperature
-
40 149^ F / -40 65^ C
-
Humidity
< 95% (non-condensing)
Safety / EMI Certificates
UL, TUV, VDE, FCC Class A, CE
Appendix B Troubleshooting
This appendix contains specific information to help you identify and solve problems. If your switch does not function properly, please make sure it is set up according to the instructions on the manual.
If you suspect your switch is not connected correctly to your network, check the following points before you contact your local dealer for support.
- Make sure the Power is ON (Check the Power LED).
- Make sure the cable is connected properly on both ends.
- Make sure that the maximum cable length between switch and end node does not exceed 100 meters (for 10/100/1000BASE-TX connection).
- Make sure that the maximum switch-to-hub/switch cable distance does not exceed 100 meters (for 10/100/1000BASE-TX connection).
- Verify that the cabling type used is correct.
- Check the corresponding 10M/100M/1000M Link/ACT. If one of them do not light up, that means a faulty connection. Check the status of the cable attachment. If the problem persists, try a different cable.
Try another port on the Switch. - Turn off power supply to the Switch. After a while, turn it on again to see if it resumes to its normal function.
- If you find out where the problem is but cannot solve it by yourself, or you simply cannot locate what is at fault, please contact your local dealer for technical support.