
NETDELIVER @V5100 - To scan AVISION - Free user manual and instructions
Find the device manual for free NETDELIVER @V5100 AVISION in PDF.

User questions about NETDELIVER @V5100 AVISION
0 question about this device. Answer the ones you know or ask your own.
Ask a new question about this device
Download the instructions for your To scan in PDF format for free! Find your manual NETDELIVER @V5100 - AVISION and take your electronic device back in hand. On this page are published all the documents necessary for the use of your device. NETDELIVER @V5100 by AVISION.
USER MANUAL NETDELIVER @V5100 AVISION
NetDeliver @V5100 User's Manual

Safety Information
When using this equipment, the following safety precautions should always be followed.
Safety During Operation
In this manual, the following important symbols are used:
WARNING:
Indicates potentially hazardous situations, which if instructions are not followed, could result in death or serious injury.
CAUTION:
Indicates a potentially hazardous situation which, if instructions are not followed, may result in minor or moderate injury or damage to property.
Important:
Indicates operational requirements and restrictions. Please read and follow these instructions to ensure a proper operation and to avoid damage to the machine.
Note:
Indicates further explanation or clarification. Reading this is highly recommended.
WARNING:
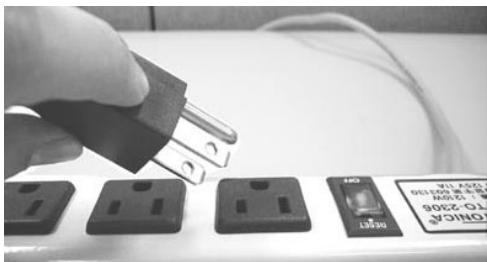
Only use the AC adapter (Model: ADP-50ZB, Manufacturer: Delta Electronics Inc.) included with the equipment. Using other AC adapters may cause an electric shock or fire.
To avoid hazardous electric shock or fire, do not remove any covers or screws other than those specified in this manual.
CAUTION:
Disconnect the power plug by pulling the plug, not the cable.
Do not touch the metal fingers of the ADF pad module. The edges are sharp and touching them may result in injury.
Precautions
- Do not install the equipment near heating or air conditioning units.
- Do not install the equipment in a humid or dusty place.
- Be sure to use the proper AC power source.
- Place the equipment securely on an even, flat surface. Tilted or uneven surfaces may cause mechanical or paper-feeding problems.
- Retain the box and packing materials for shipping purposes.
Notice
Important
- Do not make copies of any item for which copying is prohibited by law.
- Copying the following items are normally prohibited by the local law:
- Bank bills, revenue stamps, bonds, stock certificates, bank drafts, checks, pass-ports, driver's licenses.
- This machine is equipped with a function that prevents making counterfeit bank bills. Due to this, images similar to bank bills may not be copied properly.
Copyrights and Trademarks
Ethernet is a registered trademark of Xerox Corporation.
Microsoft, Windows and Windows NT are registered trademarks of Microsoft Corporation in the United States and/or other countries.
Other product names used herein are for identification purposes only and may be trademarks of their respective companies. We disclaim any and all rights to those marks.
The proper names of the Windows operating systems are as follows:
Warranty
The information contained in this document(s) is subject to change without notice.
The manufacturer makes no warranty of any kind with regard to this material, including, but not limited to, the implied warranties of fitness for a particular purpose.
The manufacturer shall not be liable for errors contained herein or for incidental or consequential damages in connection with the furnishing, performance, or use of this material.
Table of Contents
1 Getting Started. 1-1
Introduction 1-1
Features. 1-1
External View 1-3
The front view 1-3
The rear view 1-4
the Control Panel 1-5
Pre Installation Information 1-9
Internet Communication Features 1-12
Scan to e-mail 1-12
scan to file 1-12
scan to file 1-13
Post Processing 1-14
2 Installing Your Machine 2-1
Minimum Configuration Requirements 2-1
Checking Package Contents 2-2
Unlocking the Scan Unit 2-3
Setting up the Optional ADF (Auto Document Feeder) 2-4
Connecting the Cables 2-5
Connecting the ADF Cable 2-5
Connecting the Ethernet cable 2-6
Connecting the keyboard cable 2-6
Connecting the printer cable. 2-7
Connecting the Power and Turning on the Machine 2-8
3 Configuring the Machine. 3-1
Specifying the Administrator Information 3-2
Specifying the administrator information by the control panel 3-2
specifying administrator information by @V5100 Web page 3-6
Specifying Network Configurations 3-8
v
specifying network configuration by the control panel 3-8
specifying the network configuration by @V5100 Web page 3-10
Specifying the Profile Template 3-12
specify the profile templates by the Control Panel. 3-12
the settings of filing server 3-15
specifying the profile template by @V5100 Web page 3-24
4 Administration 4-1
Administering the @V5100 by the Control Panel 4-1
Administering the @V5100's by Web Page 4-2
Summary of Administrator Activities 4-4
Administrator Activities Performed only On the Machine's Homepage 4-14
Adding a New User 4-14
Modifying a Current User 4-17
Deleting a Current User 4-19
Setting Your Frequently Used Message 4-21
5 Managing the Address Book 5-1
Managing Your E-mail Address Book 5-1
adding an e-mail address 5-1
Modifying an e-mail address 5-5
Deleting an E-mail Address 5-7
Managing Your Groups 5-9
adding A new group 5-9
Modifying group 5-11
Deleting group. 5-13
6 Managing Profiles 6-1
Adding a New Profile on the Control Panel 6-1
Managing Profiles on @V5100 Web Page 6-7
adding a new profile 6-7
Modifying current profiles 6-9
Deleting profiles 6-11
7 Operation 7-1
Loading Paper 7-2
notice on using the adc. 7-2
placing document(s) in the adf. 7-3
placing document(s) on the glass 7-4
Sending Your Document to E-mails 7-5
Basic Operation 7-5
Advanced Operation 7-7
Sending Your Document to Filing Servers 7-10
basic operation. 7-10
Advanced operation 7-12
Making Copy 7-15
basic operation. 7-15
Adjusting Density 7-19
8 Troubleshooting 8-1
Information Codes/Message 8-1
Information Codes During Networking 8-3
Information Codes During E-Mailing 8-4
Information Codes During Filing 8-7
Clearing a Paper Jam 8-10
Removing the Abnormal Line Image 8-11
Cleaning the ADF 8-12
Replacing the Snap-in Pad Module 8-13
Cleaning the Glass 8-15
9 Use @V5100 As A Scanner. 9-1
System Requirements 9-1
Installation procedure 9-1
Scanner Operation 9-2
A Glance of the User Interface 9-3
Editing Your Image 9-4
Appendix .a
Quick Guide .a
Specifications.
Index .9
Introduction
Thank you for purchasing our @V5100, an internet appliance. @V5100 offers an unprecedented document delivery technology, transmitting paper documents electronically over the internet. With @V5100, you can instantly scan paper-based document and deliver the electronic image to various destinations including e-mail addresses, printers, ftp servers, web, or someone else's computer on the network. The new way to distribute documents is faster, more cost effective, and safer than any traditional methods such as fax, mail, or courier.
Features
Scan to E-mail:
Connected to an Ethernet network and a SMTP server, @V5100 allows you to transmit document(s) over the internet via e-mail. With a touch of the e-mail key and the selection of your recipients' e-mail addresses, the document(s) is/are first scanned and converted into an image file, and then transmitted to remote recipients within minutes.
Scan to File:
@V5100 allows you to send scanned documents to a server or a personal computer's file folder over intranet with FTP(File Transfer Protocol), HTTP(Hypertext Transfer Protocol), HTTPS(a secure way of using HTTP), CIFS(Common Internet File System), AVPP(Avision Post Processing) protocol. The scan to filing feature off-loads the mail server from handling large attachments.
Digital Copying:
Connected to a color or black and white laser printer, @V5100 becomes a digital copier. With an intuitive control panel, making digital copy becomes fast and easy.
Multiple Pages Sending:
With the optional Auto Document Feeder, @V5100 allows a stack of 50-page document(s) to be continuously scanned at one time in reliable quality to increase your efficiency.
Post Processing
The @V5100 can be used as a paper-scan input device with a thin client, which directs the back-end server to do various customized post processing.
Address Book/Profiles Managing:
@V5100 provides a convenient way to manage all the e-mail addresses and profiles(filing destinations). Simply by typing the machine's IP address in the URL field of your browser, @V5100 web page will be prompted. This web page allows you to create up to 2000 e-mail addresses and several filing destinations to manage your document.
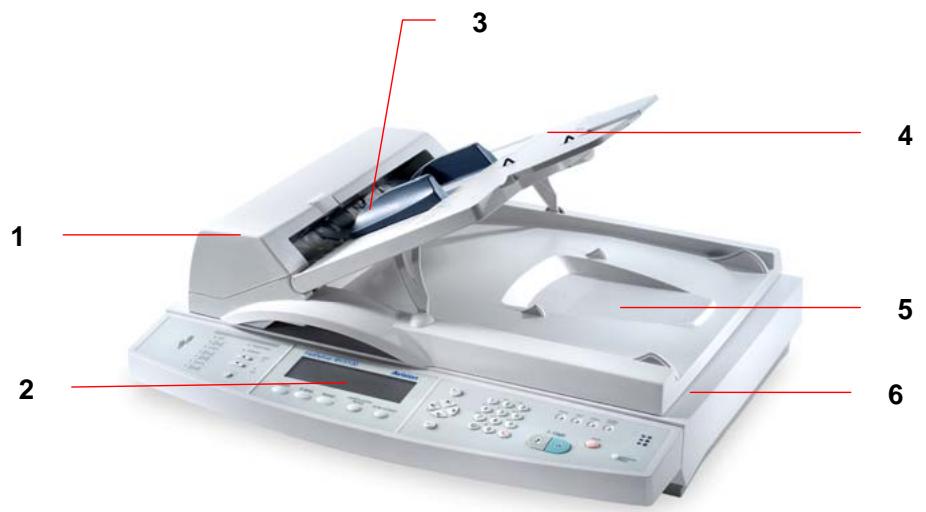
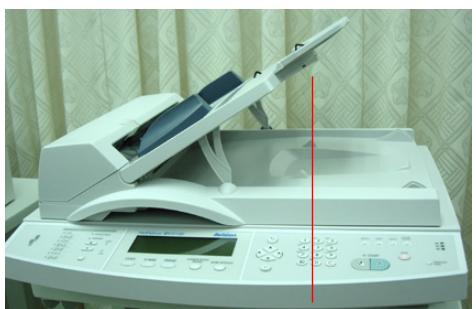
THE FRONT VIEW
- ADF Front Cover
- LCD-display
-
ADF Paper Tray
-
ADF Paper Support
- Document(s) Cover
-
Control Panel
-
ADF (Automatic Document Feeder) unit is optional.
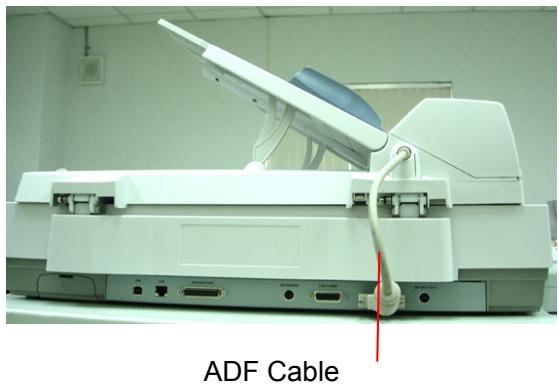
THE REAR VIEW
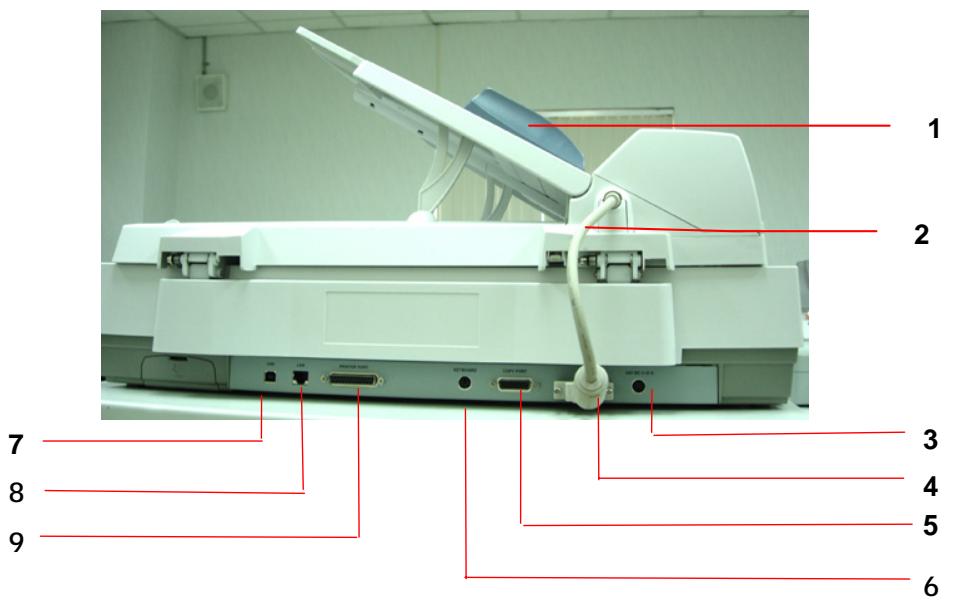
- ADF Unit: To load multi-page document.
- ADF Cable: To connect the main unit.
- Power Jack To connect power cable.
- ADF Connector To connect ADF cable.
- Copy Connector To connect printer supplied by Avision for high speed copies.
- Keyboard Connector To connect keyboard.
- USB Connector To connect a personal computer with USB interface.
- LAN Connector: To connect an ethernet cable.
-
Printer Connector: To connect a color laser printer.
-
ADF unit is optional.
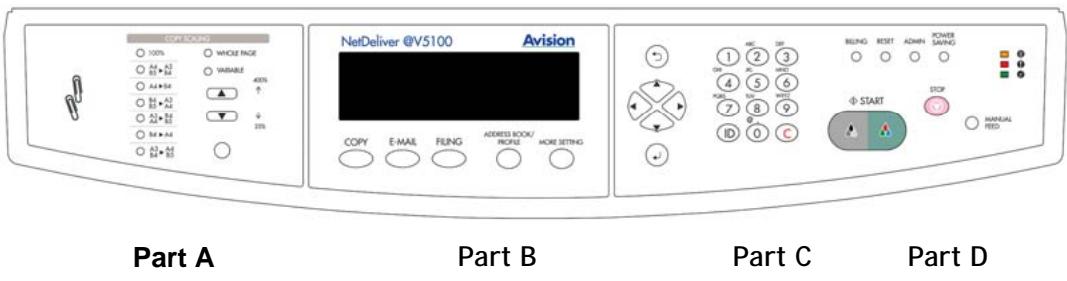
Part A: Scaling Area:
Used to reduce document(s) down to 25% or enlarge up to 400% .
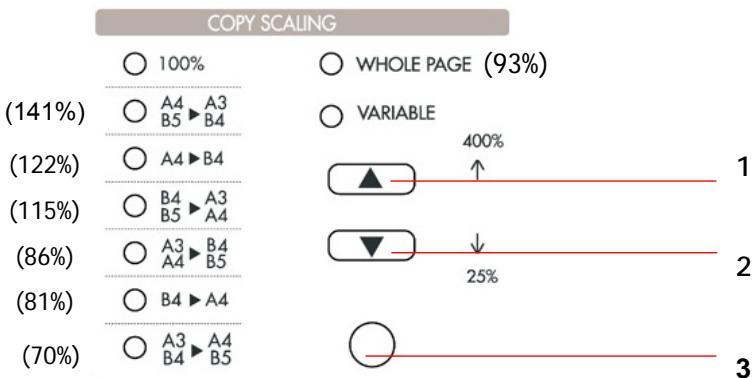
- Increase scaling in 1% increment up to 400%
- Decrease scaling in 1% Decrement down to 25%
- Select scaling from the preset percentages
Part B: LCD-display & Function Keys:
Used to display current operation and select key working mode.
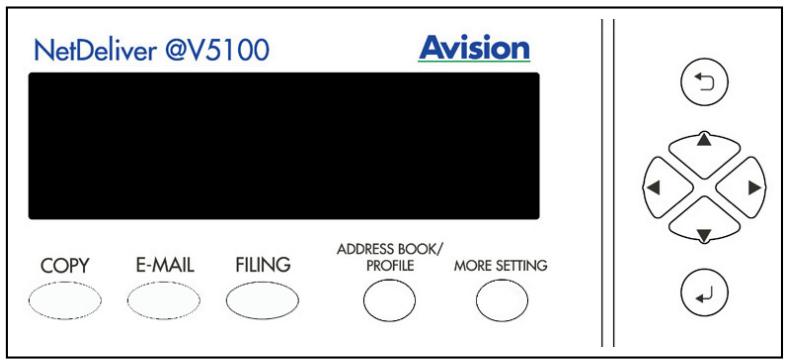
Function Keys and others:
| COPY | Press to use the Copy function (also the default working mode). |
| Press to use the email function. | |
| FILING | Press to use the filing function. |
| ADDRESS BOOK/ PROFILE | Press to select an email address from an address book or select a profile from a profile list. |
| MORE SETTING | Press to setup more settings for copy, e-mail or filing individually. |
| ← | Press to previous screen or input. |
| → | Used to move to up/down/left/right. |
| ← | Used to select a command. |
Part C: The Numeric/Character Keypad:
Used to enter the network parameters or copy page number.
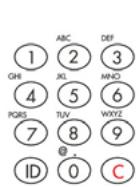

Used to clear previous input.

Used to select frequent used message shown in the subject or memo field when sending e-mail. (Refer to the machine's homepage to complete the settings.)
Part D: Start & Other Keys:
Used to select special requirement or the start key to send or copy your document(s).
| BILLING ○ | Select to end and count previous batch of scanning jobs. |
| RESET ○ | Select to clear current settings and return to panel default settings. |
| ADMIN ○ | Select to enter administrator menu. |
| POWER SAVING ○ | Select to enter power saving mode. |
| • The Power LED – Used to indicate power on and ready status. • The warning LED – Used to indicate error. • The sleeping LED – Used to indicate power-saving status. | |
| ○ MANUAL FEED | Select to scan and send multi-page document on the document glass continuously or from the auto document feeder batch by batch. |
| STOP | Select to stop processing. |
| Φ START | Select to start copying, e-mailing, or filing. |
@V5100 has to be setup properly on your network to perform e-mail and filing functions. In order for other network devices to find the @V5100 on the network, the following network parameters have to be collected from your network administrator.
| 1. DHCP enable: | |
| 2. IP Address: | . . . . |
| 3. Subnet mask: | . . . . |
| 4. Gateway IP: | . . . . |
| 5. DNS server: | . . . . |
| 6. SMTP server: | |
| 7. SMTP port: | 25 |
| 8. POP3 server: | |
| 9. POP3 port: | |
| 10. LDAP server: | . . . . |
| 11. LDAP port: |
Explanation of contents:
| 1. *DHCP Enable: | Choose Yes to obtain IP/subnet/gateway addresses automatically from DHCP server. |
| 2. *IP Address: | The Internet Protocol (IP) address assigned to your machine by your network administrator. |
| 3. Subnet Mask: | The net mask address assigned by your network administrator. |
| 4. Gateway IP: | The gateway IP address assigned by your network administrator. |
| 5. *SMTP Server: | The IP address of your SMTP Mail Server assigned by your network administrator. |
| 6. SMTP Port: | The port number of your SMTP Mail Server. |
| 7. *DNS server: | The IP address of DNS Server assigned by your network administrator. |
| 8. *POP3 Server: | The IP address of your POP3 server. |
| 9. *POP3 Port | The port number of your POP3 Server.Please enter the DNS name or IP and port number of your POP3 server if your mail server requires POP3 authentication before sending e-mails from the machine. |
| 10. *LDAP Server: | The IP address of your LDAP server. |
| 11. LDAP Port: | The port number of your LDAP server. |
Note:
- DHCP server: With DHCP (Dynamic Host Configuration Protocol), a host can automatically be given a unique IP address each time it connects to a network--making IP address management an easier task for network administrators. If the DHCP server is available from your network, you do not need to enter TCP/IP, subnet mask, gateway, and DNS information. Instead, this information will be automatically given for the @V5100.
- *IP Address: An IP (Internet Protocol) address uniquely identifies a host connection to an IP network. System administrator or network designer assigns the IP address. The IP address consists of two parts, one identifying the network and the one identifying your node. The IP address is usually written as four numbers separated by periods. Each number can be zero to 255. For example, 10.1.30.186 could be an IP address.
- *SMTP: Stands for Simple Mail Transfer Protocol. It is the main communication protocol used to send and receive e-mail on the Internet.
- DNS: Stands for Domain Name System. The DNS server identifies hosts via names instead of IP addresses. If the DNS server is available on your network, you can enter the domain name instead of digits for the IP address, such as Pegasus.com.tw instead of 120.3.2.23.
- POP3: POP3 is the latest Post Office Protocol 3, this is a service that stores and serves e-mails for various client machines that are not connected to the Internet 24 hours a day. E-mails are held in POP3 until you log on.
- LDAP: Stands for Lightweight Directory Access Protocol. LDAP enables users to access directories and address books directly from external networked devices to simplify document distribution.
SCAN TO E-MAIL
@V5100 allows you to deliver your scanned document to e-mail addresses on the network. The document is first scanned and converted to a standard PDF, JPEG, TIFF, or MTIF (Multi-page TIFF) file format and then transmitted to remote recipients simultaneously as an e-mail attachment.
When you send an e-mail to someone via @V5100, @V5100 uses Simple Mail Transfer Protocol (SMTP) to transfer your outgoing e-mails to your SMTP mail server, and then send these e-mails to your recipients through internet.

Through the intranet with FTP (File Transfer Protocol), HTTP (Hypertext Transfer Protocol), HTTPS (a secure way of using HTTP), CIFS (Common Internet File System), or AVPP (Avision Post Processing Protocol), @V5100 allows you to save scanned document directly to a designated server or a personal computer on the network in a standard PDF, JPEG, TIFF, or MTFF file format.
CIFS is the sharing system of Microsoft Windows. What's unique about this filing function is to let entire corporate users share one machine to send documents to each desired file folder on a designated server or individual computer.

The @V5100 uses an AVPP (Avision Post-processing Protocol) protocol to provide the post processing mechanism for filing document. The AVPP is a protocol developed by Avision. The distinguishing feature of such AVPP's post processing is to treat the @V5100 as a workstation's input device and a simplified post-processing controller. Before and after a document is filed, @V5100 will inquire a user how to manage the document further by following the applications (usually made of page programs like ASP, PHP, JSP etc...) on the post-end server. Such an architecture enables a single server to serve multiple sets of @V5100 simultaneously.
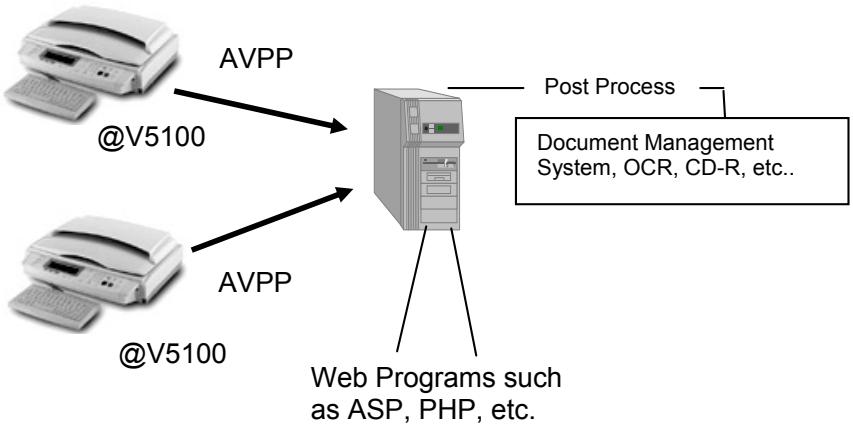
Note:
The usage of AVPP needs to develop and deploy the back-end server page programs. These programs are not included in this product service, please consult with professional web page developers to provide a customized application system.
2 Installing Your Machine
This chapter is specifically targeted to the persons who are responsible for the administration of @V5100. It is recommended that the administrator read this chapter before installing the machine.
Minimum Configuration Requirements
To make the best of @V5100, the following configuration is required:
To send e-mails from @V5100:
TCP/IP network
A SMTP and a optional POP3 server
To file document(s) via intranet
- FTP, HTTP, HTTPS, CIFS, or AVPP Protocol environment
- Windows 95, Windows 98, Windows NT, Windows 2000, Windows Me, Windows XP, HTTP or FTP server
To make copies from @V5100:
- A PostScript-compliant laser printer
Checking Package Contents
Unpack the box and check its components. If there is any item missing, contact your dealer immediately.

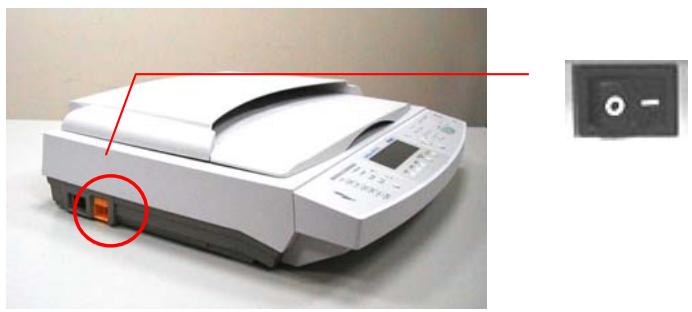
Unlocking the Scan Unit
The scan unit is locked during transport to protect the scanning mechanism from being damaged. Be sure to unlock the scan unit before using the machine.
1).Locate the lock switch at the left side of the machine.
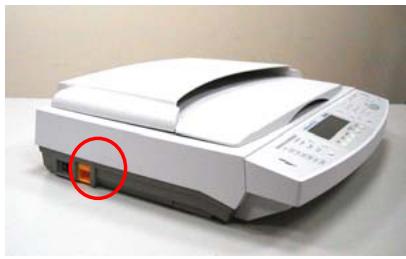
2). Push the lock switch down to the "Unlock" position.
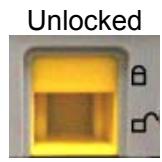
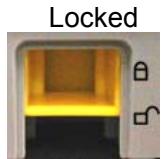

Note:
If you need to move your @V5100 for repair or any other reason, be sure to lock your @V5100 before moving. To lock your @V5100, please do the following,
- Turn off your @V5100.
- If the scan unit is not located at the front of the glass, turn on the machine. After the scan unit is returned to the front end, turn off the machine.
- Move the lock switch to the "Locked Position".
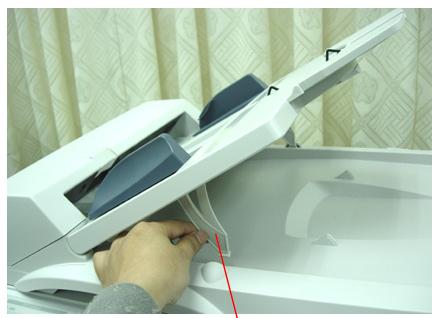
Setting up the Optional ADF (Auto Document Feeder)
- As shown in the figure below, lift the document cover to remove the studs from the hinge holes. The studs are loosely attached to the hinge holes in the purpose to cover your original when it is a few inches high.
- Insert the studs of the ADF cover to the hinge holes on the document glass.
- Raise the ADF Tray to about 45 degrees.
- Pull down the wire legs beneath the ADF Tray and insert the wire legs to the holes on the document cover.
- Pull out the ADF Tray extension to its full length.
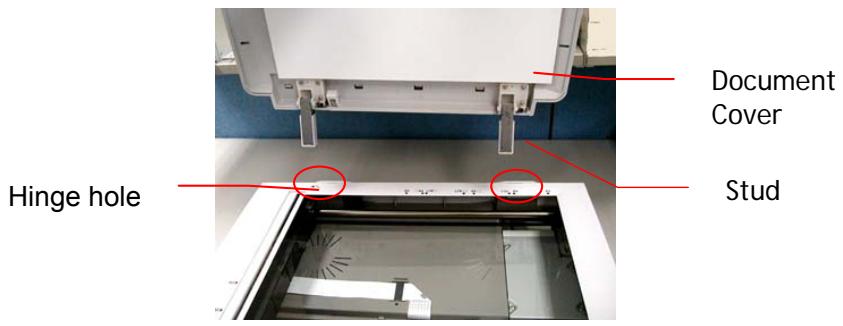
ADF Wire Legs
ADF Tray
Extension
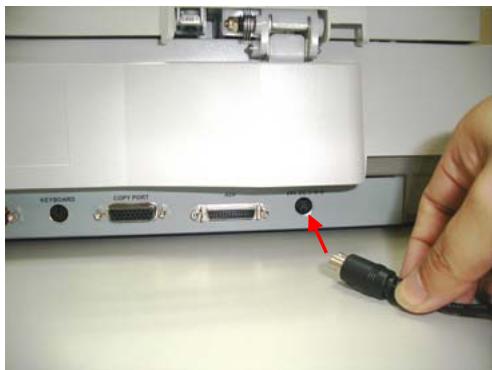
CONNECTING THE ADF CABLE
Connect the ADF (Auto Document Feeder) cable (attached to the document(s) cover) to the ADF port at the back of @V5100.
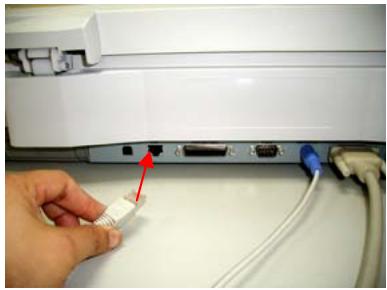
CONNECTING THE ETHERNET CABLE
- Connect one end of your Ethernet LAN cable to an available port of your Ethernet Hub.
- Connect the other end to the network port at the back of your @V5100.
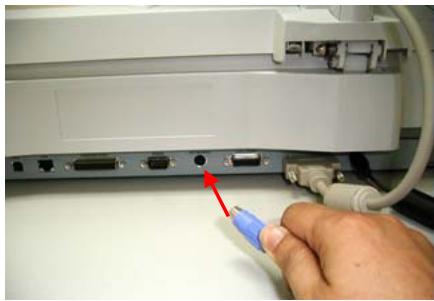
CONNECTING THE KEYBOARD CABLE
- Connect the cable of the keyboard to the PS2 port at the back of @V5100.
CONNECTING THE PRINTER CABLE
- Connect one end of the printer cable to the printer supplied by Avision.
- Connect the other end to the "Copy port" of your @V5100. If your printer is not supplied by Avision, connect it to the "Printer port" of your @V5100.
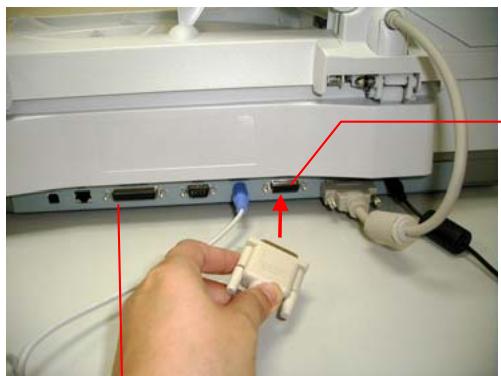
Copy port
Printer port
Note:
To make copies through printer, please first turn on the printer and then turn on @V5100. Otherwise, you may encounter problem in making copies through the printer.
CONNECTING THE POWER AND TURNING ON THE MACHINE
- Press the power switch to the "0" position to turn off @V5100.
- Connect the small end of the power cable to the power port of your @V5100.
- Connect the other end to an appropriate power outlet.
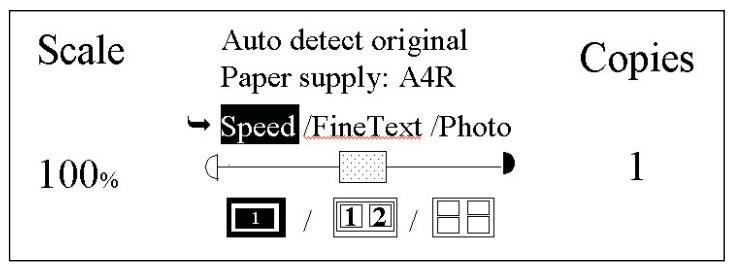
- Press the power switch to the "l" position to turn on your @V5100. After showing the booting up message, the LCD display prompts the Copy ready status (preset) as shown below.
Note:
You can press the Power Saving button on the control panel to switch to the power saving mode. If @V5100 is idle for four hours, it automatically shuts off the scanning lamp. Press any key (except the Power Saving button) to return to the ready status.
3 Configuring the Machine
This chapter is specifically targeted to the persons who are responsible for the administration of @V5100. Administrator activities are password protected with privileges that are denied to the ordinary users.
The following settings or destinations must be defined by the system administrator before the @V5100 can be used to distribute the scanned document on the network.
Network and E-mail parameters: Defines the parameters for TCP/IP, SMTP, and POP3 protocols to send your scanned document to e-mail addresses.
- Filing destinations: Defines the protocols and destinations to send your scanned document to FTP servers, web, or any personal computers on the network.
Note:
- If the system administrator has chosen DHCP, then the IP address of TCP/IP, gateway, subnet mask, and DNS server will be automatically given.
- When installing the @V5100 for the first time, it is recommended that the Administrator retain the default system settings. The settings can be customized at a later date once you are familiar with the operation and functionality.
The Administrator information is password protected and available to the Administrator only. When the machine is shipped, the login name and password for the administrator are left blank. It is recommended that system administrator of @V5100 create a new login name and password before using the machine. The administrator can either use the control panel or the @V5100 web page to specify the administrator information.
SPECIFYING THE ADMINISTRATOR INFORMATION BY THE CONTROL PANEL
ADMIN
- Press on the control panel. This prompts the login name and password message.
Admin. Login:
Password:
-
Press Select as the default login name and password are left blank. This prompts the following Administrator screen.
-
General
- Network configuration
- Copy
- Profile template
- Function buttons
- Management
- Information
-
Exit
-
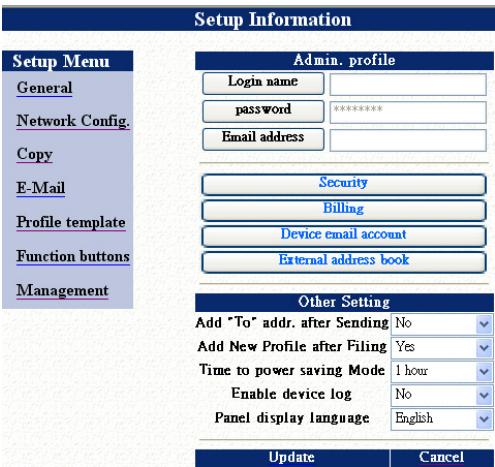
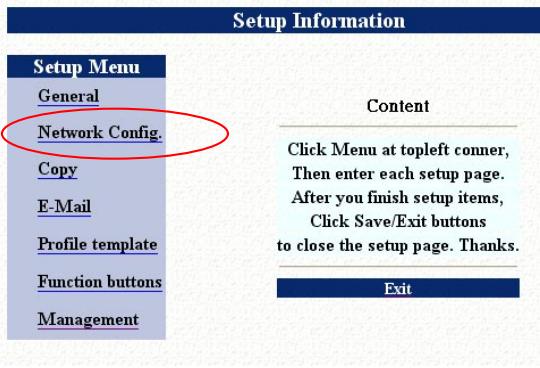
Choose Management. The following Management screen appears.
-
Admin. Profile:
- Security:
- Billing:
- Device e-mail address account:
- External address book:
- Add "To" addr. after sending: Yes
- Add new profile after filing: Yes
- Time to power saving: 1 hr
- Enable device log: No
- Panel display language:
-
Save & Exit:
12.Exit -
Enter your input and then press Select

- Use or to scroll between items and finally choose Save & Exit to save your desired settings.
Items which must be entered are marked with an “*” and are explained in below: (Leave other items for the default value and modify at a later day)
| Item | Description |
| Admin. Profile | Allow the system administrator to change his or her login name, password, e-mail address. Choice: 1. Login name (up to 16 characters or digits) 2. Password (up to 8 characters or digits) 3. E-mail address (up to 60 characters or digits) (Note the login name and password are case-sensitive.) |
| Security | Allow the system administrator to define the security type and location of the security server. If you choose “Local” or “SMTP”, you can assign the accessing activities via the machine’s webpage.(Simply type the machine’s IP address in your browser). Choice:1. Type: No, HTTP, LDAP, SMTP, Local2. Server URL: Enter the server URL if you choose HTTP, LDAP, or SMTP as your security type.3. Port: Enter port number if you choose HTTP, LDAP, or SMTP as your security type. |
| Billing | Enter information if you wish to send the billing result. Choice:1. Method: By e-mail, By Web server2. URL/To: Enter the URL address or e-mail address to send your billing result..3. Port: Enter port number of the server.4. Login Name: Enter login name of the server.5. Password: Enter password of the server. |
| Device e-mail account | Enter logon information for SMTP or POP3 authentication. Choice:1. E-mail address: (default “From” address)2. Authentication method: SMTP, POP33. Login name: (Login name for SMTP or POP3 authentication.)4. Password: (Password for SMTP or POP3 authentication.) |
| External address book | If you wish to link external e-mail address book from other devices, enter your LDAP server here. Choice:1. LDAP server URL: Enter your LDAP server URL here.2. Port: Enter port number of the LDAP server.3. Login name: Enter login name of the LDAP server.4. Password: Enter password of the LDAP server. |
| Add “To addr. after sending | Choose yes to add the “To” address to current address book after sending the e-mail from @V5100. Choice: Yes, No |
| Add new profile after filing | Choose yes to add the new profile to current profile list after sending the scanned document to the server from @V5100. Choice: Yes, No |
| Time to power saving mode | Set how long the machine will automatically enter the power saving mode after the latest action. Choice: 30 min., 1 hr, 2 hr, 3 hr, 4 hr |
| Enable device log | Choose yes if you need to enable device log for diagnostic purpose. Choice: Yes, No |
| Panel display language | Choose the language you wish to show on the LCD-display. Choice: English, Native |
| Save and Exit | Choose this to save the above settings and exit. |
| Exit | Choose this to exit without saving the above settings. |
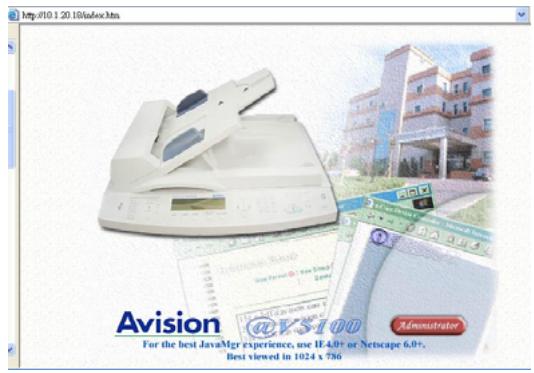
1 Type the IP address of the @V5100 in the URL field of your browser and then press Enter. The @V5100 web page appears.
For example:
http://192.32.35.10
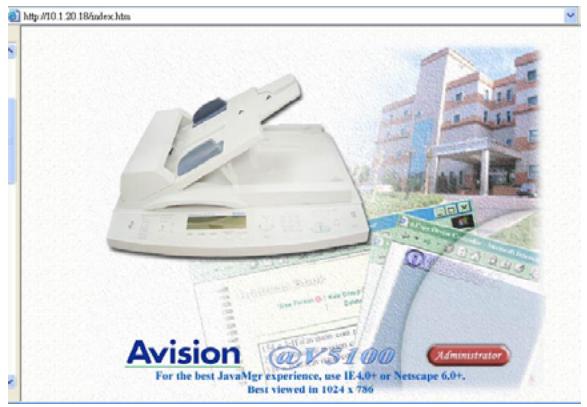
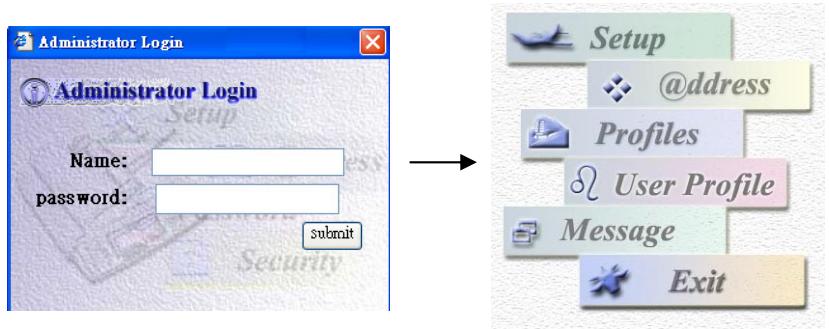
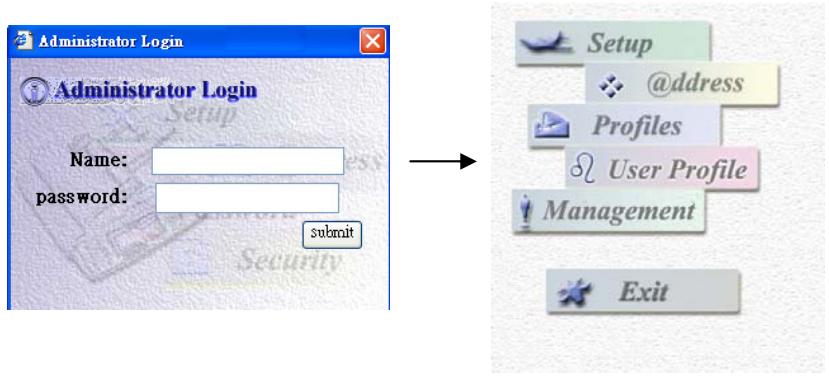
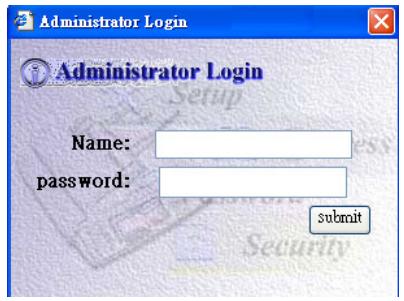
2 Click Administrator to prompt the login dialog box. Press Submit since the machine is shipped with no specific login name and password. The Administrator screen appears.
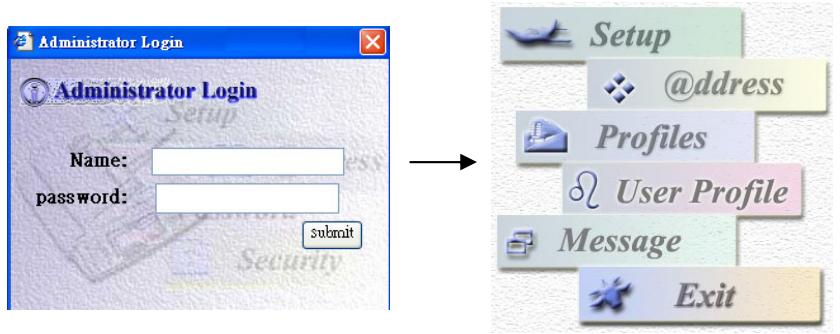
- Click Management to prompt the Management screen.
- Enter your input and then press Save to save your settings.
(Refer to previous section to change the settings.)
Before @V5100 can be used to distribute document to e-mail addresses, the network administrator must assign an IP address, subnet mask, gateway, SMTP, and POP3 to the @V5100. The administrator can assign these parameters either by using the control panel or using @V5100 web page.
SPECIFYING NETWORK CONFIGURATION BY THE CONTROL PANEL
ADMIN
- After turning on @V5100, press to prompt the login dialog.
Admin. Login:
Password:
Note:
The access to the Administrator activities is blocked by the administrator password. It is recommended that the administrator create a password before performing these activities. Both Login and Password are in blank for the default.

if the
- Enter login name and password or press Select if the administrator has not created a new one. Choose Network
Configuration to prompt the Network Configuration screen (see below) in the LCD-display.
The Network Configuration Settings
| 1. | DHCP enable: | |||
| 2. | IP address: | . | . | . |
| 3. | Subnet mask: | . | . | . |
| 4. | Gateway IP: | . | . | . |
| 5. | DNS server: | . | . | . |
| 6. | SMTP server: | . | . | . |
| 7. | SMTP port: | 25 | ||
| 8. | POP3 server | . | . | . |
| 9. | POP3 port | |||
| 10. | Save & Exit | |||
| 11. | Exit |
- Enter the network parameters respectively and press Select to complete. (Refer to page 1-9)
For example:
- DHCP enable: No
- IP address: 10.1.40.185
- Subnet mask: 255.255.255.12
- Gateway IP: 10.1.40.135
- SMTP server:smtp.company.com
- SMTP port: 25
- DNS server: 10.1.45.23
- POP3 server: pop.company.com
- POP3 port: 110
- Save & Exit
11.Exit
Note:
If you have a DHCP server available on your network and the DHCP has been selected, the above IP, subnet mask, gateway, and DNS server will be automatically given.
- Use to select Save & Exit and press Select to save your settings.
SPECIFYING THE NETWORK CONFIGURATION BY @V5100 WEB PAGE
1 Type the IP address of the @V5100 in the URL field of your browser and then press Enter. The @V5100 web page appears.
For example:
http://192.32.35.10
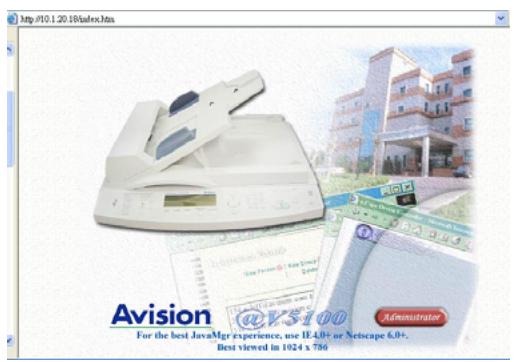
2 Click Administrator to prompt the login dialog box. Press Submit since the machine is shipped with no specific login name and password. The Administrator screen appears.
- Click Setup and then Network to prompt the Network Configuration screen.
- Enter the network parameters respectively. (Refer to page 1-9) For example,
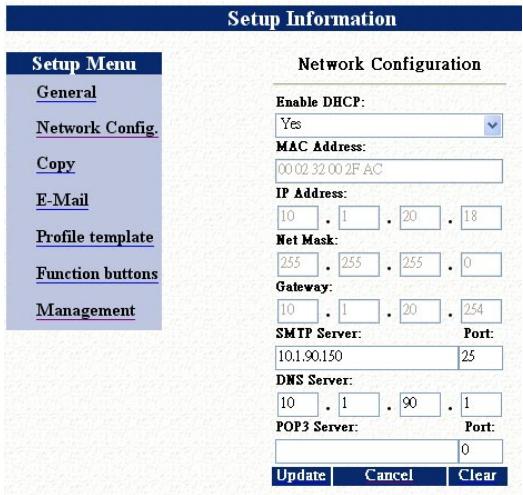
- Choose Update to save your settings.
To simplify the filing operation, the administrator can set up the filing parameters including protocols, directory, file name and other scanning parameters as a template to create a new filing profile. Setting up the filing parameters can be done either on the control panel or on the @V5100 web page.
SPECIFY THE PROFILETEMPLATES BY THE CONTROL PANEL
ADMIN
- Press on the control panel. The login dialog will appear.
Admin. Login:
Password:
- Enter login name and password or press Select if the administrator has not created a new one. (When the machine is shipped, the login name and password are left blank for the default.)
-
When the Administrator menu appears, choose Profile template. The following Profile template screen appears.
-
- Items must be filled out to send file to servers from the @V5100
1. Protocol:
2. Target URL:
3. Port
4. Login name:
5. Password:
6. File name:
7. Color output format:
8. B&W output format:
9. Resolution: 200
10. Density: 4
11. Subfolder: No
12. Report to e-mail:
13. Save & Exit:
14. Exit

- Enter your input and then press Select
- Use or to scroll between items and finally choose Save & Exit to save your desired settings.
Items must be entered are explained in below: (Other items please use default value and modify at a later day.)
| Items | Description |
| Protocol | Choose the protocol you desire to store your scanned image. Choice: *FTP, *HTTP, *CIFS, *HTTPS, *AVPP |
| Target *URL | Enter the directory for the scanned document. Note that the directory is different due to the protocol. The route starts from the root directory in FTP, HTTP, HTTPS, and CIFS. For example, ftp://, http://, and file:\, https://. When choosing AVPP protocol, the path has to start from entering the application program route and program name, for example: app.company.com/AVPPDEMO(APP1/login.asp |
| Port | If your port number for the protocol is different from the default, please enter the port number in this field. Default settings: FTP:21, HTTP:80, HTTPS:443, CIFS:139, AVPP:80 |
| Login name | Enter login name of the server. |
| Password | Enter password of the server. |
| File name | Enter file name for the scanned image. Or you can type #Y#M#D#h#m#s#n to make file name change as time goes. (Y, M, D, h, m, d and n represent year, month, date, hour, minute, second, and series number respectively.) For example, test#m#s lets the file name show minutes and seconds at the last part of file name like test1120, test1260, etc. |
THE SETTINGS OF FILING SERVER
FTP
Stands for "File Transfer Protocol." It is a common method of transferring files via the Internet from one computer to another. FTP use RFC 959[FTP] as their protocol. Therefore, please make sure you have legal FTP account with the privilege of writing under the directory to save the files and the password before using FTP to save the files. To add a sub-directory from @V5100, you need to have the privilege of adding a new directory.
HTTP AND AVPP
Both HTTP and AVPP use RFC 2616[HTTP 1.1] as their protocol, and the default Port is usually 80. If you are not using the HTTP port or AVPP port 80 to save the files, you must change the HTTP Port or AVPP Port of @V5100 to the port for the Web Server.
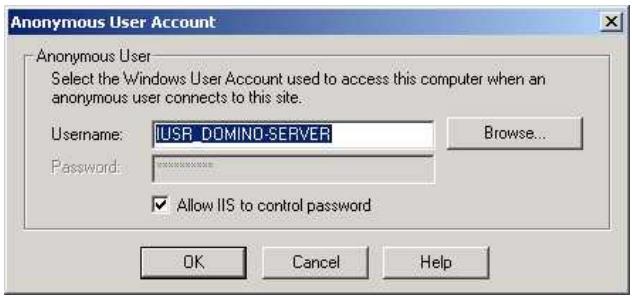
Generally speaking, Web Server, such as IIS or the other HTTP server, will use anonymous account for authentication, so that the user can link directly to the web page without entering the user name and password first. Hence, if the HTTP or AVPP Server allows anonymous account for authentication when you use @V5100 to keep the files, there is no need for setting any text in the field of Login name and Password of @V5100.
On the other hand, if IIS or HTTP server does not allow anonymous account for authentication connecting to the web page, the user will be prompted to enter the user name and password first while connecting to the web site. In this mode, the file saving feature is available only when entering the user name and password permitted by the server in the field of Login name and Password for @V5100 respectively.
Therefore, please make sure the mode that your Web Server allows before using HTTP or AVPP for files saving. If anonymous access mode is not allowed, you must have legal HTTP account and password.
Since @V5100 will check whether the directory for file saving really exists before proceeding file saving and then writing the file after scanning to the specified directory, you have to set the directory for files saving as "browse" and allow for writing in Web Server; otherwise, @V5100 will not be able to write the file into the directory.
If you wish to use @V5100 to save files, in addition to making some settings in Web Server, you will have to confirm the account with the privilege of writing for connecting Web Server; otherwise, @V5100 will not be able to "write" the scanned file in the file system.
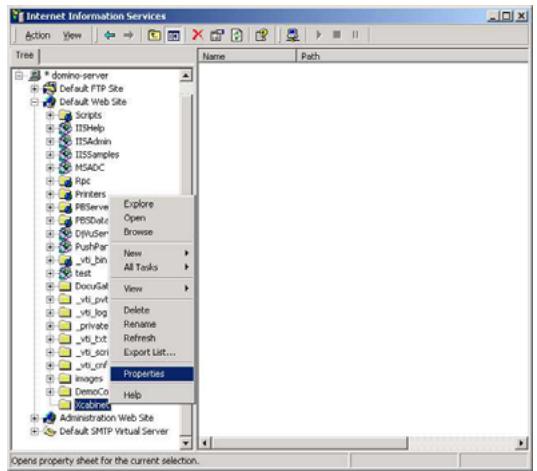
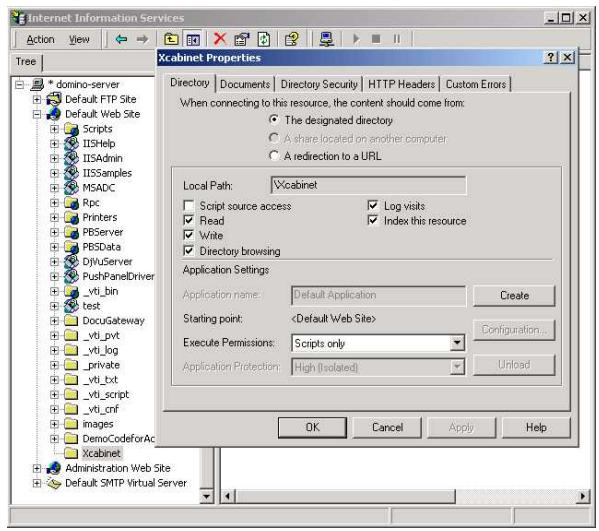
The following uses the IIS setting for anonymous access to Microsoft Windows 2000 as an example, and assumes the AVPP application is installed in the root directory of IIS, C:\Inetpub\wwwroot\X cabinet, and the directory for files saving is in C:\Inetpub\wwwroot\X cabinet\File. For non-anonymous access, refer to IIS for more detail information.
The settings for IIS anonymous access is as below:
- Start "Internet service manager" in "Control Panel", select "Default Web site" and right click C:\Inetpub\wwwroot\X cabinet, and select "Properties".
- In the X cabinet dialog box, select "Directory security" tab, and click "Edit" for "Anonymous Access and Authentication Control". Please make sure "Anonymous Access" is selected in "Authentication Methods" dialog box.
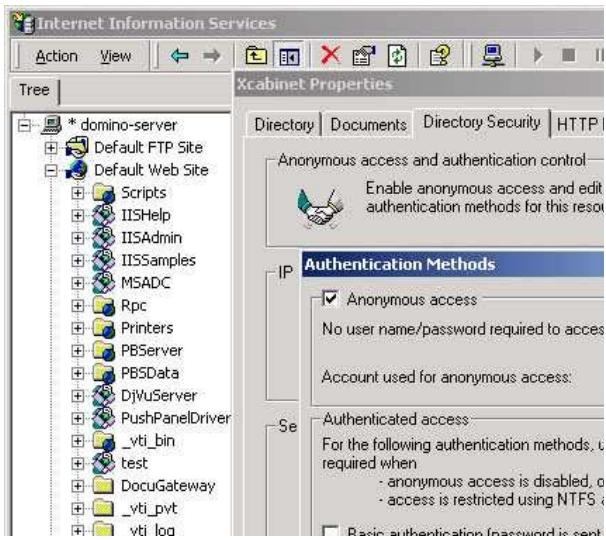
- Click on "Edit" to Open "Account for anonymous access".
Please make sure that the account, stored in your computer system, in the "username" filed is with sufficient privilege to access the file system.
The settings for IIS privilege is as below:
- Like the setting in anonymous access, start "Internet service manager" and select "Default Web site", and right click C:\Inetpub\wwwroot\X cabinet, and select "Properties".
- Select "Directory" tab in the Properties page. Please ensure the privileges for "Read", "Write" and "Directory Browsing" are selected.
If the file management system in your server is NTFS, in order to allow IIS to use an anonymous account to access the files in the directory of C:\Inetpub\wwwroot\X cabinet\Files, you have to make sure the anonymous account is with sufficient privilege. You may make the following settings:
- Select C:\Inetpub\wwwroot\X cabinet\Files directory in Windows Explorer, and right click to select "Properties".
- Select "Security" tab in the File dialog box, and select "Everyone". Select the privileges for "Read and Execute", "Folder Properties List", "Read" and "Write".
After that "every user" has the privilege to manage all files in the directory of files saving.
Note: For the actual security concern of the scanned files, we should not allow the group of "Everyone" to have full privileges of the file directory. Therefore, when setting the access privilege for your file system, it is recommended to set the privilege of the directory for file saving to IIS anonymous account or the other users and groups that can use the directory only.
Note:
- Please note that HTTP and AVPP cannot add server sub-directory from @V5100.
-
When using Apache as HTTP server, you need to have a HTTP/1.1 put add-in module since @V5100 uses chunked Transfer-encoding. In addition, the Apache will have to be set to accept HTTP PUT command in order to accept @V5100 for files saving. For more information, refer to the related document of Apache.
-
For IIS 6.0 on Windows 2003, you need to enable WebDAV in Server Extension folder.
HTTPS
HTTPS is a secure way of using HTTP. HTTP provides almost no security feature. It contains only basic authentication mechanisms, and supports little privacy. HTTPS solves this problem by adding SSL, a secure transport layer over insecure TCP.
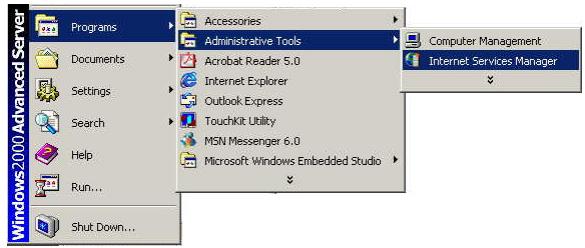
To send scanned document to servers using HTTPS, you must install SSL on the destination servers. How to install SSL properly on the server, please refer to the server's manual. After SSL has been installed well, please check if the SSL port is editable and the directory security has been selected. The following illustrations show how to check the SSL port and directory security in Windows 2000 Server system.
To check if SSL port and directory security have been selected,
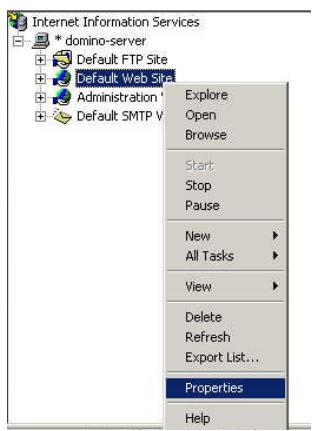
- Click Start>Program>Administrator Tools>Internet Service Manager in succession.
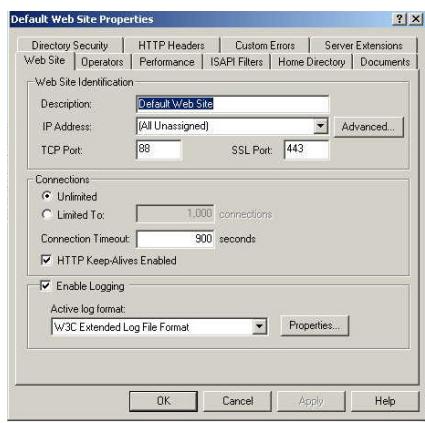
- Click Default Web Site and click the right mouse button and choose Properties. The Default Web Site Properties dialog box appears. Click the Web Site tab and check if SSL port is editable.
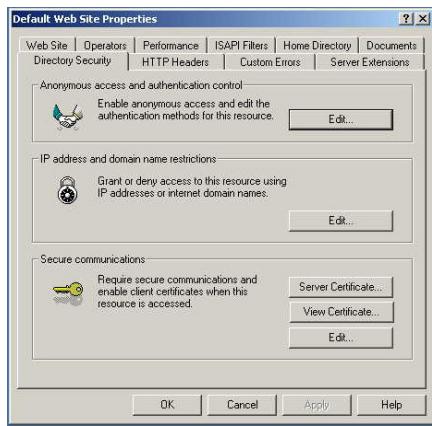
- In the Default Web Site Properties dialog, click the Directory Security tab and then click the Edit button from the Secure communication field. The Secure Communication dialog appears.
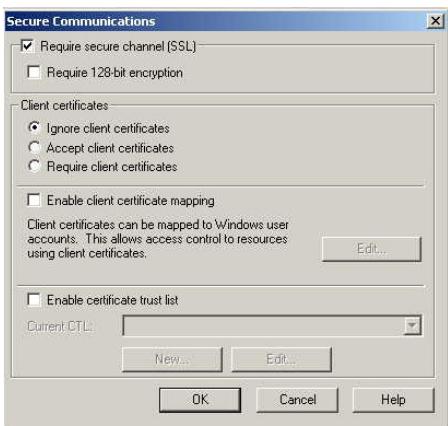
- Check if "Require secure channel (SSL)" and "Ignore client certificates" have been selected.
Or
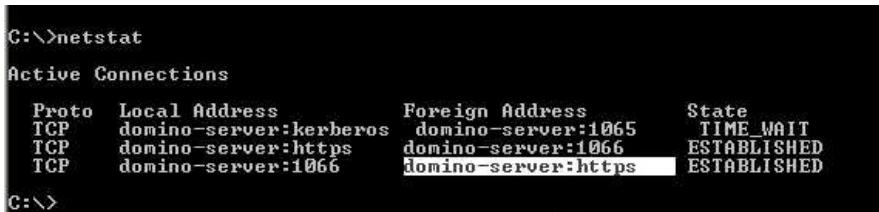
You may simply type "netstat" in a MS-DOS command. If the https has been established as below, then the server is ready to receive scanned document from @V5100 via HTTPS.
CIFS
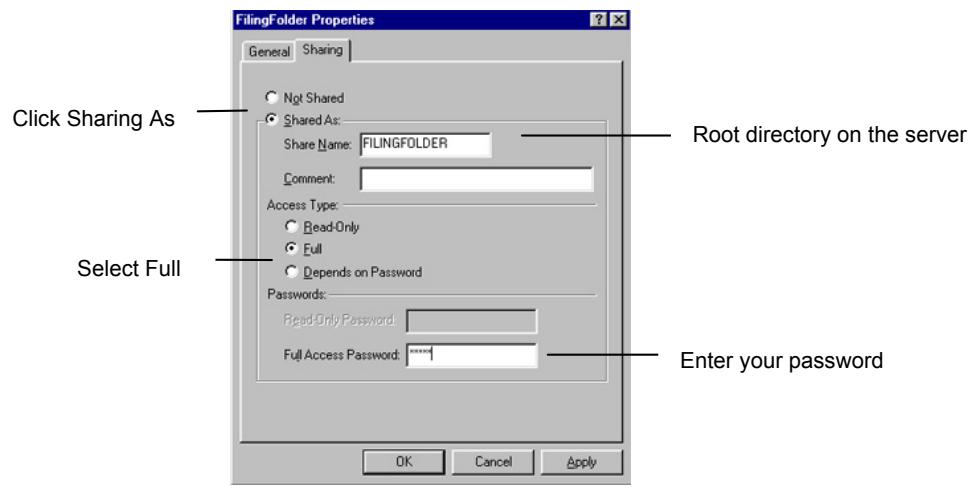
CIFS (Windows Network Share) is a file saving protocol generally used for "recourse sharing " of network in Microsoft Windows systems. Please set up the "shared directory" per the network settings for sharing in MS Windows. Generally, under the Windows 9x/Me Share level mode, use the "Full Control" password for the directory as the password of @V5100 folder and leave the login name field blank. Under the User level mode of Windows NT/2000, use the account and password with the privilege of "write" as the login name and Password of @V5100 folder.
Note: Windows NT can use local account as files saving account only. If adding a Windows NT domain, the domain account is not suitable as files saving account. In Windows XP, check following HKEY.
HKEY_local_MACHINE\system\currentcontrolset\services\Lanmagserver\para
metersenablesecuritysignature=0, requiresecuritysignature=0
Below is the Win98 CIFS server sharing set up screen for your reference.
SPECIFYING THE PROFILE TEMPLATE BY @V5100 WEB PAGE
1 Start your browser, either I.E 5.0 or higher, or Netscape 6.0 or higher.
2 Type the IP address of the @V5100 in the URL field of your browser and then press Enter. The @V5100 web page appears.
For example:
http://192.32.35.10
2 Click Administrator to prompt the login dialog box. Press Submit since the machine is shipped with no specific login name and password. The Administrator screen appears.
- Click Setup to prompt the Setup screen.
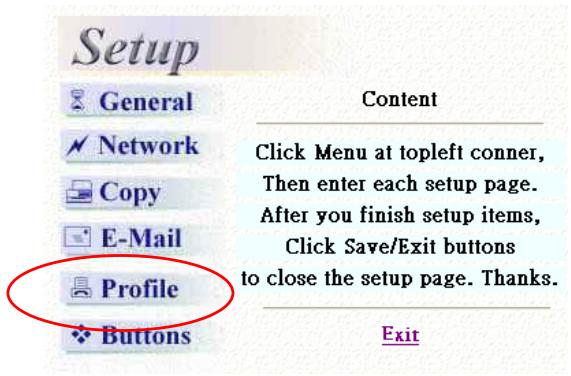
- Click Profile to prompt the Profile Template screen. (Refer to the previous section, Specifying the Profile Template By the Control Panel, to enter your profile information.)
- Click Update to save your settings.
This chapter describes how to perform the administrator activities either on the control panel or on @V5100 web page.
The access to the administrator activities is blocked by the administrator password. It is recommended that an administrator create a password before performing these activities. Both Login and Password are in blank for the default.
Administering the @V5100 by the Control Panel
ADMIN
-
Press (Admin.). The Administrator Setting screen appears as below.
-
General
- Network Configuration
- Copy
- Profile template
- Function Buttons
- Management
- Information
-
Exit
-
Use or to scroll between the menus. Press (Select) to enter each menu. To exit from the menu, press (Return). Finally, press Save & Exit to save the changes and exit from the menu.
- For the contents of each menu, please see the subsequent section, Summary of Administrator Activities.
Before administering the @V5100 by the web page, please set up the network parameters which have been described in page 3-5.
To administer the @V5100 by the web page,
- Start your browser, either I.E 5.0 or higher, or Netscape 6.0 or higher.
- Type the IP address of your @V5100 in the URL field of your browser. @V5100 web page appears.

- Click on Administrator to prompt the Administrator Login dialog. Enter your name and password and click Submit. Enter the same value as you created on the LCD-display. Both Name and Password are in blank for the default.
The Setting screen appears as below.
- For the contents of each menu, please see the subsequent section, Summary of Administrator Activities.
ADMIN
Press (Admin.) on the control panel. After typing the login name and password, the following Administrator screen will appear.
- General
- Network configuration
- Copy
- Profile template
- Function buttons
- Management
- Information
- Exit
Choose General and the following settings will appear.
| Items | Description |
| Device Name | Display the model name. You can input the device name. |
| Date/Time | Current date and time. |
| Time Zone | Time zone of your location. (Based on Greenwich Mean Time (GMT). |
| Save & Exit | Save the above settings and exit. |
| Exit | Exit the screen without saving. |
| DHCP enable | Select Yes if you wish to enable DHCP. |
| IP address | IP address of your @V5100. |
| Subnet mask | The subnet mask of your @V5100. |
| Gateway IP | The IP address of your gateway. |
| DNS server | IP address of your DNS server. |
| SMTP server | IP address of your SMTP server. |
| SMTP port | The port number of your SMTP server. |
| POP3 server | The IP address of your POP3 server if POP3 authentication is needed. |
| POP3 port | The port number of your POP3 server if POP3 authentication is needed. |
| Save & Exit | Save the above settings and exit. |
| Exit | Exit the screen without saving. |
| Printer | PostScript-compliant printer (Depend on printer profile. The printer profile can be changed only by Network Management Program through the network port) |
| Paper supply | Choice: A5 to A3 |
| Media type | Choice: Plain paper, transparency. |
| Background removal (B&W) | Remove the background color of your B&W document. Choice: Yes, No |
| Sort | Choose to enable automatic sorting. Choice: Yes, No |
| Watermark | Enter the words for watermark. |
| Duplex | Choose if you wish to use duplex (double-sided) function if duplex is available for your printer. |
| Save & Exit | Save the above settings and exit. |
| Exit | Exit the screen without saving. |
Note:
- The copy settings actually depend on the type of printer you have.
- Default settings: Media type: plain paper, Background removal: No, Sort: No, Water mark: No, Duplex: No.
| Items | Description |
| Default Subject | Default text for the Subject field in e-mail messages from @V5100. Up to 64 characters are allowed. The default subject is used only when users did not enter anything in the Subject field in e-mail message from @V5100. |
| Color Output Format | File format for documents to be sent in colors via e-mail from @V5100. Choice: 1. File format: PDF, JPG,TIFF,WDL,MTIFF(Multi-page TIFF) Note: Choose MTFIFF or PDF when you need to scan multi-page document and convert it to a single image file. 2. Compression rate: Low,Medium,High (If TIF or MTFIFF is selected as a file format, the compression rate is defined as RAW only.) |
| B/W Output Format | File format for documents to be sent in black and white via e-mail from @V5100. Choice: 1. Multi-level B&W(Gray): Yes,No 2. File format: PDF,PCX,WDL,MTIFF(Multi-page TIFF),TIFF 3. Compression rate: Low,Medium,High (If you choose Multi-level B&W (Gray) to be Yes, the file formats will include PDF,JPG,TIF,MTIF. If TIF or MTFIFF is selected as your file format, the compression rate is limited to RAW only. If you choose Multi-level B&W (Gray) to be No, the file formats will include PDF,PCX,TIF,MTIF and then the selection of compression rate of MTIF and TIF will include G3,G4,and Raw. ) 4. Enable Background removal: Yes,No 5. Document type: Text,Photo |
| Resolution | The scanning resolution you choose to scan from @V5100. Choice: 75,100,150,200,300,400,600 (dpi) |
| Separation Limit | Limit the maximum space for each incoming e-mail mainly the attachment. Choice: No, 2MB, 4MB, 5MB, 10MB, Unlimited. |
| Density | Choose the density level. Choice: 1,2,3,4,5,6,7. |
| Save & Exit | Save the above settings and exit. |
| Exit | Exit without saving the above settings. |
Note:
- MTIFF(Multi-page TIFF): Scan multi-page document and convert it to a single image file. To view a PDF file, Acrobat Reader is required. To view a JPG, TIFF, or MTFIF file, an application that supports TIFF, JPEG, or MTFIF (such as Imaging for Windows) is required.
- Default settings: Color output format: PDF, Low(Compression rate), B&W output format: PDF, Text, Low, Resolution: 200, Density: 4
| Items | Description |
| Protocol | Choose the protocol you desire to file your scanned image. Choice: FTP, HTTP, CIFS, AVPP, HTTPS |
| Target URL | Enter the directory to save the scanned document. Note that the directory will be varied due to different protocol. The route starts from the root directory in FTP, HTTP, HTTPS, and CIFS. For example, ftp://, http://, and file:\, https://. |
| Port | The port number for your filing server. |
| Login name | Enter login name for the server. |
| Password | Enter password for the server. |
| File name | The file name for filing a document without extension. Using #Y#M#D#h#m#s#n makes file name change as time goes. (Y), M, D, h, m, s, and n represent year, month, date, hour, minute, second and series number respectively.) For example, type file name: test#D#n will bring your filing file name as test05001 |
| Color Output Format | File format for documents to be sent in colors via filing from @V5100. Choice: 1. File format: PDF, JPG, TIFF, WDL, MTIFF 2. Compression rate: Low, Medium, High (If TIF or MTIFF is selected as your file format, the compression rate is limited to RAW only.) |
| B/W Output Format | File format for documents to be sent in black and white via filing from @V5100. Choice: 1. Multi-level B&W (Gray): Yes, No 2. File format: PDF, PCX, WDL, MTIFF, TIFF, Raw, PCX 3. Compression rate: Low, Medium, High (If you choose Multi-level B&W (Gray) to be Yes, the file formats will include PDF, JPG, TIF, MTIF. If you choose Multi-level B&W (Gray) to be No, the file formats will include PDF, PCX, TIF, MTIF and then the selection of compression rate of MTIF and TIF will include G3, G4, and Raw.) 4. Enable Background removal: Yes, No 5. Document type: Text, Photo |
| Resolution | The scanning resolution you choose to scan from @V5100. Choice: 75, 100, 150, 200, 300, 400, 600 (dpi) |
| Density | Choose the density level. Choice: 1,2,3,4,5,6,7. |
| Subfolder | Choose Yes if you wish to save files in a subfolder under target URL. You may create a new subfolder on demand. Choice: Yes, No |
| Report to e-mail | Choose Yes if you wish to send the filing report to your e-mail. In this e-mail, you will receive a URL link direct to the scanned document. Choice: Yes, No |
| Save & Exit | Save the above settings and exit. |
| Exit | Exit without saving the above settings. |
Note:
- MTIFF(Multi-page TIFF): Scan multi-page document and convert it to a single image file. To view a PDF file, Acrobat Reader is required. To view a JPG, TIFF, or MTFIF file, an application that supports TIFF, JPEG, or TIFF (such as Imaging for Windows) is required.
- Default settings: Color output format: PDF, Low(Compression rate), B&W output format: PDF, Text, Low, Resolution: 200, Density: 4
Choose Function Button and the following settings will appear.
| Items | Description |
| Button #1~6 | Setting up the most frequently used function keys Fn#1-6 on the keyboard packaged along with the machine)Choice: Copy, E-mail, and Filing |
| Item | Description |
| Admin. Profile | Allow the system administrator to change his or her login name, password, e-mail address. Choice: 1. Login name (Up to 16 characters or digits are allowed.) 2. Password (Up to 8 characters or digits are allowed.) 3. E-mail address (Up to 60 characters or digits are allowed.) (Note the login name and password are case-sensitive.) |
| Security | Allow the system administrator to define the security type and location of the security server. If you choose “Local” or “SMTP”, you can assign the accessing activities via the machine’s webpage.(Simply type the machine’s IP address in your browser). Choice: 1. Type: No, HTTP, LDAP, SMTP, Local 2. Server URL: Enter the server URL if you choose HTTP, LDAP, or SMTP as your security type. 3. Port: Enter port number if you choose HTTP, LDAP, or SMTP as your security type. |
| Billing | Enter information if you wish to send the billing result. Choice: 1. Method: By e-mail, By Web server 2. URL/To: Enter the URL address or e-mail address to send your billing result.. 3. Port: Enter port number of the server. 4. Login Name: Enter login name of the server. 5. Password: Enter password of the server. |
| Device e-mail account | Enter logon information for SMTP or POP3 authentication. Choice: 1. E-mail address: (default “From” address) 2. Authentication method: SMTP, POP3 3. Login name: (Login name for SMTP or POP3 authentication.) 4. Password: (Password for SMTP or POP3 authentication.) |
| External address book | If you wish to link external e-mail address book from other devices, enter your LDAP server here. Choice: 1. LDAP server URL: Enter your LDAP server URL here. 2. Port: Enter port number for the LDAP server. 3. Login name: Enter login name of the LDAP server. 4. Password: Enter password of the LDAP server |
| Add “To addr. after sending | Choose yes to add the “To” address to current address book after sending the e-mail from @V5100. Choice: Yes, No |
| Add new profile after filing | Choose yes to add the new profile to current profile list after sending the scanned document to the server from @V5100. Choice: Yes, No |
| Time to power saving mode | Set how long the machine will automatically enter the power saving mode after the latest action. Choice: 30 min., 1 hr, 2 hr, 3 hr, 4 hr |
| Enable device log | Choose yes if you wish to enable device log. Choice: Yes, No |
| Panel display language | Choose the language you wish to show on the LCD-display. Choice: English, Native |
| Save and Exit | Choose this to save the above settings and exit. |
| Exit | Choose this to exit without saving the above settings. |
Note:
- Default settings: Add "To" addr. After sending: Yes, Add new profile after filing: Yes, Time to power saving: 1 hr, Using English: No.
| Items | Description |
| Model | Display the model name. |
| IP address | Display current IP address for @V5100. |
| Serial number | Display serial number. |
| Manufacturer | Display the manufacturer. |
| F/W version | Display firmware version. |
| Scanner F/W | Display scanner firmware version. |
| Resource file | Display resource file. |
| Scan count | The count for all scanned documents. Sub items: 1. Total: 2. Copy (B&W): 3. Copy (color): 4. E-mail (B&W): 5. E-mail (Color): 6. Filing (B&W): 7. Filing (Color): 8. USB Scan (B&W): 9. USB Scan (Color): 10. ADF: 11. Print Counter Report: 12. Exit |
| Print Admin. Setting | Print out current settings of Administrator. |
| Exit | Exit the screen. |
Note:
When you need to call for service, be sure to write down the above system information for an effective response.
There are some activities which can be set only through the homepage of the machine. For example, if you choose Local or SMTP as your security type, then you can define the accessing activity of a user through the machine's homepage. Or, you can define some frequent used message that need to be shown in the Subject or Memo field when sending e-mail from the machine to save your time in typing these message. How to define these features will be described in the following sections.
ADDING A NEW USER
- Start your browser, Microsoft I.E. 5.0 or higher, or Netscape Communicator 6.0 or higher.
- Type IP address of your @V5100 in the URL field. For example, http://10.1.30.40 The @V5100 web page appears as shown below.
3. Click Administrator to prompt the Login dialog.
4. Enter the name and password of the administrator and click Submit. The Administrator screen appears.
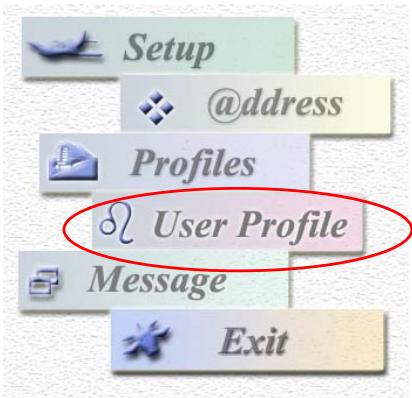
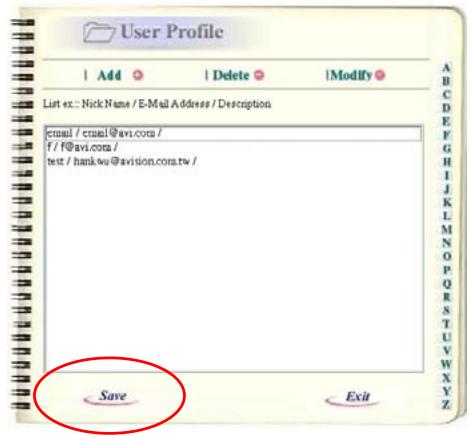
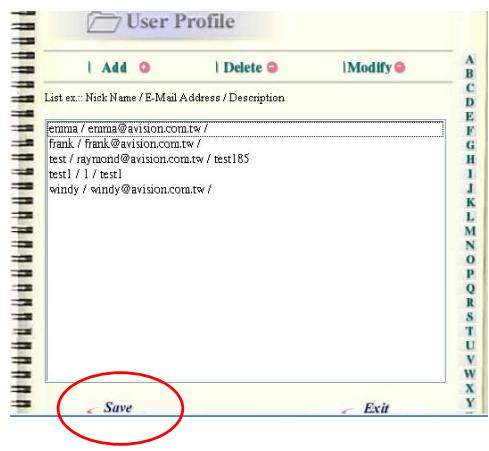
5. Click "User Profile", the following User Profile screen appears.
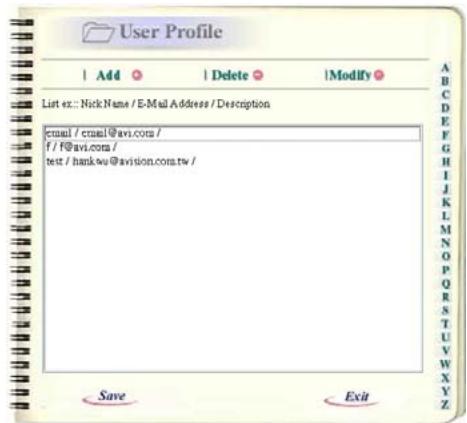
- Click "Add" to prompt the "Add a New User to User Profile" screen.
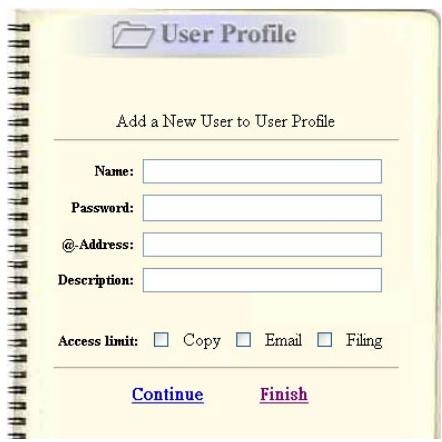
- Enter name and password and the accessing activities of the new user. Click Continue for the next input or Finish to temporarily save the latest data and return to the main screen.
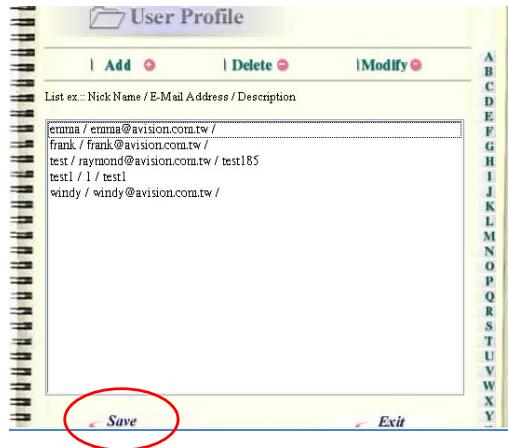
- Click Save to permanently save all the latest settings, or Exit to leave without saving any latest settings.
To modify a current user profile,
- Repeat Step 1 to Step 5 from the previous section, Adding an New User. The User Profile dialog appears.

- Choose the user profile you want to modify from the list. A Modify the User Profile dialog appears.
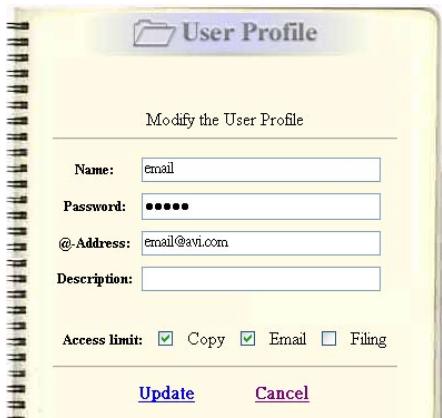
-
Modify your user profile.
-
Click Update to temporarily save the settings and return to the User's Profile's main screen, or Cancel to exit.
- Click Save to permanently save all the latest settings, or Exit to leave without saving any latest data.
To delete a current user,
- Repeat Step 1 to Step 5 from the previous section, Adding A New User. The User Profile dialog appears.
- Choose the user you want to delete from the list.
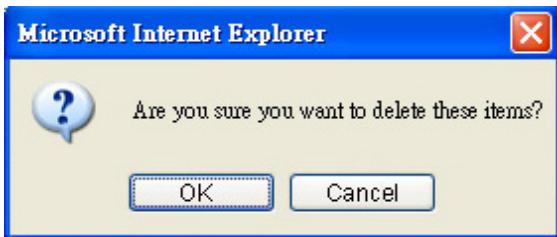
- Click Delete to erase the user. A warning message appears to confirm your deletion. Click OK to confirm or Cancel to exit.
4. Click Save to permanently save all the latest changes, or Exit to leave without saving any latest changes.
To set your frequently used message,
- Repeat Step 1 to Step 4 from the previous section, Adding a New User. The Administrator screen appears.
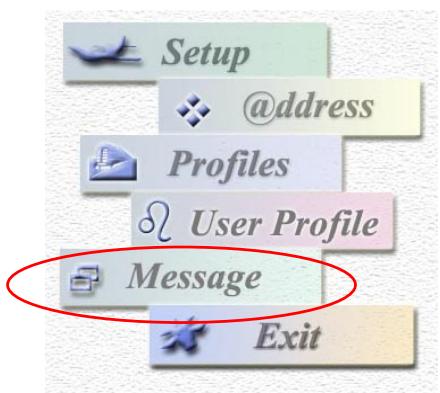
- Choose Message to prompt the following Message dialog.
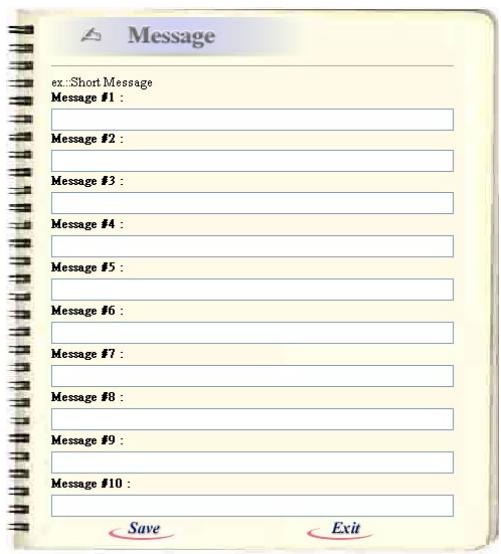
- Type your frequently used message in the blank box. For example,
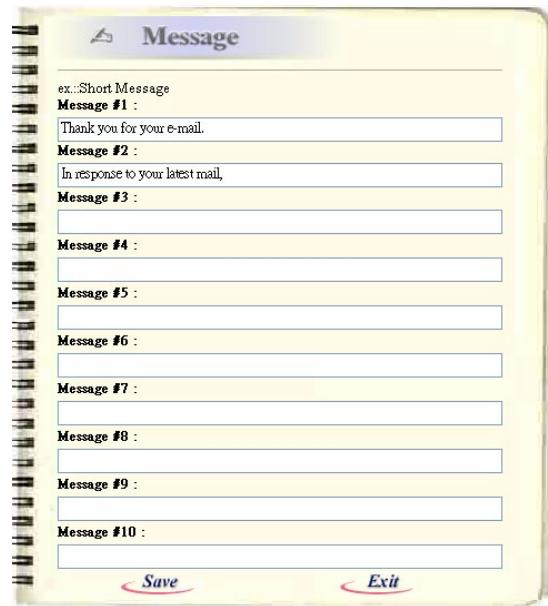
- Click Save to save your settings or Exit to leave without saving these settings.
Note:
To use the Short Message while sending e-mail, simply click

from the numeric keypad ( ) and select your desired message from the list in the Subject or Memo field.
5 Managing the Address Book
Our Java-Manager is a convenient browser-based tool to manage the address book of @V5100 remotely. Since only the administrator can manage the address book, it is highly recommended that the administrator read this chapter before manage @V5100.
Managing Your E-mail Address Book
ADDING AN E-MAIL ADDRESS
To add an e-mail address,
- Start your browser, Microsoft I.E. 5.0 or higher, or Netscape Communicator 6.0 or higher.
- Type IP address of your @V5100 in the URL field. For example, http://10.1.30.40
@V5100 web page appears as shown below.

Note:
The web page is best viewed at a 1024 x 768 dpi resolution.
3. Click Administrator to prompt the Login dialog.
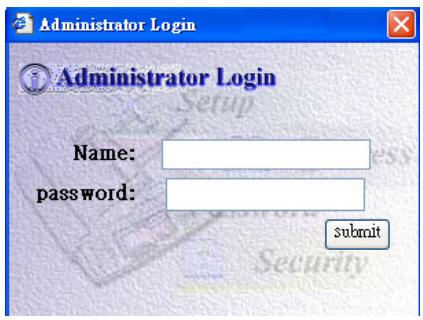
- Enter the name and password of the administrator and click Submit. The Administrator screen appears.

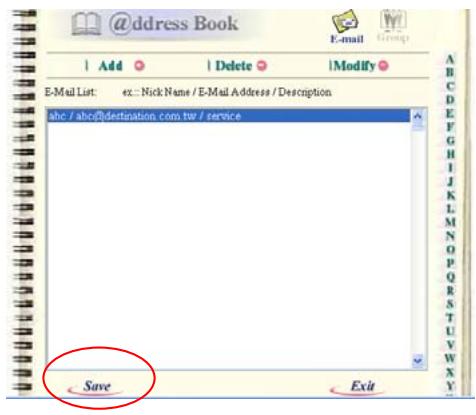
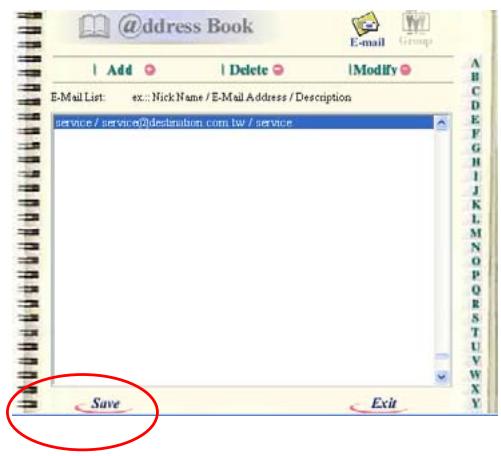
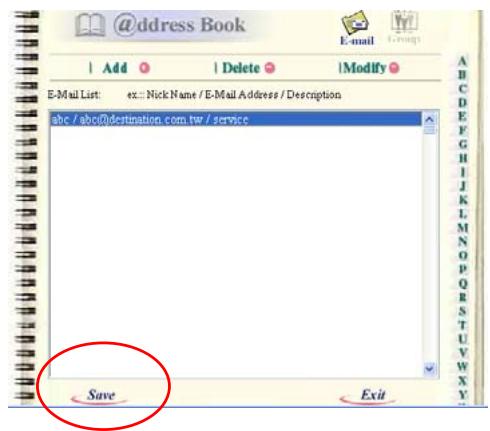
- Press "@ddress" to prompt the Address Book dialog.
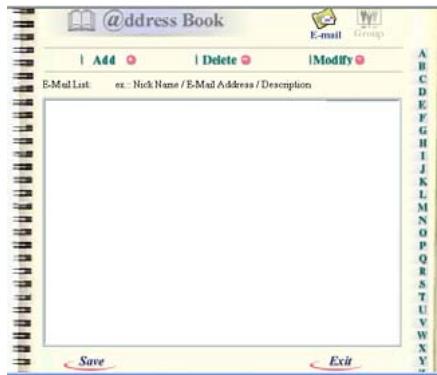
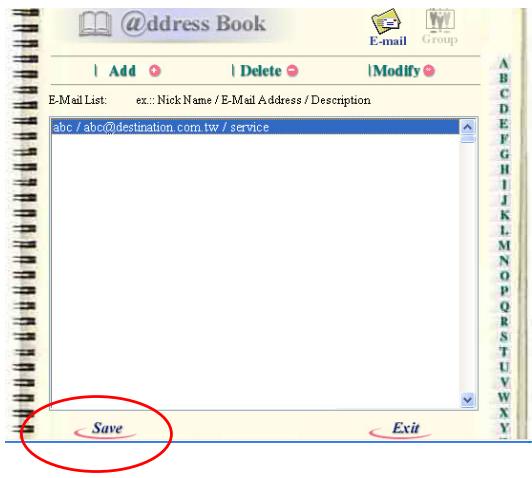
- Press the E-mail icon and choose Add to prompt the Add a New E-mail Address dialog.
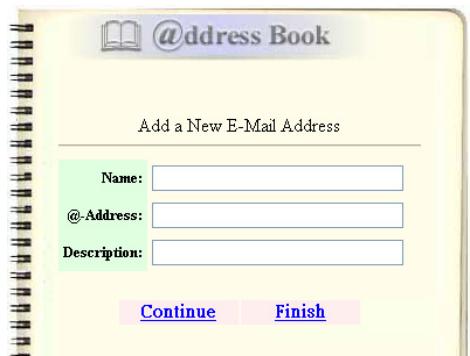
- Enter a local user's name, password, and e-mail address, and click Continue for the next input or Finish to temporarily save the latest data and return to the main screen.
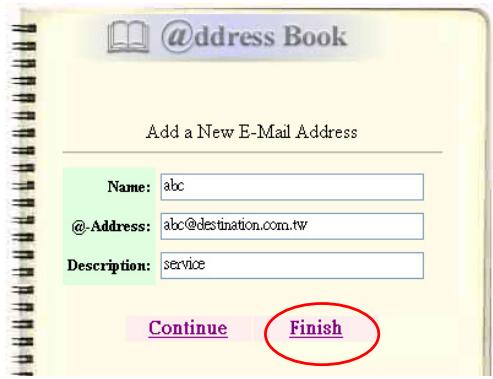
- Click Save to permanently save all the latest change on @V5100, or Exit to leave without saving any latest change.
To modify an e-mail address,
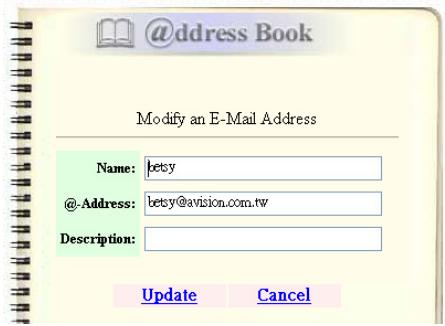
- Repeat Step 1 to Step 5 from the previous section, Adding an E-mail Address. The Address book dialog appears.

- Click the E-mail icon and choose the address you want to modify from the list. A Modify E-mail address dialog appears.
-
Modify your address.
-
Click Update to temporarily save the latest data, or Cancel to exit.
- Click Save to permanently save all the latest data on @V5100, or Exit to leave without saving any latest data.
To delete an e-mail address,
- Repeat Step 1 to Step 5 from the previous section, Adding An E-mail Address. The Address Book dialog appears.
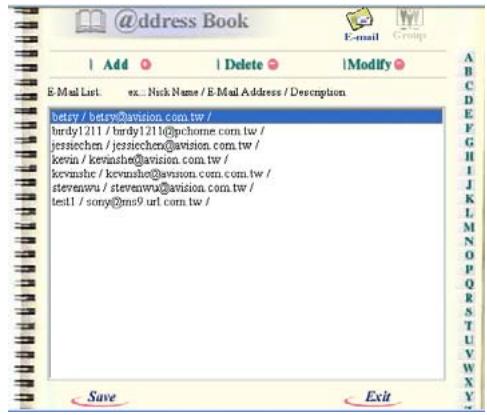
- Click the E-mail icon on the top and choose the addresses you want to delete from the list.
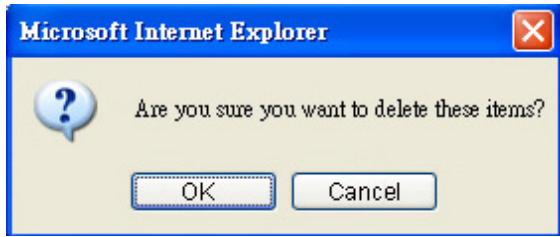
- Click Delete to erase the address. A warning message appears to confirm your deletion. Click OK to confirm or Cancel to exit.
4. Click Save to permanently save all the latest data on @V5100, or Exit to leave without saving any latest data.
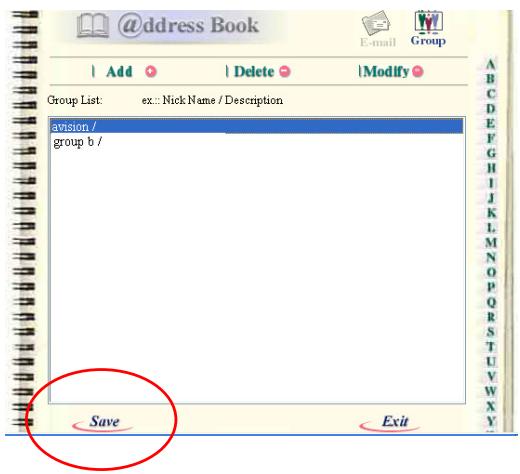
ADDING A NEW GROUP
To add new groups,
- Repeat Step 1 to Step 5 from the previous section, Adding An E-mail Address. The Address book dialog appears.
- Click the Group icon and choose Add to prompt the Add A New Group dialog.
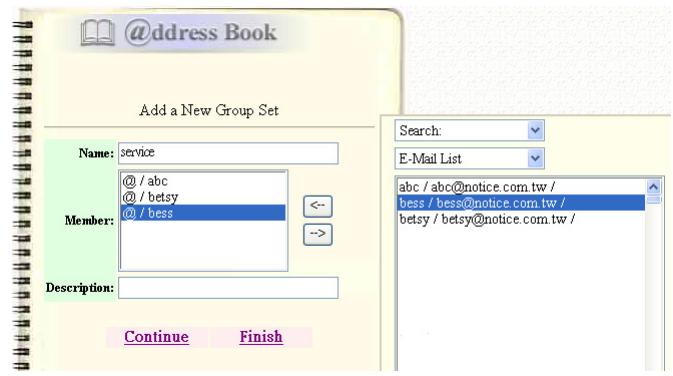
-
Enter your group name.
-
Choose the address from the right side and click to add a member to the group.
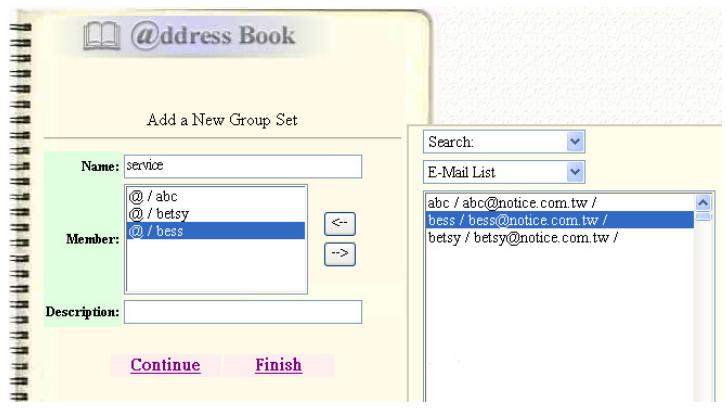
- Click Continue for the next input or Finish to temporarily save the latest data and return to the main screen.
- Click Save to permanently save all the latest data on @V5100, or Exit to leave without saving any latest data.
To modify a group,
- Repeat Step 1 to Step 5 from the previous section, Adding An E-mail Address. The Address book dialog appears.

-
Click the Group icon on the top and choose Modify to display the Modify A Group Set dialog.
-
Choose one member you want to delete from the group and click the key to delete or insert a new member from the current addresses by choosing the address on the right side and clicking the key to insert to the group.
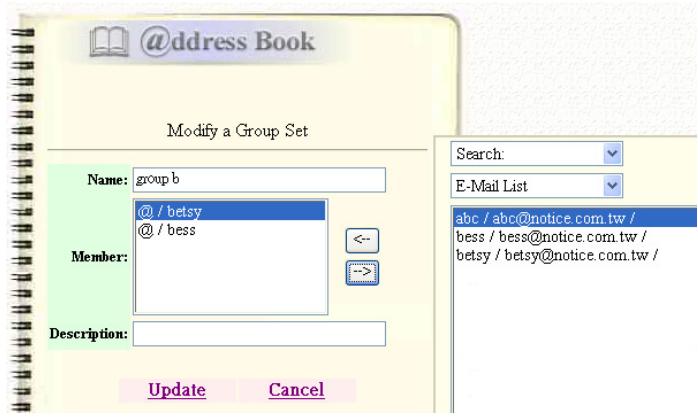
- Click Update to temporarily save the latest data, or Cancel to exit.
- Click Save to permanently save all the latest data on @V5100, or Exit to leave without saving any latest data.
Adding a New Profile on the Control Panel
A profile contains a list of information including the type of your protocol, target directory, file name, file format, and scanning parameters for your scanned document to be sent to your filing servers. Create some new profiles you frequently use to speed up the filing process.
FILING
- Press on the control panel, the Profile list screen appears.
Most Used Profiles
B&W=PDF/Med/Text
200dpi/Density: 4
-
Choose
, the following Profile Parameters screen will appear. -
Profile name:
- Protocol : ftp >
- Target URL : ftp://
4.Port:21 - Login name:
- Password:
- File name :
- Color output format :
- B&W output format:
- Resolution: 200
- Density: 4
- Sub folder: No
13.Report to e-mail: -
Document size:
-
Enter your profile name and choose your desired protocol. Note that the root of the target URL will automatically change due to the protocol you have selected. Use to scroll between items and press Select

to complete each entry.
For example,
| * 1. Profile name: test |
| * 2. Protocol : FTP |
| * 3. Target URL : ftp://ftp.company.com |
| * 4. Port : 21 |
| * 5. Login name: xxxxxx |
| * 6. Password: xxxxxx |
| * 7. File name : test#D#n |
| 8. Color output format |
| 9. B&W output format |
| 10. Resolution: 200 |
| 11. Density: 4 |
| 12. Sub folder: No |
| 13. Report to e-mail: bess@test.com.tw |
| 14. Document size: A4 |
- Stands for must items to be filled to send scanned document to filing servers.
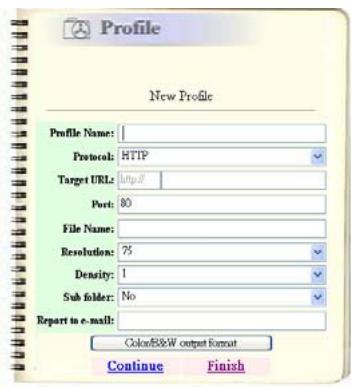
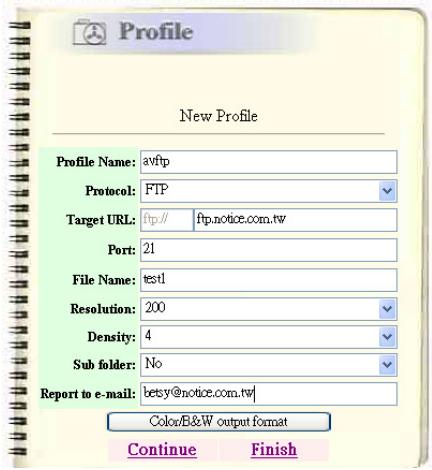
Terms and explanation:
| Items | Description |
| Profile name | Give a name of your new profile. The name of profile will appear when your press the Filing key. |
| Protocol | Choose the protocol you desire to file your scanned image. Choice: FTP, HTTP, CIFS, AVPP, HTTPS |
| Target URL | Enter the directory to save the scanned document. Note that the directory will be varied due to different protocol. The route starts from the root directory in FTP, HTTP, HTTPS, and CIFS. For example, ftp://, http://, and file:\,\, https://. |
| Port | The port number for your filing server. |
| Login name | Enter login name for the server. |
| Password | Enter password for the server. |
| File name | The file name for filing a document without extension. Using #Y#M#D#h#m#s#n makes file name change as time goes. (Y), M, D, h, m, s, and n represent year, month, date, hour, minute, second and series number respectively.) For example, type file name: test#D#n will bring your filing file name as test05001 |
| Color Output Format | File format for documents to be sent in colors via filing from @V5100. Choice: 1. File format: PDF, JPG,TIFF, WDL,MTIFF 2. Compression rate: Low, Medium, High (If TIF or MTIFF is selected as your file format, the compression rate is limited to RAW only.) |
| B/W Output Format | File format for documents to be sent in black and white via filing from @V5100. Choice: 6. Multi-level B&W (Gray): Yes, No 7. File format: PDF,PCX,WDL,MTIFF,TIFF,Raw,PCX 8. Compression rate: Low, Medium, High (If you choose Multi-level B&W (Gray) to be Yes, the file formats will include PDF,JPG,TIF,MTIF. If you choose Multi-level B&W (Gray) to be No, the file formats will include PDF,PCX,TIF,MTIF and then the selection of compression rate of MTIF and TIF will include G3,G4,and Raw. ) 9. Background removal: Yes, No 10. Document type: Text,Photo |
| Resolution | The scanning resolution you choose to scan from @V5100. Choice: 75,100,150,200,300,400,600 (dpi) |
| Density | Choose the density level. Choice: 1,2,3,4,5,6,7. |
| Subfolder | Choose Yes if you wish to save files in a subfolder under target URL. You may create a new subfolder on demand. Choice: Yes, No |
| Report to e-mail | Choose Yes if you wish to send the filing report to your e-mail. In this e-mail, you will receive a URL link direct to the scanned document. Choice: Yes, No |
File size v.s. resolution
| File size | TIFF | JPEG | |
| B&W 200 dpi, A4 | 34K | 484K | N/A |
| 300 dpi, A4 | 59K | 1089K | N/A |
| Color 150 dpi, A4 | 144K | 6550K | 141K |
| 200 dpi, A4 | 235K | 24576K | 234K |
- The above file size information is for your reference. The data may vary due to the contents of your original.
Note:
The default settings: Profile name: None, Protocol: FTP, Target URL: ftp://, Port: 21, File name: None, Color output format: PDF, B&W output format: PDF, Resolution: 200, Density:4, Subfolder: No, report to-email: None.
4. After you have completed your entry, press

to send your
document(s) in black and white. Or press

to send your
document(s) in colors. If default login name or password in profile are invalid, a login screen will be prompted to enter your login name and password to send document to your filing server.
Login name:

Password:
- After your input, the machine begins scanning and sending the scanned document to the filing server. After this is completed, the screen will enquire if you wish to include the new profile to your profile list if you have chosen "Yes" in the "Add profile after filing" from the submenu of Management when you press Administrator button.
Save new profile?


Use to select Yes and press Select to complete. The new profile will be added to the profile list as below.
Most Used Profiles
1.test
2.
B&W=PDF/Low/Text
200dpi/Density: 4
Note:
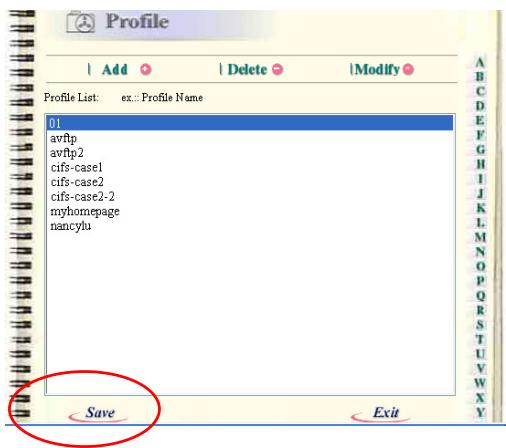
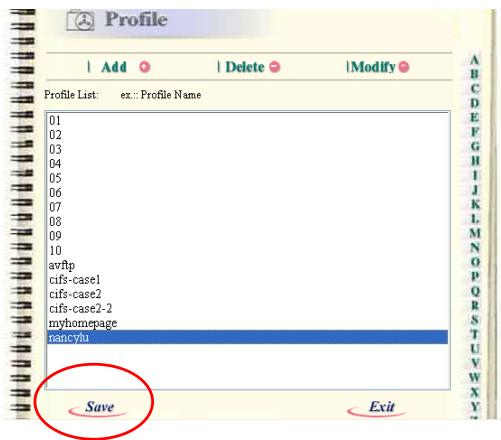
- On the control panel, you can add new profiles only. Modifying or deleting profiles is available on @V5100's web page.
- You can set up a maximum of 50 profiles. The Filing main screen can show up to 5 profiles. If your profile name does not appear in the Filing main screen, please press “Address Book/Profile” to choose your desired profile name from the list.
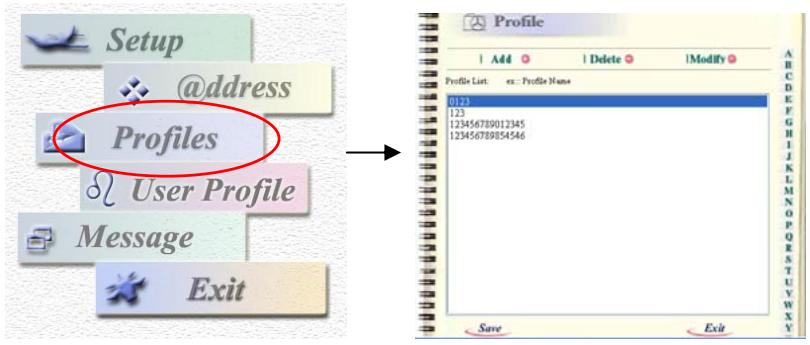
ADDING A NEW PROFILE
To add a new profile,
- Repeat Step 1 to 4 from the previous chapter, Managing the
Address Book, and click Profiles icon to prompt the Profile dialog as shown below:
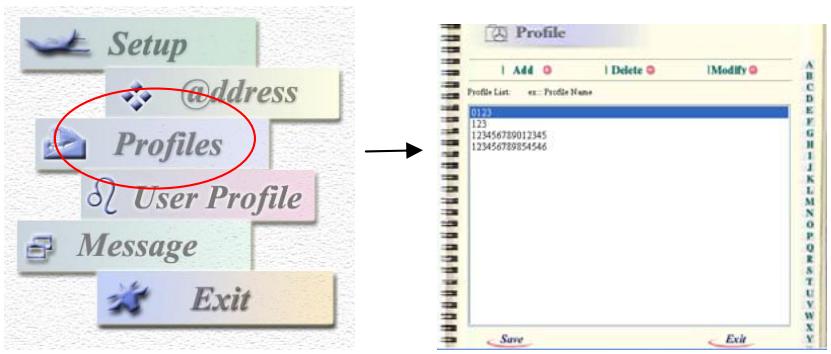
- Click Add to prompt the Add a New Profile dialog.
3. Enter your profile information. For example,
4. Click Continue for the next input or Finish to temporarily save the latest data and return to the main screen.
5. Click Save to permanently save all the latest data on @V5100, or Exit to leave without saving any latest data.
To modify a current profile,
- Repeat Step 1~4 in the Managing the Address Book section. The Profile dialog appears, as below:
- Choose the profile you wish to modify and click Modify to prompt Modify Profile dialog as shown below:
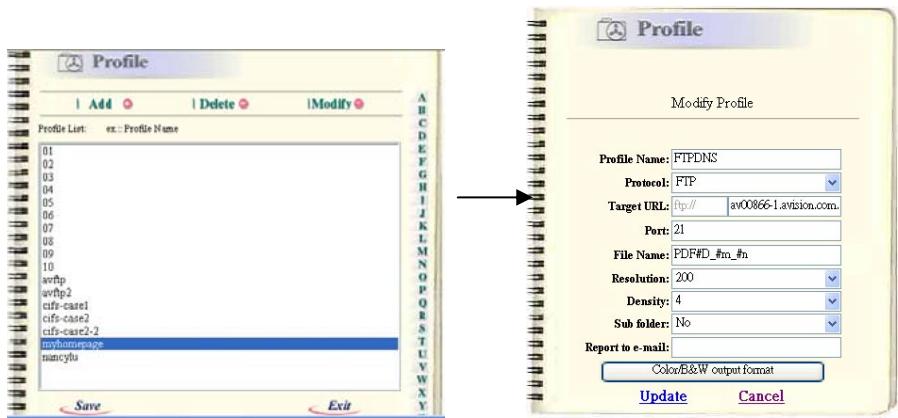
3. Modify your profile content. For example,

4. Click Update to temporarily save the latest data, or Cancel to exit.
5. Click Save to permanently save all the latest data on @V5100, or Exit to leave without saving any latest data.
To delete a profile,
- Repeat Step 1 in the Adding a New Profile section, the Profile dialog appears, as below:
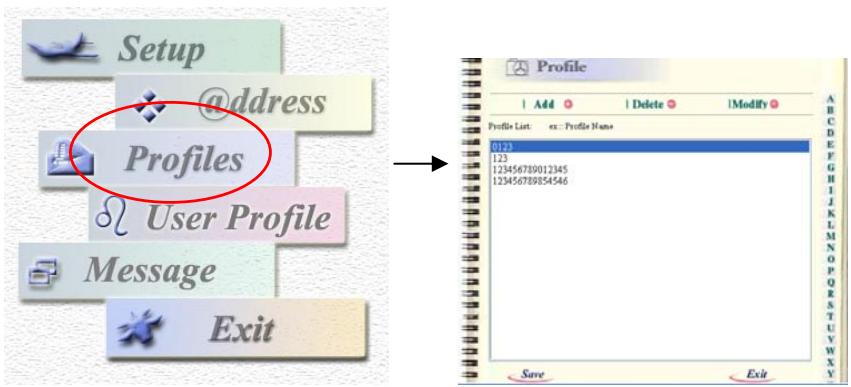
- Choose the profile you wish to delete.
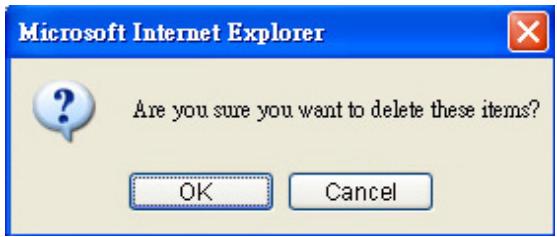
- Click Delete to erase the profile. A warning message appears to confirm your deletion. Click OK to confirm or Cancel to exit.
- Click Save to permanently save all the latest data on @V5100, or Exit to leave without saving any latest data.
With an intuitive control panel, @V5100 is designed to be easy-to-use. After the administrator has completed the configuration of the machine, basically, operating @V5100 takes a few simple steps:
- Place your paper either in the ADF or on the glass.
COPY E-MAIL FILING 2. Press , or on the control panel.
E-MAIL 3.If you are pressing ,enter an e-mail address or select one address from the address book in the "To" field.If you are pressing FILING ,choose your desired profile. - Press ("Black & White") or ("Color") to start scanning and send the scanned document to your printer, e-mail address, or filing server.
The following sections describe the advanced steps on how to make copy of your scanned document or how to distribute your document on the internet.
@V5100 can scan and send document(s) either in the ADF (Automatic Document Feeder) or on the glass. If you need to send multiple pages, please load your papers in the ADF. The ADF can hold up to 50 pages at one time. If you need to send pages from books, newspaper clippings, or paper with wrinkles or curls, please place your paper on the glass.
NOTICE ON USING THE ADF
Before using the ADF, please make sure that your paper meets the following specifications:
- Document(s) can range in size from 4.5 by 5.5 inches to 8.5 by 17 inches (Legal).
- Document(s) can range in weight from 16 to 41 lbs (0.002" to 0.006").
- Document(s) should be square or rectangular and in good condition (not fragile or worn).
- Document(s) should be free of curl, wrinkle, tears, wet ink, or punch holes.
- Document(s) should be free of staples, paper clips, paper sticky notes.
- Keep the glass clean without document placed on it.
Note:
To transmit irregular types of document(s), place the document(s) on the glass or make a copy first and then transmit the copy instead.
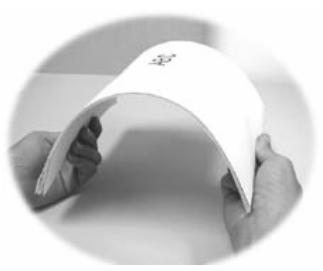
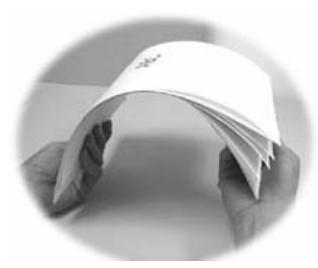
- Make sure your document is free of staples, paper clips and is not tore out.
- If you have multiple pages, fan your document(s) to avoid occasional paper jam. The ADF holds up to 50 pages at one time.
- Place your document(s) with the text FACE UP in the ADF and make sure that the top of each page feed in first.
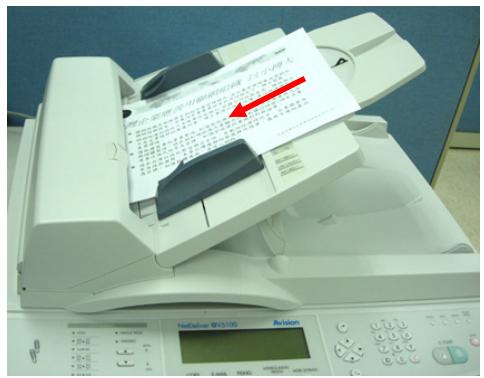
-
Adjust the Paper Guides to center the document(s) in the ADF.
-
Open the document(s) cover to reveal the glass.
- Place your document(s) with the text FACE DOWN on the glass and align the document(s) in the upper-left corner.
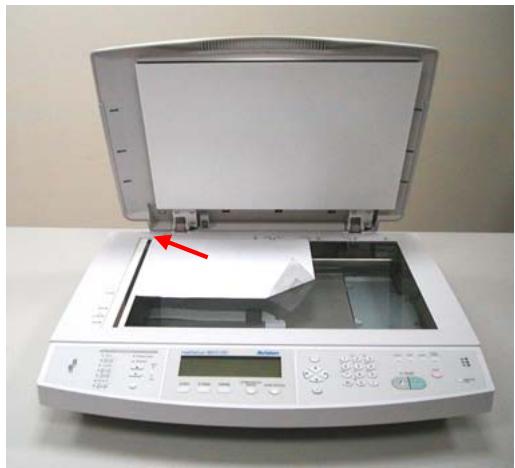
- Close the document cover.
BASIC OPERATION
- Place your document(s) with text FACE UP in the ADF or FACE DOWN on the glass.
- Enter your login name and password if required and press Select on the control panel. The following E-mail screen will appear.
To:
Subj:
CC:
BCC:
Memo:
B&W=PDF/Low/Text
200dpi\Density: 4
Note:
The last line of the initial E-mail screen will be switching between "B&W=PDF/Low/Text" and "Color=PDF/Low 200dpi/Density:4" to remind users the default scanning settings for the document.
-Manual Feed
You can enable multi-batch document scanning. Press FEED on the panel when loading more than 50 pages on the ADF or more than one page on the flatbed. Manual Feed is valid when the LED is lit.
- Enter your e-mail address with the keyboard. To enter next e-mail
address, press
Or you may select the e-mail address from the Address Book by
ADDRESS BOOK/

pressing on the control panel. Use to select multiple
e-mail addresses and press Or you may simply type the initial
letter of the e-mail address for a fast operation. Press to return to E-mail main screen.
- Enter or select CC and BCC address as well, if necessary. Enter the
subject for your E-mail. If not entered, Default Subj. will be displayed.
-
Enter your e-mail message in the Memo field.
-
Press to send your document(s) in black and white. Or press

key to send your document(s) in colors.
If you are not satisfied with the scanned image, learn to use the advanced features to enhance your scanned image.
E-MAIL MORE SETTING To use the advanced features, press and then on the control panel to prompt the More settings screen. Refer to the following table to modify the scanning settings.
| Menu items | Description |
| File name | File name for the scanned document. |
| From | Enter your From address. This is also the “From” address in your e-mail when you receive an e-mail from the @V5100. |
| Reply | Enter “Reply” address if you wish to specify a reply address which is different from the “From” address. |
| Color output format | Choose the output format for the document to be scanned in colors from PDF, TIFF, JPEG, and *MTIFF. |
| B&W output format | Choose the output format for the document to be scanned in B&W from PDF, TIFF, PCX, and *MTIFF. |
| Resolution | Choose the scanning resolution for the scanned document from a selection of 75, 100, 150, 200, 300, 400, 600 dpi. A higher resolution reproduces your image with greater details yet it requires more disk space. (Refer to page 6-3) |
| Separation limit | Limit the maximum space for each incoming e-mail mainly the attachment. Choice: No, 2MB, 4MB, 5MB, 10MB. |
| Density | If your original comes with a lighter or darker contrast, choose the density level from 1 to 7 to optimize your image. |
| Document size | If you wish to define the scanning area instead of the entire page, choose your desired area here. Choice: ‘Auto, A3, A4, A4R, A5, A5R, B5, B5R, Letter, LetterR, Legal, 11 x 17” |
Note:
- If you make a mistake during the process, press control panel to cancel the operation.

on the
- If you have stopped typing in the From, Subject, To, CC, or BCC fields for three minutes, the LCD-display automatically clears what you have typed.
- This machine allows you to send scanned document to multiple e-mail addresses. Simply add a comma between each address.
- Up to 18 lines of text on the LCD-display (each line includes 34 characters) can be shown in the Memo field. Press Enter key on the keyboard to change the line.
- If you wish to scan multi-page document and convert it to a single image file, please choose your output file format to be MTIFF or PDF.
- To select your desired e-mail address from the "Address Book", you
can also use the "Advanced Search". Simply press , there are three choices display on the screen, Group, Search All, External LDAP address book.
In "Group search", you can pick some addresses from a selected group.
In "Search all", you can type the similar or incomplete address and let the machine to look for the related e-mail addresses.
In "External LDAP address book", the machine will perform a search like "Search all" but target to the LDAP server.
Before sending your document to filing servers, you should set up a few profiles first to speed up the filing process. A profile contains a list of filing parameters such as your filing protocol, directory, file name and other scanning parameters. On how to set up a new profile, please refer to the "Adding a New Profile on the Control Panel" section in Chapter Six.
BASIC OPERATION
-
Place your document(s) with text FACE UP in the ADF or FACE DOWN on the glass.
-
Press on the Control Panel. The LCD-display prompts the following Filing screen. For example,
Most Used Profiles
1.ftp3
2.
B&W=PDF/Med/Text
200dpi\Density: 4
Note:
The last line of the Filing screen will be switching between "B&W=PDF/Med/Text" and "Color=PDF/Med 200dpi/Density:4" to remind users the default scanning settings for the document.
-Manual Feed
You can enable multi-batch document scanning. Press MANUAL FEED on the panel when loading more than 50 pages on the ADF or more than one page on the flatbed. Manual Feed is valid when the LED is lit.
- Choose your desired profile (filing destination) and press Select ( ).
- Press to send your document(s) in black and white. Or press to send your document(s) in colors.
Note:
You can create up to 50 profiles to be selected from. The Filing main screen can show up to 5 profiles. If your profile name does not appear in the Filing main screen, please press “Address Book/Profile” to choose your desired profile name from the list.
If you are not satisfied with the scanned image, learn to use the advanced features to enhance your scanned image.
FILING
To use the advanced features, press
and then
MORE SETTING

on the
control panel to prompt the More settings screen. Refer to the following table to modify the scanning settings.
| Items | Description |
| Profile name | Give a name of your new profile. The name of profile will appear when your press the Filing key. |
| Protocol | Choose the protocol you desire to file your scanned image. Choice: FTP, HTTP, CIFS, AVPP, HTTPS |
| Target URL | Enter the directory to save the scanned document. Note that the directory will be varied due to different protocol. The route starts from the root directory in FTP, HTTP, HTTPS, and CIFS. For example, ftp://, http://, and file:\,\,\,\,\,\,\,\,\,\,\,\,\,\,\,\,\,\,\,\,\,\,\,\,\,\,\,\,\,\,\,\,\,\,\,\,\,\,\,\,\,\,\,\,\,\,\,\,\,\,\,\,\,\,\,\,\,\,\,\,\,\,\,\,\,\,\,\,\,\,\,\,\,\,\,\,\,\,\,\,\,\,\,\,\,\,\,\,\,\,\,\,\,\,\,\,\,\,\,\,\, https://. |
| Port | The port number for your filing server. |
| Login name | Enter login name for the server. |
| Password | Enter password for the server. |
| File name | The file name for filing a document without extension. Using #Y#M#D#h#m#s#n makes file name change as time goes. (Y), M, D, h, m, s, and n represent year, month, date, hour, minute, second and series number respectively.) For example, type file name: test#D#n will bring your filing file name as test05001 |
| Color Output Format | File format for documents to be sent in colors via filing from @V5100. Choice: 3. File format: PDF, JPG, TIFF, WDL, MTIFF 4. Compression rate: Low, Medium, High (If TIF or MTIFF is selected as your file format, the compression rate is limited to RAW only.) |
| B/W Output Format | File format for documents to be sent in black and white via filing from @V5100. Choice: 1. Multi-level B&W (Gray): Yes, No 2. File format: PDF, PCX, WDL, MTIFF, TIFF, Raw, PCX 3. Compression rate: Low, Medium, High (If you choose Multi-level B&W (Gray) to be Yes, the file formats will include PDF, JPG, TIF, MTIF. If you choose Multi-level B&W (Gray) to be No, the file formats will include PDF, PCX, TIF, MTIF and then the selection of compression rate of MTIF and TIF will include G3, G4, and Raw. ) 4. Enable Background removal: Yes, No 5. Document type: Text, Photo |
| Resolution | The scanning resolution you choose to scan from @V5100. Choice: 75, 100, 150, 200, 300, 400, 600 (dpi) |
| Density | Choose the density level. Choice: 1,2,3,4,5,6,7. |
| Subfolder | Choose Yes if you wish to save files in a subfolder under target URL. You may create a new subfolder on demand. Choice: Yes, No |
| Report to e-mail | Choose Yes if you wish to send the filing report to your e-mail. In this e-mail, you will receive a URL link direct to the scanned document. Choice: Yes, No |
| Document size | If you wish to define the scanning area, choose your desired area here. Choice: Auto, A3, A4, A4R, A5, A5R, B5, B5R, Letter, LetterR, Legal, 11 x 17" |
| Save & Exit | Save the above settings and exit. |
| Exit | Exit without saving the above settings. |
Note:
- If you make a mistake during the process, press control panel to cancel the operation.

on the
- After sending your scanned document to filing servers, if no more work is left to be done, please press theLogout key on the keyboard to log out of the system in order to avoid people to misuse the user's ftp account for filing. If there is no any other operation within 3 minutes, the system will log out automatically.
BASIC OPERATION
Important!
Before making copies through your printer, please make sure your printer has been properly connected to @V5100 and that the power of the printer has been turned on FIRST. Otherwise, an error LED will be on from your printer.
- Place your document(s) with text FACE UP in the ADF or FACE DOWN on the glass.
- Press to copy your document(s) in black and white. Or press

to send your document(s) in colors.
Note:
If you make a mistake during the transmission process, press

to cancel the operation.
If you are not satisfied with the scanned image, use the copy features to enhance your scanned image. Basic copy features are shown in the

initial Copy screen. More copy features are available when press

on the control panel.
Basic copy features include the following:
Changing Scaling
- Focusing on Speed/FineText/Photo
Adjusting Density
- Increasing Copy Count
- Selecting Paper Saver
More copy features include the following:
- Paper Supply
Media Type
Background Removal (B&W)
Sort
Water mark
Duplex
Refer to the following section on how to use the copy features.
The machine is preset to 100% scaling. If you wish to reduce or enlarge your original, you can apply this feature to enlarge up to 400% or reduce down to 25% .
To reduce or enlarge the original document,
1. Press

on the panel to prompt the Copy screen.
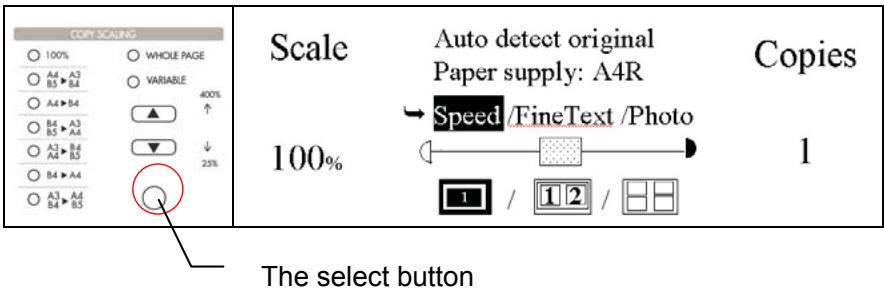
- Press to enlarge or reduce your document in 1 percent increment. Or you may press the above Select button to choose a preset value of 141% , 122% , 115% , 100% , 93% (whole page), 86% , 81% , 70% .
Note:
After you have completed your copying, the machine will automatically return to the preset scale.
The machine is preset to Speed, a mode to speed up the document to be scanned. If required, you can change to Fine Text or Photo if you wish to focus your copy result on text or photo.
To change your focus on FineText or Photo,

- Press on the control panel to prompt the Copy screen.
Scale
Auto detect original
Paper supply: A4R
Speed/FineText/Photo
100%
Copies
1

- Use to choose your focus and press Select to complete.

Note:
After you have completed your copying, the machine will automatically return to the preset document focus.
@V5100 is preset to the Normal level (level 4) of density. If your original document comes with a lighter or darker contrast, you can improve the quality using the Adjusting Density feature.
To change your density,
- Press the "Copy" key on the panel to prompt the Copy screen.
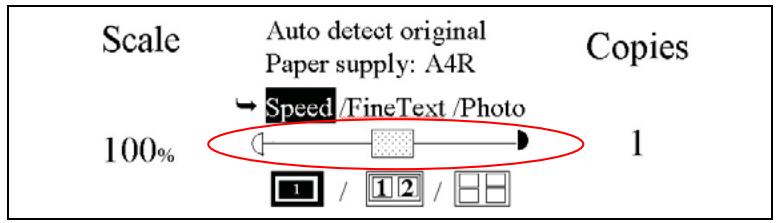
- Press to move your cursor down to the Density field.
- Choose your desired density with and press Select to complete.
Note:
After you have completed your copying, the machine will automatically return to the preset value.
The machine is preset without Paper Saver feature. To minimize paper usage, you can copy a 2-page or a 4-page document to a single page. Yet please check if your printer supports Paper Saver before using this feature.
To choose paper saver,
- Press the "Copy" key on the panel to prompt the Copy screen.
- Press to move your cursor down to the Paper Saver field.
- Choose your desired option from 1-page to 1-page, 2-page to 1-page, or 4-page to 1-page with and press Select to complete.
Note:
After you have completed your copying, the machine will automatically return to the preset settings.
@V5100 is preset to 1 copy count. If you wish to increase the number of copies, choose your desired copy count with the numeric keypad or keyboard.
To increase your copy count,
- Press the "Copy" key on the control panel to prompt the Copy screen.
- Enter your desired copy count with the numeric keypad. The LCD display shows the number of your copy count.
Scale
100%
Auto detect original
Paper supply: A4R
Speed/FineText/Photo


Copies
15
Note:
After you have completed your copying, the machine will automatically return to the preset count.
*This feature depends on the capability of your printer.
Please note that the machine provides the auto detect paper size feature. The detectable paper size includes Ledger, A4, A4R, Letter, LTR, A3, A4, A4R,B5, B5R, Letter, LetterR, A4, A4R, B4, B4R, A3. If you wish to make copy for a particular area of your original, you can manually specify paper size to make a copy for that particular area only.
Please note that the paper size ending with a letter R represents a portrait style (□) while the paper size ending without a letter R represents a landscape style.
To change your copy area,
-
Press the "Copy" key on the control panel and then "More Settings" key to prompt the More Settings screen.
-
Paper supply:
- Media type:
- Background removal (B&W):
- Sort
- Watermark:
-
Duplex
-
Use or to select your desired paper size from the Paper Supply drop-down menu and press the Select key to complete.
Note:
After you have completed your copying, the machine will automatically return to the preset size.
*This feature depends on the capability of your printer.
If you wish your output is transparency rather than plain paper, you can choose transparency from the Media Type option.
To choose media type,
-
Press the "Copy" key on the control panel and then "More Settings" key to prompt the More Settings screen.
-
Paper supply:
- Media type:
- Background removal (B&W):
- Sort
- Water mark:
-
Duplex
-
Choose Media type field with and press (Select).
- Use or to select Transparency from the drop-down menu and
press

(Select) to complete.
Note:
After you have completed your copying, the machine will automatically return to the preset scale.
If your original document contains color background, please choose to enable Background removal to sharpen your text.
To remove background,
-
Press the "Copy" key on the control panel and then "More Settings" key to prompt the More settings screen.
-
Paper supply:
- Media type:
- Background removal (B&W):
- Sort
- Watermark:
-
Duplex
-
Use to choose the Background removal field and press

(Select).
- Use or to select Yes from the drop-down menu and press

(Select) to complete.
Note:
After you have completed your copying, the machine will automatically return to the default settings.
*This feature depends on the capability of your printer.
@V5100 is preset without the sorting feature. If you wish to sort your document, please apply this feature to increase your efficiency.
To sort your document,
-
Press the "Copy" key on the control panel and then "More Settings" key to prompt the More Settings screen.
-
Paper supply:
- Media type:
- Background removal (B&W):
- Sort
- Watermark:
-
Duplex
-
Use to choose the Sort field and press (Select).
-
Use or to select Yes from the drop-down menu and press

(Select) to complete.
Note:
After you have completed your copying, the machine will automatically return to the default settings.
@V5100 is preset without the watermark and stamp feature. If you wish to contain specific wordings as your watermark or stamp, please enter text in this option for your scanned document.
To use watermark,
-
Press the "Copy" key on the control panel and then "More Settings" key to prompt the More Settings screen.
-
Paper supply:
- Media type:
- Background removal (B&W):
- Sort
- Water mark:
-
Duplex
-
Use to choose the Watermark field and press (Select).
- Enter text as your watermark and press (Select) to complete.
For example, type “CONFIDENTIAL” as your watermark. The result will look as below:
Features:
Scan to Filing:
@V5100 allows you to send scanned documents to a server or a personal computer's file folder over intranet with FTP(File Transfer Protocol), HTTP(Hypertext Transfer Protocol), HTTPS(a secure way of using HTTP), CIFS(Common Internet File System), AVPP(Avision Post Processing) protocol. The scan to filing feature offloads the mail server from handling large attachments.
Note:
After you have completed your copying, the machine will automatically return to the default settings.
*This feature depends on the capability of your printer.
@V5100 is preset without Duplex feature. If you wish to copy a 2-page document to a single page and double-sided document, please apply this feature to save your paper. Before using this feature, check if your printer supports Duplex function.
To use duplex,
-
Press the "Copy" key on the control panel and then "More Settings" key to prompt the More Settings screen.
-
Paper supply:
- Media type:
- Background removal (B&W):
- Sort
- Watermark:
-
Duplex
-
Use to choose the Manual duplex field and press (Select).

- Use or to select Yes from the drop-down menu and press

(Select) to complete.
Note:
After you have completed your copying, the machine will automatically return to the default settings.
Information Codes/Message
Information Codes During Scanning and Copying
| Info code | Meaning | Action |
| 10001 | SRAM error | Restart your @V5100. If the code still appears, contact your nearest dealer. |
| 10002 | DRAM error | Restart your @V5100. If the code still appears, contact your nearest dealer. |
| 10003, 10004 | Lamp error | Restart your @V5100. If the code still appears, contact your nearest dealer. |
| 10005 | Home sensor error | Restart your @V5100. If the code still appears, contact your nearest dealer. |
| 10006 | Lamp error | Restart your @V5100. If the code still appears, contact your nearest dealer. |
| 10007 | Lock error | 1. Turn off your @V5100. 2. Find the lock switch underneath the machine and unlock the machine. 3. Restart your @V5100. If the code still appears, contact your nearest dealer. |
| 10008, 10009 | ADF error. | ADF paper jam. Open the ADF cover and remove the paper from the ADF then restart your @V5100. If the code still appears, contact your nearest dealer. |
| 10201 | Z1 access error | Restart your @V5100. If the code still appears, contact your nearest dealer |
| 10202 | Z1 SRAM error | Restart your @V5100. If the code still appears, contact your nearest dealer |
MESSAGE DURING SCANNING AND COPYING
| LCD Message | Action |
| Copy function disables. | Please download the printer profile. |
| Check printer cable or status. | 1. Check if the printer cable has been correctly connected. 2. Check if the printer is turn on. 3. Restart the @V5100 and your printer. 4. If the message still appears, contact your nearest dealer. |
| Info Code | Meaning | Action |
| 20512 | The connection failed. | Ping the IP address of the @V5100 from another PC in DOS prompt. For example, type “Ping 10.1.20.144” in Dos prompt. If the @V5100 has no response, then perform the following steps. 1. Check if the RJ-45 connector is firmly plugged-in. 2. Check the Ethernet cable. 3. Check the @V5100 IP address. 4. Check the destination IP address. 5. Check Subnet Mask. 6. Check Gateway IP. |
| 20519 | The destination address is invalid. | |
| 20530 | Network is down. | |
| 20531 | Network is unreachable. | |
| 20533 | The connection aborted by the server. | |
| 20534 | The connection reset by the server. | |
| 20540 | Connection timed out | |
| 20541 | The attempt to connect failed. | |
| 20545 | The destination host is not able to reach. | |
| 29999 | Fail to connect Email Server | Check network environment. |
| 30001 | Device internal failure | Reboot the machine, and try again. If the error is still there, contact your nearest dealer. |
| 30002 | Fail to connect Mail server | Contact your network administrator for further help. |
| 30009 | Fail to get Mail server response | Turn on Log File option in [ADMIN / MANAGEMENT/ Service mode] to record and observe network actions and contact your network administrator or nearest dealer for further help. |
| 31019 | ||
| 31029 | ||
| 31049 | ||
| 32009 | ||
| 33009 | ||
| 33019 | ||
| 31000 | Unpredicted error | Turn on Log File option in [ADMIN / MANAGEMENT/ Service mode] to record and observe network actions and contact your network administrator or nearest dealer for further help. |
| 31020 | ||
| 31030 | ||
| 32000 | ||
| 33000 | ||
| 33010 | ||
| 31001 | SMTP [421] | Contact your network administrator for further help. |
| 31021 | Service not available, closing transmission channel. The Server is going to shut down. | |
| 31031 | ||
| 32001 | ||
| 31010 | Mail server doesn't support SMTP service extension | Contact your network administrator for further help. |
| 31011 | Mail server doesn't support SMTP-login authentication | Contact your Mail server administrator to turn on SMTP-login option. |
| 31012 | SMTP login user name error | Check your login user name |
| 31032 | SMTP[450]Requested mail action not taken: mailbox unavailable | Check “To” address. |
| 31022 | SMTP[451]Requested action aborted: local error in processing | Contact your network administrator for further help. |
| 31033 | ||
| 32002 | ||
| 33001 | ||
| 31023 | SMTP[452]Requested action not taken: insufficient system storage | Contact your network administrator for further help. |
| 31034 | ||
| 33002 | ||
| 31013 | SMTP[454]Temporary authentication failure:The authentication failed due to a temporary server failure. | Contact your network administrator for further help on mail server's authentication mechanism.Choose SMTP authentication for Email security or turn off the mail server's authentication and try again. |
| 31024 | SMTP[500]Syntax error, command unrecognized | Reboot the machine, and try again. If the error is still there, contact your nearest dealer. |
| 31024 | SMTP[501]Syntax error in parameters or arguments | 1. Check if the Device Name is valid. The Device Name can be found in Menu/General.2. Check “From” address.3. Check “To” address.4. Contact your network administrator for further help. |
| 31035 | ||
| 32003 | ||
| 33011 | ||
| 31003 | SMTP[501]Syntax error | 1. Check if the Device Name is valid. The Device Name can be found in Menu/General. |
| 31025 | SMTP[501]Syntax error | 2. Check “From” address. |
| 31036 | SMTP[503]Bad sequence of commands | 3. Check “To” address.4. Contact your network administrator for further help. |
| 32004 | ||
| 31037 | SMTP[503]Bad sequence of commands | Reboot the machine, and try later. If the error is still there, contact your nearest dealer. |
| 32005 | ||
| 31004 | SMTP [504]Command parameters not implemented | Check if the Device Name is valid. The Device Name can be found in Menu/General. |
| 31027 | SMTP [530]Authentication requires Mail server requires authentication in order to perform the requested action. | Contact your network administrator for further help on mail server's authentication mechanism. Choose SMTP authentication for Email security or turn off the mail server's authentication and try again. |
| 31038 | SMTP [550]Requested action not taken: mailbox unavailable [E.g., mailbox not found, no access] | Check “To” address. |
| 31039 | SMTP [551]User not local: please try again. | Check “To” address. |
| 31026 | SMTP | 1. Check “To” address. |
| 31040 | [552]Requested mail action aborted: exceeded storage allocation | 2. Check mailbox storage allocation. |
| 33003 | 3. Contact your network administrator for further help. | |
| 31041 | SMTP | Check “To” address. |
| [553]Requested action not taken: mailbox name not allowed | ||
| 32006 | SMTP | Contact your network administrator for further help. |
| 33004 | Transaction failed | |
| 32999 | Connection broken during data transmission. | 1. Check network environment. 2. Check if email attachment size is larger than the mailbox quota. |
| Info Code | Meaning | Action |
| 40001 | Device internal failure | Reboot the machine, and try later. If the error is still there, contact your nearest dealer. |
| 40002 | ||
| 40003 | ||
| 40004 | ||
| 40005 | ||
| 40006 | ||
| 41001 | ||
| 41002 | ||
| 41003 | ||
| 41004 | Fail to connect FTP server | Make sure the FTP server is not shut downing and port number is correct. If the error is still there, contact your FTP server administrator. |
| 41005 | ||
| 41006 | ||
| 41007 | ||
| 41008 | ||
| 41009 | Unpredicted error | Turn on Log File option in [ADMIN / MANAGEMENT/ log action] to log and observe device actions and contact your server administrator or nearest dealer for further help. |
| 410010 | FTP login name error | Check your login name and try again |
| 42000 | FTP password incorrect | Check your password and try again |
| 43001 | FTP can't enter this directory | Make sure your have privilege to enter this directory. |
| 43003 | FTP can't check file existed or not | Make sure your have privilege to browse this directory. |
| 44001 | FTP can't change data transfer type | Contact your server administrator for further help. |
| 44002 | FTP store file error | Make sure your have privilege to store file in this position (server/director) |
| 44003 | Insufficient storage space in system. | Check FTP server free storage space and contact your server administrator. |
| 44004 | File name not allowed. | Change file name to meet naming convention of FTP server's OS. |
| 50001 | CIFS Network share name incorrect. | Check directory in profile and make sure it follows UNC, such as \\Computer\\Share\\directory. |
| 51001 | CIFS fail to connect | Check that server supports CIFS(SMB) connection. |
| 51002 | CIFS Computer name error | Make sure computer name in directory is correct. |
| 51003 | CIFS dialect negotiation fail | This CIFS may not support PC NETWORK PROGRAM 1.0 dialect. |
| 52001 | CIFS (User level) login fail. | Check login name and password you typed and try again. |
| 53001 | CIFS (User level) can not make subdirectory | This account has not right to create new subdirectory. |
| 54001 | CIFS fail to create file. | Make sure you have full control privilege on this network share. |
| 54002 | CIFS send data error | |
| 61001 | HTTP fail to connect | Check Server IP and HTTP port. Make sure they are correct. Or, Check whether that server supports HTTP connection. |
| 63001 | ||
| 63002 | ||
| 64000 | ||
| 62001 | HTTP [401] Unauthorized | This HTTP server needs authorization. Make sure your account has correct authorization. |
| 64001 | ||
| 62002 | HTTP [403] Forbidden | This action is forbidden in this server. This is not unauthorized but forbidden. |
| 64002 | ||
| 62009 | Unpredicted error | Turn on Log File option in [ADMIN / MANAGEMENT/ log action] to log and observe device actions and contact your server administrator or nearest dealer for further help. |
| 64009 | ||
| 63003 | HTTP [405] MKCOL method not allowed | Contact server administrator to change permission on this privilege. |
| 63004 | HTTP [501] MKCOL method not implemented | HTTP server does not support MKCOL to create directory. Give up creating new directory or create directory at server in advance. |
| 64003 | HTTP [405] PUT method not allowed | Contact server administrator to change permission on this privilege. |
| 64004 | HTTP [500] internal server error | Contact your server administrator for further help. |
| 64005 | HTTP [501] PUT method not implemented | That server does not implement HTTP PUT method. @V5100 can't store file on this server, contact your system administrator for help |
| 64006 | HTTP [503] service unavailable | Contact your server administrator for help. |
| 64007 | HTTP [505] server does not support HTTP version 1.1 | That server does not support HTTP version 1.1 (@V5100 uses), contact your server administrator for help. |
| 64021 | HTTP [404] Resource not found | That server can't save the files, contact your server administrator for help. |
| 65001 |
In the event of a paper jam, follow the procedures below to remove the paper:
- Pull the Paper Jam Release button on the front cover.
- Gently open the ADF front cover to the left.
- Carefully pull the paper out of the ADF unit.
- Close the ADF front cover. Your @V5100 is now ready to use.
Paper Jam Release button
ADF Front Cover
When the scanned image is with abnormal lines on it, clean the strip of glass area as indicated below.
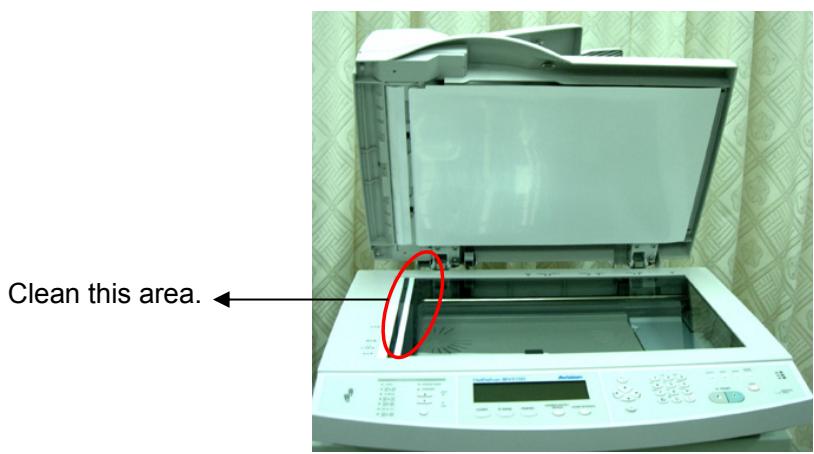
From time to time the pad assembly and feeding rollers may become contaminated with ink, toner particles or paper dust. In this case the @V5100 may not feed documents smoothly. If this occurs please follow the cleaning procedures to return your machine to its original state.
- Moisten a cotton swab with isopropyl alcohol (95%).
- Pull the Paper Jam Release button.
- Open the ADF front cover to the left. Wipe the feeding rollers by moving the swab from side to side. Rotate the rollers forward with your finger and repeat the above cleaning procedures until the rollers are clean. Be careful not to snag or damage the pick springs.
- Wipe the pad in the direction from top to bottom. Be careful not to hook the pick springs.
- Close the ADF cover. Your machine is now ready to use.
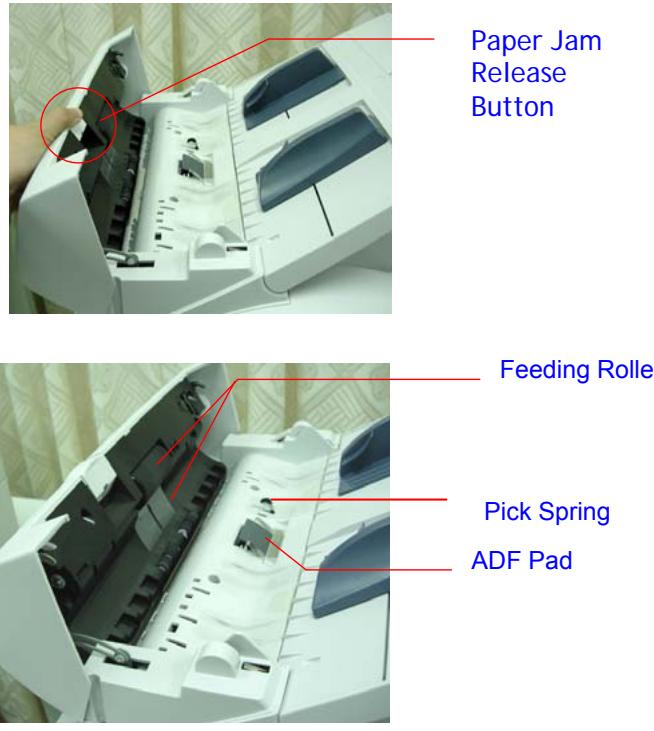
After scanning approximately 100,000 pages through the ADF, the pad module may be worn out and you may experience problems with document feeding. In this case, it is highly recommended to replace the pad module with a new one. For ordering the pad module, please consult your nearest dealer and follow the procedure below to replace it.
Disassembling Procedure
- Pull the Paper Jam Release button.
- Open the ADF front cover to the left.
- Press both sides of the ADF snap-in pad module inwardly with your fingers to pull out the ADF snap-in pad module.
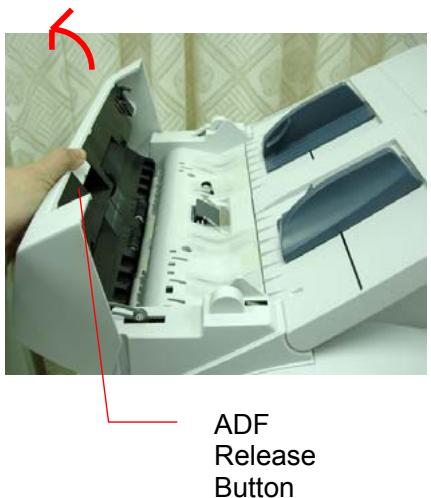
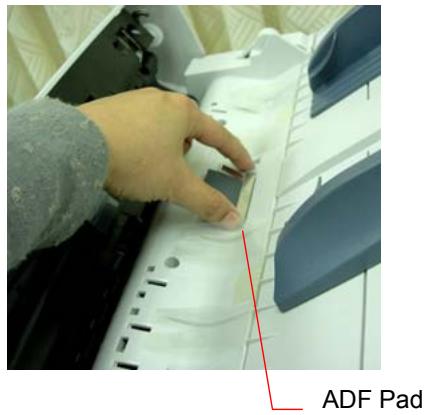
Assembling Procedure
- Take out the ADF pad module from the box.
- Press both arms of the ADF snap-in pad module inwardly with your two fingers
- Place it into the holes until it snaps into place.
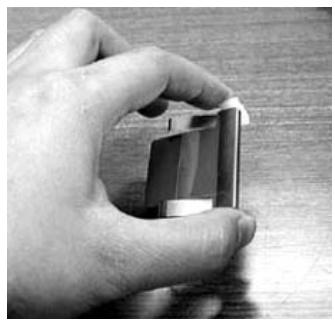
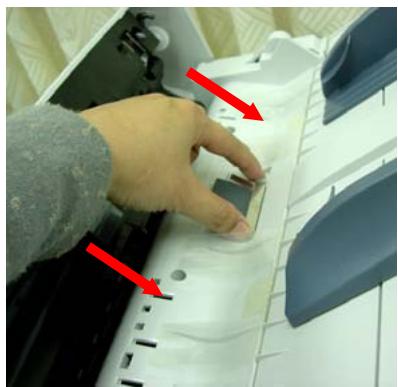
The @V5100 is designed to be maintenance-free. However, it still needs to be cleaned occasionally to ensure optimum image quality and performance.
To clean the glass,
- Open the document cover as shown below.
- Dip a soft clean cloth with isopropyl alcohol (95%)
- Gently wipe the document glass and the white sheet beneath the document cover to remove the dust or any toner particles.
- Close the document cover. The @V5100 is now ready for use.
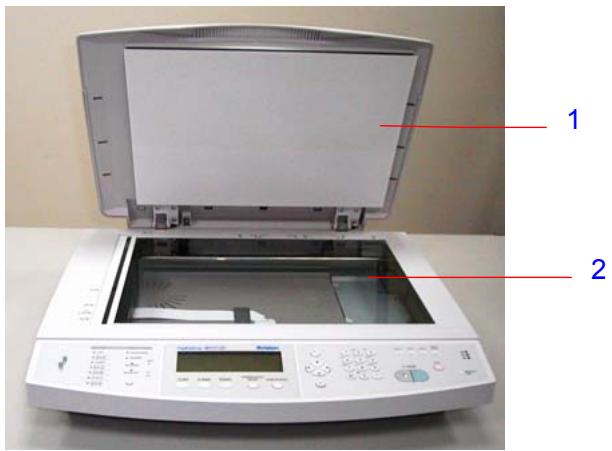
- Document Cover
- Document Glass
System Requirements
IBM compatible PC (Pentium or later);
Microsoft Windows 98, Windows Me, Windows 2000, Windows XP
A USB (universal serial bus) port
- At least 100M bytes of free hard disk space
- At least 128M bytes of system memory
A VGA monitor
- A CD-ROM drive
Installation procedure
Installation procedures of the @V5100 driver and utilities are as follows:
- Start Microsoft Windows.
- Insert the supplied CD-ROM into your CD ROM drive.
- The CD-ROM will auto launch on most systems. However, if your system does not support auto launching CD-ROMs, press the Start button, choose RUN, type d:cdsetup.exe (d: the CD-ROM drive in use), and then click OK.
- Follow the on-screen instructions to complete the driver installation.
Important:
To ensure the scan function works properly, please install the scanner driver FIRST before connecting the USB cable to the computer.
Scanner Operation
- Start your scanning application.
- Pull down the File menu and choose Select Source.
If the Select Source command is not available on the File menu, see your application's user's guide to determine how the TWAIN link is used. A dialog box with a list of scanning sources appears.
- Select @5100/32 x.xx.
You need to select the source only once, unless you want to choose another scanner.
- Place the document FACE DOWN on the document glass or FACE UP in the ADF.
- Pull down the File menu and choose Acquire.
A dialog box containing scanning features appears.
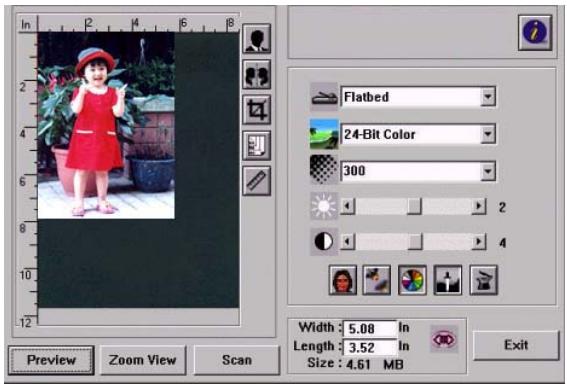
- Select the scanning method you want to use on the Scan Method drop-down menu.
- Select the mode you want to use for your scans on the Image Type drop-down menu.
- Select a scanning resolution on the Resolution drop-down menu.


- Select the setting for the scanning features (e.g. Sharpen, Desscreen, etc.) that you want to use.
- Click on the Preview or Scan button to preview or scan you documents.
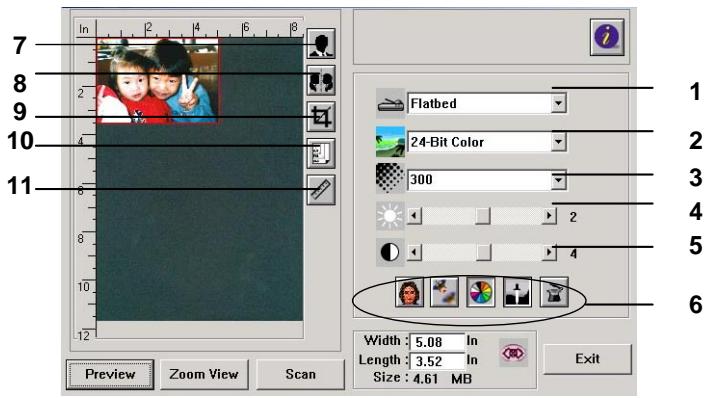
A Glance of the User Interface
| 1. Scan Method | Choice: ADF/Multi-page, Flatbed. |
| 2. Image Type | Choice: Black & White, Halftone 1-4, Diffusion, 8-Bit Gray, 24-Bit Color, 48-Bit Color. |
| 3. Resolution | Choice: 50, 72, 100, 144, 150, 200, 300, 600, 1200 (dpi). |
| 4. Brightness: | Adjust the brightness level from -100 to +100. |
| 5. Contrast | Adjust the contrast level from -100 to +100. |
| 6. Further Tools | Descreen, Sharpen, Color Adjustment, Auto Level, Advanced Settings (From left to right). |
| 7. Invert | Reverse the color of your scanned image. |
| 8. Mirror Function | Flap your image. |
| 9. Preview Auto Area | Resize your scanned area. |
| 10. Paper Size | Select your paper size from Card 4"x2.5", Photo 5"x3.5", Photo 3.5"x5", Photo 4"x6", Photo 6"x4", A5, B5, A4, Letter, Legal, A3, or scanner maximum. |
| 11. Measuring Unit | Choice: cm, Inch, and Pixel. |
USING THE BASIC FEATURES
CHOOSING YOUR SCAN METHOD
1. Scan Method
Choice:
Flatbed: Select this setting if you need to scan photo, or newspaper clippings.
ADF/Multipage: Select this setting if you need to scan multi-page document from the automatic document feeder (ADF).
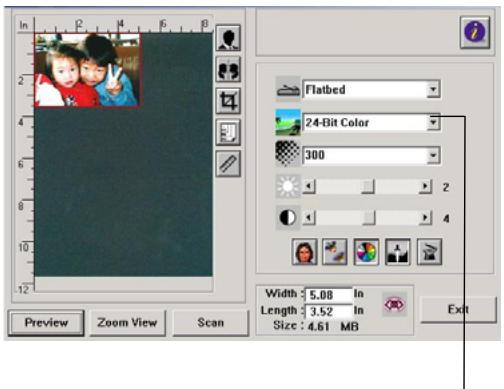
1. Image Type
Please see following table for a choice of an ideal image type.
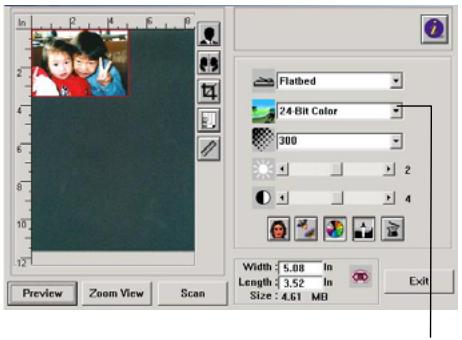
| Black & White | Choose B&W if your original contains only B&W text, pencil or ink sketch. |
| Halftone | Halftones are reproduction of image that gives the illusion gray. An example of halftone imaged would be the pictures you see in newspapers. |
| 8-Bit Gray | 8-Bit Gray images contain actual shades of gray. |
| 24-Bit Color | Choose 24-Bit Color if you wish to scan a color image. |
| 48-Bit Color | Choose 48-Bit Color (input) if you wish to scan a color image. |

Black & White
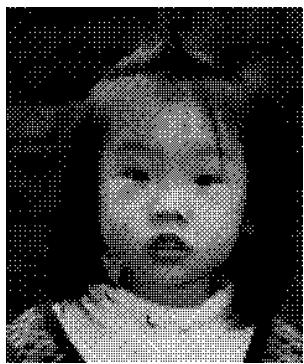
Halftone
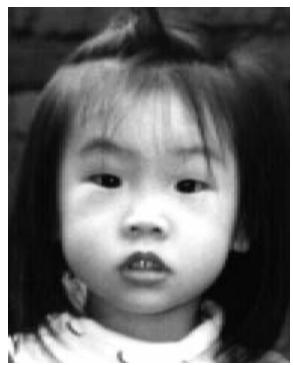
Gray

24- Bit Color/48-Bit Color
1. Resolution
A proper resolution reproduces a clear image with good details. The resolution is measured by dots per inch (dpi).

Resolution: 50 dpi

Resolution: 100 dpi
Note:
For your information, an A4 size color image scanned at 300 dpi at True Color mode consumes approximately 25 MB of disk space. A higher resolution (usually means over 600 dpi) is only recommended when you need to scan a small area at True Color mode.
ADJUSTING THE BRIGHTNESS AND CONTRAST
1. Brightness
Adjusts the lightness or darkness of an image. The higher the value, the brighter the image.
2. Contrast
Adjusts the range between the darkest and the lightest shades in the image. The higher the contrast, the bigger the different grayscale.
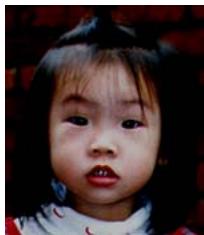
Decrease Brightness

Normal

Increase Brightness

Decrease Contrast

Normal

Increase Contrast
ENLARGING PREVIEWED IMAGE
1. Zoom View
Enlarge your previewed image to the max. of the preview window.
Note this function only enlarging your preview image. This does not enlarge your real image.
Before Zoom
After Zoom
1. Invert
The invert command reverses the brightness and the color in the image. For color images, each pixel will be changed into its complementary color at the command of Invert.
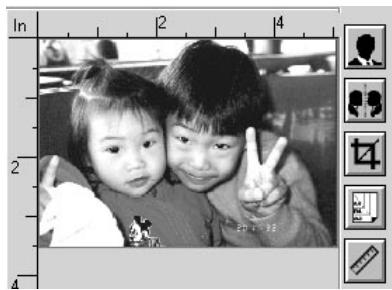
Before Invert
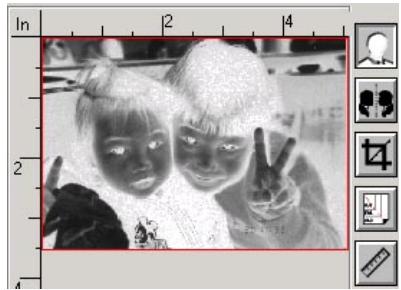
After Invert
2. Mirror Function
Reverse the right and left side of your image.
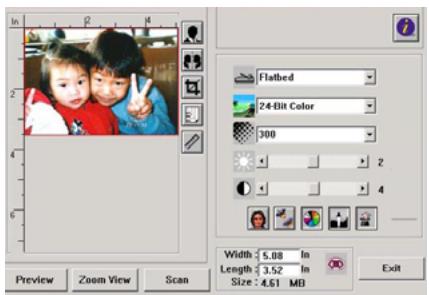
Before Mirror
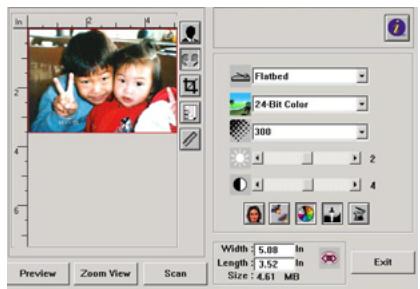
After Mirror
3. Auto Select Image
Automatically set the whole image as your scan area. (Or you may resize the area by "drag and drop" diagonally.)
1. Descreen
Eliminates the moire patterns* commonly found in printed matter.
2. Sharpen
Sharpen the scanned image.
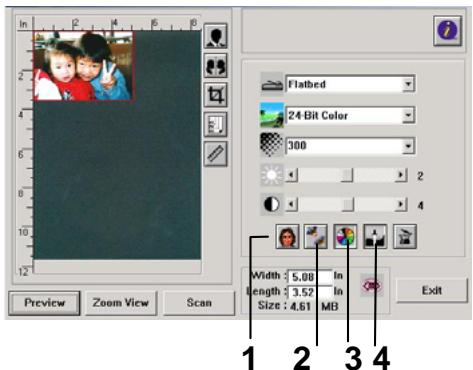

Before Descreen

After Descreen

Before Sharpen
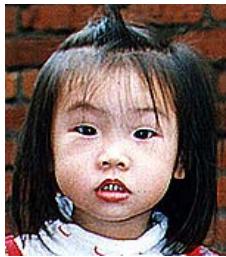
After Sharpen
*Moire pattern: An undesirable pattern in a color printing resulting from incorrect screen angle of overprinting halftone.
3. Color Adjustment
Adjusts the color quality of the image so that it comes close to the original. This function uses default parameters to adjust the image.
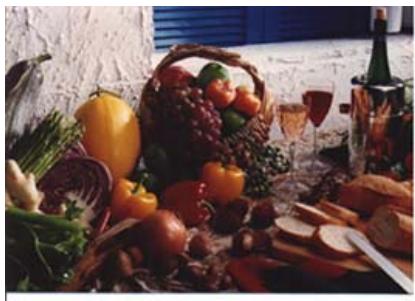
Normal

After Color Matching
4. Auto Level
Automatically adjusts the highlight and shadow areas of the scanned image to optimize your image.

Normal

After Auto Level
THE SWITCH BUTTON
- Click the button to pop up the advanced settings bar at the right side. The advanced settings include Highlight/Shadow, Hue/Saturation/Lightness, Curve, Color Balance, Color Drop-out.
- The Advanced Settings bar
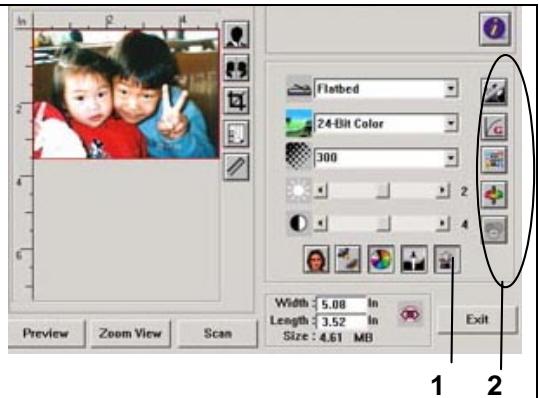

Highlight refers the lightest point in a scanned image while shadow refers the darkest point. Using Highlight and Shadow tool together allows you to extend the range of color and reveal more details in a gray or color image.
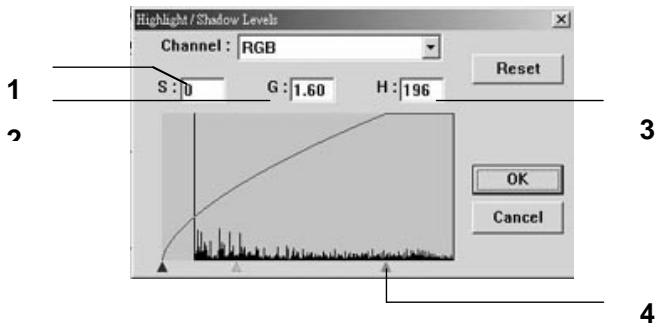
- Shadow: The darkest point of an image.
- Gamma: The midtones of the image.
- Highlight: The lightest point of an image.
- Pointer: Move the pointer to change the value.
When the value of gamma changes, the image changes accordingly.

Gamma Value: 1.0

Gamma Value: 1.4

Gamma Value: 2.0
When the value of highlight and shadow change, the image changes accordingly.
Highlight: 255/Shadow: 0(Normal)


Highlight: 210/Shadow:10

Highlight: 200/Shadow:0

Highlight: 255/Shadow: 50
Adjusts the midtones of the image without dramatically altering then lightest and the darkest areas.
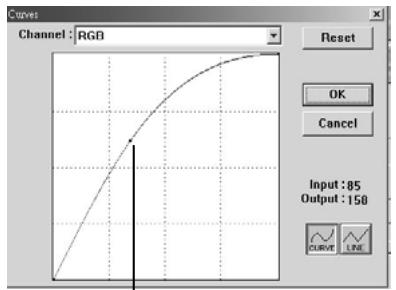
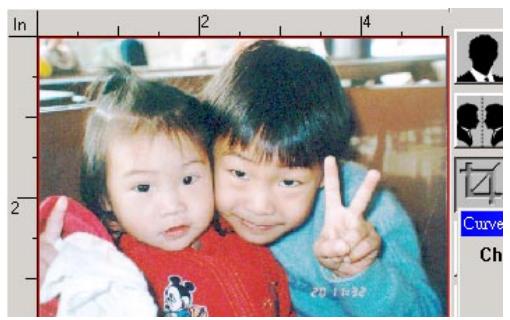
When the curve is moved up or down, the image turns brighter or darker.
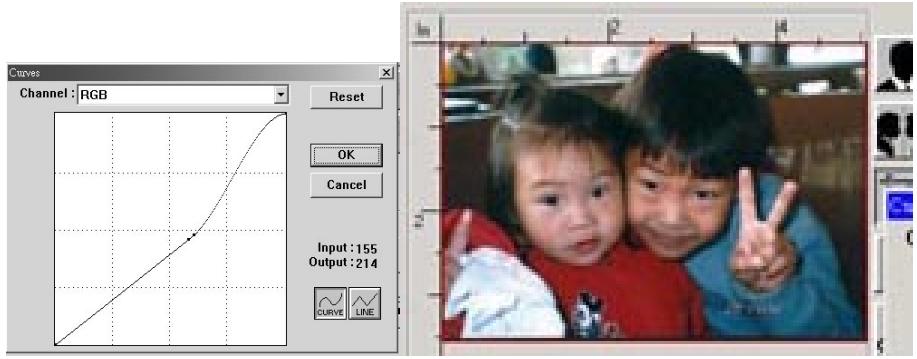
Changing Color Hue/Saturation/Lightness

Improve your image by changing the level of hue/saturation/lightness.
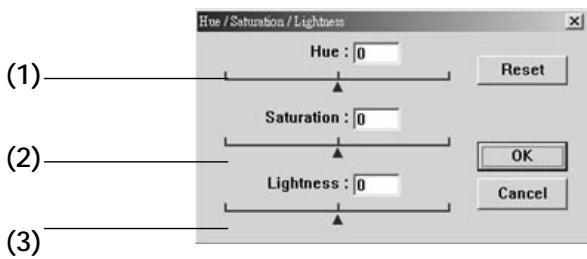
| (1). | Hue | Adjust the hue by moving the triangle to the right or left. (Note the level of intensity for the color will be changed simultaneously when the hue adjustment is made). |
| (2). | Saturation | Move the triangle to the right to increase the saturation level or to the left to decrease the level. The level of saturation decides if the color is pale or rich. |
| (3). | Lightness | Increase the lightness by moving the triangle to the right or to the left to decrease the lightness. |
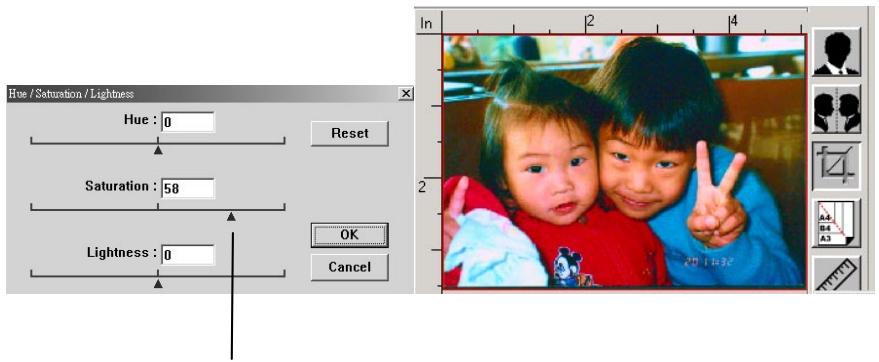
Move the Saturation pointer to the right, the color turns rich.
USING COLOR BALANCE

The Color Balance allows you to obtain an optimal image quality.
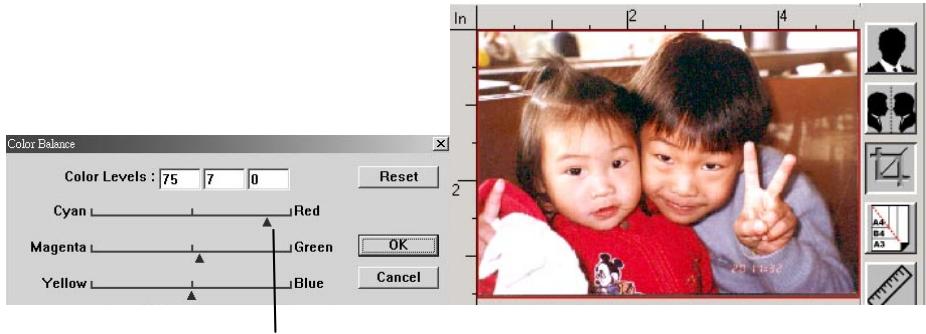
Move the pointer toward Red, the image turns into a reddish hue.
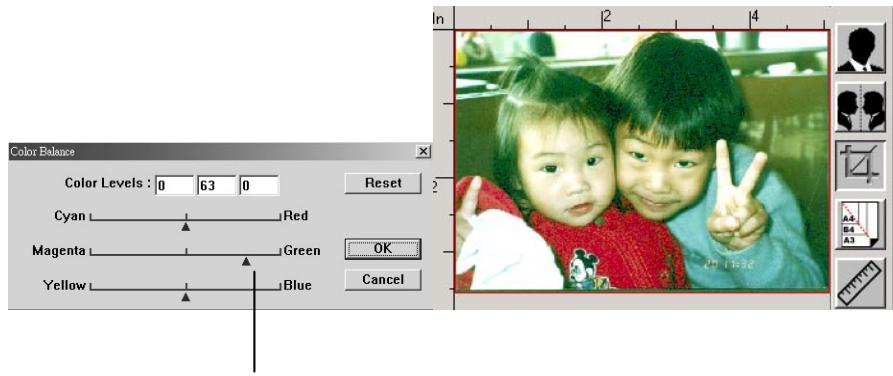
Move the pointer toward Green, the image turns into a greenish hue.
COLOR DROP-OUT

Click the button and a dialog box in below will be displayed. This dialog allows you to remove one of the R (Red), G (Green), or B (Blue) color channel. This function is particularly useful when you need to convert text using OCR software.
Note that this function supports only black & white and gray image. Therefore, be sure to choose any black & white or gray image type while applying this function.
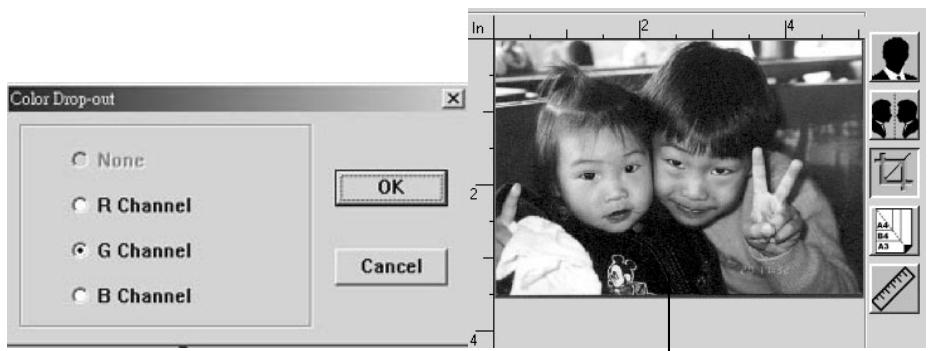
The effect on image after removing the G channel.
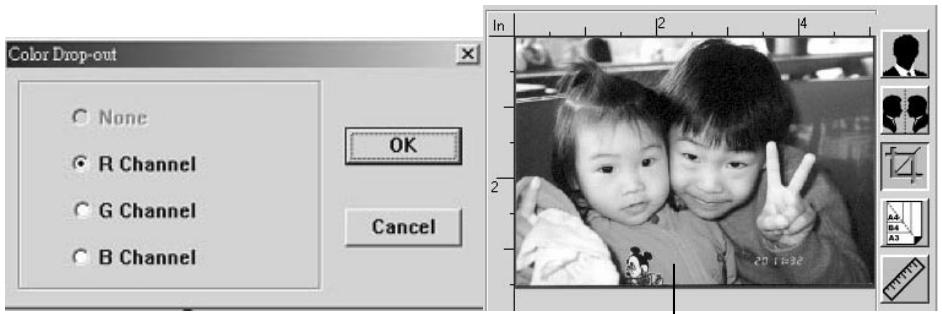
The effect on image after removing the R channel.
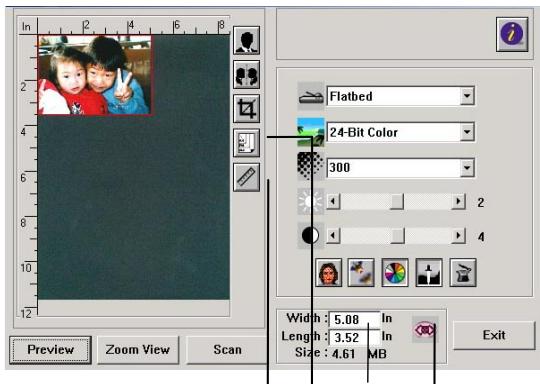
1 2 3 4
| 1. Measuring Unit | A reminder of the measuring system in use. By clicking the button, you can change the measuring unit. Choice: Inch, cm, Pixel. |
| 2. Paper Size | Provide frequently scan sizes. Choice: Card 4"x2.5", Photo 5"x3", Photo 6"x4", B5, A5, A4, Letter, and Scanner Maximum. |
| 3. Image Size | Display image size for the scanned area. |
| 4. Lock Image | Fix your output width and height. |
Appendix
Quick Guide
Placing Your Documents
For multi-page transmission
Place your document FACE UP in the ADF.
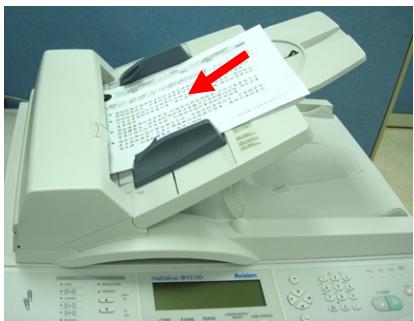
For single-page transmission
Place your documents FACE DOWN on the glass.
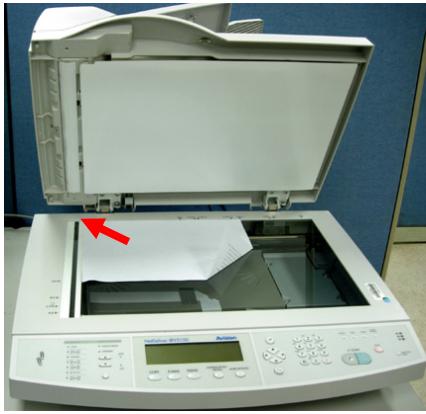
Simple Operation Steps
| To make copy, COPY Press the Copy key. | Enter your copy count via the numeric keypad | Press the key to make B&W copy. |
| 1 ABC DEF 2 3 GHE KL MNO 4 5 6 PGRS TUV WXYZ 7 8 9 ID 0 C | Press the key to make color copy. | |
| To send e-mail, E-MAIL Press the E-Mail key. | Enter an e-mail address with your keyboard. → or press "Address Book/Profiles" key to select an e-mail address from the list. ADDRESS BOOK/ PROFILE (i.e + + ) | Press the key to send your document in B&W. |
| Press the key to send your document in color. | ||
| To send document to filing server, FILING Press the Filing key. | Select your desired profile as your filing destination, or choose your desired profile from the "Address Book/Profiles". | Press the key to file your document in B&W. |
| ADDRESS BOOK/ PROFILE (i.e + + ) | Press the key to file your document in color. |
| Items | Specifications |
| General Specifications | |
| System Description | Stand-alone Internet Appliance |
| Image Sensor | Color CCD |
| Light Source | Cold Cathode Fluorescent Lamp |
| Optical Resolution | 600 x 600 dpi |
| Output Quality | Input: 36 bits color Output: 24 bits Color 8 bits Gray 4 bits CMYK 1 bit Monochrome |
| Memory Size | 112.5 Mbytes |
| LCD Size | 240 x 640 dots Effective area: 127.15 x 33.87 mm |
| Paper Size Auto Detection (Flatbed and ADF) | Ledger, Legal, A3, B5R, A4, A4R, Letter, LetterR, B4, B4R, A5, A5R |
| External Connections | 1. RJ-45 (for Network connection) 2. AV_COPYPORT 3. IEEE 1284 (SPP, ECP) compatible 4. PS2 (for External standard PS2 keyboard) 5. ADF port 6. USB 2.0 (For PC Scan) |
| Network Connection | 10/100 Mbits auto-negotiation |
| Networked Workgroup Solution for: | Stand-alone Copy E-Mail via Internet/Intranet Filing |
| Output Format | PDF, JPEG, TIFF, Postscript, PCL, PCX |
| Duty Cycle | 7,500 pages/month |
| Dimension | 447x365x275(mm) |
| Weight | 9 kgs |
| Power Supply | 24V DC, 2A external power adapter |
| Power Consumption | Less than 30W |
| Auto Document Feeder | |
| Capacity | 50 sheets |
| Dimension | 540 x 422 x 210 mm |
| Weight | 4.1 kgs |
| Document Size | 4.5" x 5.5" ~ 11.8" x 17" |
| Document Weight/Thickness | 16 ~ 41 lb / 0.002" ~ 0.006" |
| Paper Feed | Face Up |
| Copy Specification (printer supplied by Avision) | |
| Copy Port | Copy port |
| First copy time | 8 seconds |
| Multiple Copies | Up to 99 |
| Copy Resolution | 600 x 600 dpi |
| Copy Media | Plain paper, Heavy paper, Transparency |
| Copy Mode | Speed, Fine Text, Photo |
| Density Control | 7 Levels |
| Background Remove | Yes |
| Output Format | Postscript, PCL, LIPS |
| Enlarge / Reduce | Whole Page (93%)25%~400% in 1% increment/decrementPre-set Scales |
| Input Capacity | Standard: 250 sheetsBypass: 100 sheetsMax.: 1350 sheets |
| Output Capacity | 250 sheets |
| Copy Application | One scan, multiple copiesWater mark and Stamp |
| 2ndPort Color Copy Specification | |
| Color Copy Port | Connect printer by IEEE 1284 portECP/SPP |
| Printer Language | Postscript, PCL/PJL, ESC/P, ESC/P-C, LIPS IV |
| Copy Media | Plain paper, Heavy paper, Transparency |
| Copy Mode | Speed, Fine Text, Photo |
| Network Specification | |
| Connectivity | Ethernet 10BaseT/100BaseTX auto-negotiationwith RJ-45 connector |
| Communication Protocol | TCP/IP, SMTP, HTTP, HTTPS, MIME, FTP,CIFS, AVPP, DHCP, DNS, LDAP |
| Supported Browsers | Microsoft IE 5.0 or higherNetscape Navigator 6.0 or higher |
| Configuration Requirement | 1. IP address 2. Subnet mask 3. Gateway 4. SMTP server/POP3 server 5. FTP server 6. Web server |
| E-mail Specification | |
| Communication Protocol | SMTP, MIME, POP3 |
| File Formats | |
| B&W | PDF, WDL, TIFF, MTIFF, PCX |
| Gray/Color | PDF, WDL, TIFF, MTIFF, JPEG |
| Default File Format | |
| Separation Limit | Yes, 2MB, 3 MB, 4 MB, 5MB, 10 MB, Unlimited |
| Document Type | Text/Photo |
| Resolution | 75, 100, 150, 200, 300, 400, 600 dpi |
| Default Resolution | 200 dpi |
| Compression Method | |
| B&W | G4/G3, Run Length |
| Gray/Color | JPEG |
| Address Book Volume | |
| Max. Addresses | 2000 |
| Group | 50 |
| No. of Addresses in Each Group | 99 |
| Multiple Recipients Allow | Yes |
| Security Check | Yes |
| Mail Server Authentication | SMTP, POP3 |
| Supported Mail Server Application | Lotus Mail Server 5.0 MS Exchange Server 2000 RedHat 7.0 SendMail MAC Mail Server in OS 9.04 |
| Supported LDAP Server | Windows 2000 Active Directory Windows NT 4.0 + MS Exchange 5.5 Lotus Notes R5 |
| Supported Mail Application | Microsoft Outlook 2000 Microsoft Outlook Express 5.0 Microsoft Outlook Express 6 Netscape Messenger 4.7 Netscape Messenger 4.73 MAC built-in MAIL application Eudora 4.3.2J Lotus Notes R5 |
| Filing Specification | |
| Communication Protocol | FTP, HTTP, HTTPS, CIFS, AVPP |
| Post Processing Protocols for System Integrator | AVPP |
| File Formats | |
| B&W | PDF, WDL, TIFF, MTIFF, PCX |
| Gray/Color | PDF, WDL, TIFF, MTIFF, JPEG |
| Default File Format | |
| Resolution | 75, 100, 150, 200, 300, 400, 600 dpi |
| Default Resolution | |
| B&W | 200 dpi |
| Gray/Color | 150 dpi |
| Compression Method | |
| B&W | G3/G4 |
| Gray/Color | JPEG |
| Number of Most Used Profiles | 5 |
| Max. Number of Profiles | 50 |
Index
A
adding email addresses, 5-1
adding new groups, 5-9, 6-7
adding water mark, 7-25
Address Book, 1-2, 5-1
adf, 7-3
ADF
ADF tray, ADF tray extension, ADF wire leg, Paper guide, Push button, Front cover, 2-4
Adjusting Density, 7-18
AVPP, 1-14
C
Changing Scaling, 7-16
Choosing copy area, 7-21
choosing duplex, 7-27
Choosing Paper Saver, 7-19
choosing Sorting your document, 7-24
Clean the ADF, 8-12
Clean the Glass, 8-15
D
Deleting E-mail Addresses, 5-7
Deleting groups, 5-13, 6-11
Digital Copying, 1-2
E
Ethernet Hub, 2-6
F
Focusing on Photo or Text, 7-17
Folders Managing, 1-2
I
increasing Copy Count, 7-20
Internet Communication Features
Scan to E-mail, Scan to Filing., 1-12
L
LAN, 2-6
LCD-display, 1-3, 7-8
Loading Your Paper
Via the ADF, Via the Glass, 7-2
lock switch, 2-3
M
Making Copies, 7-14
Managing Your E-mail Address Book
Adding Email Addresses, Modifying Email
Addresses, Deleting Email Addresses, 5-1
Managing Your Groups
Adding New Groups, Modifying Your
Groups, Deleting Your Groups, 5-9
Manual Feed, 7-6
Modifying e-mail addresses, 5-5
Modifying groups, 5-11, 6-9
Multiple Pages Sending, 1-2
N
network parameters
IP Address, Subnet mask, Gateway IP, SMTP Server, SMTP port, DNS server, DHCP enable, POP3 Server, POP3 port, 1-9
P
pad module, 8-13
Paper Jams, 8-10
placing your document(s) in the adc, 7-3
placing your document(s) on the glass, 7-4
Power Saving, 2-9
Profile template
protocol, target URL, port, file name, color output format, B&W output format, resolution, density, subfolder, report to e-mail, 3-12
S
Scan count, 4-13
Scan to E-mail, 1-1
scan to file, 1-13
Scan to Filing, 1-1
Setting up the ADF, 2-4
T
TCP/IP network, 2-1