
DS8000C - To scan AVISION - Free user manual and instructions
Find the device manual for free DS8000C AVISION in PDF.
User questions about DS8000C AVISION
0 question about this device. Answer the ones you know or ask your own.
Ask a new question about this device
Download the instructions for your To scan in PDF format for free! Find your manual DS8000C - AVISION and take your electronic device back in hand. On this page are published all the documents necessary for the use of your device. DS8000C by AVISION.
USER MANUAL DS8000C AVISION
DS8000C User's Manual
Trademarks
The brands and product names herein are trademarks or registered trademarks of their respective holders.
Copyright
© 2001 Avision Inc. All rights reserved. No part of this publication may be reproduced, transmitted, transcribed, stored in a retrieval system, or translated into any language or computer language, in any form or by any means, electronic, mechanical, magnetic, optical, chemical, manual, or otherwise, without the prior written permission of the manufacturer.
Warranty
The information contained in this document(s) is subject to change without notice.
The manufacturer makes no warranty of any kind with regard to this material, including, but not limited to, the implied warranties of fitness for a particular purpose.
The manufacturer shall not be liable for errors contained herein or for incidental or consequential damages in connection with the furnishing, performance, or use of this material.
The Federal Communications Commission Statement
Note this equipment has been tested and found to comply with the limits for a class A digital device, pursuant to Part 15 of the FCC rules. These limits are designed to provide reasonable protection against harmful interference in a residential installation. This equipment generates, uses, and can radiate radio frequency energy and, if not installed and used in accordance with the instruction manual, may cause harmful interference to radio communication. Operation of this equipment in a residential area is likely to cause harmful interference in which case the user will be required to correct the interference at his own expense.
You are cautioned that changes or modifications not expressly approved by the party responsible for compliance could void your authority to operate the equipment.
The device complies with part 15 of the FCC Rules.
Operation is subject to the following two conditions:
(1) This device may not cause harmful interference, and
(2) This device must accept any interference received, including interference that may cause undesired operation.
CE Warning!
This is a class A product. In a domestic environment this product may cause radio interference in which case the user may be required to take adequate measures.
Table of Contents
1 Getting Started. 1-1
PRECAUTIONS 1-1
INTRODUCTION 1-2
EXTERNAL VIEW 1-2
THE FRONT VIEW 1-2
THE REAR VIEW. 1-3
CONTROL PANEL 1-4
2 Setting up Your Machine 2-1
MINIMUM CONFIGURATION REQUIREMENTS. 2-1
CHECKING PACKAGE CONTENTS 2-1
UNLOCKING THE SCAN UNIT 2-2
SETTING UP THE ADF (AUTO DOCUMENT FEEDER) (OPTIONAL)...2-3
CONNECTING THE CABLES 2-4
CONNECTING THE PRINTER CABLE 2-4
CONNECTING THE ADF CABLE 2-4
CONNECTING THE POWER AND TURNING ON THE MACHINE ..2-5
3 Operation 3-1
LOADING PAPER 3-2
NOTICE ON USING THE ADF 3-2
PLACING DOCUMENT(S) IN THE ADF. 3-3
PLACING DOCUMENT(S) ON THE GLASS. 3-4
ACCESSING COPY FEATURES 3-5
CHANGING SCALING 3-6
CHOOSING PAPER SIZE 3-7
SELECTING PHOTO OR TEXT 3-8
ADJUSTING DENSITY 3-9
INCREASING COPY COUNT 3-10
CHOOSING COPY QUALITY 3-11
4 Troubleshooting 4-1
LCDMESSAGE DURING SCANNING AND COPYING 4-1
INFORMATION CODES. 4-1
CLEARING A PAPER JAM. 4-2
CLEANING THE GLASS. 4-3
TECHNICAL SUPPORT 4-4
Appendix A
QUICK GUIDE
SPECIFICATIONS
INDEX
Precautions
- Keep the machine out of direct sunlight. Direct exposure to the sun or excessive heat may cause damage to the unit.
- Do not install the machine near heating or air conditioning units.
- Do not install the machine in a humid or dusty place.
- Be sure to use the proper AC power source.
- Only use the AC adapter (model name ADP-50ZB made by Delta Electronics, Inc.) included with the machine. Using other AC adapters may damage the machine and void the warranty.
- Place the machine securely on an even, flat surface. Tilted or uneven surfaces may cause mechanical or paper-feeding problems.
- Retain the box and packing materials for shipping purposes.
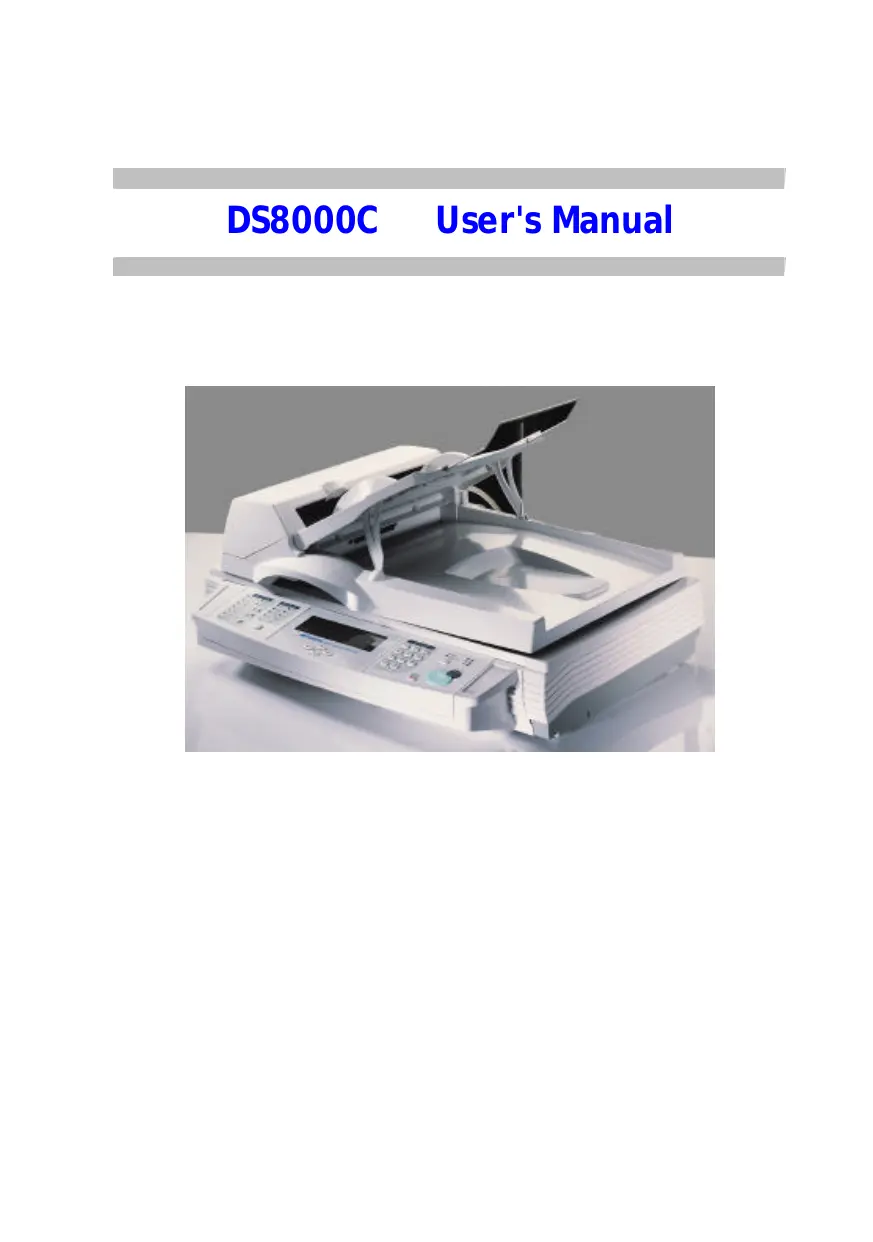
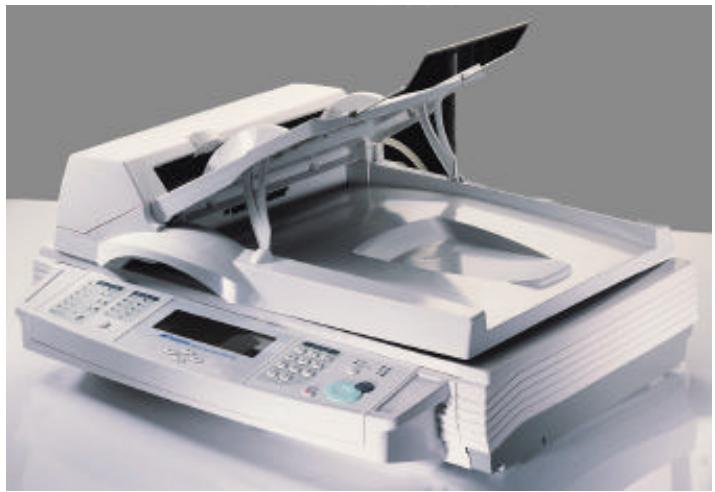
Thank you for purchasing the Avision DS8000C. The DS8000C provide you a fast and affordable access to color digital copying by simply connecting the product to a color laser printer. The new way to make digital copies is cost-saving and it produces a dramatic high-quality copy result compared to regular analog copier.
EXTERNAL VIEW
THE FRONT VIEW
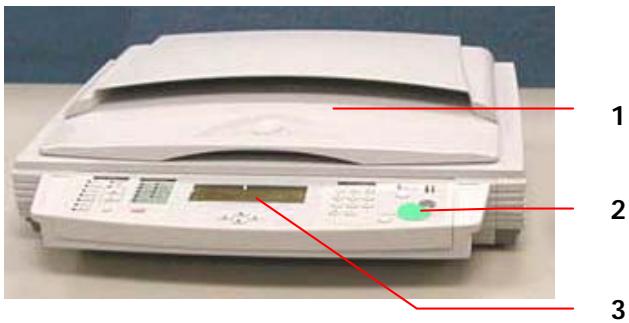
- Document Cover
- Control Panel
- LCD-display
THE REAR VIEW
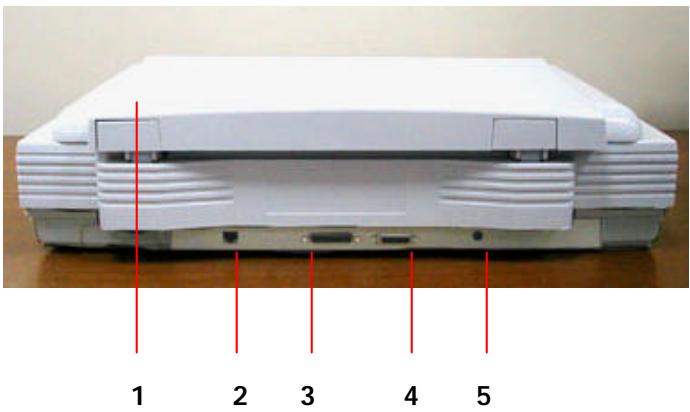
- Document Cover
- RJ-45 Network Port (For updating printer profile, and firmware)
- Printer Port
- ADF Port
- Power Jack
1

3
4
5
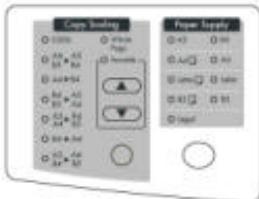
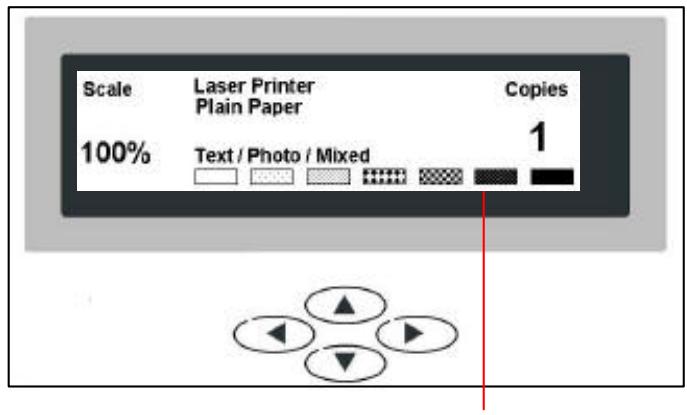
1 Scaling Area:
Used to reduce document(s) down to 25% or enlarge it up to 400% .
—Increase scaling in 1 % increment
Decrease scaling in 1% Decrement
Select scaling from the preset percentage
Paper Supply Area:
Used to detect your original paper orientation (for A3, A4 portrait, A4 landscape only) and specify your output paper size.
O

Used to indicate A4 Portrait.

Used to indicate A4 landscape.
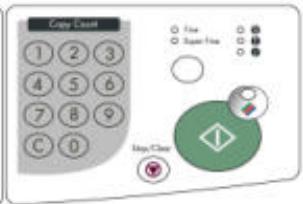
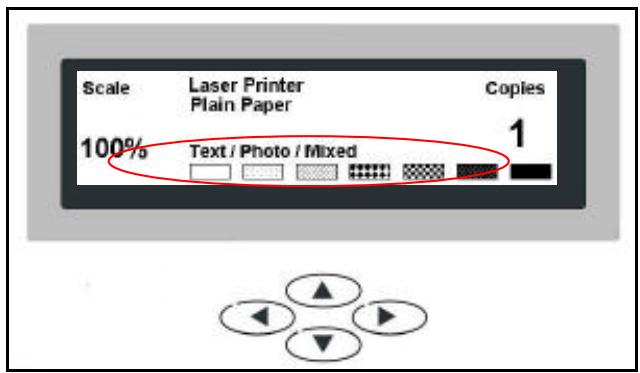
LCD-display & Moving Keys:
Used to display current operation and select your command.
LCD-display
Moving Keys and Others:
| Used to move to up/down/left/right. |
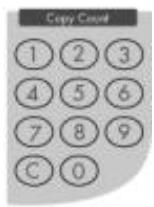
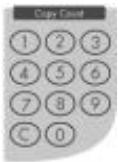
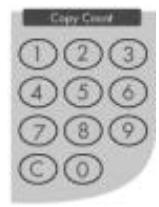
The Copy Count:
Used to enter copy count.
5 Start & Other Keys:
Used to select scanning resolution and start making copies.
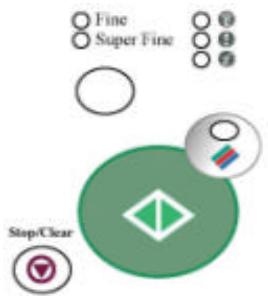
| Stop/Clear | Used to clear previous settings or stop during copying. |
| Fine Super Fine | Used to select copy resolution from Fine(300 dpi) to Super Fine (600 dpi). |
| • The Power LED – Used to indicate power on and ready status. • The warning LED – Used to indicate error. • The Sleep LED – Used to indicate power-saving status. | |
| Used to select color copies. | |
| Used to start making copies. Pressing the start button without first selecting the color button brings you a black and white copy. |
Minimum Configuration Requirements
A PCL-compliant laser printer
A printer cable
Checking Package Contents
Unpack the box and check its components. If there is any item missing, contact your dealer immediately.

Accessories: CD, User's Manual.
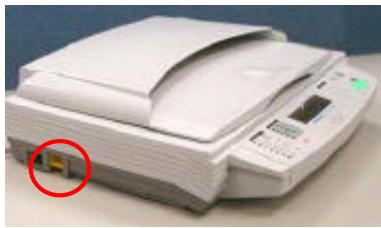
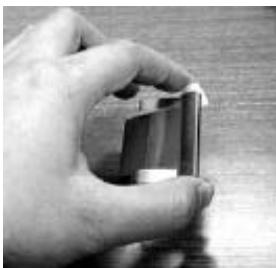
Unlocking the Scan Unit
The scan unit is locked during transport to protect the scanning mechanism from being damaged. Be sure to unlock the scan unit before using the machine.
1).Locate the lock switch at the left side of the machine.
2). Push the lock switch down to unlock the scan unit.
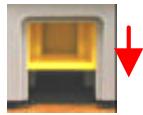
Locked
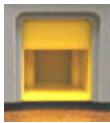
UnlockED
The scan unit at this position before locking
Note: If you need to move your DS8000C for repair or any other reason, be sure to lock your DS8000C before moving. To lock your DS8000C, please do the following,
- Turn off your DS8000C.
- If the scanning head is not located at the front of the glass, turn the DS8000C on to return the scanning head to the front of the glass. After the scanning head is returned to the home position, turn the power supply off.
- Move the lock switch to the "Locked Position".
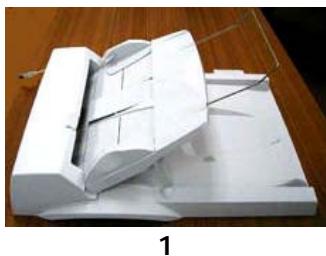
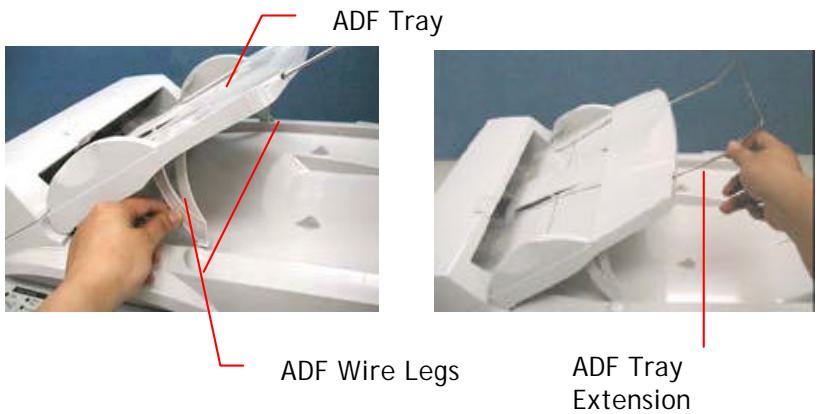
Setting up the ADF (Auto Document Feeder) (Optional)
- Raise the ADF Tray to about 45 degrees.
- Pull down the wire leg beneath the ADF Tray.
3 Pull out the ADF Tray extension to its full length.
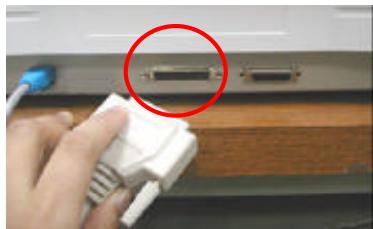
CONNECTING THE PRINTER CABLE
- Connect one end of the printer cable (not included) to your printer.
- Connect the other end to the printer port of your DS8000C.
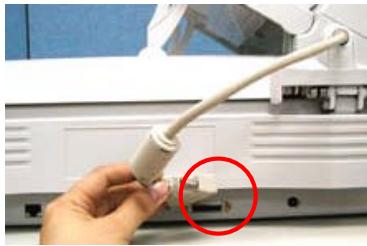
CONNECTING THE ADF CABLE
Connect the ADF cable which is attached to the document cover to the ADF port.
CONNECTING THE POWER AND TURNING ON THE MACHINE
- Press the power switch to the "0" position to turn off the DS8000C.
- Connect the small end of the power cable to the power port of your DS8000C.
- Connect the other end to an appropriate power outlet.
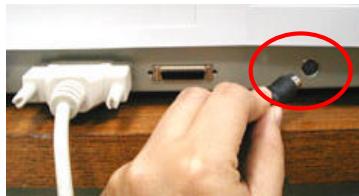
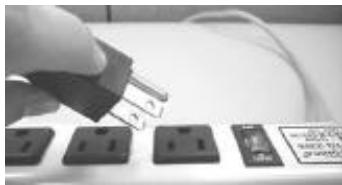
- Press the power switch to the "l" position to turn on your DS8000C. After showing the warming up message, the LCD display prompts the Copy ready status (present) as shown below.
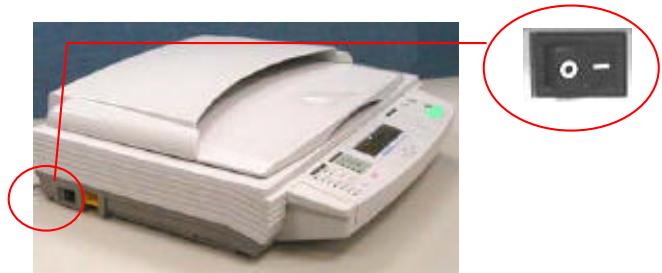
Note: You can leave your DS8000C ON at all times since the DS8000C is designed with a power saving function. If the DS8000C is idle for one hour, it automatically shuts off the scanning lamp.
With an intuitive control panel, the DS8000C is designed to be easy-to-use. Basically, to operate the DS8000C takes three simply steps:
- Place your paper on the glass.
-
Enter your copy count.
-
Press the and then the want to make color copies.

button if you
Press the white cop

button if you want to make black and
The following sections describe in detail the things you should know and the advanced features on how to make copies with the DS8000C.
You can load the paper from the DS8000C either in the ADF (Automatic Document Feeder) or on the glass. If you need to copy multiple pages, please load your papers in the ADF. The ADF can hold up to 50 pages at one time. If you need to send pages from books, newspaper clippings, paper with wrinkles or curls, please place your paper on the glass.
NOTICE ON USING THE ADF
Before using the ADF, please make sure that your paper meets the following specifications:
- Document(s) can range in size from 6 by 7 inches to 11.8 by 17 inches.
- Document(s) can range in weight from 16 to 28 lbs (60~105 g/m ^2 ).
- Document(s) should be square or rectangular and in good condition (not fragile or worn).
- Document(s) should be free of curl, wrinkle, tears, wet ink, or punch holes.
-
Document(s) should be free of staples, paper clips, paper sticky notes.
-
Make sure your document is free of staples, paper clips and is not torn out.
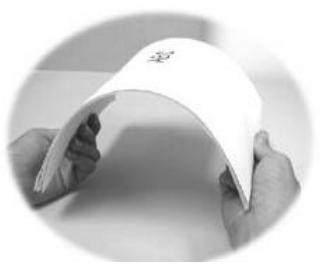
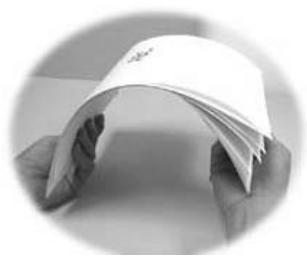
- If you have multiple pages, fan your document(s) to avoid occasional paper jam. The ADF can hold up to 50 pages at one time.
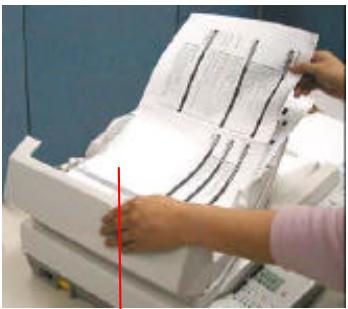
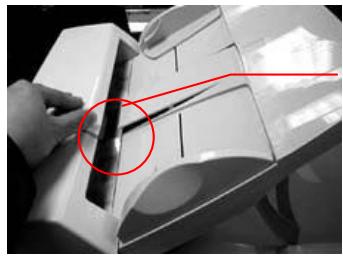
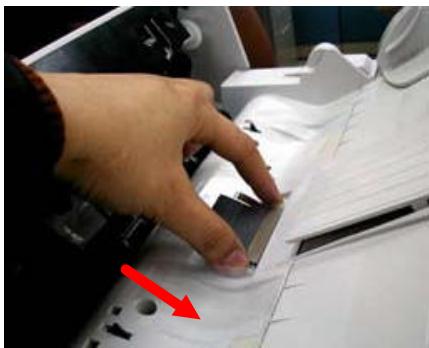
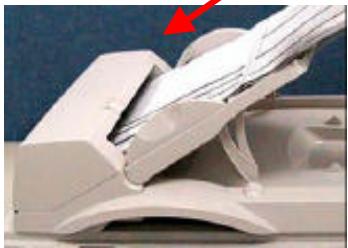
- Place your document(s) with the text FACE UP in the ADF and make sure that the top of the pages is fed in first.
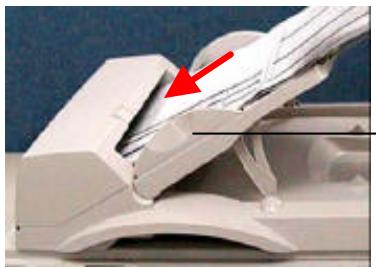
Paper Guide
-
Adjust the Paper Guides to center the document(s) in the ADF.
-
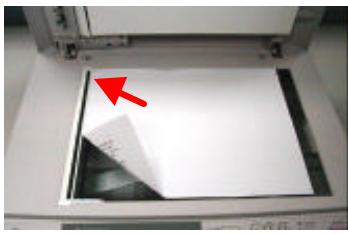
Open the document(s) cover to reveal the glass.
- Place your document(s) with the text FACE DOWN on the glass and align the document(s) in the upper-right corner of the glass.
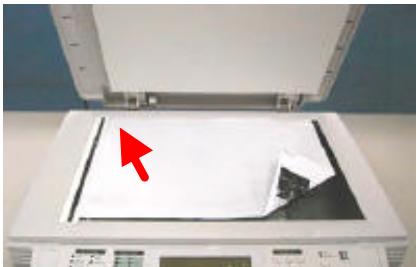
- Close the document cover.
The DS8000C provides the following features:
Changing Scaling
- Choosing Paper Size
- Focusing on Text/Photo/Mixed
Adjusting Density
- Increasing Copy Count
- Choosing Copy Quality
To use the copy features is easy and intuitive. However, you may refer to the following pages to learn how to use these features.
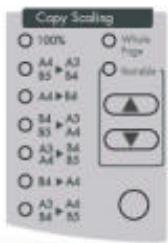
The paper scaling is preset to 100% . If required, you can change the scaling by reducing it down to 25% or enlarging it to 400% .
To reduce or enlarge the original document,
- Press the key to enlarge your document in 1 percent increment. Or press the key to reduce your document in 1 percent decrement.
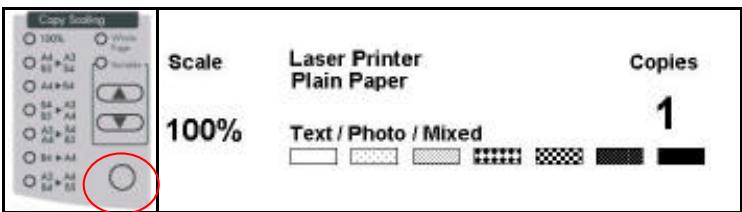
Or, you may press the round button to choose your scaling from preset scaling from 141% , 122% , 115% , 93% (whole page) 86% , 81% .
** After you have made your copies, the settings you have just made will remain in the LCD-display for three minutes. After three minutes, the machine will automatically return to the factory default settings.
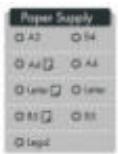
Paper Supply specifies your output paper size.
To specify your output paper size,
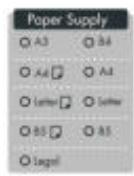


Used to indicate A4 Portrait.
Used to indicate A4 landscape.
- Press the round button on the Paper Supply area.
- Press repeatedly until the LED for your desired paper size appears.
** After you have made your copies, the settings you have just made will remain in the LCD-display for three minutes. After three minutes, the machine will automatically return to the factory default settings.
The machine is preset to Text mode. You can select photo or text to optimize your copy result.
To select photo or text,
- Press the key to scroll down to the Text/Photo/Mixed field.
- Choose your focus with the or keys.
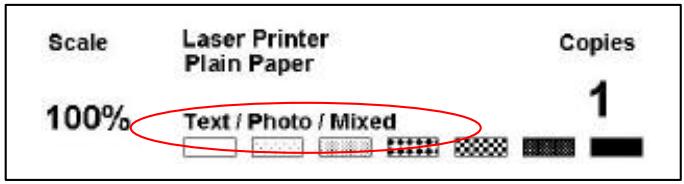
** After you have made your copies, the settings you have just made will remain in the LCD-display for three minutes. After three minutes, the machine will automatically return to the factory default settings.
The DS8000C is preset to the normal level of density. If your original document comes with a lighter or darker contrast, your can improve the quality using the Adjusting Density feature.
To change your density,
- Press the key to move your cursor down to the Density field.
- Choose your desired density with the or keys.
** After you have made your copies, the settings you have just made will remain in the LCD-display for three minutes. After three minutes, the machine will automatically return to the factory default settings.
The DS8000C is preset to 1 copy. If you wish to increase the number of copies, choose your desired copy count with the numeric keypad or keyboard.
To increase your copy count,
Enter your desired copy count with the numeric keypad. The LCD display shows the number of your copy count.
Scale
Laser Printer Plain Paper
100%
Text / Photo / Mixed


** After you have made your copies, the settings you have just made will remain in the LCD-display for three minutes. After three minutes, the machine will automatically return to the factory default settings.
The DS8000C is preset to Fine copy quality, the setting suitable for most business document(s). If necessary, this setting can be changed to Super Fine (enhanced quality) copy quality.
To choose your copy quality,

The Super Fine button appears with a lit LED.
** After you have made your copies, the settings you have just made will remain in the LCD-display for three minutes. After three minutes, the machine will automatically return to the factory default settings.
LCD Message During Scanning and Copying
| LCD Message | Action |
| Copy function disables. | Please download the printer profile. |
| Check printer cable or status. | 1. Check if the printer cable has been correctly connected. 2. Check if the printer is turned on. 3. Restart the DS8000C and your printer. 4. If the message still appears, contact your dealer. |
Information Codes
| Info code | Meaning | Action |
| 10001 | SRAM error | Restart your DS8000C. (Turn off and on again.) If the code still appears, contact your dealer. |
| 10002 | DRAM error | Restart your DS8000C. If the code still appears, contact your dealer. |
| 10003, 10004 | Lamp error | Restart your DS8000C. If the code still appears, contact your dealer. |
| 10005 | Home sensor error | Restart your DS8000C. If the code still appears, contact your dealer. |
| 10006 | Lamp error | Restart your DS8000C. If the code still appears, contact your dealer. |
| 10007 | Lock error | 1. Turn off your DS8000C. 2. Find the lock switch underneath the machine and unlock the machine. 3. Restart your DS8000C. If the code still appears, contact your dealer. |
| 10201 | Z1 access error | Restart your DS8000C. If the code still appears, contact your dealer |
| 10202 | Z1 SRAM error | Restart your DS8000C. If the code still appears, contact your dealer |
Clearing a Paper Jam
- Lift the ADF release button on the ADF front cover and open the cover to the left.
- Gently pull out the jammed paper.
- Close the ADF cover.
ADF Release Button
ADF Front Cover
Document
The DS8000C is designed to be maintenance-free. However, it still needs to be cleaned occasionally to ensure optimum image quality and performance.
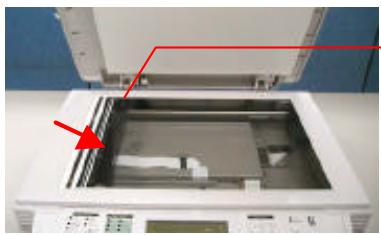
To clean the glass,
- Open the document cover as shown below.
- Dip a soft clean cloth with isopropyl alcohol (95%).
- Gently wipe the document glass and the white sheet beneath the document cover to remove the dust or any toner particles.
- Close the document cover. The DS8000C is now ready for use.

- Document Cover
- Document Glass
From time to time the pad assembly and feeding rollers may become contaminated with ink, toner particles or paper dust. In this case the DS8000C may not feed documents smoothly. If this occurs please follow the cleaning procedures to return your machine to its original state.
- Moisten a cotton swab with isopropyl alcohol (95%) .
- Lift the ADF release button.
- Open the ADF front cover to the left. Wipe the feeding rollers by moving the swab from side to side. Rotate the rollers forward with your finger and repeat the above cleaning procedures until the rollers are clean. Be careful not to snag or damage the pick springs.
- Wipe the pad in the direction from top to bottom. Be careful not to hook the pick springs.
- Close the ADF unit. The machine is now ready to use.
ADF Release Button
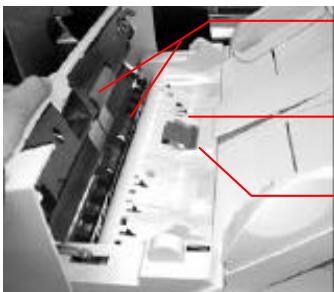
Feeding Roller
Pick Spring
ADF Pad
After scanning approximately 100,000 pages through the ADF, the pad may be worn out and you may experience problems with document feeding. In this case, it is highly recommended to replace the pad module with a new one. For ordering the pad module, please consult your nearest dealer and follow the procedure below to replace it.
Disassembling Procedure
- Lift the ADF release button.
- Open the ADF front cover to the left.
- Press both arms of the ADF snap-in pad module inwardly with your fingers to pull out the ADF snap-in pad module.

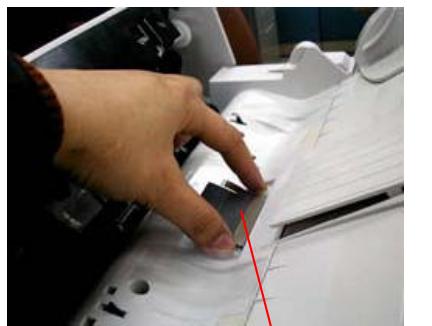
ADF Release Button
ADF Pad
Assembling Procedure
- Take out the ADF pad module from the box.
- Press both arms of the ADF snap-in pad module inwardly with your two fingers
- Place it into the holes until it snaps into place.
If your problem still exists after trying the above solutions, please prepare the following information and then contact the technical support of Avision.
- Serial number of your machine
- Error Code and its description if any
- Brand and model name of the Printer connected to the machine
Headquarter
Avision Inc.
No. 20, Creation Road I, Science-Based Industrial Park, Hsinchu 300, Taiwan, ROC
TEL: +886 (3) 578-2388
FAX: +886 (3) 577-7017
1 Placing Your Documents
Multi-page copy
Place your document FACE UP in the ADF.
Single-page copy
Place your documents FACE DOWN on the glass.
Making Copies Through Your Printer
Enter your copy count via the copy count keypad

Press the Start button to make B&W copies.


Press these two buttons subsequently to make Color copies.
Specifications
| System Overview | |
| Image Sensor | Color CCD |
| Light Source | CCFL |
| Optical Resolution | 600 x 600 dpi |
| Color Depth | 36-bit Color |
| LCD | 132*65 dot Graphic display |
| External Connections | 1. RJ-45 (Network connection, for updating printer profile, and firmware) 2. IEEE 1284(for Copy application)/ECP |
| Copy Area | 300*422mm |
| CPU | 32 bit RISC CPU |
| Memory Size | DRAM: 16 MB |
| Dimension | 589x428x140mm(DS8000C) 540x210x422mm (ADF) |
| Weight | 8 kgs (DS8000C) 3.7 kgs (ADF) |
| ADF Capacity | 50 pages |
| ADF Document Weight/Thickness | 16 ~ 28 lbs / 60 ~ 105g/m² |
| ADF Paper Feed | Face Up |
| Flatbed Paper Feed | Face Down |
| Power Supply | 24V DC, 2A external power adapter |
| Power Consumption | < 30W Standby: 23W Power Saving Mode: 18W |
| Environment | |
| Operating | 10°C to 35°C(50°F to 95°F) 20% to 80% R.H. |
| Copy | |
| Features | Scaling: 25%~400% in 1% increment/decrement Paper Size Auto Detection (A4 Landscape, A4 Portrait, A3) Fine/Super Fine Mode Color Density Control Copy Count up to 99 |
Index
A
ADF
ADF tray, ADF tray extension,
ADF wire leg, Paper guide, Push
button, Front cover, 2-3
ADF cable, 2-4
ADF port, 2-4
Adjusting Density, 3-9
Auto Document Feeder, 1-2
C
Changing Scaling, 3-6
Choosing Paper Size, 3-7
Clean the ADF, 4-4
Clean the Glass, 4-3
Control Panel, 1-2
Copy Count, 1-5
Copy Features
Changing Scaling, Choosing
Paper Size, Focusing on
Text/Photo/Mixed, Adjusting
Density, Increasing Copy Count,
Choosing Copy Quality, 3-5
Copy Quality, 3-11
D
Document Cover, 1-2
F
Focusing on Photo or Text, 3-8
1
increasing Copy Count, 3-10
L
LCD-display, 1-5
Loading Your Paper
Via the ADF, Via the Glass, 3-2
lock switch
locked position, unlocked
position, 2-2
M
make black and white copies, 3-1
make color copies, 3-1
Multi-page copy, a
P
Paper Guides, 3-3
Paper Supply Area, 1-4
placing your document(s) in the adf, 3-3
power saving, 2-5
power switch, 2-5
primer cable, 2-4
primer port, 2-4
R
RJ-45 Network Port, 1-3
S
Scaling Area, 1-4
Setting up the ADF, 2-3
Single-page copy, a