VIRUS TI - Synthesizer ACCESS - Free user manual and instructions
Find the device manual for free VIRUS TI ACCESS in PDF.
| Product Type | Dual DSP synthesizer, polyphonic and multi-timbral |
| Power Supply | External 12V DC power adapter |
| Maximum Polyphony | Up to 64 voices (depending on patch complexity) |
| Play Modes | Single, Multi (16 parts), Sequencer |
| Oscillators | 3 oscillators per voice, modes Classic, Hypersaw, Wavetable, Grain, Formant, etc. |
| Filters | 2 configurable filters in series/parallel, modes LP/HP/BP/BS/Analog |
| Envelopes | 2 ADSR envelopes (filter and amplitude) |
| LFOs | 3 LFOs with multiple waveforms, tempo sync |
| Modulation Matrix | 6 slots, each slot can modulate up to 3 destinations |
| Arpeggiator | 64 preset patterns + user patterns, tempo sync |
| Effects | Delay, Reverb, EQ (Low/Mid/High), Distortion, Character, Chorus, Phaser, Ring Mod, Frequency Shifter, Vocoder |
| Patch Banks | 4 RAM banks + 26 ROM banks, 128 patches each |
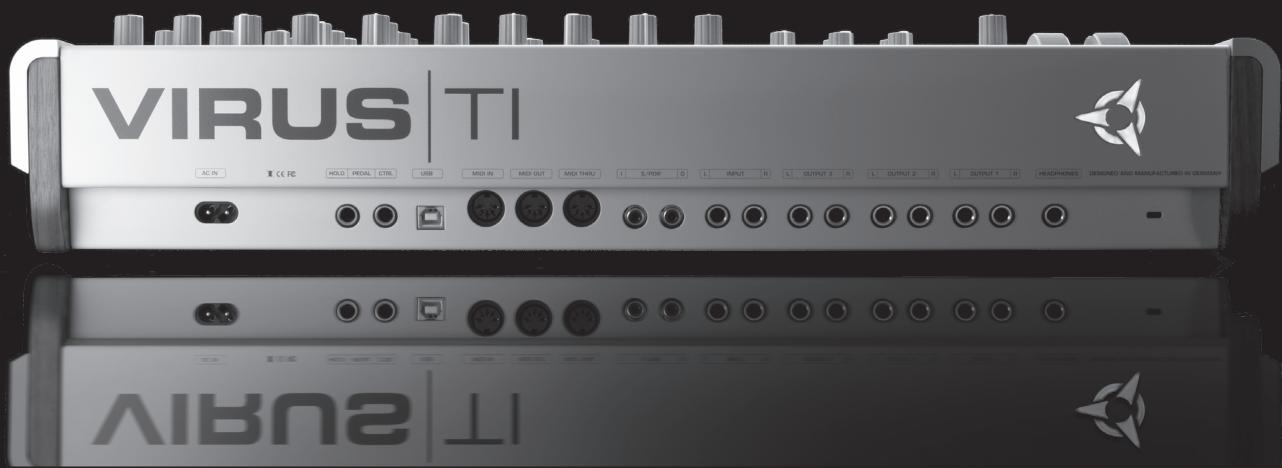
| Connectivity | USB (audio and MIDI), MIDI In/Out/Thru, audio outputs L/R, audio inputs L/R, headphones |
| DAW Integration | Virus Control: VST/AU/RTAS plug-in, full control via USB, delay compensation |
| Display | Backlit LCD screen |
| Controls | 32 potentiometers, 42 buttons, mode selection buttons |
| Maintenance | Clean with a dry, soft cloth. Do not use solvents. Do not open the device. |
| Safety | Avoid moisture, dust, shocks, and extreme temperatures. Use the supplied power supply. |
| Updates | Free firmware updates via the Access Music website. |
| Warranty | Complies with directive 89/336/EC (EMC). FCC information for USA and Canada. |
Frequently Asked Questions - VIRUS TI ACCESS
User questions about VIRUS TI ACCESS
0 question about this device. Answer the ones you know or ask your own.
Ask a new question about this device
Download the instructions for your Synthesizer in PDF format for free! Find your manual VIRUS TI - ACCESS and take your electronic device back in hand. On this page are published all the documents necessary for the use of your device. VIRUS TI by ACCESS.
USER MANUAL VIRUS TI ACCESS
How to get customer support?
15 Basic Operation
Power On/Off
Connect it to your other equipment
Audio I/O
17 Choose Your Weapon
Virus Control vs MIDI?
What Is Total Integration?
Host Software
19 Modes Of Operation
Mode/ExitButton
Tap Tempo / Panic Button
Preset Sounds
Making Your Own Sounds
Tutorial Patches
23 Parameter Overview
Oscillator Section
Mixer Section
Filter Section
Envelopes
Modulators Section
Matrix Section
Arp Section
Effect Section
Effects In Upper Row
Effects In Lower Row
35 Utility Buttons
Shift
Search
Store
Random Patch Generator
Undo
Edit
Config
Exit
Tap
Transpose
39 About Virus Control Center
Backup and Restore
Burn To Flash
Update OS
41 About Polyphony
Level 1
Level 3
Level 5
Maximising Polyphony
Conclusion
45 Compliance and Warranty
Enjoy making tunes :)
Legal Notice
© Copyright 2009 Kemper Digital GmbH. All rights reserved.
This manual, as well as the software and hardware described in it, is furnished under license and may be used or copied only in accordance with the terms of such license. The content of this manual is furnished for informational use only, is subject to change without notice and should not construed as a commitment by Kemper Digital GmbH.
Kemper Digital GmbH assumes no responsibility or liability for any errors or inaccuracies that may appear in this book. Except as permitted by such license, no part of this publication may be reproduced, stored in a retrieval system, or transmitted in any form or by any means, electronic, mechanical, recording, by smoke signals or otherwise without the prior written permission of Kemper Digital GmbH.
Virus is a trademark of Kemper Digital GmbH. All other trademarks contained herein are the property of their respective owners. All features and specifications subject to change without notice.
www.access-music.de
support@access-music.de
Introduction
Welcome
The Virus TI is the most powerful synthesizer Access have ever built. The dual DSP architecture is capable of delivering loads of voices over 16-part multi-timbral parts each with the full arsenal of effects to its disposal. The user-interface comprises 32 knobs and 42 buttons, and a elegant LC display to give you easy and intuitive access to its vast array of sound-sculpting possibilities. Coming as it does from the fine lineage of Virus synthesizers, the TI can draw upon a vast library of high quality sounds, created by some of the most talented sound-designers in the industry and spanning every conceivable genre of electronic music.
The "TI" stands for "Total Integration", and this is where we have redefined what it means to integrate a hardware synth with your computer and sequencer software. All audio and MIDI data can be streamed into and out of your compatible software host via USB, with the Virus Control plugin making your Virus TI appear as a VST/AU/RTAS multi-channel instrument, complete with patch browsing and full editing capabilities.
All this means that the lines between hardware and software are so elegantly blurred, that from here on in you'll find it hard to imagine how it could be any other way.
Health and Safety
Please read the following carefully. Some of this advice concerns your health as well as that of your instrument!
- Avoid exposing your Virus to moisture, dust or dirt. Do not place open liquids anywhere near the unit. If any substances get into the Virus housing contact Access support (www.access-music.de).
- Avoid exposing the unit to excessive heat or direct sunlight. Please ensure that relatively cool air can circulate freely around the unit.
- Avoid exposing the unit to physical shock or vibrations. Make sure it is placed firmly on a flat surface.
- This Virus model may require a 12V DC external power supply. Only use the one that was included with the unit. Never connect the Virus to a power outlet that does not fully comply with national safety regulations. Never use an external power supply which wasn't designed to match the local voltage requirements.
- Disconnect the power whenever you are unlikely to use the Virus for a long period of time. Always pull on the plug itself, not on the cord.
- The Virus is capable of generating levels that can cause irreversible damage to your ears, either via an external amplifier or when using headphones connected directly to the unit. Please keep levels reasonable at all times! Make sure that the equipment you connect the Virus TI to matches the Virus' requirements (+4dB Outputs etc.)
- In addition to the above, please consider the following advice carefully: Please do not hide the Virus TI in the oven, in case you later forget and cook it by accident. Please do not place the Virus TI on top of your car whilst fastening the kids into their seats, in case you forget and drive off with it still there.
Maintenance
- Updating the OS
Access Music is famous for improving their products via free updates to the operating system. We recommend that you visit www.access-music.de/start/ regularly and download the latest OS.
- Cleaning
Only use a soft, dry cloth or soft brush to clean the panel - do not apply any liquids. Note that industrial or household solvents can cause severe damage to surfaces.
Repair
Never open the Virus yourself - there are no user-servicable parts inside. If your Virus ever needs repairing, please contact Access support.
Where do I find …
This quick start manual takes references to the following, additional resources:
| Information | Location |
| Patch parameter reference | ·Click on the “?” in Virus Control and open the patch parameter reference. ·PC: Start > All programs > Access Music > Virus TI > Documentation > Manuals ·Mac: Applications/Access Music/Virus TI/ Documents/Manuals/ |
| Multi parameter reference | ·Click on the “?” in Virus Control and open the multi parameter reference. ·PC: Start > All programs > Access Music > Virus TI > Documentation > Manuals ·Mac: Applications/Access Music/Virus TI/ Documents/Manuals/ |
| Config menu reference | ·Click on the “?” in Virus Control and open the configuration menu reference. ·PC: Start > All programs > Access Music > Virus TI > Documentation > Manuals ·Mac: Applications/Access Music/Virus TI/ Documents/Manuals/ |
| Addendum | ·Click on the “?” in Virus Control and open the manual addendum. ·PC: Start > All programs > Access Music > Virus TI > Documentation > Addenda ·Mac: Applications/Access Music/Virus TI/ Documents/Addenda/ |
| Tutorials for Virus Control | ·Click on the “?” in Virus Control and open the Virus Control tutorials. ·PC: Start > All programs > Access Music > Virus TI > Documentation > Tutorials ·Mac: Applications/Access Music/Virus TI/ Documents/Tutorials/ |
| Tutorial for Virus Control Center | ·Click on the “?” in Virus Control and open the Virus Control Center tutorial. ·PC: Start > All programs > Access Music > Virus TI > Documentation > Tutorials ·Mac: Applications/Access Music/Virus TI/ Documents/Tutorials/ |
| Tutorials for Sequencers | ·Click on the “?” in Virus Control and open the Virus Control Sequencer tutorial. ·PC: Start > All programs > Access Music > Virus TI > Documentation > Addenda ·Mac: Applications/Access Music/Virus TI/ Documents/Addenda/ |
| Tutorial videos | ·Click on the “?” in Virus Control and open the Videos folder ·PC: Start > All programs > Access Music > Virus TI > Documentation > Videos ·Mac: Applications/Access Music/Virus TI/ Documents/Video/ |
| Tutorial songs | ·PC: Start > All programs > Access Music > Virus TI > Documentation > Tutorials ·Mac: Applications/Access Music/Virus TI/ Documents/Tutorials/ |
Additional resources can be found on the Access Music website.
How to get customer support?
First of all, please don't hesitate to ask for customer support. We like to help and improve your experience with our instruments.
We prefer to be contacted my e-mail. Simply because it is easier to gather all information in writing than on the phone. Nevertheless call us, if you prefer to talk. Details on how to contact our international support team can be found here:
http://access-music.de/support/
Basic Operation
The following is intended as a walkthrough guide to show you how simple it is to use the Virus TI. Please read through it carefully, with the Virus in front of you.
Power On/Off
Plug the supplied power adaptor into the mains, and connect it to the POWER socket on the rear of the Virus TI. The first time you do this, the unit should power up straight away. If you unplug the mains when the Virus is in standby, it will still be in standby when you reconnect it.
Press both the TRANSPOSE buttons together to bring the Virus out of standby. Please wait for a few seconds while the Virus boots the operating system. To return it to standby at any time, press and hold the TRANSPOSE buttons for approx. 3 seconds.
Connect it to your other equipment
USB
Important: You must install the TI Software and drivers before connecting the Virus to your computer via USB.
To install: Go to www.access-music.de/start/ and download the latest build of the Virus TI installer package for your chosen computer platform.
Once downloaded, extract the archive and run the installer. Follow the on screen instructions carefully, and connect the USB cable when told to do so.
Connect the USB port on the Virus to a dedicated port on your computer using the cable provided or one similar. DO NOT USE A HUB! Sorry to have to shout, but the importance of this cannot be overstated - the Virus needs a USB port all of its own if the large amounts of data involved are to flow freely!
The firmware of the Virus TI will be updated automatically as part of the installation process.
MIDI
For those of you who simply cannot wait even a couple of minutes to hear your new baby make its first sounds (don't worry - we sympathise completely), then you can simply connect the out port of any MIDI compatible keyboard to the IN port of the Virus TI and start playing.
Audio I/O
- Outputs
If you're scratching your head at this point and wondering why you aren't hearing anything, that's because the Virus TI does not come with built-in speakers. If you wish to hear all the wonderful noises you are making, then you need to connect OUTPUT 1 LEFT and RIGHT to the inputs of a stereo amplification system (preferably via a mixer), or a pair of headphones to the HEADPHONE socket. Please lower the MASTER VOLUME (upper-leftmost knob) before you play anything, especially through headphones, as we really don't want you to break your ears before you've even started.
If you have your Virus connected to a mixing desk, it is probably best to leave Master Volume at maximum (127), and adjust the levels on your mixer to suit. This will give you the best signal-to-noise ratio.
Please note, that Master Volume will not have any effect when you are using the USB outs in Virus Control.
Inputs
Connect your external audio equipment to input left/right if you wish to route it through the Virus TI. With these inputs you can use the Virus as a sound card for your computer, or you can use them to do all sorts of naughty things to your other equipment by running it through the Virus' filters and effects.
If you want the audio to pass straight through the Virus to the audio outputs, then simply adjust the Input Thru parameter in the CONFIG menu to the desired level.
Now you have installed the Virus TI on your computer and connected it to your equipment, you can start to explore the full potential of your new favourite synthesizer.
Choose Your Weapon
Virus Control vs MIDI?
There are three main ways you can work with the Virus TI:
- As we've already mentioned, you can simply plug a MIDI controller keyboard into the MIDI IN port and start playing.
- You can use a software sequencer host to route up to 16 different channels of MIDI to the Virus TI. All you need to do is select the appropriate MIDI port in your host, which is labelled "Virus TI Synth", and put the Virus into Sequencer Mode. Program changes can be made as normal on the Virus itself, or via your sequencer.
- You can enjoy Total Integration between your compatible sequencer host and the Virus TI by using Virus Control.
What Is Total Integration?
The Virus TI comes bundled with the Virus Control software - the hub of the Total Integration concept. Virus Control allows the Virus TI to appear as a multi-channel VST/Audio Unit/RTAS plugin, streaming audio and MIDI data discreetly over USB in 3 stereo channels, with sample-accurate timing and delay-compensation. Every parameter of the Virus TI synth engine is represented in the graphical user interface, with automation of all relevant parameters possible within suitable host software. The Browser page allows comprehensive patch library management, including a powerful search tool, and total recall of all your settings means the Virus TI will always be exactly as you last saved it with each project.
For detailed information on how to use Virus Control, please refer to the relevant section in the Virus Control tutorials, which can be accessed directly by clicking on the '?' button in Virus Control itself, along with several other useful resources.
Host Software
At this stage, it's worth mentioning that to make full use of the Virus TI, it is recommended that you have one of the compatible software sequencers installed on your computer, a list of which can be found at www.access-music.de. Whilst it is still perfectly possible to use the Virus TI in 'standalone' mode, a compatible sequencer will allow you to record your work in minute detail, and experience Total Integration as it was intended.
Since all the compatible hosts have a unique working method, it is recommended that you take a little time out at this point to watch the tutorial video specific to your host, which can be found on your computer's hard drive. You can also view these at any time by clicking on the ? symbol in Virus Control and selecting the relevant option. Please note that a video tutorial might not be available for every supported host.
Modes Of Operation
Mode / Exit Button
There are 3 ways or 'modes' to play your Virus TI. The Mode Select buttons are located to the right of the LCD display.
- Single Mode
This is the default mode, in which the Virus will only play one sound at a time across the whole length of your MIDI controller keyboard.
Multi Mode
In Multi mode, you can have up to 16 different sounds playing at a time. Each of these 16 sounds is handled by a 'Part', and each Part has its own performance settings, such as volume, pan position, transpose etc. By assigning the same MIDI channel to each Part, you can easily create fantastic combinations of any of the available presets, which can be arranged in layers or split into different key zones.
The Virus TI has 128 slots for storing your Multi set-ups. The first 16 (0-15) of these are 'embedded' Multis, by which we mean that they store all the data for the patches they use, so any edits you make to the sounds are automatically preserved when you store the Multi, so you need never worry about breaking a preset. Multis numbered 16 and upwards do not store the individual patch data, but instead refer to patches stored in the Single RAM/ROM banks.
- Sequencer Mode
Sequencer mode is a simplified version of Multi mode designed for use with a software sequencer. Each of the 16 Parts is set to its equivalent MIDI channel, and the performance settings are mostly hidden, as it is expected that you would rather use your sequencer to control these things. The Virus TI will automatically switch to Sequencer Mode when Virus Control is activated.
Please note that you cannot store your settings in Sequencer mode - if it is important to do so, you should use Multi mode instead.
- Exit
Pressing this button from within any of the edit menus will bring you back out into the top page of the currently selected mode.
Tap Tempo / Panic Button
- Tap Tempo
Tap this button repeatedly to set the tempo. This will set the rate of the clock to which any 'clocked' parameters will sync, for instance the LFOs (in clock mode), the Arpeggiator, the Delay (clock mode) etc. Please bear in mind that only one global tempo can be set when working in Multi mode. Alternatively, you can find Tempo in the COMMON edit menu, should you wish to choose a more precise tempo.
- Panic (OSC MONO + OSC SYNC)
Hit this combo to kill any hanging notes, which can be caused by incoming MIDI errors, such as when your sequencer decides to crash, for instance.
Preset Sounds
- RAM/ROM?
The Virus TI contains 4 banks of RAM, followed by 26 banks of ROM for storing sounds or 'patches', with each bank containing 128 sounds. 'RAM' stands for 'Random Access Memory', which means any of these locations can be overwritten with your own patches, whenever you like. 'ROM' stands for 'Read Only Memory', meaning these locations are permanent, and you cannot store your edited patches here normally. It is possible to flash a ROM bank with a customised bank using Virus Control Center however, which is explained in detail later in this guide.
The RAM banks of the Virus TI contain a showcase of sounds selected from the ROM banks, so you needn't worry about replacing any of them. Should you wish to restore them to their original state at any time, we have saved them as libraries in the Patches folder, which you can access with the Browser in Virus Control (for further details, please refer to the Virus Control chapter in the user manual).
- Selecting Single Presets
To select a particular RAM/ROM bank, use the PARAMETERS (BANK) < > buttons to the bottom right of the display. The banks are ordered RAM A-D, followed by ROM A-Z.
To scroll through the patches within a bank, use the VALUE (PROGRAM) +/- buttons located near the bottom right of the display. To jump to the middle of a bank (patch 64), press both buttons together.
- Selecting Multi Presets
Since there is only one bank of 128 Multis, it is not necessary to select a Bank first; apart from this the procedure is exactly the same as in Single mode.
To select which Single preset you want to assign to a particular Part, you need to press EDIT followed by Multi, and then select the preset using the Bank and Program parameters.
Making Your Own Sounds
So, you didn't buy a synthesizer as powerful as the Virus TI to just play the presets, did you? Well, if you did, that's OK - with so many great presets to choose from, it was still a wise choice! But aren't you just itching to start tweaking those knobs? In this section, we'll be walking through all those controllers that are immediately available from the front panel, to help guide you on the path to righteous synthesis.
For this guide we will be focussing on the primary functions of the knobs and buttons only. To access their secondary function (written in smaller text beneath the primary function), hold the SHIFT button whilst turning or pressing them.
For more detailed information on all features of the Virus TI, please refer to the user manual.
Tutorial Patches
We have included a selection of simple tutorial patches at the end of bank RAM B. To start, please choose patch ROM B-120 'Tutorial 1' - a basic, one oscillator patch using the Classic oscillator mode.
So, let's start with the Oscillator section, as this will be the starting point for creating most of your sounds.
Parameter Overview
Oscillator Section
'Oscillator' is the name given to a device that generates a continuous, cyclic waveform. Different waveforms produce tones with different characteristics or 'timbre' - from the pure simplicity of a sine wave to the harsh buzz of a saw wave. The Virus TI offers several oscillator types, for a virtually limitless supply of different tones from which to start your sound. You can then combine up to three different oscillator types, to create all manner of rich, complex sounds.
The top row of knobs in the oscillator section are all assigned by the OSC1/2/3 SELECT button. Press this button repeatedly to move the focus of these knobs to the desired oscillator. For now, please ensure that the OSC1 LED (directly above SELECT) is lit up.
Press EDIT once to access parameters relevant to the selected oscillator. You can now use the VALUE 1/2/3 knobs beneath the display to adjust the displayed parameters, and the PARAMETER buttons to navigate the pages within the menu. On page 1, the following parameters are displayed:
| Soft Knob | Parameter | Meaning |
| #1 | Mode | Choose from eight different types of oscillators |
| #2 | Shape | Adjust the value of the parameter assigned to the SHAPE knob |
| #3 | Wave Select | Adjusts the parameter assigned to the Wave Select / PW knob |
Press EDIT again to access the Common Edit sub-menu containing parameters common to the whole oscillator section. If at any time you want to return to the 'top' page which displays the Single preset names, press either the EXIT button (top left of the display) or the SINGLE button.
Shape
The SHAPE knob blends the waveform between a selection of waves determined by Oscillator Mode. Starting with patch ROM B-120 'Tutorial 1', please take some time to explore the different modes and how the SHAPE knob behaves in each (first ensure that SELECT is focussed to OSC1)
| Mode | Meaning |
| Classic | Blends the waveform smoothly from a “spectral” wave (fully anti clockwise) to a saw wave at center position (default), to a pulse wave (fully clockwise) |
| Hypersaw | Increases the number of saw waves from 1 to 9 |
| Wavetable .. Formant Complex | Sweeps through the Index of the current wavetable |
Wave Select / PW
The function of the WAVE SELECT/ PW knob varies depending on the Oscillator Mode and the current value of SHAPE. Starting with patch ROM B-120 'Tutorial 1', please take some time to explore the different modes and how the WAVE SELECT/PW knob behaves in each (first ensure that SELECT is focussed to OSC1):
| Mode | Meaning |
| Classic | If Shape = Wave>Saw 98% or less, the function is Wave Select, which allows you to choose between Sine (default) and 63 different 'spectral' waves. If Shape = Saw.... Pulse, the function is Pulse Width, which affects the width of the Pulse wave |
| Hypersaw | Adjusts the amount of detune between the saws |
| Wavetable .. Formant Complex | Selects the wavetable |
- Semitone
Adjusts the base pitch of the selected oscillator in semitones. You can pitch each oscillator by +/- 4 octaves. Use steps of +/- 12 semitones to adjust the pitch by an octave.
Please select patch ROM B-121 'Tutorial 2' before continuing.
- Detune 2/3
Use the DETUNE knob to create a slight offset in the pitch of either Osc 2 or 3. Suitable amounts of detuning between the oscillators can really help to make a sound 'warmer'. If OSC SELECT is either OSC1 or 2 then the target parameter is always Oscillator 2 Detune.
FM Amount
FM is an abbreviation of Frequency Modulation, a process by which the frequency (pitch) Oscillator 2 is modulated by the frequency of Oscillator 1. The resulting effect is often a dramatic distortion of the affected oscillator, but there are also 'sweet-spots' to be found, where the effect is more subtle and harmonious.
Experiment with different values for Osc1 and 2 Semitone and FM Amount. If you want a purer, less distorted FM sound, use a sine wave for Osc 2 (turn SHAPE fully anti-clockwise).
The function of the FM AMOUNT knob varies depending on the mode of Oscillator 2:
| Mode | Meaning |
| Classic/Wavetable/Grain/Formant | Determines by how much the frequency of Osc 2 is modulated by Osc 1 |
| Hypersaw | Controls the pitch of the HyperSaw's internal sync oscillator. Sweeping this parameter is great for creating screaming lead and bass sounds. |
*To hear the effects of FM, you must have OSC BALANCE (MIX section) set so that Osc 2 is at least audible. If you want the pure FM sound, set Oscillator Balance to +63.
- OSC3 On
Oscillator 3 is turned off by default to save on calculation power, as its use will reduce available polyphony by about 25% . Since Oscillator 3 is restricted to Classic Mode only, it is best to think of it as a kind of glorified sub-oscillator, and not as something to automatically use in every sound.
Press the OSC3 ON button to activate it, then use either the SHAPE or WAVE SELECT/ PW knob to select the Mode or Wave. The first choice is 'Slave', which is an easy way to enrich the sound by making a clone of Osc 2 (if you want to hear Oscillator 3 in Slave Mode, OSC BALANCE must be set to a value higher than -64).
Note that in Slave mode when SELECT=OSC3, neither the Semitone nor Detune knobs will function. Also, please be aware that only Osc 2 Classic Mode settings will be cloned when Osc 2 is set to a different Oscillator Mode.
Mono
Press the MONO button to make the sound play monophonically, which means it will only play one note at a time. This behaviour is essential for many lead and bass sounds.
Sync
Pressing the SYNC button will have different effects, depending on the mode of Oscillator 2:
| Mode | Meaning |
| Classic | Slaves Osc 2 to Osc 1 - try sweeping Osc 2 Semitone for classic lead sounds |
| HyperSaw | Enables Internal sync oscillator for Osc 1 HyperSaw (control with FM AMOUNT). Oscillator 1 must be in HyperSaw mode for this to have any effect |
| Wavetable...Formant Complex | No function (unless Osc 1 = HyperSaw) |
Mixer Section
The Mixer section is where you can combine the output of the Oscillator section with some additional signal sources, and adjust the overall balance between them. From here, the combined signal is sent to the Filter section.
Oscillator Balance
Use the OSC BALANCE knob to set the relative volumes of Oscillators 1 and 2. At centre position (default), the outputs of both oscillators will be at equal volume. Turn to the left to hear more of Osc 1 and to the right to hear more of Osc 2. At either extreme, only the one oscillator will be audible.
Sub Oscillator Volume
Use this knob to set the volume of the sub-oscillator, which is useful for adding more bass harmonics by adding an additional tone which is always pitched an octave below the main oscillator.
The availability of the sub-oscillator depends on the oscillator mode.
| Mode | Meaning |
| Classic | The Sub Oscillator is available to Oscillator 1 only |
| HyperSaw | both Oscillator 1 and 2 have internal sub oscillators (one for each saw wavel). The SUB OSC VOLUME knob controls the level for all sub oscillators simultaneously |
| Wavetable...Formant Complex | These oscillator types do not have a sub oscillator available to them |
Status LED
Situated between the SUB OSC VOLUME and OSC VOLUME knobs, the Status LED performs one very simple function: it flashes whenever you pass through the original value for a particular parameter. This means you can always return a parameter to how it was before you messed with it, even when the original value isn't displayed.
Osc Volume
Use the OSC VOLUME knob to control the level of the combined output of Osc 1, 2, 3 and Sub Oscillator. When you turn it past +0 , you will not hear any further increase in volume, but you may hear an increase in the amount of distortion or 'saturation'. This will only happen so long as a Saturation Curve is selected for Filter 1, or if you are using the 'Analog' filter mode.
Please be aware that Oscillator Volume will have no effect on the levels of either the Noise Generator or the Ring Modulator, which are both controlled independently.
- Noise Volume
Controls the volume of the Noise Generator, which can be useful for adding hiss and making certain types of sound FX.
Filter Section
We use filters in synthesizers for changing and shaping the timbre of a sound by removing certain frequencies. The Virus TI has two filters, which can be run in series or parallel. 'Series' means that the output of Filter 1 goes straight into Filter 2, and it is the output of Filter 2 that you hear. 'Parallel' means the oscillator signal is divided into two channels, one of which goes into Filter 1, the other into Filter 2. In this case, you hear a mixture of the outputs of both filters.
Cutoff
This is where the fun with synths really begins! Turn the knob all the way up to 127 and hold a note down on your keyboard. Now, slowly sweep the knob down to 0 and back again - you should notice the buzzy sound of the "Tutorial 2" patch get increasingly dull, until it disappears altogether, and then open back up to full buzziness as you return to 127. You have just heard a 'lowpass' filter in action.
The CUTOFF knob is controlling the 'cutoff' frequency of Filter 1, which determines from what pitch the filter starts to have an effect.
Tip: If you want the cutoff to change as you play up and down the keyboard, you will need to adjust the Key Follow parameter, available either in the Filter Edit menu, or by using SHIFT+ENV AMOUNT.
- Resonance
Set this knob at around 12 o' clock, and then sweep the Cutoff knob in exactly the same way as before. Increasing the resonance of the filter amplifies frequencies around the cutoff frequency, making it 'speak' as you throw the cutoff knob around. A little caution is advised when applying high values of resonance, as the resulting sound can damage your speakers if you are not careful, especially as you sweep the cutoff around the lower values!
- Env Amount (Filter 1 and 2 Envelope Amount)
Use the ENV AMOUNT knob to control by how much Cutoff 1 and 2 are affected by the Filter Envelope. The effectiveness of this parameter is highly dependent on the current position of Cutoff 1 and 2 - in the Tutorial 2 patch, please turn CUTOFF all the way down to 0 and ENV AMOUNT to 127. Now play some keys, and listen to how the filter now closes automatically.
Filter Balance
Use the FILTER BALANCE knob to change the way the signal flows through the filters. In the centre (default) position, the filters are arranged in serial, so you will only hear the combined effect of both. Turn FILTER BALANCE fully left to hear only the output of Filter 1, and fully right to hear only the output of Filter 2.
- (Filter) Edit
Press the EDIT button to enter the Filter Edit menu. This menu contains all of the parameters relevant to the filter section, including Filter Routing and both the Filter and Amplifier Envelopes. Use the PARAMETER buttons to move through the pages - if you want to navigate more quickly, you can use the EDIT button to jump from one group of parameters to the next.
Cutoff 2
This determines the offset of Filter 2, relative to that of Filter 1. Filter 2 Cutoff is set by default to follow Filter 1 Cutoff at the same frequency. By adjusting this parameter, you cause Filter 2 to operate at a different frequency from Filter 1, which will change the perceived depth of the filters. Please note this parameter is highly dependent on other parameters within the filter section (such as Filter Balance, for instance) and may not always have an audible effect.
Tip: If you want Filter 2 Cutoff to behave independently, you need to switch Cutoff Link to 'Off' in the Filter Edit menu.
- Filt 1/2 Mode
Use the FILT 1 and FILT 2 MODE buttons to select different filter types for either filter. The following modes are available for both filters:
| Mode | Meaning |
| LP | ‘Lowpass’ for removing frequencies above the cutoff |
| HP | ‘Highpass’ for removing frequencies below the cutoff |
| BP | ‘Bandpass’ for removing frequencies above and below a narrow band around the cutoff |
| BS | ‘Bandstop’ for removing frequencies within a narrow band (sometimes called a ‘notch’ filter) |
| AF | AF ‘Analog 1-4 pole’ inspired by the 4-pole lowpass ladder filter from the Minimoog tm. This mode is only available to Filter 1 |
The 'Analog' filter modes are available via the FILTER EDIT menu, or alternatively, you can use SHIFT+FILT1 MODE to select between Analog 1/2/3 or 4 pole. If you want to set it up as an accurate emulation of the Minimoog's filter, select Analog 4 pole mode, turn FILTER BALANCE to -64 and OSC VOLUME to +0.
Filt 1/2 Select
The FILT 1/2 SELECT buttons are used to determine which filters are affected by the RESONANCE and ENV AMOUNT knobs. Select either filter by pressing the corresponding button, or select both (default) by pressing the two buttons together.
When both are selected, any adjustments cause the target parameter of both filters to 'snap' to the same value, regardless of their previous setting.
Envelopes
The term 'envelope' is used to describe the parts of a synthesizer we use to shape the timbre and volume of a sound over time. The Virus TI has two envelopes, one for the Filter section and one for the Amplifier. They both behave in exactly the same way, and are therefore equipped with the same selection of knobs.
| Segment | Meaning |
| Attack | How fast the envelope opens when you first press the key |
| Decay | How fast the envelope closes to the Sustain level once the Attack phase has completed |
| Sustain | The level at which the envelope then remains until you release the key |
| Release | How long it takes for the envelope to close completely once you release the key |
A further parameter 'Sustain Slope' is also available to both envelopes by using SHIFT+SUSTAIN. At centre position (+0), this will have no effect on the sound. Positive values will cause the envelope level to rise back up to maximum once it reaches the Sustain phase. Negative values will cause the envelope to fall to zero once the Sustain level is reached.
Filter Envelope
Use the Filter Envelope to automatically control the cutoff frequency of one or both of the filters. For these parameters to have any audible effect, you must first set ENV AMOUNT and CUTOFF to suitable values. With the 'Tutorial 2' patch, turn the CUTOFF knob to 0 and ENV AMOUNT to 127.
Tip: If you want the Filter Envelope to sweep the cutoff in the opposite direction (i.e. Down>Up), enter the Filter Edit menu, and set the Env Polarity for both filters to Negative. You will probably have to find new values for Cutoff, as well as the Filter Envelope parameters, though! For some really interesting shapes, try setting one to Positive, and the other to Negative...
- Amplifier Envelope
Use the Amplifier Envelope to automatically control the volume of the sound. For a short, percussive sound try: ATTACK=0, DECAY=25, SUSTAIN=0, RELEASE=25. For a long, soft pad try: ATTACK=90, DECAY=XX*, SUSTAIN=127, RELEASE=70
Now try messing around with different shapes for both envelopes. Notice how the shape of either one can affect your perception of the other! Understanding how the envelopes behave is is a very important part of sound-design.
*Note that when Sustain=127 (max), the value for Decay is irrelevant.
Modulators Section
'Modulation' is the term used to describe a function which changes the value of another parameter over time. Specifically for this purpose, the Virus has 3 LFOs or 'Low Frequency Oscillators'. These are different from the oscillators used to generate the sound, as they operate at much lower speeds.
The LFOs have been designed to run at independent rates, or to slave to the overall tempo of the current patch or Multi. If they are set to Rate, then you can choose a value between 0 - 127, and if they are set to Clock, you can choose a divider setting, based on a whole bar of 4/4, whereby 1/4 represents a rate equivalent to quarter notes or crotchets.
Please select patch ROM B-122 'Tutorial 3' before continuing.
LFO 1/2/3 Select
Each LFO has its own SELECT button, which has two purposes: Firstly, it brings the RATE knob and the buttons on the top row to the focus of the selected LFO. Secondly, it allows direct access to the parameters assigned to the selected LFO via the VALUE knobs beneath the display - press SELECT repeatedly to cycle through the available options (watch the display!).
LFOs 1 and 2 can target several parameters at once by this method - once you have set the value of any parameter to anything other than +0 , the respective LED will light up to indicate that this parameter is being modulated.
LFO 3 can only target one parameter from the Assign Target list which you select with the VALUE 2 knob.
Listen carefully to the 'Tutorial 3' patch which uses all 3 LFOs, and see if you can hear all the modulations happening within it. By adjusting the RATE knob for each LFO, you should find it easier to hear what each one is doing.
(LFO) Edit
Press the (LFO) EDIT button to access parameters relevant to the selected LFO.
Env Mode
In some situations it can useful to have the LFO generate only a single cycle, which effectively makes it behave just like an envelope. Press ENV MODE to toggle between the normal, cyclic mode and Envelope (one-shot) Mode.
Shape
Press SHAPE repeatedly to cycle through the basic selection of waveforms for the selected LFO. 'WAVE' defaults to S&H (Sample & Hold) which generates random values, but you can also select from S&G (Sample & Glide) or any of the spectral waveforms in the EDIT menu.
Rate
The RATE knob affects the rate or speed of the selected LFO. You can adjust the rate continuously from 0-127, or you can use it to select clock divisions by first enabling Clock mode in the EDIT menu.
Please select patch ROM B-123 'Tutorial 4' before continuing
Matrix Section
The Modulation Matrix is a very powerful tool for adding movement and dynamics to a sound. It comprises 6 main slots, each of which can 'patch' a control source into 3 different parameters. This means you can have up to 18 different modulations happening all at once (not including those already assigned to the LFOs and Envelopes!) in a virtually unlimited number of configurations. Creative use of the Mod Matrix can make the difference between an average patch and something truly spectacular!
Mod Select
Press the MOD SELECT button repeatedly to move the focus of the VALUE knobs through Slots 1-6. Once you have selected the Slot, use the VALUE knobs as follows:
| Soft Knob | Parameter | Meaning |
| #1 | Source | Select the source of the modulation, i.e. Mod Wheel, Velocity, LFOs etc |
| #2 | Amount | Determine the depth of modulation - set either a positive or negative value |
| #3 | Destination | Select the parameter to be modulated |
Once a parameter is highlighted, you can use the VALUE buttons for fine adjustments.
The SLOT 1-6 LEDs illuminate once their respective Slot has been assigned a Source and a Destination, so you can easily see which ones are active.
Destination
Use the DESTINATION up/down buttons to move the focus of the VALUE knobs through each of the 3 routings within each Slot. If you continue to press the same direction, you will move on to the next Slot. You can also use the PARAMETER buttons to do this, if you prefer.
Note that the VALUE knobs are always focussed collectively on one row at a time.
Take a look at all the modulation routings used in patch 'Tutorial 4'. It uses a combination of realtime controllers like MIDI Note On Velocity and the Modulation Wheel, as well as assigning LFOs and the Filter Envelope to modulate different parameters. Experimenting with different Amount values for each should help to give you an idea of how powerful the Modulation Matrix is.
Arp Section
The Arpeggiator is used to create automatic arpeggios (broken chords) out of any notes you hold together. You can select from any one of 64 pre-defined rhythmic patterns, or even make one of your own (User) using the pattern editor in Virus Control.
- Arp On
Switches the Arpeggiator on/off.
(Arp) Edit
Press this to gain access to all parameters relevant to the Arpeggiator. Please note that most are unavailable when the Arpeggiator is switched off.
Effect Section
Effects are like the final icing on your cake of sound. The entire output of the sound-engine passes through the Effects section, where you can use several different FX types to take a basic sound and turn it into a production-ready epic.
- Select
Each row of effects has its own SELECT button. Press it repeatedly to move the focus of the adjacent knobs through the selection of effects in that same row.
Effects In Upper Row
| Effect | Meaning |
| Delay | An echo effect, in which you can control the amount of echo (SEND), the time between echoes (TIME) and how long the echoes take to fade out (FEEDBACK/DAMPING). A Tape Delay mode is also available - for details, please refer to the user manual. |
| Reverb | Simulates the reverberation of an acoustic space. You can set the amount of reverberation (SEND), the length (TIME) and the decay rate of high frequencies (FEEDBACK/DAMPING). |
| Low EQ | Attenuates (reduce) or boosts the amount of low frequency (bass) content in the sound by up to +/-16dB. Use EQ GAIN to set the desired level, and EQ FREQ to set the frequency below which the Gain is applied. |
| Mid EQ | Attenuates or boosts the amount of mid frequency content in the sound by up to +/-16dB. Use EQ GAIN to set the desired level and EQ FREQ to set the frequency above which the Gain is applied. Q determines the slope of the peak/cut. |
| High EQ | Attenuates or boosts the amount of high frequency (treble) content in the sound by up to +/-16dB. Use EQ GAIN to set the desired level and EQ FREQ to set the frequency above which the Gain is applied. |
Effects In Lower Row
| Effect | Meaning |
| Distortion | Allows you to distort or overdrive the sound in various ways. Use TYPE to select the distortion type, and INTENSITY to set the amount of distortion. |
| Character | Select from different Character presets to apply subtle changes to the tonal characteristics of the Virus TI's oscillators and filters. Some of the Character types are modelled on classic synthesizers, while others are specially created to achieve more radical effects. On certain Characters, you can use the TYPE/MIX and INTENSITY knobs to fine-tune the effect. For details on each of the Character types, please refer to the User Manual. |
| Chorus | Adds warmth and movement to the sound. Use TYPE/MIX to set the mix between the dry and chorused signals, and INTENSITY to set the level of Chorus Feedback. Adding feedback to a chorus effectively turns it into a flanger. |
| Phaser | Adds a psychedelic, sweeping movement to the sound for instant flower-power. Use TYPE/MIX to set the mix between the dry and phased signals, and INTENSITY to set the level of Phaser Feedback. |
| (Others) Ring Modulator | An extreme effect, great for creating wild, atonal sounds. Use the Mix parameter to determine the amount of ring modulation. When Mix = 0, there will be no ring modulation, when Mix = 64, the effect is equivalent to Amplitude Modulation (AM), and with Mix = 127, you will get full ring modulation. Use Stereo Phase to offset the phase of the left and right signals |
| (Other) Frequency Shifter | Use Mix to adjust the level of the Frequency Shifter, and Frequency to adjust the pitch of the sine wave. On the next page, use Shape L/R to choose the mix between the ‘sum’ and ‘difference’ frequencies for left and right separately. At centre position, the effect is the same as a Ring Modulator. Use Stereo Phase to offset the phase of the left and right signals |
| (Other) Input Ringmodulator | In this mode, the Virus will ring-modulate the oscillators with the signal from the L/R Inputs. Use Mix to set the balance between the signal from the Oscillators, the Inputs and the Ring Modulator effect |
| (Others) Vocoder | The Vocoder is used to modulate the sound of the oscillators with a band-filtered audio signal - usually to make it sound as though the notes you play are speaking. Please refer to the Vocoder chapter in the reference manual for details. |
| (Others) Input Follower | Allows you to modulate the cutoff of the filter by an incoming audio signal. Select the input channel with Input Select, and adjust Attach and Release until you get the desired effect. Please note that this effect replaces the Filter Envelope, and as such you need to set CUTOFF to a suitable value, and adjust ENV AMOUNT until you achieve the desired level of modulation. |
Utility Buttons
To the left of the display you will see 4 rows of buttons, most of which are used for administration purposes. Let's take a quick look at them, starting with the bottom row:
Shift
Press and hold the SHIFT button to switch the focus of the knobs and buttons to their secondary function, which is written in small type underneath the primary function. For instance, you can use SHIFT+NOISE VOLUME to adjust the level of the Ring Modulator.
Search
The Search function allows to you audition only those patches assigned to a particular category, e.g. Percussion, Lead, Bass, etc. Choose the category with the VALUE 1 knob, and then use the VALUE +/- buttons to step through all the patches in that category.
Store
Press STORE if you wish to save the current patch or Multi set-up. In Single mode, you have the option to save your patch to any of the RAM banks A-D. Once you have chosen the desired RAM bank and patch number, press STORE again to move along to the patch naming page. A fifth option 'Dump Single' allows you to transmit the patch as sysex information via MIDI OUT. Press Store to execute the Dump.
Once you are on the naming page, use the VALUE knobs to select the character for first step, then press PARAMETER > to move the focus to each consecutive step. Once you are happy with the name, press STORE once more to complete the process.
In Multi mode, you have three options:
- RAM Store the current Multi to one of 128 locations. If you have created custom patches for the Multi, you should choose one of the 'embedded' multi slots in locations 0-15 Dump Arrangement.
- Send the Multi as sysex information via MIDI OUT.
- Store Single Menu Store the patch on the selected Part to a location in the Single RAM banks.
Random Patch Generator
Press SHIFT+STORE if you wish to trigger the Random Patch Generator.
Undo
Press UNDO to undo the last edit you made. Press again to redo it. If you haven't made any edits to the currently selected patch, pressing UNDO will revert to the previously selected patch, including any edits you made to it before you accidentally changed patches.
Edit
Press EDIT to enter the Single Edit menu, where you will find many important parameters, such as Patch Volume, Panorama, Transpose, Unison mode, and many preset Velocity routings.
If you are in Multi mode, pressing EDIT will enter the Single Edit menu for the selected Part. If you wish to enter the Multi edit menu, you must press SHIFT+EDIT.
Config
Press CONFIG to enter the Configuration menu, where the global parameters are located. All hardware and system-related parameters are here, including MIDI communication options. Please refer to the User Manual if you need help with a specific parameter.
Exit
Press EXIT at any time to return to the Single or Multi page you were in. This button is the only way to get out of the Store menu without completing the Store process.
Tap
Use the TAP button to set the tempo of the current Single or Multi patch. Simply tap the button at the required tempo. Please bear in mind that this will not work if the TI is slaved to an external MIDI clock.
Transpose
To the left of the SHIFT button are the TRANSPOSE buttons. Use these to adjust the pitch up or down by up to 2 octaves.
About Virus Control Center
Virus Control Center helps you handle Virus TI data backups and allows you to overwrite the content of the ROM preset banks. It can also update your Virus TI to the latest OS version, although the Virus TI software suite installer usually takes care of this.
Backup and Restore
Backup and Restore allows you to write the entire memory content (including all RAM and ROM banks along with all multi patches) to one single file on your hard drive. To perform a backup, select the Backup and Restore tab, hit Backup and choose a filename and file location. Once that's done, confirm by clicking "OK". Depending on your Virus TI model, backing up the entire memory takes between 5 and 25 minutes. Restoring a backup file is equally simple. Switch to the Backup and Restore tab, hit Restore, select the file you wish to restore from and click "OK".
Burn To Flash
Burn To Flash allows you to overwrite the content of the ROM banks in your Virus TI. As you may have already noticed, the Virus TI memory has been expanded to 26 ROM banks and all the new ones are only filled with INIT sounds. All those unused banks are waiting to be filled using Burn To Flash. In order to transfer a bank of sounds to the ROM section you need to select a source bank first. The "Select source bank" menu shows exactly the same choice of banks you see in Virus Control.
Next you need to decide where you want to write the bank to. By clicking on the letters A-Z you select the target for the transfer, as well as see the present content of the bank to be overwritten. Once you made up your choice, hit "OK" and proceed from the top again in case you want to overwrite more banks in your Virus TI.
The user bank icon indicates which banks already have been overwritten in the past. To restore the original banks later, see "Advanced Menu" below.
Update OS
In most situations you will never need to manually install an OS update. The Software Suite installer automatically takes care of it. In the unlikely case that the firmware update wasn't successfully transferred you can use the Virus Control Center to manually install the firmware again. Since OS 2.7 your Virus shows an alert during boot up if the firmware wasn't successfully installed. To update your Virus TI operating system press "Start update"
About Polyphony
So, how many voices (notes) can you expect from the Virus TI at a time? The answer is that since the Virus TI sound engine is highly dynamic, the voice count can vary dramatically from one sound to the next, depending on which features are being used.
To help give you a rough idea of how many voices you can expect to achieve with your chosen patch, we have provided a patch complexity meter in the top right hand side of the display.
There are five levels of complexity, with level 1 being the least complex, and hence allowing for the highest voice-counts. Since it is too complex to explain all the different scenarios, we have provided the following three examples*:
*Please be aware that maximum polyphony can only be achieved when playing one Part at a time.
Level 1
Patches using e.g. 1 or 2 simple oscillators, one or two mod routings and one or two effects can achieve upwards of around 64 voices. With the very simplest of patches you can achieve far more than this - for example, please check out ROM B-124 'Tutorial 5', a nice, warm PWM pad with Delay and Chorus, capable of being played with more than 100 simultaneous voices.
Level 3
Patches using e.g. 3 simple oscillators, 3 or 4 mod routings and several effects can achieve upwards of around 40 voices.
Level 5
Patches using e.g. the Grain or Formant oscillators, several mod routings, lots of effects and the Analog 1-4 pole filter can achieve between about 20 - 28 voices.
Maximising Polyphony
The Virus TI has several features which are considerably more demanding of the available DSP power than others, and this can become apparent much more quickly in Multi Mode. If you find you are running out voices too quickly, you could take a closer look at the patches you are using, and seeing if they can be optimised in any way. The following features should be considered prime suspects in this situation:
- Unison Mode (Common Menu) - divides the voice count by the chosen value.
- Analog 1-4 pole (Filter Menu) - reduces polyphony by 50%
- Oscillator 3 (Osc1/2 Menu) – reduces polyphony by 25%
WavePWM or Grain /Formant Complex (Osc1/2 Menu) - reduce polyphony by 50%
Reverb - this is the most 'expensive' of all the effects, especially if used on more than one Part, so it can be advisable to try to avoid using it on more than one Part at a time. A delay will have far less impact on resources, and often be just as effective - alternatively, don't forget you can use external plug-in effects if you are using Total Integration.
Phaser - whilst not drastically expensive, it's worth bearing in mind that the more poles (Stages) you select, the more calculation power is used.
If you find your patch is making use of any of the above features, try alternatives to reduce the CPU load. Remember that a feature is active and consuming calculation power even when set to a very small value, so in certain cases it can be wise to switch something off rather than have something which is barely audible but still using up resources. For instance, if Osc Balance is set to -63, you will almost certainly be unable to hear Oscillator 2, so try turning it to -64, at which point Oscillator 2 will be switched off altogether, thereby freeing up resources. If an effect's Mix or Send parameter is set to Off or Dry, then it will not use any resources, so again, if a patch is using only tiny amounts of a particular effect, then it may be advisable to switch it off entirely.
The Virus also has to work a little harder when both filters are used. If you only need a gentle, 2-pole filter for a particular sound, then by turning Filter Balance fully left (-64) you switch off Filter 2, thereby freeing up some voices.
Another factor that can be easily overlooked is the length of release tails. These can cause the voice count to stack up much more quickly than you may think, and in an arrangement you can often reduce them a certain amount without having a detrimental effect to the overall mix.
Try not to use the mod matrix to apply an effect than be achieved by using one of the hard wired slots - e.g. if you want an LFO to modulate Cutoff 1, use the LFO2>Cutoff1 parameter, which is always on anyway; by using the mod matrix instead, you will be using unnecessary additional resources.
Some controller sources you may choose to apply in the mod matrix take more calculation power than others – this is because some have to be calculated per-voice, whereas some are only applied globally. For instance, the modulation wheel applies to all voices on a given part simultaneously, whereas Key Follow or Filter Envelope apply to each individual voice. If you are playing a polyphonic patch, this can make quite a difference, especially if you are using several different mod routings of this kind at the same time.
It is also advisable to switch off any redundant mod slots, i.e. don't just turn them down to zero, switch the source and/or destination parameters to Off.
Finally, remember that every single feature you can turn on and off can have an effect on the polyphony, even if it's only by a single voice, but sometimes you may only need to find yourself that one extra voice to achieve the result you desire, so think efficient!
Conclusion
So, there it is: the end of the quick start guide – we hope it has been of some use to you. If you don't feel ready to drive solo at this point, fear not, as you are not alone – there are resources available to you, should you run into any problems.
Please consult the support documents on your hard drive (they are installed as part of the TI software suite), where every feature is covered in fine detail.
Compliance and Warranty
FCC information (USA)
Important notice: Do not modify this unit. This product, when installed as indicated in the instructions contained in this manual, meets FCC requirements. Modifications not expressly approved by Kemper Digital GmbH may void your authority, granted by the FCC, to use this product.
When connecting this product to accessories and/or another product use only high quality shielded cables. Cables supplied with this product MUST be used. Follow all installation instructions. Failure to follow instructions could void your FCC authorisation to use this product in the USA.
NOTE: This product has been tested and found to comply with the requirements listed in FCC Regulations, Part 15 for Class „B“ digital devices. Compliance with these requirements provides a reasonable level of assurance that your use of this product in residential environment will not result in harmful interference with other electronic devices. This equipment generates/uses radio frequencies and, if not installed and used according to the instructions found in the user manual, may cause interference harmful to the operation of other electronic devices. Compliance with FCC regulations does not guarantee that interference will not occur in all installations. If this product is found to be the source of interference, which can be determined by turning the unit „OFF“ and „ON“, please try to eliminate the problem by using one of the following measures: Relocate either this product or the device that is being affected by the interference. Utilise power outlets that are on branch (Circuitbreaker or fuse) circuits or install AC line filter/s. In the case of radio or TV interference, relocate/reorient the antenna. If the antenna lead-in is 300 ohm ribbon lead, change the lead- in to coaxial type cable. If these corrective measures do not produce satisfactory results, please contact the local retailer authorised to distribute this type of product. The statements above apply ONLY to products distributed in the USA.
FCC information (Canada)
The digital section of this apparatus does not exceed the „Class B“ limits for radio noise emmissions from digital apparatus set out in the radio interference regulation of the Canadian Department of Communications. This only applies to products distributed in Canada.
Other standards (rest of world)
This product complies with the radio frequency interference requirements of the Council Directive 89/336/EC.
Declaration of conformity
This device is designed exclusively for generating low frequency audio signals. Any other use is not permitted, and automatically invalidates the warranty supplied by Kemper Digital GmbH. The following devices Virus TI is hereby declared to conform with the requirements of Council Directive 89/336/FWG for radio frequency interference. They also comply with regulations dated August 30th, 1995 concerning radio interference generated by electronic devices. The following standards have been applied: EM 50 082-1 : 1992, EN 50 081-1 : 1992, EN60065 : 1993 This declaration has been given responsibly on behalf of the manufacturer: Kemper Digital GmbH, Recklinghausen, Germany.
Warranty regulations
The Kemper Digital GmbH warranty covers all defects in material and workmanship for a period of 24 months from the date of original purchase. This warranty does not cover defects due to abuse, faulty connections or operation under other than specified conditions. Warranty coverage is also voided when the device is repaired by unauthorized persons or tampered with in any way. Kemper Digital reserves the right to refuse warranty claims, if the product was not sold from an Authorised Base Dealer to the respective end-customer. This warranty is limited to replacement or repair of the product. It does not limit the customers' rights according to the current product liability regulations of the country where the product was purchased. The warranty is only valid, if a completely filled in warranty card, including serial no., date of sale, company stamp, signature of the Authorised Base Dealer, as well as name and address of the customer is returned to the address given below. If a defect occurs during the warranty period, contact the Autorised Base Dealer from whom you bought the synthesizer or write an email to info@kemper-digital.com. The synthesizer can only be returned upon prior approval and the following requirements have to be fulfilled:
- The unit is sent in its original package or one of equal quality.
- A detailed description of the defect and a copy of the purchase receipt is included.

Other standards (rest of world)
Declaration of conformity
Warranty regulations
support@access-music.de
Introduccion
Bienvenido/a
- Oscillator Balance
- Sub Oscillator Volume
Important notice: Do not modify this unit. This product, when installed as indicated in the instructions contained in this manual, meets FCC requirements. Modifications not expressly approved by Kemper Digital GmbH may void your authority, granted by the FCC, to use this product.
When connecting this product to accessories and/or another product use only high quality shielded cables. Cables supplied with this product MUST be used. Follow all installation instructions. Failure to follow instructions could void your FCC authorisation to use this product in the USA.
NOTE: This product has been tested and found to comply with the requirements listed in FCC Regulations, Part 15 for Class „B“ digital devices. Compliance with these requirements provides a reasonable level of assurance that your use of this product in residential environment will not result in harmful interference with other electronic devices. This equipment generates/uses radio frequencies and, if not installed and used according to the instructions found in the user manual, may cause interference harmful to the operation of other electronic devices. Compliance with FCC regulations does not guarantee that interference will not occur in all installations. If this product is found to be the source of interference, which can be determined by turning the unit „OFF“ and „ON“, please try to eliminate the problem by using one of the following measures: Relocate either this product or the device that is being affected by the interference. Utilise power outlets that are on branch (Circuitbreaker or fuse) circuits or install AC line filter/s. In the case of radio or TV interference, relocate/reorient the antenna. If the antenna lead-in is 300 ohm ribbon lead, change the lead- in to coaxial type cable. If these corrective measures do not produce satisfactory results, please contact the local retailer authorised to distribute this type of product. The statements above apply ONLY to products distributed in the USA.
FCC information (Canada)
The digital section of this apparatus does not exceed the „Class B“ limits for radio noise emmissions from digital apparatus set out in the radio interference regulation of the Canadian Department of Communications. This only applies to products distributed in Canada.
Other standards (rest of world)
This product complies with the radio frequency interference requirements of the Council Directive 89/336/EC.
Declaration of conformity
This device is designed exclusively for generating low frequency audio signals. Any other use is not permitted, and automatically invalidates the warranty supplied by Kemper Digital GmbH. The following devices Virus TI Snow is hereby declared to conform with the requirements of Council Directive 89/336/FWG for radio frequency interference. They also comply with regulations dated August 30th, 1995 concerning radio interference generated by electronic devices. The following standards have been applied: EM 50 082-1 : 1992 , EN 50 081-1 : 1992 , EN60065 : 1993 This declaration has been given responsibly on behalf of the manufacturer: Kemper Digital GmbH, Recklinghausen, Germany.
Warranty regulations
The Kemper Digital GmbH warranty covers all defects in material and workmanship for a period of 24 months from the date of original purchase. This warranty does not cover defects due to abuse, faulty connections or operation under other than specified conditions. Warranty coverage is also voided when the device is repaired by unauthorized persons or tampered with in any way. Kemper Digital reserves the right to refuse warranty claims, if the product was not sold from an Authorised Base Dealer to the respective end-customer. This warranty is limited to replacement or repair of the product. It does not limit the customers' rights according to the current product liability regulations of the country where the product was purchased. The warranty is only valid, if a completely filled in warranty card, including serial no., date of sale, company stamp, signature of the Authorised Base Dealer, as well as name and address of the customer is returned to the address given below. If a defect occurs during the warranty period, contact the Autorised Base Dealer from whom you bought the synthesizer or write an email to info@kemper-digital.com. The synthesizer can only be returned upon prior approval and the following requirements have to be fulfilled:
- The unit is sent in its original package or one of equal quality.
- A detailed description of the defect and a copy of the purchase receipt is included.
Tap Tempo / Panic-Taster
Preset Sounds
Other standards (rest of world)
Warranty regulations
Rechtliche Hinweise
support@access-music.de
Einleitung
Willkommen
Tap Tempo / Panic-Taster
- Tap Tempo
- Oscillator Balance
- Sub Oscillator Volume
Important notice: Do not modify this unit. This product, when installed as indicated in the instructions contained in this manual, meets FCC requirements. Modifications not expressly approved by Kemper Digital GmbH may void your authority, granted by the FCC, to use this product.
Important: When connecting this product to accessories and/or another product use only high quality shielded cables. Cables supplied with this product MUST be used. Follow all installation instructions. Failure to follow instructions could void your FCC authorisation to use this product in the USA.
Note: This product has been tested and found to comply with the requirements listed in FCC Regulations, Part 15 for Class „B“ digital devices. Compliance with these requirements provides a reasonable level of assurance that your use of this product in residential environment will not result in harmful interference with other electronic devices. This equipment generates/uses radio frequencies and, if not installed and used according to the instructions found in the user manual, may cause interference harmful to the operation of other electronic devices. Compliance with FCC regulations does not guarantee that interference will not occur in all installations. If this product is found to be the source of interference, which can be determined by turning the unit „OFF“ and „ON“, please try to eliminate the problem by using one of the following measures: Relocate either this product or the device that is being affected by the interference. Utilise power outlets that are on branch (Circuitbreaker or fuse) circuits or install AC line filter/s. In the case of radio or TV interference, relocate/reorient the antenna. If the antenna lead-in is 300 ohm ribbon lead, change the lead- in to coaxial-type cable. If these corrective measures do not produce satisfactory results, please contact the local retailer authorised to distribute this type of product. The statements above apply ONLY to products distributed in the USA.
FCC information (Canada)
The digital section of this apparatus does not exceed the „Class B“ limits for radio noise emmissions from digital apparatus set out in the radio interference regulation of the Canadian Department of Communications. This only applies to products distributed in Canada.
Other standards (rest of world)
This product complies with the radio frequency interference requirements of the Council Directive 89/336/EC.
Warranty regulations
The Kemper Digital GmbH warranty covers all defects in material and workmanship for a period of 24 months from the date of original purchase. This warranty does not cover defects due to abuse, faulty connections or operation under other than specified conditions. Warranty coverage is also voided when the device is repaired by unauthorized persons or tampered with in any way. Kemper Digital reserves the right to refuse warranty claims, if the product was not sold from an Authorised Base Dealer to the respective end-customer. This warranty is limited to replacement or repair of the product. It does not limit the customers' rights according to the current product liability regulations of the country where the product was purchased. The warranty is only valid, if a completely filled in warranty card, including serial no., date of sale, company stamp, signature of the Authorised Base Dealer, as well as name and address of the customer is returned to the address given below. If a defect occurs during the warranty period, contact the Autorised Base Dealer from whom you bought the synthesizer or write an email to info@kemper-digital.com. The synthesizer can only be returned upon prior approval and the following requirements have to be fulfilled:
- The unit is sent in its original package or one of equal quality.
- A detailed description of the defect and a copy of the purchase receipt is included.
Other standards (rest of world)
Declaration of conformity
Warranty regulations
139 Introduction
Bienvenue
Sain et Sauf
Maintenance
Où trouver...
Que Signifie Total Integration?
Logiciel Hôte
147 Modus Operandi
Bouton Mode/Exit
Bouton Tap Tempo/Panic
Les Presets
Creer Vos Propres Sons
Patches - Tutorial
FCC information (USA)
FCC information (Canada)
Other standards (rest of world)
Declaration of conformity
Warranty regulations
Informations
support@access-music.de
Introduction
Bienvenue
Que Signifie Total Integration?
- Oscillator Balance
- Sub Oscillator Volume
Important notice: Do not modify this unit. This product, when installed as indicated in the instructions contained in this manual, meets FCC requirements. Modifications not expressly approved by Kemper Digital GmbH may void your authority, granted by the FCC, to use this product.
When connecting this product to accessories and/or another product use only high quality shielded cables. Cables supplied with this product MUST be used. Follow all installation instructions. Failure to follow instructions could void your FCC authorisation to use this product in the USA.
NOTE: This product has been tested and found to comply with the requirements listed in FCC Regulations, Part 15 for Class „B“ digital devices. Compliance with these requirements provides a reasonable level of assurance that your use of this product in residential environment will not result in harmful interference with other electronic devices. This equipment generates/uses radio frequencies and, if not installed and used according to the instructions found in the user manual, may cause interference harmful to the operation of other electronic devices, Compliance with FCC regulations does not guarantee that interference will not occur in all installations. If this product is found to be the source of interference, which can be determinated by turning the unit „OFF“ and „ON“, please try to eliminate the problem by using one of the following measures: Relocate either this product or the device that is being affected by the interference. Utilise power outlets that are on branch (Circuitbreaker or fuse) circuits or install AC line filter/s. In the case of radio or TV interference, relocate/reorient the antenna. If the antenna lead-in is 300 ohm ribbon lead, change the lead- in to coaxial type cable. If these corrective measures do not produce satisfactory results, please contact the local retailer authorised to distribute this type of product. The statements above apply ONLY to products distributed in the USA.
FCC information (Canada)
The digital section of this apparatus does not exceed the „Class B“ limits for radio noise emmissions from digital apparatus set out in the radio interference regulation of the Canadian Department of Communications. This only applies to products distributed in Canada.
Other standards (rest of world)
This product complies with the radio frequency interference requirements of the Council Directive 89/336/EC.
Declaration of conformity
This device is designed exclusively for generating low frequency audio signals. Any other use is not permitted, and automatically invalidates the warranty supplied by Kemper Digital GmbH. The following devices Virus TI is hereby declared to conform with the requirements of Council Directive 89/336/FWG for radio frequency interference. They also comply with regulations dated August 30th, 1995 concerning radio interference generated by electronic devices. The following standards have been applied: EM 50 082-1 : 1992, EN 50 081-1 : 1992, EN60065 : 1993 This declaration has been given responsibly on behalf of the manufacturer: Kemper Digital GmbH, Recklinghausen, Germany.
Warranty regulations
The Kemper Digital GmbH warranty covers all defects in material and workmanship for a period of 24 months from the date of original purchase. This warranty does not cover defects due to abuse, faulty connections or operation under other than specified conditions. Warranty coverage is also voided when the device is repaired by unauthorized persons or tampered with in any way. Kemper Digital reserves the right to refuse warranty claims, if the product was not sold from an Authorised Base Dealer to the respective end-customer. This warranty is limited to replacement or repair of the product. It does not limit the customers' rights according to the current product liability regulations of the country where the product was purchased. The warranty is only valid, if a completely filled in warranty card, including serial no., date of sale, company stamp, signature of the Authorised Base Dealer, as well as name and address of the customer is returned to the address given below. If a defect occurs during the warranty period, contact the Autorised Base Dealer from whom you bought the synthesizer or write an email to info@kemper-digital.com. The synthesizer can only be returned upon prior approval and the following requirements have to be fulfilled:
- The unit is sent in its original package or one of equal quality.
- A detailed description of the defect and a copy of the purchase receipt is included.

Enjoy making tunes :)
- Basic Operation
- Choose Your Weapon
- Modes Of Operation
- Parameter Overview
- Utility Buttons
- About Virus Control Center
- About Polyphony
- Compliance and Warranty
- Legal Notice
- Introduction
- Welcome
- Health and Safety
- Maintenance
- - Updating the OS
- - Cleaning
- Repair
- Where do I find …
- How to get customer support?
- Basic Operation
- Power On/Off
- Connect it to your other equipment
- USB
- MIDI
- Audio I/O
- - Outputs
- Inputs
- Choose Your Weapon
- Virus Control vs MIDI?
- What Is Total Integration?
- Host Software
- Modes Of Operation
- Mode / Exit Button
- - Single Mode
- Multi Mode
- - Sequencer Mode
- - Exit
- Tap Tempo / Panic Button
- - Tap Tempo
- - Panic (OSC MONO + OSC SYNC)
- Preset Sounds
- - RAM/ROM?
- - Selecting Single Presets
- - Selecting Multi Presets
- Making Your Own Sounds
- Tutorial Patches
- Parameter Overview
- Oscillator Section
- Shape
- Wave Select / PW
- - Semitone
- - Detune 2/3
- FM Amount
- - OSC3 On
- Mono
- Sync
- Mixer Section
- Oscillator Balance
- Sub Oscillator Volume
- Status LED
- Osc Volume
- - Noise Volume
- Filter Section
- Cutoff
- - Resonance
- - Env Amount (Filter 1 and 2 Envelope Amount)
- Filter Balance
- - (Filter) Edit
- Cutoff 2
- - Filt 1/2 Mode
- Filt 1/2 Select
- Envelopes
- Filter Envelope
- - Amplifier Envelope
- Modulators Section
- LFO 1/2/3 Select
- (LFO) Edit
- Env Mode
- Rate
- Matrix Section
- Mod Select
- Destination
- Arp Section
- - Arp On
- (Arp) Edit
- Effect Section
- - Select
- Effects In Upper Row
- Utility Buttons
- Shift
- Search
- Store
- Random Patch Generator
- Undo
- Edit
- Config
- Exit
- Tap
- Transpose
- About Virus Control Center
- Backup and Restore
- Burn To Flash
- Update OS
- About Polyphony
- Level 1
- Level 3
- Level 5
- Maximising Polyphony
- Conclusion
- Compliance and Warranty
- FCC information (USA)
- FCC information (Canada)
- Other standards (rest of world)
- Declaration of conformity
- Warranty regulations
- Introduccion
- Bienvenido/a
- - Oscillator Balance
- - Sub Oscillator Volume
- Rechtliche Hinweise
- Einleitung
- Willkommen
- Tap Tempo / Panic-Taster
- Introduction
- Modus Operandi
- Informations
- Bienvenue
- Que Signifie Total Integration?
Brand : ACCESS
Model : VIRUS TI
Category : Synthesizer