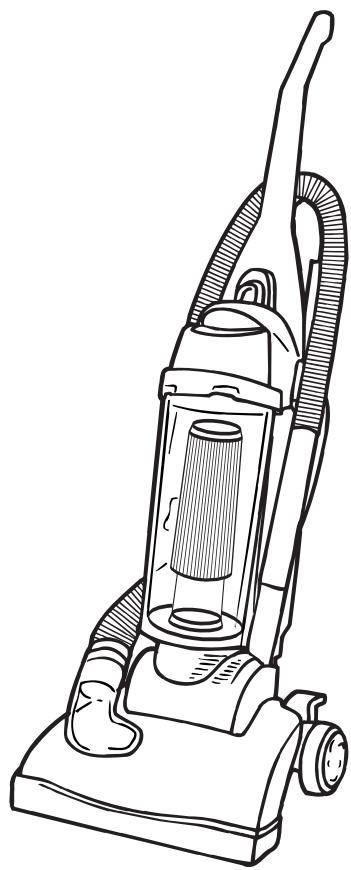
M085845RDI - Vacuum Cleaner DIRT DEVIL - Free user manual and instructions
Find the device manual for free M085845RDI DIRT DEVIL in PDF.


User questions about M085845RDI DIRT DEVIL
0 question about this device. Answer the ones you know or ask your own.
Ask a new question about this device
Download the instructions for your Vacuum Cleaner in PDF format for free! Find your manual M085845RDI - DIRT DEVIL and take your electronic device back in hand. On this page are published all the documents necessary for the use of your device. M085845RDI by DIRT DEVIL.
USER MANUAL M085845RDI DIRT DEVIL
- Please read these instructions carefully before using your Upright.
- Let us help you put your vacuum together or answer any questions, call:
1-800-321-1134
(USA & Canada)
www.dirtdevil.com
Warranty Registration
Online at: www.dirtdevil.com
Mail: Royal Appliance Mfg 7005 Cochran Rd.
Glenwillow, Ohio 44139
WARNING:
Cleaner assembly may include small parts. Small parts can present a choking hazard.
For quick reference, please record your vacuum information below.
Model #:
Mfg. Code:
(Mfg. code located on the lower backside of cleaner)
IMPORTANT SAFETY INSTRUCTIONS
When you use an appliance, basic precautions should always be followed, including the following:
- READ ALL INSTRUCTIONS BEFORE USING THE APPLIANCE.
- ALWAYS FOLLOW THESE SAFETY INSTRUCTIONS.
- BRING VACUUM CLEANER TO UPRIGHT POSITION WHEN USING THE HOSE AND ATTACHMENTS.
- DO NOT LEAVE VACUUM CLEANER UNATTENDED WHEN PLUGGED IN.
- REGULARLY CHECK THE FILTER TO CLEAN OR REPLACE.
WARNING: DO NOT USE SHARP OBJECTS TO CLEAN OUT THE HOSE SINCE THEY COULD CAUSE DAMAGE. - OCCAsIONALLY REMOVE BRUSH AND CLEAN DEBRIS FROM END CAPS TO KEEP BRUSH ROTATING SMOOTHLY.
- WARNING: THE CORDS, WIRES, AND/OR CABLES SUPPLIED WITH THIS PRODUCT CONTAINS CHEMICALS, INCLUDING LEAD OR LEAD COMPOUNDS, KNOWN TO THE STATE OF CALIFORNIA TO CAUSE CANCER AND BIRTH DEFECTS OR OTHER REPRODUCTIVE HARM. WASH HANDS AFTER USING.
WARNING: TO REDUCE THE RISK OF FIRE, ELECTRIC SHOCK OR INJURY:
- Do not leave appliance when plugged in. Unplug from outlet when not in use and before servicing.
- Do not use outdoors or on wet surfaces. Electrical shock could occur.
- Do not allow to be used as a toy. Close attention is necessary when used by or near children.
- Use only as described in this manual. Use only manufacturer's recommended attachments.
- Do not use with damaged cord or plug. If appliance is not working as it should, has been dropped, damaged, left outdoors, or dropped into water, return it to a service center for inspection. Call 1-800-321-1134 for the nearest service center.
- Do not pull or carry by cord, use cord as handle, close a door on cord, or pull cord around sharp edges or corners. Do not run appliance over cord. Keep cord away from heated surfaces.
- Do not unplug by pulling on cord. To unplug, grasp the plug, not the cord.
- Do not handle plug or appliance with wet hands.
- Do not put any objects into openings. Do not use with any opening blocked; keep free of dust, lint, hair, and anything that may reduce air flow.
- Keep hair, loose clothing, fingers, and all parts of body away from openings and moving parts.
-
Do not pick up anything that is burning or smoking, such as cigarettes, matches, or hot ashes.
-
Do not use without dirt container and filters in place.
- Turn off all controls before unplugging.
- Use extra care when cleaning on stairs.
- Do not use to pick up flammable or combustible liquids, such as gasoline, or use in areas where they may be present.
- Keep the vacuum cleaner on the floor. Only the hand-held vacuum cleaners may be set on furniture.
- Vacuum cleaner must be in the upright position to lift the rotating brush off the carpet when doing above floor cleaning.
- Do not use an extension cord with this vacuum cleaner.
- Store the vacuum cleaner indoors. Put the vacuum cleaner away after use to prevent tripping accidents.
- Using improper voltage may result in damage to the motor and possible injury to the user. Proper voltage is listed on the cleaner plate.
- Unplug before connecting *Power Brush Tool.
*NOT AVAILABLE ON ALL MODELS
SAVE THESE INSTRUCTIONS
WARNING:
To reduce the risk of electric shock, this appliance has a polarized plug (one blade is wider than the other). This plug will fit in a polarized outlet only one way. If the plug does not fit fully in the outlet, reverse the plug. If it still does not fit, contact a qualified electrician to install the proper outlet. Do not change the plug in any way.
Your cleaner contains a thermal protective device to shut off the motor to avoid overheating. If this happens, turn switch off and unplug the cleaner. Inspect the exhaust, inlet, and filters for any blockage. Empty the dirt container and clean filters. After approximately 30 minutes the motor will have cooled and the vacuum will be ready to use. NOTE: the cleaner must remain unplugged during the 30 minute cooling period.
CONGRATULATIONS
You are now the proud owner of the Dirt Devil®. We trust your new purchase will bring you many years of satisfaction.
Our company has designed and developed this product with you in mind.
We are very proud of our products and hope that you are equally satisfied with their quality and performance.
Thank you for your support of Dirt Devil® products.
Visit our website at www.dirtdevil.com
TABLE OF CONTENTS
Safety Instructions. Page 2, 3
Features. Page 5
How to Assemble. Page 6
Body to Nozzle. Page 6
Tool Caddy. Page 6
Handle to Body . 6
How To Operate. Page 7, 8
Floor/Carpet Cleaning Page 7
Above Floor Cleaning. Page 8
Dirt Container & Filter: Removal & Replacement. Page 9
Belt or Brushroll: Removal & Replacement. Page 10
Lightbulb: Removal & Replacement . Page 11
General Maintenance. Page 11
Troubleshooting Guide Page 12
LIMITED WARRANTY
To the consumer, Royal Appliance Mfg. Co. warrants this vacuum cleaner to be free of defects in material or workmanship commencing upon the date of the original purchase. Refer to your vacuum cleaner carton for the length of warranty and save your original sales receipt to validate start of warranty period.
If the vacuum cleaner should become defective within the warranty period, we will repair or replace any defective parts free of charge. The complete machine must be delivered prepaid to any ROYAL® Authorized Sales & Warranty Service Station. Please include complete description of the problem, day of purchase, copy of original sales receipt and your name, address and telephone number. If you are not near a Warranty Station, call the factory for assistance at USA & Canada: 1-800-321-1134. Use only genuine Royal® replacement parts.
The warranty does not include unusual wear, damage resulting from accident or unreasonable use of the vacuum cleaner. This warranty does not cover brushes, bags, flat belts, filters and bulbs. This warranty does not cover unauthorized repairs. This warranty gives you specific legal rights and you may also have other rights (Other rights may vary from state to state in the USA).
IMPORTANT: USE ONLY GENUINE ROYAL® REPLACEMENT PARTS.
NOTE: TO REGISTER YOUR PRODUCT, RETURN YOUR WARRANTY CARD OR REGISTER ONLINE AT WWW.DIRTDEVIL.COM.
FEATURES
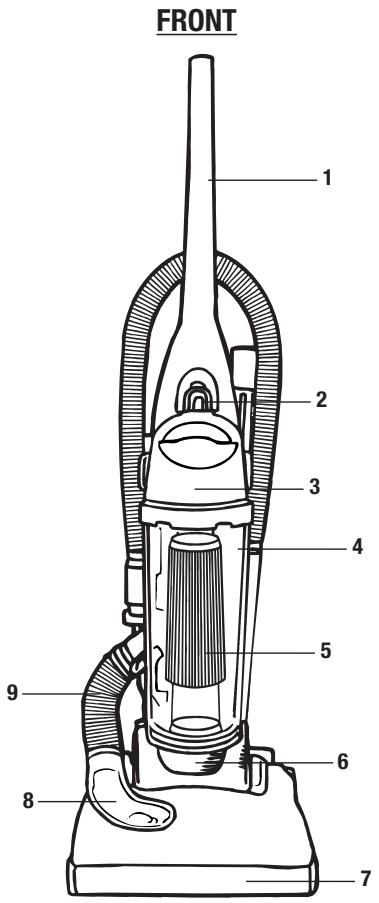
FRONT
- Handle
- Dirt Container Release Latch
- Dirt Container Lid
- See Through Dirt Container
- Dirt Container Filter
- Headlight
- Bumper
- Clear Dirt Window
- Lower Hose
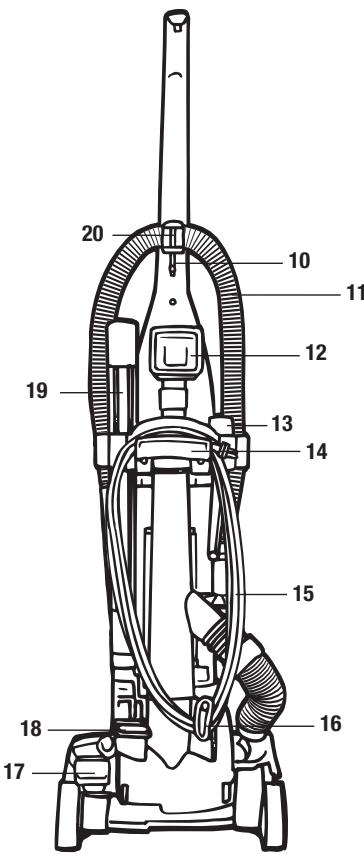
BACK
BACK
- Cord Guide
- Hose
- 2-in-1 Tool-Dust Brush / Upholstery Tool
- Crevice Tool
- Carrying Handle/Upper Cord Wrap
- Long Power Cord
- Cord Wrap with Quick Cord Release
- Handle Release Pedal
- On/Off Pedal
- Extension Wand
- Hose Clip
HOW TO ASSEMBLE
TOOL REQUIRED: PHILLIPS OR FLAT HEAD SCREWDRIVER
BODY TO NOZZLE
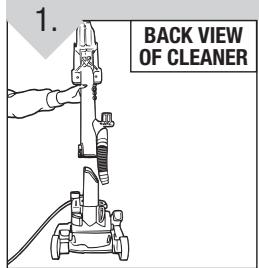
Assemble the body to the base so that the lower hose is on the right side.
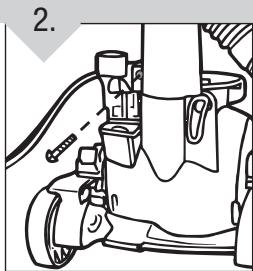
To secure, insert one (1) screw into the back of the cleaner, above the on/off switch.
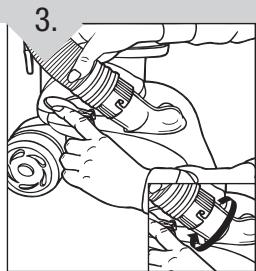
Push back dirt window flap. Align tabs on clear dirt passage window with the slots on the lower hose cuff. Push and turn to lock into place (inset).
TOOL CADDY ASSEMBLY
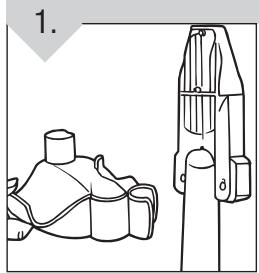
Align screw holes on bottom of Tool Caddy with screw holes on body.
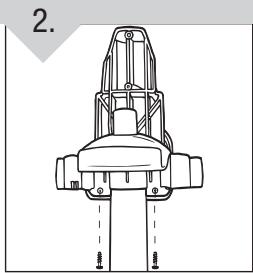
Insert two (2) screws into the holes and tighten until secure.
HANDLE TO BODY
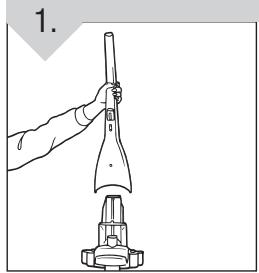
Place upper handle onto upright.
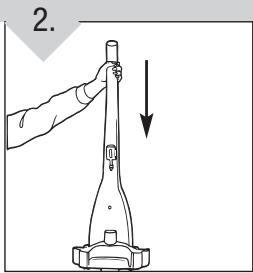
Push upper handle down onto upright.
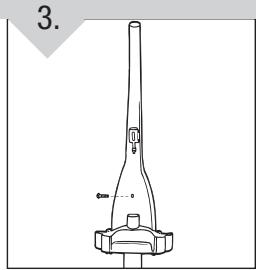
Insert one (1) screw (supplied) into the back of the cleaner to secure handle.
HOW TO OPERATE
HOSE ASSEMBLY
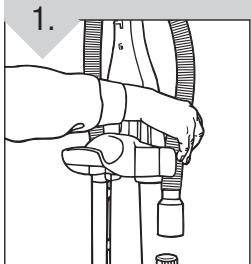
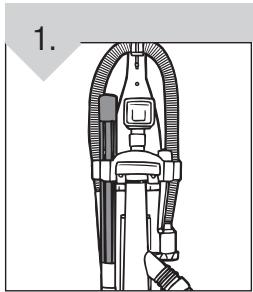
Insert the short end of the hose onto the tool caddy holder on the right side.
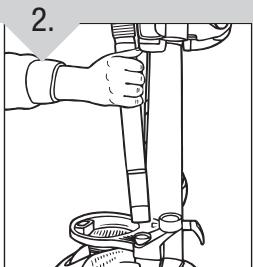
Insert hose handle into the left side of the cleaner. Press down firmly. Press hose into top and sides of tool caddy.
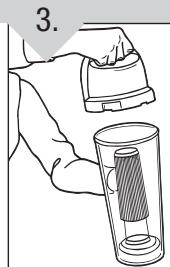
Assemble dirt container lid to the dirt cup.
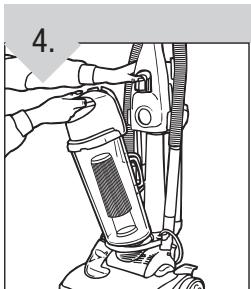
Tip bottom of dirt container into cleaner and push forward. Dirt cup lid will snap into handle.
TOOL STORAGE
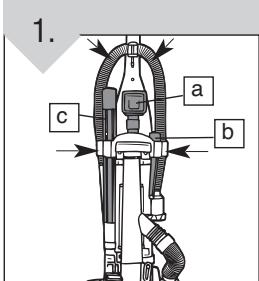
Attach tools: (a) Slide the 2-in-1 tool onto post on the back panel. (b) Slide the crevice tool into round slot on right side of tool caddy. (c) Slide the extension wand into round slot on left side of tool caddy.
ON/OFF PEDAL
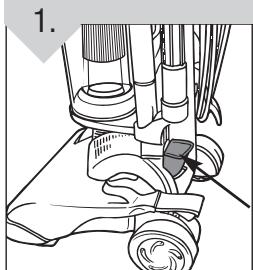
Plug cord into electrical outlet. Turn cleaner on by depressing foot pedal located on the back left side of the cleaner.
HANDLE RELEASE PEDAL
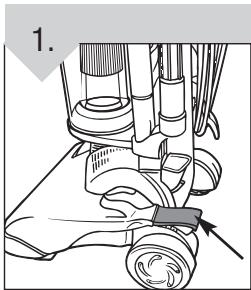
To release the handle, push the handle release pedal located on the lower left side of the cleaner.
CORD RELEASE
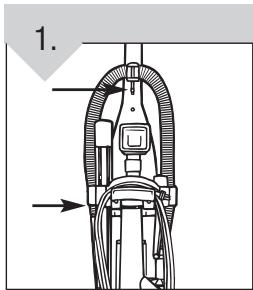
Use the cord guides to store the cord out of the way while vacuuming.
FLOOR/CARPET CLEANING
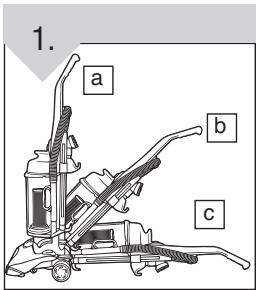
Move the handle and adjust it to the desired position for (a) storing the upright, (b) operating the cleaner, and (c) de-press the handle release pedal again to clean under furniture.
HOW TO OPERATE: CONTINUED
CAUTION: Brush agitator continues to rotate while hose is removed or in use and at all times while cleaner is on. Keep hair, loose clothing, fingers, and all parts of body away from brush area while cleaner is on. Cleaner must be in the upright position to lift the rotation brush off the carpet when cleaning above the floor.
ABOVE FLOOR CLEANING
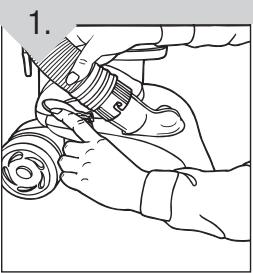
Cleaner must be in its upright position. Remove lower hose from the side of the cleaner by twisting to the right and then pull off.
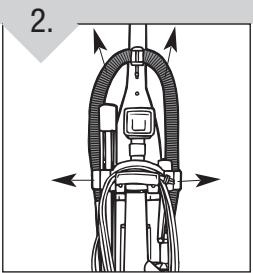
Remove the hose from the tool caddy.

Slide the tool hose into the lower dirt hose with the notch facing up. Push together and twist to secure.
Choose any of the handy accessories or use the hose alone. Simply push the attachment firmly onto the end of the wand or hose handle. To remove tool, twist and pull apart gently.
EXTENSION WAND
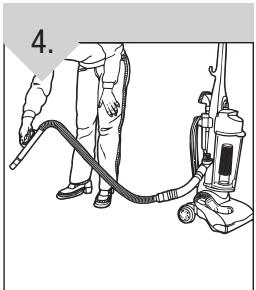
If additional length is needed, use the extension wand.
CARRY HANDLE
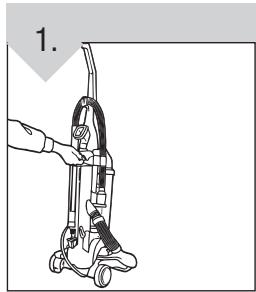
Use the carry handle on the back of the cleaner to move the cleaner from room to room.
DIRT CONTAINER & FILTER: REMOVAL & REPLACEMENT
WARNING: TO REDUCE THE RISK OF INJURY FROM MOVING PARTS - UNPLUG BEFORE SERVICING.
NOTE: Unplug cleaner before changing filter.
NOTE: For best performance, replace pleated filter yearly.


For F1 filter replacement, please visit our website at www.dirtdevil.com to buy online or call customer service at 1-800-321-1134.
EMPTY AND CLEAN DIRT CONTAINER
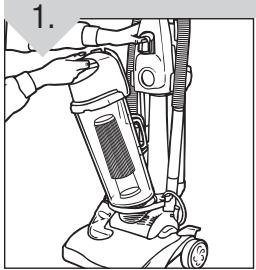
Depress latch to remove dirt container from cleaner.
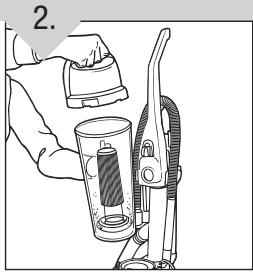
Remove lid by grasping both handles and turning lid counterclockwise.
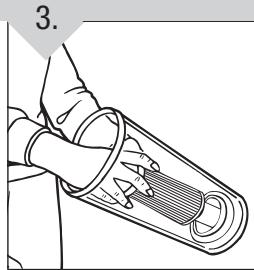
Hold the dirt container and grasp the top of filter.
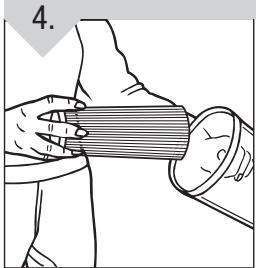
Twist and pull the filter up and out.
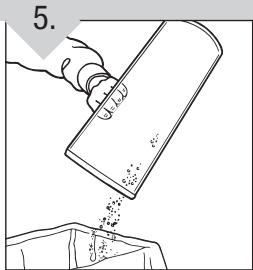
Clean filter and empty dirt container completely. See "Regular Maintenance" note below for instructions on cleaning the filter.
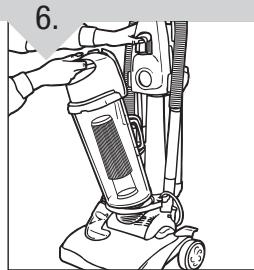
Return filter to dirt container. Push filter into place to prevent dirt leakage. Return dirt container to cleaner.
*Regular Maintenance: Each time the dirt container is emptied, the pleated filter should be cleaned. Tap the filter firmly against the inside of a trash can until the dirt stops falling from the filter. (Filter will be discolored after use, this will not affect the filter's performance.) Do not brush the filter. The cleaning instructions may vary depending on the dirt conditions. In some cases, more or less cleaning of the filter may be required. It is recommended that the filter be replaced once per year.
BELT OR BRUSHROLL: REMOVAL & REPLACEMENT
TOOL REQUIRED: PHILLIPS OR FLATHEAD SCREWDRIVER
WARNING: TO REDUCE THE RISK OF INJURY FROM MOVING PARTS - UNPLUG BEFORE CHANGING BELT OR BRUSHROLL.

For Belt Style 5 replacements, please visit our website at www.dirtdevil.com to buy online or call customer service at 1-800-321-1134.
TO REMOVE BELT
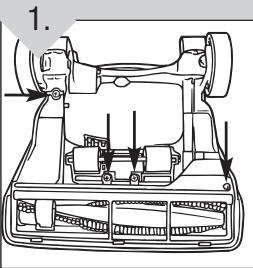
Lay cleaner flat and flip cleaner to expose nozzle base. Base should lay flat and face up. To remove nozzle guard, use Phillips screwdriver to remove the four (4) screws. Arrows show location of screws.
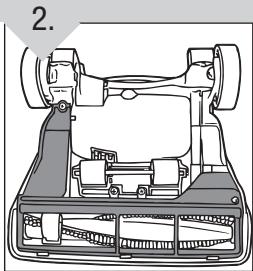
Lift nozzle guard off.
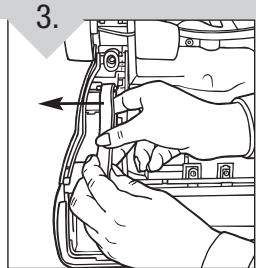
Slide belt off motor shaft.
TO REPLACE BELT OR BRUSHROLL
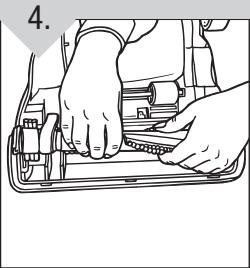
Lift and remove brushroll. Dispose of old belt.
Place new belt in area of brushroll without bristles.
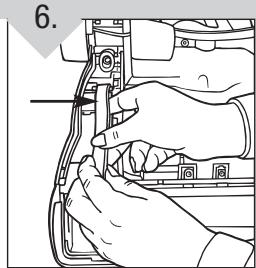
Slide belt onto motorshaft.
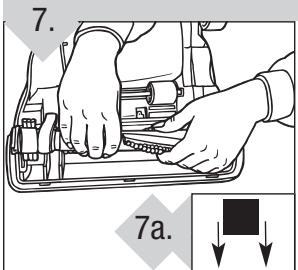
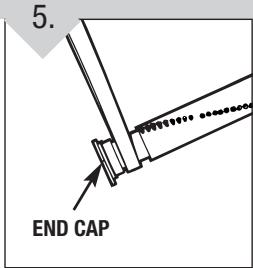
With new belt in place, pull and slide brushroll into nozzle making sure that the brushroll end caps are in the correct orientation (7a inset). Rotate brushroll manually to make sure belt is properly aligned.
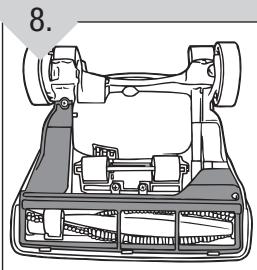
Reattach nozzle guard.
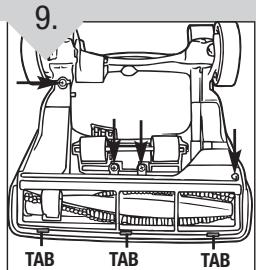
Secure by aligning the three (3) tabs in the base slots. Be sure to replace all four (4) screws.
LIGHTBULB: REMOVAL & REPLACEMENT
TOOL REQUIRED:PHILLIPS OR FLATHEAD SCREWDRIVER
WARNING: TO REDUCE THE RISK OF ELECTRIC SHOCK - UNPLUG CLEANER BEFORE REMOVOING OR REPLACING LIGHTBULB.
This cleaner uses a common automotive lamp #906, 13.0 volts. For bulb replacement, please visit our website at www.dirtdevil.com to buy online or locate a dealer nearest you.
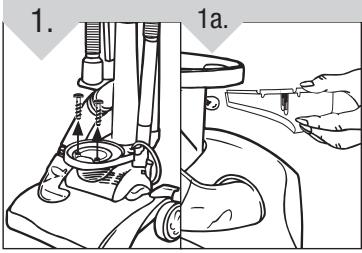
Depress latch to remove dirt container from cleaner. Remove the two (2) screws located on the inside of the (Diagram 1). Remove lens (Diagram 1a).
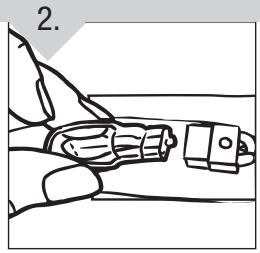
Pull bulb out of socket to remove. Do NOT twist. Gently push new bulb into socket to replace.
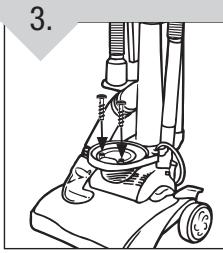
Replace lens. Secure the headlight lens by replacing the two (2) screws.
GENERAL MAINTENANCE
WARNING: TO REDUCE THE RISK OF INJURY FROM MOVING PARTS - UNPLUG BEFORE SERVICING.
IF OBSTRUCTION DEVELOPS DURING FLOOR CLEANING:
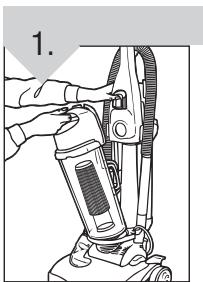
- If obstruction develops while cleaning carpets, turn cleaner OFF and unplug. Check to see if dirt container is full (Diagram 1); empty if needed (Page 9).
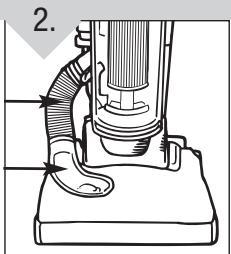
- Check dirt path window and lower hose (Diagram 2). Remove any obstruction.
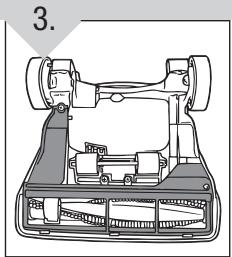
- Turn cleaner over and remove nozzle guard (Diagram 3). Clear any obstruction that occurs in or around the brushroll area.
IF OBSTRUCTION DEVELOPS DURING ABOVE FLOOR CLEANING:
- If obstruction develops while above floor cleaning, turn cleaner OFF and unplug. Check to see if dirt container is full; empty if needed (Page 9).
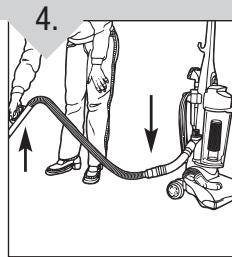
- Check airflow areas of hose (Diagram 4). If there is no suction, disconnect hose, drop quarter through end. If quarter comes out, there is NO blockage.
TROUBLESHOOTING GUIDE
WARNING: TO REDUCE RISK OF PERSONAL INJURY - UNPLUG CLEANER BEFORE SERVICING
| PROBLEM | POSSIBLE REASON | POSSIBLE SOLUTION |
| Cleaner won't run | 1. Power cord not firmly plugged into outlet. | 1. Plug unit in firmly. |
| 2. Blown fuse or tripped breaker. | 2. Check fuse or breaker in home. Replace fuse/reset breaker. | |
| 3. Needs service. | 3. Take to service center. To find nearest location, visit our website at www.dirtdevil.com or call 1-800-321-1134. | |
| 4. Thermal Protector activated. | 4. Allow cleaner to cool - Pg. 3. | |
| Cleaner won't pick-up or low suction | 1. Dirt container not installed correctly. | 1. Review dirt container removal & replacement - Pg. 9. |
| 2. Dirt container full. | 2. Empty dirt container - Pg. 9. | |
| 3. Brushroll worn. | 3. Replace brushroll - Pg. 10. | |
| 4. Broken or worn belt. | 4. Replace belt - Pg. 10. | |
| 5. Clogged filter. | 5. Remove filter and clean - Pg. 9. | |
| 6. Nozzle/dirt passage hose clogged. | 6. Remove lower hose; remove obstruction - Pg. 8. | |
| Dust escaping from cleaner | 1. Dirt container full. | 1. Empty dirt container - Pg. 9. |
| 2. Dirt container not installed correctly. | 2. Review dirt container removal & replacement - Pg. 9. | |
| 3. Hose not connected correctly. | 3. Review hose installation - Pg. 7. | |
| 4. Filter not installed completely. | 4. Review filter removal & replacement - Pg. 9. | |
| Cleaner tools won't pick-up | 1. Hose clogged. | 1. Remove hose and tools; remove obstruction - Pg. 8. |
| 2. Dirt container full. | 2. Empty dirt container - Pg. 9. | |
| 3. Filter clogged. | 3. Clean filter - Pg. 9. | |
| Headlight not working | 1. Bulb burnt out. | 1. Replace bulb - Pg. 11. |
| 2. Loose electrical wires. | 2. Take to service center. To find nearest location, visit our website at www.dirtdevil.com or call 1-800-321-1134. |
ANY OTHER SERVICING SHOULD BE DONE BY AN AUTHORIZED SERVICE REPRESENTATIVE CUSTOMER SERVICE (1-800-321-1134)
In the event that further assistance is required, see your Yellow Pages for an authorized Royal® Dealer or visit our website at www.dirtdevil.com. Costs of any transportation to and from any place of repair are to be paid by the owner. The service parts used in this unit are easily replaced and readily available from an authorized Royal® Dealer or retailer. Always identify your cleaner by the model number and manufacturing code when requesting information or ordering replacement parts. (The model number appears on the bottom of the cleaner.)