
YS1085 - Guitar amplifier TRAYNOR - Free user manual and instructions
Find the device manual for free YS1085 TRAYNOR in PDF.
User questions about YS1085 TRAYNOR
0 question about this device. Answer the ones you know or ask your own.
Ask a new question about this device
Download the instructions for your Guitar amplifier in PDF format for free! Find your manual YS1085 - TRAYNOR and take your electronic device back in hand. On this page are published all the documents necessary for the use of your device. YS1085 by TRAYNOR.
USER MANUAL YS1085 TRAYNOR
IMPORTANT SAFETY INSTRUCTIONS

This lightning flash with arrowhead symbol, within an equilateral triangle, is intended to alert the user to the presence of uninsulated "dangerous voltage" within the product enclosure that may be of sufficiency
magnitude to constitute a risk of electric shock to persons.
The exclamation point within an equilateral triangle is intended to alert the user to the presence of important operating and maintenance (servicing) instructions in the literature accompanying the appliance.

Instructions pertaining to a risk of fire, electric shock, or injury to a person
CAUTION: TO REDUCE THE RISK OF ELECTRIC SHOCK, DO NOT REMOVE COVER (OR BACK).
NO USER SERVICEABLE PARTS INSIDE.
REFER SERVICING TO QUALIFIED SERVICE PERSONNEL.
Read Instructions: The Owner's Manual should be read and understood before operation of your unit. Please, save these instructions for future reference and heed all warnings.
Clean only with dry cloth.
Packaging: Keep the box and packaging materials, in case the unit needs to be returned for service.
Warning: To reduce the risk or fire or electric shock, do not expose this apparatus to rain or moisture. Do not use this apparatus near water!
Warning: When using electric products, basic precautions should always be followed, including the following:
Power Sources
Your unit should be connected to a power source only of the voltage specified in the owners manual or as marked on the unit. This unit has a polarized plug. Do not use with an extension cord or receptacle unless the plug can be fully inserted. Precautions should be taken so that the grounding scheme on the unit is not defeated. An apparatus with CLASS I construction shall be connected to a Mains socket outlet with a protective earthing ground. Where the MAINS plug or an appliance coupler is used as the disconnect device, the disconnect device shall remain readily operable.
Hazards
Do not place this product on an unstable cart, stand, tripod, bracket or table. The product may fall, causing serious personal injury and serious damage to the product. Use only with cart, stand, tripod, bracket, or table recommended by the manufacturer or sold with the product. Follow the manufacturer's instructions when installing the product and use mounting accessories recommended by the manufacturer. Only use attachments/accessories specified by the manufacturer
Note: Prolonged use of headphones at a high volume may cause health damage on your ears.
The apparatus should not be exposed to dripping or splashing water; no objects filled with liquids should be placed on the apparatus.
Terminals marked with the "lightning bolt" are hazardous live; the external wiring connected to these terminals require installation by an instructed person or the use of ready made leads or cords.
Ensure that proper ventilation is provided around the appliance. Do not install near any heat sources such as radiators, heat registers, stoves, or other apparatus (including amplifiers) that produce heat.
No naked flame sources, such as lighted candles, should be placed on the apparatus.
Power Cord
Do not defeat the safety purpose of the polarized or grounding-type plug. A polarized plug has two blades with one wider than the other. A grounding type plug has two blades and a third grounding prong. The wide blade or the third prong are provided for your safety. If the provided plug does not fit into your outlet, consult an electrician for replacement of the obsolete outlet. The AC supply cord should be routed so that it is unlikely that it will be damaged. Protect the power cord from being walked on or pinched particularly at plugs. If the AC supply cord is damaged DO NOT OPERATE THE UNIT. To completely disconnect this apparatus from the AC Mains, disconnect the power supply cord plug from the AC receptacle. The mains plug of the power supply cord shall remain readily operable.
Unplug this apparatus during lightning storms or when unused for long periods of time.
Service
The unit should be serviced only by qualified service personnel. Servicing is required when the apparatus has been damaged in any way, such as power-supply cord or plug is damaged, liquid has been spilled or objects have fallen into the apparatus, the apparatus has been exposed to rain or moisture, does not operate normally, or has been dropped.
SUVEZ TOUTES LES INSTRUCTIONS
The Traynor DarkHorse DH15H is a professional grade, all-tube guitar head. Designed with the working musician in mind, the DarkHorse is suited for use in the studio and on stage. Taking cues from Traynor's 50 years in the amp business, the DarkHorse is a stripped down piece of gear – but don't let that fool you into thinking this DarkHorse is a one trick pony! With two user selectable output stages and three unique tonestack voicings, it's like getting six amps in one!
Features
- 100% designed & manufactured in Canada!
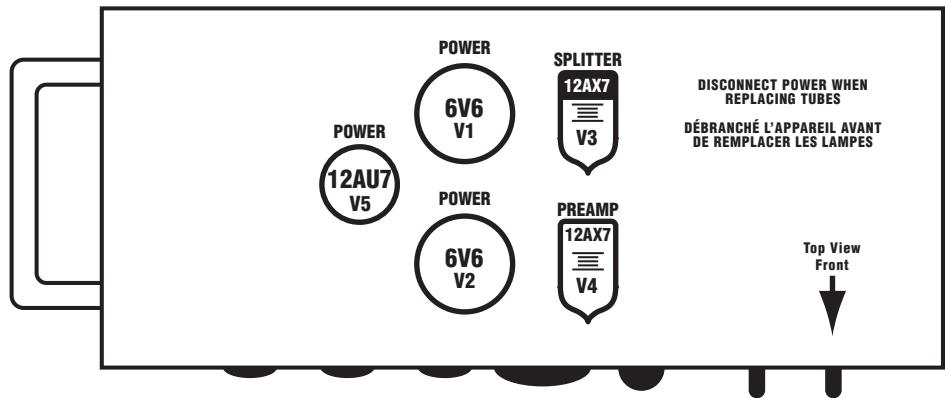
- All-tube design with a pair of 12AX7, one 12AU7 and a pair of matched 6V6 tubes
- User selectable triode (12AU7) and pentode (6V6) class A output stages
- Three tonestack voicings to choose from: USA, Brit and PURE
- Cathode biased and no feedback loop for a classic tone
- Steel chassis for maximum durability and noise immunity
- Traynor DHB1 padded bag included

QuickStart Instructions
- Plug the AC power line into a 3-hole grounded outlet.
- Connect the amp to an 8 or 16 ohm cabinet via the jacks on the back of the amp. The matching Traynor DHX12 extension cabinet would be a good choice. So would a wall of 4x12 cabinets if you're that sort of person...
- Flip the Standby switch to the middle position and turn the Power switch ON. It'll take a minute for your tubes to heat up.
- Plug in your instrument and turn the Master control to zero.
- Turn the Gain, Treble and Bass controls to their mid position.
- Select which output tube you want to use with the Standby switch. In the down position you'll be in the lower power mode with a true triode 12AU7 output stage. Flip the switch to the up position to engage the higher power of the pentode 6V6 stage. Aside from the power levels, you'll find each of the output tubes has their own sound.
- Crank up the Master, dial in your tone and break a few strings!
Traynor

Chassis Layout
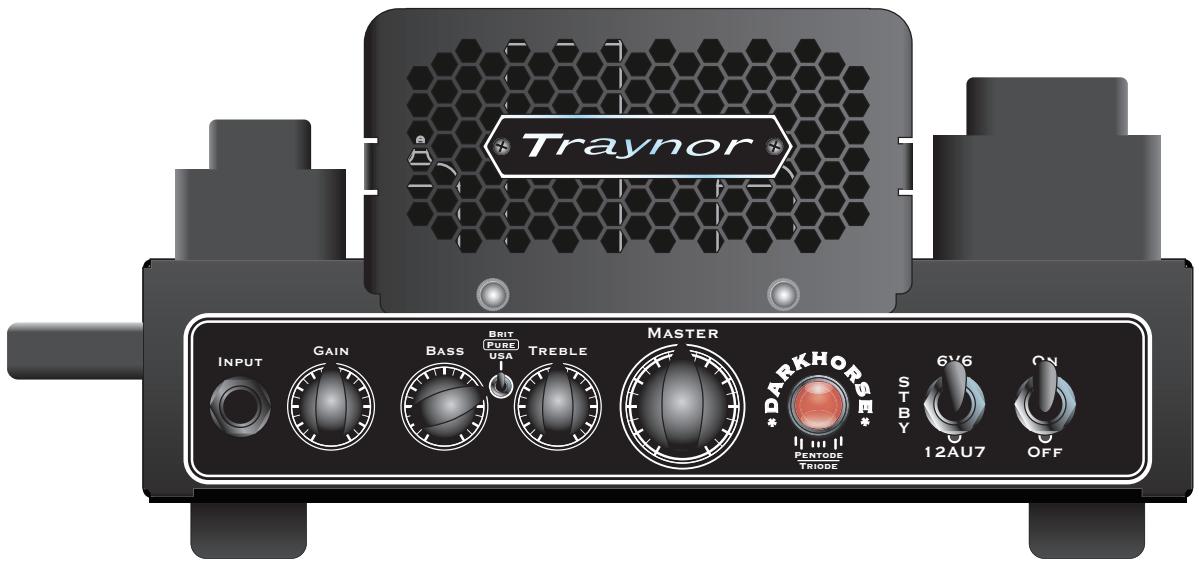
① Input jack - 1/4 inch phone jack.
② Gain Control.
③ Bass and Treble Control.
④ Tonestack Switch.
⑤ Master Control.
⑥ Standby / Output Switch.
⑦ Power Switch.
Speaker Output Jacks - 1/4 inch phone jacks.
Traynor
Controls
1. Input
This is a high sensitivity input intended for guitars. If you're planning on connecting a piece of line-level gear, make sure you turn its output volume way down.
2. Gain
This control adjusts the gain of the amp's first tube stage. Along with the Tonestack switch, the Gain control determines how much clipping you'll get at low volumes. You'll also notice the amp sounds a little brighter when the Gain is set low; it's like a built in 'brightness' setting.
3. Bass and Treble
Use these controls to shape the overall tone of the amp. The mid point is a good starting position.
4. Tonestack Switch
The Tonestack switch is one of the features that really make the DarkHorse unique. It shifts where in the circuit your tonestack sits. It's like getting three amps in one!
Brit - Setting to Brit mode positions the tonestack after the second tube stage, just before the phase splitter, which is similar to classic English rock amp designs. This mode also has a boost in the mid frequencies making it great for lead tones and high gain chord bashing.
Pure - A Pure setting - what's this you ask? This position bypasses the tonestack, meaning you can spin those tone knobs all you want, but they won't do much! What you get is the natural EQ of the amp and the hottest possible signal going to the power amp. Crank the Gain and Master to 10 and listen to the output tubes saturate!
USA - The USA mode positions the tonestack between the first and second tube stages, just as you'd find it in classic American amps. Sounds great for clean tones, blues and country.
5. Master
The Master control sets the overall output volume of the DH15H. Use it to control your volume but also use it in conjunction with the Gain knob to vary the amp's clipping characteristic. High Gain + Low Master = Preamp Clipping. Low Gain + High Master = Power Amp Clipping.
6. Standby / Output Switch
Another feature unique to the DarkHorse DH15H is the ability to choose between two types of output tubes for your amp. In the mid position, your amp will be in standby as indicated by the amber pilot light. Switch to the down position to use the 12AU7 Triode tube stage. You'll see the pilot light go green. Flip to the up position to get the 6V6 Pentode stage. The pilot light turns red – that means it's loud!
7. Power Switch
You know what the Power switch does, but here's a tip: when you turn your amp off, set the Output switch to 6V6 mode. This will discharge the capacitors in your amp's power supply when you're not using it.
8. Speaker Cabinets
On the rear of the DH15H you'll find a 16-ohm output jack and a pair of 8-ohm output jacks. This allows for a variety of cabinets to be connected to your amp.
Take note that the 8-ohm jacks are connected internally in parallel and want to see 8-ohms total. If two 8-ohm cabinets were connected to the DH15H, the amp would actually see a 4-ohm load. While the DH15H is capable of driving this load, you'll actually get less output power than if you were to connect a single 8-ohm cabinet. This is due to the impedance mismatch with the output transformer.
Here are some examples of how to connect cabinets to your DarkHorse:
- Connect a single Traynor DHX12 (16-ohms) to the 16-ohm output jack.
- Connect a pair of Traynor DHX12 (16-ohms each, 8-ohms total when connected in parallel) to the 8-ohm jacks - one cabinet per jack.
- Connect a Traynor YCX12 (8-ohms) to either 8-ohm jack and leave the other 8-ohm jack unused.

Tips on Tone
- TIP #1: The DarkHorse's tonestack is not the typical circuit found in most amps. It's based on a tonestack found in several vintage Traynor amps and has a lot of range on the controls. To start off, set the Bass and Treble to their mid position (the amp was designed and voiced with the controls in this position). From there, tweak the tone to match your guitar, cabinet and taste.
- TIP #2: Maximum headroom – if you're looking to get a great clean tone, go to 6V6 mode, switch to USA mode and lower the Gain. You'll find that the amp also gets brighter as you turn the Gain control down. This can be great for a sparkly clean tone that cuts through. Dialing the Gain up in USA mode will thicken up the tone and just start to induce some amp breakup.
- TIP #3: Want maximum gain at low volume? Go to 12AU7 mode and crank the Gain control in Brit mode with the Master control turned low. Need max gain and max volume? Turn up the Gain and Master in 6V6 mode with the tonestack set to Pure. You'll find that Brit mode has more gain with the Master turned down while the Pure puts out more with Master cranked.
Specifications
Power @ min. impedance (Watts): 6V6 mode: 12 watts; 12AU7 mode: 0.8 watts
Burst Power - 2 cycle: 6V6 mode: 15 watts; 12AU7 mode: 2 watts
Input Channels: 1
Channel 1 - inputs: 1/4 inch phono
Channel 1 - controls: Gain, Bass, Treble, Master
Channel 1 - switches: Tonestack
Channel Switching: No
Effects Loop / Location: No
Effects Footswitch / Function: No
Internal Reverb / Effects: No
LED Indicators: Standby / Output Tube
Dimensions (DWH, inches): 6x12.75x6
Dimensions (DWH, cm): 15.25x32.5x15.25
Weight (lbs/kg): 11/5
Suramplification brusque - 2 cycles: mode 6V6: 15 watts; mode 12AU7: 2 watts
Canaux d'Entrées: 1
Canal 1 - entrées: 1/4 pouce, phone
Canal 1 - commands: Gain, Bass, Treble, Master
Dimensions (PLH, pouce): 6x12.75x6
Dimensions (PLH, cm): 15.25x32.5x15.25
Poids (livres/kg): 11/5

Note: when in PURE, the Tone Controls are bypassed!


HUMBUCKER PICKUP
Classic Rock

West Coast Punk
HUMBUCKER PICKUP
SONILLES DESEGEHNSHLHO
DH15H USER SETTINGS


SONILLES RESEHGLHO
Your Traynor two year unlimited warranty on this product is transferable and does not require registration with Yorkville Sound or your dealer. If this product should fail for any reason within two years of the original purchase date, simply return it to your Traynor dealer with original proof of purchase and it will be repaired free of charge.
Freight charges, consequential damages, weather damage, damage as a result of improper installation, damages due to exposure to extreme humidity, accident or natural disaster are excluded under the terms of this warranty. Warranty does not cover consumables such as vacuum tubes, bulbs or batteries beyond 90 days of original purchase. See your Yorkville dealer for more details. Warranty valid only in Canada and the United States.
Garantie Illimitée
Voice: (905) 837-8481 Voice: (716) 297-2920
Fax: (905) 837-8746 Fax: (716) 297-3689

550 Granite Court 4625 Witmer Industrial Estate
Pickering, Ontario Niagara Falls, New York
L1W-3Y8 CANADA 14305 USA

WEB: www.yorkville.com
Niagara Falls, New York
14305 USA
Voice: (716) 297-2920
Fax: (716) 297-3689

Quality and Innovation Since 1963
Printed in Canada
Manual-Owners-DH15H-00-1v0 - March 23/2010