
YS1060 - Guitar amplifier TRAYNOR - Free user manual and instructions
Find the device manual for free YS1060 TRAYNOR in PDF.
User questions about YS1060 TRAYNOR
0 question about this device. Answer the ones you know or ask your own.
Ask a new question about this device
Download the instructions for your Guitar amplifier in PDF format for free! Find your manual YS1060 - TRAYNOR and take your electronic device back in hand. On this page are published all the documents necessary for the use of your device. YS1060 by TRAYNOR.
USER MANUAL YS1060 TRAYNOR
B A S S G U T A R A M P L I F I E R
IMPORTANT SAFETY INSTRUCTIONS

This lightning flash with arrowhead symbol, within an equilateral triangle, is intended to alert the user to the presence of uninsulated "dangerous voltage" within the product enclosure that may be of sufficiency
magnitude to constitute a risk of electric shock to persons.
The exclamation point within an equilateral triangle is intended to alert the user to the presence of important operating and maintenance (servicing) instructions in the literature accompanying the appliance.
Instructions pertaining to a risk of fire, electric shock, or injury to a person
CAUTION: TO REDUCE THE RISK OF ELECTRIC SHOCK, DO NOT REMOVE COVER (OR BACK).
NO USER SERVICEABLE PARTS INSIDE.
REFER SERVICING TO QUALIFIED SERVICE PERSONNEL.
Read Instructions: The Owner's Manual should be read and understood before operation of your unit. Please, save these instructions for future reference and heed all warnings.
Clean only with dry cloth.
Packaging: Keep the box and packaging materials, in case the unit needs to be returned for service.
Warning: To reduce the risk or fire or electric shock, do not expose this apparatus to rain or moisture. Do not use this apparatus near water!
Warning: When using electric products, basic precautions should always be followed, including the following:
Power Sources
Your unit should be connected to a power source only of the voltage specified in the owners manual or as marked on the unit. This unit has a polarized plug. Do not use with an extension cord or receptacle unless the plug can be fully inserted. Precautions should be taken so that the grounding scheme on the unit is not defeated. An apparatus with CLASS I construction shall be connected to a Mains socket outlet with a protective earthing ground. Where the MAINS plug or an appliance coupler is used as the disconnect device, the disconnect device shall remain readily operable.
Hazards
Do not place this product on an unstable cart, stand, tripod, bracket or table. The product may fall, causing serious personal injury and serious damage to the product. Use only with cart, stand, tripod, bracket, or table recommended by the manufacturer or sold with the product. Follow the manufacturer's instructions when installing the product and use mounting accessories recommended by the manufacturer. Only use attachments/accessories specified by the manufacturer
Note: Prolonged use of headphones at a high volume may cause health damage on your ears.
The apparatus should not be exposed to dripping or splashing water; no objects filled with liquids should be placed on the apparatus.
Terminals marked with the "lightning bolt" are hazardous live; the external wiring connected to these terminals require installation by an instructed person or the use of ready made leads or cords.
Ensure that proper ventilation is provided around the appliance. Do not install near any heat sources such as radiators, heat registers, stoves, or other apparatus (including amplifiers) that produce heat.
No naked flame sources, such as lighted candles, should be placed on the apparatus.
Power Cord
Do not defeat the safety purpose of the polarized or grounding-type plug. A polarized plug has two blades with one wider than the other. A grounding type plug has two blades and a third grounding prong. The wide blade or the third prong are provided for your safety. If the provided plug does not fit into your outlet, consult an electrician for replacement of the obsolete outlet. The AC supply cord should be routed so that it is unlikely that it will be damaged. Protect the power cord from being walked on or pinched particularly at plugs. If the AC supply cord is damaged DO NOT OPERATE THE UNIT. To completely disconnect this apparatus from the AC Mains, disconnect the power supply cord plug from the AC receptacle. The mains plug of the power supply cord shall remain readily operable.
Unplug this apparatus during lightning storms or when unused for long periods of time.
Service
The unit should be serviced only by qualified service personnel. Servicing is required when the apparatus has been damaged in any way, such as power-supply cord or plug is damaged, liquid has been spilled or objects have fallen into the apparatus, the apparatus has been exposed to rain or moisture, does not operate normally, or has been dropped.
SUVEZ TOUTES LES INSTRUCTIONS
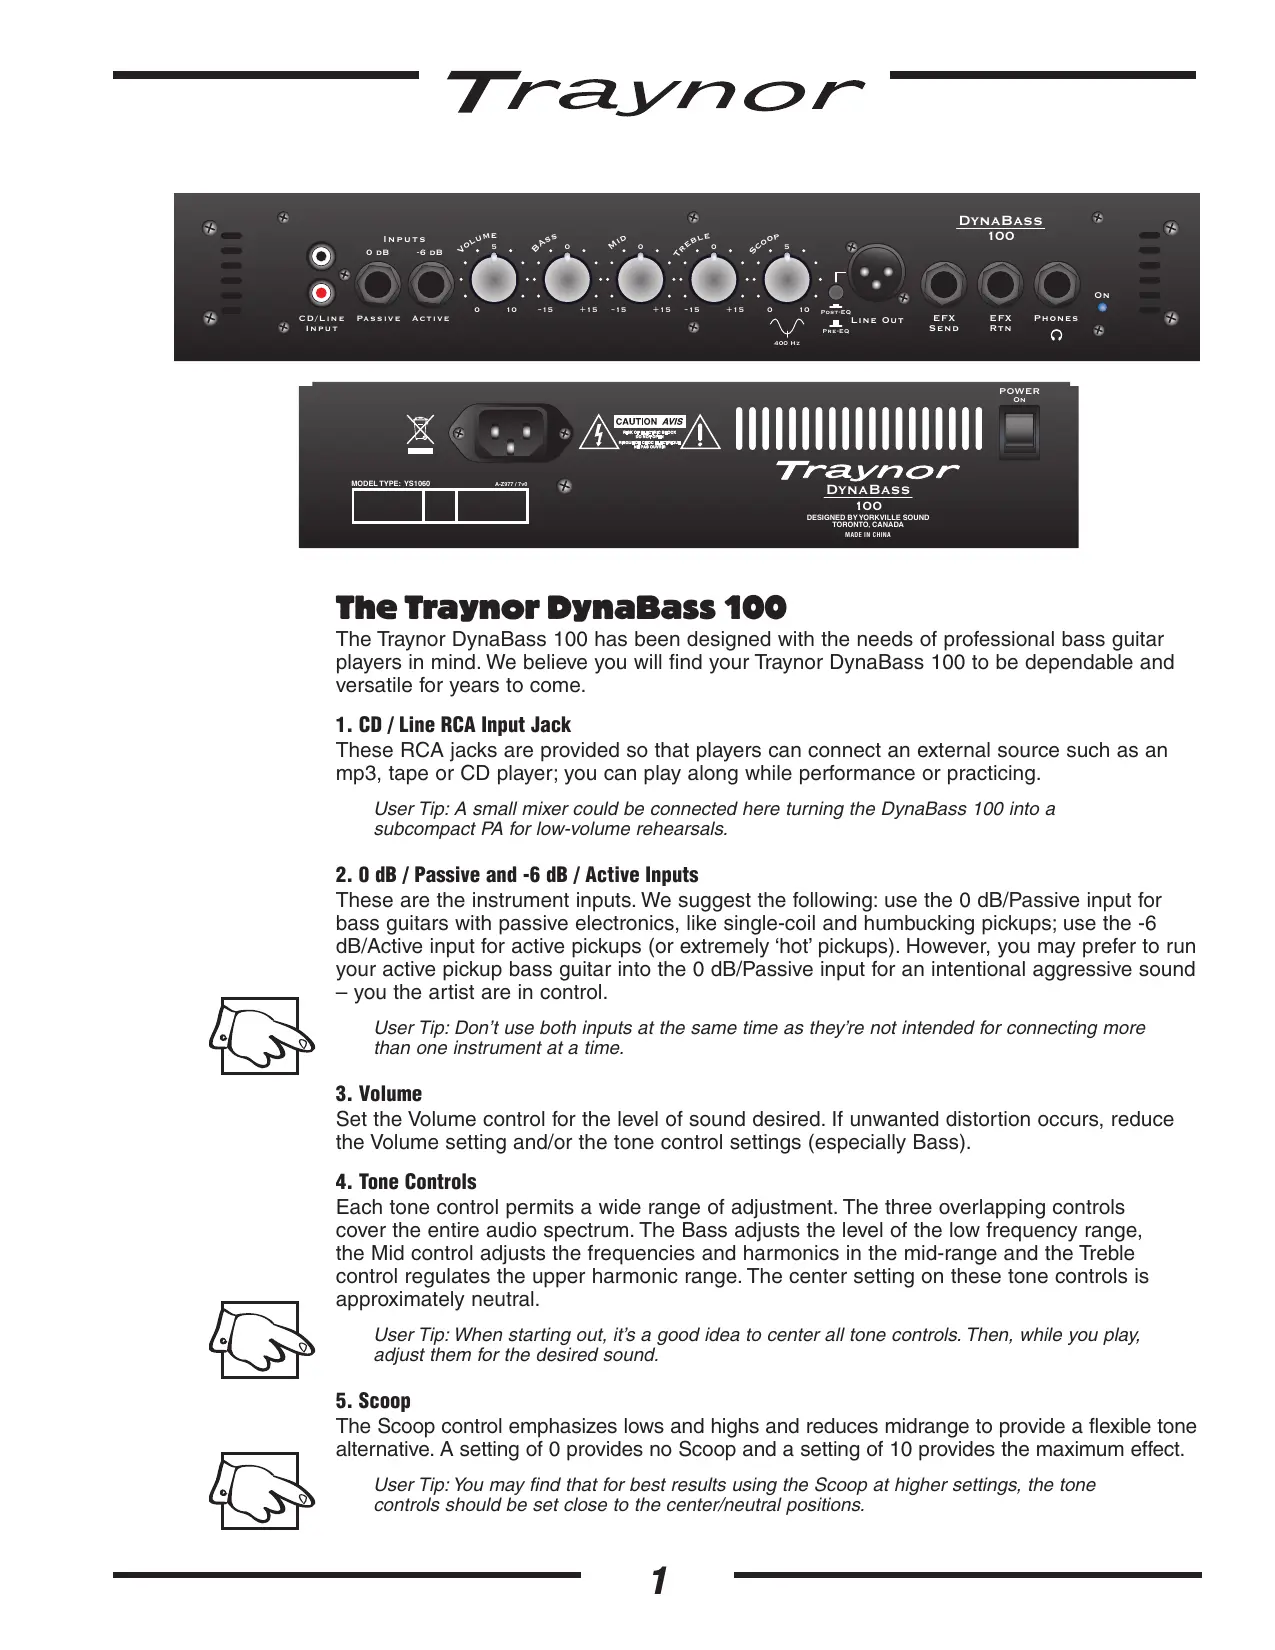
The Traynor DynaBass 100 has been designed with the needs of professional bass guitar players in mind. We believe you will find your Traynor DynaBass 100 to be dependable and versatile for years to come.
1. CD / Line RCA Input Jack
These RCA jacks are provided so that players can connect an external source such as an mp3, tape or CD player; you can play along while performance or practicing.
User Tip: A small mixer could be connected here turning the DynaBass 100 into a subcompact PA for low-volume rehearsals.
2.0 dB / Passive and -6 dB / Active Inputs
These are the instrument inputs. We suggest the following: use the 0 dB/Passive input for bass guitars with passive electronics, like single-coil and humbucking pickups; use the -6 dB/Active input for active pickups (or extremely 'hot' pickups). However, you may prefer to run your active pickup bass guitar into the 0 dB/Passive input for an intentional aggressive sound – you the artist are in control.

User Tip: Don't use both inputs at the same time as they're not intended for connecting more than one instrument at a time.
3. Volume
Set the Volume control for the level of sound desired. If unwanted distortion occurs, reduce the Volume setting and/or the tone control settings (especially Bass).
4. Tone Controls
Each tone control permits a wide range of adjustment. The three overlapping controls cover the entire audio spectrum. The Bass adjusts the level of the low frequency range, the Mid control adjusts the frequencies and harmonics in the mid-range and the Treble control regulates the upper harmonic range. The center setting on these tone controls is approximately neutral.

User Tip: When starting out, it's a good idea to center all tone controls. Then, while you play, adjust them for the desired sound.

5. Scoop
The Scoop control emphasizes lows and highs and reduces midrange to provide a flexible tone alternative. A setting of 0 provides no Scoop and a setting of 10 provides the maximum effect.
User Tip: You may find that for best results using the Scoop at higher settings, the tone controls should be set close to the center/neutral positions.
6. XLR Line Output
This is your conduit to the P. A. or recording console. Using an XLR mic cable or a shielded patch cord with a female XLR connector on one end (balanced or unbalanced, e.g. a high or low-impedance mic cable), connect the Line Out to the input of the mixer. Electronic balancing circuitry minimizes the possibility of hum or noise when the Line Out is connected to a mixer (even when the mixer does not have balanced inputs). Also, this output can be made Pre-EQ or Post-EQ according to the selector button which is described below.
7. Pre-EQ / Post-EQ Selector Switch
The Pre-EQ / Post-EQ selector switch enables you to configure the behavior of the Line Out XLR jack.
- In the Pre-EQ setting, the Line Out signal comes directly from the input section bypassing the Volume control, tone controls and EFX Send/Return circuitry. Use the Pre-EQ setting in a recording or P.A. situation where the mixing engineer requires a completely dry signal, as if it were a D.I. box (Direct from the Instrument).
- In the Post-EQ setting, the Line Out signal comes from the final preamp stage. The Volume control, tone controls and any connected effects all affect the signal directly. Use the Post-EQ setting when connecting the Line Out to the input of another amp (perhaps for added stage coverage) or to a recording or P.A. mixer where a dry signal is not required.

User Tip: For most club PA situations or for home recording, you would probably prefer the Post-EQ setting.
8. EFX Send / EFX Return Jacks
The line-level signal at the EFX Send jack is post-fader and post-EQ (it is affected by the Volume and all tone controls). The EFX Send would normally be connected to the input of the effects processor with a shielded patch cord. When a phone plug is inserted to the EFX Return jack, the signal goes directly to the DynaBass 100's internal power amp. Technically, by inserting a 14 -inch phone plug into the EFX Return, you are disconnecting the internal preamp signal going to the power amplifier stage. As a result, the power amp can only receive signals routed through here (i.e. it isolates the power amp). Only use shielded patch cords for all interconnections.

User Tip: You can "slave" your DynaBass 100 to another amp. As an example, if you wanted to run two bass amps for a large gig, you can simply run a shielded patch cable from the line output of the other amp (possibly another DynaBass 100) to the EFX Return of your DynaBass 100.

Note: When used as a preamp for an external amplifier, the DynaBass 100 does not control the volume and tone of the external amplifier.
9. Phones
When a headphone plug is inserted into the Phones jack, the built-in speaker is disconnected. This permits silent practicing. The headphone jack must be used with stereo headphones – do not use mono headphones as the output signal will be cancelled.
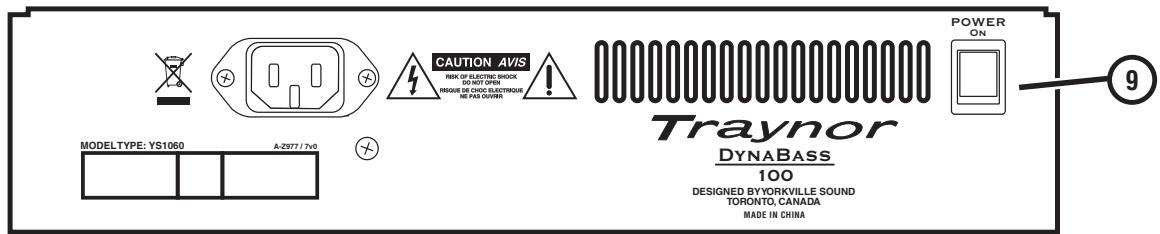
10. Power
The LED on the front panel will illuminate when the Power switch, on the rear panel is turned to the On position.
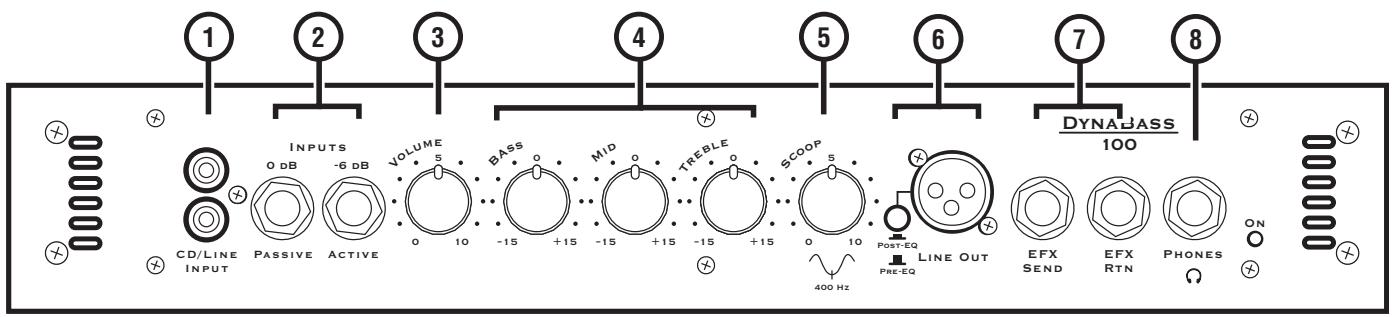
① CD/Line RCA Input Jack
② 0dB / Passive and -6dB / Active Input Jacks – 1/4 -inch phone jacks.
Volume Control
④ Tone Controls - Bass, Mid and Treble.
⑤ Scoop Control
Line Out XLR Jack and Selector Switch - Switch between Pre-EQ and Post-EQ settings.
⑦ EFX Send and EFX Return Jacks - 1/4 -inch TRS phone jacks.
⑥ Phones- 14 -inch TRS phone jack.
^9 Power Switch - Turns the AC mains on and off, the LED indicator illuminates when active.

Le Traynor DynaBass 100
Cabinet program power (Watts) 100
Cabinet impedance (ohms) 4
Burst Power - 2 cycle 130
Speaker Configuration - LF (Size / Power) Single 15 inch
Input Channels 1
Channel 1 - inputs 1/4-inch (0 dB /Passive and -6dB Active) and RCA
Channel 1 - controls Volume, Bass, Mid, Treble and Scoop
Input Sensitivity (mV) 60
Line Out (type / configuration) XLR (Balanced)
Line Out Level (Vrms) 1
Effect Loop / Location Front
LED Indicators Power
External speaker output / location No
Headphone Jack Yes
Other Features Tilt/Upright
Dimensions (DWH, inches) 13 × 17 × 21
Dimensions (DWH, cm) 33 × 43.5 × 53.5
Weight (Ibs/kg) 30/13.65
Specifications
Model DB100
Type Bass Combo
Traynor Two Year Warranty
Unlimited Warranty
Your Traynor two year unlimited warranty on this product is transferable and does not require registration with Yorkville Sound or your dealer. If this product should fail for any reason within two years of the original purchase date, simply return it to your Traynor dealer with original proof of purchase and it will be repaired free of charge.
Freight charges, consequential damages, weather damage, damage as a result of improper installation, damages due to exposure to extreme humidity, accident or natural disaster are excluded under the terms of this warranty. Warranty does not cover consumables such as vacuum tubes, bulbs or batteries beyond 90 days of original purchase. See your Yorkville dealer for more details. Warranty valid only in Canada and the United States.
Garantie Illimitée
Voice: (905) 837-8481 Voice: (716) 297-2920
Fax: (905) 837-8746 Fax: (716) 297-3689

Yorkville
550 Granite Court 4625 Witmer Industrial Estate
Pickering, Ontario Niagara Falls, New York
L1W-3Y8 CANADA 14305 USA

WEB: www.yorkville.com
Niagara Falls, New York
14305 USA
Voice: (716) 297-2920
Fax: (716) 297-3689

Quality and Innovation Since 1963
Printed in China
May 7/2008 • Manual-Owners-db100-00-6v0