
RS-7 - Speaker KLIPSCH - Free user manual and instructions
Find the device manual for free RS-7 KLIPSCH in PDF.
User questions about RS-7 KLIPSCH
0 question about this device. Answer the ones you know or ask your own.
Ask a new question about this device
Download the instructions for your Speaker in PDF format for free! Find your manual RS-7 - KLIPSCH and take your electronic device back in hand. On this page are published all the documents necessary for the use of your device. RS-7 by KLIPSCH.
USER MANUAL RS-7 KLIPSCH
IMPORTANT SAFETY INSTRUCTIONS
- READ these instructions.
- KEEP these instructions.
- HEED all warnings.
- FOLLOW all instructions.
- DO NOT use this apparatus near water.
- CLEAN ONLY with dry cloth.
- DO NOT block any ventilation openings. Install in accordance with the manufacturer's instructions.
- DO NOT install near any heat sources such as radiators, heat registers, stoves, or other apparatus (including amplifiers) that produce heat.
- DO NOT defeat the safety purpose of the polarized or grounding type plug. A polarized plug has two blades with one wider than the other. A grounding type plug has two blades and a third grounding prong. The wider blade or the third prong are provided for your safety. If the provided plug does not fit into your outlet, consult an electrician for replacement of the obsolete outlet.
- PROTECT the power cord from being walked on or pinched, particularly at plugs, convenience receptacles, and the point where they exit from the apparatus.
- ONLY USE attachments/accessories specified by the manufacturer.
- USE only with a cart, stand, tripod, bracket, or table specified by the manufacturer, or sold with the apparatus. When a cart is used, use caution when moving the cart/apparatus combination to avoid injury from tip-over.
- UNPLUG this apparatus during lightning storms or when unused for long periods of time.
- REFER all servicing to qualified service personnel. Servicing is required when the apparatus has been damaged in any way, such as power-supply cord or plug is damaged, liquid has been spilled or objects have fallen into the apparatus, the apparatus has been exposed to rain or moisture, does not operate normally, or has been dropped.
This symbol indicates that there are important operating and maintenance instructions in the literature accompanying this unit.

This symbol indicates that dangerous voltage constituting a risk of electric shock is present within this unit.

WARNING: To reduce the risk of fire or electrical shock, do not expose this apparatus to rain or moisture.

CAUTION
RISK OF ELECTRIC SHOCK DO NOT OPEN

WARNING: Voltages in this equipment are hazardous to life. No user-serviceable parts inside. Refer all servicing to qualified service personnel.
CAUTION: Changes or modifications not expressly approved by the manufacturer could void the users authority to operate this device.
POSITIONING YOUR REFERENCE SERIES SPEAKERS
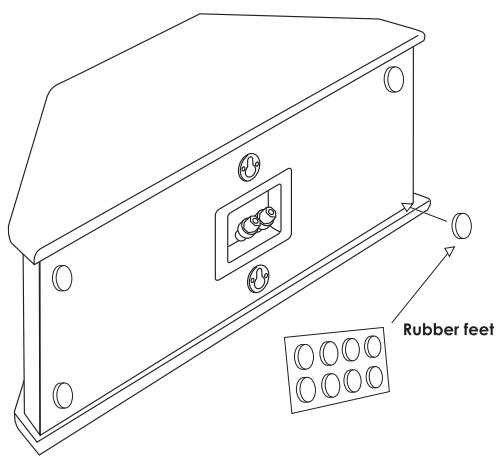
Before You Start — Some Klipsch speakers have feet and other accessories that may need to be installed prior to use. Please refer to Diagrams 1, 2, and 3 for installation.
FOR MAXIMUM STABILITY AND SAFETY THE INCLUDED OUTRIGGER FEET MUST BE INSTALLED.
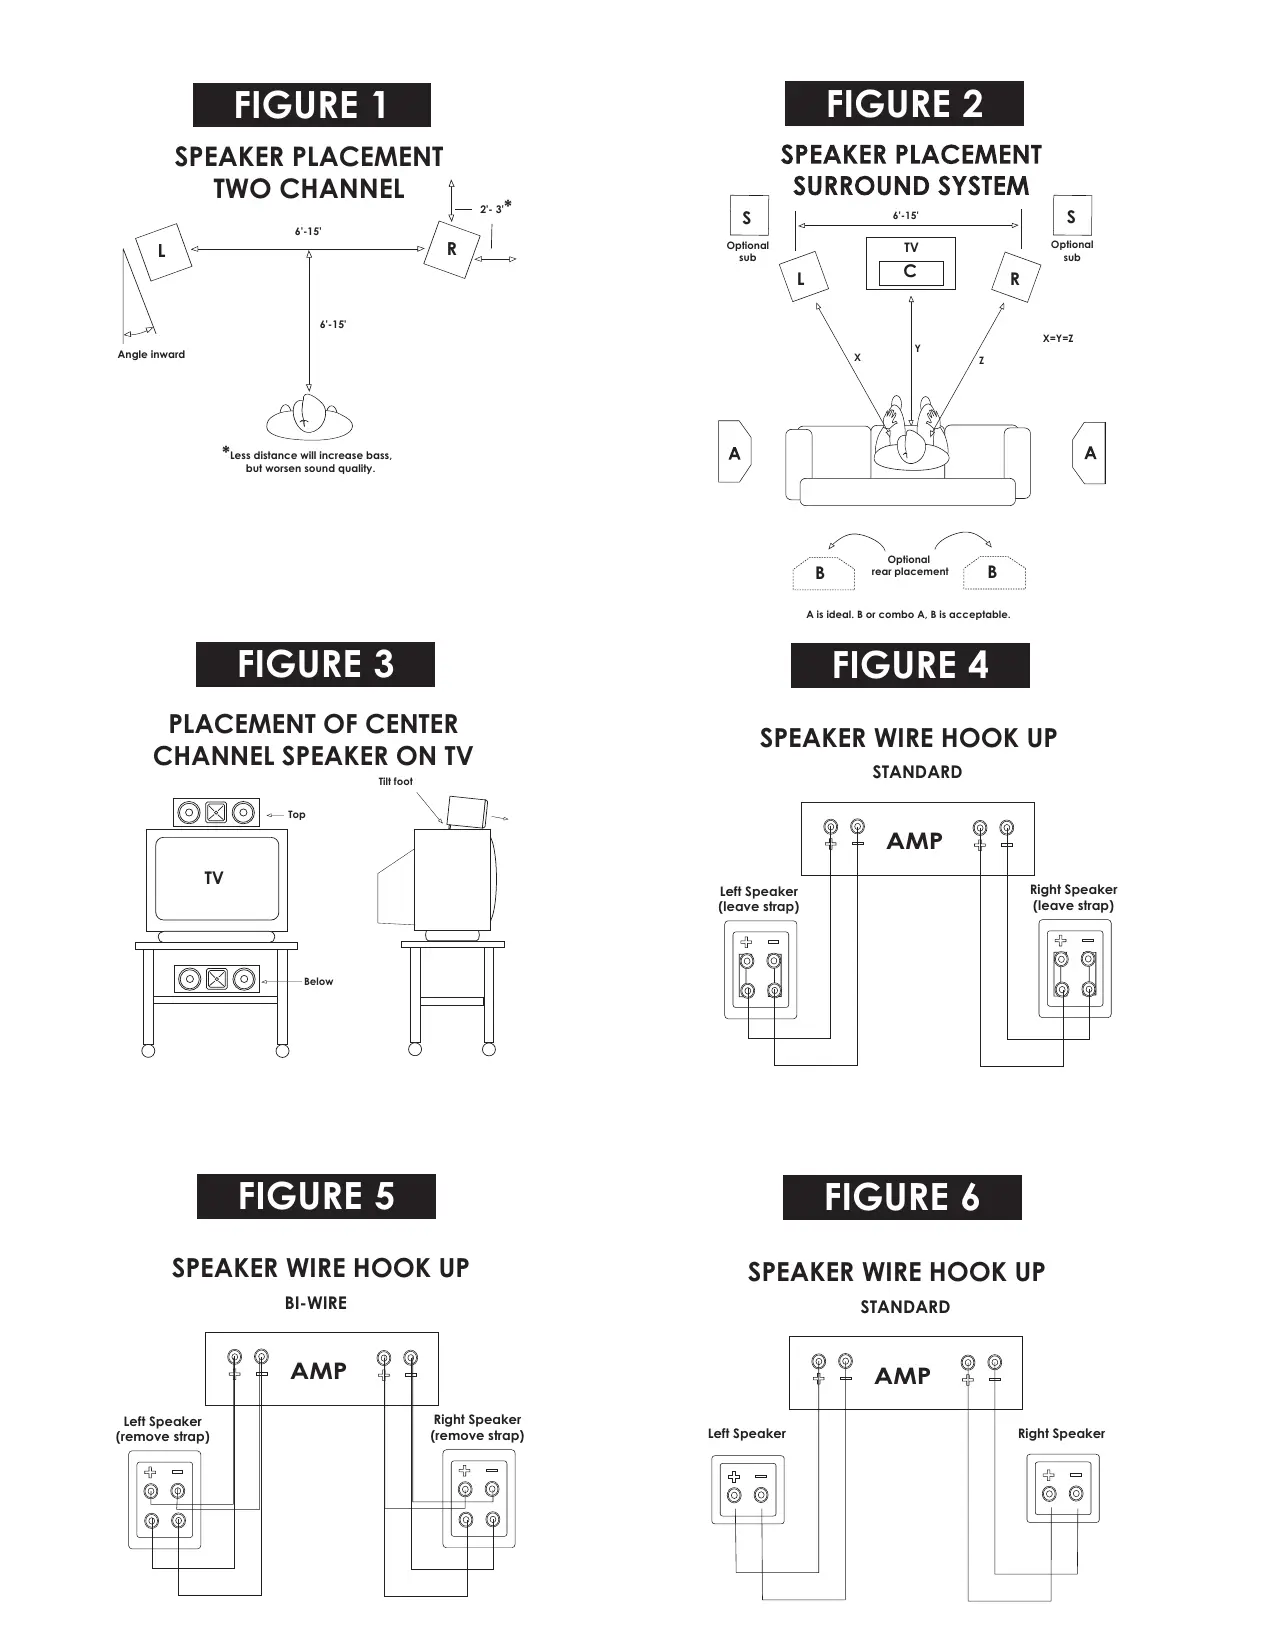
Left and Right Main Channel Speakers — For optimum performance, place your speakers six to 15 feet (2 to 4.5m ) apart and at least 24 inches (60.8cm) from the back and side walls. They may also be toed-in slightly for better stereo imaging. The listening position should be about 1 to 1.5 times the distance separating the speakers. Refer to Figures 1 and 2 for connection and placement.
Center Channel Speakers — Center channel speakers are designed to place dialogue and primary sounds so that they appear to come from the video screen. The speakers should therefore be placed as close to the screen as possible, preferably directly on top of or below the screen. Refer to Figures 2 and 3 for placement.
Rear Surround Channel Speakers — Klipsch WDST™ surround speakers should be placed on the walls directly adjacent to or on the wall behind the listening position. They are designed to recreate the sense of space and ambience that many of today's surround sound technologies provide. Refer to Diagram 4 and Figures 2 for placement.
CONNECTING YOUR REFERENCE SERIES SPEAKERS TO YOUR AMPLIFIER
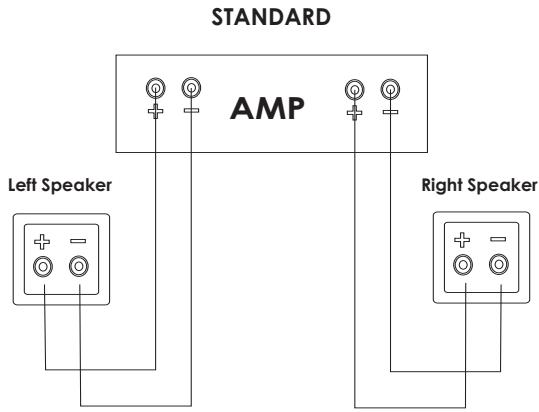
Conventional Connection — Using 16-gauge or larger speaker wire, connect the RED "positive" (+) terminal of the LEFT speaker to the RED "positive" (+) terminal of your amplifier's LEFT channel. Connect the BLACK "negative" (-) terminal of the LEFT speaker to the BLACK "negative" (-) terminal of your amplifier's LEFT channel. Repeat this procedure for connecting all remaining speakers to the appropriate amplifier channels. Refer to Figure 4 and 6. Make sure that no bare wires from any of the connections touch any other terminals as this could cause a short and damage your equipment. Some Reference models have two sets of input terminals connected by wire jumpers. For conventional connection, leave these jumpers in place, and use either set of terminals.
Bi-wire Connections — Some Reference models have the capability to be bi-wired. These speakers have two sets of input terminals connected by wire jumpers. Bi-wiring requires using two separate speaker wires for each speaker. The RED "positive" (+) leads of both LEFT channel wires are tied together and inserted into the same RED "positive" (+) terminals of the amplifier's LEFT channel. On the LEFT speaker, the wire jumpers are removed. One of the two speaker wires is connected to the top set of terminals (RED to RED and BLACK to BLACK) while the other speaker wire is connected to the lower set of terminals in the same manner. Refer to Figure 5. Klipsch recommends this method of hook-up for improved bass response, imaging and detail. For more information on how to bi-wire your speakers, see your dealer or visit www.klipsch.com.
Amplifier Requirements — Klipsch speakers are highly efficient and will operate easily on a wide variety of amplifiers. All Klipsch speakers are 8-ohm compatible and can be driven to very high levels with low distortion. Due to the high output levels Klipsch speakers are capable of reproducing, exercise caution with the volume control. Excessive volume over long periods can permanently damage your hearing. Overdriving your amplifier could also damage your speakers. Check with your dealer to make sure your particular amplifier is best suited to your application. We want you listening for a lifetime.
CARE AND CLEANING OF YOUR REFERENCE SERIES SPEAKERS
Your speakers have a durable vinyl or real wood veneer finish that should only require dry dusting or cleaning with a damp cloth. Avoid the use of abrasive or solvent-based cleaners and harsh detergents. The brush attachment of your vacuum or a slightly damp sponge should remove any dust from your speaker grilles.
WARRANTY—U.S. AND CANADA ONLY
The Warranty below is valid only for sales to consumers in the United States or Canada.
KLIPSCH, L.L.C. ("KLIPSCH") warrants this product to be free from defects in materials and workmanship (subject to the terms set forth below) for a period of five (5) years from the date of purchase. During the Warranty period, KLIPSCH will repair or replace (at KLIPSCH's option) this product or any defective parts (excluding electronics and amplifiers). For products that have electronics or amplifiers, the Warranty on those parts is for a period of two (2) years from the date of purchase.
To obtain Warranty service, please contact the KLIPSCH authorized dealer from which you purchased this product. If your dealer is not equipped to perform the repair of your KLIPSCH product, it can be returned, freight paid, to KLIPSCH for repair. Please call KLIPSCH at 1-800-KLIPSCH for instructions. You will need to ship this product in either its original packaging or packaging affording an equal degree of protection.
Proof of purchase in the form of a bill of sale or receipted invoice, which is evidence that this product is within the Warranty period, must be presented or included to obtain Warranty service.
This Warranty is invalid if (a) the factory-applied serial number has been altered or removed from this product or (b) this product was not purchased from a KLIPSCH authorized dealer. You may call 1-800-KLIPSCH to confirm that you have an unaltered serial number and/or you purchased from a KLIPSCH authorized dealer.
This Warranty is only valid for the original purchaser and will automatically terminate prior to expiration if this product is sold or otherwise transferred to another party.
This Warranty does not cover cosmetic damage or damage due to misuse, abuse, negligence, acts of God, accident, commercial use or modification of, or to any part of, the product. This Warranty does not cover damage due to improper operation, maintenance or installation, or attempted repair by anyone other than KLIPSCH or a KLIPSCH dealer which is authorized to do KLIPSCH warranty work. Any unauthorized repairs will void this Warranty. This Warranty does not cover product sold AS IS or WITH ALL FAULTS.
REPAIRS OR REPLACEMENTS AS PROVIDED UNDER THIS WARRANTY ARE THE EXCLUSIVE REMEDY OF THE CONSUMER. KLIPSCH SHALL NOT BE LIABLE FOR ANY INCIDENTAL OR CONSEQUENTIAL DAMAGES FOR BREACH OF ANY EXPRESS OR IMPLIED WARRANTY ON THIS PRODUCT. EXCEPT TO THE EXTENT PROHIBITED BY LAW, THIS WARRANTY IS EXCLUSIVE AND IN LIEU OF ALL OTHER EXPRESS AND IMPLIED WARRANTYES WHATSOVER, INCLUDING BUT NOT LIMITED TO, THE WARRANTY OF MERCHANTABILITY AND FITNESS FOR A PRACTICAL PURPOSE.
Some states do not allow the exclusion or limitation of incidental or consequential damages or implied warranties so the above exclusions may not apply to you. This Warranty gives you specific legal rights, and you may have other rights, which vary from state to state.
WARRANTY OUTSIDE THE UNITED STATES AND CANADA
The warranty on this product if it is sold to a consumer outside of the United States or Canada shall comply with applicable law and shall be the sole responsibility of the distributor that supplied this product. To obtain any applicable warranty service, please contact the dealer from which you purchased this product, or the distributor that supplied this product.
IMPORTANT CONSIGNES DE SECURITÉ
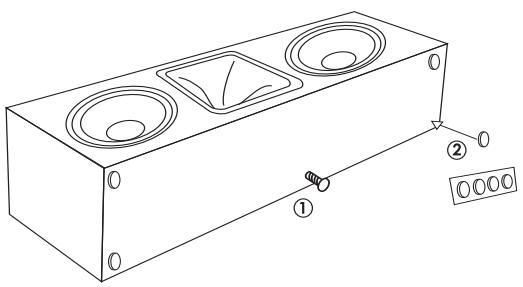
① Leveling foot for angling speaker
down when placed on top of TV.
② Rubber feet.
DIAGRAM 2
RS-7 BUMPER LOCATIONS
Step 1
Install screws
5'7" off floor.
Step 2
Hang speaker.
DIAGRAM 4
RS-7 WALL MOUNTING
Minimum
distance
from ceiling-
1.75 ft.
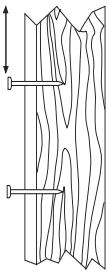
10 or #12
2.5"-3" panhead
wood screws.
···
Mount in
wall stud or
use anchors
leave 1/4
exposed.
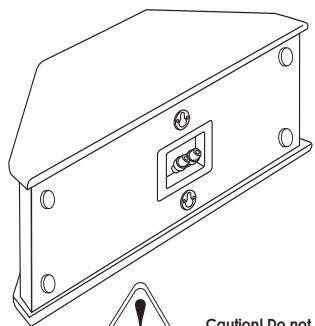

Caution! Do not use keyholes
for ceiling mounting!
FIGURE 1
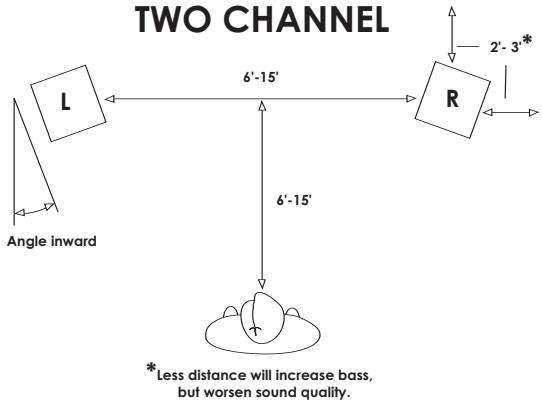
SPEAKER PLACEMENT TWO CHANNEL
FIGURE 2
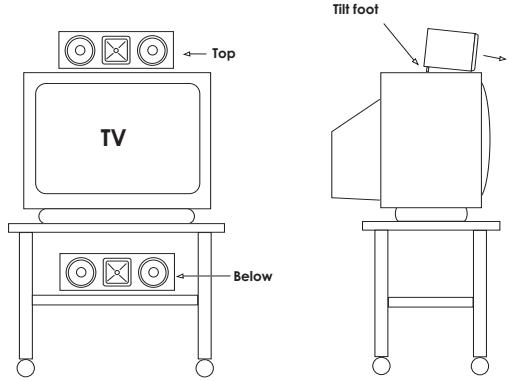
PLACEMENT OF CENTER CHANNEL SPEAKER ON TV
FIGURE 4
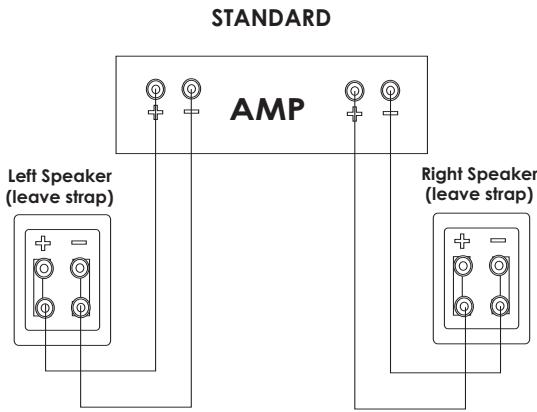
SPEAKER WIRE HOOK UP
FIGURE 5
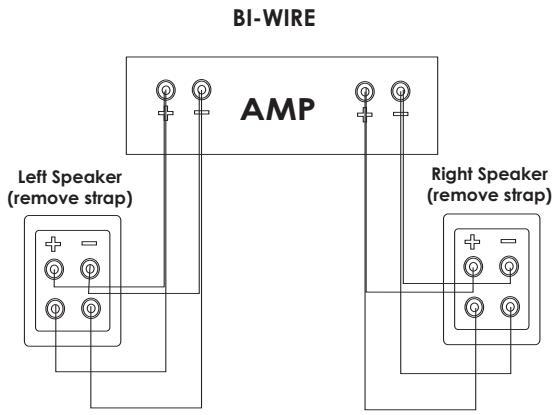
SPEAKER WIRE HOOK UP
FIGURE 6
SPEAKER WIRE HOOK UP
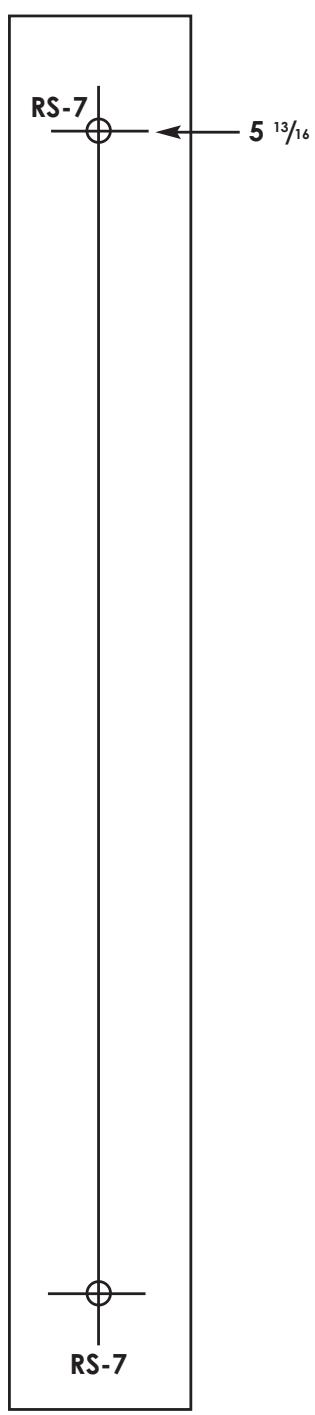
RS-7 Mounting Template
Cut along dotted line and mail.
For multiple speaker purchases, please fill out only one warranty card.
Name:
Street Address:
City/State/Zip:
Home Phone:
Work Phone:
E-mail Address:
Would you like to receive the latest product updates and news via e-mail? Yes No
Product Purchase
Model and serial number must be included to honor your warranty card. For multiple speaker purchases, please fill out only one warranty card.
Model
Serial Number
Model
Serial Number
Model
Serial Number
Model
Serial Number
Model
Serial Number
Model
Serial Number
WHAT store did you purchase your Klipsch products from?
Store Name:
State:
How did you hear about Klipsch? Audio/Home Theater Magazine Other Magazine TV Radio Newspaper
Trade
Show
iend
Retail Dealer
rect Mail
Have you purchased Klipsch products before? Yes No
If yes, what products?
Product Name(s):
When do you hope to purchase additional loudspeakers? 6 mos. -1 yr. 1-2 yrs.
How likely are you to consider Klipsch products for your upcoming purchases? Very likely Somewhat likely Doubtful
If doubtful, why?
Don't carry product I'm looking for
Too expensive
Klipsch dealer too far away
Other
Please tell us about you!
Married
□:
cle
□s
ident
ale
Female
Age: 15-17 18-24
25-35
36-45
46-5
55-64
65+
Annual Household Income:
Under $25,000
$25-35,000
$35-50,000
50-75,00075-100,000
$100,000+
Make sure you return your warranty card so that we may keep you up-to-date on new Klipsch products and promotions. As always, if you have any questions, contact your local authorized Klipsch dealer.
For your records:
Model:
Date Purchased:
89294 N1 's'odaeupeau 002eN'S eoeaewm 2098 sE66