TSE 6102 - Lock BURG WACHTER - Free user manual and instructions
Find the device manual for free TSE 6102 BURG WACHTER in PDF.

| Product Type | Electronic keypad with fingerprint reader (Fingerscan) |
| Brand | BURG WACHTER |
| Model | TSE 6102 |
| Power supply | 4 MIGNON LR6 AA ALKALINE batteries (1.5 V) |
| Number of users | Up to 48, including up to 24 fingerprints |
| Opening methods | 6-digit code, fingerprint, E-Key remote control (optional) |
| Time functions | User-Timer (24 time slots), Permanent-Timer (16 time slots) - via TSE software |
| History | Recording of the last 600 events (readable via optional software) |
| Optical signaling | LED on interior button: opening/closing, programming, low battery |
| Display | Adjustable in 12 languages |
| Security | Lockout after 3 incorrect entries (1 min, then 3 min); mechanical emergency key |
| Operating temperature | -20°C to +50°C; optimal -15°C to +40°C |
| Humidity | Up to 95% without condensation |
| Remote control range | Approximately 3 meters |
| Sensor maintenance | Clean with a slightly damp cloth; no cleaning products |
| Lock maintenance | Do not oil or grease |
| Replaceable parts | Batteries (AA), remote control battery (CR2032) |
| Supplied with | Cylinder, keypad, covers, adapters, screws, emergency key, batteries |
| Compatibility | Drilling lock for profile cylinder, door thickness up to 120 mm |
Frequently Asked Questions - TSE 6102 BURG WACHTER
User questions about TSE 6102 BURG WACHTER
0 question about this device. Answer the ones you know or ask your own.
Ask a new question about this device
Download the instructions for your Lock in PDF format for free! Find your manual TSE 6102 - BURG WACHTER and take your electronic device back in hand. On this page are published all the documents necessary for the use of your device. TSE 6102 by BURG WACHTER.
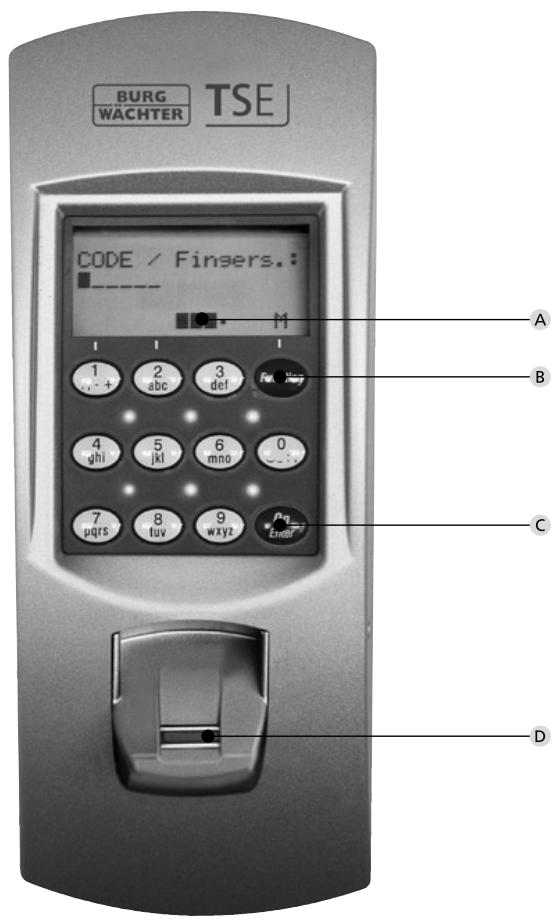
USER MANUAL TSE 6102 BURG WACHTER
A Battery status indication
Battery full Battery empty
B Function key
Entry into the menu for programming. In the menu, the keys "1" and "2" are intended as a scroll function. Besides this, you can use this key to skip always to the previous level of the menu.
C On/Enter key
Activation of the keypad for code entry, or for entering the menu.
D Fingerscan sensor (not with TSE 5001)
To open or register the particular finger.
Dear Customer,
Thank you very much for choosing the electronic lock system TSE 5000 by BURG-WÄCHTER. This system has been developed and manufactured using the latest technical potential and satisfies high security requirements.
The electronic cylinder can be used easily without any boring and installation of cables in any door prepared for profile cylinder up to a door thickness of 120mm . The electronic cylinder is perfectly suitable for both new installations and upgrading. Further, the BURG-WACHTER TSE 5000 system will offer you a variety of possibilities, e.g. which indent media you may use. Please read more to this on the following pages.
Important: Please read the entire User Manual before you start programming.
Enjoy your new lock system.
TSE Set 5001 PINCODE
The electronic cylinder is operated with a 6-digit code. As an option, also the radio controlled key TSE 5103 E-Key can be used.
TSE 5001 PINCODE functions (as standard)
Total number of users: up to 48
- To each pincode user (except administrator) also an E-Key can be assigned.
Optional locking media
- Radio controlled key TSE 5103 E-KEY
Time functions
- User timer (up to 24 different time windows) *
Permanent timer (up to 16 different time windows) * - (only together with an appropriate TSE software)
History function
- Storing of last 600 events (readout by optional TSE software)
Administrator code
Factory set to 1-2-3-4-5-6 (please be sure to modify)
Power supply
- 4 × MIGNON LR6 AA ALKALINE
Optical signaling
Optical signaling in the form of a LED is incorporated in the knob on the inner side of the door. This LED informs you on the following:
- 1 × brief: lock has been opened
- 2 × brief: lock has been shut
- every 5 sec. 1 × brief: permanent opening activated
- 1 × brief, 1 × long, 2 sec. pause, repeated: lock in programming mode
- 5 × brief, 2 sec. pause, repeating at 20 sec. battery empty
Technical data
| Blocking times | After 3 × wrong code is entered 1 minute, then always 3 minutes |
| Display | Adjustable to 12 languages |
| Power supply | 4 × MIGNON LR6 AA ALKALINE |
| Optimum ambient conditions | -15°C/+40°C/Up to 95 % rel. air humidity (noncondensing) Allowed temperature range: -20°C/+50°C As a result of extreme temperature changes, the display can react slowly or darken. |
TSE Set 5002 FINGERSCAN
Using this ident medium, you can control the cylinder based on fingerscan. In addition, the cylinder can be controlled by entering a 6-digit code.
Up to 24 fingers can be programmed using the keypad. The users are set separately (USER XXX_FP). In case a code and/or E-Key is to be assigned additionally to a user, this needs to be set separately.
Attention! The finger scanner must not be cleaned with detergents. Please use a slightly moist cloth for this purpose. Please make sure that the finger scan sensor is not exposed to direct rain.
TSE 5002 FINGERSCAN functions (as standard)
Total number of users: up to 48 of which number of fingerprints: up to 24
- To each code user (except administrator) also an E-Key can be assigned
- To each E-key user a code can be assigned
Optional locking media
Radio controlled key TSE 5103 E-KEY
Time functions
- User timer (up to 24 different time windows) *
- Permanent timer (up to 16 different time windows) *
- (only together with an appropriate TSE software)
- Presumably as from December 2009 it will be possible to programme a fingerscan considering also the time functions
History function
- Storing of last 600 events (readout by optional TSE software)
Administrator code
Factory set to 1-2-3-4-5-6 (please be sure to modify)
Power supply
- 4 × MIGNON LR6 AA ALKALINE
Optical signaling
Optical signaling in the form of a LED is incorporated in the knob on the inner side of the door. This LED informs you on the following:
- 1 × brief: lock has been opened
- 2 × brief: lock has been shut
- every 5 sec. 1 × brief: permanent opening activated
- 1 × brief, 1 × long, 2 sec. pause, repeated: lock in programming mode
- 5 × brief, 2 sec. pause, repeating at 20 sec. battery empty
Technical data
| Blocking times | After 3 × wrong code is entered 1 minute, then always 3 minutes |
| Display | Adjustable to 12 languages |
| Power supply | 4 × MIGNON LR6 AA ALKALINE |
| Optimum ambient conditions | -15℃/+40℃/Up to 95 % rel. air humidity (noncondensing) Allowed temperature range: -20℃/+50℃ As a result of extreme temperature changes, the display can react slowly or darken. |
TSE Set 5003 E-KEY
The electronic cylinder is operated by the radio controlled key E-Key. The principle of its function is similar to that of a car locking system. The cylinder can be controlled when the button is pressed once. The E-Key can be programmed afterwards via a keypad or a TSE software. The radio range of the E-Key is up to 3 m.
TSE 5003 E-KEY functions (as standard)
Total number of users: up to 48
Optional locking media
TSE 5103 E-KEY
TSE 6101 Keypad PIN
- TSE 6102 Keypad FS (up to 24 fingerprints possible)
Time functions
- User timer (up to 24 different time windows)*
- Permanent timer (up to 16 different time windows)
- (only together with an appropriate TSE software)
History function
- Storing of last 600 events (readout by optional TSE software)
Administrator code
The code is delivered on a separate sticker. Please store it carefully.
Attention: If the code gets lost it is impossible to change any programmation or use any of the administrator functions.
Power supply cylinder
- 2 × MIGNON LR6 AA ALKALINE
Power supply E-Key
- 1 × CR 2032
Optical signaling
Optical signaling in the form of a LED is incorporated in the knob on the inner side of the door. This LED informs you on the following:
- 1 × brief: lock has been opened
- 2 × brief: lock has been shut
- every 5 sec. 1 × brief: permanent opening activated
- 1 × brief, 1 × long, 2 sec. pause, repeated: lock in programming mode
- 5 × brief, 2 sec. pause, repeating at 20 sec. battery empty
Description of the menu functions
In the following the functions for the products TSE 5001 and TSE 5002 are described.
Menu functions
Menu code change
Changing the administrator code and the user codes
Activate the keypad using the ON/Enter key
- Then press Function. "Menu/Code change..." is displayed
- Confirm your choice with ON/Enter. Now you can use the keys 1 or 2 to scroll until the user, whose user code should be changed, is displayed
- Confirm with ON/Enter
- Enter the so far valid (previous) code and press ON/Enter
- Enter the new code confirm it with ON/Enter
- Repeat your entry and confirm it again with ON/Enter. After a successful entry, "Code change completed!" is displayed
Menu Language/Sprache
Language setup
Activate the keypad using the ON/Enter key
- Then press Function. "Menu/Code change" is displayed
- Scroll using the 2 key till reaching the appropriate menu item
- Confirm it with ON/Enter
- Scroll using the keys 1 or 2 until the required language is displayed
- Confirm it with ON/Enter
Menu Administrator
Various submenus are available under the
Administrator menu.
- Activate the keypad using the ON/Enter key
- Then press Function. "Menu/Code change..." is displayed
- Scroll using the 2 key till reaching the appropriate menu item.
- Confirm it with ON/Enter
- You can now use the scroll function to choose the following submenus:
Submenu user create
- Confirm it with ON/Enter. Now you can choose between entering a user code, programming an E-Key or saving a fingerscan (fingerscan only for TSE 5002 or with keypad TSE 6102 FS) or programming a transponder (only available for series TSE 6000).
- Scroll till reaching the appropriate function and confirm it with ON/Enter
Create code
- Enter the administrator code in order to acquire the authorization for programming
- The next free memory cell is indicated (e.g. USER.0003)
- Enter the 6 digit code and confirm it 2 × with ON/Enter
- "Data are stored" is displayed
- Create E-Key
- Enter the administrator code in order to acquire the authorization for programming
- The next free memory cell is indicated (e.g. USER.003), press ON/Enter
- Bring the E-Key into the programming mode (see the E-Key manual)
- Then confirm 2 × with ON/Enter
- "Data are stored" is displayed
- Create Fingerscan
(fingerscan only for TSE 5002 or with keypad TSE 6102 FS)
- Enter the administrator code in order to acquire the authorization for programming
- "Teach-in finger" is displayed
- Move the finger to be registered 5 × straight over the sensor (the number of these actions is counted on the display)
- "User_XXX_LP created" is displayed
- Create Transponder
The function is available only for series TSE 6000 System.
Submenu E-Key assign
Using this function, you can subsequently assign an E-Key to an already existing user. For this purpose, proceed as follows:
- Enter the administrator code in order to acquire the authorization for programming
- Scroll till reaching the user, to whom you intend to assign an E-Key, and confirm 2 × with ON/Enter
- Bring the E-Key into the programming mode (see the E-Key manual)
- Once the E-Key is in the programming mode, confirm on the keypad with ON/Enter
- "Data has been saved" is displayed
Submenu delete
Using this menu, you can delete a user.
- Scroll till reaching the appropriate menu and confirm it with ON/Enter
- Enter your administrator code
- Scroll till reaching the user or the ident medium (E-Key) you intend to delete and confirm your selection 2 × with ON/Enter
- "Data record is deleted" is displayed
Submenu Timer functions
This is intended for setting the time and date
Time entry:
- Select the function with ON/Enter
- Enter the hour (2 digits), confirm with ON/Enter
- Enter the minutes (2 digits), confirm with ON/Enter
Data has been saved
- Date entry:
- Select the function with ON/Enter
- Enter the day (2 digits), confirm with ON/Enter
- Enter the month (2 digits), confirm with ON/Enter
- Enter the year (2 digits), confirm with ON/Enter
Data has been saved
Submenu TSE-Setup
General system settings
RFID channel
The radio channel can be set up here (12 channels to select from). This can be required when the radio channel is already used by another application, e.g. WLAN, which can possibly lead to interference. In such case, please select another channel with a spacing of at least 3 channels.
- Priority
In case the door cannot be opened after several attempts with the E-Key, the priority of the door can be increased by this function. Conversely, it can be advisable in such a case to reduce the priority of doors in a direct vicinity.
- Restructure
The use of this function is recommended when several users have been deleted.
Install keyboard
After a replacement of the cylinder or the keypad, the two units have to be newly aligned, so that they can resume communication.
Registration of a keypad
- Activate the keypad using the ON/Enter key
- Then press Function. "Menu/Code change" is displayed
- Then use the keys 1 or 2 to scroll till reaching the Administrator menu.
- Confirm with ON/Enter
- Use the keys 1 or 2 to scroll till reaching the Admin.
Setup TSE setup menu
-
Confirm with ON/Enter
-
Use the keys 1 or 2 to scroll till reaching the Admin. Setup Register menu
- Enter the admin code of the unit to be registered
- "Data has been changed" is displayed after a successful registration
Attention: Make sure that no other powered TSE unit is placed within a direct reach of the device when registering a new keypad or a new cylinder, as such unit could be mistakenly addressed instead of the intended one. When in doubt, disconnect such units from power.
Submenu FS-Reset
(fingerscan only for TSE 5002 or with keypad TSE 6102 FS)
All the stored fingerprints are deleted, however, the corresponding users are retained. Please select this menu and follow the instructions on the display in case of repeated error functions related to the use of fingerprints.
Menu Key sync.
In this menu item, the channel of the E-Key can be adapted to the channel of the input unit. This function is necessary when the radio channel of the cylinder is modified, although E-Keys with the old channel setup are still in use.
- Press ON/Enter
- Bring the E-Key into the programming mode (see the E-Key manual)
- "Data has been saved" is displayed
Menu Info
The version and serial numbers of the system are displayed using this function.
User Manual TSE E-Key
The E-Key is intended as radio transmitter for releasing the cylinder. The E-Key can be programmed by means of a keypad or of a TSE software. The radio range of the E-Key is up to 3m . The principle of its function is similar to that of a car locking system. The cylinder can be controlled when the button is pressed once.
E-Key functions
Door opening:
Press 1× briefly, green LED flashes
Automatic function (only together with a keypad) Hold the button pressed for 6 seconds, green LED flashes briefly 2× in a row
In the automatic mode the door can be opened by pressing the On/Enter button on the keypad. For this purpose, the E-Key must be within the radio range. This function is automatically deactivated after a period of 15 minutes.
Programming mode:
The programming mode has three purposes:
- Registration of an E-Key by means of a keypad or of a TSE software
- Synchronization of the radio signal set up in the E-Key with the channel set in the lock
- Searching for the E-Key within the TSE software
E-Key programming
When programming the E-Key for the first time, please press the button once (green LED flashes) when being required to do so by the keypad or by the software.
When programming the E-Key later on, please keep the button pressed for a period of 10 seconds, until the green LED flashes three times in a row. Then release the button.
Remarks
In case the door opens with a delay of 3 to 7 seconds after the button on the E-Key is pressed once, and the red LED flashes, the battery (CR2032) in the E-Key should be replaced immediately.
In case the door opens with a delay of 3 to 7 seconds after the button on the E-Key is pressed once, and the red LED does not flash, the batteries (2 × 1.5V LR06 alkaline) in the cylinder should be replaced. This is also valid for the keypad if existing.
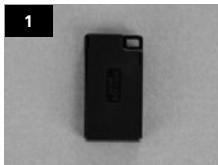
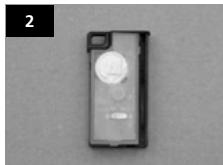
Battery replacement
1 Open the housing cover by carefully forcing open the detent lugs.
2 Lift the silicon pad and replace the battery.
3 Clap the silicon pad back and close the cover.
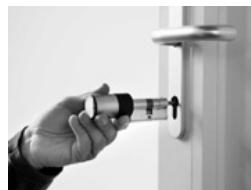
Assembly instruction cylinder TSE 5000
The installation of the TSE cylinder is described below. Please read this Assembly Manual carefully before the assembly and then store it at a safe place.
The cylinder is provided with a special detent system offering you a possibility to use the cylinder for doors up to a thickness of 120mm (60/60 mm, measured at the cylinder fixing screw). No prior adjustment is necessary.
The fixing of the rotary knobs is provided with an incorporated locking screw in each knob.
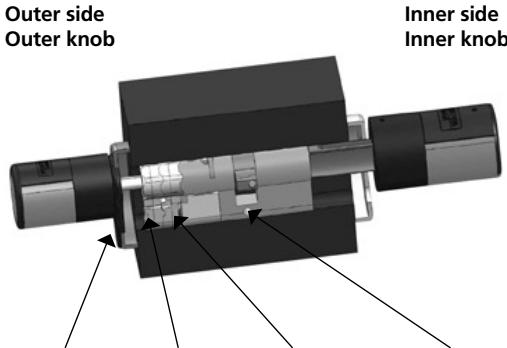
Cover panel
Adapter 2
Adapter 1
Cylinder fixing screw
Remark
The base size of the cylinder is 30mm per side. When delivered, the cylinder is completely collapsed (the smallest door thickness). Before you insert the cylinder into the door, you should adjust it to your door thickness.
When installing the cylinder, proceed as follows:
1 Take a rough measurement of the door thickness (incl. fittings).
2 Pull the outer knob from the shaft, move the inner knob over the detent system (spacing 2.85mm ) to the required dimension.
Attention: Never pull the inner knob completely from the shaft, this can lead to damaging of the electronics.
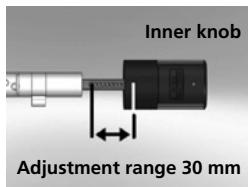
Schematic illustration of setup of the inner knob
3 Depending on the door thickness, you can affix an appropriate adapter on the outer side, in order to improve the path for the emergency key.
The following combinations are possible:
| Space detent bolt / mounting (mm) on the outer side | Adapter 1 | Adapter 2 |
| < 43 | - | - |
| 44–53 | X | - |
| 54–60 | X | X |
X: To be selected
Not provided
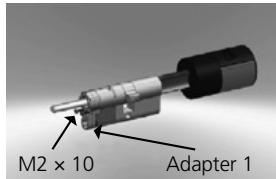
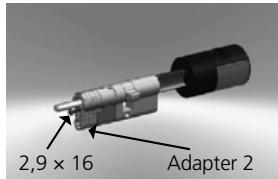
Table: cylinder fixing screw/mounting [mm] on the outer side and the required adapter.
4 Move the TSE cylinder from inside to outside through the mortise lock into the door and then tighten the cylinder fixing screw.
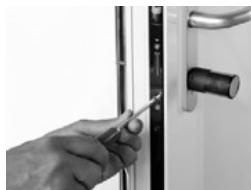
5 Shift the inner knob over the shaft until attaining the required dimension. Please make sure that the clearance between the knob and the door mounting is at least 1mm . Then fix the knob using the hex key.
6 Before you fix the outer knob, please consider whether you wish to use the attached cover panel for the profile cylinder section. If so, remove the protective films and fix the cover panel onto the fitting.
7 Shift the outer knob into the required position on the shaft and fix it with a clearance of at least 1mm from the mounting using the hex key.
8 Remove the battery protective strip from the inner knob.
9 The function test should be performed with an open door.
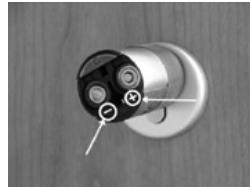
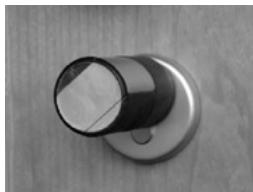
Replacement of batteries - knob (inner side)
1 Using the attached hex key, loose the top locking screw on the knob cover. It can be turned out only up to the opening of the cover and will not fall out.
2 Lift the cover up.
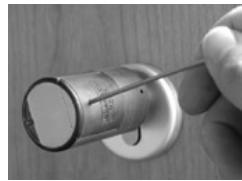
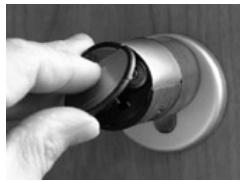
3 Replace the batteries. Make sure the batteries are inserted with a correct polarity, indicated at the marked point on the housing.
4 Replace the cover.
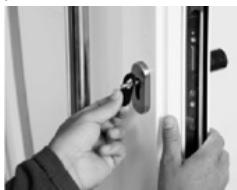
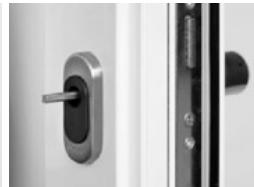
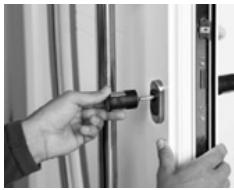
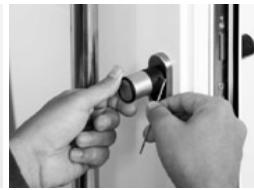
Emergency key function (outer side)
Using the emergency key, you can provide access in case of failure of the system.
1 Swing the emergency key open and then insert it into the indicted slot in the cover panel.
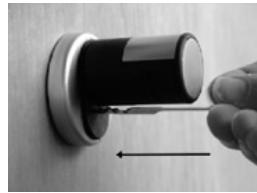
2 Turn the key 90^ clockwise. If required, move the outer knob slightly to the right and left in order to release the mechanism.
3 Turn the outer knob. The lock opens when fully turned, at the latest.
Turn the key to its initial position and take it out. To close the emergency lock, the knob shall be turned twice fully in both directions.
Attention: The lock may neither be greased nor oiled!
Mistakes and changes reserved.