660T - Laptop MAXDATA - Free user manual and instructions
Find the device manual for free 660T MAXDATA in PDF.


User questions about 660T MAXDATA
0 question about this device. Answer the ones you know or ask your own.
Ask a new question about this device
Download the instructions for your Laptop in PDF format for free! Find your manual 660T - MAXDATA and take your electronic device back in hand. On this page are published all the documents necessary for the use of your device. 660T by MAXDATA.
USER MANUAL 660T MAXDATA
Table of Contents 37
Notice 39
Regulatory Information 39
Usage & References 39
Federal Communications Commission Statement: FCC 40
Sound pressure level 40
Note for the user: 40
CD-ROM-Drive: 41
Take back guarantee 41
Important safety instructions 42
Item Checklist 44
The preparation 45
Inserting the Battery 46
Power supply Hardware 47
Turning on the computer 48
Power Management 49
Intel SpeedStep R 50
A Short tour around your system 51
Left and right side 51
Rear and Bottom view 52
Explanation of the LED - signals 53
Key combinations 54
The Keyboard 55
The Touchpad 56
The Floppy Disc Drive 57
The CD - device 57
The PC - Card - Slot 58
SD Media and Memory Sticks 58
Appendix A - Specifications 59
Appendix B - Troubleshooting 62

NOTICE
The company reserves the right to revise this publication or to change its contents without notice. Information contained herein is for reference only and does not constitute a commitment on the part of the manufacturer or any subsequent vendor. They assume no responsibility or liability for any errors or inaccuracies that may appear in this publication nor are they in anyway responsible for any loss or damage resulting from the use (or misuse) of this publication.
This publication and any accompanying software may not, in whole or in part, be reproduced, translated, transmitted or reduced to any machine readable form without prior consent from the vendor, manufacturer or creators of this publication, except for copies kept by the user for backup purposes.
Brand and product names mentioned in this publication may or may not be copyrights and/ or registered trademarks of their respective companies. They are mentioned for identification purposes only and are not intended as an endorsement of that product or its manufacturer.
©July 2001
Regulatory Information
This product incorporates copyright protection technology that is protected by method claims of certain U.S. patents and other intellectual property rights owned by Macrovision Corporation and other rights owners. Use of this copyright protection technology must be authorized by Macrovision Corporation, and is intended for home or other limited viewing uses only unless otherwise authorized by Macrovision Corporation. Reverse engineering or disassembly is prohibited. Intel and Pentium are registered trademarks of Intel Corporation.
MS-DOS, Windows, Windows 95, Windows Me, Windows 98, Windows 2000 and Windows NT are registered trademarks of Microsoft Corporation.
Usage & References
This Concise User, s Manual is a brief introduction and quick guide to getting your system started. This is a supplement, not a substitute for the expanded Service Manual. All references are to the accompanying CD-ROM, Device Drivers and Tools which contains the expanded Service Manual (in Adobe Acrobat format), drivers, and special tools for your notebook computer. If you plan on using another operating system, not covered in these publications, please
refer to the „ ReadMe“ files on the CD-ROM and consult that operating system’s vendor to see if it is suitable with our components. The Device Drivers & Tools CD-ROM does not contain the operating system itself.
Note: Some or all of the computer's features may already be setup. If they aren't, or if you need to reconfigure (or reinstall) portions of the system, refer to the expanded Service Manual on the Device Drivers and Tools CD-ROM
Federal Communications Commission (FCC) Statement
This equipment has been tested and found to comply with the limits for a Class B digital device, pursuant to Part 15 of the FCC Rules. These limits are designed to provide reasonable protection against harmful interference in a residential installation.
This equipment generates, uses and can radiate radio frequency energy and, if not installed and used in accordance with the instructions, may cause harmful interference to radio communications. However, there is no guarantee that interference will not occur in a particular installation. If this equipment does cause harmful interference to radio or television reception, which can be determined by turning the equipment off and on, the user is encouraged to try to correct the interference by one or more of the following measures:
Reorient or relocate the receiving antenna.
Increase the separation between the equipment and receiver.
Connect the equipment into an outlet on a circuit different from that to which the receiver is connected.
Consult the dealer or an experienced radio/TV technician for help.
Sound pressure level
The sound pressure level in your working environment does not exceed 55dB A.
Note for the user:
- Although this device has been tested excessively on harmful interference and has found to comply FCC regulations, you should consider that, when using external data cables, in some cases this device may emit some interference.
Therefore please follow the instructions listed below:
- In case a data cable that was supplied by the manufacturer needs replacement,
please make sure that you obtain a new cable that meets the quality of the original cable, in order to assure further compliance with FCC regulation.
- Please only use shielded cables and only devices that meets the same high EMC and Safety standards as this notebook.
- Not following these notes, may cause the device not to comply with above standards anymore!
CD-ROM Drive:
- The CD-ROM drive in this product is a Class 1 Laser Product. Do not open the device or look into the laser beam, not even with optical instruments.
- If the device is not explicitly reported to be fit for simultaneous multiple CD usage, insert one CD only.

Take back guarantee
We issue a take back guarantee on your notebook:
All materials used on your notebook are fully recyclable. The card board box and all other card board material contained within is fully recyclable
IMPORTANT SAFETY INSTRUCTIONS
The notebook computer is quite rugged, but it can be damaged. To ensure that does not happen, follow these suggestions:
- Don't drop it.
- Don ,t overheat it. Keep the system away from heating elements and direct sunlight.
- Avoid electromagnetic interference. It can also damage your data.
- Keep it dry. This is an electrical appliance!
- Be careful with power. The computer has specific power requirements: Only use an approved power adapter. Your AC adapter requires a steady, uninterrupted power flow. If you are unsure of your local power specifi-
WARNING

ons, consult your dealer or local power company.
The power adapter must have a grounded plug. If you do not have access to a compatible outlet, have a qualified electrician install one.
When you want to unplug the power cord, disconnect it by the plug head, not the wire.
Before cleaning, disconnect the computer from any external power supplies (i.e. AC adapter or car adapter).
- Battery Precautions
ATTENTION

Only use batteries designed for this computer.
Recharge the batteries using the notebook ,s system.
Do not try to repair a battery pack. Contact your dealer or qualified service personnel to replace a defective battery. Keep children away from and promptly dispose of a damaged battery. Always dispose of batteries carefully.
Batteries may explode or leak if exposed to fire, or improperly handled or discarded.
The product that you have purchased contains a rechargeable battery. The battery is recyclable. At the end of its useful life, under various state and local laws, it may be illegal to dispose of this battery into the municipal waste stream. Check with your local solid waste officials for details in your area for recycling options or proper disposal.
WARNING

- UL® Mainboard Battery Note
CAUTION: Danger of explosion if battery is incorrectly replaced. Replace only with the same or equivalent type recommended by the manufacturer. Discard used battery according to the manufacturer's instructions.
- SERVICING & CLEANING
Do not attempt to service the computer yourself! Doing so may violate your warranty and expose you and the computer to electric shock. Refer all servicing to authorized service personnel. Unplug the computer from the power supply. Then refer servicing to qualified service personnel under any of the following conditions:
WARNING

- When the power cord or AC/DC adapter is damaged or frayed.
- If the computer has been exposed to rain or other liquids
- If the computer does not work normally when you follow the operating instructions.
- If the computer has been dropped or damaged.
- Cleaning
Do not apply cleaner directly to the computer, use a soft clean cloth. Do not use volatile (petroleum distillates) or abrasive cleaners on any part of the computer.
ITEM CHECKLIST
When you are unpacking your notebook, please make sure your package is complete. If you discover damaged or missing items, please contact your retailer.
First unpack
- Notebook
- Accu
- Utility CD Intel® SpeedStep® incl.
- Power Supply
- Power Cord
- Manual
- CD-ROM Drive (built in)
- Floppy drive
Modem Cable
In case you have to ship your notebook for servicing or upgrading, always use the original packaging. Therefore do not throw the original packaging away.
THE PREPARATION
Before you use the notebook the first time, please take some time to get accustomed with your note-book. Shift the cover latch (1) to the right and open the display.
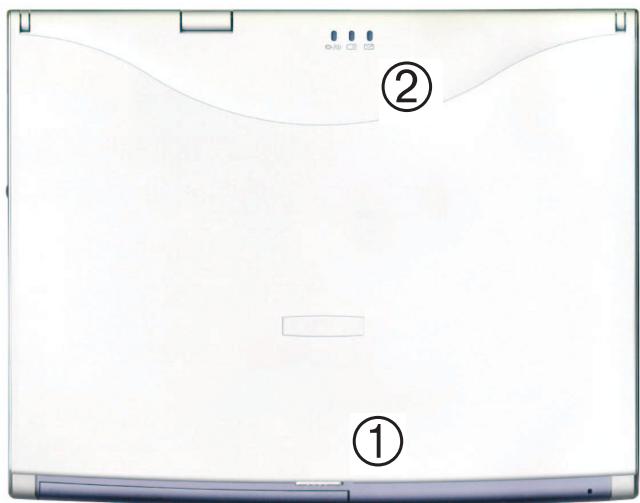
Figure 1
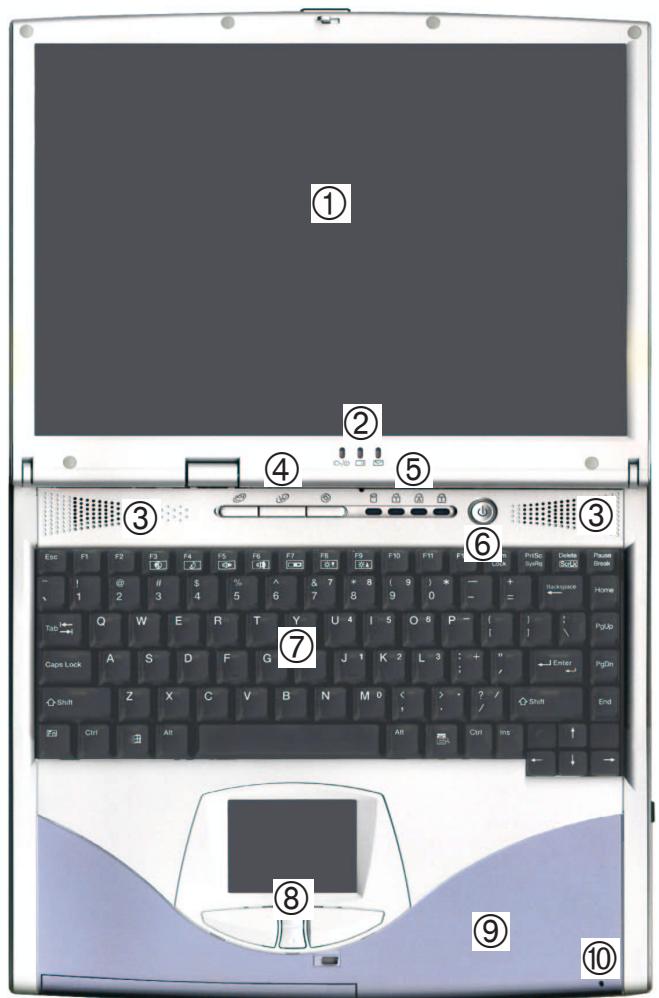
Figure 2
(1) Cover latch
② LED Power indicators:
Power
Accu
New mail has arrived
① LCD-Display
② LED Power Indicators
(3) Speakers
(4) Three hot-key buttons
⑤ LED status indicators
- Harddisc
- Numlock
- Capslock
- Scroll - Lock
(6) Power button (A short pressing of this button - less than 1sec.- with running system will activate the „suspend“ Mode
(7) Keyboard
⑧ TouchPad and buttons
Cover (changeable)
Microphone (built-in)
INSERTING THE BATTERY
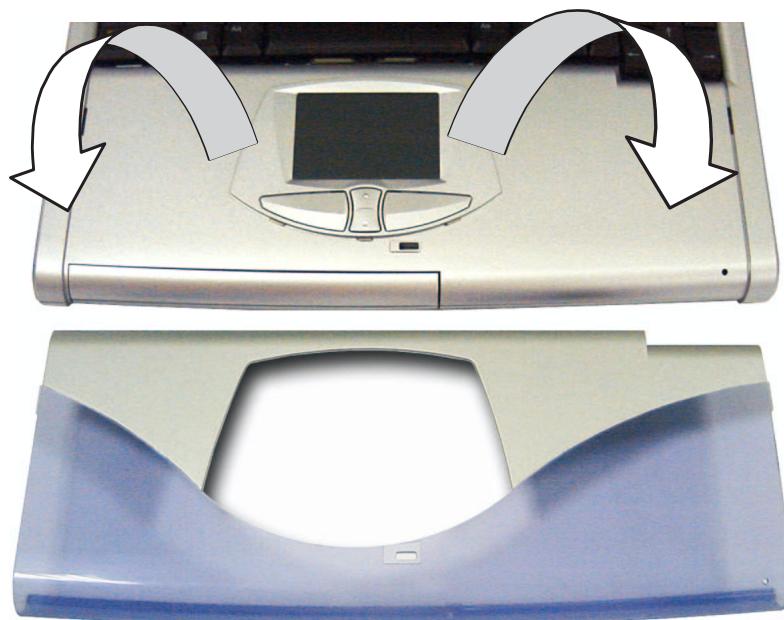
Figure 3
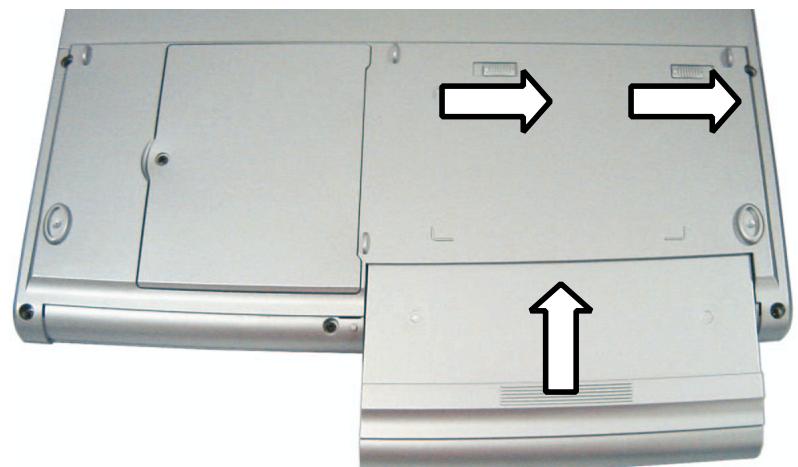
Figure 4
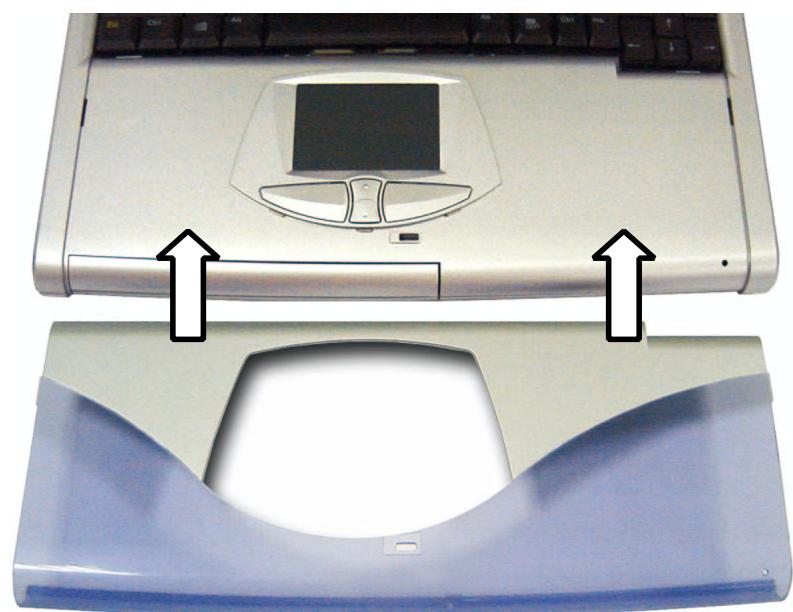
Figure 5
Your Notebook comes with a partially charged battery.
Take the new battery from its wrapping and insert it into the notebook as shown in figure 3, 4 and 5.
Remove the palm rest by applying gentle upward pressure with your fingers close to the area around the left Alt key, and the right Ctrl key.Pull the palm rest forward (Figure 3).
Insert the battery as shown in Figure 4.
Slide the palm rest back in to place, applying a slight downward pressure to the left and the right side (see Figure 5) in order to snap it gently back in to place.
POWER SUPPLY HARDWARE
The Notebook can be operated by battery or by power supply.
The initial use will be by power supply, as the battery is ony partially loaded for shipping.
Only use the original power supply. A wrong power supply can damage your notebook.

WARNING
The Power Supply contains no servicable parts
DANGER!!
The notebook comes with an AC power cord and a universal, autoswitching power adapter.
You can use the adapter anywhere the voltage is steady, between 100 and 240 volts.
When the adapter is connected to a power source and then to the computer, the Power icon lights up to indicate the system is receiving AC power.
To use the AC adapter: :
- Plug the power cord to the power adapter.
- Plug the power adapter to the DC IN 19V socket on the computer's rear panel.
- Plug the power cord into a wall outlet.
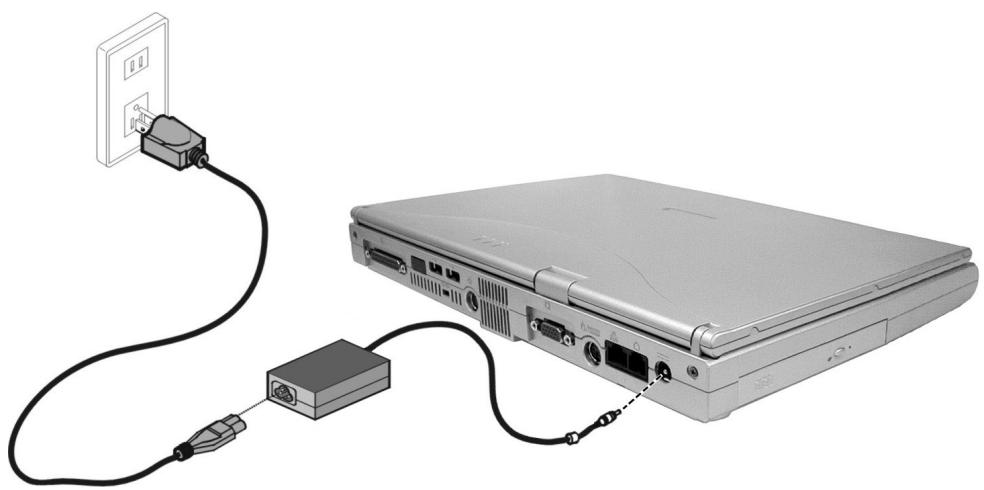
Figure 6
TURING ON THE COMPUTER
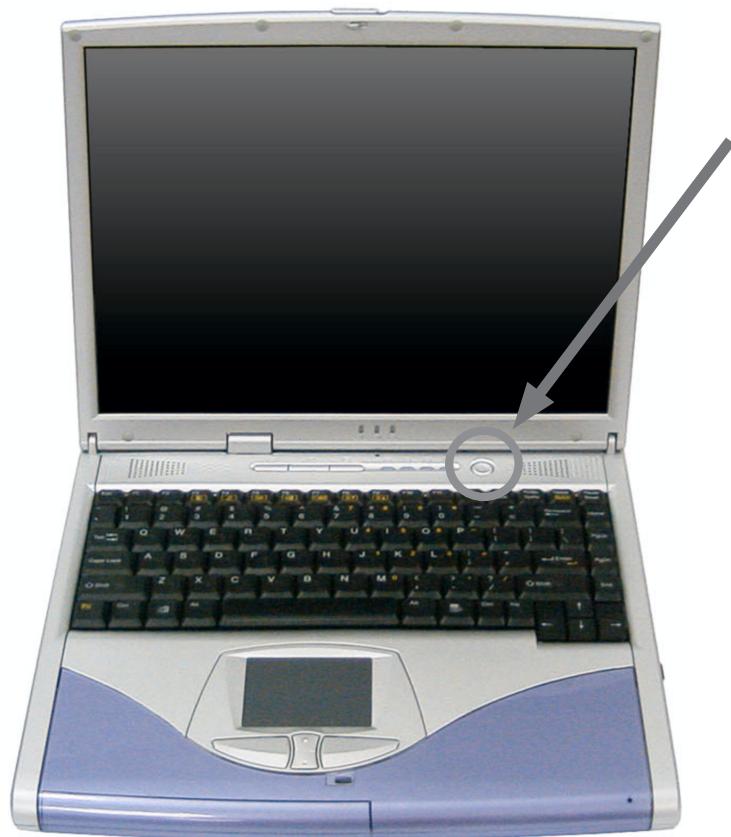
Figure 7
Now you are ready to begin using your new notebook computer. To turn it on simply press the power button in the top right of the front panel. When the computer is turned on, the Power Button can also be used as a Standby/ Hibernate/Shutdown hotkey button if pressed less than 4 seconds (pressing and holding the Power Button for longer than this will shut the computer down) and appropriately configured in the OS Control Panel (Power Management or Power Options).
Shutdown
Please note that you should always shut your computer down by choosing the Shut Down command from the Start menu in Windows. This will help prevent hard disk or system problems.
Forced Off
If the Ctrl + Alt + Del key combination doesn't work when the system "hangs", press the power button for 4 seconds to force the system to turn itself off.
POWERMANAGEMENT
Your system is designed to work with both APM and the newer (and more effective) ACPI power management systems.
PC Card Warning
Do not remove or change the PC Card while the system is in Save to Disk Mode. The slot is turned off and any change in the system configuration may cause prob-lems when the computer comes back on.

ATTENTION
HARDWARE (BATTERY STATUS & WARNINGS) After the POST finishes, the battery status LED indicates the battery ,s charge level. When the battery is low, this icon flashes. Save your work immediately and connect the AC- Adaptor.
LOW BATTERY & SUSPEND
The most basic of the computer, s features provide some protection when battery levels get too low ( and you , re not using the adapter). The computer reacts in one of two ways:
WITHOUT SAVE TO DISK
If your system doesn ,t have a Save to Disk file or partition on your HDD, information is saved to the RAM and the system goes into Suspend ( low power) mode.
WITH SAVE TO DISK
The system records status information to a special file or partition on the HDD and then turns itself OFF. If a Save to Disk file or partition isn ,t avail-able, the system goes into „Suspend „mode
INTEL® SPEEDSTEP®
If you have purchased a product with the Intel ® SpeedStep Pentium -M ® CPU, please read the following note carefully:
The software for a fault free use of the SpeedStep - Frequency switching in the Powermanagement is preinstalled on your hard disc.
After the system has rebooted, double click the newly generated flag symbol on the bottom right hand corner of your screen.
By doing this, you can change additional settings. Pressing the „Apply“ Button will implement these changes.
ATTENTION

! IMPORTANT !
Keep the Intel ® SpeedStep diskette / CD in a safe place, together with your Operatings System CD. In case you need to re-install your OS, the diskette is needed again.
! IMPORTANT
Left and right side view

Figure 8
(1) CD- resp. DVD- ROM Drive *
(2) CD-Eject button
(3) Emergency Unlock *2
(4) Busy Indicator

Figure 9
(1) Microphone-in jack and Speaker-out jack
(2) S/PDIF Port.
(3) SD port 2
(4) Sony Memory Stick port3
(5) Floppy disk drive with Floppy disk eject switch **
(6) Dual PC card slots with PC card socket eject buttons
(7) IEEE 1394 port
(8) Dual USB ports *2
(9) Vent

-
depending on system configuration *2 Use a small object (e.g. a needle) Only use when you have to open the drive without power
-
S/ PDF Port You can use this port for S/ PDF (Sony/ Philips Digital Interface Format) output, which allows you to connect your DVD-capable PC to a Dolby AC-3 compatible receiver for "5.1" surround sound.
^*2 This port accepts SD (Secure Digital) memory cards.
*3 This port accepts Sony's Memory Stick.
** Don't try to remove a floppy disk while the system is accessing it. This may cause the computer to "crash" and damage your data.
**2 Windows NT 4 doesn't support USB
Rear View

Figure 10
(1) Parallel port
(2) Infrared port
(3) Vent
(4) Security lock
(5) Dual USB ports *
(6) S-Video Connector
(7) External Monitor (CRT) Port
(8) PS/2 type port (ext. Mouse or Keyboard)
(9) LAN jack/Phone jacks
(10) AC-in jack
- Windows NT 4 doesn't support USB
Bottom View
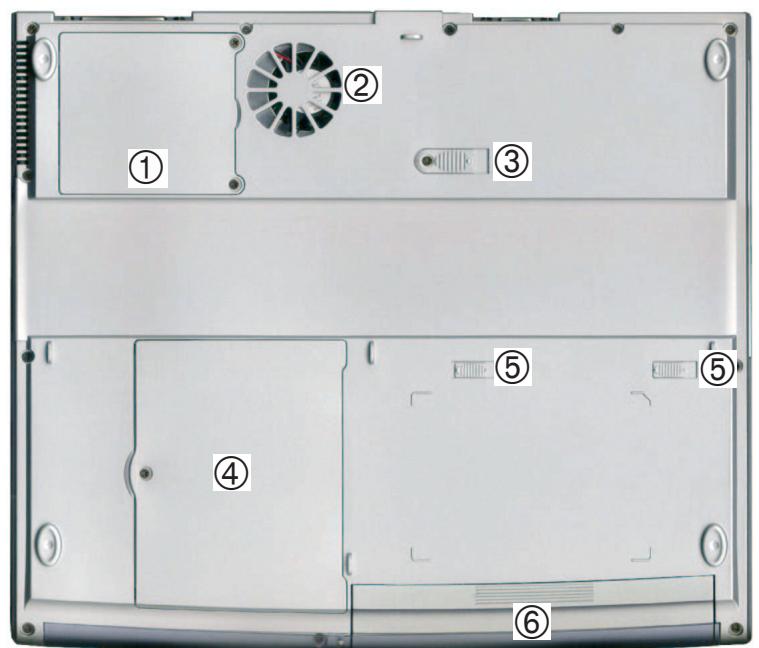
Figure 10
(1) CPU cover
(2) Fan outlet *
(3) CD-ROM or DVD-ROM Drive release latch
(4) Cover for HDD (Hard Disk Drive)
(5) Battery release latches
(6) Battery
*Overheating To prevent your computer from overheating make sure nothing blocks the vent while the computer is in use.
LED Power / Status Indicators
Table 1
| Icon | Color | Description |
| D:/ | Yellow | AC Power is plugged in |
| Green | The computer is turned on | |
| Blinking | The system has entered the configured standby mode | |
| Green | ||
| III | Yellow | The battery is being charged |
| Green | The battery is fully charged | |
| Blinking | The battery has reached critically low power status | |
| Yellow | ||
| Green blinking | New mail has arrived. | |
| Green | The floppy disk drive/ hard disk drive/CD device is being accessed. | |
| I | Green | Num Lock is activated. |
| A | Green | Caps Lock is activated. |
| ↓ | Green | Scroll Lock is activated. |
Key Combinations
On the bottom-left of the keyboard is the Fn key or Function key. The Fn key allows you to change operational features instantly. To use the following functions, press and hold the Fn key; then press the appropriate function key (Esc, F3, F5, etc.) located at the top of your keyboard (See Figure 12).
Table 2
| Keys | Description |
| Fn + F3 | Turn audio on/off |
| Fn + F4 | Toggle between suspend/resume state |
| Fn + F5 | Decrease audio volume |
| Fn + F6 | Increase audio volume |
| Fn + F7 | Toggle between CRT/LCD/LCD and CRT |
| Fn + F8 | Decrease LCD brightness. |
| Fn + F9 | Increase LCD brightness. |
| Fn + F12 | Toggle the TouchPad on/off |
| Fn + ScrLk | Enables Scroll Lock |
The Keyboard
Type -
Your computer's keyboard has all the functions of a full-sized AT-compatible keyboard plus a few extras: These keys are like those on a typewriter.
Function -
Many operating systems (and applications) use these keys to access special features, so you should consult those manuals.
Hot Keys -
These keys (and combinations) control some of the hardware.
Press Fn + NumLk to turn on the embedded numeric keypad (outlined).
The LED will light
Function Keys:
See also Table 2 Key Combinations
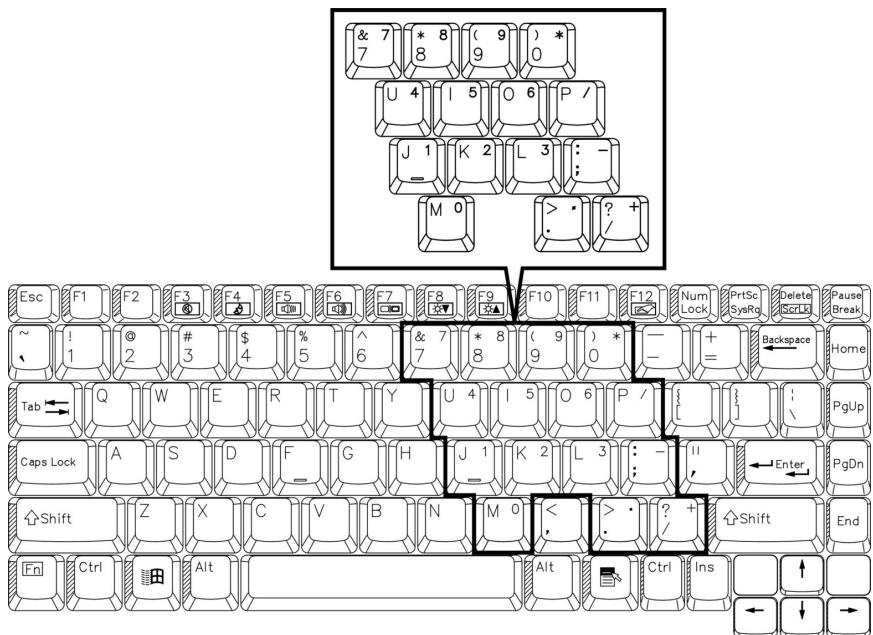
Figure 11
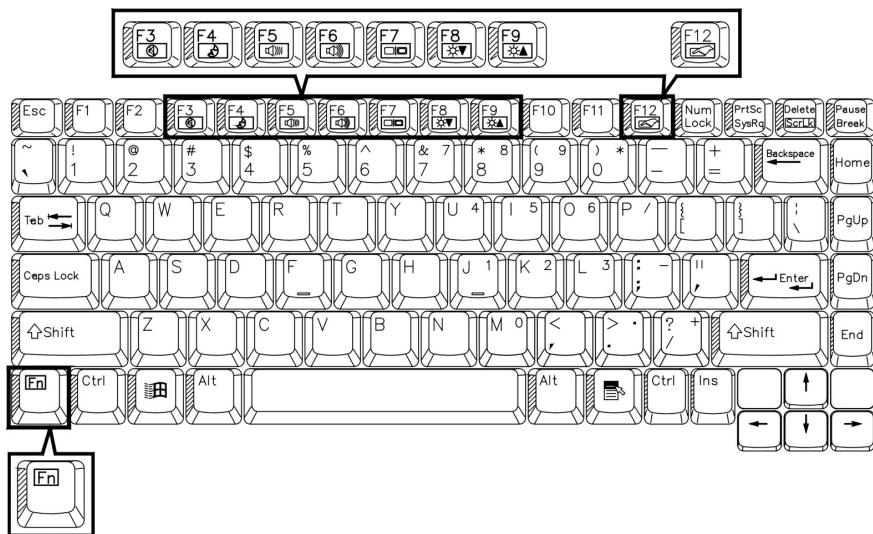
Figure 12
The TouchPad
The system automatically enables the built- in TouchPad. So, if you're using any version of Windows , you don't have to install any other drivers for it.
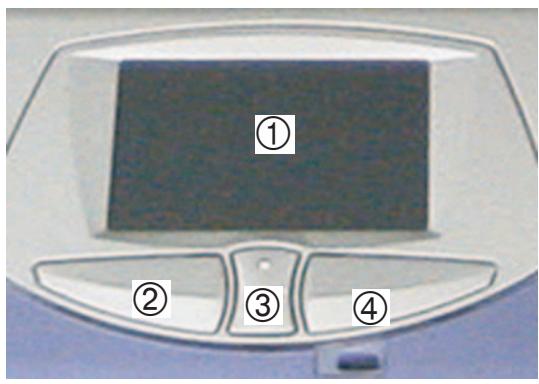
Figure 13
(1) sensor pad
(2) left ,,mouse ,,button
(3) Rocker Switch - may be configured to function as a “third” button if you prefer
(4) right ,,mouse“ ” button
Note for left-handers:
Most operating systems allow you to reverse the mouse-button settings
You can configure the functions from the TouchPad driver icon on the Task Bar.
You may toggle the TouchPad on and off by means of the Fn and F12 keys as indicated in “Key Combination”
You can also add a mouse to your notebook computer. You can use a mouse through either the PS/2 interface or through one of the USB ports.

ATTENTION
Please note that peripherals (printers, digital cameras, etc.) which attach to your computer by either USB or IEEE1394 ports may be connected after Windows is up and running. All other peripherals must be connected before you turn on the system.

ATTENTION
The Floppy Disk Drive (FDD)
The computer is equipped with a fixed 1.44 MB, 3.5” floppy disk drive module. By default it is drive “A:”.

ATTENTION
Don't try to remove a floppy disk while the system is accessing it. This may cause the computer to "crash" and damage your data.
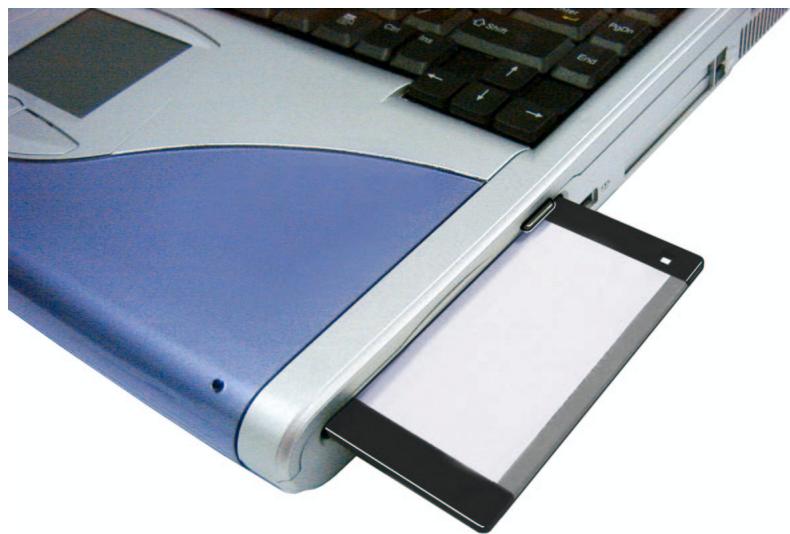
Figure 14
When using the floppy drive, always insert your floppy diskette with the label-side facing up. To remove the inserted diskette, press the eject button on the top-right corner of the floppy drive.
The CD Device
To insert a CD disk, press the Open Button and carefully place a CD disk onto the Disc tray with label-side facing up.
Push the CD tray in until its lock " clicks" and you are ready to start. The Busy Indicator will light up while data is being accessed or while an audio CD is playing. If power is unexpectedly interrupted, insert an object such as a straightened paper clip into the emergency eject hole to open the tray.
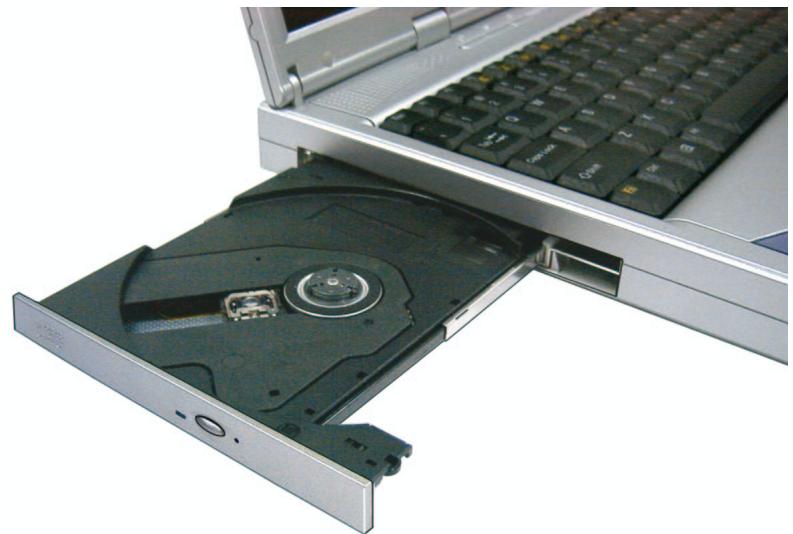
Figure 15
The PC Card Slot
The computer is equipped with two PC card slots. These are PCMCIA 3.3V/ 5V/ 12V sockets, type II x2 or type III x1.Type III PC cards only fit into the lower socket.
Align the PC card with the slot and push the card in until it locks into place.
To remove a PC card, simply press the eject button next to the slot.
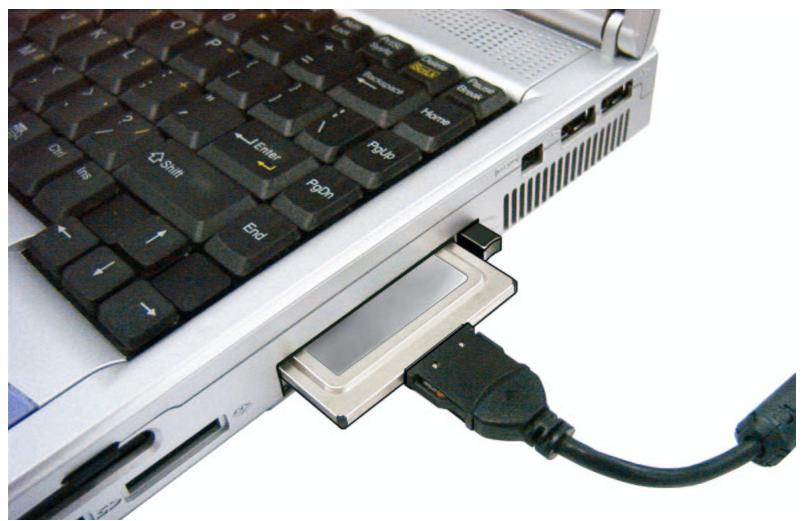
Figure 16
SD- Media and Memory Sticks
The Memory Stick and the Secure Digital Media should be inserted until it ‘clicks’ into place.
They will appear as a Removable Disk when you double-click the My Computer (icon) on your desktop in Windows. They may be removed by pressing your finger against them to eject. Be careful not to do this while information is being written to, or read from the or you could lose data.
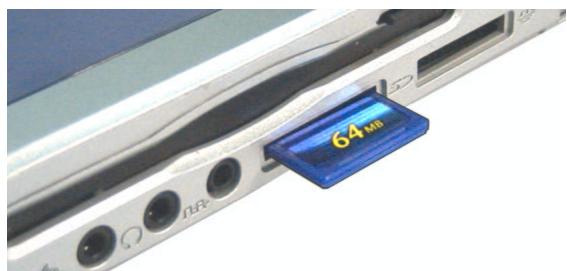
Figure 17
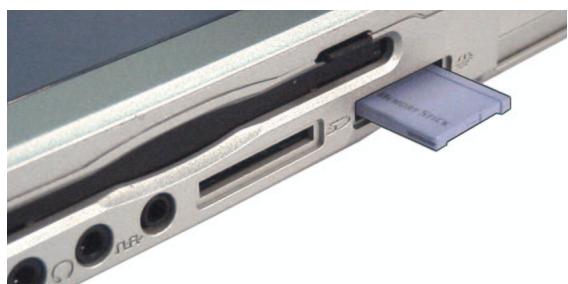
Figure 18
CPU
- Mobile Intel® Pentium® III Processor - M 866MHz- 1,2 GHz
· FCPGA package
MEMORY
Two SODIMM sockets
- Expandable memory up to 1GB (upon market introduction)
BIOS
One 512KB Flash ROM
Phoenix BIOS
LCD
14.1" TFT XGA 1024x768, or 15.0" TFT SXGA+ 1400x1050
Core Logic
INTEL - M FW82830MP
Display
ATI M6-P Integrated AGP 4X
Integrated 128-bit 2D / 3D Graphics Accelerator
- Advanced HW Acceleration for DVD Playback (Motion Compensation engine and IDCT)
Fully DirectX 8 Compliant Graphics Engine
External memory up to 32MB of DDR SGRAM on board
Dual-view Display Monitor (if supported by OS)
Keyboard
Win key, Multi-Language
Storage
3.5” 3- mode FDD
2.5” 9.5 mm (h) HDD
- Bay one for CD-ROM (24X speed), or 8X DVD-ROM and CD-RW are optional
Support Master mode IDE, support PIO mode 4 / ATA-33/66/100 (Ultra DMA)
Audio
AC’97 Compliant Interface
3D stereo enhanced sound system
Sound- Blaster PRO compatible
S/PDIF AC3 Digital output (5.1 CH)
Built-in microphone and Headphone out
Built-in 2 speakers
PC Card Sockets
- Two PCMCIA 3.3 ~V / 5 ~V / 12 ~V sockets, type II x2 or type III x1
Support TWO CardBus slots
Interface
Built-in Touch pad (Scrolling Key functionality integrated))
Four USB ports
One IEEE 1394 port (Mini)- i. Link compatible
One S-Video jack for TV output
One parallel port (LPT1), support ECP / EPP
Infrared file transfer
External CRT monitor
One PS/2 port support mouse or keyboard
One headphone jack
One microphone jack (mono)
One S/PDIF jack
One RJ-11 jack for Modem
One RJ-45 jack for LAN
DC-in jack
Build-in 3 instant keys, www, email, DVD Player
One SONY standard Memory Stick jack
One PANASONIC SD Memory jack
Communication
- 10/ 100Mb Ethernet LAN built-in
802.11b Wireless LAN - 56K MDC Modem with V.90 & V.92 compliant
Power Management
- Support ACPI v1.0b
- Support APM v1.2
- Support "Suspend to RAM"
- Support "Suspend to disk"
- Battery low suspend
Power
- Full Range AC adapter AC in 100 240V , 50 60Hz , DC Output 20V , 3.25A
- Support one removable Smart Li-Ion Battery 80W
Indicator
- LED indicator (HDD, Power on/ AC-In/SUSPEND, Battery Charging/ Battery full, E-mail, Num Lock, Caps Lock, Scroll Lock)
EMC & Safety
FCC Class B, CE, VCCI, C-TICK, BSMI, UL, CUL, TUV, CB
S/W Certificate
- MICROSOFT WHQL and WINKEY Logo, MACROVISION
Environmental Spec
• Temperature /
-
Relative Humidity
-
Operating: 5 C^ 35 C^ /
-
Operating: 20% 80%
-
Non-Operating: -20C^ 60C^
Non-Operating: 10% 90%
Physical
• 313mm wide , 272mm deep , 43mm height - with 14.1” LCD
• 331mm wide , 272mm deep , 45mm height - with 15.0” LCD
Weight
- 2.8 ~kg / o Battery with 14.1" LCD
- 2.95 ~kg / o Battery with 15" LCD
TROUBLESHOOTING
If something goes wrong with your system, check here before you panic. If you don't find the answer, check the expanded Service Manual (on the Device Drivers &Tools CD-ROM). If the system still won't cooperate, try turning it off for a few minutes and then rebooting. You will lose any unsaved data, but it may start working again. Then call your dealer or service representative..
YOU TURNED THE POWER ON BUT IT DOESN'T WORK .
possible cause:
Battery missing /incorrectly installed
indicator: Power LED doesn't light.
solution:
Check the power bay, make sure the battery is present and seated properly.
o Make sure there's nothing interfering with the battery contacts.
Plug in the AC power source and allow the system to recharge the battery (if present).
possible cause:
Low battery
indicator: Battery LED is flashing.
solution:
Plug in the AC power source. If the computer doesn't start up immediately, turn it off then on again
NOTHING APPEARS ON THE SCREEN.
possible cause:
Power saving activated.
indicator: The Suspend LED is flashing.
solution:
o Toggle Fn + F4
possible cause: The screen controls need to be adjusted..
solution:
o Toggle Fn + F7
o If an external monitor is connected, turn it on
possible cause: The computer is set for a different display
solution:
o Toggle Fn + CRT
o If connected to an external monitor, plug in the monitor and turn it on. Also check its brightness and contrast controls.(Refer to the expanded Service Manual for a more permanent solution.).
THE SYSTEM FREEZES.
possible cause:
Power saving features have timed-out.
indicator: The screen goes dark.
solution:
Press the Fn +F4 key combination, or press the On/Off switch if no LEDs are lit indicator:
A software conflict made the system „crash „
solution:
o Consult your operating system manual.
o As a last resort, since you will lose any unsaved data, try to reboot the system or if that doesn't work, turn the computer off and on again.
WARNING MESSAGES
Each time you boot up, the computer performs a self-diagnostic check. If there is an error, a short message will appear to identify it. You should refer to the expanded User's Manual for an explanation of what to do.

Mode d'emploi -
Supports SD et memory sticks 90
ANNEXE A - SPECIFICATIONS 91
ANNEXE B - DEPANNAGE 94