HTM1000 - Heating controller REMOTEC - Free user manual and instructions
Find the device manual for free HTM1000 REMOTEC in PDF.
User questions about HTM1000 REMOTEC
0 question about this device. Answer the ones you know or ask your own.
Ask a new question about this device
Download the instructions for your Heating controller in PDF format for free! Find your manual HTM1000 - REMOTEC and take your electronic device back in hand. On this page are published all the documents necessary for the use of your device. HTM1000 by REMOTEC.
USER MANUAL HTM1000 REMOTEC
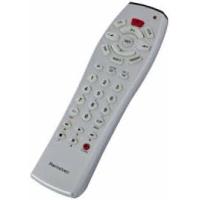
Universal Touch Screen Remote Control
User's Manual (GB)
Congratulations! Your Home Theatre Master 1000 (HTM1000) is a state-of-the-art device which integrates many different infrared remote controls to deliver instant A/V action to your fingertips. We hope that you love this remote and take it as your Personal Digital Assistant for your Home Theatre system.
Before operating the remote, please read thoroughly this manual. Then, reserve it for future reference.
1.1 Key Features
- Pre-programmed with learning capability
- 5-in-1 high end Home Theatre remote (support TV, VCR, SAT, CBL and DVD)
Maximum of 226 learning commands - Bright-blue backlight LCD display panel
- Segment-typed display panel with 24 touch-sensitive squares
- Quick set up by code entering and library code search
Macro function performed by up to 6 programmable smart keys
Volume punch through control for TV - Teletext and Fastext control available for digital TV
- Auto power off (Sleep mode) for battery conservation
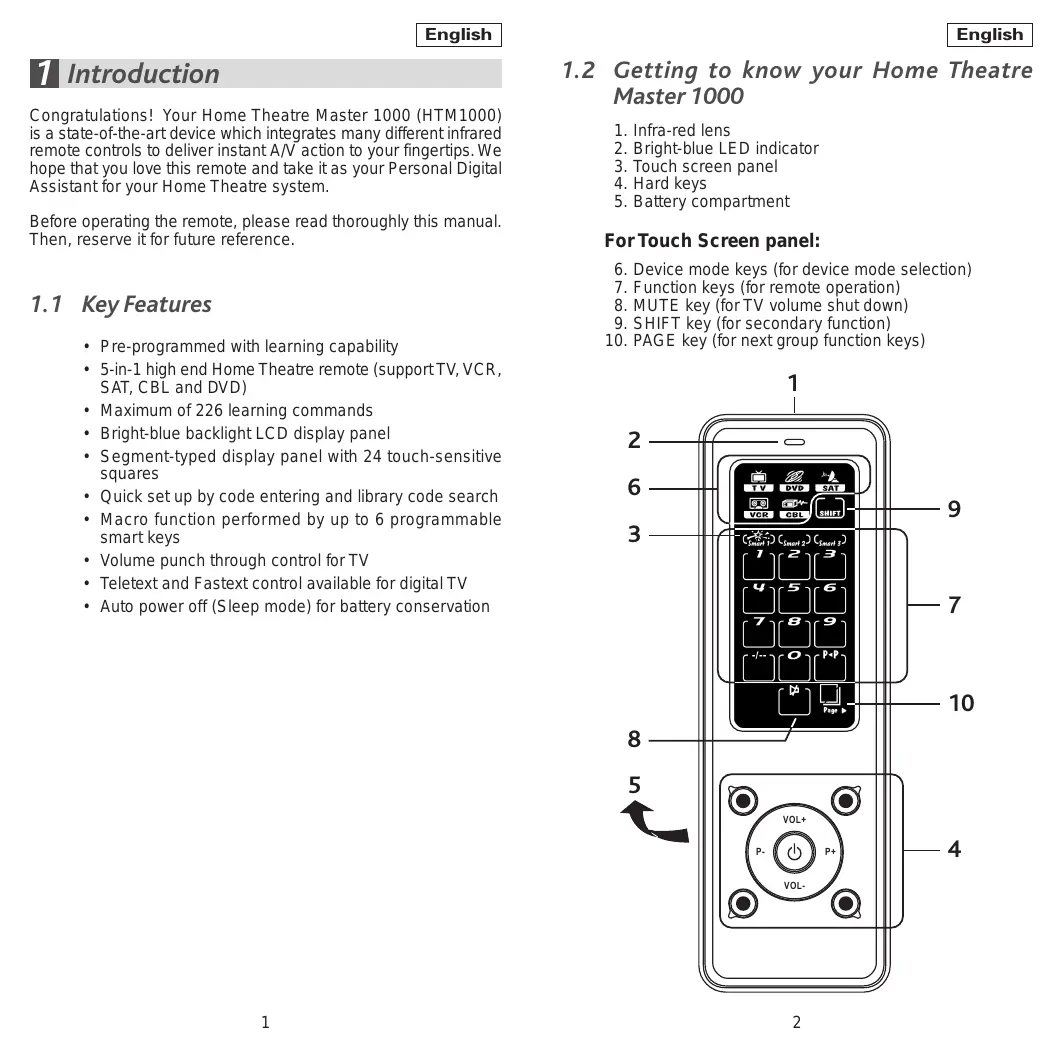
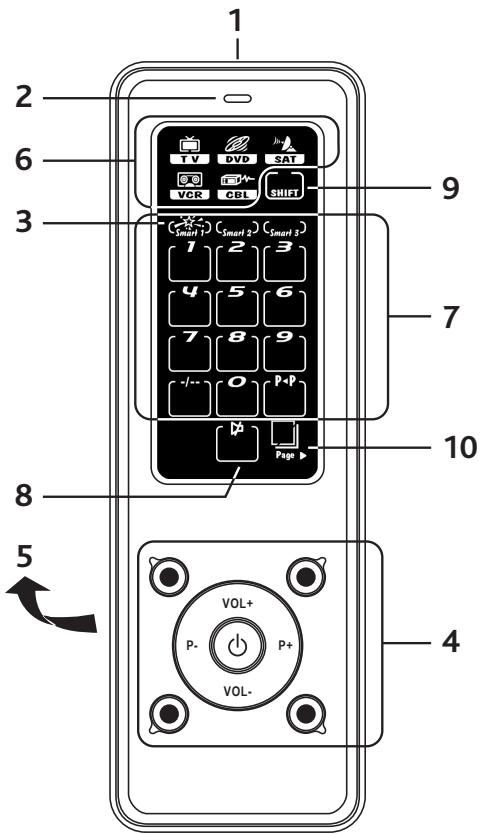
1.2 Getting to know your Home Theatre Master 1000
- Infra-red lens
- Bright-blue LED indicator
- Touch screen panel
- Hard keys
- Battery compartment
For Touch Screen panel:
- Device mode keys (for device mode selection)
- Function keys (for remote operation)
- MUTE key (for TV volume shut down)
- SHIFT key (for secondary function)
- PAGE key (for next group function keys)
1.3 Specifications
| Operation System: | Integrated preprogrammed & learning infra-red remote control system |
| Compatibility: | Preprogrammed with code library of Televisions (TVs), Video Cassette Recorders (VCRs), Satellite / Digital Satellite Receivers (SATs), Cable Converters (CBLs) and Digital Video Disc Players (DVDs) |
| Memory Capacity: | 226 learning commands |
| Memory Retention after Battery Disconnection: | Non-volatile and permanent memory |
| Display Panel: | Negative touch screen LCD |
| EL Backlighting: | Bright-blue EL backlight |
| Operating Distance: | 8 metres (25 feet) |
| Power Requirement: | 4 x AAA size batteries (Alkaline is recommended) |
| Dimensions: | 163 x 54 x 19.5 mm |
| Weight : | 130g (without batteries installed) |
| 180g (with batteries installed) |
For improvement purposes, specifications and functions are subjected to change without priority notice.
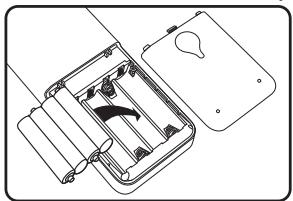
1.4 How to Install Batteries
Alkaline batteries are recommended.
- Open the battery cover.
- Follow the polarity symbol shown in the battery compartment.
- Place the batteries inside.
- Replace the battery cover.
Note: Battery Low
If the icon " 4 " is shown on the display panel, it shows that the battery level is low. You must replace the battery with a new one to ensure proper functioning. Do not use old and new batteries together as old batteries tend to leak.
Getting Start
After installed batteries, your HTM1000 prompts at TV mode. If it is in-active for about 15 seconds, it goes to power saving (sleep) mode and shut down the display. Simply, touch the screen panel to activate the unit again.
Note: When in power saving (sleep) mode, the hard key section is still available for command.
Tap any of the Device Mode Key on the screen to enter the corresponding device mode. e.g. TV. The “” icon will change to blue color.
Tap a key directly to send out the corresponding infra-red command.
2.1 Hard Keys
There are 9 hard keys. They transmit IR command corresponding to the selected device.
Power ON/OFF
P+ Program up or channel up
P- Program down or channel down
VOL+ Volume up
VOL- Volume down
- GREEN For teletext and fastext function
- RED For teletext and fastext function
- YELLOW For teletext and fastext function
- BLUE For teletext and fastext function
(Remark: G/R/Y/B buttons are also used for supporting some Satellite Receivers and Cable box)
2.2 KeyTone
When you tap any key, there is a short beep sound.
2.3 Backlight
Bright-blue EL Backlight will be turned on once you tap the remote. The backlight will be turned off automatically if the remote is not active for 15 seconds.
3 How to Set Up the Home Theatre Master 1000
3.1 By Entering Device Code
You may setup the remote by the following code entering instructions.
- Refer to the Device Code List, look up the 4-digit device code which corresponds to the brands of your A/V equipment. If there are more than one device code listed under your brand, try from the first code.
- Turn on your device manually (e.g. TV).
- Press a desired device mode key (e.g. TV, “ icon will change into blue color)
- Hold down “P+” and “VOL-” on the remote simultaneously for 3 seconds until the indicator lights up.
- Input the 4-digit device code, the indicator will flash twice and turn off if successful.
Turn on your device (e.g. TV), try the function keys on the remote. If your device (e.g. TV) responds to your selected function correctly, you have entered the right device code. Otherwise, repeat the above setup instructions with the rest available device codes until your device (e.g. TV) responds to your selected function, and most keys work correctly.
- Simply repeat the above procedures to enter the device codes for your VCR, SAT, DVD or CBL. (Remember to press a correct device mode key in step 3 above.)
Note:
DVD, CBL, SAT and other device codes can be entered into any device modes except "TV" & "VCR" modes. Just simply press the device mode key and enter your 4-digit device code for DVD, CBL, SAT and other devices.
- If the indicator flashes 6 times in step 5, a wrong device code has been entered. You are required to repeat step 2 to 5 again.
Suggestion:
- If you cannot find a correct device code for your equipment, see "3.2 By Searching Through the Library".
3.2 By Searching Through the Library
If you cannot identify a correct device code for your equipment from the Device Code List, you may search the code through the library:
- Turn on your device manually (e.g. TV).
- Press a desired device mode key (e.g. TV)
- Hold down " P+ " and " VOL- " on the HTM1000 simultaneously for 3 seconds until the indicator lights up.
- Enter a corresponding Magic Search Code from the following table. The indicator will flash twice and turn off.
| DEVICE TYPE: | TV | VCR | SAT | CBL | DVD |
| MAGIC SEARCH CODE: | 0001 | 0002 | 0003 | 0004 | 0005 |
(e.g. press TV device mode key, then press P_+ and "VOL-," and enter TV Magic Search Code 0001.)
- Press the same desired device mode key again as in step 2 above. (e.g. TV)
- Hold down “P+” and “VOL-” simultaneously for 3 seconds until the indicator lights up, and your HTM1000 is ready to start searching.
- Aim the remote at your device (e.g. TV), press the "O" key repeatedly, slowly and patiently until the device has been turned off. Once your device has been turned off, immediately press the device mode key (e.g. TV) to lock in code and the indicator flashes twice and then turn off.
- Simply repeat the above setup procedures to search the device code for your VCR, SAT, DVD or CBL... (Remember to press a correct device mode key and correct Magic Search Code in step 2-5 above.)
IMPORTANT:
- If the power on/off function of your device is not infrared controlled — you need to follow step 2 to 6 above and start searching:—
Press " " and another important function key alternately until your device responds to the expected function, press the device mode key (e.g. TV) to lock in the code.
e.g. Press " " & " 1 "alternately, or Press " " & " ▲ "alternately.
Note:
DVD, CBL and other device codes can be searched and locked into any device modes except "TV" & "VCR" modes. Just simply press the corresponding device mode key in step 2 & 5 and enter an appropriate Magic Search Code for your DVD, CBL and other devices.
Each time you press the "O", the HTM1000 will skip to the next code and send out a POWER signal trying to turn off your device.
If you failed to stop pressing “ ” in time when your device has been turned off, turn on your device again immediately. Before the indicator goes out, press “P-” on the HTM1000 to skip backward. Repeat the step 7 above and lock in code.
- If the indicator flashes 6 times after your pressing of “ ” key, you are already at the last code of the library. Press the device mode key (e.g. TV) to resume the HTM1000 and repeat carefully the above procedures to search again.
4 How to Set Up Your HTM1000 (Learning Commands)
Your HTM1000 is factory preprogrammed to operate your TVs, VCRs, SATs, CBLs & DVDs. Due to the limited number of key, some minor functions may not be included. You may teach your remote with the original A/V remote to operate any excluded function by your choice.
Besides the preprogrammed devices, you may also teach the remote to operate other infra-red controlled equipment and appliances, such as HiFi or air-conditioners, etc.
Your HTM1000 can learn and reproduce up to 226 commands from other remote controls. All 5 device modes (TV, VCR, DVD, SAT, CBL) can be taught to operate additional commands:-
- Press a desired device mode key (e.g. TV, " icon will change into blue color).
- Hold down “P+” & “VOL-” on the remote together simultaneously for 3 seconds until the indicator lights up.
- Enter the Magic Learn Code - 0000, the " Learn " icon will light up and your HTM1000 is ready to learn commands.
- Aim your A/V remote control to the HTM1000 infra-red lens on a flat surface, with 5-8 cm apart. Make sure your A/V remote control has new batteries.
-
Press and release a desired keys on the remote you want to hold the command.
-
Press and hold the corresponding key on your A/V remote control to transfer the command. The indicator will flash once and the device mode key icon (e.g. ) will flash again when the command is copied. You can release the key on the A/V remote control. If the indicator flashes 6 times, it shows error in learning process. Adjust the position of both remote controls and repeat steps 5 to 6 again.
-
Repeat steps 5 to 6 to transfer other signals into next function key. When you finish the whole device mode, press the same device mode key (e.g. TV) again to store your setting. The indicator will flash twice and then turn off.
4.1 Learning Additional Codes by "SHIFT"
There are in maximum of 42 squares within 3 pages which are available to be learnt for each device mode. In case you would like to learn more than 42 commands per each device, you can make use of "SHIFT" function to obtain additional 3 more pages in order to obtain additional 42 free learning spaces under "SHIFT" platform. For detail explanation of how to use the "SHIFT" function, please refer to section "5.3 SHIFT" for reference.
4.2 Advance Learning - Teaching a Dual Signal
If you found a learned command work for your A/V equipment only occasionally, your original remote control may contain dual signals. Try the following steps to reprogram this command:
- Follow step 1 to 4 of “How to Set Up Your HTM1000 (Learning Commands)”.
- Press and release a desired key on the HTM1000 you want to hold the command. The device mode key icon (e.g. l ) will stop flashing.
- Press and hold the corresponding key on your A/V remote control to transfer the command. The indicator will flash once and the device mode key icon (e.g. l ) will flash again. The first signal has been transferred successfully and you can release the key on the A/V remote control.
- Press and release the same button on the HTM1000 again. The device mode key icon (e.g. ) will stop flashing.
- Press and hold the same corresponding key on your A/V remote control until the indicator will flash once and the device mode key icon (e.g. l ) flash again. The dual signal command has been transferred successfully.
- Repeat steps 2 to 5 of this procedure to transfer other signals if there is any.
- When finished, press the same device mode key again to store your setting.
Warning:
Entering a new preprogrammed device code will automatically erase and replace all learned commands in the chosen device mode.
Note:
- Do not attempt to learn additional commands with the Device Mode Keys, "Page ➔" Key & "SHIFT" Key. They will not hold commands by themselves.
Each function key will hold one command only, a new command to be learnt will automatically erase and replace the previous one.
- If you have accidentally pressed an unexpected key in step 5 above, you have to wait 16 seconds until the indicator goes out and the HTM1000 will go back to normal operation. You may repeat the above procedures to setup the remote again.
- If the indicator flashes 3 times during the transference of the signals, this tells you the memory bank is full. Press the same device key again to resume normal operation. (You may erase the learned commands in a device mode and make room for any new signal. See "Warning" above.)
5 Operating the Remote
5.1 Normal Operation
Once you have setup the remote for your A/V equipment, it works like your original remote controls. To operate, just aim it at your equipment, press an appropriate device mode key and invoke the desired function by pressing a corresponding key on the remote. The indicator flashes and you can hear beep sound during signal transmission as confirmation of key touch.
For some VCR/DVD players, please use / / / buttons for performing PLAY/STOP/REW/FF and REC functions.
5.2 Page
Each device mode contains 3 groups of commands. You can simply tap the "Page "key on the right bottom corner of the remote panel to turn to another command group.
5.3 Shift
"SHIFT" function allows you to obtain additional learning space for each device mode. There are 3 pages for each default device mode. Through using "SHIFT" key, you can access the 4th, 5th and 6th pages. The practical procedures are as follows:
5.3.1 Learn additional codes into the 4th, 5th and 6th pages
- Follow step 1 to 4 of “4 How to Set Up Your HTM1000 (Learning Commands)”.
-
Press "SHIFT" key and you can see the "SHIFT" key changed to "SHIFT".
-
Now, your HTM1000 is into the 4th page for additional learning space. Press "Page" to access the 5th and 6th page.
- Follow the procedures from point 5 of section " 4 How to Set Up Your HTM1000 (Learning Commands) " for remaining learning command setup.
5.3.2 "Shift" for obtaining additional Macro(s)
Besides accessing additional learning spaces, "SHIFT" function can also allow you to program the 4th, 5th and 6th "Smart" for performing Macro function. The setup procedure, please refer to section "6.1 Program the 4th, 5th and 6th Smart".
5.3.3 How to access the "Shift" function
- Press the device mode key that you have previously learnt commands e.g. TV.
- Press "SHIFT", a "SHIFT" can be seen.
- Your HTM1000 is now into the 4th page of chosen device mode e.g. "TV".
- Find the function icon that you have learnt before and press once to execute the command.
- To exit "SHIFT" mode, press the "SHIFT" icon again.
5.4 Punch Through
Punch through allows you to operate TV's volume and mute functions without having to switch the device modes repeatedly even when your remote is in other operating modes.
However, if you have learned commands on VOL_+ , VOL- or in the device mode (VCR, DVD, SAT, CBL), the punch through function will be disabled in that corresponding device mode.
5.5 Advanced Function - Smart Program
Create a chain of multiple commands - your remote comes with 6 programmable Smart programs (Smart1, Smart2, Smart3) each with maximum 20 key steps. With the help of Smart, you can program a group of commands in time delay to execute in a chain of infra-red signal simply by a press of Smart.
6 Program a Smart
- Hold down “P+” & “VOL-” on the HTM1000 together simultaneously for 3 seconds until the indicator lights up.
- Enter the Magic Code - 0009.
- The Smart icons will turn on.
- Select a desired Smart key. (e.g. Smart 1)
- Select a command from the corresponding device mode and indicator will flash once for each key.
- Press and hold the command if you want to setup the transmission period of the command (max. up to 60 seconds).
- Repeat step 5 until you finish the whole program and press the same Smart key (e.g. Smarl1). The Smart program is stored.
- To program another Smart, repeat the steps 1 to 6 above.
6.1 Program the 4th, 5th and 6th Smart
- Follow step 1 to 3 of section "Program a Smart".
- Press "SHIFT" to enter "SHIFT" mode and then choose Smart 1 , Smart 2 or Smart 3 and that represent Smart 4 , Smart 5 and Smart 6 respectively.
- The indicator will flash twice and keep light on. The HTM1000 is ready to receive a series of commands.
- Select a command from the corresponding device mode and indicator will flash once for each key.
- Press and hold the command if you want to setup the transmission period of the command (max. up to 60 seconds).
- Repeat step 5 until you finish the whole program and press "SHIFT" and the same Smart key (e.g. Smart). The Smart program is stored.
6.2 Operating a Smart Program
- Aim your remote at the equipment.
- Press and release the Smart key that you have programmed (e.g. smart1). The corresponding Smart icon and the indicator will flash slowly during transmission of the signals. The Smart icon and the indicator will stop flashing when the chain of infra-red signals has been transmitted completely. The remote will go back to normal.
6.3 Operating the 4th, 5th and 6th Smart Program
- Aim your remote at the equipment.
- Press "SHIFT" and choose the Smart key that you have programmed (e.g. Smart 1). The corresponding Smart icon and the indicator will flash slowly during transmission of the signals. The Smart icon and the indicator will stop flashing when the chain of infra-red signals has been transmitted completely. The remote will go back to normal.
7 Maintenance
- Do not expose your HTM1000 to dust, strong sunlight, humidity, high temperature or mechanical shock.
- Do not use old and new batteries together as old batteries tend to leak.
- Do not use corrosive or abrasive cleansers on your HTM1000.
- Keep the unit dust free by wiping it with a soft, dry cloth.
- Do not disassemble your HTM1000, it contains no user-serviceable parts.
8 Troubleshooting
Q. My remote does not work all !!!
A. Check your A/V device, if the main switch of the device is turned off, your remote could not operate it.
A. Check whether your batteries are inserted properly and are in correct +/- marks.
A. If the batteries are weak, replace the batteries. See "1.4 How to Install Batteries".
Q. If several device codes listed under the brand of my A/V device, how can I select the correct device code?
A. To seek the correct device code for your A/V device, test the code one by one until most keys work properly.
Q. My A/V equipment responds only to some of the commands.
A. You have set a code for which only some commands work properly but some do not. Try other codes until most keys work properly.
A. You can also copy from the original A/V remote. See “4 How to Set Up Your HTM1000 (Learning Commands)”.
Q. My remote indicator shows error in learning commands from other A/V remote control.
A. Make sure you are aiming your A/V remote control at the HTM1000 infra-red lens on a flat surface with 5-8 cm apart.
A. Make sure the learning procedures are carried out in an environment free from direct sunlight and/or strong light.
A. Clean the infra-red transmission diode/lens of your / remote and try again.
A. Check the batteries inside the A/V remote control. If the batteries are weak, the remote cannot learn command properly.
A. Make sure the distance between the A/V remote and your HTM1000 is remained the same throughout the whole learning procedures.
Q. Some learned commands in my remote do not work.
A. Those signals are not learnt properly. Try to teach your HTM1000 again for those functions.
Q. Some learned commands in my remote work occasionally.
A. Your original A/V remote may carry dual signal commands. You have to go through the section “4.2 Advanced Learning – Teaching a Dual Signal”.
Q. What is SMART?
A. It is an advanced feature of your HTM1000 which allows you to program a series of commands in appropriate time delay. By simply a press of the selected Smart button, your HTM1000 will execute a chain of infra-red signals automatically. For details, please refer to section "5.5 Advanced Function-Smart Program".
1 Introduction
3 Come Programmare Home Theatre Master 1000
A工程技术 is a technique used to improve the performance of an application. It is a technique that improves the performance of an application by making it more efficient and better.