
C400.4 CARBON - Car amplifier POLK AUDIO - Free user manual and instructions
Find the device manual for free C400.4 CARBON POLK AUDIO in PDF.
| Product Type | 4/3/2 Channel Car Amplifier |
| Brand | Polk Audio |
| Model | C400.4 Carbon |
| RMS Output Power (4 Ohms) | 75 W per channel (0.1% THD+N, 20 Hz – 20 kHz) |
| RMS Output Power (2 Ohms) | 100 W per channel (1% THD+N) |
| Bridged Power (4 Ohms) | 200 W (1% THD+N) |
| Total Dynamic Power | 975 W |
| Frequency Response | <15 Hz – 45 kHz (-3 dB) |
| Signal-to-Noise Ratio | >105 dB (ref. rated power) |
| Channel Separation (1 kHz) | >55 dB |
| Power Supply Required | 10 V – 16 V DC, negative ground |
| Input Sensitivity | 200 mV – 8.0 V |
| Input Impedance | >10 kΩ |
| Speaker Output Impedance | >2 Ω (stereo), 4 Ω (bridged) |
| Crossover Filters | High-pass, low-pass, OFF; frequency 50 – 5000 Hz; slope 12 or 24 dB/octave |
| Subsonic Filter | 24 dB/octave at 15 Hz |
| Dimensions (L × W × H) | 40.64 × 24.8 × 6.35 cm (16 × 9.75 × 2.5 inches) |
| Weight | Approx. 2.5 kg (estimated) |
| Built-in Protections | Against overvoltage, ground reversal, thermal, short circuit, output overload, Auto-Standby mode |
| Included Parts | 2 hex keys, 4 screws (2 long, 2 short), washers, spare fuses, desiccant packet |
| Warranty | 1 year (2 years if professionally installed) |
| Maintenance and Cleaning | Clean with a dry cloth; avoid moisture |
| Repairability | No user-serviceable parts; service by trained personnel only |
Frequently Asked Questions - C400.4 CARBON POLK AUDIO
User questions about C400.4 CARBON POLK AUDIO
0 question about this device. Answer the ones you know or ask your own.
Ask a new question about this device
Download the instructions for your Car amplifier in PDF format for free! Find your manual C400.4 CARBON - POLK AUDIO and take your electronic device back in hand. On this page are published all the documents necessary for the use of your device. C400.4 CARBON by POLK AUDIO.
USER MANUAL C400.4 CARBON POLK AUDIO
C400.4 Carbon Series
4/3/2 Channel Amplifier
C400.4 Carbon Series
Polk Audio—A Passion for Sound
Welcome to the Polk Audio family! For over thirty years, George Klopfer and I, and all the people at Polk Audio, have been designing and building sound equipment for people like you: the person who demands high quality and outstanding performance at a reasonable price. (Someone just like US, in other words!)
Please take a moment and read through this manual before you get started. Installing a car audio system is a serious project. If you have any doubts about your ability to execute any of the installation steps found in this manual, save yourself a lot of grief and contact your local authorized Polk Audio AutoSound dealer. He (or she) is a professional installer and ready to help you get the most for your autosound dollar.
More information—including audio how-to articles, FAQs, and online manuals—is available on our award-winning website www.polkaudio.com/car. And if you ever have a question or comment, please feel free to call us or email us. In North America and Canada, call Polk Audio Customer Service 800-377-7655 (M-F, 9-6 EST) or via email polkcs@polkaudio.com. Outside the US, call 410-358-3600. We love to hear from you! Here at Polk Audio, building loudspeakers and audio equipment is more than just our business—it's our passion. We're happy to share it with you.
Sincerely,

Matthew S. Polk
Chairman and Co-Founder
Please inspect your new amplifier(s) carefully. Notify your Polk Audio dealer if you notice any damage or missing items. Keep the carton and packing material; this will do the best job of protecting your equipment if it must be transported.
PARTS INCLUDED
2 Hex wrenches
Screws (2 long, 2 short)
Extra washers
Fuse replacements
Moisture Packet (Do not eat!)
In the event that your amplifier requires service or is ever stolen, you will need to have a record of the product's serial number. Please take the time to enter that number in the space provided below. The serial number can be found on the bottom panel of the amplifier and on the amplifier packaging.
Serial Number:
Optional Accessories
Remote Bass Gain Module is standard with the Mono Model Polk/MOMO Carbon Series Amplifier. It is available separately for the 4- and 2-channel models. See your Authorized Polk/MOMO dealer, or visit the webstore at polkaudio.com.
Guide de démarrage
All Carbon Series Amplifier Models Feature:
- Polk's Maximum Dynamic Headroom (MDH) Power Supply allows Polk/MOMO Amplifiers to deliver more instantaneous power peaks, easily driving your speakers during musical peaks. Get "max headroom" (!) and more power for low impedance loads.
Each model features fully adjustable electronic crossovers to power any install using any speakers on the market.
Each model also features the exclusive Polk/MOMO PreEQ Switch, which optimizes the crossovers for use with Polk/MOMO Ultra High Performance Speakers and Subwoofoers so you can take high performance to whole new level. - 5-Way Smart System Protection (SSP) circuits: Power and Ground-Reversal Protection, Thermal and Short Protection, Current Overdraw and Low Impedance Protection circuits with auto-Standby Mode ensure safety, reliability and durability.
- Hideaway Cover Plate conceals the wiring and the "Set It Once" user-adjustable controls for clean-looking, fiddle-free installs.
- Polk Performance Certificate attests to each individual amp's Power Rating, and serial number.
- High-density split-dome convection heat sinks with more surface area than standard fins for extreme heat dissipation and a long, reliable life of high amplification. No need for noisy fans.
- High damping factor improves driver control for tighter, punchier bass.
- Subsonic Filter (15Hz@24dB/octave) for an extra level of speaker protection.
- Remote Subwoofer Level Control available on all models (a stock feature on the mono sub amp).
- Power, Thermal and Short Protection LEDs easily visible on top plate.
- Gold-Plated Screw-Down Capture Terminals for the most secure connections.
- Small footprints for compact installs. Removable End Caps for even smaller footprints: big power in small packages.
C400.4 Features:
- May be used as a 4-channel, 3-channel or 2-channel amplifier for maximum adaptability.
- Allows bi-amplification of Polk/MOMO component systems or Polk/MOMO Coaxial speakers.
- Variable Low Pass and High Pass crossover filters, 50Hz-5kHz, switchable between 12dB/Octave and 24dB/Octave: all the control you need to power virtually any type of speaker from tweeters to component systems to subwoofoers.
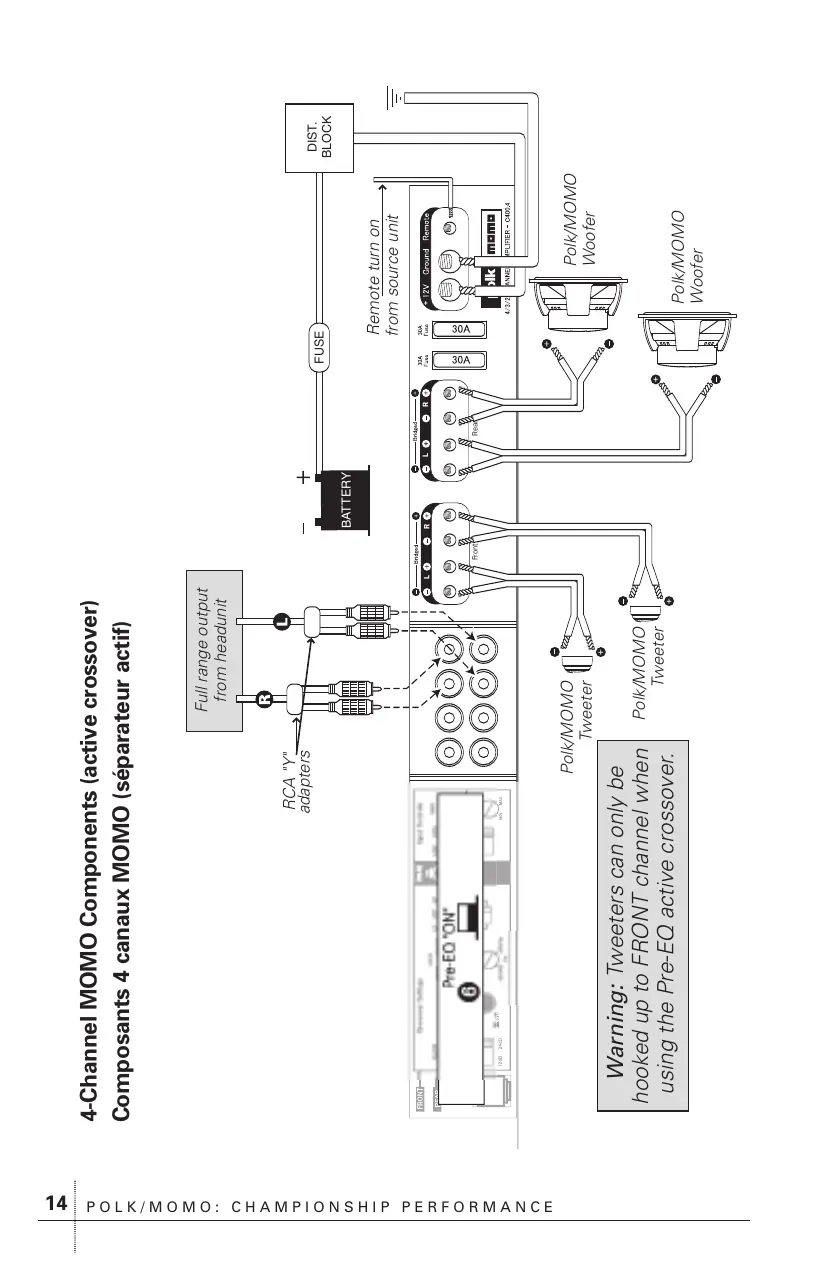
Exclusive Polk/MOMO Pre-EQ Switch: One-button preset active crossover and EQ optimization for the best performance from Polk/MOMO Component systems.
Active crossover optimized for all 62^ component systems.
Installing a car audio system is a serious project. If you have any doubts about your ability to execute any of the installation steps found in this manual, save yourself a lot of grief and contact a professional installer. Your Polk Audio dealer is a good place to find one. If you intend to do the installation yourself we assume you possess some skill in the proper use of hand and power tools. No matter how much installation experience you have, we recommend that you...
- Read this manual thoroughly before you begin
Plan your installation carefully - Allow enough time to complete the installation without rushing
- Take steps to protect your car and upholstery from unwanted scratches and punctures.
- Wear proper protective safety gear.
Tools you May Need
- Phillips head screwdriver
- Panel pry tool
Electric drill and 3 / 16^ and 1 / 8^ drill bits
Permanent ink marker or pencil - Solderless, crimp-on connectors and a crimping tool
- Safety glasses
- Wire strippers and cutters
- Electrical tape
Grommets for passing wires through metal car walls - Amplifier Power Wire Kit (available at your authorized Polk Audio Dealer)
Safe Limits of Operation
Your Polk Audio AutoSound equipment is constructed of the highest quality materials for years of trouble-free performance. You should be aware that damage to loudspeakers can occur when an amplifier, regardless of its wattage, is made to play at higher listening levels than its power can clearly produce. Operation at this level can result in very high levels of audible distortion originating in the amplifier, which can add a harsh, gritty sound to your listening material. If you hear distortion—turn it down or risk damaging your speakers. You can damage any speaker, regardless of power rating, if you push any amplifier, regardless of power rating, to the point of distortion.
Notes About Electrical Installation
- ALWAYS DISCONNECT YOUR VEHICLE'S BATTERY GROUND BEFORE WORKING WITH YOUR VEHICLE'S ELECTRICAL SYSTEM.
- This amplifier is designed for use in vehicles with 12-volt, negative-ground electrical systems. Use of this product in vehicles with positive-ground, or with voltages other than 12 volts, may result in damage to the product and the system, and will void the warranty. This product is NOT certified or approved for use in aircraft.
- We recommend that you carefully design your car audio system before you begin a major installation like this. Draw it all out. Make sure that the cables for power and signal are not on the same side of the vehicle and that they do not cross each other; this will help reduce any noise that may radiate from the power cable to the signal cable. If a signal cable is too close to a power cable, it may pick up the magnetic field generated by the power cable, which could lead to a loss of quality in your signal.
- Do not run wires under your vehicle or outside your vehicle.
- For best possible performance, give your power the widest possible throughput. Use the largest gauge power/ground cable available; we recommend at least 8 AWG. Use the largest gauge connectors, as well: barrier spades at the amp and terminal rings to the battery. See your authorized Polk AutoSound Dealer for power cables and wire connectors.
- Protect your vehicle with a circuit breaker or fuse placed no more than 12^ (30cm) from your battery. This circuit breaker or fuse should be no greater than the fuse(s) of your amplifier for optimal protection. For example, this Polk Audio Amplifier has two 30A fuses. Your "vehicle protection" fuse should be rated at 60A. See your authorized Polk AutoSound Dealer for professional advice on fuses and circuit breakers.
- Make your ground wires as short as possible to avoid Ground Loop engine noise and hum from interfering with your system. When using multiple components, ground everything at the same point.
- ALWAYS DISCONNECT YOUR VEHICLE'S BATTERY GROUND BEFORE WORKING WITH YOUR VEHICLE'S ELECTRICAL SYSTEM.
Before installing your new amplifier, carefully choose the location for the installation. The amplifier should have at least 2^ (5cm) of ventilation space on all sides to allow heat to rise and dissipate away from the amplifier. Be sure that the power and signal cable connections can enter and leave the amplifier in a straight line to avoid the risk of kinked wires causing a malfunction. And try to make your ground connections as short as possible.
CAUTION: Remember, your car is filled with hidden stuff: electrical wires, gas lines, vacuum lines, brake lines and all sorts of other lines. Then there's that pesky gas tank. You do not want to run into this stuff while drilling. Make sure you know where all of these dangers are when you're installing your amp to avoid puncturing anything.
The amplifier should be protected from exposure to moisture and direct sunlight. The best places to mount your amplifier are: The floor of the trunk, under the driver's seat, or on the back of the rear seat.
Once you decide where to install your amplifier and have made certain that there is ample ventilation, air circulation and shelter from unusual hazards, mark the mounting surface using the amplifier itself as a template. A tip: a strip of masking tape on these surfaces will help make your marks more visible.
Drill holes using a 1/8'' (2.5mm) metal bit at the marked locations and mount the amplifier using the supplied screws and inserts. Take the time to secure the amplifier solidly so that it does not come loose in the event of a collision or sudden jolt to the vehicle. A flying amp will hurt you.
DO NOT DRILL HOLES
WHILE THE AMPLIFIER IS IN PLACE AS A "TEMPLATE." YOU COULD EASILY DAMAGE THE AMP'S ANODIZED COATING BY DOING THIS.
Typical Installation
ALWAYS DISCONNECT YOUR VEHICLE'S BATTERY GROUND BEFORE WORKING WITH YOUR VEHICLE'S ELECTRICAL SYSTEM.
ALWAYS BE AWARE OF THE LOCATION OF HIDDEN WIRES, CABLES AND FLUID LINES BEFORE DRILLING HOLES OR MAKING CONNECTIONS.
- DISCONNECT the negative battery post connection and secure the disconnected cable away from the battery to prevent "accidental re-connection" during the installation process. This is not an option. Just do it, Ben Franklin.
- RUN power wire from the engine compartment to the amplifier installation location, taking care to route it in such a way that it will not be damaged and will not interfere with vehicle operation.
Your amp will need to draw large levels of current, so use the largest gauge power/ground cable available; we recommend at least 8 AWG. (See your authorized Polk AutoSound Dealer for power cables and wire connectors.) Don't forget to protect your vehicle with a circuit breaker or fuse placed no more than 12^ (30cm) from your battery. This circuit breaker or fuse should be no greater than the fuse(s) of your amplifier for optimal protection. For example, this Polk Audio Amplifier has two 30A fuses. Your "vehicle protection" fuse should be rated at 60A. (See your authorized Polk AutoSound Dealer for professional advice on fuses and circuit breakers.)
- CONNECT power wire with EMPTY fuse holder to the positive battery post. Do not install the fuse itself until the power wire has been connected to the amplifier.
- RUN signal cables and remote turn-on wire from the head unit to the amplifier mounting location.
Use high quality RCA cables for signal connections. The remote turn-on connection allows the amplifier to be turned on and off with the power control of your head unit. Use smaller cable here, 16 gauge is probably best. (See your authorized Polk AutoSound Dealer for professional advice on cables and connectors.)
Make sure that the cables for power and audio signal are not on the same side of the vehicle and that they do not cross each other; this will help reduce any noise that may radiate from the power cable to the signal cable. If an audio signal cable is too close to a power cable, it may pick up the magnetic field generated by the power cable, which could lead to a loss of quality in your signal.
- RUN speaker wire from the speakers to the amplifier installation location.
Measure enough wire to reach from your amplifier to each speaker or inline crossover, plus an additional 12^ to allow moving the speakers or equipment without having to disconnect the wires. - FIND a good solid metal grounding point close to the amplifier and connect the negative power wire to it.
Installation typique
DEBRANCHÉT OUJOURS LÉ RACCORD DE MISE À LA MASSE DE LA BATTERIE AVANT DE TRAVAILLER SUR LE SYSTème ÉLECTRIQUE DU VÉHICULE.
ASSUREZ-VOUS DE TOUJOURS CONNAITRE L'EMPLACEMENT DES FILS, CÁBLES ET CONDUITS DISSIMULÉS AVANT DE PERCER DES TROUS OU DE FAIRE DES ConnexIONS.
Typical Installation, continued
For the ground connection, also use the largest gauge cable available. Connect to the terminal marked GND and then connect this cable directly to your car's chassis. Keep the length of the GND connection as short as possible, ideally under 6", to avoid ground loops and engine noise hum problems. Make certain that the ground point is directly connected to the car's metal chassis, with no dirt or paint getting in the way of a clean metal-to-metal connection.
- SECURELY install the amplifier in your chosen location. Take the time to secure the amplifier solidly so that it does not come loose in the event of a collision or sudden jolt to the vehicle. Warning: Low Flying Amp!
- CONNECT the positive and negative power wires to the amplifier. A fuse near the amplifier is not necessary.
- CONNECT the remote turn-on wire to the amplifier.
- CONNECT the RCA signal input cables to the amplifier.
- CONNECT the speaker wires to the amplifier. Make sure to use speaker wire of at least 16 gauge or thicker. Be certain to maintain correct polarity. One of the terminals on the rear of your speaker is positive (+) and the other is negative (-). Make certain that you connect the wire from the positive (+) terminal of your amplifier to the positive (+) terminal on your speaker, and the wire from the negative (-) terminal of your amplifier to the negative (-) terminal on your speaker. Most speaker wire has some indicator (color code, ribbing, or printing) on one of the two wires to help you maintain consistency.
Make certain that no bare wire ends touch each other. Such contact could result in an electrical short and cause your head unit or amplifier to turn off or malfunction.
- Carefully review the amplifier's control settings to make sure that they are set according to the needs of your system.
- Now install the power wire fuse and reconnect the negative battery post terminal. (See your authorized Polk AutoSound Dealer for professional advice on fuses and circuit breakers.)
- Turn on the head unit at low level to check that the amplifier is configured correctly. Resist the temptation—RESIST!—to crank it up until you have verified the control settings and made your fine tunings.
- Make the necessary adjustments to the input sensitivity to obtain the right overall output and the desired balance between the two pairs of channels and other amps in your system.
ADDITIONAL STEPS AND DIFFERENT PROCEDURES MAY BE REQUIRED IN SOME APPLICATIONS. IF YOU HAVE ANY QUESTIONS, PLEASE CONTACT YOUR AUTHORIZED POLK AUDIO AUTOSOUND DEALER OR POLK AUDIO CUSTOMER SERVICE.
Installation typique, suite
For Flush Mount installations (where amp sits directly on solid surface), route wiring through side vents of end caps BEFORE wiring into the amp.
For Stealth installations, route wiring down through bottom opening under removable plate.
Detailed Adjustments for the Amp Panel
1 REMOTE BASS GAIN MODULE JACK
Accepts telephone jack input connection from the remote bass gain module (only works on REAR channel when crossover is set to LP). Set GAIN (8) to max when using the remote. Remote bass gain module is sold separately. See your Authorized Polk AutoSound Dealer or visit the webstore at polkaudio.com.
2 FREQUENCY SLOPE TOGGLE
Use this switch to determine the grade of the frequency slope over which the amplifier "rolls off" the frequencies for better blending between highs and lows. Choose either steep crossover slope (24dB/Octave) or a more gentle crossover slope (12dB/Octave).
3 FREQUENCY MULTIPLICATION SWITCH
Choose "x1" for lower crossover frequencies(50 to 500Hz), choose "x10" and the crossover frequency will be multiplied by 10 (500Hz to 5kHz).
4 CROSSOVER FREQUENCY ADJUSTMENT
When the FREQUENCY MULTIPLICATION SWITCH is set to "x1," the crossover frequency can be adjusted between 50 to 500Hz . When the FREQUENCY MULTIPLICATION SWITCH is set to "x10," the crossover frequency can be adjusted between 500Hz to 5kHz .
The crossover frequency adjustment filters out frequencies that you don't want the speaker to reproduce. When the CROSOVER MODE is set to LP it filters out the midrange and high frequencies from the subwoofer. If it is set too high, you'll hear voices and other midrange sounds coming from the subwoofer and the bass will seem to come only from the rear of the vehicle. If it is set too low, you'll miss the "kidney punch" kick of the mid-bass. Set the control to 80Hz -120Hz and adjust it by ear from there.
When the CROSSOVER MODE is set to HP it filters out bass from your midrange or full range speakers. That takes strain off the speakers, allowing them to play louder with less distortion. Set the Frequency Control to around 80Hz - 100Hz . If it sounds like you're losing too much mid-bass punch, turn the Frequency Control down to 50Hz .
Most of the time you should set the LP and HP filters to around the same frequency setting, but always let your ears be the final judge. Experiment and go with the settings that sound best.
When the CROSSOVER MODE is set to OFF, the Frequency Control does nothing. When the Pre EQ switch is on, the Frequency Control does nothing (the crossovers are preset by the Pre EQ feature).
Detailed Adjustments for the Amp Panel continued
5 CROSSOVER MODE SELECTOR SWITCH
A] set to the LP position when the amplifier is used to drive a woofer or subwoofer. The frequencies above the crossover point will be attenuated at 12dB/Octave or 24/Octave. B] set to OFF ("Full Pass") position when the amplifier will be used to drive full range speakers with no subwoofer in the system. The full frequency bandwidth will be output to the speakers with no high or low frequency attenuation. C] set to HP position when the amplifier is used to drive full range speakers with a subwoofer in the system. The frequencies below the crossover point will be attenuated at 12dB/Octave or 24/Octave.
6 POLK/MOMO PRE-EQ SWITCH
One-button preset crossover and EQ optimization for the best performance from Polk/MOMO Component systems. Using this will override all other crossover settings.
7 INPUT TYPE SELECTOR
This switch allows you to select the type of connection being made. The default for the average head unit is the LOW position, as the most popular head unit output connections are low voltage. To use HIGH level speaker wire inputs, simply splice an RCA connector onto your speaker wire, then set this switch to HIGH. If you have a higher output head unit, a 4V or 8V head unit output (see your head unit's owner's manual), set this selector to HIGH because you will have high voltage coming into the amp.
8 GAIN ADJUSTMENT
Begin with gain set at about the 11 o'clock position. Once all settings are made, turn this setting up until your source JUST BEGINS to distort, then back off slightly to cut distortion and operate at optimum gain. The voltage range for the RCA audio inputs is 200mV to 8V. Anything greater may cause audible distortion and/or damage to the amplifier
Most applications of the four channel amp require two sets of RCA inputs (Front and Rear). If your head unit only has one RCA output, you may use a short RCA cable to connect from PRE-OUT Front to INPUT Rear as shown in the diagram. You may also use a Y-adapter to split the signal.
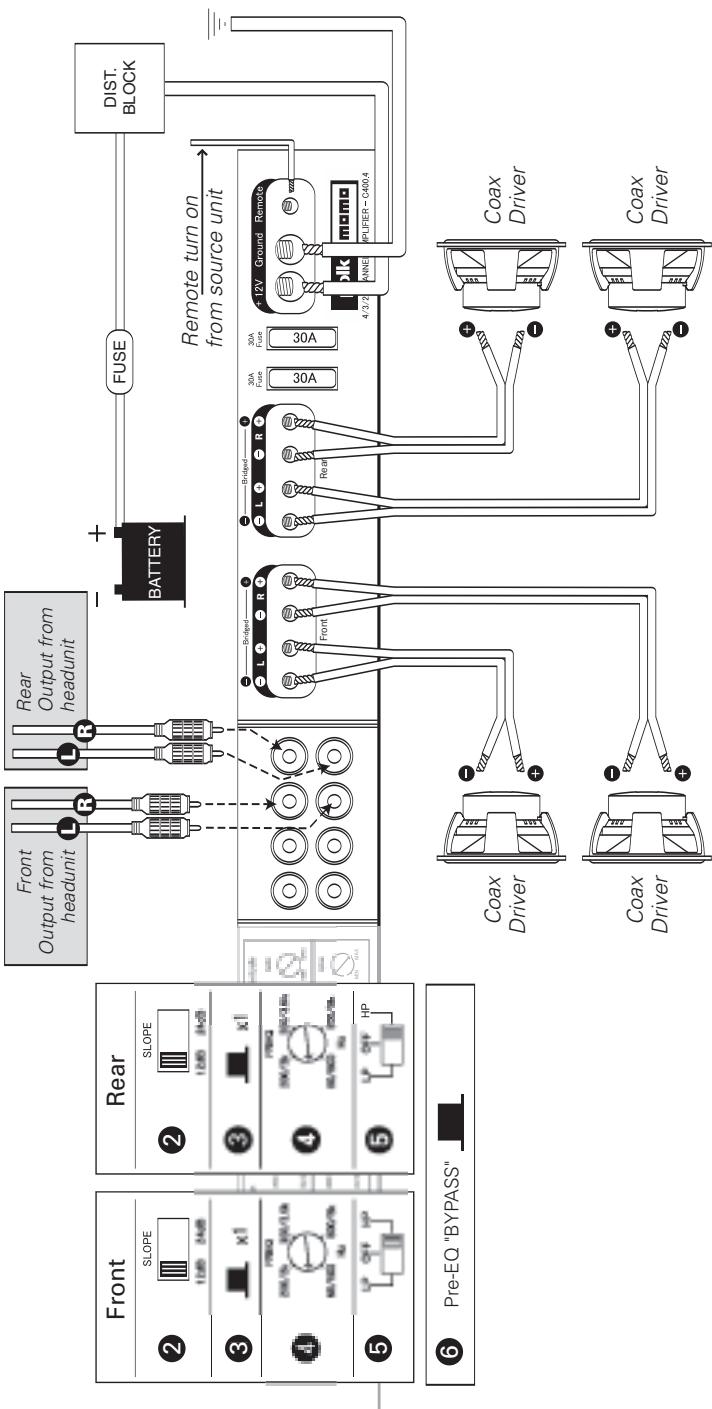
Front and Rear Coax Hook-Up
Connexions avant/arrière coaxiales
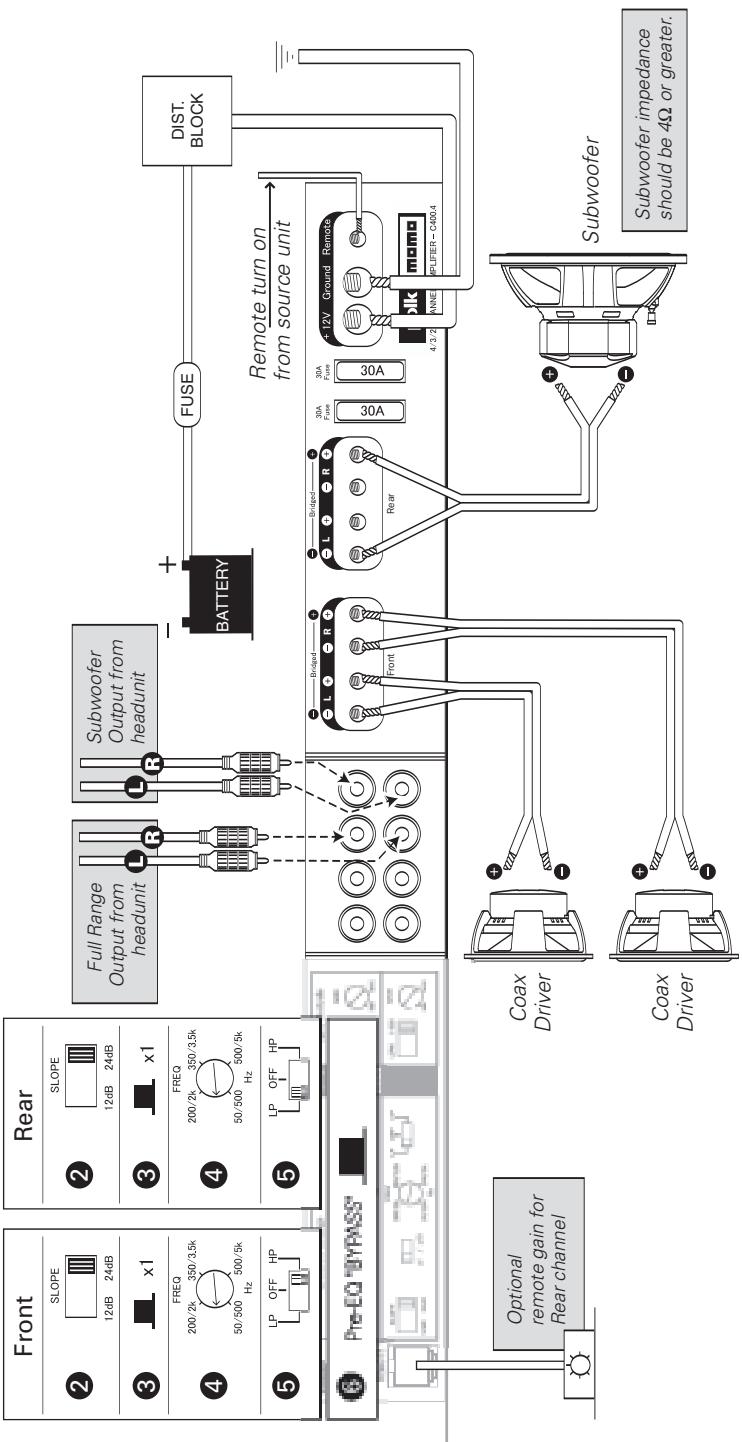
Front Coax and Rear Subwoofer Hook-Up
Connexions avant coaxiale/arrière subwoofer
Power Connection Details
Before installing your amplifier, disconnect the negative (ground) wire from the vehicle's battery and secure it away from the battery. This will prevent accidental damage to the system. And to yourself as well.
This amplifier's " +12 VDC" and "GROUND" (chassis ground) connections are designed to accept 4 AWG power wire or smaller. We recommend a power wire of at least 8 AWG. Bigger power wire means more room for more power to flow. To connect the power wires to the amplifier, first back out the set screw on the top of the amplifier using the included hex wrench. Strip 1/2 inch (12mm) of insulation from the end of each wire and insert the bare wire into the receptacle on the front panel of the amplifier, seating it firmly so that no bare wire is exposed. While holding the wire in place, tighten the set screw firmly.
The ground connection should be made using the same gauge wire as the power connection (since they must carry the same amount of power) and should be kept as short as possible. Make a direct connection between the Ground Terminal of the amplifier ("GROUND") and the chassis of the vehicle. Metal must connect to metal. Be sure that all body paint, undercoating, insulation or obstruction is removed from the area of the ground connection to ensure a direct and secure ground connection. Use a "star washer" to better "lock down" the ground connection.
This amplifier uses a conventional +12V remote turn-on lead, typically controlled by the head unit's remote turn-on output. The amp will turn on when the +12V is present at its "REMOTE" input and turn off when the +12V is switched off. If the head unit does not have a dedicated remote turn-on output, the amplifier's turn-on lead can be connected to +12V via a switch that derives power from an ignition switch circuit. Any power cables run through metal barriers or firewalls must be protected with a high quality rubber grommet to prevent damage to the insulation of the wire. Failure to do so may result in a dangerous short circuit. Grommet. Grommet grommet. What a great word. Grommet. Say it with me: "Grommet."
Remote Bass Gain Module
This amp features an optional Remote Bass Gain Module connection. The Remote Bass Gain Module is standard with the MONO model, and available separately for the 2- and 4-channel models. It uses standard telephone wire and telephone jack connectors. To connect the Remote Bass Gain Module to the amplifier, simply insert the telephone jack into place on the amp's control plate. Install the remote module within easy reach on or under your dash.
Protect Your Hearing!
Now that you've got Polk Audio equipment in your car you're a valued member of the Polk Audio family. We want you, and your hearing, to be around for a long, long time. We urge you to practice restraint in the operation of this product so as not to damage your hearing (and that of other
people in your car, or in your neighborhood). Studies have shown that continuous exposure to high sound pressure levels can lead to permanent irreparable hearing loss. And then you'd be
no good to us. This and all other high-power amplifiers are capable of easily producing sound pressure levels that can be dangerous.
Please use common sense in the operation of this product. Limit your exposure to continuous high volume levels, and consider operating your audio system while driving in a manner that still allows you to hear necessary outside noises like sirens and horns.
Technical Assistance or Service
If, after following the hookup directions, you experience difficulty, please double-check all wire connections. Should you isolate the problem to the amplifier, contact the authorized Polk Audio dealer where you made your purchase, or contact Polk Audio Customer Service 800-377-7655
(M-F, 9-6 EST, US only) or via email polkcs@polkaudio.com. Outside the US, call 410-358-3600.
More detailed information—including audio how-to articles, FAQs, and online manuals—is available on our award-winning website www.polkaudio.com.
There are no user serviceable parts or fuses inside the amplifier. The unique nature of the circuitry in the Polk Audio Carbon Series Amplifiers requires specially trained service personnel. Do not attempt to service this amplifier yourself or through unauthorized repair facilities. This will not only void the warranty, but may result in the creation of more problems within your amplifier.
C400.4 Specifications
Power Output:RMS Continuous Power
(at 14.4V at the input terminals, 20Hz - 20kHz )
Per Channel into 4 Ohms (0.1% THD+N) 75W
Per Channel into 2 Ohms (1% THD+N) 100W
Bridged into 4 Ohms (1% THD+N) 200W
Total Dynamic Power (at 1kHz) 975W
Frequency Response (-3dB Points) <15Hz to 45kHz
Signal-to-Noise (Referenced to rated power) >105dBA
Channel Crosstalk >55dB
Input Sensitivity 200mV to 8.0V
Remote Gain Control 0 to -30dB
Input Impedance >10k Ohms
Speaker Impedance >2 Ohms Stereo
4 Ohms Bridged
Power Requirement 10V to 16V DC Negative Ground
Crossover Filters
Filter Function High Pass, Low Pass, Off
Frequency 50Hz to 5000Hz
Slope 12 or 24dB/Octave
Subsonic Filter 24dB/Octave at 15Hz
Pre-EQ
Front
Filter Function High Pass
Corner Frequency 4.0kHz
Slope 12dB/Octave
Filter Function Shelf
Corner Frequency +2dB at 12.1kHz
Bandwidth 6dB/Octave
Rear
Filter Function High Pass
Corner Frequency 38.4Hz
Slope 12dB/Octave
Filter Function Low Pass
Corner Frequency 2.82kHz
Slope 18dB/Octave
Polk/MOMO Series Limited Warranty
Polk Audio, Inc., warrants to the original retail purchaser only. This warranty will terminate automatically prior to its stated expiration if the original retail purchaser sells or transfers the Product to any other party.
Polk Audio, Inc., warrants, to the original retail purchaser only, that the LOUDSPEAKER(S), PASSIVE CROSSOVER COMPONENT(S) and ENCLOSURE on this Polk Audio Loudspeaker Product will be free from defects in material and workmanship for a period of one (1) year from the date of original retail purchase from a Polk Audio Authorized Dealer.
Furthermore, Polk Audio, Inc., warrants, to the original retail purchaser only, that any AMPLIFIER OR OTHER ELECTRONIC COMPONENT will be free from defects in material and workmanship for a period of one (1) year (extended to two years when professionally installed) from the date of original retail purchase from a Polk Audio Authorized Dealer.
To allow Polk Audio to offer the best possible warranty service, please register your new product online at: www.polkaudio.com/registration or call Polk customer service 800-377-7655 in the USA and Canada (outside the USA: 410-358-3600) within ten (10) days of the date of original purchase. Be sure to keep your original purchase receipt.
Defective Products must be shipped, together with proof of purchase, prepaid insured to the Polk Audio Authorized Dealer from whom you purchased the Product, or to the Factory at 2550 Britannia Boulevard, Suite A, San Diego, California 92154. Products must be shipped in the original shipping container or its equivalent; in any case the risk of loss or damage in transit is to be borne by you. If upon examination at the Factory or Polk Audio Authorized Dealer it is determined that the unit was defective in materials or workmanship at any time during this Warranty period, Polk Audio or the Polk Audio Authorized Dealer will, at its option, repair or replace this Product at no additional charge, except as set forth below. All replaced parts and Products become the property of Polk Audio. Products replaced or repaired under this warranty will be returned to you, within a reasonable time, freight prepaid.
This warranty does not include service or parts to repair damage caused by accident, disaster, misuse, abuse, negligence, inadequate packing or shipping procedures, commercial use, voltage inputs in excess of the rated maximum of the unit, cosmetic appearance of cabinetry not directly attributable to defect in materials or workmanship, or service, repair, or modification of the Product which has not been authorized or approved by Polk Audio. This warranty shall terminate if the Serial number on the Product has been removed, tampered with or defaced.
This warranty is in lieu of all other expressed Warranties. If this Product is defective in materials or workmanship as warranted above, your sole remedy shall be repair or replacement as provided above. In no event will Polk Audio, Inc. be liable to you for any incidental or consequential damages arising out of the use or inability to use the Product, even if Polk Audio, Inc. or a Polk Audio Authorized Dealer has been advised of the possibility of such damages, or for any claim by any other party. Some states do not allow the exclusion or limitation of consequential damages, so the above limitation and exclusion may not apply to you.
All implied warranties on this Product are limited to the duration of this expressed Warranty. Some states do not allow limitation on how long an implied Warranty lasts, so the above limitations may not apply to you. This Warranty gives you specific legal rights, and you also may have other rights which vary from state to state.
This Warranty applies only to Products purchased in Canada, the United States of America, its possessions, and U.S. and NATO armed forces exchanges and audio clubs.
The Warranty terms and conditions applicable to Products purchased in other countries are available from the Polk Audio Authorized Distributors in such countries.
Garantie limite Polk/MOMO Series
Contact Polk Audio Customer Service 800-377-7655 (M-F, 9-6 EST, US only)
or via email polkcs@polkaudio.com. Outside the US, call 410-358-3600.
"Polk," "Polk Audio" and "Dynamic Balance" are registered
trademarks of Polk Investment Corporation used under license by Polk Audio Incorporated.
"MOMO" is a registered trademark of MOMO Design, Italy.