
DRAW ESSENTIALS 2 - Graphics Software COREL - Free user manual and instructions
Find the device manual for free DRAW ESSENTIALS 2 COREL in PDF.
User questions about DRAW ESSENTIALS 2 COREL
0 question about this device. Answer the ones you know or ask your own.
Ask a new question about this device
Download the instructions for your Graphics Software in PDF format for free! Find your manual DRAW ESSENTIALS 2 - COREL and take your electronic device back in hand. On this page are published all the documents necessary for the use of your device. DRAW ESSENTIALS 2 by COREL.
USER MANUAL DRAW ESSENTIALS 2 COREL
Welcome to CorelDRAW Essentials 2
About Corel Corporation 2
Registering Corel products. 2
Corel Support Services 2
Customer feedback 4
Documentation conventions 4
Installing and uninstalling applications. 5
Getting help 6
Other resources 7
CorelDRAW Essentials workspace tour
Terminology and concepts 9
CorelDRAW Essentials application window 10
CorelDRAW Essentials workspace tools 12
Getting started
Starting and opening drawings. 19
Exploring the basic features of CorelDRAW Essentials 20
Working with templates 21
Undoing and redoing actions 22
Saving drawings. 22
Closing drawings and quitting CorelDRAW Essentials 23
Working with objects
Selecting objects 25
Copying, duplicating, and deleting objects 26
Positioning objects 27
Outlining and filling objects
Formating lines and outlines 29
Applying uniform fills. 29
Adding and formatting text
Adding and selecting text 31
Changing the appearance of text 33
Publishing your work
Optimizing bitmaps for the World Wide Web 35
Printing 36
Saving documents as PDF files 37
Importing and exporting files
Importing files 39
Exporting files 40
Using Corel Photobook and Corel PhotoAlbum
Using the Corel Photobook application window 43
Using the toolbox 46
The Visual toolbar 47
Starting Corel Photobook. 48
Creating image files 48
Opening image files 48
Acquiring images 49
Closing image files. 50
Saving image files 50
Quitting Corel Photobook 51
Using Corel PhotoAlbum. 51
Index 53
The Corel DRAW® Essentials 2 suite is an easy-to-use, all-in-one drawing application, with powerful photo-retouching tools, that lets you learn, explore, and create professional-looking graphics projects. You can create sophisticated graphics, correct and enhance photos, lay out your project, and publish your work so others can easily access and view it. Manipulate ready-made templates for fast results. Correct common photo problems and add stunning effects. See your work in real time — and publish it in a range of file formats. Use the Quick Start manager to quickly access applications and files so you can start on special projects without delay.
The CorelDRAW Essentials 2 suite contains the following applications:
- CorelDRAW Essentials — an intuitive graphics design application that gives you a more enjoyable work experience. Unique interactive tools set it apart, saving you time and making the design process easier. CorelDRAW Essentials is built and designed to help you graphics for print or for the Web.
- Corel® Photobook™ — a fast, easy, and powerful image editor for Windows®. Corel Photobook offers powerful photo retouching; objects and layers; natural-media brushes; over 130 effects, macros, and wizards; and GIF and JPEG support for the Web.
- Corel® PhotoAlbum™ — helps you locate, view, organize, and distribute image files
In this section, you'll learn about
- Corel Corporation
- registering Corel products
- customer support
- customer feedback
- documentation conventions
installing and uninstalling applications
using Quick Start - getting help
- other resources
About Corel Corporation
Founded in 1985, Corel Corporation (www.corel.com) is a leading technology company specializing in content creation tools, business process management and XML-enabled enterprise solutions. The company's goal is to give consumers and enterprise customers the ability to create, exchange and instantly interact with visual content that is always relevant, accurate, and available. Corel Corporation has its headquarters in Ottawa, Canada.
Registering Corel products
Registering Corel products is important. Registration provides you with timely access to the latest product updates, valuable information about product releases, and access to free downloads, articles, tips and tricks, and special offers.
You can register when you install the application, or choose to register at a later date.
You can register using the following methods:
- online — you can launch online registration if you are connected to the Internet when you install the Corel graphics application. If no Internet connection is detected, a list of options displays in a dialog box.
- FTP — you can complete the registration form and it will be sent automatically when an Internet connection is detected
- by phone — you can call the Corel Customer Service Center nearest you
For more information about registering a Corel product, visit www.corel.com/support/register.
Corel Support Services
Corel Support Services can provide you with prompt and accurate information about product features, specifications, pricing, availability, services, and technical support.
Online support
For information about online support services, visit www.corel.com/support. Please note, some of the services are available only in English.
| Web services | Description |
| Corel® Knowledge Base kb.corel.com | Allows you to read, print, and download documents that contain answers to many technical questions |
| Newsgroups (peer-to-peer forums) www.corel.com/newsgroups | Allow you to exchange information, tips, and techniques with other users of Corel products |
| Downloads www.corel.com/downloads | Allow you to download product patches, updates, and trial versions |
Telephone support
For detailed information regarding telephone support services, please visit www.corel.com/support.
Live telephone support for this Corel product is available as a fee-based service only.
North America
- For pricing, purchasing, or general inquiries about Corel products, you can call Customer Service toll-free at 1-800-772-6735.
- To speak directly to a technician on a Pay-As-You-Go line please dial 1-900-733-8780. To speak directly to a technician on a Pay-Per-Incident line please dial 1-877-662-6735. The hours of operation are 8:30 A.M. to 7:30 P.M., Monday to Friday, Eastern Standard Time (EST).
Outside North America
- For pricing, purchasing, or general inquiries about Corel products, call Customer Service toll-free. For the most up to date contact details, check the international support numbers page at www.corel.com/support.
- Contact Customer Service for pricing, purchasing, general inquiries, or replacement CDs. Contact Technical Support should you require technical assistance operating your Corel software.
Mail and fax support
You can send specific customer-service questions to Corel Support Services representatives by mail or fax.
Corel Support Services
1600 Carling Avenue
Ottawa, Ontario, Canada
K1Z 8R7
Fax: 1-613-761-9176
Customer feedback
If you have any comments or suggestions about CorelDRAW Essentials 2, you can send them by email to drawsuggest@corel.com.
If you have any comments or suggestions about the user guide and Help, you can send them by email to drawdoc@corel.com or by regular mail to the address below. You can check the product Web site for the latest news, tips and tricks, and product upgrade information. Go to www.corel.com and follow the links to the product site.
Creative Products Documentation Manager
Corel Corporation
1600 Carling Avenue
Ottawa, Ontario, Canada
K1Z 8R7
Documentation conventions
The table below describes important conventions used in the user guide and Help.
| Convention | Description | Examples |
| Menu ➔ Menu command | Click the menu item followed by the menu command. | Click File ➔ Open. |
| list box | A list of options that drops down when a user clicks the down arrow button. | Choose a layout style from the Layout list box. |
| A note contains information that is important to the preceding steps. It can describe conditions under which the procedure can be performed. | The status bar displays a description of each hidden object as you select it. | |
| A tip contains suggestions for performing the preceding steps. It can present alternatives to the steps, and other benefits and uses of the procedure. | You can also launch Help by pressing F1. |
Installing and uninstalling applications
The application's Installer makes it easy to install Corel applications and components. It lets you install and uninstall any Corel applications included in your software package.
To install an application
1 Close all applications.
2 Insert Disc 1 in the CD drive.
If the installation wizard does not start automatically, click Start on the Windows taskbar, and click Run. Type D:\Setup, where D is the letter that corresponds to the CD drive.
3. Follow the instructions in the installation wizard for installing and registering the application.
To uninstall applications
1 On the Windows taskbar, click Start Control Panel.
If your operating system is Windows 2000 or earlier, click Start Settings Control Panel.
2 Double-click Add/Remove programs.
3 Choose a Corel application from the list, click Change/Remove, and enable the Remove all option in the dialog box.
If your operating system is Windows 2000 or earlier, click the Remove button.
4 Follow the InstallShield® wizard instructions.
Using Quick Start
Quick Start lets you receive information and guidance based on the task you select. It provides easy access to recent files, documentation, tips, and the Corel online store. It also consolidates support and third-party information.
To use Quick Start
1 Click Start Programs CorelDRAW Essentials 2 Quick Start.
2 Click one of the following tabs:
- Tasks — provides several project types and loads the required CorelDRAW Essentials 2 application with the corresponding category in the template wizard
- Recent documents — lists recent files for CorelDRAW Essentials and Corel Photobook
- Applications — provides information on CorelDRAW Essentials, Corel Photobook, Corel PhotoAlbum, and the third-party applications included with CorelDRAW Essentials 2
- Tips & Tricks — provides content, and links to content from Designer.com
- Help & Support — links to the online Help systems, as well as to Corel support resources on www.corel.com
- Upgrade now — links to the latest information on CorelDRAW Graphics Suite
Getting help
You can get help from the accompanying user guide or directly from the user interface. You can find topics from the Help by using the table of contents and search tool. You can also print a Help topic and display Help topics relevant to the task you are performing.
Help is available through the following tools:
- User guide — provides commonly used procedures and information. Chapters ending with From here tables contain keywords that direct you to additional topics in the Help.
- Help — lets you access Help directly from the user interface and find topics using the contents topic, index, and word/phrase search tool
- ToolTips — lets you access tips for using the application's icons and buttons. To view a ToolTip, position the cursor over an icon, button, or other application control.
To use Help
1 Click Help Help topics.
2 Click one of the following tabs:
-
Contents — lets you browse through topics in the Help
-
Index — lets you use the index to find a topic
- Search — lets you search the full text of the Help for a particular word. For example, if you are looking for information about RGB color mode, you can type “RGB” to display a list of relevant topics.
You can also
| View Help for a dialog box | Click the Help button. |
| Print a specific Help topic | Open a Help topic, click the frame you want to print, and click Print. |

You can also launch Help by pressing F1.
Other resources
Corel has training partnerships with other firms and provides professional services for its software products. The Corel Designer.com Web site contains a wealth of graphics resources.
Training
Corel Training Events
- Maximize your skills and attend a Corel® Training Camp — special intensive Training Events held throughout North America on various Corel products. All Training Camps are delivered by a Corel Training Specialist, with hands-on instruction, exercises and practical real-world projects. To look at the training schedule or to register for a course, please visit: www.corel.com/trainingschedule.
Corel Customized Training
- Once you have Corel applications running on your computers, our team of expert Corel Training Specialists can help you make the most of them with customized training, tailored to the specific needs of your work environment. We will help you develop a custom curriculum which is practical and relevant to the needs of your organization. For more information about Corel Customized Training, please visit www.corel.com/customizedtraining.
Corel Training Partners (CTP)
- A Corel® Training Partner is an independent, officially accredited local organization that provides training on Corel products and is located worldwide for your convenience. To find a partner near you, please visit www.corel.com/trainingpartners.
Designer.com
Users are encouraged to visit Corel's Designer.com Web site. It contains articles, tips and tricks, free clipart, product news, tutorials, and other graphics resources to inspire, excite, and illuminate. Visit www DESIGNer.com to start.
CorelDRAW Essentials workspace tour
Becoming familiar with the terminology and workspace of CorelDRAW Essentials will help you easily follow this user guide's concepts and procedures.
In this section, you'll learn about
- terminology and concepts
CorelDRAW Essentials application window - CorelDRAW Essentials workspace tools
Terminology and concepts
Before you get started with CorelDRAW Essentials, you should be familiar with the following terms.
| Term | Description |
| object | An element in a drawing such as an image, shape, line, text, curve, symbol, or layer. |
| drawing | The work you create in CorelDRAW Essentials; for example, custom artwork, logos, posters, and newsletters |
| vector graphic | An image generated from mathematical descriptions that determine the position, length, and direction in which lines are drawn. |
| bitmap | An image composed of grids of pixels, or dots; also called a raster image |
| Docker window | A window containing available commands and settings relevant to a specific tool or task |
| flyout | A button that opens a group of related tools or menu items |
| artistic text | A type of text to which you can apply special effects, such as drop-shadows |
| paragraph text | A type of text to which you can apply formatting options, and which can be edited in large blocks |
CorelDRAW Essentials application window
When you launch CorelDRAW Essentials, the application window opens containing a drawing window. The rectangle in the center of the drawing window is the drawing page where you create your drawing. Although more than one drawing window can be opened, you can apply commands to the active drawing window only.
The CorelDRAW Essentials application window appears below. A description of its parts follows.
| Part | Description |
| Menu bar | The area containing pull-down menu options |
| Property bar | A detachable bar with commands that relate to the active tool or object. For example, when the text tool is active, the text property bar displays commands that create and edit text. |
| ToolBar | A detachable bar that contains shortcuts to menu and other commands |
| Title bar | The area displaying the title of the currently open drawing |
| Rulers | Horizontal and vertical borders that are used to determine the size and position of objects in a drawing |
| Toolbox | A floating bar with tools for creating, filling, and modifying objects in the drawing |
| Drawing window | The area outside the drawing page bordered by the scroll bars and application controls |
| Drawing page | The rectangular area inside the drawing window. It is the printable area of your work area. |
| Color palette | A dockable bar that contains color swatches. |
| Docker window | A window containing available commands and settings relevant to a specific tool or task |
| Status bar | An area at the bottom of the application window that contains information about object properties such as type, size, color, fill, and resolution. The status bar also shows the current mouse position. |
| Document navigator | The area at the bottom left of the application window that contains controls for moving between pages and adding pages |
| Navigator | A button at the bottom-right corner that opens a smaller display to help you move around a drawing |

To toggle between displaying and hiding the status bar, click Window Toolbars Status bar.
To toggle between displaying and hiding the rulers, see "To hide or display the rulers" in the Help.
CorelDRAW Essentials workspace tools
Application commands are accessible through the menu bar, toolbars, toolbox, property bar, and Docker windows. The property bar and Docker windows provide access to commands that relate to the active tool or current task. The property bar, Docker windows, toolbars, and toolbox can be opened, closed, and moved around your screen at any time.
Standard toolbar
The standard toolbar contains buttons that are shortcuts to many of the menu commands.
The standard toolbar displays by default.
| Click this button | To |
| Start a new drawing | |
| Open a drawing | |
| Save a drawing | |
| Print a drawing | |
| Cut selected objects to the Clipboard | |
| Copy selected objects to the Clipboard | |
| Paste the Clipboard contents into a drawing | |
| Undo an action | |
| Restore an action that was undone | |
| Import a drawing |
Click this button
To

Export a drawing

Set a zoom level
Exploring the toolbox
Flyouts open to display a set of related CorelDRAW Essentials tools. A small arrow in the bottom, right corner of a toolbox button indicates a flyout; for example, the Shape edit flyout 4 . Clicking a flyout arrow opens a set of related tools. Clicking and dragging the grab handles at the end of the flyout sets the flyout in its expanded form.
You can use the tools in the toolbox to create, fill, and modify the objects in your drawings.
The following table provides descriptions of the flyouts and tools in the CorelDRAW Essentials toolbox.
Flyouts
| Flyout | Description | |
| Shape edit | Lets you access the Shape, Knife, and Eraser tools | |
| Curve | Lets you access the Freehand, Bézier, and Artistic media tools | |
| Object | Lets you access the Graph paper, Polygon, and Spiral tools | |
| Perfect ShapesTM | Lets you access the Basic shapes, Arrow shapes, Flowchart shapes, Star shapes, and Callout shapes tools | |
| Interactive tools | Lets you access the Interactive blend, Interactive contour, Interactive distortion, Interactive drop shadow, Interactive envelope, Interactive extrude, and Interactive transparency tools | |
| Outline | Lets you access the Outline pen and the Outline color dialog boxes, and a selection of outlines of various widths | |
| Fill | Lets you access the Fill color, Fountain fill, Pattern fill, and Texture fill dialog boxes | |
Tools
| Tool | Description |
| The Pick tool lets you select and size, skew, and rotate objects. | |
| The Shape tool lets you edit the shape of objects. | |
| The Knife tool lets you cut through objects. | |
| The Eraser tool lets you remove areas of your drawing. | |
| The Text tool lets you type words directly on the screen as artistic or paragraph text. | |
| The Basic shapes tool lets you choose from a full set of shapes, including a hexagram, a smiley face, and a right-angle triangle. | |
| The Arrow shapes tool lets you draw arrows of various shape, direction, and number of heads. | |
| The Flowchart shapes tool lets you draw flowchart symbols. | |
| The Star shapes tool lets you draw ribbon objects and explosion shapes. | |
| The Callout shapes tool lets you draw callouts and labels. | |
| The Freehand tool lets you draw single line segments and curves. | |
| The Bezier tool lets you draw curves one segment at a time. | |
| The Artistic media tool provides access to the Brush, Sprayer, and Calligraphic tools. | |
| The Graph paper tool lets you draw a grid of lines similar to that on graph paper. | |
| The Polygon tool lets you draw symmetrical polygons and stars. | |
| The Spiral tool lets you draw symmetrical and logarithmic spirals. | |
| The Rectangle tool lets you draw rectangles and squares. | |
| The Ellipse tool lets you draw ellipses and circles. | |
| The Interactive fill tool lets you apply various fills. | |
| The Interactive blend tool lets you blend two objects. | |
| The Interactive contour tool lets you apply a contour to an object. | |
| The Interactive distortion tool lets you apply a Push or Pull distortion, a Zipper distortion, or a Twister distortion to an object. | |
| The Interactive drop shadow tool lets you apply a drop shadow to an object. | |
| The Interactive envelope tool lets you distort an object by dragging the nodes of the envelope. | |
| The Interactive extrude tool lets you apply the illusion of depth to objects. | |
| The Interactive transparency tool lets you apply transparencies to objects. | |
| The Zoom tool lets you change the magnification level in the drawing window. | |
| The Hand tool lets you control which part of the drawing is visible in the drawing window |
Property bar
The property bar displays the most commonly used functions that are relevant to the active tool or to the task you're performing. Although it looks like a toolbar, the property bar content changes depending on the tool or task.
For example, when you click the Text tool in the toolbox, the property bar displays only text-related commands. In the example below, the property bar displays text, formatting, alignment, and editing tools.

Docker windows
Docker windows display the same type of controls as a dialog box, such as command buttons, options, and list boxes. Unlike most dialog boxes, you can keep Docker windows open while working on a document, so you can readily access the commands to experiment with different effects.
Docker windows can be either docked or floating. Docking a Docker window attaches it to the edge of the application window. Undocking a Docker window detaches it from other parts of the workspace, so it can be easily moved around. You can also collapse Docker windows to save screen space.
An example is the Object properties Docker window. When this Docker window is open, you can click an object in the drawing window and view formatting, dimensions, and other properties of the object.
Status bar
The status bar displays information about selected objects (such as color, fill type, and outline, cursor position, and relevant commands).
| (6.168, 3.803) Text Size: 24.000 points | Artistic Text: AvantiGarde Bk. BT (Normal) (US) on Layer 1 | Black | ||
| (-13.529, 12.803) | Click+drag adds Paragraph Text | None | × | |
Getting started
Drawings are the work that you create and edit in CorelDRAW Essentials.
In this section, you'll learn about
- starting and opening drawings
exploring the basic features of CorelDRAW Essentials
working with templates - undoing and redoing actions
- saving drawings
- closing drawings and quitting CorelDRAW Essentials
Starting and opening drawings
CorelDRAW Essentials lets you start a new drawing from a blank page, from a template, or from an existing drawing.
A blank page gives you the freedom to specify every aspect of a drawing.
A template provides you with a starting point and leaves the amount of customization up to you.
For more information about using templates, see "Working with templates" on page 21.
Basing a new drawing on an existing drawing lets you reuse objects and page settings. CorelDRAW Essentials lets you open existing drawings saved to a variety of file formats. For information about the file formats you can open in CorelDRAW Essentials, see "File formats" in the Help.
To start CorelDRAW Essentials
- Click Start Programs CorelDRAW Essentials 2 CorelDRAW Essentials.
To start a drawing
| To | Do the following |
| Start a drawing from a blank page | Click File ➔ New. |
| Start a drawing from a CorelDRAW Essentials template | Click File ➔ New from template, click the tab that corresponds to the template category you want, and choose a template. |

You can specify a layout style (template) by clicking Layout Page options, clicking Layout in the list of categories, and choosing a layout style from the Layout list box.
To open a drawing
1 Click File Open.
2 Locate the folder where the drawing is stored.
3 Click a filename.
4 Click Open.

You can also open a drawing by clicking the Open button on the toolbar. If you want to view a thumbnail of the drawing, click the Preview check box.
Exploring the basic features of CorelDRAW Essentials
CorelDRAW Essentials has a wide range of tools and capabilities to help you create drawings. The following table provides you with the basic features of CorelDRAW Essentials so that you can get started.
| For information on | See |
| Drawing lines | “Working with lines, outlines, and brush strokes” in the Help |
| Drawing shapes | “Drawing shapes” in the Help |
| Creating and manipulating objects | “Working with objects” on page 25 and in the Help |
For information on
See
| Outlining and filling objects | “Outlining and filling objects” on page 29; “Working with lines, outlines, and brush strokes” and “Filling objects” in the Help |
| Adding text to a drawing | “Adding and formatting text” on page 31 |
| Publishing your work | “Publishing your work” on page 35 |
Working with templates
A template is a set of styles and page layout settings that govern the layout and appearance of a drawing. You can choose from a wide variety of preset templates available in the application. The templates included with CorelDRAW Essentials are available under the following categories:
Stationery
Label
- Envelope
Card
Calendar
- Promo
Odio dignissim qui blandit praesent

Dolor sit amet, consectetuer
Adipiscing elit, sed diem
nonummy nibu euismod
tincudant ut lacreet odlore magna
aligium erat volutpat. Ut wisis
enim ad minim veniam, quis
nostrud exerci tuition ullam
corper suscipt lobortis nisi ut
aliquip ex ea commodo
consequat. Duis te feugi facili.
Duis autem dolor in hendrerit in
vulpata velit esse molestie
consequat, vel illum dolore eu
feugiat nulla facilis at vero eros et accumsan et iusto odio dignissim ki y blandit praesent laptatum zzzr delenit au gue duis dolore te feugat nulla facilis, erat volutpat. Ut wisis enim ad minim veniam, quis nostrud exerci tution ullam corper suscipit lobortis nisi ut aliquip ex ea commodmo consequat. Duis te feugi faciliis. Duis autem dolor in hendrerit in vulputate velit esse molestie consequat, vel illum
Use a template for drawing designs that you want to reuse.
When you create a new drawing using a template, CorelDRAW Essentials formats the page using the template's page layout settings and loads the template's styles in the new file.
If none of the preset templates meet your requirements, you can edit an existing template, or you can create a template based on styles you create or styles taken from other templates. For more information on editing and creating templates, see "Working with templates" in the Help.
To create a new file based on a saved template
1 Click File Open.
2 Choose CDT - CorelDRAW template from the Files of type list box.
3 Locate the folder where the template is stored.
4 Double-click a template filename.
5 Enable the New from template check box in the Open dialog box.
Undoing and redoing actions
You can undo the actions you perform in a drawing, starting with the most recent action. If you don't like the result of undoing an action, you can redo it.
To undo and redo actions
| To | Do the following |
| Undo an action | Click Edit ➔ Undo. |
| Redo an action | Click Edit ➔ Redo. |

You can also undo or redo actions by clicking the Undo button or Redo button on the Standard toolbar.
Saving drawings
CorelDRAW Essentials lets you save a drawing as you work.
CorelDRAW Essentials offers advanced options that let you assign notes, keywords, and thumbnails to drawings so that you can find them more easily.
By default, drawings are saved to the CorelDRAW file format (.cdr); however, advanced save options let you choose other file formats as well. If you are saving a drawing to use in another application, you must save it to a file format that is supported by that application. You can also save a drawing to another version of CorelDRAW. For information about file formats supported by CorelDRAW Essentials, see "File formats" in the Help. For information about saving files to other formats, see "Exporting files" on page 40.
To save a drawing
1 Click File Save as.
2 Locate the folder where you want to save the file.
- If you want to save notes or keywords with the file, type them in the corresponding box.
- If you want to specify advanced settings, click Advanced, and specify the settings you want in the Preferences dialog box.
3 Type a filename in the File name list box.
4 Click Save.

If you want to save changes made to a previously saved drawing, click File Save.
You can also save a drawing by clicking the Save button on the Standard toolbar.
Closing drawings and quitting CorelDRAW Essentials
You can close one or all open drawings at any time before quitting CorelDRAW Essentials.
To close drawings
| To close | Do the following |
| One drawing | Click File ➔ Close. |
| All open drawings | Click Window ➔ Close all. |
To quit CorelDRAW Essentials
- Click File Exit.

You can also quit CorelDRAW Essentials by pressing Alt + F4.
From here
| For more information about | In the Help index, see |
| Finding and inserting drawing content | images |
| Zooming and panning | zooming |
Working with objects
Working with objects is a central part of creating drawings.
In this section, you'll learn about
- selecting objects
- copying, duplicating, and deleting objects
positioning objects
Selecting objects
Before you can change an object, you must select it. You can select visible objects, hidden objects, and a single object in a group or a nested group, and each object in the order in which it is created. You can also select all objects at once and deselect objects.

A bounding box displays around a selected object, and an "X" appears at its center.
To select objects
| To select | Do the following |
| An object | Click an object using the Pick tool R . |
| Multiple objects | Hold down Shift, and click each object you want to select. |
| An object, starting with the first object created and moving toward the last object created | Press Shift + Tab until a selection box displays around the object you want to select. |
| An object, starting with the last object created and moving toward the first object created | Press Tab until a selection box displays around the object you want to select. |
| All objects | Click Edit ▶ Select all ▶ Objects. |

The status bar displays a description of each hidden object as you select it.

You can also select one or more objects by dragging around the object or objects using the Pick tool.
To deselect objects
| To deselect | Do the following |
| All objects | Click the Pick tool, and click a blank space in the drawing window. |
| A single object in multiple selected objects | Hold down Shift, and click the object using the Pick tool. |
Copying, duplicating, and deleting objects
CorelDRAW Essentials gives you two ways to copy objects. You can cut or copy an object to place it on the Clipboard and paste it into a drawing or another application, or you can duplicate an object. Cutting an object to the Clipboard removes it from the drawing; copying an object to the Clipboard leaves the original in the drawing; and duplicating an object places a copy directly in the drawing window, not the Clipboard. Duplicating is also faster than copying and pasting. You can copy entire objects or their properties.
When you no longer need an object, you can delete it.
To cut or copy an object
1 Select an object.
2 Click Edit, and click one of the following:
Cut
- Copy

You can also cut or copy an object by right-clicking the object and clicking Cut or Copy.
To paste an object into a drawing
- Click Edit Paste.
To duplicate an object
1 Select an object.
2 Click Edit Duplicate.
To delete an object
1 Select an object.
2 Click Edit Delete.

You can also delete an object by right-clicking the object and clicking Delete.
Positioning objects
You can position objects by dragging them to a new location.
You can also position objects by nudging, or by specifying their horizontal and vertical position. For more information, see "Positioning objects" in the Help.
To move an object
- Drag the X in the object's center to move the object to a new position in the drawing.

You can move an object to another page by dragging the object over a page number tab and then dragging over the page.
From here
| For more information about | In the Help index, see |
| aligning, distributing, and snapping objects | aligning |
| changing the order of objects | order |
| sizing objects | sizing |
| grouping objects | groups |
| combining objects | combined objects |
| shaping objects | shaping, objects |
| adding three-dimensional effects to objects | three-dimensional effects |
Outlining and filling objects
CorelDRAW Essentials lets you format the outlines that surround objects, as well as add fills to the inside of objects.
In this section, you'll learn about
- formatting lines and outlines
applying uniform fills
Formatting lines and outlines
You can change the appearance of both lines and outlines. For example, you can specify their color, width, style, corner shape, and cap style.
To specify line and outline settings
1 Select an object.
2 Open the Outline tool flyout, and click the Outline pen dialog button.
3 Specify the settings you want.

You can change the outline color of a selected object by choosing a color from the color selector in the Outline pen dialog box.
You can remove a selected object's outline by opening the Outline tool flyout and clicking No outline.
Applying uniform fills
You can apply a uniform fill to objects. Uniform fills are solid colors.
You can also apply fountain fills, pattern fills, and texture fills to objects. For more information, see the Help.
To apply a uniform fill
1 Select an object.
2 Click the Interactive fill tool
3 Choose Uniform fill from the Fill type list box on the property bar.
4 Specify the settings you want on the property bar, and press Enter.

You can also fill a selected object by clicking a color on the color palette.
You can mix colors in a uniform fill by selecting a filled object, pressing Ctrl and clicking another color on the color palette.
You can remove the fill from a selected object by opening the Fill flyout and clicking the No fill button × .
From here
| For more information about | In the Help index, see |
| working with lines, outlines, and brush strokes | lines |
| applying fountain fills | fountain fills, applying |
| applying pattern fills | pattern fills, applying |
| applying texture fills | texture fills, applying |
| working with fills | fills |
Adding and formatting text
CorelDRAW Essentials lets you use text to create documents or annotate drawings.
In this section, you'll learn about
- adding and selecting text
- changing the appearance of text
Adding and selecting text
There are two types of text you can add to drawings — artistic text and paragraph text. Artistic text can be used to add short lines of text to which you can apply a wide range of effects, such as drop shadows. Paragraph text can be used for larger bodies of text that have greater formatting requirements. You can add both paragraph and artistic text directly in the drawing window.
When adding paragraph text, you must first create a text frame. By default, paragraph text frames remain the same size regardless of how much text they contain. Any text that continues past the bottom-right border of the text frame is hidden until you either enlarge the text frame or link it to another text frame.
You can insert a paragraph text frame inside a graphic object. This lets you use objects as containers for text so that you can use different shapes for text frames. You can also separate text from an object. When you do, the text retains its shape, and you can move or modify the text and the object independently.
Paragraph text placed inside an object. The object is made invisible by removing its outline.
To modify text, you must first select it. You can select entire text objects or specific characters.
To add artistic text
- Click anywhere in the drawing window using the Text tool , and type.
To add paragraph text
To
Do the following
| Add paragraph text | Click the Text tool A . Drag in the drawing window to size the paragraph text frame, and type. |
| Add paragraph text inside an object | Click the Text tool. Move the pointer over the object's outline, and click the object when the pointer changes to an Insert in object pointer. Type inside the frame. |
| Separate a paragraph text frame from an object | Select the object using the Pick tool B , and click Arrange ▷ Break paragraph text inside a path apart. |
To select text
| To select | Do the following |
| An entire text object | Click the text object using the Pick tool . |
| Specific characters | Drag across the text using the Text tool . |

You can select multiple text objects by holding down Shift and clicking each text object using the Pick tool.
Changing the appearance of text
You can enhance artistic text and paragraph text by modifying their character properties. For example, you can change the font type and size or make the text bold or italic. You can also change the position of text to subscript or superscript, which is useful if a drawing contains scientific notation. You can add underlines, strikethrough lines, and overlines to text. You can change the thickness of these lines, as well as the distance between the lines and the text. You can also change the color of text.
To change character properties
1 Select the text.
2 Click Text Format text.
3 Click the Character tab.
4 Specify the character attributes you want.

You can also make selected text bold, italic or underlined by clicking the Bold button, Italic button, or Underline button on the property bar.

To change the color of text
1 Select the text using the Text tool A.
2 Click a color on the color palette.

You can change the color of an entire text object by deselecting any text and dragging a color swatch from the color palette to the text object.
From here
| For more information about | In the Help index, see |
| aligning and spacing text | text, aligning |
| editing, and converting text | text, editing |
| moving text | text, moving |
| fitting text to a path | text, fitting to a path |
| formatting paragraph text | text, formatting |
| combining and linking paragraph text frames | text, combining paragraph text frames |
| wrapping paragraph text around objects and text | text, wrapping |
Publishing your work
7
CorelDRAW Essentials lets you publish your work in various ways.
You can save objects and optimize them for the World Wide Web. You can also print your work, or save it as an Adobe® Acrobat® PDF file.
In this section, you'll learn about
- optimizing bitmaps for the World Wide Web
- printing
- saving documents as PDF files
Optimizing bitmaps for the World Wide Web
You can save objects and optimize them for the World Wide Web using the Web Image Optimizer.
When you optimize an image for the Web, you can export to a GIF, JPEG, PNG 8-bit, and PNG 24-bit file type, choose a Web preset, and compare the previewed results. The Web presets are optimized for color, dithering, compression, and smoothing, depending on the file type you choose. You can compare up to four file types by viewing their download speed, image quality, file size, color range, and compression size as well as by panning and zooming in the image.
You can also add and delete Web presets of your own.
To save and optimize a drawing to Web-compatible format
1 Click File Web image optimizer.
2 Choose a speed from the Connection speed list box.
3 Choose one of the following pane display options:
- Single pane
- Double-vertical panes
- Double-horizontal panes
Four panes
4 Keep one pane as the original image. In one or more of the other panes, choose from the following list boxes below the preview window:
File type
Web preset
You can also
| Edit preset settings for a single preview area | Click Advanced. In the Export dialog box, customize the preset options. If you select GIF or PNG8 file formats, you can modify the color palette and settings in the Convert to palleted dialog box. |
| Save the current configuration of settings for a preview area. | Click the Save settings button for each area where you want to save the settings. |
| Save a custom preset | Click Add . |
| Delete a preset | Click Delete . |
| Display file information below each preview window | Enable the Preview check box. |
| Pan to another section of the image | Drag in the preview window of the original image. |
| Zoom in the preview window | Choose a magnification from the Zoom level list box. |

You can compare file types with the original image by choosing Original from the File type list box in one of the panes.
Printing
In CorelDRAW Essentials, you can print one or more copies of the same drawing.
Before printing a drawing, you can specify printer properties, including paper size and device options.
To print your work
1 Click File Print.
2 Click the General tab.
3 Choose a printer from the Name list box.
4 Type a value in the Number of copies box.
If you want the copies collated, enable the Collate check box.
5 Enable one of the following options:
- Current document - prints the active drawing
- Current page — prints the active page
Pages - prints the pages that you specify - Documents — prints the documents that you specify
- Selection — prints the objects that you have selected

You can quickly preview a print job in the Print dialog box by clicking File
▶ Print, and clicking the Mini preview button
Saving documents as PDF files
PDF is a file format designed to preserve fonts, images, graphics, and formatting of an original application file.
You can save a document as a PDF file. A PDF file can be viewed, shared, and printed on any platform provided that users have Adobe Acrobat or Adobe® Acrobat®
Reader® installed on their computers. A PDF file can also be uploaded to an intranet or the World Wide Web.
When you save a document as a PDF file, you can choose from three preset PDF styles, which apply settings that are specific to that particular PDF style. For example, with the PDF for the Web style, the resolution of the images in the PDF file will be optimized for the World Wide Web.
To save a document as a PDF file
1 Click File Publish to PDF.
2 From the PDF style list box, choose one of the following:
- PDF for document distribution — enables JPEG bitmap image compression, and is best used for general document delivery. These documents can be printed on a laser or desktop printer.
- PDF for the Web — enables JPEG bitmap image compression, embeds fonts, and compresses text for publishing the document to the World Wide Web.
- PDF for editing — enables LZW compression and embeds fonts. It displays the PDF files with all the fonts, and with all of the images at full resolution, so you can edit the file at a later date.
3 Locate the folder where you want to save the file.
4 Type a filename in the File name box.
From here
| For more information about | In the Help index, see |
| laying out print jobs | printing, layout |
| working with imposition layouts | printing, imposition layouts |
Importing and exporting files
CorelDRAW Essentials provides filters that convert files from one format to another when you import or export files.
In this section, you will learn about
importing files
- exporting files
Importing files
CorelDRAW Essentials lets you import files created in other applications. You can import a file and place it in the active application window as an object. The imported file becomes part of the active file.
To import a file into an active drawing
1 Click File Import.
2 Choose the folder where the file is stored.
3 Choose a file format from the Files of type list box.
4 Click the filename.
5 Enable any of the following active check boxes:
- Link bitmap externally — lets you link a bitmap externally instead of embedding it in a file
- Combine multi-layer bitmap — automatically merges the layers within a bitmap
- Do not show filter dialog — lets you use the filter's default settings without opening its dialog box
- Maintain layers and pages — lets you maintain layers and pages when importing files; if you disable the check box, all layersCorelDRAW Essentials 2 Getting Started User Guide are combined in a single layer
6 Click Import.
7 Click the drawing page.

Multi-layered bitmaps can be imported by default.
Exporting files
You can export and save images to a variety of file formats that can be used in other applications.
You can export a file to a selected file format. You can also export a file by saving the open file under a different name or to a different file format while leaving the open file in its existing format.
To export a file
1 Click File Export.
2 Choose the folder where you want to save the file.
3 Choose a file format from the Files of type list box.
4 Type a filename in the File name list box.
5 Enable any of the following active check boxes:
- Selected only — saves only the objects selected in the active drawing
- Web-safe filenames — replaces the white space in a filename with an underscore. Special characters are replaced by characters suitable for Web-based filenames.
- Do not show filter dialog — suppresses dialog boxes that provide other options when exporting
6 Click Export.
| You can also | Do the following |
| Compress a file on export | Choose a compression type from the Compression type list box. |
| Specify information about a file | Type any comments you want in the Notes box. |

Not all of the options or the compression types in the Export dialog are available for all file formats.
If a dialog box for the export format opens, specify the options you want. For detailed information about file formats, see "File formats" in the Help.
To save a file to a different format
1 Click File Save as.
2 Choose the folder where you want to save the file.
3 Choose a file format from the Save as type list box.
4 Type a filename in the File name list box.
5 Enable any of the following active check boxes:
- Selected only — saves only the objects selected in the active drawing
- Web-safe filenames — replaces the white space in a filename with an underscore. Special characters are replaced by characters suitable for Web-based filenames.
- Embed fonts using TrueDoc® — lets you save fonts to the file using TrueDoc 6 Click Save.
| You can also | Do the following |
| Specify information about a file | Type any comments you want in the Notes box. |

Not all of the options or the compression types in the Save drawing dialog are available for all file formats.
From here
| For more information about | In the Help index, see |
| file formats | file formats |
Using Corel Photobook and Corel PhotoAlbum
9
Corel Photobook lets you edit images, such as photographs or bitmaps.
Corel PhotoAlbum lets you locate, view, and organize images.
In this section, you'll learn about
- using the Corel Photobook application window
using the toolbox
using the Visual toolbar - starting Corel Photobook
- creating image files
- opening image file
acquiring images
closing image files - saving image files
- quitting Corel Photobook
using Corel PhotoAlbum
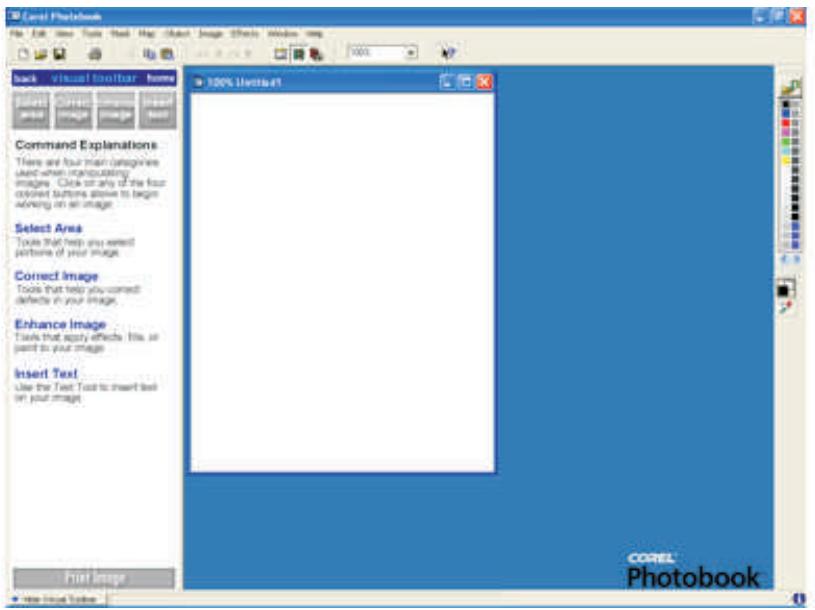
Using the Corel Photobook application window
When you launch Corel Photobook, the application window opens containing an image window. Although more than one image window can be opened, you can apply commands to the active image window only.
The Corel Photobook application window appears below. A description of its parts follows.
Part
Description
| Control menu box | The icon, located in the upper left corner of a window, that opens the Control menu. This menu lets you restore, move, size, minimize, maximize, and close the main window. |
| Menu bar | The menus are in the menu bar at the top of the window, under the title bar. The menus are grouped by category. For example, the Mask menu contains commands that let you load, save, edit, and remove masks. |
| Minimize, Maximize, and Close buttons | The buttons located in the upper right corner of each window that are used to reduce or enlarge the window. The left button minimizes Corel Photobook. The center button maximizes the Corel Photobook main window. The right button, which contains an X, lets you exit from Corel Photobook. |
Part
Description
| Standard toolbar | The area that displays various tools used with Corel Photobook. The standard toolbar is dockable at the top, bottom, left, or right sides of the main window. It can also be made to float on the main window. To move the Standard toolbar, drag it to a location on the window and release the mouse button. |
| Ribbon | When you click a tool in the toolbox, the ribbon under the Standard toolbar changes to show options that let you specify how you want to use the tool. For example, if you want to change the mode for freehand masking, click the Mask tool on the toolbox, then click the Freehand mask tool. The ribbon displays options for masking, including modes. The ribbon is dockable at the top, bottom, left, or right sides of the main window. It can also be allowed to float in the main window. To move the ribbon, drag it to the location on the window and release the mouse button. |
| Toolbox | The toolbox contains tools that let you edit images. The toolbar contains the following tools: Selector, Selector transform, View, Mask, Crop, Retouch, Filter, Fill, Draw, Text, Color probe, and Color swatch. The toolbox is dockable at the top, bottom, left, or right sides of the main window. It can also be allowed to float in the main window. To move the toolbox, drag it to the location on the window and release the mouse button. |
| Title bar | The bar across the top of a window that contains the program name (Corel Photobook) or the filename. The title bar also contains the window's Control menu box, and the Minimize, Maximize, and Close buttons. |
| Image window | Different images appear in separate windows within the Corel Photobook main window. You can display more than one image at a time, but only the active window receives the action. For example, when you save an image, only the one in the active window is saved. |
| Status bar | The Status bar at the bottom of the main window gives a brief description of the object under the pointer. You can also determine the status of Corel Photobook operations. |
| Part | Description |
| ToolTips | ToolTips display the name or function of the tool or button the pointer is over. |
| Object Manager | All objects that have been created on a base image are listed in the Object Manager window that floats on the image window. You use the Show Object Manager command on the View menu to show the Object Manager. The Object Manager contains small image buttons for selecting or deselecting each object. An object that is selected appears with a highlighted background. Using the Object Manager, selected objects can be hidden, grouped, deleted, and moved forward or backward (in layers) on top of the base image. |
| Color Palette window | The Color Palette is a collection of colors grouped together for easy access. Corel Photobook comes with many different palettes. You can also create your own. The default palette, called “Default Palette,” contains many of the common colors such as red, green, blue, cyan, magenta, yellow, black, and white. |
| Image info window | This window displays information that helps you perform precise operations, such as aligning pixels and measuring sizes of areas within an image. The Info window also provides color (RGB or CMYK) values or grayscale values of the area under the mouse pointer, depending on the image type. |
| Image properties button | Opens the Image properties dialog box. This dialog box shows information about the image type, size, number of objects, and color management. If a digital camera was used, the EXIF tab may show information about the camera and image, including shutter speed, aperture, and focal length. |
Using the toolbox
The toolbox gives you easy access to the tools you use most to change and enhance an image.
Tool
Description
| The Selector tool selects individual or multiple objects for transforming, grouping, or deleting. | |
| The Selector transform tool lets you resize, reshape, rotate, flip, or move a selected object. | |
| The View tool changes the view of an image. | |
| The Mask tool opens the Mask tool set. | |
| The Crop tool lets you cut out unwanted portions of an image. | |
| The Retouch tool opens the Retouch tool set. | |
| The Filter tool opens the Filter tool set. | |
| The Fill tool opens the Fill tool set. | |
| The Draw tool opens the Draw tool set. | |
| A | The Text tool lets you add text. |
| The Color probe tool lets you select an active color in the Color Swatch. | |
| The Color Swatch lets you select a color. |
The Visual toolbar
The Visual toolbar lets you easily perform tasks to complete a project without having to find tools on the menus, on the toolbars, or on the ribbons. Simply click the icon or text of the task you want to perform. The Visual toolbar then leads you to the next set of available options, and even shows you how to use the selected tool.
If you close the Visual toolbar, Corel Photobook opens the toolbox and the tool ribbons.
To show or hide the Visual toolbar
- Click View Visual toolbar.
Starting Corel Photobook
You can start Corel Photobook at any time.
To start Corel Photobook
- Click Start Programs CorelDRAW Essentials 2 Corel Photobook.
Creating image files
You can create new images in Corel Photobook. There are three types of images you can create:
- Line art — an image that uses only black and white; also called a bi-level image.
- Grayscale — an image that stores image data in varying shades of gray; also called a black-and-white image.
- RGB color — a color image that stores image data in shades of red, green, and blue.
The default image type is RGB, the default width is 4 inches, the default height is 5 inches, and the default resolution setting is 96 pixels per inch. The default background color is white. Increasing the size or resolution of the image increases the amount of memory Corel Photobook requires to create the image. Corel Photobook displays the amount of memory required to create the image in the bottom of the dialog box.
To create a new image
1 Click File New.
2 In the Image type box, choose the type of image you want.
3 In the Width and Height boxes, type the dimensions you want. If you want a background color other than white for the image, click the Color button to open the Color selector dialog box.
4 Click Create.
Opening image files
You can open image files of various formats.
To open a file
1 Click File Open.
2 From the Files of type box, choose the file format you want.
3 From the Look in box, choose the drive you want to use.
4 Click the folder containing the file you want to open.
If you want to display thumbnails, click the Show/hide thumbnails button.
5 Click the file.
6 Click Open.
Acquiring images
The most common way to bring images into Corel Photobook is with a scanner or digital camera. Before you can use a scanner or digital camera with Corel Photobook, you must install it by following the instructions provided by the manufacturer.
To receive input from a TWAIN device, such as a video frame grabber or a TWAIN scanner, you must first set up your device. The operation of devices using TWAIN differs among manufacturers and products. For help using a TWAIN interface, see the documents supplied with the product.
The TWAIN driver interface gives you access to scanners, video grabbers, and other data acquisition devices without requiring special drivers.
To set up a TWAIN device
1 Click File Device setup Scanner.
2 Click Select source.
A TWAIN setup dialog box displays.
3 Select a TWAIN device.
To set up a scanner
1 Click File Device setup Scanner.
2 From the Select a scan device box, choose a scanner driver.
If your scanner driver is not listed, contact the scanner manufacturer for a TWAIN driver.
3 In the Scanner address box, type a scanner address, if necessary.
To use the TWAIN driver interface
- Click File Acquire. A dialog box opens.
Each Acquire dialog box will be different, depending on the device being used. Refer to the documentation provided by the vendors of those products.
Closing image files
You can close the active image file. If the active image file contains changes you have not saved, Corel Photobook displays a message asking if you want to save the changes.
To close a file
- Click File Close.
If the image you are working with has been edited, and you did not save it before closing, Corel Photobook prompts you to choose one of three options:
- Yes — saves changes to your image before closing the image window
- No — closes the image window, but does not save changes to your image
- Cancel — cancels the Close command and returns you to the current image without saving it
Saving image files
You can save the currently active image using the current filename with the same file type and image settings.
If the file has never been saved and you choose the Save command, the Save as dialog box opens, giving you the option of saving the file using a different format or name.
To save a file
- Click File Save.
To save a file using a different format or name
1 Click File Save as.
2 From the Save as type box, choose the file format you want.
3 From the Save in box, choose the drive you want to use.
4 Click the folder where you want to save the file.
5 In the File name box, type a new filename for the image.
6 Click Save.
Quitting Corel Photobook
You can quit Corel Photobook. If you have any image files open in which you have unsaved changes, Corel Photobook prompts you to save the files before the program closes.
To quit Corel Photobook
- Click File Exit.
If the image you are working with has been edited, and you did not save it before closing, Corel Photobook prompts you to choose one of three options:
- Yes — saves changes to your image before closing the image window
- No — closes the image window, but does not save changes to your image
- Cancel — cancels the Close command and returns you to the current image without saving it
Using Corel PhotoAlbum
Corel PhotoAlbum is a program that helps you locate, view, and organize image files. With Corel PhotoAlbum, you can
- navigate to images using the familiar tree view of folders and resources, like Windows Explorer.
- view thumbnails of images that help you quickly identify the ones you need.
- add properties to image files that help you find them later.
- batch rename files or batch convert file formats.
- use drag-and-drop to copy, move, or open files or to add items to albums.
- use albums to create and maintain collections of files located anywhere on your computer or the network.
-
adjust images or open them in Corel Photobook for more extensive editing.
-
share your images by recording them to CD, creating slide shows, attaching them to emails, or uploading them over the Web to a print service.
- create screen savers and desktop wallpaper for your computer.
To start Corel PhotoAlbum
- Click Start Programs CorelDRAW Essentials 2 Corel PhotoAlbum.
From here
For more information on using Corel Photobook, see the Help.
A
acquiring images 49
actions
redoing 22
undoing. 22
artistic text 31
adding 32
B
bitmaps
optimizing for the Web . . . 35
C
closing
drawings. 23
images 50
commands
redoing 22
undoing. 22
copying objects 26-27
Corel Corporation
corporate solutions 7
training 7
Corel PhotoAlbum.
starting 52
Corel Photobook
quitting. 51
starting 48
Corel Photobook workspace
application window 43
toolbox 46
Visual toolbar 47
CorelDRAW Essentials
features 20
quitting. 23-24
starting 19
CorelDRAW Essentials workspace
application window 10
Docker windows. 17
property bars 17
standard toolbar 12
status bar 18
toolbox 13
tools. 12
creating
drawings. 20
images 48
cutting objects 26-27
D
definitions
Corel Photobook. 43
CorelDRAW Essentials 9
deleting objects 27
deselecting. 25
documentation conventions. 4
drawings
closing 23
creating 20
creating from a template. 22
information about 18
opening 20
printing. 36-37
publishing 35
saving 22-23
saving to different formats 41
starting 20
starting from a template. 20
using templates with. 21
duplicating objects 26-27
E
editing images. 43
exporting files. 39-40
F
file formats. 22,39
files
exporting 39-40
importing 39
fills. 29
applying to objects 29
colors 30
uniform 30
fonts
specifying attributes. 33
formatting lines and outlines 29
H
Help 6
printing 6
search. 6
using 6
1
images
acquiring. 49
closing 50
creating. 48
editing 43
opening. 48-49
saving 50
saving to different formats 51
starting 48
importing files. 39
installing 5
application 5
L
lines 29
formatting 29
specifying settings for 29
M
moving objects. 28
0
objects
applying uniform fills to. 29
copying 27
cutting 27
deleting. 27
deselecting 26
duplicating 27
moving 28
pasting 27
positioning 27
selecting. 26
opening images 48-49
optimizing bitmaps 35
outlines 29
formatting 29
specifying settings 29
P
paragraph text. 31
adding 32
adjusting frames automatically 32
placing inside an object 32
separating from an object 32
pasting objects. 27
saving files 37
positioning objects. 27
printing drawings. 36-37
publishing drawings 35
Q
Quick Start. 5
using 6
quitting
Corel Photobook. 51
CorelDRAW Essentials. 23-24
R
redoing actions. 22
registering
Corel products 2
support 2
s
saving drawings. 23
drawings to different formats 41
images 50
images to different formats .. 51
PDF files. 37
scanner
setting up 49
selecting
objects 26
text 33
setting up
scanner 49
TWAIN device 49
starting
Corel PhotoAlbum 52
Corel Photobook. 48
CorelDRAW Essentials 19
drawings. 20
images 48
support
customer feedback 4
customer service 2
registration 2
training 7
T
technical support 2
templates 19
loading 22
using. 21
terminology
Corel Photobook. 43
CorelDRAW Essentials 9
text 31
adding 31
changing case 33
changing color 34
character properties 33
placing inside objects 32
selecting. 33
using driver interface 50
U
undoing actions 22
uniform fills 30
uninstalling. 5
application 5
W
Web support 2
Web training 7