
GT 2-IN-1 FORCE FEEDBACK - Simulation Steering Wheel TRUSTMASTER - Free user manual and instructions
Find the device manual for free GT 2-IN-1 FORCE FEEDBACK TRUSTMASTER in PDF.

| Product type | Simulation steering wheel with force feedback |
| Brand | TRUSTMASTER |
| Model | GT 2-IN-1 FORCE FEEDBACK |
| Compatible platforms | PC (Windows 98 SE/Me/2000/XP) and PlayStation 2 |
| Force feedback technology | Force Feedback with 3 modes: Strong, Medium, Off |
| Pedal set | Analog pedal set with 2 pedals (accelerator and brake) |
| Pedal modes | Separate (3 axes) or Combined (2 axes) selectable |
| Auto-centering | Enable/disable via the Force button |
| Precision Drive mode | Yes, improves sensitivity in tight turns |
| Sequential gearbox reverser | Allows reversing assignment of speed paddles (L2/R2) |
| Buttons | 6 action buttons (including Select and Start), D-pad, 2 speed paddles, Force button |
| Indicator light | Indicates mode and status by color (red, green, orange) |
| Connectivity | USB, Gameport (PS2), RJ45 for pedal set, power adapter socket |
| Mounting system | Clamp screw mounting to a table |
| Calibration | Automatic upon USB connection or console power-on |
| Power supply | Included power adapter |
| Driver software | Included installation CD-ROM |
| Warranty | 2 years (material and manufacturing defects) |
| Technical support | Website: http://ts.thrustmaster.com and phone (see manual) |
| Included accessories | Steering wheel, pedal set, power adapter, driver CD-ROM, user manual |
| Safety | Disconnect the power adapter during periods of inactivity; keep out of reach of young children |
Frequently Asked Questions - GT 2-IN-1 FORCE FEEDBACK TRUSTMASTER
User questions about GT 2-IN-1 FORCE FEEDBACK TRUSTMASTER
0 question about this device. Answer the ones you know or ask your own.
Ask a new question about this device
Download the instructions for your Simulation Steering Wheel in PDF format for free! Find your manual GT 2-IN-1 FORCE FEEDBACK - TRUSTMASTER and take your electronic device back in hand. On this page are published all the documents necessary for the use of your device. GT 2-IN-1 FORCE FEEDBACK by TRUSTMASTER.
USER MANUAL GT 2-IN-1 FORCE FEEDBACK TRUSTMASTER
2 in 1 Force Feedback Racing wheel
For use with / Für / Pour
Playstation 2
PC
English -
CAUTION: On PCs equipped with certain motherboards, your wheel may remain powered (LED on) and may stay turned to one side (full left or full right) while the PC is off. In this case, you must disconnect the power adapter connector and/or the USB connector in order to prevent overheat which might damage the wheel's motor.
Français -
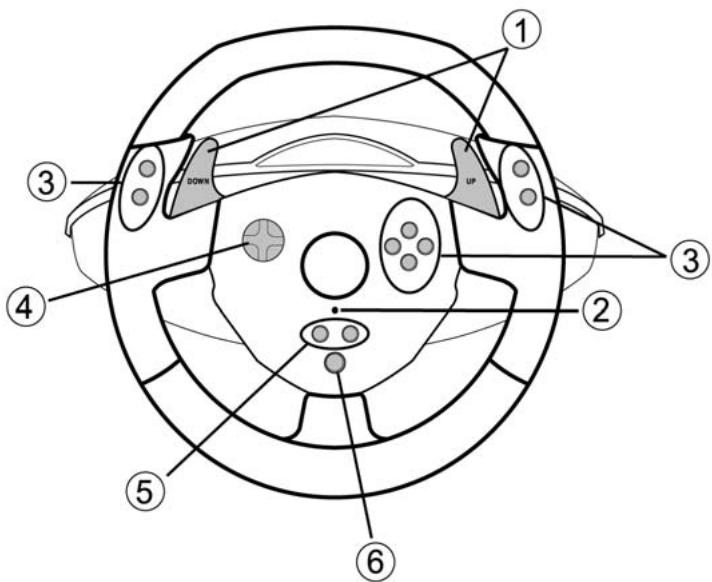
1 2 digital gearshift levers
2 Mode led
3 Action buttons
4 D-pad
5 Select and Start buttons
6 Force button
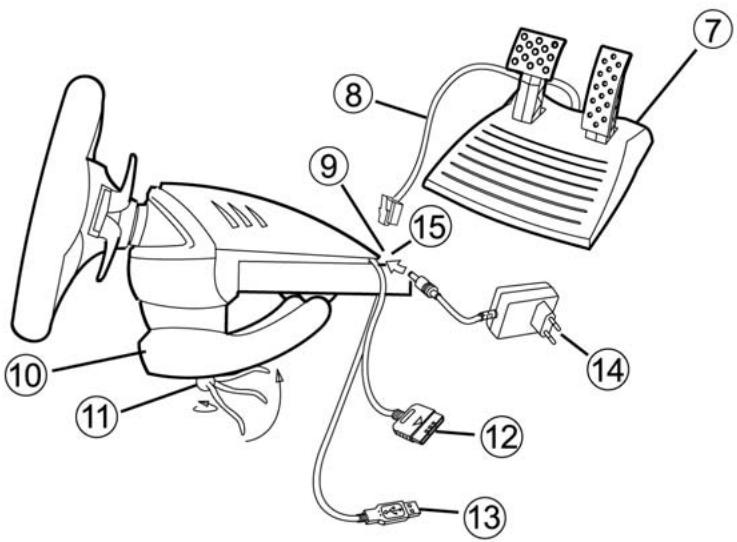
7 Analog pedal set
8 Pedal cable
9 Pedal connector
10 Table clamp
11 Clamp screw
12 GAMEPORT connector (for PlayStation2)
13 USB connector (for PC and PlayStation2)
14 Power adapter
15 Adapter connector
INSTALLING THE WHEEL
Fixing the wheel in place
- Place the wheel on a table or other flat surface.
- Place the clamp screw (11) in the table clamp (10) and then screw the clamping unit into the hole on the underside of the wheel until firmly fixed in place. Do not turn the screw too tightly, as you risk damaging the clamping unit and/or the table.
Connecting the pedal set
- Connect the pedal connector (8) to the pedal receptor (9).
- Connect the power adapter (14) to the adapter connector (15) and plug the adapter into an electrical outlet.
INSTALLATION FOR PC
System requirements: PC (Windows 98 SE, Me, 2000, XP) equipped with USB port.
The CD-ROM included with this product allows you to install the Force Feedback drivers.
- Insert the installation CD-ROM into your CD-ROM drive. Follow the on-screen instructions to install the Force Feedback drivers. Once the installation is complete, click Finish and restart your computer.
- Once your computer has restarted, connect the USB connector (10) to one of your computer's USB ports. Windows 98/Me/2000/XP will automatically detect the new device. (If you are connecting a USB device for the first time, Windows may ask you to insert the Windows CD-ROM during the installation procedure in order to install the required system files.)
- Driver installation:
Windows 98: the Add New Hardware Wizard will search for the appropriate drivers. Click Next.
Follow the on-screen instructions to complete the installation.
Windows Me/2000/XP: the drivers are installed automatically.
- Select Start/All Programs/Thrustmaster/Force Feedback driver/Control Panel. The Game Controllers dialog box displays the gamepad's name with OK status.
-
In the Control Panel, click Properties to configure your gamepad:
-
Test device: to test and visualize the buttons, D-pad and 3 axes (wheel, brake and gas pedals).
- Test forces: to test 8 Force effects and configure the ForceFeedback settings (3 possible settings: from 0 to 150% : Forces Main, Static and Dynamic).
ADVANCED FUNCTIONS ON PC
Calibrating the wheel
The wheel is calibrated automatically once the USB is connected (this operation will move the wheel). The pedals self calibrate after a few presses.
Selecting "Separate" (3-axis) OR "Combined" (2-axis) acceleration/braking mode
By default, the wheel's acceleration/braking controls operate in "separate" 3-axis mode, i.e. with brake and gas pedals operating on independent axes.
3-axis support considerably improves driving precision in races.
If the 3-axis mode is not supported by your game, the wheel's gas pedals will not work properly. Please exit the game and select the "combined" 2-axis mode.
To activate this mode, press simultaneously the acceleration/braking controls (7) and the Force button (6).
To revert to the "separate" 3-axis mode, repeat the same procedure.
Note:
- When you select the "combined" (2-axis) mode, the led flashes red for a few seconds (Wheel = "X" axis, Accelerator and Brake = "RZ" axis).
- When you select the "separate" (3-axis) mode, the led flashes green for a few seconds (Wheel = X" axis, Accelerator = RZ" axis and Brake = "Y" axis).
Enabling/disabling the recentering function
Wheel recentering is enabled by default.
To disable or re-enable the recentering, press the Force button (6).
Most recent games now propose their own recentering mode.
You are strongly advised to disable wheel recentering (in most cases), to allow the game to handle it. The
ForceFeedback will then be of greater quality.
When enabled, the recentering mode is especially useful in games that do not feature ForceFeedback.
Note:
- When Recentering is enabled, the led is Red (default mode on PC).
- When Recentering is disabled, the led is Green (mode recommended for PC).
INSTALLATION FOR PLAYSTATION 2
CONNECTING THE WHEEL
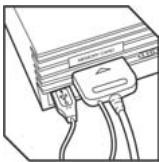
- Switch off your console before connecting the wheel.
- Connect the console connector (12) to port 1 of your console and connect the USB connector (13) to the upper USB port (connect in this order).
- Switch your console back on. The wheel calibrates itself autonomously (this operation will move the wheel.) and the led (2) is red to indicate that the ForceFeedback mode is activated.
You are now ready to play!
ADVANCED FUNCTIONS ON PLAYSTATION 2
Configuring the wheel
By default, the wheel's acceleration/braking controls operate in "separate" 3-axis mode, i.e. with brake and gas pedals operating on independent axes.
3-axis support considerably improves driving precision in races.
However you can still select the "combined" 2-axis mode.
To activate this mode, press simultaneously the acceleration/braking controls (7) and the Force button (6).
To revert to the "separate" 3-axis mode, repeat the same procedure.
Note:
- When you select the "combined" (2-axis) mode, the led flashes green for a few seconds (Wheel = "Left Horizontal Joystick" axis, Accelerator et Brake = "Right Vertical Joystick" axis).
- When you select the "separate" (3-axis) mode, the led flashes red for a few seconds (Wheel = "Left Horizontal Joystick" axis, Accelerator = "Cross" and Brake "Square").
To change the configuration of the other buttons, go to the "gamepad control options" of your game.
Setting the ForceFeedback
On PlayStation 2, your wheel has 3 Force Feedback modes = Power, Medium or Off.
Just press the Force button (6) to switch from one mode to the other.
Note:
- When you select the Power ForceFeedback mode, the led is Red (default mode).
- When you select the Medium ForceFeedback mode, the led is Orange.
- When you select the ForceFeedback Off mode, the led is Green.
"Sequential gearbox inversion" function
In most games, gearshift functions (1) are assigned to the L2, R2 buttons by default.
The "Sequential gearbox inversion" function allows you to assign gear shifting directly to the 2 digital gearshift levers (1) in 100% of games.
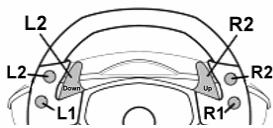
To switch from "Normal sequential gearbox" mode to "Inverted sequential gearbox" mode, press the L1 + R1 and Force buttons (6) simultaneously.
Note: follow the same steps to return to "normal" mode.
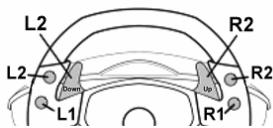
Normal Sequential Gearbox

Inverted Sequential Gearbox
Note:
- When you select the Inverted Sequential Gearbox Mode, the led flashes red for a few seconds.
- When you select the Normal Sequential Gearbox Mode, the led flashes green for a few seconds.
Precision Drive mode
Precision Drive mode has been specially developed with a view to enhancing performance.
Depending on the game, it may help you to beat your best times (and those of your opponents) or make it easier to successfully complete the different driving events.
This new exclusive mode calculates and redistributes your wheel's various analogy points without generating any dead zones (as may be the case with other wheels which allow you to adjust their sensitivity).
How appropriate and effective this mode will be depends on the game you are playing and the course you are racing on. In this mode, the wheel is more sensitive and will allow you to powerslide more easily and thus avoid an excessive loss of speed, in courses with hairpin turns for example.
In games where the wheel's reactions are very sensitive (such as F1 racing, for example), you will therefore probably want to avoid using this mode.
We recommend that you use this mode with an interior view for maximum effectiveness.
To go into Precision Drive mode, simultaneously press the D-pad (4) and the Force button (6). Proceed in the same way to return to normal driving mode.
Note:
- When the Precision Drive mode is enabled, the led flashes continuously.
- When the Precision Drive mode is disabled, the led does not flash.
TROUBLESHOOTING
- My wheel doesn't work correctly or appears to be incorrectly calibrated. Switch off your PC or your console, then disconnect your wheel, reconnect all the cables (with power adapter and pedals), switch back on and restart the game.
- My wheel moves by itself during the game. This is normal and is the recentering function featuring in some games. To stop these movements, just place your hands on the wheel or reduce the ForceFeedback intensity.
- My wheel stays turned to one side (left or right) after auto-calibration. This is normal in some games. The wheel will recenter itself once you have identified it as a wheel in the game's setup options.
- On PC, my wheel is detected by my computer but doesn't work in the game. Access your game's options to configure your wheel. Please refer to your game's manual for further information.
- On PC, my pedal set does not work correctly. Display your game's option management interface to reconfigure the wheel. If the problem persists, exit the game and switch the pedal set to the "combined" (2-axis) mode. Then return to the game to reconfigure the wheel with the new axes.
SAFETY RECOMMENDATIONS AND INFORMATION
- When connecting the wheel and during auto-calibration: to prevent any incorrect calibration, never turn the wheel, press the pedals or buttons.
- When not in use for extended periods and to avoid any unwanted power consumption or deterioration, disconnect the mains adaptor of the wheel. Reconnect it before going back to the game.
- Your wheel features ForceFeedback: NEVER leave the wheel within the reach of young children, especially during the auto-calibration phases.
TECHNICAL SUPPORT
If you encounter a problem with your product, please go to http://ts.thrustmaster.com and click Technical Support. From there you will be able to access various utilities (Frequently Asked Questions (FAQ), the latest versions of drivers and software) that may help to resolve your problem. If the problem persists, you can contact the Thrustmaster products technical support service ("Technical Support"):
By email:
In order to take advantage of technical support by email, you must first register online. The information you provide will help the agents to resolve your problem more quickly. Click Registration on the left-hand side of the Technical Support page and follow the on-screen instructions. If you have already registered, fill in theUsername and Password fields and then click Login.
By telephone:
| United Kingdom | 020 7216 0047 | price of a national phone call, Monday to Friday, from 12PM to 10PM |
| United States / Canada | 514-279-9911 | price of a long distance phone call, Monday to Friday, from 7AM to 5PM (Eastern time) |
| Australia | 1902 262 514 | $1.98/min, Monday to Friday from 9AM to 6PM |
| Denmark | 82 33 28 58 | price of a national phone call, Monday to Friday from 1PM to 10PM |
| Finland | 09 81 71 01 54 | price of a national phone call, Monday to Friday from 2PM to 11PM |
| Norway | 23 50 01 16 | price of a national phone call, Monday to Friday from 1PM to 10PM |
| Sweden | 08-51992032 | price of a national phone call, Monday to Friday from 1PM to 11PM |
WARRANTY INFORMATION
Worldwide, Guillemot Corporation S.A. ("Guillemot") warrants to the consumer that this Thrustmaster product will be free from material defects and manufacturing flaws for a period of two (2) years from the original date of purchase. Should the product appear to be defective during the warranty period, immediately contact Technical Support, who will indicate the procedure to follow. If the defect is confirmed, the product must be returned to its place of purchase (or any other location indicated by Technical Support).
Within the context of this warranty, the consumer's defective product will, at Technical Support's option, be either repaired or replaced. Where authorized by applicable law, the full liability of Guillemot and its subsidiaries (including for indirect damages) is limited to the repair or replacement of the Thrustmaster product. The consumer's legal rights with respect to legislation applicable to the sale of consumer goods are not affected by this warranty.
This warranty shall not apply: (1) if the product has been modified, opened, altered, or has suffered damage as a result of inappropriate or abusive use, negligence, an accident, normal wear, or any other cause not related to a material defect or manufacturing flaw; (2) in the event of failure to comply with the instructions provided by Technical Support; (3) to software not published by Guillemot, said software being subject to a specific warranty provided by its publisher.
Additional warranty provisions
In the United States of America and in Canada, this warranty is limited to the product's internal mechanism and external housing. Any applicable implied warranties, including warranties of merchantability and fitness for a particular purpose, are hereby limited to two (2) years from the date of purchase and are subject to the conditions set forth in this limited warranty. In no event shall Guillemot Corporation S.A. or its affiliates be liable for consequential or incidental damage resulting from the breach of any express or implied warranties. Some States/Provinces do not allow limitation on how long an implied warranty lasts or exclusion or limitation of incidental/consequential damages, so the above limitation may not apply to you. This warranty gives you specific legal rights, and you may also have other legal rights which vary from State to State or Province to Province.
COPYRIGHT
© 2005 Guilemot Corporation S.A. All rights reserved. Thrustmaster® is a registered trademark of Guilemot Corporation S.A. Microsoft® Windows® is a registered trademark of Microsoft Corporation in the United States and/or other countries. PlayStation® is a registered trademark of Sony Computer Entertainment Inc. All other trademarks and brand names are hereby acknowledged and are property of their respective owners. Illustrations not binding. Contents, designs and specifications are subject to change without notice and may vary from one country to another.
ENVIRONMENTAL PROTECTION RECOMMENDATION
At the end of its working life, this product should not be disposed of with standard household waste, but rather dropped off

at a collection point for the disposal of Waste Electrical and Electronic Equipment (WEEE) for recycling.
This is confirmed by the symbol found on the product, user manual or packaging.
Depending on their characteristics, the materials may be recycled. Through recycling and other forms of processing Waste Electrical and Electronic Equipment, you can make a significant contribution towards helping to protect the environment.
Please contact your local authorities for information on the collection point nearest you.
FAQs, tips and drivers available at www.thrustmaster.com
Normal Sequential Gearbox

Inverted Sequential Gearbox
Opmerking:
Dependiendo del jeu,我会 help you to make the most of your time.
FAQs, tips and drivers available at www.thrustmaster.com

Guiado Utilizador
CHARACTERISTICAS TECNICAS
- in 1 Force Feedback Racing wheel
- English -
- Français -
- INSTALLING THE WHEEL
- Fixing the wheel in place
- Connecting the pedal set
- INSTALLATION FOR PC
- ADVANCED FUNCTIONS ON PC
- Calibrating the wheel
- Selecting "Separate" (3-axis) OR "Combined" (2-axis) acceleration/braking mode
- Note:
- Enabling/disabling the recentering function
- INSTALLATION FOR PLAYSTATION 2
- CONNECTING THE WHEEL
- ADVANCED FUNCTIONS ON PLAYSTATION 2
- Configuring the wheel
- Setting the ForceFeedback
- "Sequential gearbox inversion" function
- Precision Drive mode
- TROUBLESHOOTING
- SAFETY RECOMMENDATIONS AND INFORMATION
- TECHNICAL SUPPORT
- By email:
- WARRANTY INFORMATION
- Additional warranty provisions
- COPYRIGHT
- ENVIRONMENTAL PROTECTION RECOMMENDATION
- Opmerking:
- CHARACTERISTICAS TECNICAS
Brand : TRUSTMASTER
Model : GT 2-IN-1 FORCE FEEDBACK
Category : Simulation Steering Wheel