
CONTROLER CR100 - Media remote SONOS - Free user manual and instructions
Find the device manual for free CONTROLER CR100 SONOS in PDF.

| Product type | Wireless multimedia remote |
| Brand | SONOS |
| Model | CONTROLER CR100 |
| Power supply | Provided AC adapter (charges battery) |
| Battery life | Up to 2 hours for full charge (usage time not specified) |
| Charging time | 2 hours |
| Indicators | Battery status light (red, orange, green), wireless signal strength indicator, battery charge indicator |
| Main functions | Zone control, music browsing, playlist management, volume adjustment, play/pause, track skipping |
| Navigation | Scroll wheel with OK button, Back, Zones, Music buttons, programmable buttons |
| Volume control | +/- buttons and mute |
| Sleep mode | Light sleep and deep sleep with motion sensor |
| Reset | Simultaneously press Mute and Music for 3 seconds, or via System Settings menu |
| Optical sensor | Automatically turns on backlight according to ambient brightness |
| Motion detector | Wakes the controller automatically |
| Maintenance and cleaning | Clean with a soft, dry cloth; avoid household cleaners |
| Safety | Use only the provided power adapter; do not use solvents |
| General information | Indoor use, frequency band 2.454-2.4835 GHz (France) |
Frequently Asked Questions - CONTROLER CR100 SONOS
User questions about CONTROLER CR100 SONOS
0 question about this device. Answer the ones you know or ask your own.
Ask a new question about this device
Download the instructions for your Media remote in PDF format for free! Find your manual CONTROLER CR100 - SONOS and take your electronic device back in hand. On this page are published all the documents necessary for the use of your device. CONTROLER CR100 by SONOS.
USER MANUAL CONTROLER CR100 SONOS
Sonos® Digital Music System
Controller
Setup Guide • Installatiehandleiding • Installationshandbok • Guide d'Installation Guida all'instrumentation • Installationshandbuch • Guía de configuración
Sonos® Controller CR100 Setup Guide. For use with the Sonos Digital Music System.
THIS DOCUMENT CONTAINS INFORMATION THAT IS SUBJECT TO CHANGE WITHOUT NOTICE.
No part of this publication may be reproduced or transmitted in any form or by any means, electronic or mechanical, including but not limited to photocopying, recording, information retrieval systems, or computer network without the written permission of Sonos, Inc.
Sonos is a registered trademark of Sonos, Inc. in the United States, and a trademark of Sonos, Inc. in other countries. Sonosnet and all Sonos logos are trademarks of Sonos, Inc. in the United States and/or other countries.
Macintosh and Mac OS are trademarks of Apple Computer, Inc., registered in the U.S. and other countries. Windows XP and Windows 2000 are either registered trademarks or trademarks of Microsoft Corporation in the United States and/or other countries.
This product includes technology owned by Microsoft Corporation and under a license from Microsoft Licensing, GP. Use or distribution of such technology outside of this product is prohibited without a license from Microsoft Corporation and/or Microsoft Licensing, GP as applicable.
MPEG Layer-3 audio decoding technology licensed from Fraunhofer IIS and Thomson.
Sonos uses MSNTP software, which was developed by N.M. Maclaren at the University of Cambridge.
© Copyright, N.M. Maclaren, 1996, 1997, 2000; © Copyright, University of Cambridge, 1996, 1997, 2000.
All other products and services mentioned may be trademarks or service marks of their respective owners.
© 2004-2006 by Sonos, Inc. All rights reserved.
For the latest product documentation, go to www.sonos.com/support and click Documents.
CR100 Setup Guide
August, 2006
Version: 060801
E5A08263MBMF
Sonos® Controller
Setup Guide 1
Installationshandbuch. 9
Regulation Information
Europe
This product complies with the requirements of the R&TTE Directive (1999/5/ED). A copy of the full Declaration of Conformance may be obtained at http://eu.sonos.com.
C C O Attention In France, operation is limited to indoor use within the band 2.454-2.4835 GHz.
This equipment has been tested and found to comply with the limits for a Class B digital device, pursuant to part 15 of the FCC Rules. These limits are designed to provide reasonable protection against harmful interference in a residential installation. This equipment generates, uses and can radiate radio frequency energy and, if not installed and used in accordance with the instructions, may cause harmful interference to radio communications. However, there is no guarantee that interference will not occur in a particular installation. If this equipment does cause harmful interference to radio or television reception, which can be determined by turning the equipment off and on, the user is encouraged to try to correct the interference by one or more of the following measures:
Reorient or relocate the receiving antenna.
- Increase the separation between the equipment and receiver.
- Connect the equipment into an outlet on a circuit different from that to which the receiver is connected.
- Consult the dealer or an experienced audio technician for help. Modifications not expressly approved by the manufacturer may void the user's authority to operate the equipment under FCC rules.
Canada
This Class B digital apparatus complies with Canadian ICES-003 and RSS-210.
Industry Canada
The installer of this radio equipment must ensure that the antenna is located or pointed such that it does not emit RF field in excess of Health Canada limits for the general population; consult Safety Code 6, obtainable from Health Canada's Web site www.hc-sc.gc.ca/rpb.
RF Exposure Requirements
To comply with FCC and EU exposure essential requirements, a minimum separation distance of 20cm (8 inches) is required between the equipment and the body of the user or nearby persons.
Recycling Information

This symbol on the product or on its packaging indicates that this product shall not be treated as household waste. Instead please deliver it to the applicable collection point for the recycling of electrical and electronic equipment. By recycling this product correctly, you will help conserve natural resources and prevent potential negative environmental consequences. For more detailed information about recycling of this product, please contact your local city office, your household waste disposal service or the shop where you purchased the product.
Setup Guide
Before you Begin
If you are setting up a new Sonos Digital Music System, Sonos recommends you begin by unpacking your ZonePlayer(s), and setting up at least one ZonePlayer before adding the Controller(s) to your music system. As part of the ZonePlayer setup process, you will be directed to go to your computer and install the System Setup software included with your ZonePlayer.
For Additional Information
- For the latest product documentation, as well as the Sonos License Agreement and Limited Warranty, go to www.sonos.com/support and click Documents.
- To access the online help system included with your software, select Sonos System Help from the Help menu.
- For answers to common or uncommon questions, visit our Web site at www.sonos.com/support and click FAQs.
For the latest Sonos Digital Music System product news, go to www.sonos.com.
Technical Support
- Web site
For help with troubleshooting and support issues, visit our Web site at www.sonos.com/support. There you can visit our Forums, browse our Frequently Asked Questions (FAQ) pages, or request assistance.
Telephone
Visit our Web site at www.sonos.com/support and click Phone Support to find the correct telephone number for your country.
Connecting Your Controller
- After at least one ZonePlayer has been set up, follow the instructions on the Controller screen to associate this Controller to your Sonos Digital Music System.
- You should charge your new Sonos Controller when you remove it from the packaging. The Controller battery will be fully charged in about two (2) hours. You can use your Controller while it is charging.
- The power connector cover is part of your Controller's splash-resistant design, so keep the cover down when the Controller is not charging.
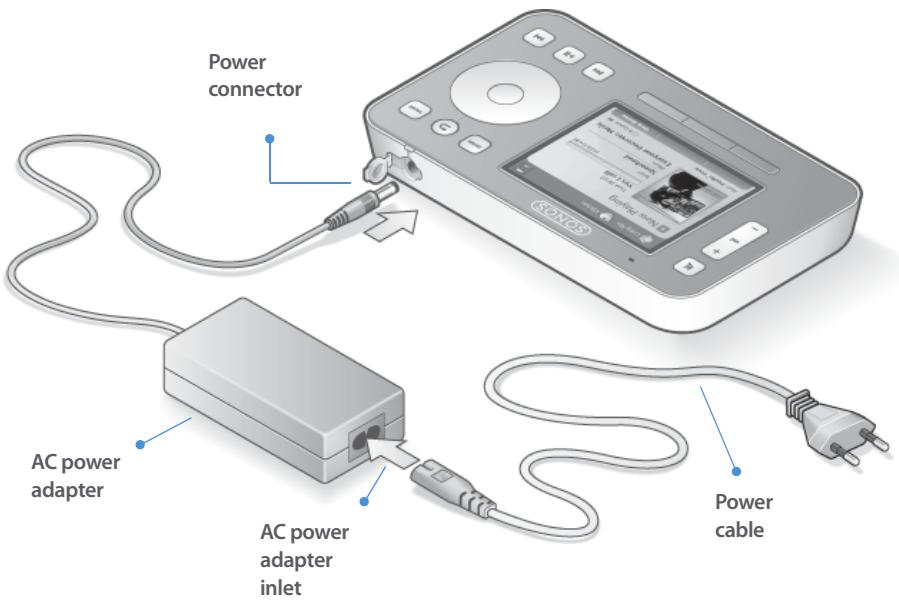

Caution: Use only the supplied power adapter to charge the Controller's battery. Using another adapter will damage your Controller and void your product warranty.
Using the Controller

Navigation

Zones. Use the Zones button to select a zone to play music in, to view the music selections playing in each room, or to create or modify zone groups to share the same music across zones.

Music. Use the Music button to browse or select music, manage your music queues, access playlists, and change the default settings for a Sonos ZonePlayer or Controller.

Back. Use the Back button to return to the previous screen.
Scroll wheel. The scroll wheel is used to navigate through a displayed list. Use your thumb or finger to "turn" the wheel clockwise to scroll down through the list, and counterclockwise to scroll up through the list.
OK. Touch the OK button located in the center of the scroll wheel to make selections.

Soft buttons. The soft button functions change to reflect the available actions for the Controller screen currently displayed. The action for each button appears above it (for example View Queue or Add to Queue).
Playback

Play/Pause. Toggles between playing and pausing the current track. When browsing music sources, if you highlight a playable item (track, album, artist, playlist) and press Play/Pause, the highlighted music item is added to the end of the music queue and begins to play immediately.

Next (short press). Jumps to the start of the next track in the music queue.

Fast forward (long press). Pressing and holding this button moves you forward through the current track. The music playback jumps to the new position when the button is released.

Previous (short press). If you are more than 3 seconds into the track, this button jumps to the start of the current track; if you are less than 3 seconds into the track, this button jumps to the start of the previous track.

Rewind (long press). Pressing and holding this button moves you backward through the current track. The music playback jumps to the new position when the button is released.
Volume

Volume controls. Use the volume control buttons to increase (+) or decrease (-) the volume in any zone, or across a zone group.

Mute. Use the Mute button to temporarily silence the music in a zone. Touch the Mute button again to unmute.
To mute all zones, touch and hold the Mute button for 3 seconds in any zone that is not currently muted. Touch and hold for 3 seconds to unmute all zones.
Controller Sensors and Indicators

Light sensor. The light sensor automatically turns on the button backlights based upon the brightness of the environment.

Wireless signal strength indicator. Indicates the current strength of the Controller's wireless signal.

Battery status indicator light. Alerts you to the status of the battery charge:
- Lights red when the battery gets low, indicating that the Controller needs charging.
- Lights amber while the Controller is charging.
- Lights green when the Controller finishes charging.
- Unlit when your Controller is in use and the battery is charged.

Battery charge indicator. Indicates the Controller's remaining battery charge.
Sleep Modes
The following settings can be adjusted by selecting System Settings Controller Settings from the Music menu:
Light sleep. Your Controller will go into light sleep to preserve the battery life when it is unused for a specified period of time. The screen will turn off until motion is detected or a button is pressed. Use the Sleep Timer Docked (when connected to power supply) and Undocked settings to select the amount of time after which your Controller will enter light sleep.
Deep sleep. Your Controller will go into deep sleep to preserve the battery life when it is unused for a specified period of time. When your Controller wakes from deep sleep - either from the motion sensor or from a button touch - it will go through a restart cycle that takes several seconds. Select Deep Sleep Timer from the Advanced Settings menu to select the amount of time after which your Controller will enter deep sleep.
Motion sensor. The Controller has a motion sensor to automatically wake your Controller when motion is detected. Use the Motion Sensor setting if you want to turn this off. (You may hear a slight rattling sound if you shake the Controller. It is the motion sensor, and the sound is normal.)
Recharging
The Sonos Controller can be recharged by plugging it into the supplied AC adapter, or by placing it in the Sonos Charging Cradle. The Battery Charge Indicator on your Controller displays the current battery charge level. When the battery charge gets very
low, the Battery Status Indicator will light red. To extend the battery life, it's best not to let the battery discharge completely before recharging.
Resetting Your Controller
If your Controller's screen should freeze, press and hold the Mute and Music buttons simultaneously on the Controller for approximately 3 seconds. The Controller will reset itself momentarily.
If you want to join your Controller to a different Sonos Digital Music System, you must first factory reset your Controller. Select System Settings Controller Settings Advanced Settings Factory Reset from the Music menu.

Caution: Household cleaners or solvents can damage the finish on your ZonePlayers or Controllers. Clean only with a dry soft cloth.

Installationshandbuch
- Sonos® Digital Music System
- Controller
- Sonos® Controller
- Regulation Information
- Europe
- Canada
- Industry Canada
- RF Exposure Requirements
- Recycling Information
- Setup Guide
- Before you Begin
- For Additional Information
- Technical Support
- - Web site
- Telephone
- Connecting Your Controller
- Using the Controller
- Navigation
- Playback
- Volume
- Controller Sensors and Indicators
- Sleep Modes
- Recharging
- Resetting Your Controller
- Installationshandbuch
Brand : SONOS
Model : CONTROLER CR100
Category : Media remote