
ICLIMBER-ER - Smartwatch IROX - Free user manual and instructions
Find the device manual for free ICLIMBER-ER IROX in PDF.
User questions about ICLIMBER-ER IROX
0 question about this device. Answer the ones you know or ask your own.
Ask a new question about this device
Download the instructions for your Smartwatch in PDF format for free! Find your manual ICLIMBER-ER - IROX and take your electronic device back in hand. On this page are published all the documents necessary for the use of your device. ICLIMBER-ER by IROX.
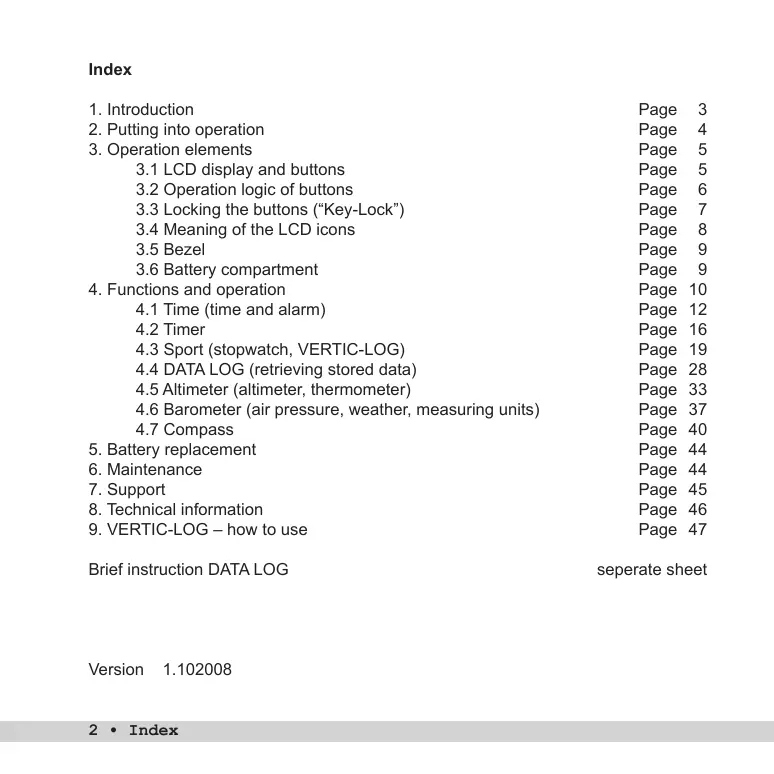
USER MANUAL ICLIMBER-ER IROX
- Introduction
2.Putting into operation - Operation elements
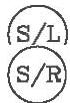
3.1 LCD display and buttons
3.2 Operation logic of buttons
3.3 Locking the buttons ("Key-Lock")
3.4 Meaning of the LCD icons
3.5 Bezel
3.6 Battery compartment
- Functions and operation Page 10
4.1 Time (time and alarm)
4.2 Timer Page 16
4.3 Sport (stopwatch, VERTIC-LOG) Page 19
4.4 DATA LOG (retrieving stored data)
4.5 Altimeter (altimeter, thermometer) Page 33
4.6 Barometer (air pressure, weather, measuring units) Page 37
4.7 Compass
- Battery replacement Page 44
- Maintenance Page 44
- Support Page 45
- Technical information Page 46
- VERTIC-LOG - how to use
Brief instruction DATA LOG seperate sheet
Version 1.102008
1. INTRODUCTION
Thank you for choosing the iClimber-ER by IROX. You are now the owner of a high quality watch which is the result of Italian design, Swiss engineering, Canadian and Swiss technology, and is manufactured in the greater Hong Kong area.
The iClimber-ER offers true novelties in the watch market. Among other things the VERTIC-LOG® function, which was developed in cooperation with Swiss mountain guides. Besides the operating steps described in chapter 4 you will also find an explanation of how to use this function in chapter 9 and why mountain guides requested this function.
Please read the instructions carefully. You will find useful and interesting information beyond the operation explanations.
About IROX
IROX, as a brand, was founded in the year 2002 in Switzerland. IROX has established itself as specialist for measuring devices for weather, environment, and sports and is internationally present. Besides closely collaborating with the best manufacturers in the electronics branch worldwide, IROX has also developed, and made market ready, real innovations some of which have totally revolutionised the market. The weather stations with the Meteotime System are only one example.
The iClimber is delivered with inserted battery and the watch in a battery conserving sleep-mode. In this state the display is switched off, "blank".
The watch is activated by a short pressing of any button.
The watch can now be operated as described in chapter 4.

Important information
The iClimber is a high quality measuring device with several functions that you can influence and also some that can not be influenced because they run in the background (e.g. pressure measurement). Please be aware that active use of each additional function requires energy and therewith battery. Often activating the backlight, using the Key-Tone or compass for bearings also draws power from the battery and this has a direct influence on the battery life.
If you are going on an expedition during which you will be intensely using the watch and exposing yourself and your equipment to very cold temperatures we strongly recommend taking along replacement batteries (Type CR2032).
The watch battery, if the watch is simply used as a wristwatch, has a lifetime of up to one year. The repeated use of several functions can reduce the battery lifetime by a few months!
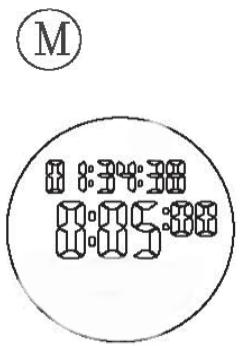
3.1 LCD DISPLAY AND BUTTONS
All functions are shown in 5 lines on a liquid crystal display (LCD) and can be operated with the 4 buttons on the sides.
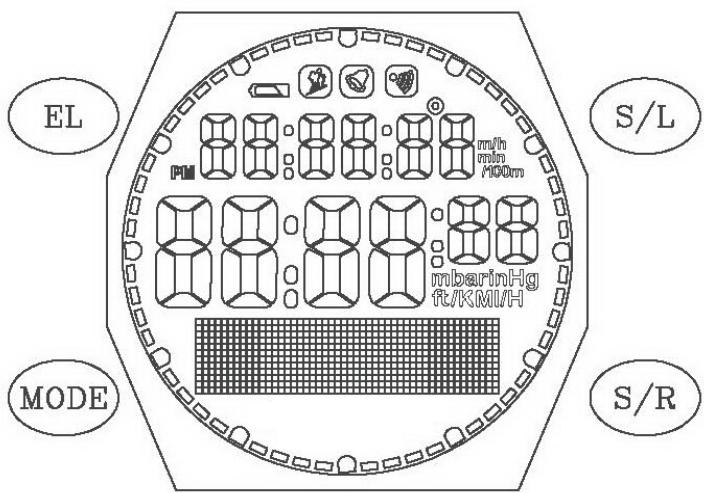
Complete segment with the four button labels
If displays with data are used in this manual, the data herein will vary from the data on your watch. These printed displays are only for better understanding.
3.2 OPERATION LOGIC OF BUTTONS
The button functions are described in detail in chapter 4. Where button symbols are used, please remember the following logic:

Press button

Press and hold button for 2 seconds

Good to know
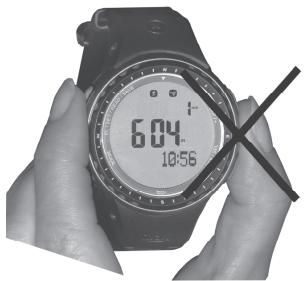
Important: When operating the buttons with your fingers please avoid covering the opening on the right side of the case. The pressure sensor for the altimeter/ barometer is located directly behind the opening and such manual operations may influence the measuring.
3.3 LOCKING THE BUTTONS ("KEY-LOCK")
You can deactivate the buttons to avoid undesired operation of the buttons:
Activate "Key-Lock":

Press the M and S/L buttons simultaneously for at least 2 seconds.
Display for activated "Key-Lock":
If the buttons are deactivated 4 dots will appear on the border of the display.
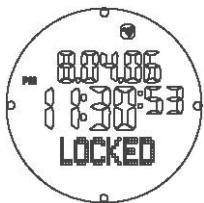
If you press any button in this state, the information "LOCKED" will appear at the bottom of the display.
Deactivate "Key-Lock":


Press the M and S/L buttons simultaneously. The four dots will disappear and the buttons can be operated again.
3.4 MEANING OF THE LCD ICONS

VERTIC-LOG is active

Alarm is active

Key tone is active

Battery weak (see chapter 2, 3.6 and 5)
3.5 BEZEL
The bezel serves for position finding with the compass. Operating was arranged in such a manner that the ring can be turned, but does not move easily when only slightly brushed.
3.6 BATTERY COMPARTMENT
1x 3V battery type CR2032
You can replace the battery yourself.
Proceed as follows:
- Place the watch face down, on a soft cloth, on a table
- Take a fitting coin (e.g. a 2 Euro or SFR 2 coin) and open the screw cap on the back of the watch by turning counter clockwise
- Use tweezers to remove the batteries
- Reversing the procedure insert a new battery into the watch (please pay attention to the correct polarity)
- Make sure that the gasket is still in place. If possible put some silicone grease on the sealing ring.
- Screw the lid clockwise onto the watch again. Make sure that at least one complete turn, clockwise, can be conducted without resistance. If this is not possible the lid is not lying correctly in the thread and too much force would destroy the thread.
Illustrated instructions can be found at www.irox.com.
4. FUNCTIONS AND OPERATION
The iClimber has 7 function windows. They are:
TIME Your time (T + ) , another time zone (T2) and the alarm time (AL)
SPORT Stopwatch, VERTIC-LOG
DATA LOG Retrieval of stored stopwatch data (tour data, lap times, VERTIC-LOG evaluation)
ALTIMETER Altimeter, thermometer
BARO Air pressure data, weather forecast and setting of the measuring units
COMPASS Compass and its calibration

Move from function to function with the MODE button.
Two additional functions of the watch have a "superior" function available in all modes: the backlight and the key tone.
a) Backlight
In addition there is the option of switching on a backlight of the display.

To do this, press the EL and S/L buttons simultaneously. The LCD lighting will be activated for 4 seconds.

Good to know
If you press other buttons within these 4 seconds, the light will stay on for 4 seconds longer each time you press. This makes it easier to set the alarm or read-out the DATA-LOG during the night!
b) Key tone:
You can switch a button sound ("Key tone") on or off.

move to the time display (with the day displayed under the time!) and press S/R2

will appear in the upper part of the display and the key tone is active.
To switch off, proceed accordingly in reverse sequence.
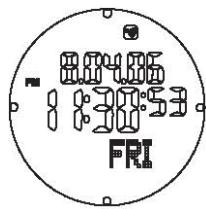
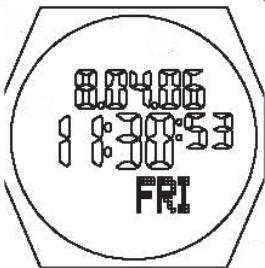
4.1 TIME (TIME AND ALARM)
In the time window you can see the time, the date, and the weekday. A second time zone can also be displayed, and an alarm with a 1-minute alarm sound can be activated.

Press until TIME appears in the display You can, at any time, use the same button to move to the next function, unless you are conducting a setting.

Select the display in the following sequence:
- your local time (T1)
- other time zone (T2)
- alarm (AL)
Different entries can be made according to the display.
4.1.1 Local time (T1)

Press until the day (3 letters, below the minutes) appears on the display.

To switch the key tone on/off

This brings you to the time set mode.
The element to be set will start to blink and a text will appear, in English, informing you of what needs to be set.
If during setting for longer than one minute no button is pressed, the watch will automatically leave the set mode. The settings made up to this point will be stored.
The commands for setting the time are as follows:

With these buttons you change the setting value

Skip to the next setting value (until you leave the set mode)

Leave the set mode. The settings made up to this point will be stored.
4.1.2 Time zone (T2)
In the time set mode, following the instructions in 4.2.1, you can also set a "T2 Off-Set". For this the "OFF Set" setting for time zone T2 is either added or subtracted from the local time (T1). The Off Set setting can be set from -23 to +23 hours.

Press until "T2" appears in small on the display.

This moves the T2 as main time into the big display. On the bottom (small T1) your "home time" is displayed.
4.1.3 Alarm (AL)
The watch offers a daily alarm function which, when activated, will sound for one minute at the time for which it is set.
The valid time for the alarm is the time that appears as the main time (large) on the display. This can be T1 or T2!

Press until "AL" appears, with the alarm time small.

Activate / Deactivate the alarm. If the alarm is active the bell symbol will appear at the top of the display:


This brings you to the set mode for the alarm time.
The element to be set will start to blink and a text will appear, in English, informing you of what needs to be set.
If during setting for longer than one minute no button is pressed, the watch will automatically leave the set mode. The settings made up to this point will be stored.
Attention: The alarm must be activated separately!
The commands for setting the alarm time are as follows:
(S/L)
With these buttons you change the setting value
S/R
M
Skip to the next setting value (until you leave the set mode)
EL
Leave the set mode. The settings made up to here will be stored.
The alarm will sound for 1 minute and, unless the alarm function is deactivated, will sound again the next day.
EL
The sounding 1 minute alarm tone can be interrupted with this button.
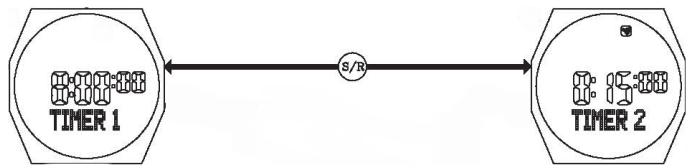
4.2 TIMER
In the timer function you can set a time target and have this time counted down in seconds to zero.
There are always two timers available (TIMER 1 and TIMER 2) which can be set independently of each other.

Press until TIMER appears in the display.
If you are not in a setting mode you can use the same button to, at any time, move to the next function.

Selecting the timer (TIMER 1 TIMER 2)

This brings you to the set mode for the timer.
The element to be set will start to blink and a text will appear, in English, informing you of what needs to be set.
If during setting for longer than one minute no button is pressed, the watch will automatically leave the set mode. The settings made up to this point will be stored.
The timers can not be active together at the same time.
Some special functions can be carried out with the two timers:
INT.LEAVE (Interleave):
After the countdown of timer 1, timer 2 starts automatically.
REPEAT (Repeat):
As soon as the active timer has counted down (in Interleave after the countdown of timer 2), the counter begins again with the countdown.
CT BEEP (Countdown tone):
During the countdown, at certain times, acoustic signals will sound: A 1 second beep for each of the last 5, 4, 3,2 and 1 minutes A 1 second beep for each of the last 50, 40, 30, 20 and 10. During the last 5 seconds a fast beep-beep will sound. This function can be used as a Regatta Timer, for example.
At the end of the countdown, when the timer reaches 0:00:00, there will be a signal (length: 20 seconds)
Time setting of the timer: from 0:01 to 9:59 hours in minute steps.
The commands for setting the time of the timer are as follows:
With these buttons you change the setting value

Skip to the next setting value (until you leave the set mode)
As soon as the settings have been made, following commands are possible:

Start the timer

Stop the timer

Reset the timer to the initial value (when the timer is stopped)

Interrupt the sounding 20 second tone
4.3 SPORT (STOPWATCH, VERTIC-LOG)
In the SPORT function the stopwatch is available with up to 99 laps/interims (LAP).
This data can be stored in a LOG at the end of the timing.
The description on how to read-out the measuring blocks (LOG) can be found in chapter 4.4
The resolution is 1/100 seconds for lap times of up to 59 minutes. Thereafter and for the accumulated time the resolution is 1 second.
Press until SPORT appears on the display. You can, at any time, use the same button to move to the next function, unless you are conducting a setting.
accumulated time of all LAPs in this measuring block
running lap (LAP)
In addition, in the SPORT function, the VERTIC-LOG function is also activated/deactivated and then started via the stopwatch. If the VERTIC-LOG is switched on when climbing in the mountains, every 100m net altitude ascent the climbing data is stored in the lap memory. The LAP function via the S/L buttons is switched off.
The operation logic with or without VERTIC-LOG has only slight differences and is described separately in the following.
4.3.1 STOPWATCH with LAP function

Start and restart ("Restart") the stopwatch

Stops the running stopwatch
When the stopwatch is running:

Counts laps/interims. The stopwatch continues running.
The LAP time with LAP No. remains on the display for five seconds.
Then the running time of the new lap appears.
Attention: For 5 seconds no other lap time can be measured, that means the buttons S/L and S/R are inactive during these 5 seconds.
4.3.2 When the stopwatch is stopped

Delete (ERASE) stopwatch times. The question "ERASE?" will appear on the display. To confirm, press the button again for 3 seconds. The data that has been deleted can not be retrieved! If you do not want to delete the data, press and release the S/R button again.

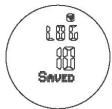
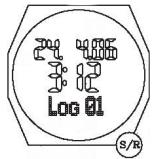
With this button the data can be stored in the LOG. The prompt "HOLD TO SAVE" will appear. When the button is released you will return to the current display. If you press the button for another 3 seconds the data will be stored in the DATA LOG. The information "LOG xx SAVED" (xx is the LOG number) will appear.
After successful LOG storing the stopwatch, in the SPORT mode, will return to the initial value (0:00:00).
There are up to 10 LOGs available. If they have all been used "ALL LOGS FULL" will appear at the next attempt to store.

In this case go to the function DATA LOG (see chapter 4.4), delete a LOG and then return to SPORT, to store.
4.3.3 STOPWATCH with VERTIC-LOG function
To switch on this function and continue working with it the stopwatch must be on 0:00:00 and ready for a new LOG.
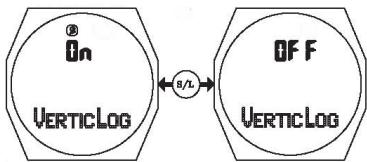
Activate/deactivate the VERTIC-LOG function:

With this button you reach the ON / Off switching of the VERTIC-LOG function. The element to be set (ON OFF) will start to blink.

The VERTIC-LOG is activated / deactivated with this button. If active the icon will appear.

Confirm setting and return to stopwatch.
If during setting for longer than one minute no button is pressed, the watch will automatically leave the set mode. The settings made up to this point will be stored.
As soon as the stopwatch is started the VERTIC-LOG begins recording the climb log.
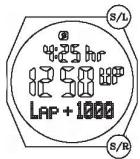
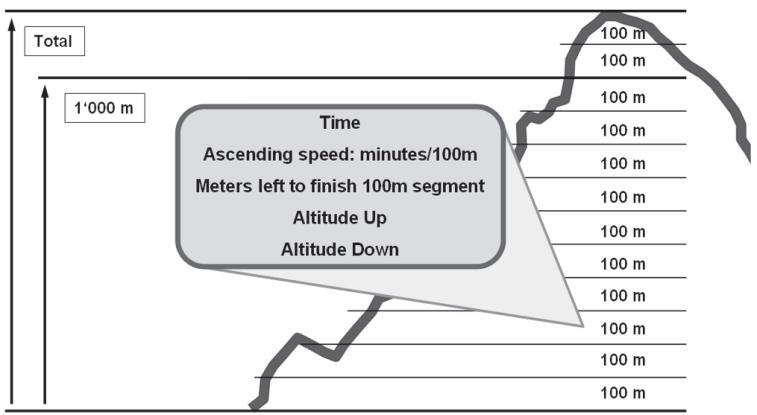
One lap (LAP) is recorded per 100m climbed. The first 100m are LAP 1, the second LAP 2 etc.
After a total of 1000m of actual climbing (equals 10 LAPs), the time and the altitude gain for these 1000m is additionally stored (LAP +1000).
The same is done for the next 1000m etc. (LAP +2000, LAP +3000 etc.).
LAP 1-10 LAP +1000
LAP 11-20 LAP +2000
LAP 21-30 LAP +3000
etc.
4.3.4 Beginning the climb
To start the previously activated VERTIC-LOG function you must start the stopwatch at the beginning of the climb you want to monitor!

Start the stopwatch and with that the VERTIC-LOG recording
Important: The recording of the climb will be interrupted when the stopwatch is stopped. If you press the S/R button by mistake, do a "RESTART" with the S/L button. The interrupted LAP x will be stored at its last status and a new LAP x+1 will begin with the RESTART. If altitude was gained during this time it is lost to the VERTIC-LOG recordings. To avoid unintentionally operating the STOP button (S/R) we recommend activating the key lock.
4.3.5 Operation during the climb
For each LAP during the climb, that means while the stopwatch is running, following data is available:
- climbing speed in m/h as the case may be min/100 m
- in this LAP total meters climbed (UP). This means when you climb 50m , then descend 20 and climb 40 again that you are 70m above the starting point and UP 90m will be displayed.
- the LAP number alternates in a 2 second rhythm with the remaining meters until 100m is achieved (in the example above that would be 30m )

Following display will then appear with the above data:
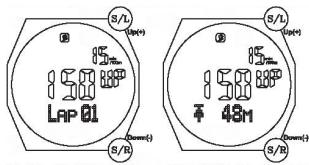
In this display the last segment (LAP) is always displayed.
With the S/L and S/R buttons you can retrieve previous recordings which will be displayed for approx. 4 seconds.
When at least 10 LAPs have been completed, the "1000 Meter" summary will appear if you press the EL button again.
Analogue to the individual LAPs here too the S/L and S/R buttons can be used to scroll through other such summaries.

Return to the running stopwatch.
4.3.6 End of climb - Store data in LOG

Stops the stopwatch
To store when the stopwatch is stopped:

With this button the data can be stored in the LOG. The prompt "HOLD TO SAVE" will appear. When the button is released the watch will return to the current display. If you press the button for another 3 seconds the data will be stored in the DATA LOG. The information "LOG xx SAVED" (xx is the LOG number) will appear.

After successful LOG storing the stopwatch, in the SPORT mode, will return to the initial value (0:00:00).
There are up to 10 LOGs available. If they have all been used "ALL LOGS FULL" will appear at the next attempt to store.

In this case go to the function DATA LOG (see chapter 4.4), delete a LOG and then return to SPORT, to store.
Attention:
In order to be able to retrieve additional data stored in the VERTIC-LOG, you must store the LOG in the stopwatch function at the end of your climb. If you delete the stopwatch times before storing, the VERTIC-LOG data will also be deleted!
Important:
The VERTIC-LOG function was developed for mountain climbers making ascensions. When you have reached the highest point of your tour, stop the watch and store the LOG. There is no need for descent data in the VERTIC-LOG! For longer interruptions we recommend closing the LOG and when the tour is continued beginning with a new LOG.
If you do not wish to store the LOG, you can delete the data (stopwatch and VERTIC-LOG):

Delete (ERASE) the stopwatch times. The question "ERASE?" will appear on the display. To confirm, press the button again for 3 seconds. The data that has been deleted can not be retrieved! If you do not want to delete the data, press and release the S/R button again and move to LOG memory.
4.4 DATA LOG (RETRIEVING STORED DATA)
To operate this function please also note the short instructions!
With each Log that was stored in the SPORT function via the stopwatch or the VERTIC-LOG numerous other data has also been stored. These LOGS can be read-out in the DATA LOG and if necessary either individual or all LOGS can be deleted.
The memory capacity is 10 LOGs with up to 99 LAPs each.

Press until DATA LOG appears in the display.
For approx. 1 second a number from 00 to 10 will appear above the DATA LOG. This demonstrates how many LOGs are in the memory.
(You can, at any time, use the same button to move to the next function unless you are in the delete function.)
The first to appear on the display is following information ("LOG DISPLAY"):
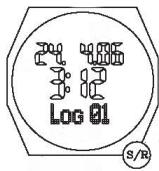
Date of the storing of LOG x
Time of the storing of LOG x
LOG ready to be read-out
select LOG number with the S/R button
There are two ways to do this

LOG delete function (individual or all) - see page 29

Further to read-out LOG data - see page 30
4.4.1 LOG delete (ERASE)
As described on the previous page you reach the LOG delete function with the EL2 button. The deleting is important to remove old data and make room for new data. If you have 5 logs for example, they are numbered in numerical order 1-5. If you delete No. 3, 4 and 5 will move one down.
On the operation screen the LOG No. ready to be deleted will appear along with the question ERASE? (= delete?).
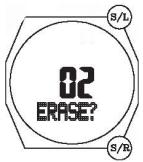
If yes: Select the corresponding LOG No. using the S/L and S/R buttons. By then pressing the button EL2 again, the selected LOG will be removed from the memory. The remaining number of LOGs will be displayed (remaining = REMAIN). After 2 seconds you will be returned to the LOG display.
If no: You can use the M button to move to the question ALL ERASE?

If yes: Confirm again with EL2. The remaining number of LOGs will be displayed, zero (= 00 DATABLOG). With the M button you can move to the next function - 4.5 ALTIMETER
If no: Return to the LOG display with the M button
4.4.2 READING-OUT THE LOG DATA
As described in the beginning of this chapter you can reach the data read-out of the LOG selected in LOG DISPLAY using the EL button.
LOG ready for read-out (here, as an example, "01")
Select LOG number with S/R button
LOG xx (select xx with S/R)
There is a lot of data available. In order to easily and understandably move around through the data, imagine there are drawers filled with data contents that have to be opened and closed. The operation buttons have certain logic for this purpose:

Accept suggested selection and open a "Data-Drawer"

Within the Data-Drawer to the next information

Close the drawer and return to the last selection (press repeatedly to move to the initial point, the "LOG DISPLAY").
All data, stored either by the stopwatch or the VERTIC-LOG function after every 100m climb, are ready for the LOGs. The only exceptions are the LAP +1000 which are only available for the VERTIC-LOG recordings.
Possible choices of "Data Drawers" (from LOG DISPLAY with EL):
SUMMARY button S/R LAP INFO
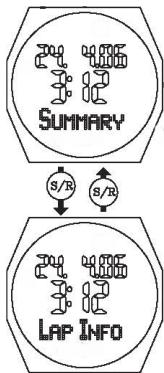
- With EL from SUMMARY: total time of selected LOG, this means all LAPs (select TOTAL TIME, altimeter data ALTI UP, DOWN, MAX and MIN with S/R)
- With EL from LAP INFO: total time (ACC.TIME) of individual LAPs in hh:mm:ss. Select the desired LAP in ACC.TIME via the S/R button.
- With EL from ACC.TIME: data from individual LAPs (LAP TIME in mm:ss and 1/100 secs, select altimeter data ALTI UP, ALTI DOWN with S/R)
If this LOG has VERTIC-LOG data and at least 10 complete LAPs:
with EL from LAP TIME: LAP +1000 *
- A summary is stored (LAP +1000, LAP +2000 etc.) in the VERTIC-LOG after each 10 x 100 m (10 LAPs). If such a data record is available in a LOG, the data can be retrieved from the LAP TIME / ALTI UP/DOWN display with the EL button. If there are more than one data record the S/R button can be used to scroll.

When reading-out the data, you can use this button to move to the next function - 4.5 ALTIMETER at any time.
4.5 ALTIMETER (ALTIMETER, THERMOMETER)
The altimeter (ALTIMETER) functions by measuring the air pressure. The air pressure is generally determined by two factors:
the weather
the height of your location above sea level

Important notice
The display in meter (or foot) is hereby subject to certain fluctuations which can be influenced by the atmospheric pressure, your vertical movements, and also technical characteristics of the watch.
Please consider: 1 m difference in altitude is about 0.1 hPa. The pressure measurement is conducted in regular intervals and is further processed inside the watch. Thereby there are also calculated rounding offs that may influence the value.
Before you start a tour or want to use the altimeter we recommend calibrating it.
In this function you have various display options and functions such as calibration, altitude alarm, and the storing of 3 reference altitudes.

Press until ALTIMETER appears on the display.
(You can, at any time, use the same button to move to the next function, unless you are in a setting mode.)
The first display on the screen is:

Climbing speed in m/h or min/100 m
Current measuring of the altimeter
Temperature measurement on the watch
Rate of climb: displayed in m/h. Up to 120 m/h. Then the display switches to min/100 m.
The m/h refers to the last hour. You are, so to speak, pulling a string of the last hour along behind you and the climb is displayed for this string.
Display options

In the temperature field of the display following information can be shown with this button (in the sequence of the display):
-time (the main time of the watch, meaning T1 or T2 as in chapter 4.1)
- positive altitude travelled
-negative altitude travelled
- These two recordings are only conducted when the stopwatch is running. As soon as the stopwatch is set back to zero these two values will also be set back to zero. This ensures that the time frame for which you want to monitor your climb is clearly defined.
4.5.1 Settings (calibration, reference heights, altitude alarm)

Important notice
If you conduct an altitude calibration, please make sure that at that moment the TIMER and the STOPWATCH are not running. Due to the extra memory requirements the calibration may be negatively influenced.
EL2
With this button you can move to the set mode with the menus SET ALTI - ALTI RECALL - ALTI ALARM
S/R
With these buttons you can scroll back and forth between the three upper setting menus
S/L
With this button you move from one of the three menus to the respective setting in the selected menu
1) SET ALTI
The current measured altitude is blinking and can be adjusted (calibrated) up/down with the S/R and S/L buttons.
Confirm with M. On the next display, which can be selected with S/L and S/R, you have following options: Curr rEF-1 rEF-2 rEF-3 ABORT.
This determines whether the set altitude should only be taken over as current altitude (Curr) or at the same time stored as one of the reference altitudes (rEF 1-3). (ABORT = abort setting).
As soon as the corresponding option is on the display, confirm with M and then return to the menu SET ALTI.
2) ALTI RECALL
This enables you to retrieve one of the 3 reference altitudes. Selectable with S/L and S/R: rEF-1 rEF-2 rEF-3 ABORT
(Set reference altitudes in "SET ALTI").
When the retrieved reference altitude appears press and release M to confirm and return to the menu ALTI RECALL. Beforehand the selected reference altitude will appear with the text "APPLY ALTI" for 1 second.
For ABORT the retrieval of the reference altitude will be stopped and you will move directly to the menu ALTI RECALL.
3) ALTI ALARM
Programming an altitude alarm. The ON or OFF blinks and can be changed with S/L or S/R. Then confirm with M.
For OFF: Return to menu ALTI ALARM
or ON: Continue to set the altitude at which an acoustic alarm should sound (setting with S/L and S/R). If this altitude is exceeded and endless alarm will sound.

Good to know
If during setting for longer than one minute no button is pressed the settings made will be deleted and you will leave the set mode (return to the display of the current altitude).
4.6 BAROMETER (AIR PRESSURE, WEATHER, MEASURING UNITS)
In the BAROMETER function in general the atmospheric pressure is measured and displayed in mbar (hPa).
For this purpose following display options are available
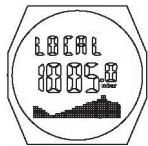
A) Display of locally measured effective air pressure (LOCAL) and the temperature measured in the watch, along with a chart of the pressure course of the last 24 hours (horizontal in 12 hour steps, vertical in 1 mbar resolution). The current value is found here on the right side of the bar diagram and in the vertical middle of it.
B) Pressure display compensated on sea level (according to the setting of the local altitude or the "SEA LEVEL" value) together with the current temperature of the watch and the current time.
C) Day's MAX value of SEA LEVEL pressure and also the temperature of the watch
D) Day's MIN value of SEA LEVEL pressure and also the temperature of the watch
E) Weather forecast/trend with 5 symbols and the current temperature of the watch. The weather forecast only applies for the next day and has a probability of approx. 70% . If the watch is worn at greater heights the forecast probability can decrease.
Display example A-E see next page.
The measuring units can also be set in the BAROMETER function.
4.6.1 Display Options

Press until ALTIMETER appears on the display.
(You can, at any time, use the same button to move to the next function, unless you are conducting a setting.)
The first display on the screen is:
Display A

With this display you can scroll through the display options (A to E and back to A)

Display
4.6.2 Settings
In the display for the measuring values there are several measuring units to choose from. They can be defined in the BAROMETER function.

With this button you can move to the set mode for the measuring units
DEGREE ^ C < - > DEGREE ^
mbar /hPa -->inHg
METRIC (m) < - > IMPERIAL (ft)
Calibration of the pressure gauge (on SEA LEVEL) *
Calibration of temperature gauge
Enter the current weather (one of the 5 symbols) *

With these buttons you can switch back and forth between the above units


This button brings you to the next setting. After the last setting return to BAROMETER display
* Attention
When conducting settings, we recommend only changing the values if there is a clearly defined reference available.
For the pressure entry the altitude shown by the altimeter is also modified.
For the thermometer all further measurements will be corrected accordingly.
For weather the adjustments in extreme weather situations are easiest and most effective.
4.7 COMPASS
The compass is based on a sensitive, magnetic measuring element. The white triangle in the inner ring of the watch shows the direction of the watch.
In the COMPASS function in the middle of the display the current time is shown in large numbers. Above this there is a display of the directions in degrees (0 - 359^) , below this the direction of the watch, abbreviated in the 4 directions (N, S, W, E), as well as the 4 in between directions.
It is important that for the exact fixing of a position the watch is held horizontal and that you fix your position with the triangle position fixing. If you look directly to the north, 0^ and NW-N-NE will appear on the watch.
On the edge of the LCD you will also find 1, respectively 3 dots that will align accordingly with the positioning (1 dot: North / 3 dots: South)
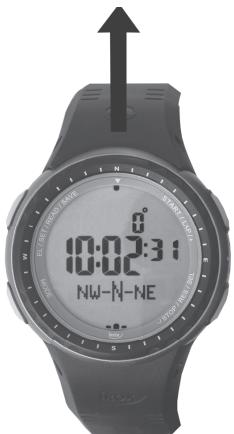
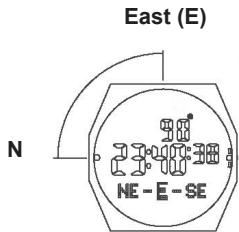
As an example here, if north is shifted by 90^ degrees to the 9 o'clock position.

Press until COMPASS appears on the display.
(You can, at any time, use the same button to move to the next function, the TIME function, unless you are in a setting mode.)
First a display, as described on the previous pages, will appear with the current bearings.
After approx. 30 seconds the bearing is switched off, to conserve the battery.

With the EL button the bearing in the COMPASS mode can be switched on again for 30 seconds.
Attention: It may occur that at the first start-up of the compass function the iClimber requests a calibration. In this case please read the directions on the following pages in "Settings".
4.7.1 Settings
Calibration is recommended or necessary if you detect apparent discrepancies in the position fixing. Also for devices where the compass has never or only seldom been used it is recommended to conduct a calibration.
The input of a declination angle, the variance between geographic and magnetic north direction requires that you know this at the site of compass use. If this is not possible leave the declination angle at 0^ .
In the Internet you can find a multitude of information about this (e.g. Wikipedia) and also links on pages on how to calculate the declination using the coordinates.
(e.g. http://www.ngdc.noaa.gov/geomagmodels/Declination.jsp)
The iClimber setting range is from -90^ to +90^ . Following applies
Declination angle east (E) = positive number
Declination angle west (W) = negative number

With this button you can move to the calibration mode (CAL)
There are two options available
- Calibration
- Setting the declination angle

With this button you can move to the calibration mode (thereafter to the setting of the declination angle)
or...

With this button you move directly to the setting of the declination angle
4.7.2 Calibration
In the calibration mode following display appears:

Hold the watch as level as possible to the ground and rotate it slowly, 2 x, clockwise (one rotation approx. 15 seconds).

With this button you end the calibration (CAL DONE).
After approx. 2 seconds you will be prompted to enter the declination angle.
4.7.3 Declination
In the declination mode following display will appear:
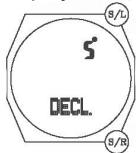

With these buttons you can modify the declination angle from -90^ to +90^ (instructions on how to do this can be found in the beginning of this chapter)

After completing, return to compass bearing
5. BATTERY REPLACEMENT
Battery replacement display

Depending on use of the device the battery lasts from a couple of months up to one year (please note chapter 2 "Putting into operation"). To avoid a sudden and unpleasant interruption of operation a battery symbol will appear, above the date symbol, as soon as the battery becomes too weak and needs to be replaced. To replace the batteries please follow the instructions in chapter 3.7 (Battery compartment).
If the battery is replaced in one minute's time, certain information will remain stored:
- Alarm setting
- Compass calibration
- Data Logs
- Display units
The other settings are lost and must be re-set.
Please remember that used batteries do not belong in normal household trashcans, they should be collected and disposed of at the appropriate collection sites. The environment appreciates it!
6. MAINTENANCE
- Do not expose the device to extreme temperatures or direct sunlight.
- Avoid bumps or shocks of any kind to the device.
-
For cleaning use a dry, soft cloth moistened with water and a mild cleaning agent. You must never use volatile substances such as benzene, thinner, cleaning agents in spray cans etc.
-
If the device is not being used store it in a dry place and out of the reach of small children.
In such cases it is important to remove the battery! - If a function is activated in extremely cold temperatures it may occur that the display is illegible and does not or only slowly change. This is normal because the battery may be too weak or the liquid crystals in the display are so to say frozen. As soon as the device is returned to a warmer environment it will function properly again.
- Store the operating instructions and other documents included in the delivery in order to be able to read them at a later time.
- Important: For all Irox devices all disposal fees are completely compensated, in Switzerland (vRG) as well as in the European Union (WEEE).
7. SUPPORT
This device is a new development of Irox Development Technology. All information was given in accordance with a functioning device and checked for correctness. Prototypes were successfully tested during expeditions before production began. It may still occur that adjustments and improvements which, due to print technical procedures, were conducted on the device but were not able to be included in these instructions. If you notice variances that make operating and handling the device difficult, you can download the updated version of the instructions from www.irox.com at any time, free of charge onto your PC (please note the version number). We are also thankful for any information concerning such discrepancies.
© IROX Development Technology
IROX, iClimber and VERTIC-LOG are registered trademarks and may only be used by Irox.
8. TECHNICAL INFORMATION
Important: All information with nominal battery charging!
Operating temperature
-10°C to +60°C (14°F to 140°F)
Temperature measurement
Measuring range: -40^ to +90.0^ (-40^ to 194^) Resolution: 0.1^ (0.2^) Measuring accuracy: + / - 1^ ranging from 0^ to +40^ + / - 2^ for the rest
Pressure measurement (Barometer/Altimeter)
Measuring range: 300-1100 hPa (mBar) (8.86-32.48 inHg) (equals approx. -380m to +9000m ) Resolution: 0.1 hPa (0.01 inHg) 1 m (3.3 ft) rel. measuring accuracy: +/- 0.5 hPa at specific pressure abs. measuring accuracy: +/- 1 hPa over 500-1100 hPa Measuring frequency of every 30 seconds the Altimeter: With stopwatch running: Every 2-4 seconds
Compass
Measuring range: 0 to 35 Resolution: 1^ Measuring accuracy: + / - 3^
Quartz watch mov. variance: + / - 1 second/month
Power supply: 1 CR2032 3.0V battery
Dimensions: 67 g (including battery); visible display Ø 30 mm
Mischu Wirth is an internationally renowned mountain guide IVBV, trainer, leader of exhibitions throughout the world and owner of the Mountain Sports School "MWGuiding" in Bern/Switzerland (www.mwguiding.ch).
Mischu and his team specified the functions of the VERTIC-LOGs.
VERTIC-LOG has basically two user groups:
- The interested outdoor athlete and hiker who has fun with the watch and also wants to monitor his/her performance
- The mountain climber who wants to conduct his/her tours and behaviour on the mountain in a professional manner.
For the mountain climber Mischu explains on the following pages how to professionally use this function.
VERTIC-LOG - successfully to the peak!
Mountain sports are great – and demanding. Beside a good physical condition, mental readiness and resilience and technical skills the active participation in this sport also requires a clear thought-out strategy with a realistic and coordinated time management.
Let your theoretic knowledge and your practical experience flow into the planning. Visualise your tour from the beginning, over the ascent, the stay on the peak, to the descent and through to the desired time of return.
Consider the fact that conditions in the mountains can change very fast. Organise your time so that you can return early enough, without the risk of getting caught in a storm.
As soon as you start your tour, begin recording your ascent with the VERTIC-LOG. The VERTIC-LOG independently divides your ascent into segments of 100 m effective altitude increase, and while your are still climbing you can monitor the most important data and that way adjust your progress to your time plan. This also allows you to make safety relevant decisions.
After finishing your tour, be this at home or in a bivouac, you can evaluate the VERTIC-LOG data stored in the iClimber and compare it to the plan gaining valuable conclusions. This helps set-up and strengthen tactical intelligence. And that improves your safety on the mountain in the future.