
GPSZ28V9CS7 - Refrigerator FRIGIDAIRE - Free user manual and instructions
Find the device manual for free GPSZ28V9CS7 FRIGIDAIRE in PDF.
| Product Type | Side-by-Side Refrigerator |
| Brand | FRIGIDAIRE |
| Model | GPSZ28V9CS7 |
| Dimensions (approx.) | Width 91 cm, height 178 cm, depth 76 cm |
| Weight (approx.) | 113 kg |
| Power Supply | 115 V, 60 Hz, 15 A (grounded outlet) |
| Climate Class | Ambient temperature from 13°C to 43°C |
| Total Capacity (approx.) | 790 L (28 cu ft) |
| Cooling | Modern high-efficiency compressor, forced air cooling |
| Defrost | Automatic |
| Controls | Electronic digital display with separate freezer and refrigerator settings |
| Temperature Display | Digital, switchable °C/°F |
| Water and Ice Dispenser | Integrated front panel, non-refrigerated water, ice cubes and crushed ice |
| Ice Maker | Automatic with On/Off switch, 24-hour production, removable bin |
| Water Filter | Integrated, recommended replacement every 6-9 months (1514 L) |
| Air Filter | Integrated in the refrigerator compartment, replacement every 6 months |
| Shelves | Adjustable and sliding tempered glass, special shelf for 355 ml cans |
| Drawers | Fruit/vegetable bins with humidity control, adjustable meat keeper |
| Interior Lighting | Standard appliance bulbs, easy replacement |
| Safety | Open door, high temperature, power failure alarms; dispenser lock system |
| Installation | Requires water supply (copper), leveling, clearances 10 mm sides, 25 mm rear |
| Maintenance | Regular cleaning of surfaces with non-abrasive solutions; do not wash parts in dishwasher |
| Warranty | See supplied registration card |
Frequently Asked Questions - GPSZ28V9CS7 FRIGIDAIRE
User questions about GPSZ28V9CS7 FRIGIDAIRE
0 question about this device. Answer the ones you know or ask your own.
Ask a new question about this device
Download the instructions for your Refrigerator in PDF format for free! Find your manual GPSZ28V9CS7 - FRIGIDAIRE and take your electronic device back in hand. On this page are published all the documents necessary for the use of your device. GPSZ28V9CS7 by FRIGIDAIRE.
USER MANUAL GPSZ28V9CS7 FRIGIDAIRE
Please Read And Save This Guide
This Use & Care Guide is part of our commitment to customer satisfaction and product quality throughout the service life of your new refrigerator. We view your purchase as the beginning of a relationship. To ensure our ability to continue serving you, please use this page to record key product information.
Make A Record For Quick Reference
Purchase Date
Model Number
Serial number
Note
Registering your product enhances or ability to serve you. You can register by dropping your product registration card in the mail.
Safety
Important Safety Instructions

Warning
Please read all instructions before using your new refrigerator.
General Safety
- Do not store or use gasoline, or other flammable liquids in the vicinity of this or any other appliance. Read product labels for warnings regarding flammability and other hazards.
- Do not operate the refrigerator in the presence of explosive fumes.
- Avoid contact with any moving parts of automatic ice maker.
- Remove all staples from the carton. Staples can cause severe cuts, and also destroy finishes if they come in contact with other appliances or furniture.
Child Safety
Packing Materials
- Packing cartons covered with rugs, bedspreads, plastic sheets or stretch wrap may become airtight chambers and can quickly cause suffocation.
- Destroy or recycle the product's carton, plastic bags, and any exterior wrapping material immediately after the refrigerator is unpacked. Children should never play with these items.
Child Entrapment And Suffocation
- These problems are not limited to the past. Whether junked, abandoned or temporarily stored (even for a few hours), unattended refrigerators and freezers are dangerous.
Electrical Information

Warning
You must follow these guidelines to ensure that your refrigerator's safety mechanisms operating correctly.
- If the power cord is damaged, it should be replaced by the manufacturer, service technician or a qualified person to prevent risk.
- Never unplug the refrigerator by pulling on the power cord. Always grip the plug firmly, and pull straight out from the receptacle to prevent damaging the power cord.
-
Unplug the refrigerator before cleaning and before replacing a light bulb to avoid electrical shock.
-
Performance may be affected if the voltage varies by 10% or more. Operating the refrigerator with insufficient power can damage the compressor. Such damage is not covered under your warranty.
- Do not plug unit into an outlet controlled by a wall switch or pull cord to prevent the refrigerator from being turned off accidentally.
Important
To turn off power to your refrigerator, unplug the power cord from the wall outlet.
Installation
Location
- Choose a place that is near a grounded electrical outlet. Do Not use an extension cord or an adapter plug.
- If possible, place the refrigerator out of direct sunlight and away from the range, dishwasher or other heat sources.
- The refrigerator must be installed on a floor that is level and strong enough to support a fully loaded refrigerator.
- Consider water supply availability for models equipped with an automatic ice maker.
Installation

Caution
Do Not install the refrigerator where the temperature will drop below 13^ ( 55^ ) or rise above 43^ ( 110^ ). The compressor will not be able to maintain proper temperatures inside the refrigerator. Do Not block the toe grille on the lower front of your refrigerator. Sufficient air circulation is essential for the proper operation of your refrigerator.
Installation Clearances
Allow the following clearances for ease of installation and plumbing and electrical connections:
Sides & Top 10 mm (3/8 inch)
Back 25 mm (1 inch)
Door Opening
Your refrigerator should be positioned to allow easy access to a counter when removing food. For best use of drawers and freezer baskets, the refrigerator should be in a position where both the refrigerator and freezer doors can be fully opened.
Note
If your refrigerator is placed with the door hinge side against a wall, you may have to allow additional space so the door can be opened wider.
Removing And Replacing The Toe Grille:
To remove the toe grille:
1 Open the freezer and refrigerator compartment doors.
2 Remove the screw from each side of the toe grille.
3 Pull the toe grille forward and lift it off.
Reverse these instructions to install the grille.
Leveling
All four corners of your refrigerator must rest firmly on a solid floor. Your refrigerator is equipped with adjustable front rollers to help level your unit. To ensure proper door seal and assist door closing, the refrigerator should be tilted 6 mm (1/4 inch), front to back.
To level your refrigerator:
1 Remove toe grille (see above) to access the front rollers.
2 Adjust the rollers by turning each roller adjustment bolt with a wrench or flat-blade screwdriver until the refrigerator is level and stable.
3 Check both doors to be sure seals touch cabinet on all four sides.
4 Replace the toe grille.
Tips:
- If the freezer door is higher than the refrigerator door, raise the right corner and/or lower the left corner until the doors align across the top of the cabinet.
- If the refrigerator door is higher than the freezer door, raise the left corner and/or lower the right corner until doors align across the top of the cabinet.
Removing The Doors
If your refrigerator will not fit through an entrance area, you can reduce its size by removing the doors. Check first by measuring the entrance.
Required Tools
You will need the following tools:
- Phillips™ head screwdriver.
- Socket wrench set OR adjustable wrench.
To prepare for removing the doors:
1 Make sure the electrical power cord is unplugged from the wall outlet.
2 Open both doors and remove the toe grille.
3 Remove any food from the door shelves.
4 Close the doors.
To remove the top hinge cover(s):
Depending on your model, follow the appropriate procedure below.
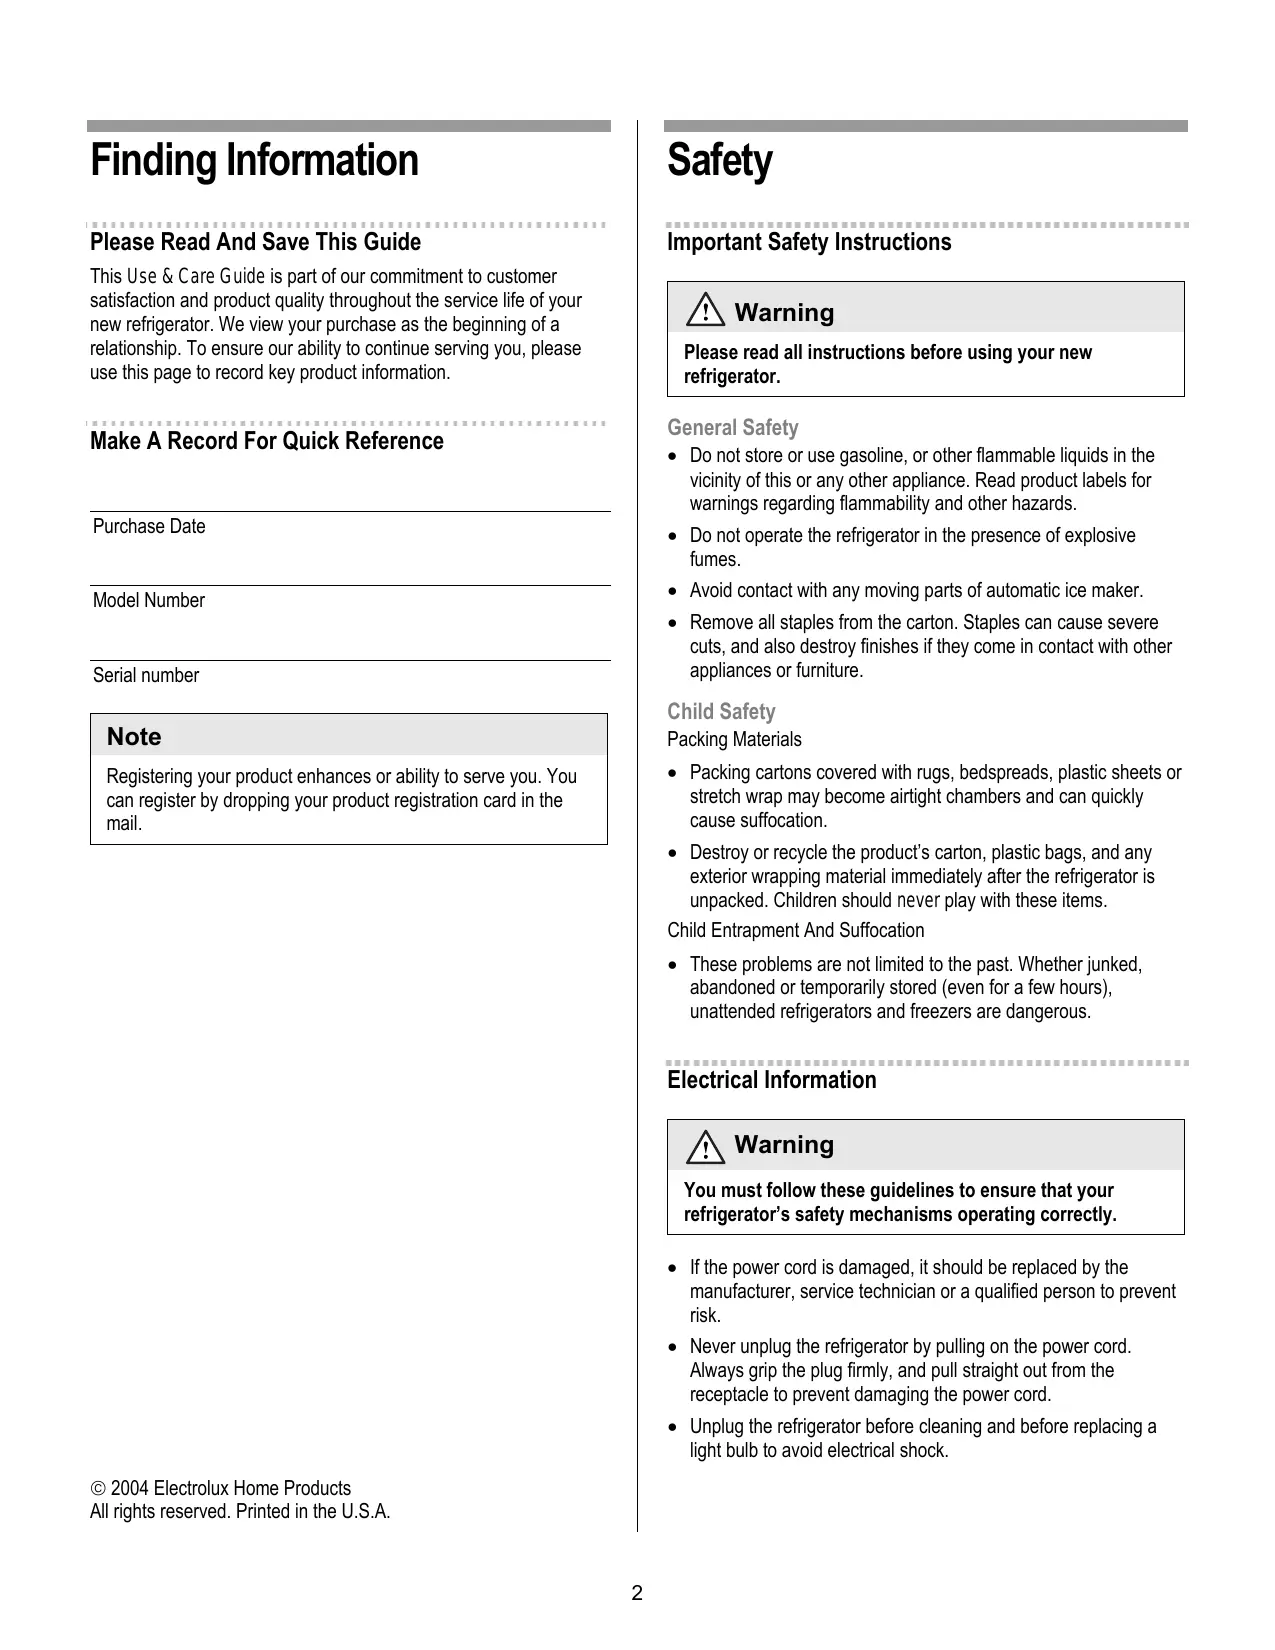
Large Hinge Cover
1 Remove the three screws from the cover over the top door hinges.
2 Pull the cover forward and lift it off.
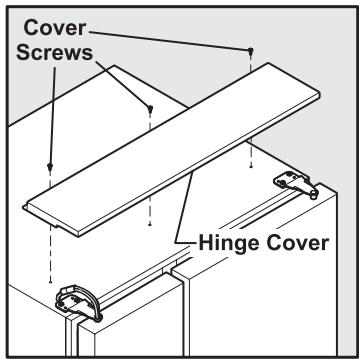
Small Hinge Covers
Remove the cover screw and cover from the top hinge of both refrigerator doors.
To remove the refrigerator door:
1 Trace lightly around the door's top hinge with a pencil. This makes reinstallation easier.
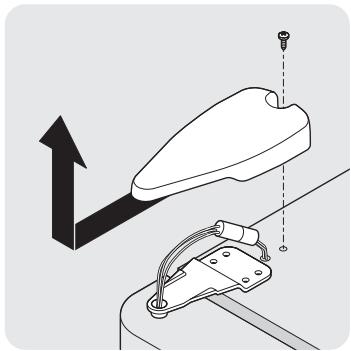
2 Remove the two screws from the top hinge. Lift the door off of the bottom hinge and set it aside.
3 Remove the three bottom hinge screws and hinge, if necessary.
To reinstall the refrigerator door, reverse the above steps. Once both doors are in place, also replace the top hinge cover.
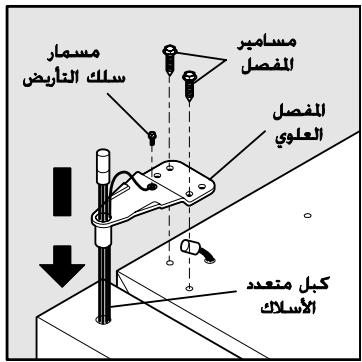
To remove the freezer door:
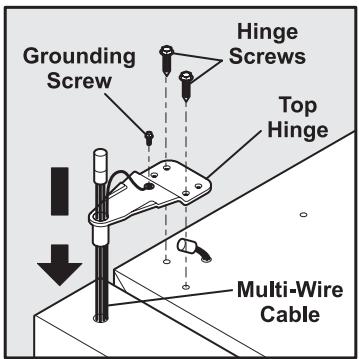
1 Detach the multi-wire cable connector located above the top hinge. Grasp both sides of the connector firmly and pull apart.
2 Trace lightly around the door's top hinge with a pencil. This makes reinstallation easier.
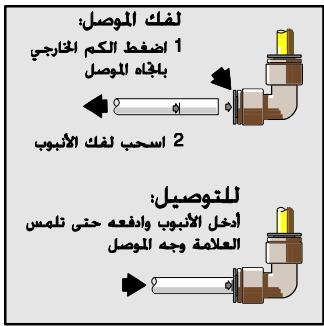
3 Detach the water tube from the connector located below the freezer door. The connector releases when you press its outer sleeve inward.
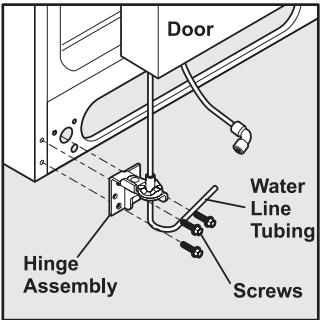

4 Remove the screws from the top hinge. Leave the multi-wire cable inside the hinge. Do not unscrew the ground wire that attaches the cable to the hinge. Lift the door off of the bottom hinge.
5 Remove the three bottom hinge screws and hinge if necessary.
6 Lay the door on its side to avoid damage to the water tube extending from the bottom hinge.
To reinstall the freezer door, reverse the above steps. Once both doors are in place, also replace the top hinge cover.
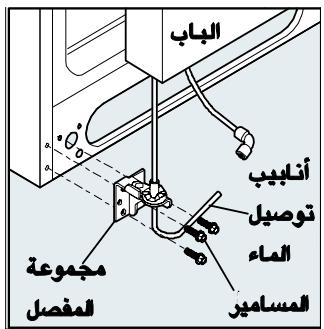
Connecting The Water Supply
About Your Refrigerator's Water Supply
The automatic ice & water dispenser on your refrigerator requires a permanent water supply to function correctly. During installation, you (or a service professional) establish this water supply by connecting a copper tube from your household water system to a valve at the rear of the refrigerator.

Caution
To Avoid Property Damage:
- Use copper tubing for the water supply line (plastic tubing is more likely to leak). Manufacturer is not responsible for any damage if plastic tubing is used for supply line.
- Ensure water supply complies with local plumbing codes.
- For proper dispenser operation, recommended water supply pressure should fall between 1.4 and 6.9 bars. Excessive pressure may cause water filter to malfunction.
What you will need:
- Access to a cold water line with pressure of 1.4-6.9 bars.
- The water connector kit that comes with your refrigerator, which provides all materials for a water installation, including 7.6 ~m (25 feet) of copper tubing.
To connect your water supply to the rear of your refrigerator:
1 Ensure that the refrigerator is not plugged in.
2 Flush the supply line until water is clear by placing the end of the copper tube in a sink or bucket and opening the shut-off valve.
3 Unscrew the plastic cap from water valve inlet at the rear of your refrigerator. Discard the cap.

4 Slide the brass compression nut, then the ferrule (sleeve) onto copper tube.
5 Push the copper tube into water valve inlet as far as it will go (6.5 mm).
6 Slide the ferrule (sleeve) into valve and finger-tighten compression nut onto valve. Tighten another half turn with a wrench. Do not over-tighten.
7 Secure the copper tube to your refrigerator's rear panel with a steel clamp and screw (see illustration).
8 Coil the excess copper tubing (about 2 12 turns) behind your refrigerator as shown. Arrange coiled tubing to avoid vibration or wear against other surfaces.
9 Open water supply shut-off valve and tighten any connections that leak.
Note
After connecting the water supply, see information in this guide about priming an empty water supply system. Also read all topics in the "Automatic Ice & Water Dispenser" section to learn about normal operating procedures.
Controls & Settings
Allowing Cooling Time Before Use
To ensure reliable food storage, allow your refrigerator and freezer to operate with the doors closed for 8 to 12 hours before placing food inside. During this cooling period, you do not need to adjust the controls, which are preset at the factory.
Setting Cooling Temperatures
Your refrigerator comes with a state-of-the-art electronic digital control system. The system's control panel is located at the top of the refrigerator compartment.
The two digital displays on the left half of the control panel indicate the current temperatures of your freezer and refrigerator compartments.
To adjust the temperature to a higher or lower setting, press the Up or Down arrow button closest to the display. The first time you press the button the display shows the last setting you entered. Each press of the button after that increments the setting by one degree.
The display shows your new setting momentarily, then changes back to the current temperature.
Note
The advanced electronic control system in your refrigerator includes additional display modes that service professionals can use to rapidly diagnose performance issues.
Choosing Centigrade or Fahrenheit (Select Models)
Depending on which temperature standard you prefer to use, you can set your control panel to display in Centigrade or Fahrenheit. To change between these standards, press the Mode button.
Making Temperature Adjustments
After running your refrigerator for 24 hours, you can adjust temperatures as needed. Make your adjustments small and gradual, allowing time for temperatures to change and stabilize. Refer the following guidelines for temperature settings.
Temperature Control Range
| Freezer | Refrigerator | ||||
| °F | °C | °F | °C | ||
| ↑ Less Cold | Warmest | 6° | -14° | 47° | 8° |
| Factory Setting | Midpoint | 0° | -18° | 37° | 3° |
| Colder | Coldest | -10° | -23° | 33° | 1° |
Temperature Adjustment Guide
| If Refrigerator compartment is too warm | Adjust Refrigerator control one degree colder by pressing the Down arrow button. |
| If Refrigerator compartment is too cold | Adjust Refrigerator control one degree warmer by pressing the Up arrow button. |
| If Freezer compartment is too warm | Adjust Freezer control one degree colder by pressing the Down arrow button. |
| If Freezer compartment is too cold | Adjust Freezer control one degree colder by pressing the Up arrow button. |
What To Do If The Temperature Displays Flash
If ever you see the temperature displays continuously flashing, it may indicate that the control system has detected a performance problem. Call your service representative, who can interpret the flashing message.
System Monitoring Alarms (Select Models)
The electronic control system continuously monitors your refrigerator/freezer for temperature consistency, doors left ajar, and power failures. Variances from normal operating conditions are
communicated by audible tones and a set of four status indicator lights.
Note
Each time you make settings on the control panel, a single audible tone acknowledges your input.
Responding to Alarms (Audible Tones & Indicator Lights) Your refrigerator's control system can convey the following information through audible tones and the alarm indicator lights.
| Alarm | Light | Tones | Condition | How To Respond |
| On | (light is off) | Alarm system is not active while freezer and refrigerator compartments are cooling toward the current temperature settings. | If freezer and refrigerator compartments do not match your temperature settings in three hours, expect the control system to signal other conditions. If cooling does not stabilize toward your current settings call for assistance, using the phone number on the back page of this Use & Care Guide. | |
| Steady Green | Alarm system is active. | No response required. | ||
| Door Ajar | Flashing Green | ✓ | Freezer or refrigerator door has been open for over five minutes. | Close door to disable and reset alarm. |
| High Temp | Flashing Amber | ✓ | Freezer or refrigerator compartment has been too warm (7.2°C or higher) for over an hour. | Press Alarm Reset button to turn off alarm. If temperatures do not improve, call for assistance, using the phone number on the back page of this Use & Care Guide. |
| Power Failure | Flashing Amber | A power outage was detected. | Press Alarm Reset button to turn off alarm and press again to reset. Check if the power failure lasted long enough to affect stored food temperatures. |
Using The Alarm Reset Button
You can disable or activate the alarm system by pressing and holding the Reset button for three seconds. Use it, for example, to turn off audible tones and/or flashing indicator lights.

Caution
The alarm system does not automatically reset if you disconnect and reconnect your refrigerator's power cord. It can only be reactivated by pressing the Alarm Reset button.
Once you disable the alarm system, you must again press and hold the Alarm Reset button for three more seconds to reset (activate) the alarm system. The On indicator light remains off while the freezer and refrigerator compartments cool toward the current cooling settings. When temperature settings are reached, the On light displays green to indicate an active alarm system.
Checking the Air Filter Status (Select Models)
Your refrigerator's fresh food air filter needs to be replaced from time to time. You can monitor the need for replacement by pressing and holding the Air Filter On/Off button for three seconds.
To check the air filter status:
1 Press the Air Filter On/Off button. This activates a test cycle, and one of the three filter status lights displays, indicating one of the following:
| Filter OK | Air filter does not need changing. |
| Order Filter | Air filter is about 80 percent used. Please order new one. |
| Change Filter | Air filter is 100 percent used. Please change now. |
2 Press the Air Filter On/Off button to turn off the status light.
Note
See the later section in this Use & Care Guide for instructions on replacing the filter.
Turning The Cooling System On And Off
You can disable the cooling system in your refrigerator by pressing the system's On/Off button located on the left side of the temperature control panel.
To ensure that you do not accidentally turn off the cooling system, the button does not work unless you press and hold it for three seconds.
Once you disable the cooling system, all refrigeration to the freezer and refrigerator compartments stops. To turn the cooling system back on, you must again press and hold the On/Off button for three more seconds.
Important
The On/Off button only controls your refrigerator's cooling system. Power to lights and other electrical components continues unless you unplug the power cord.
Storage Features

Caution
To avoid injury from breakage, handle tempered glass shelves carefully.
Cantilever Shelves
You can easily adjust shelf positions in the freezer and fresh food compartments to suit your needs. The shelves have mounting brackets, which attach to slotted supports at the rear of each compartment.
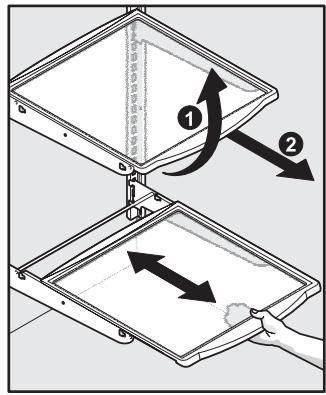
To change the position of a shelf:
1 Before adjusting a shelf, remove all food.
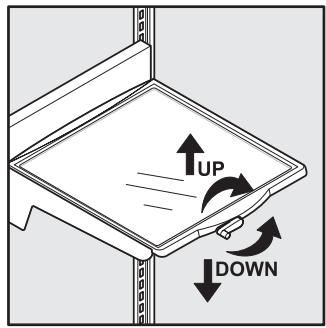
2 Lift the front edge up.
3 Pull the shelf out.
4 Replace by inserting the mounting bracket hooks into the desired support slots.
5 Lower the shelf and lock into position.
Shelf Features
Your refrigerator includes glass shelves, which are designed to catch and hold accidental spills. These shelves slide out for easy access to food and faster cleaning.
Sliding shelves can be pulled forward as far as their built-in stops allow. Sliding shelves cannot be separated from their mounting brackets.
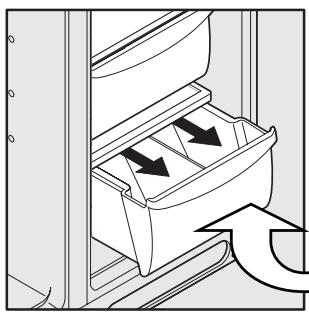
Drawers
Your refrigerator includes a variety of storage drawers. These drawers usually are located in fixed positions at the bottom of the fresh food compartment.
Crispers
Crisper drawers are designed for storing fruits, vegetables, and other fresh produce. Before storing items in a crisper:
- Wash items in clear water and remove excess water.
- Wrap any items that have strong odors or high moisture content.
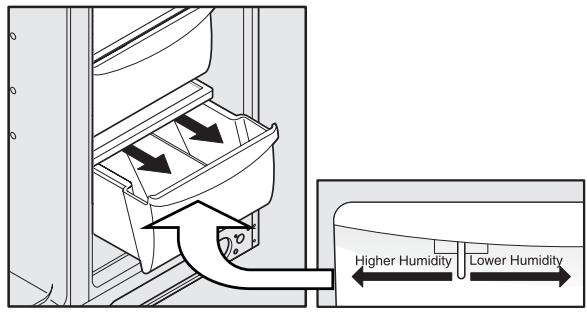
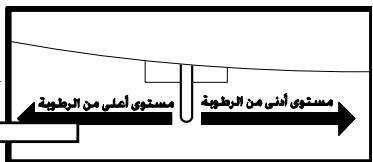
Crisper Humidity Control
Crisper drawers include a sliding control for adjusting the humidity inside the risper. This feature can extend the life of certain fresh vegetables that keep longer in high humidity.
Note
Leafy vegetables keep best when stored with the Humidity Control set on Higher Humidity, or in a drawer without a Humidity Control. This keeps incoming air to a minimum and maintains maximum moisture content.
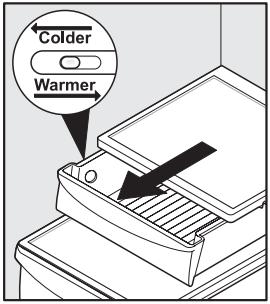
Meat Keeper
Some models are equipped with a meat keeper drawer for short term storage of bulk meat items. This drawer includes a sliding control for adjusting the temperature inside.
Any meat to be kept longer than two days should be frozen. If you store fruits or vegetables in this drawer, set it to a warmer temperature to prevent freezing.
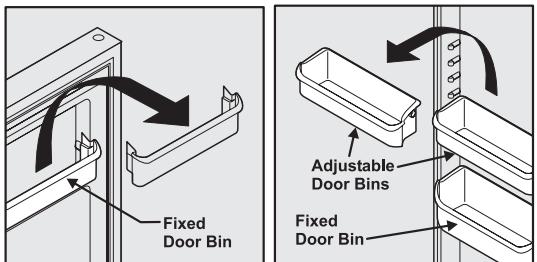
Doors
The doors to your freezer and fresh food compartments use a system of modular storage bins. All of these bins are removable for easy cleaning. Some of them have fixed positions, while others can be adjusted to your needs.
Door bins are ideal for storing jars, bottles, cans, and large drink containers. They also enable quick selection of frequently used items.
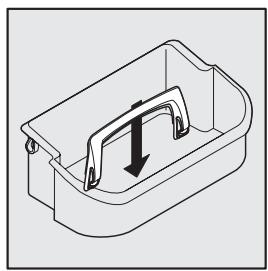
To change the position of an adjustable door bin:
1 Before adjusting a bin, remove all food.
2 Grip the bin firmly with both hands and lift it upward.
3 Remove the bin.
4 Place the bin just above desired position.
5 Lower the bin onto supports until locked in place.
Accessories
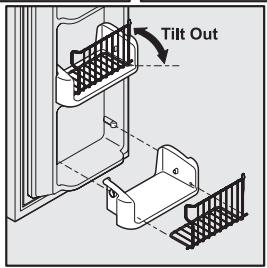
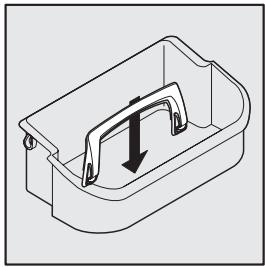
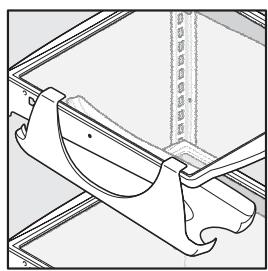
Tall Bottle Retainer
The tall bottle retainer keeps tall containers in the bin from falling forward when opening or closing the refrigerator door. To install, snap the ends of the retainer over the edge of the retainer wall as shown in the illustration.
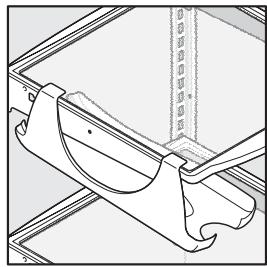
Special Items Rack
The innovative design of the special items rack allows you to store a six-pack of 12 ounce drink cans, a bottle of wine, a two-liter soft drink bottle, or a carton of eggs. To install, slide the special item rack onto the left side of any shelf as shown in the illustration.
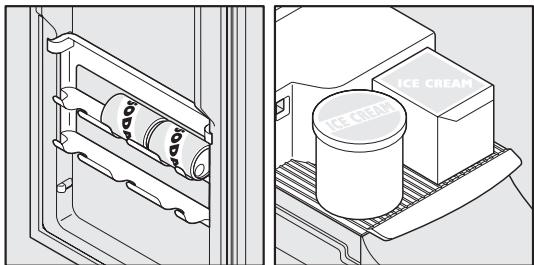
Can Rack
The can rack allows you to efficiently and securely store up to six twelve-ounce cans of beverage drink.
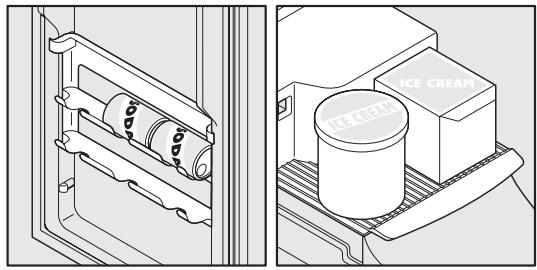
Ice Cream Shelf
The ice cream shelf attaches to the top of the ice dispenser container. It allows storage of both round and rectangular cartons of your favorite ice cream.
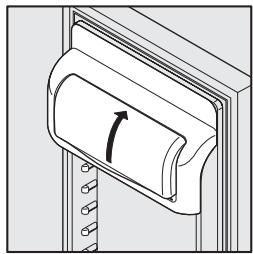
Dairy Compartment
Use the dairy compartment, at the top of the fresh food compartment door, for short term storage of cheese, spreads, or butter. The dairy compartment, which includes a lift-up cover, is designed to be warmer than the open storage area to accommodate these types of food.

Caution
To avoid errors in your refrigerator's control system, do not remove the magnet that is mounted behind the dairy compartment.
Automatic Ice & Water Dispenser
Using The Dispenser
Your automatic ice & water dispenser includes a control panel, a drinking glass bay, and two push-paddles for turning on the ice and water supplies. Using the dispenser control panel is necessary for the ice dispenser but not the water dispenser. The control panel also includes options for lighting, filter monitoring, and increasing the rates of ice making and freezing.
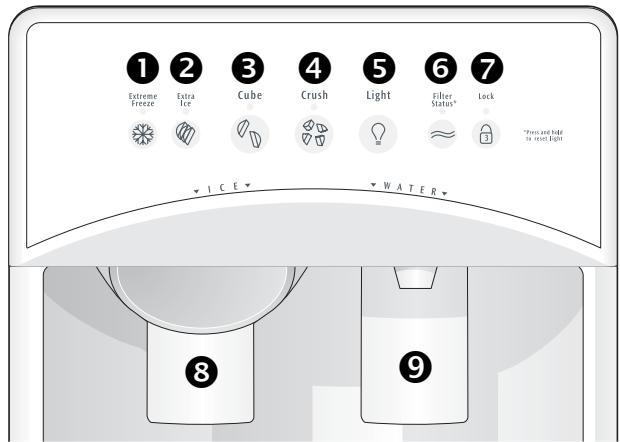
Dispensing Ice
To operate the ice dispenser (3), press an option for crushed or cubed ice on the control panel. Press a drinking glass against the dispensing paddle (as far up as possible to catch all the ice). To stop, pull the glass away from the dispensing paddle. See details for operating the dispenser controls below.
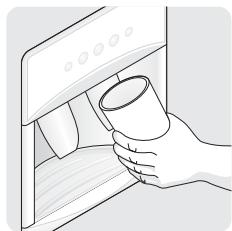
Dispensing Water
To operate the water dispenser (9), press a drinking glass against the dispensing paddle. To stop dispensing water, pull the glass away from the dispensing paddle. The dispensed water is not cold. For colder water, first add crushed ice or cubes to your drinking glass.
Drip Tray
A drip tray located at the base of the dispenser bay catches small spills and allows them to evaporate. This drip tray is removable for easy cleaning.
Using The Dispenser Control Panel
| 1 Fast Freeze | Press and hold touchpad for 3-5 seconds to activate faster rate for freezing food (preserving freshness). Light displays green. Press and hold touchpad for 3-5 seconds again to deactivate. |
| 2 Fast Ice | Press and hold touchpad for 3-5 seconds to increase ice production for special occasions, such as parties. Light displays green. Press and hold touchpad for 3-5 seconds again to deactivate. |
| 3 Cube | Press touchpad to get cubed ice. Light displays green. Press glass against ice dispensing paddle, holding high up to catch all ice. |
| 4 Crush | Press touchpad to get crushed ice. Light displays green. Press glass against ice dispensing paddle, holding high up to catch all ice. |
| 5 Light | Press touchpad to turn on dispenser light. Light displays green. Press touchpad again to turn off dispenser light. Dispenser light also turns on automatically when ice and/or water is dispensed. |
| 6 Filter Reset (& Status Light) ≈ | Light displays in one of three possible colors each time the dispenser is used to show status of water filter: Green Water filter does not need changing. Amber Water filter is about 80 percent used. Please order a new one. Red Water filter is 100 percent used. Please change as soon as possible. After replacing the water filter, reset the filter status by pressing and holding touchpad for 10-15 seconds. |
| 7 Lock | The dispenser can be locked to prevent unwanted use. To lock, press and hold touchpad for 3-5 seconds. Light displays red. To unlock, press and hold touchpad for 3-5 seconds until light goes out. |
Note
Please do not pour excess water and ice into the drip tray. It does not have a drain.
Priming The Water Supply System
Your refrigerator's water supply system includes several tubing lines, an advanced water filter, a distribution valve bank, and a reserve tank to ensure ample supply to the ice and water dispenser at all times. This system needs to be completely filled with water when first connected to an external supply line.

Caution
For proper dispenser operation, recommended water supply pressure should fall between 1.4 and 6.9 bars. Excessive pressure may cause water filter to malfunction.
To prime the water supply system:
1 Begin filling the tank by pressing and holding a drinking glass against the water dispenser paddle.
2 Keep the glass in this position until water comes out of the dispenser. It may take about 1 12 minutes.
3 Continue dispensing water for about 3 minutes to flush the system and plumbing connections of any impurities (stopping to empty the glass as necessary).
Note
The water dispenser has a built-in device that shuts off the water flow after 3 minutes of continuous use. To reset this shutoff device, simply release the dispenser paddle.

Caution
Pushing the dispensing paddle in for more than 4 minutes may cause the dispenser motor to overload and stop. The overload protector resets automatically after 3-4 minutes.
Ice Dispenser Operation & Care
The ice maker, ice bin, and dispenser feeding mechanism are located in the top of the freezer compartment. After the refrigerator is installed properly and has cooled for several hours, the ice maker can produce ice within 24 hours. It can completely fill an ice bin in about two days.
Important
The ice maker is turned on at the factory to work as soon as you install your refrigerator. If you cannot connect a water supply, turn the ice maker's On/Off switch to the off (O) position. Otherwise, the ice maker's fill valve may be noisy when it attempts to operate without water.
Using The Ice Dispenser After Installation
Before making ice for the first time, be sure to prime the water supply system as described on page 10. Air in new plumbing lines can result in two or three empty ice maker cycles. Furthermore, if the system is not flushed, the first ice cubes may be discolored or have an odd flavor.
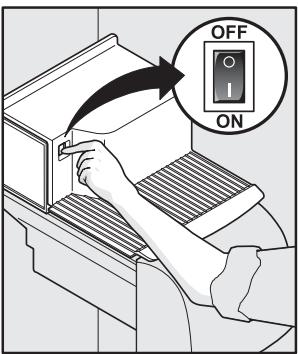
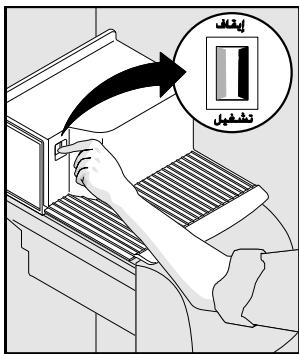
Turning The Ice Dispenser On And Off
Ice production is controlled by the ice maker's On/Off power switch. Press the switch to the "O" position to turn it Off and press to the "I" position to turn it On.
Ice Dispenser Tips
- Ice cubes stored too long may develop an odd flavor. Empty the ice container as explained on the next page.
- Occasionally shake the ice container to keep ice separated.
- If your refrigerator is not connected to a water supply or the water supply is turned off, turn off the ice maker by pressing the On/Off switch to the "O" position.
- If you need a large quantity of ice at one time, it is best to get cubes directly from the ice container.
-
The following sounds are normal when the ice maker is operating:
-
Motor running
- Ice dropping into ice container
Water valve opening or closing - Ice loosening from tray
-
Running water
-
Turn off the ice maker when cleaning the freezer and during vacations.
- If you turn off the ice maker for a long period of time, you should also turn off the water supply valve.

Caution
Chemicals from a malfunctioning water softener can damage the ice maker. If the water supply to your refrigerator is softened, be sure the softener is maintained to work properly.
Cleaning The Ice Dispenser
Clean the ice maker and ice bin at regular intervals, particularly before you take a vacation or move.

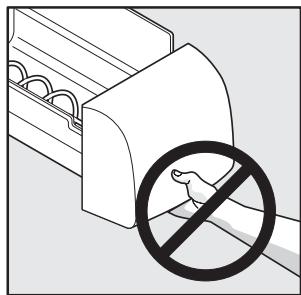
Caution

When removing the ice bin, do not grip the ice chute (beneath the front of the bin) as a handle. Surfaces in the ice chute may be sharp.
To clean the ice dispenser:
1 Turn off ice production by pressing the ice maker's On/Off switch.
2 Remove the ice bin by lifting up and out.
3 Empty and carefully clean the ice bin with mild detergent. Rinse with clear water. Do not use harsh or abrasive cleaners.
4 Allow the ice bin to dry completely before replacing in the freezer.
5 Remove ice chips and clean the ice bin shelf and the freezer door chute.
6 Replace the ice bin. Press the ice maker's Off/On switch to resume ice production.
Remove and empty the ice storage bin if:
- An extended power failure (one hour or longer) causes ice cubes in the ice storage bin to melt and freeze together, jamming the dispenser mechanism.
- You do not use the ice dispenser frequently. Ice cubes will freeze together in the bin, jamming the dispenser mechanism.
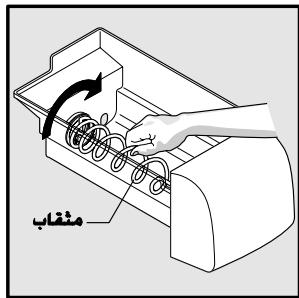
Remove the ice storage bin and shake to loosen the cubes or clean as explained above. Never use an ice pick or similar sharp instrument to break up the ice. This could damage the ice storage bin and dispenser mechanism.
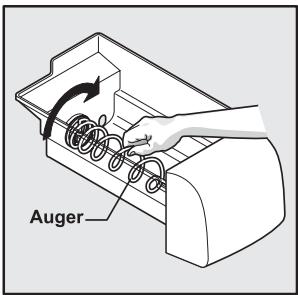
Important
When removing the ice bin, avoid rotating the auger inside the bin. The auger must align with its drive mechanism when the bin is replaced. If you accidentally move the auger, realign by making quarter turns until the ice bin fits back in place.
Changing The Filters
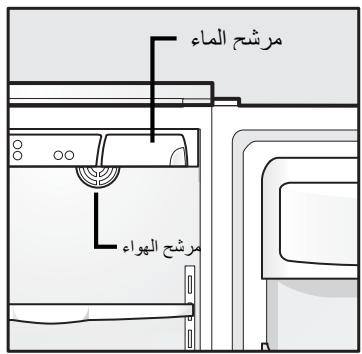
Locating The Filters
Your refrigerator is equipped with separate water and air filtering systems. The water filter system filters all dispensed drinking water, as well as the water used to produce ice. The air filter removes odors and impurities from the refrigerator compartment.
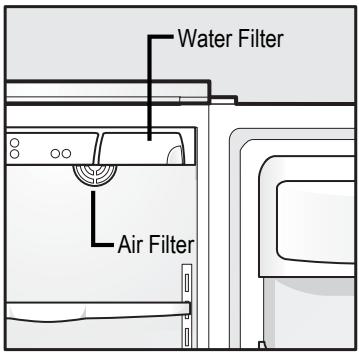
Water Filter
The water filter is located at the top of the fresh food compartment, next to the electronic control system panel. See the earlier section in this manual for more information about when to replace the filter.
Air Filter (Select Models)
The air filter is located inside the refrigerator compartment at the top rear corner. See the earlier section in this manual for more information about when to replace the filter.
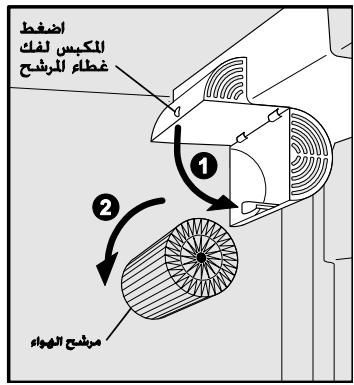
Replacing The Air Filter
In general, you should change the air filter every six months to ensure optimal filtering of refrigerator odors. You may want to adjust this time period depending on the types and amounts of food you typically store in you refrigerator. To replace your air filter:
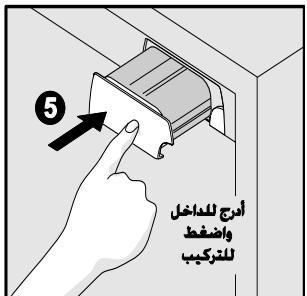
1 Push the plastic bubble tab located on the side of the air filter housing. The hinged bottom half drops open.

2 Remove the old filter and discard it.
3 Unpackage the new filter and place it inside the hinged bottom half of the housing.
4 Push the hinged bottom half upward until the tab snaps into closed position.
5 Press and hold the Filter Reset button on the electronic control panel for 3 seconds. When the Filter OK light comes on, the status has been reset.
6 Press and hold the Filter Reset button for 3 seconds again to turn off the filter status system.
Note
The electronic control panel, located at the top of the refrigerator compartment, includes controls to monitor the status of your air filter. See the previous section for more information about these controls.
Replacing The Water Filter
In general, you should change the water filter every six to nine months to ensure highest possible water quality. The Filter Status light on the dispenser control panel prompts you to replace the filter after 1514 liters of water has flowed through the system. If your refrigerator has not been used for a period of time (during moving for example), change the filter before reinstalling the refrigerator.
More About Your Advanced Water Filter
NS
The ice & water filter system is tested and certified by NSF International, the nationally respected, not-for-profit certification organization for public health safety. The filter system is
tested and certified to ANSI/NSF Standards 42 and 53. See the performance data sheet that came with your product for detailed specifications.
This system should not be used on water that is microbiologically unsafe or with water of unknown quality unless the water has been adequately disinfected before or after traveling through the filtration system.
To replace the water filter:
It is not necessary to turn the water supply off to change the filter. Be ready to wipe up any small amounts of water released during the filter replacement. The bottom of the filter housing includes two small water drainage holes, so be sure to remove any stored food from the top shelf.
1 Turn Off the ice maker power switch (see page 10 for more about turning off the ice maker).
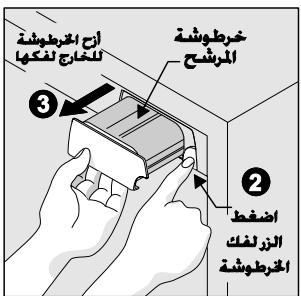
2 Push the filter release button to the right of the cartridge to disconnect it.
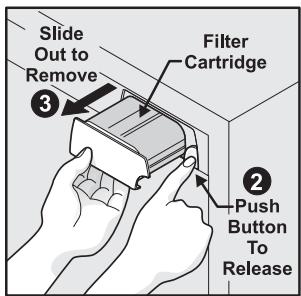
3 Slide the old filter cartridge straight out of the housing and discard it.
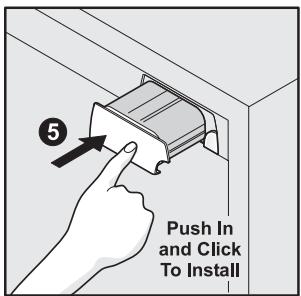
4 Unpackage the new filter cartridge and slide it gently into the filter housing until it stops against the snap-in connector at the back of the housing.
5 Push firmly until the cartridge snaps into place. When fully engaged, the front of the filter cartridge should be flush with the filter release button.
6 Turn On the ice maker power switch (see page 10 for more about turning on the ice maker).
7 Press a drinking glass against the water dispenser while checking for any leaks at the filter housing. Any spurs and sputters that occur as the system purges air out of the dispenser system are normal.
8 After filling one glass of water, continue flushing the system for about three minutes.
9 Press and hold the Filter Reset button on the Ice & Water Dispenser control panel for 3 seconds. The light flashes red, amber, and green to indicate the Filter Status has been reset.
Note
The o-rings on a new water filter are lubricated. To ensure a good seal, please do not remove this lubricant.
Understanding The Sounds You May Hear
Your new high-efficiency refrigerator may introduce unfamiliar sounds. These sounds normally indicate your refrigerator is operating correctly. Some surfaces on floors, walls, and kitchen cabinets may make these sounds more noticeable.
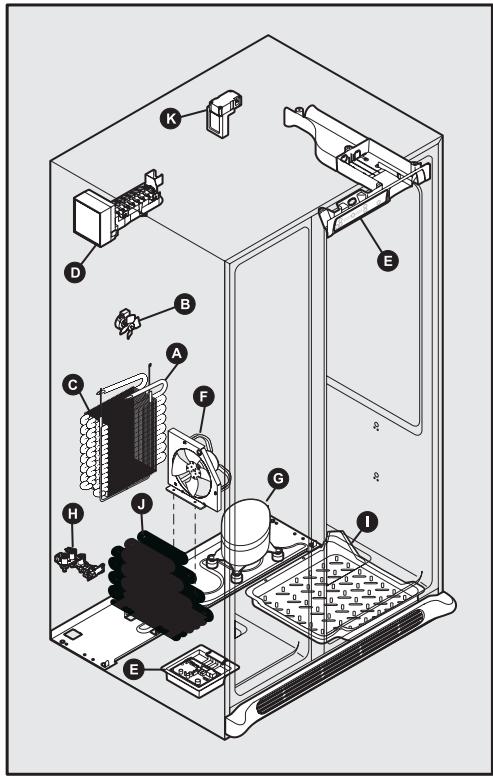
Following is a list of major components in your refrigerator and the sounds they may cause:
A Evaporator
Refrigerant through the evaporator may create a boiling or gurgling sound.
B Evaporator Fan
You may hear air being forced through the refrigerator by the evaporator fan.
C Defrost Heater
During defrost cycles, water dripping onto the defrost heater may cause a hissing or sizzling sound. After defrosting, a popping sound may occur.
Important
During automatic defrost cycle, a red glow in the back wall vents of your freezer compartment is normal.
Automatic Ice Maker
When ice has been produced, you will hear ice cubes falling into the ice bin.
E Cold Control & Automatic Defrost Control
These parts can produce a snapping or clicking sound when turning the cooling system on and off.
F Condenser Fan
You may hear air being forced through the condenser.
G Compressor
Modern, high-efficiency compressors run much faster than in the past. The compressor may have a high-pitched hum or pulsating sound.
H Water Valve
Makes a buzzing sound each time it opens to fill the ice maker.
1 Drain Pan (not removable)
You may hear water dripping into the drain pan during the defrost cycle.
J Condenser
May create minimal sounds from forced air.
K Motorized Damper
May produce a light humming during operation.
Note
Energy efficient foam in your refrigerator is not a sound insulator.
Care & Cleaning
Protecting Your Investment
Keeping your refrigerator clean maintains appearance and prevents odor build-up. Wipe up any spills immediately and clean the freezer and fresh food compartments at least twice a year. When cleaning, take the following precautions:
- Never use metallic scouring pads, brushes, abrasive cleaners or strong alkaline solutions on any surface.
- Do not wash any removable parts in a dishwasher.
- Always unplug the electrical power cord from the wall outlet before cleaning.
Note
If you set your temperature controls to turn off cooling, power to lights and other electrical components continues until you unplug the power cord from the wall outlet.
- Remove adhesive labels by hand. Do not use razor blades or other sharp instruments which can scratch the appliance surface.
- Do not remove the serial plate.

Caution
- Pull the refrigerator straight out to move it. Shifting it from side to side may damage flooring. Be careful not to move the refrigerator beyond the plumbing connections.
- Damp objects stick to cold metal surfaces. Do not touch refrigerated surfaces with wet or damp hands.
Important
If you store or move your refrigerator in freezing temperatures, be sure to completely drain the water supply system. Failure to do so could result in water leaks when the refrigerator is put back into service. Contact a service representative to perform this operation.
Care & Cleaning Tips
Part
Cleaning Agents Tips and Precautions
| Interior & Door Liners | Soap and waterBaking soda and water | Use 2 tablespoons of baking soda in 1 quart of warm water.Be sure to wring excess water out of sponge or cloth before cleaning around controls, light bulb or any electrical part. |
| Door Gaskets | Soap and water | Wipe gaskets with a clean soft cloth. |
| Drawers & Bins | Soap and water | Use a soft cloth to clean drawer runners and tracks.Do not wash any removable items (bins, drawers, etc.) in dishwasher. |
| Glass Shelves | Soap and waterGlass cleanerMild liquid sprays | Allow glass to warm to room temperature before immersing in warm water. |
| Toe Grille | Soap and waterMild liquid spraysVacuum attachment | Vacuum dust from front of toe grille.Remove toe grille (see Installation Instructions.).Vacuum backside and wipe with sudsy cloth or sponge. Rinse and dry. |
Part
Cleaning Agents
Tips and Precautions
| Exterior & Handles | ·Soap and water ·Non Abrasive Glass Cleaner | ·Do not use commercial household cleaners, ammonia, or alcohol to clean handles. ·Use a soft cloth to clean smooth handles. ·Do not use a dry cloth to clean smooth doors. |
| Exterior & Handles (Stainless Steel Models Only) | ·Soap and water ·Ammonia ·Stainless Steel Cleaners | ·Clean stainless steel front and handles with non-abrasive soapy water and a dishcloth. Rinse with clean water and a soft cloth. ·Wipe stubborn spots with an ammonia-soaked paper towel, and rinse. Use a non-abrasive stainless steel cleaner. These cleaners can be purchased at most home improvement or major department stores. Always follow manufacturer's instruction. Note: Always, clean, wipe and dry with grain to prevent scratching. ·Wash the rest of the cabinet with warm water and mild liquid detergent. Rinse well, and wipe dry with a clean soft cloth. |
Replacing Light Bulbs
Both the freezer and fresh food compartments of your refrigerator include light bulbs that will need replacing from time to time. Some lights have covers that you will need to remove before replacing the bulbs. Always use bulbs that are designed for appliance lighting.

Caution
Wear gloves when replacing light bulbs to avoid getting cut.
To replace light bulbs:
1 Unplug your refrigerator's power cord.
2 Wear gloves as protection against possible broken glass.
3 Remove light cover, if necessary.
4 Unscrew and replace old bulb with an appliance bulb of the same type and wattage (normally 40 watts).
5 Replace light cover, if necessary.
6 Plug in the refrigerator's power cord.
J 1 J 1 J 1 J 1 J 1 J 1 J 1 J 1 J 1 J 1 J 1 J 1 J 1 J 1 J 1 J 1 J 1 J 1 J 1 J 1 J 1 J 1 J 1 J 1
A
jlll l jll l jll jll jll jll jll jll jll jll jll jll jll jll jll jll jll jll jll jll jll jll jll jll jll jll jll jll jll jll jll jll jll jll jll jll jll jll jll jll jll jll jll jll jll jll jll jll jll jll jll jll jill
e 1
1
jdl
Jlulalll
#
i 1
边
a a a a a a a a a a a a a a a a a a a a a a a a a a a a
aalal 1 aaii i j o 1 g
ai = 12( ai - 1 + a_i - 1)
A. 1
aalalal alalal g aiee eae eae ae
.3
aill 1sll lalaiill all
gaiu
a 6 a 6
1/4)
aill (s)
aolall laxell Ugall (jll jll jll) aolall aill
j 2
i 1
J 3
m : x = 1 或 3x + 4y + 1 = 0
Aaalal alalal
:
J 1
g 1000000000000000000000000000000000000000
y j 1
1 1
1
a 1
J 1
a
ailll lul
.PhillipsTM
.
j%10 j
g 111111111111111111111111
J 1
a a a a a a a a a a a a a a a a a a a a
P
jlll llo joc ygSllll Jy aag aagglg S
billy
1
y
a 1
JU
gall
aill j 1 oJ 0 J aal Jaa J a J a J a J a J a J a J a J a J a J a J a J a J a J a J a J a J a J a J a J a J a J a
a 1
a jll a jll a aill lall a aai
A. = , =
1
4
J 43 J (y55) 13
10)
a a a a a a a a a a a a a a a a a a a a a a a a a a a
J 1
Jus Jus Jus Jus Jus Jus Jus Jus Jus
JdLdLdLdLdLdLdLdLdLdLdLdLdLdLdLdLdLdLdLdLdLdLdLdLdLdLdLdLdLdLdLdLdLdLdLdLdLdLdLdLdLdLdLdLdLdLdLdLdLdLd
Jellll Jnssll j
aaii jaiai ai iaii aaiiaai iaiaiai .5
1
Jg Jdall lgs jds rjglll clogalall golll jolll jssg j 1s 1s 1s 1s 1s 1s 1s 1s 1s 1s 1s 1s 1s 1s 1s 1s 1s 1s 1s 1s 1s 1s 1s 1s 1s 1s 1s 1s 1s 1s 1s 1s 1s 1s
#
a 1
J 128 8 000000000000000000000000000000000000000000
#
jgl 105ll 4g j g 105ll p 105ll 105ll
a a a a a a a a a a a a a a a a a a a a a a a a
j 1 j baii j 1 j 1 j 1 j 1 j 1 j 1 j 1 j 1 j 1 j 1 j 1 j 1 j 1 j 1 j 1 j 1 j 1 j 1 j 1 j 1 j 1 j 1 j 1 j 1 j 1 j 1 j 1 j 1 j 1 j 1 j 1 j 1 j 1 j 1
a a a a a a a a a a a a a a a a a a a a a a
边
a 24 2d 2d 2d 2d 2d 2d 2d 2d 2d 2d 2d 2d 2d 2d 2d 2d 2d 2d 2d 2d 2d 2d 2d 2d 2d 2d 2d 2d 2d 2d 2d 2d 2d 2d
aal aai jbi
| الترجمة | الترجمة | |||
| °p | °f | °p | °f | |
| °8 | °47 | °14- | °6 | |
| °3 | °37 | °18- | °s# | dʒa##y##y##y##y##y##y##y##y##y##y##y##y##y##y##y##y##y##y##y##y##y##y##y##y##y##y##y##y##y##y##y##y##y##y##y##y##y##y##y##y##y##y##y##y##y##y##y##y##y##y## y |
| °1 | °33 | °23- | °10- | |
a
Off/On jzge biizally aiaiill iaiii
a a a a a a a a a a a a a a a a a a a a a a a
.
y jll jls yjc k yjill pbi jdi ydi ydi ydi
Jgj 1
a 1
a aal l aal alal alal alal alal alal alal alal alal alal alal alal alal alal alal alal alal alal alal alal alal alal alal alal alal alal alal alal
Jill Jill
alalal
1 330 a j 320 a j 320 a j 320 a j
J 1
jibali pabil ci jiaol
aaii g aal jai jial jll aabbl abil all jy y ai pi
g aabyl jni jsi li lae lgc jjll aabbl no lae g
a jll aabbl cbl al
jill jll colli gai play aebbl Jucil
aie aiee ie eae ee eee e e e e e e e e e e e
a jilai aai bai ci kai oia gbi g iin
j 1 j 1 j 1 j 1 j 1 j 1 j 1 j 1 j 1 j 1 j 1 j 1 j 1 j 1 j 1 j 1 j 1 j 1 j 1 j 1 j 1 j 1 j 1 j 1 j 1 j 1 j 1 j 1 j 1 j 1 j 1 j 1 j 1 j 1 j
a.
设 x_0
Jiee Hghg 10000000000000000000000000000000000000000000000000000000000000000000000000000000
ablll lll lll jll gagg aagaaa aal blll
aiee aiee
Juele Cwll Jau la jyjai aiaaall 130 aji ci
J 1 1 1 1 1 1 1 1 1 1 1 1 1 1 1 1 1 1 1
151511 2111
jolil oally yg jll 1
oelll 1
biwai liyui
.2
1.5
J 3
(1) (2)
边
J 3
eall jie aaiy

4 j 2j 2j 2j 2j 2j 2j 2j 2j 2j 2j 2j 2j 2j 2j 2j 2j 2j 2j 2j 2j 2j 2j
4-3 15
111 111
J 20000000000000000000000000000000000000000000000000000000000000
J 1
P
Jaeill gKay gaiall Jauill gge 1g kll aaiu bua p
Jauay jll aaiu Jauy jia dll aag
Jauy jia ggl (alal/Jai) Off/On ciao baay po all
Laoie elag s yd jg lil aeil u plaa n (0)
e.o.o.o.o.o.o.o.o.o
4uji 111 jie jie al
Ld Jall oolal y jll albi jy jn 51 y l l l l l l l l l l l l l l l l l l l l l l l l l l l l l l l l l l l l l l l l l l l l l l l l l l l l l l l l l l l l l l l l l l l l l l l l
yj 1
g jie jie jie jie jie jie jie jie
aill (lai/1j) Off/On 1i 1i 1i 1i 1i 1i 1i 1i 1i 1i 1i 1i
A
yill jie 4
dle gaiy jil 1n a yjg jia jia jia jia jia jia jia jia .5
alall juaa aai jiai i
a (j)On/Off 106
Cull 1
:iiilll llll 1i i jia iie jie jie jie
Iailllll lalaae aee
a
Cill lss s wii 1sS Cill g i j 1sS
i 1
y 1 1 1 1 1 1 1 1 1 1 1 1 1 1 1 1 1 1 1 1 1 1 1 1 1 1 1 1 1 1 1 1

i j k l n o p q r s t
Jgill So 1
#
a
p 111111111111111111111111111111111111111
j jll jll jll jll jll jll jll jll jll jll jll jll jll jll jll jll jll jll jll jll jll jll jll jll jll jll jll jll jll jll
jai jaiui


aai jaii jaii jaii gai) iill abla aiau uui y ill ale iaie
aLgAeAeall Cwllnss
:
()On/Off c1a 1
.2
边
J 1
jol jal jall lgl jll g jg jg jg jg jg jg jg jg jg jg jg jg jg jg jg jg jg jg jg jg jg jg jg jg jg jg jg jg
sall
a a a a a a a a a a a a a a a a a a a a a a a a a a a a a a a a a a a a a a a a a a a a a a a a a a a a a a a a a a a a a a a a a a a aaa
glial glial glial glial glial glial glial
NSF®
i j 1 1 1 1 1 1 1 1 1 1 1 1
NSF
I International
a a a a a a a a a a a a a a a a a
aJ all j no slll alle c yll llll gall aal glgall
glal jia jia jia jia jia jia
()()Ong 1
79
.2
3
aaii i 1
i
5
j j j j j j j j j j j j j j j j j j j j j j j j j j j j j j j j j j j j j j j j j j j j j j j j j j j j j j j j j j
aagaaeg aeggagaae
sall
a j 1j 1j b a b b b b b b b b b b b b b b b b b b
jao 12bui jai jai jai jai jai jai jai jai jai jai jai jai jai jai jai jai jai jai jai jai jai jai jai jai jai jai jai jai jai jai jai jai jai jai jai jai jai jai jai jai jai jai jai jai jai jai jai jai jai jai jali jai jali jali jali jali jali jali jali jali jali jali jali jali
J 1
()
jgl jgl jgl jgl jgl jgl jgl jgl jgl jgl jgl jgl
Jyj Jy j 10000000000000000000000000000000000000000000
.2
1
j j j j j j j j j j j j j j j j j j j j j j j j j j j j j j j j j j j j j j j j j j j j j j j j j j j j j j j j j j j j j j j
eell JyJyW. Aytll g aay jz yd c yg yll plall
cagell gaoa aie gale gaaal jjall baiol .1
Jauy Jauu Jauu Jauu
Aio wll 1
Cwll 1
aaii jai gai gai
a a a a a a a a a a a a a a a a a
.2
000000000000000000000000000000000000000000000000000000000000000
ailll aiee iiai jaiy
iie 1
j 1
J 1
.
j 1g a
a
C
eill jn wse bwlalll lall jz d 1111111
a
P
ailll llllgl 1000
y
aui jai
Cill lalc g balaatg 8g Cill ckaa Gaa Clll cllaie
1 0
j 1 j 1 j 1 j 1 j 1 j 1 j 1 j 1 j 1 j 1 j 1 j 1 j 1 j 1 j 1 j 1 j 1 j 1 j 1 j 1 j 1 j 1 j 1 j 1 j 1 j 1 j 1 j 1 j 1 j 1
AD = 2
a.
aill 124e e 10g 1
jgsyaggl .j
a a a a a a a a a a a a a a
dle. aiill jjll 1e jjia jjll aai bial jaiai jaiai jai
: ailll llll lalul y
On goll l jll 1a bui yil aill uaiu .6
auiu juii juc iogaleal juyol 79 aia (j) (jii)
()
7
J 1 J
100 100 100 100 100 100 100 100 100 100
.
e 1
Filter 1
() Status
设 = 1p
a a a a a a a a a a a a a a a a a a a a
a
j
y j 1
cBwJi jui iui kui Jai dill j 1
- Please Read And Save This Guide
- Make A Record For Quick Reference
- Note
- Safety
- Important Safety Instructions
- Warning
- General Safety
- Child Safety
- Electrical Information
- Important
- Installation
- Location
- Caution
- Installation Clearances
- Door Opening
- Removing And Replacing The Toe Grille:
- Leveling
- Removing The Doors
- Required Tools
- To prepare for removing the doors:
- To remove the top hinge cover(s):
- Large Hinge Cover
- Small Hinge Covers
- To remove the refrigerator door:
- To remove the freezer door:
- Connecting The Water Supply
- About Your Refrigerator's Water Supply
- To Avoid Property Damage:
- What you will need:
- To connect your water supply to the rear of your refrigerator:
- Controls & Settings
- Allowing Cooling Time Before Use
- Setting Cooling Temperatures
- Choosing Centigrade or Fahrenheit (Select Models)
- Making Temperature Adjustments
- What To Do If The Temperature Displays Flash
- System Monitoring Alarms (Select Models)
- Using The Alarm Reset Button
- Checking the Air Filter Status (Select Models)
- To check the air filter status:
- Turning The Cooling System On And Off
- Storage Features
- Cantilever Shelves
- Shelf Features
- Drawers
- Crispers
- Crisper Humidity Control
- Meat Keeper
- Doors
- To change the position of an adjustable door bin:
- Accessories
- Tall Bottle Retainer
- Special Items Rack
- Can Rack
- Ice Cream Shelf
- Dairy Compartment
- Automatic Ice & Water Dispenser
- Using The Dispenser
- Dispensing Ice
- Dispensing Water
- Drip Tray
- Priming The Water Supply System
- To prime the water supply system:
- Ice Dispenser Operation & Care
- Using The Ice Dispenser After Installation
- Turning The Ice Dispenser On And Off
- Ice Dispenser Tips
- Cleaning The Ice Dispenser
- To clean the ice dispenser:
- Remove and empty the ice storage bin if:
- Changing The Filters
- Locating The Filters
- Water Filter
- Air Filter (Select Models)
- Replacing The Air Filter
- Replacing The Water Filter
- More About Your Advanced Water Filter
- NS
- To replace the water filter:
- Understanding The Sounds You May Hear
- Care & Cleaning
- Protecting Your Investment
- Care & Cleaning Tips
- Replacing Light Bulbs
- To replace light bulbs:
- #
- 边
- aalal 1 aaii i j o 1 g
- gaiu
- 1
- a
- P
- y
- 4
- a 1
- 111
- sall
- NSF®
- 7
- 设 = 1p
- j
Brand : FRIGIDAIRE
Model : GPSZ28V9CS7
Category : Refrigerator