
COLOREDGE CG222W - Professional Monitor EIZO - Free user manual and instructions
Find the device manual for free COLOREDGE CG222W EIZO in PDF.
Download the instructions for your Professional Monitor in PDF format for free! Find your manual COLOREDGE CG222W - EIZO and take your electronic device back in hand. On this page are published all the documents necessary for the use of your device. COLOREDGE CG222W by EIZO.
USER MANUAL COLOREDGE CG222W EIZO
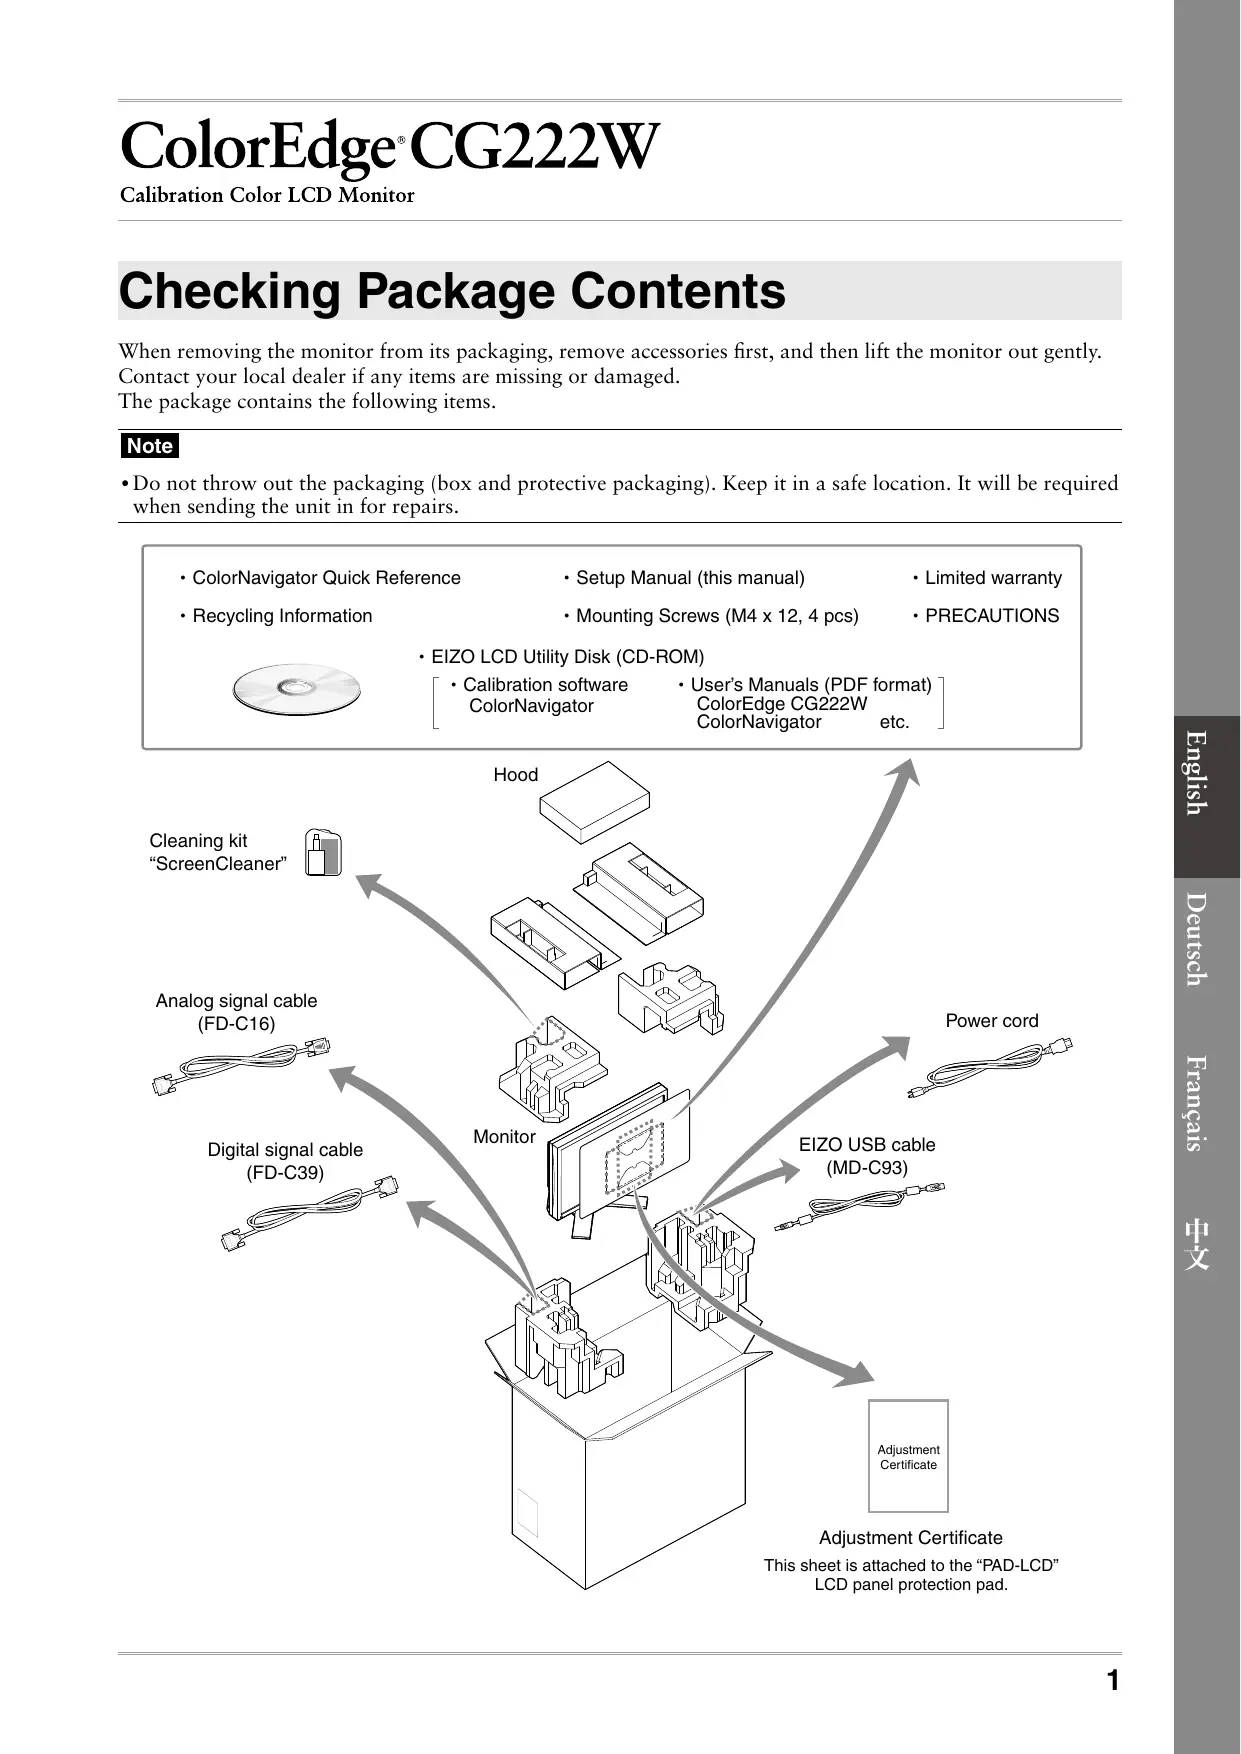
ColorEdge CG222W Calibration Color LCD Monitor Checking Package Contents When removing the monitor from its packaging, remove accessories first, and then lift the monitor out gently. Contact your local dealer if any items are missing or damaged. The package contains the following items. + Do not throw out the packaging (box and protective packaging). Keep it in a safe location. It will be required when sending the unit in for repairs. + ColorNavigator Quick Reference + Setup Manual (this manual) + Limited warranty - Recycling Information + Mounting Screws (M4 x 12, 4 pcs) + PRECAUTIONS L + EIZO LCD Utility Disk (CD-ROM) FD + Calibration software + Users Manuals (PDF format) ColorNavigator ColorEdge CG222W ColorNavigator etc. ysISu 4 Cleaning kit “ScreenCleaner”
Adjustment Certificate Adjustment Certificate This sheet is attached to the “PAD-LCD” LCD panel protection pad.
Controls and Functions Display and adjustment buttons are located on the front of the monitor, and connectors are located on the rear. The name and functions of the buttons and connectors are described below. Adjustment menu (ScreenManager ©)
= EEE © ® ® ® ® O[© O © ®)E » Re nn On | T7! TITITI lÎ 1 | Sensor Detects ambient brightness. BrightRegulator function. For details, refer to the User's Manual on the CD-ROM. 2 | Adjustment Lock button This function locks the buttons to retain the status adjusted or set once. 3 | Input Signal Selection button | Switches input signals for display when two PCs are connected to the monitor. 4 | Mode button Allows you to switch the display mode. 5 | Auto button Performs the function to adjust the screen automatically. (analog input only) 6 | Enter button Displays the Adjustment menu, determines an item on the menu screen, and saves values adjusted. 7 | Control buttons Chooses an adjustment item or increases/decreases adjusted values for (Left, Down, Up, Right) advanced adjustments using the Adjustment menu. 8 | Power button Turns the power on or off. 9 | Power indicator Indicates monitor's operation status. Blue: Operating Orange: Power saving Off: Power off Flashing blue (2 times for each): When the timer is set for ColorNavigator, notifies that a recalibration is required (for CAL mode or EMU mode). 10 | Security lock slot Complies with Kensington's MicroSaver security system. 11 | Power connector Connects the power connector. 12 | Input signal connectors DVI-I Connector x 2 13 | USB port (Up) Connects the USB cable in order to use the provided software. For how to use it, refer to the Users Manual on the CD-ROM. 14 | USB port (Down) Connects a peripheral USB device. 15 | Stand Used to adjust the height and angle of the monitor screen. 16 | Cable holder Covers the monitor cables. A | Caution Statements The equipment must be connected to a grounded main outlet. B | Caution Statements CAUTION Risk of electric shock. Do not open. ScreenManager ® is an EIZO'S nickname of the Adjustment menu. (For how to use ScreenManager, refer to the Users Manual on the CD-ROM.)
Connecting Cables Connect the monitor to the PC. Turn the monitor, the PC, and all peripheral devices off before connecting the cables. For details, refer to the Users Manual contained in the supplied CD-ROM.
Power cord E—————— Connect to power outlet USB cable Digital/Analog signal cable Connect the monitor to the PC with a signal cable that matches the connectors. After connecting the cable connectors, tighten the screws of the connectors to secure the coupling. Connectors on the monitor cable Connectors on the PC [Analog signal cable] DVI FD-C16 Analog connection [Digital signal cable] Dvi-1 FD-C39 Digital connection Connect the monitor to the PC with the USB cable. Connect to the monitor Connect to the PC <The USB cable is required for calibration. Be sure to connect the monitor and PC with the USB cable. Plug the power cord into a power outlet and the power connector on the monitor. Press (G) to turn on the monitor. The monitor’s Power indicator lights up blue. Turn on the PC. The screen image appears. If an image does not appear, refer to "No-Picture Problem" for additional advice. + When the PC and the monitor are turned off, monitor power is turned off completely, even though the power cord is still connected to the monitor. ysISu 4
Setting Resolution When you connect the monitor to the PC and find that the resolution is improper, or when you want to change the resolution, follow the procedure below. Recommended resolution: 1680 dots x 1050 lines (60 Hz) MacOS X KR & ND R Select "System Preferences" from the Apple menu. When the "System Preferences" dialog is displayed, click "Displays" for "Hardware". On the displayed dialog, select the "Display" tab and select desired resolution in the "Resolutions" field. Your selection will be reflected immediately. When you are satisfied with the selected resolution, close the window. Windows XP
Right-click the mouse anywhere on the desktop except for icons. From the displayed menu, click "Properties". When the "Display Properties" dialog is displayed, click the "Settings" tab and select desired resolution for "Screen resolution" under "Display". Click the "OK" button to close the dialog. Windows Vista ONCE ANNE Right-click the mouse anywhere on the desktop except for icons. From the displayed menu, click "Personalize". On the "Personalization" window, click "Display Settings". On the "Display Settings" dialog, select the "Monitor" tab and select desired resolution in the "Resolution" field. Click the "OK" button. When a confirmation dialog is displayed, click "Yes". Adjusting the Monitor Height and Angle The angle and height of the monitor can be adjusted. Adjust the screen height and angle, tilt and swivel the screen to the best condition for working.
How to Install the Hood ÂA CAUTION Do not carry the monitor with the hood Q Do not place any objects on the hood. attached. If the hood falls or slips off or the monitor falls over, it While carrying the monitor, the hood may fall or slip may result in injury or equipment damage. off, which may result in injury or equipment damage. Close the open/close cover until it contacts the Do not rotate the monitor into the portrait stopper. position. If the cover is not closed properly, the ventilation slots Doing so may cause the hood to slip off, which may on the monitor will be covered and proper airflow result in injury or equipment damage. will be prevented. This may cause overheating inside the monitor and may result in fire, electric shock, or equipment damage. Package Contents Check that all the following items are included in the packaging box. Open/close cover LEZ —— Metal fitting Top cover QE LT 5 Hook Right Cover Assemble the left and right hoods Assemble the hoods in the direction of the arrows marked on the insertions on the top covers of the right and left hoods. Top cover 71% Left cover _f 1 Hold the left hood's left and top covers with the sides with the anti-reflective sheet facing inward. 2 Connect the top and left covers by aligning the arrow (1 ®&) on the top ps l cover’ insertion with the two lines on T7 LU the left covers insertion slot. 3 Slidethe top cover in the direction shown by the arrow (2 &). 1 Assembly of the left hood is complete. 4 Assemble the right hood in the same way. ysISu 4
Attach the left and right hoods to the monitor Be sure to install the second hood only after the other hood is firmly attached with hook. 1 Attachthe top side of the left hood to the monitor first and then securely fit the left side of the hood in order to fix the hood to the monitor. 2 Insert the hook into the upper hole on the hood (1) and slide it down along the projection on the back side of the monitor (2). Z Attach the right hood in the same way. 4 Check the locations of the depressions in the fitting and insert the fitting into the left and right hoods by aligning those depressions with the projections
(À) in the grooves on the right and left D = hoods. 77 S Attachthe open/close cover to the left hood. + Do not attach the open/close cover to the right hood. Doing so prevents the cover from closing. 6 Place the open/close cover on the top of the left hood (without contacting the metal fitting) from front (1) to back (2). 7 Slide the open/close cover to the right (3) until it contacts the stopper on the metal fitting. 8 When performing calibration, slide the open/close cover to the left in order to attach the sensor. + The open/close cover does not slide onto the right cover.
Prepare for the Monitor Calibration For details regarding the calibration procedure, refer to the ColorNavigator Users Manual on the CD-ROM. Installing ColorNavigator 1 Uninstall any measurement driver software that may be installed on the PC. 2 Insert the EIZO LCD Utility Disk into the PC's CD/DVD drive. 3 MacOS X Click the CD-ROM icon on the desktop, and then click [Start Menu] in the displayed window. Windows XP A menu will open automatically. If the menu does not open automatically, double-click the "Launcher.exe" icon in the CD-ROM. Windows Vista When using Windows Vista, a "User Account Control" dialog may appear by clicking the "Launcher.exe" icon. In this case, click [Continue] to open the menu. ysISu 4 #4 Click "Install ColorN, avigator" in the EIZO LCD Utility's initial screen. Follow the instructions to complete the installation. + Measurement driver software is automatically installed during ColorNavigator installation. It is
not necessary to install the driver software that is supplied with your measurement device. Connecting the measurement device Connect an optional measurement device which you purchased separately. + Refer to the User’s Manual for the measurement device in regard to connection. SEUL]
How to calibrate the monitor Startup ColorNavigator and calibrate the monitor. Follow the instructions displayed on the screen and in the ColorNavigator Quick Reference. For details, refer to the "ColorEdge ColorNavigator Users Manual" on the EIZO LCD Utility Disk. + When calibrating the monitor, the monitor and the PC must have had the power on for at least 30 minutes. Be sure to calibrate the monitor after the power has been turned on for 30 minutes or more. + For detailed information about calibration, visit http://www.eizo.com. You can use the mode button on the front panel to switch the monitor to one of the four image adjustment modes (SRGB mode, Custom mode, CAL mode, and EMU mode) suitable for the displayed image. No-Picture Problem If no picture is displayed on the monitor even after the following remedial action is taken, contact your local dealer.
1. Check the Power indicator.
Symptom Status Possible cause and remedy No picture Power indicator does not light up. + Check whether the power cord is correctly connected. - lfthe problem persists, turn off the monitor, and then turn it on again a few minutes later. + Press ©). Power indicator lights blue. + Set high values for Gain RGB levels. Power indicator lights orange. + Switch the input signal with (S). - Press a key on the keyboard or click the mouse. + Turn on the PC.
2. Check the error message that remains on the screen.
These messages appear when the input signal is incorrect even if the monitor is functioning. Symptom Status Possible cause and remedy Signal Check Signal 2 fH: O.0kHz fU: O0.0Hz The input signal is not received. + Check whether the PC is turned on. + Check whether the signal cable is properly connected to the PC. + Switch the input signal with (S). Signal Error Signal 2 fD: fH: fu: 165.0MHz 75.0kHz 60.0Hz The signal frequency is outside the specification. Incorrect signal frequency is shown in red. + Restart the PC. + Change the mode to an appropriate mode using the graphics board's utility software. Refer to the manual of the graphics board for details.
ColorEdge CG222W ERÉRRRERS REERAE FF ART, ES TFINTE, AN PPS RRE r at DAUR UE far in BR ER AU VE HU AU LEA
RAT MERE RIT, RE REA FE
ADR RATER, 1 SRE DA AE TA
Moosacherstrasse 6, Au CH - 8820 Wädenswil, Switzerland Phone: +41-0-44 782 24 40 Fax: +41-0-44 782 24 50 http://www.eizo.com EIZO Eco Products a PRINTED WITH d SOYINK|, This document is printed on recycled chlorine free paper. 1st Edition-February, 2008 Printed in Japan. OONOLAO8A (U.M-SUCG222W-4)