CFX-30 - CD Player GEMINI - Free user manual and instructions
Find the device manual for free CFX-30 GEMINI in PDF.
| Product Type | Professional CD Player with Effects |
| Brand | GEMINI |
| Model | CFX-30 |
| Disc Compatibility | CD, CD-R, CD-RW (8 cm and 12 cm) |
| Loading | Slot-in with indicator LED |
| Display | Blue backlit LCD with dimmer |
| DSP Effects | 8 effects: filter, zoom, echo, pan, reverse, transform, brake, scratch |
| Cue Points | 5 instant Cue points |
| Samples | 4 recordable samples |
| Perfect Loop | Yes, with adjustment and editing (B-Edit) |
| Speed Adjustment | ±4%, ±8%, ±16%, +100% |
| Pitch Bend | ±4% buttons and jog wheel |
| Digital Output | RCA |
| Shockproof Memory | 10 seconds |
| Power Supply | AC 115/230 V, 60/50 Hz |
| Dimensions (W x H x D) | 216 x 95 x 320 mm |
| Warranty | 3 years (optical unit: 1 year) |
| Maintenance and Cleaning | Use a dry cloth, do not use solvents |
| Safety | Do not disassemble, no user-serviceable parts |
| After-Sales Service | Contact the dealer or technical support at 01 69 79 97 79 |
Frequently Asked Questions - CFX-30 GEMINI
User questions about CFX-30 GEMINI
0 question about this device. Answer the ones you know or ask your own.
Ask a new question about this device
Download the instructions for your CD Player in PDF format for free! Find your manual CFX-30 - GEMINI and take your electronic device back in hand. On this page are published all the documents necessary for the use of your device. CFX-30 by GEMINI.
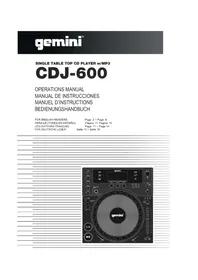
USER MANUAL CFX-30 GEMINI
Professional FX CD Player
PROFESSIONELLER CD-PLAYER SLOT-IN MIT DSP-EFFEKTEN
REPRODUCTOR PROFESIONAL DE CD CFX-30
PROFESSIONNEL LECTEUR CD CFX-30 AVEC EFFETS
OPERATIONS MANUAL
BEDIENUNGSHANDBUCH
MANUAL DEL OPERADOR
MANUEL D'INSTRUCTIONS
text_image
gemini +IO PUSH MEMO 1 2 3 4 5 6 7 8 9 10 11 12 13 14 15 16 17 18 19 20 21 22 23 24 25 26 27 28 29 30 31 32 33 34 35 36 37 38 39 40 41 42 43 44 45 46 47 48 49 50 51 52 53 54 55 56 57 58 59 60 61 62 63 64 65 66 67 68 69 70 71 72 73 74 75 76 77 78 79 80 81 82 83 84 85 86 87 88 89 90 91 92 93 94 95 96 97 98 99 100 SAMPLER 1 2 3 4 FILTER ZOOM ECHO PAN PITCH SELECT 1-4% REVERSE TRANS BRAKE SCRATCH 9% LOOP OUT BREAD SMOKE B-EDIT - + HOT START PITCH BEND - EJECT STOP 30% CUE PLAY/PAUSE REV FWD DISC IN SLOT +PLEASE READ BEFORE USING APPLIANCE, IMPORTANT WARNING & SAFETY INSTRUCTIONS!


CAUTION
RISK OF ELECTRICAL SHOCK DO NOT OPEN!


CAUTION: This product satisfies FCC regulations when shielded cables and connectors are used to connect the unit to other equipment. To prevent electromagnetic interference with electric appliances such as radios and televisions, use shielded cables and connectors for connections.
The exclamation point within an equilateral triangle is intended to alert the user to the presence of important operating and maintenance (servicing) instructions in the literature accompanying the appliance.
The lightening flash with arrowhead symbol, within an equilateral triangle, is intended to alert the user to the presence of uninsulated “dangerous voltage” within the product’s enclosure that may be of sufficient magnitude to constitute a risk of electric shock to persons.
READ INSTRUCTIONS: All the safety and operating instructions should be read before the product is operated.
RETAIN INSTRUCTIONS: The safety and operating instructions should be retained for future reference.
HEED WARNINGS: All warnings on the product and in the operating instructions should be adhered to.
FOLLOW INSTRUCTIONS: All operating and use instructions should be followed.
CLEANING: The product should be cleaned only with a polishing cloth or a soft dry cloth. Never clean with furniture wax, benzine, insecticides or other volatile liquids since they may corrode the cabinet.
ATTACHMENTS: Do not use attachments not recommended by the product manufacturer as they may cause hazards.
WATER AND MOISTURE: Do not use this product near water, for example, near a bathtub, wash bowl, kitchen sink, or laundry tub; in a wet basement; or near a swimming pool; and the like.
ACCESSORIES: Do not place this product on an unstable cart, stand, tripod, bracket, or table. The product may fall, causing serious injury to a child or adult, and serious damage to the product. Use only with a cart, stand, tripod, bracket, or table recommended by the manufacturer, or sold with the product. Any mounting of the product should follow the manufacturer's instructions, and should use a mounting accessory recommended by the manufacturer.
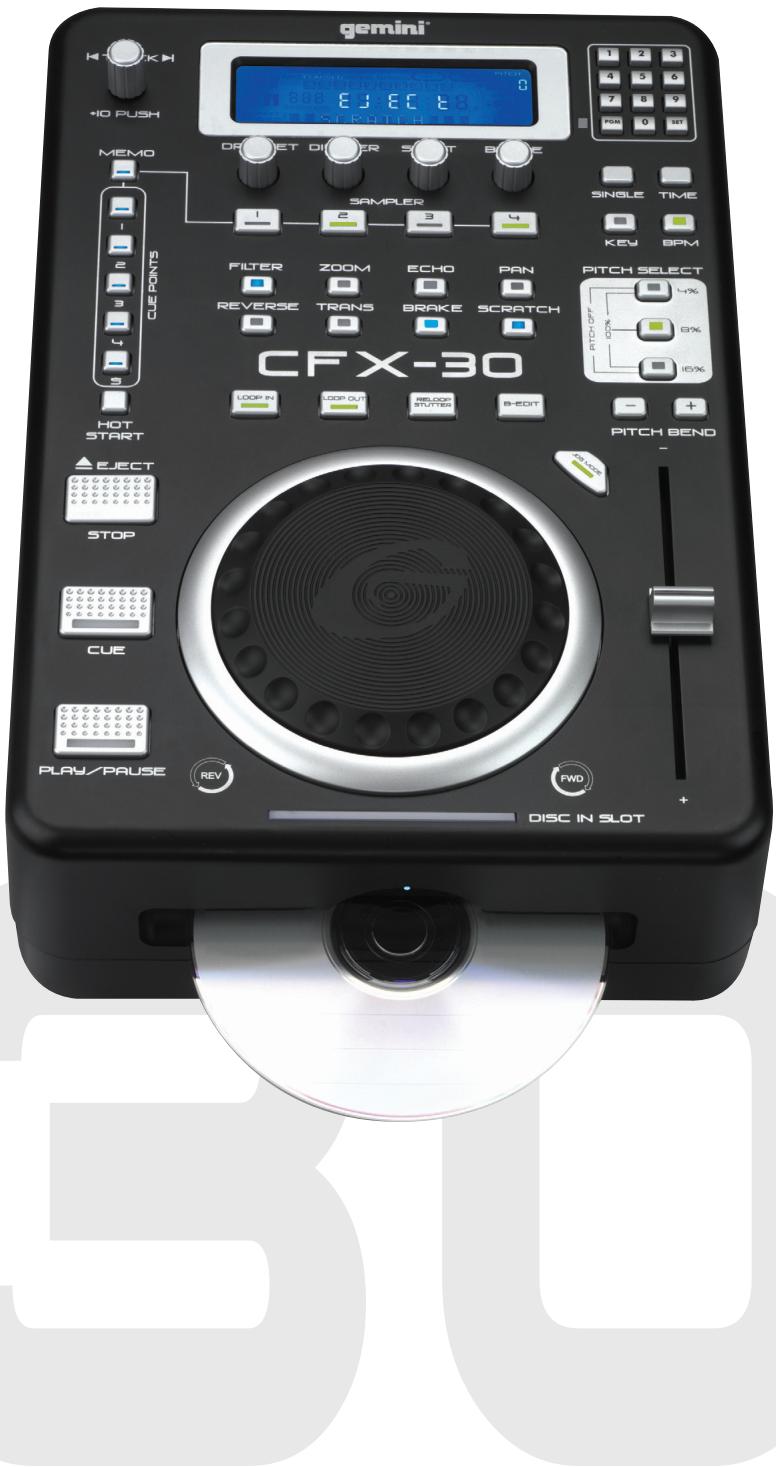
CART: A product and cart combination should be moved with care. Quick stops, excessive force, and uneven surfaces may cause the product and cart combination to overturn. See Figure A.
VENTILATION: Slots and openings in the cabinet are provided for ventilation and to ensure reliable operation of the product and to protect it from overheating, and these openings must not be blocked or covered. The openings should never be blocked by placing the product on a bed, sofa, rug, or other similar surface. This product should not be placed in a built-in installation such as a bookcase or rack unless proper ventilation is provided or the manufacturer's instructions have been adhered to.
POWER SOURCES: This product should be operated only from the type of power source indicated on the marking label. If you are not sure of the type of power supply to your home, consult your product dealer or local power company.
LOCATION: The appliance should be installed in a stable location.
NON-USE PERIODS: The power cord of the appliance should be unplugged from the outlet when left unused for a long period of time.
GROUNDING OR POLARIZATION:
- If this product is equipped with a polarized alternating current line plug (a plug having one blade wider than the other), it will fit into the outlet only one way. This is a safety feature. If you are unable to insert the plug fully into the outlet, try reversing the plug. If the plug should still fail to fit, contact your electrician to replace your obsolete outlet. Do not defeat the safety purpose of the polarized plug.
- If this product is equipped with a three-wire grounding type plug, a plug having a third (grounding) pin, it will only fit into a grounding type power outlet. This is a safety feature. If you are unable to insert the plug into the outlet, contact your electrician to replace your obsolete outlet. Do not defeat the safety purpose of the grounding type plug.
POWER-CORD PROTECTION: Power-supply cords should be routed so that they are not likely to be walked on or pinched by items placed upon or against them, paying particular attention to cords at plugs, convenience receptacles, and the point where they exit from the product.
OUTDOOR ANTENNA GROUNDING: If an outside antenna or cable system is connected to the product, be sure the antenna or cable system is grounded so as to provide some protection against voltage surges and built-up static charges. Article 810 of the National Electrical Code, ANSI/NFPA 70, provides information with
regard to proper grounding of the mast and supporting structure, grounding of the lead-in wire to an antenna discharge unit, size of grounding conductors, location of antenna-discharge unit, connection to grounding electrodes, and requirements for the grounding electrode. See Figure B.
LIGHTENING: For added protection for this product during a lightening storm, or when it is left unattended and unused for long periods of time, unplug it from the wall outlet and disconnect the antenna or cable system. This will prevent damage to the product due to lightening and power-line surges.
POWER LINES: An outside antenna system should not be located in the vicinity of overhead power lines or other electric light or power circuits, or where it can fall into such power lines or circuits. When installing an outside antenna system, extreme care should be taken to keep from touching such power lines or circuits as contact with them might be fatal.
OVERLOADING: Do not overload wall outlets, extension cords, or integral convenience receptacles as this can result in a risk of fire or electric shock.
OBJECT AND LIQUID ENTRY: Never push objects of any kind into this product through openings as they may touch dangerous voltage points or short-out parts that could result in a fire or electric shock. Never spill liquid of any kind on the product.
SERVICING: Do not attempt to service this product yourself as opening or removing covers may expose you to dangerous voltage or other hazards. Refer all servicing to qualified service personnel.
DAMAGE REQUIRING SERVICE: Unplug this product from the wall outlet and refer servicing to qualified service personnel under the following conditions:
- When the power-supply cord or plug is damaged.
- If liquid has been spilled, or objects have fallen into the product.
- If the product has been exposed to rain or water.
- If the product does not operate normally by following the operating instructions. Adjust only those controls that are covered by the operating instructions as an improper adjustment of other controls may result in damage and will often require extensive work by a qualified technician to restore the product to its normal operation.
- If the product has been dropped or damaged in any way.
- When the product exhibits a distinct change in performance, this indicates a need for service.
REPLACEMENT PARTS: When replacement parts are required, be sure the service technician has used replacement parts specified by the manufacturer or have the same characteristics as the original part. Unauthorized substitutions may result in fire, electric shock, or other hazards.
SAFETY CHECK: Upon completion of any service or repairs to this product, ask the service technician to perform safety checks to determine that the product is in proper operating condition.
WALL OR CEILING MOUNTING: The product should not be mounted to a wall or ceiling.
HEAT: The product should be situated away from heat sources such as radiators, heat registers, stoves, or other products (including amplifiers) that produce heat.
text_image
Fig. A Fig. B ANTENNA LEAD IN WIRE GROUND CLAMP ANTENNA DISCHARGE UNIT (NEC SECTION 810-20) GROUNDED CONDUCTORS (NEC SECTION 810-21) ELECTRIC SERVICE EQUIPMENT GROUND CLAMPS POWER SERVICE GROUNDING ELECTRODE SYSTEM (NEC ART 250, PART H)NEC — NATIONAL ELECTRICAL CODE
CFX-30
REAR
text_image
LINE OUT DIGITAL OUT MAY.2000 S/N.GC910001 POWER OFF ON 110V 60Hz 220V 50Hz 3 4 2FRONT
text_image
9 10CONTROL
text_image
gemini® 12 13 +IO PUSH 14 15 MEMO 28 29 30 31 32 33 34 35 36 37 38 39 40 CUE POINTS 16 17 6 STOP 7 CUE 8 PLAY/PAUSE REV DISC IN SLOT PITCH OFF 100% BPM 4% 8% 16% 20 21 22 23 FWD PGM 0 8ET SAMPLER 1 2 3 4 REVERSE TRANS BRAKE SCRATCH LOOP OUT RELOOP TUTTER BREDIT HOT START HOT PLET TICK BANDCONTROL
INTRODUCTION
Congratulations on purchasing the Gemini CFX-30 Professional FX CD Player. This state of the art professional CD player is backed by a three year warranty, excluding lasers. Lasers are backed by a one year warranty on CD lasers. Prior to use, we suggest that you carefully read all the instructions.
FEATURES
- Audio CD, CD-R, CD-RW compatible
- 8 DSP effects: Filter, Zoom, Echo, Pan, Reverse, Trans, Brake & Scratch
- Precise Dry/Wet FX parameter, dimmer, start & brake rotary controls
- 5 Fly cues & 4 sampler memory buttons
- Front loading slot-in tray with large "Disc in slot" LED
- Large blue LCD display w/ dimmer
- Single/auto-cue, continuous & 3-way time selection
- Easy to operate memo button for cueing & sampling
- Soft-touch rubber dial with finger grooves
- Vinyl/CD jog mode function
- Frame-accurate search & cue
- Master cue has hot-start feature
- Quick-track selection knob
- Seamless loop featuring reloop/stutter & loop editing
- 4%, 8%, 16% & 100% variable pitch with OFF mode
- Pitch bend for jog wheel or buttons
- Programmable direct-access rubber keypad
- Key lock & BPM controls
- Buffer ram anti-shock memory (10 seconds)
- Coaxial RCA digital output
- Soft touch buttons with bright LEDs
SAFETY CERTIFICATIONS:
Laser Diode Properties
Material: Ga - Al - As
Wavelength: 755 - 815 nm (25°C)
Laser Output: Continuous Wave, max. 0.5mW
CAUTIONS:
-
Do not use this CD Player at temperatures below 41^ F/ 5^ C or higher than 95^ F/ 35^ C.
-
The apparatus should not be exposed to dripping or splashing and no objects filled with liquids such as vases should be placed on the apparatus. Place the unit in a clean and dry location.
-
Do not place the unit in an unstable location.
-
When disconnecting the power cord from an AC outlet, always grasp it by the plug. Never pull the power cord.
-
To prevent electric shock, do not remove the cover or the bottom screws. THERE ARE NO USER SERVICEABLE PARTS INSIDE. Please refer servicing to a qualified technician.
IN THE USA \~ IF YOU EXPERIENCE PROBLEMS WITH THIS UNIT CALL GEMINI CUSTOMER SERVICE AT: 1 (732) 738-9003. DO NOT ATTEMPT TO RETURN THIS EQUIPMENT TO YOUR DEALER.
-
Do not use chemical solvents to clean the unit.
-
Keep this manual in a safe place for future reference.
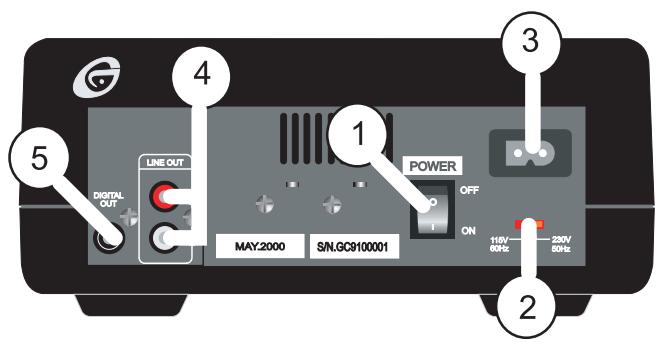
LINE VOLTAGE SELECTION:
Model CFX-30 is a dual voltage unit. It will operate at 115 or 230 volts. To set the proper voltage, follow these steps:
-
Place the head of a screwdriver in the groove of the VOLTAGE SELECTOR SWITCH (2) found on the rear panel.
-
Flip the switch to 115 or 230 volts.
-
Do not force or twist the switch. Excessive force may cause damage. If the switch does not move smoothly, contact a qualified technician.
CONNECTIONS:
-
Before making any connections, please make sure the POWER SWITCH (1) is in the off position. All connections are located on the REAR panel of the CD player. Please refer to the diagram of this model on page 4.
-
Included with your CFX-30 is a power cord. Plug one end of the power cord in to the AC IN (3). Plug the other end in to the nearest available power output.
-
Plug one end of a set of RCA connectors into each of the LINE OUTPUT JACKS (4).
-
Plug the other end of the RCA connectors into any available line level input jacks on your mixer. If you are playing the CFX-30 through a receiver, you can plug the RCA connectors into the CD or AUX input jacks on your receiver. If there are no CD or AUX inputs, use any line level (except phono) inputs.
-
The DIGITAL OUTPUT- RCA (5) jack is for connecting this unit to any type of DAT, MD, HARD DISK RECORDER, or any other type of device that accepts digital signals.
FUNCTIONS:
-
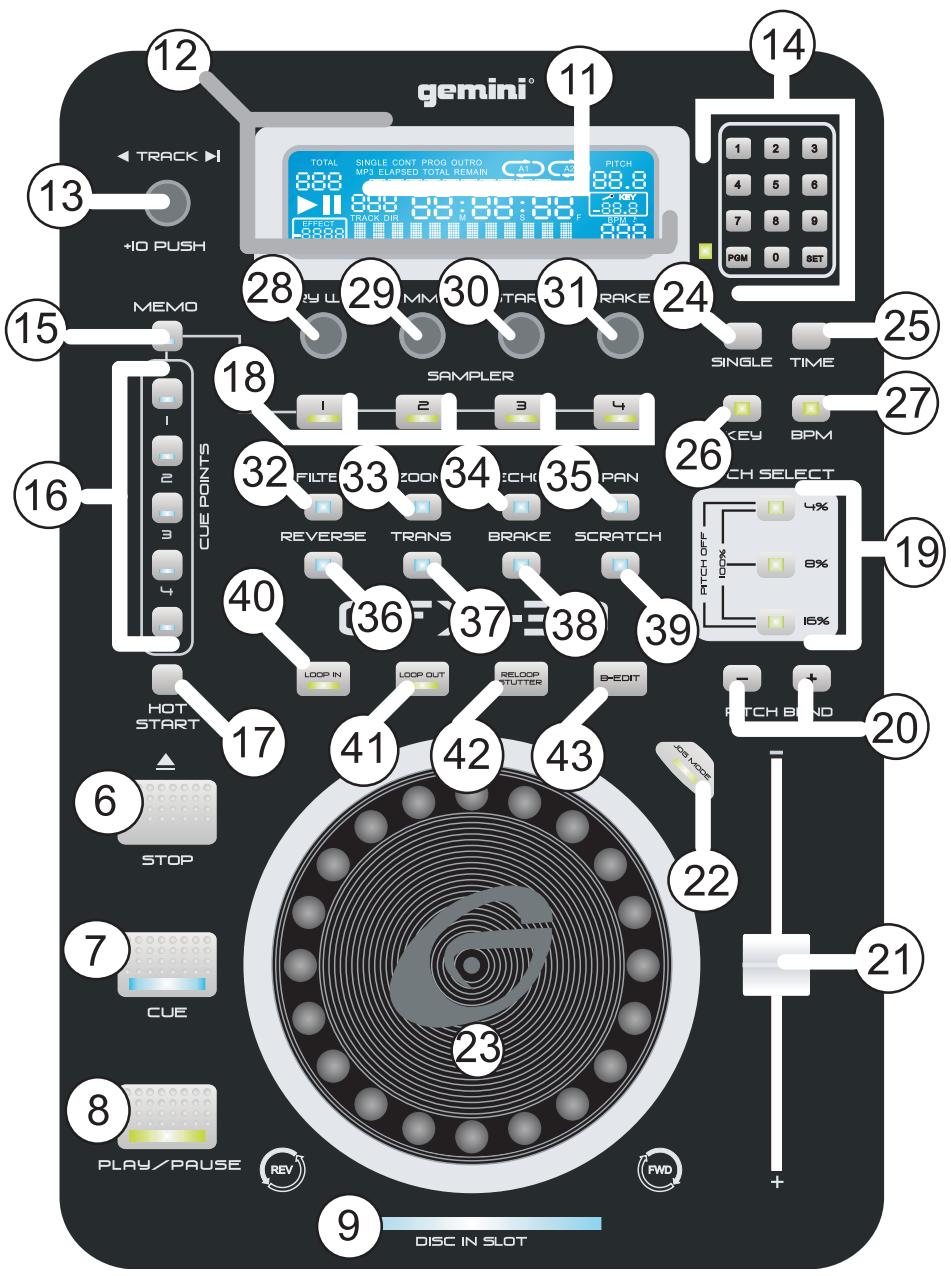
POWER SWITCH: After making sure that the VOLTAGE SELECTOR SWITCH (2), found on the rear panel, is properly set, plug the unit in and press the POWER SWITCH (1) to ON. The unit will turn on and the blue LCD (12) screen will illuminate. Turn off the unit by pressing the POWER SWITCH (1) to OFF to when not in use.
-
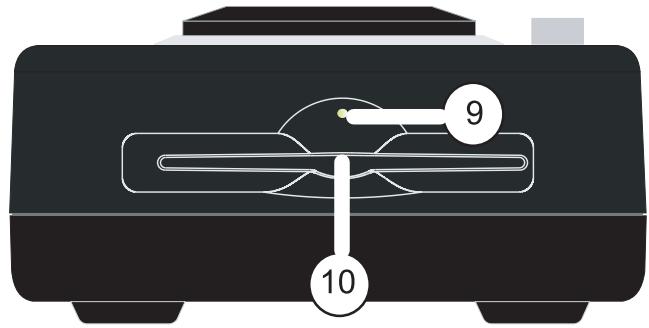
DISC IN SLOT: The DISC IN SLOT (10) is where the CD is held. When a disc is in the slot, the blue LED (9) bar will be illuminated above the slot and the LCD (12) will read the TOTAL TIME and TRACKS on the disc. When a CD is not in the unit, the LCD (12) will show NO DISC.
-
STOP/EJECT: Press STOP/EJECT (6) once to STOP, twice and/or hold to EJECT the CD.
-
CUE: With the unit is in the play mode, and after memorizing the cue point, pressing the CUE (7) button will cause the CD player to enter pause mode at the memorized cue point. Holding down the CUE (7) button changes the cue function to preview (allowing you to hear the music play from the cue point). Releasing the CUE (7) button returns you to the preset cue point in pause mode. If a cue point is not memorized, pressing the CUE (7) button in play mode will not begin cue selection.
-
PLAY/PAUSE: Each press of the PLAY/PAUSE (8) button causes the operation to change from play mode to pause mode or vice versa.
-
LCD: The Liquid Crystal Display (LCD (12)) shows the track numbers, play mode, pause mode, playback, effects, dry/wet parameters, loops, tempo, pitch, and programmed settings.
-
PLAYBACK DISPLAY: The PLAYBACK DISPLAY (11) displays 3 different time displays, the time elapsed, the total time remaining, and the track time remaining until play ends. PLAYBACK DISPLAY (11) flashes slowly when the track has 30 seconds left. The PLAYBACK DISPLAY (11) flashes quickly when the track has 15 seconds left.
-
TRACK SKIP/+10: The TRACK SKIP (13) rotary control lets you select the track to play. Push the TRACK SKIP (13) rotary control and you will advance through the CD track listing in multiples of ten.
-
JOG MODE: The JOG MODE (22) button is used to convert the JOG WHEEL (23) from pitch bend to fast forward/rewind in CD mode. This means the unit will sound just like a CD player in fast forward or rewind when searching in JOG MODE (22). Press the JOG MODE (22) button and then use the JOG WHEEL (23) to move forward or reverse while in play mode. Use the JOG MODE (22) button in pause mode and the unit will enter into stutter mode. Move the JOG WHEEL (23) clockwise to fast forward. Move the JOG WHEEL (23) counter clockwise to rewind.
-
JOG WHEEL: The JOG WHEEL (23) has multiple functions:
Use the JOG WHEEL (23) to bend the pitch for precise synchronization in play mode during a mix.
The JOG WHEEL (23) is also used for frame accurate positioning in pause mode. This positioning on the track may then be memorized as a point of CUE (7). You will notice that the unit will enter into stutter mode when making your adjustments in pause mode. See the CUE INSTRUCTIONS section for more information.
In conjunction with the JOG MODE (22) button, the JOG WHEEL (23) is used for fast forward/rewind. SEE JOG MODE (22) for more information.
In conjunction with the SCRATCH (39) button, the JOG WHEEL (23) is used for precise cuts and scratches, as the unit enters into vinyl mode. You may also fast forward or rewind as if you were using vinyl.
In conjunction with the DSP effects buttons (FILTER, ZOOM, ECHO, etc.) the JOG WHEEL (23) is used to modify the parameters of selected effect for sound augmentation of the track in play mode.
-
KEY: Pressing the KEY (26) button activates the KEY LOCK function. With this feature engaged, using the PITCH SLIDE CONTROL (21) will only modify the tempo of the track playing, without changing the key or tone.
-
SINGLE: Pressing the SINGLE (24) button activates the AUTO-CUE function. The AUTO-CUE function causes the unit to pause at the point in the selected track, where the music begins. This feature allows you to start play immediately at the beginning of the music without any blank space (which exists at the beginning of every track).
Pressing the SINGLE (24) button a second time activates the CONTINUOUS function causing the unit to play continuously (after the last track, the unit will return to the first track of the disc and continue to play).
Pressing the SINGLE (24) button a third time deactivates the CONTINUOUS function (the CD will play through once and then stop). CONTINUOUS & AUTO-CUE functions appear in the display to indicate which mode the unit is in. When deactivated, no play function will appear in the LCD (12). SEE LCD (12).
- TIME: The TIME (25) button switches the TIME display between the 3 available choices listed under LCD(12):
- TIME ELAPSED on the track,
- TOTAL TIME remaining on the disc
- TIME REMAINING on the track.
-
LOOP IN: Pressing the LOOP IN (40) button while a track is playing will enter a loop point into the memory, and the LOOP IN's green LED will blink rapidly while memorizing the entry point. This is the first step in creating a SEAMLESS LOOP.
-
LOOP OUT: After a loop entry point is memorized, pressing LOOP OUT (41) in play mode will complete the loop with an exit point. This will repeat the section between the loop's entry point, programmed with the pressing of the LOOP IN (40) button, and a second exit loop point, when the LOOP OUT (41) button is pressed. Press LOOP OUT (41) again to stop the loop from repeating and continue play from the point where the loop ends.
-
RELOOP: Press the RELOOP (42) for the unit to return to the previously set loop. Press the RELOOP (42) repeatedly for stuttering the loop entry point. The RELOOP (42) function automatically returns the music to the loop point and will play the loop until it is released with the LOOP OUT (41) button.
-
B-EDIT: Use the B-EDIT (43) button to edit the SEAMLESS LOOP. This feature allows you to adjust the exit point saved in your LOOP OUT (41) setting. When pressing B-EDIT (43), the LCD (12) will read the frame where the LOOP OUT (41) is set to. You may adjust it with the use of the JOG WHEEL (23), by turning the wheel left or right examining frame by frame while the loop repeats itself. You should be able to hear the difference in each frame until you are satisfied with your loop exit point. Press B-EDIT (43) when you are satisfied with your exit point and your loop will continue to play until you press LOOP OUT (41).
-
PITCH: Pressing the PITCH (19) buttons enable you to select pitch levels ranging from 4%, 8%, 16%, & 100%. Press the 2 buttons labeled PITCH OFF (4% & 16%) together to turn OFF the PITCH CONTROL SLIDE (21). Press all 3 buttons to select the 100% pitch setting.
-
PITCH BEND: Pushing the PITCH BEND (20) buttons will automatically raise the pitch up to +4% or lower the pitch down to -4% from the existing pitch setting. Releasing the PITCH BEND (20) buttons will return the pitch to the original pitch setting. You can use the PITCH BEND (20) to match beats when mixing from one song to another.
-
PITCH CONTROL SLIDE: Moving the PITCH CONTROL SLIDE (21) up or down will lower or raise the pitch percentage up to the selected PITCH (19) setting.
-
DIRECT SELECT: Use the DIRECT SELECT (14) section to create a programmed set list (see PROGRAM). You may also key in the specific track you would like to play, in order to instantly scan through the track list to the selected track.
-
DSP EFFECTS: The CFX-30 comes equipped with 8 Digital Signal Processors (DSP) Effects. ECHO, PAN, TRANSFORM, ZOOM, BRAKE, FILTER, REVERSE, and SCRATCH, are all DSP effects that can be further modified by the DRY/WET (28), START (30), and BRAKE (31) rotary control knobs. See respective functions for more information:
-
ECHO: ECHO (34) is when the original signal is delayed when being input and then fed back into the signal creating the Echo effect. The length of the echo increases or decrease when increasing or decreasing the parameter setting.
-
PAN: PAN (35) simply pans the sound from the left and to the right. It will speed up or slow down as you increase or decrease the parameter setting.
-
TRANSFORM: TRANSFORM (37) simply cuts the sound from the left and right stereo levels. It will speed up or slow down as you increase or decrease the parameter setting.
-
ZOOM: Mixing the signal with a slightly delayed copy of itself, where the length of the delay is constantly changed, creates zooming. This resembles the sound of a plane taking off and landing. The depth of the ZOOM (33) will increase or decrease with the parameter increase or decrease.
-
BRAKE: The BRAKE (38) button simulates the sound of a record stopping/starting on a turntable. The larger or smaller the parameter the longer or shorter it takes for the record to stop.
-
FILTER: The FILTER (32) goes through three passes during parameter adjustment:
- Low Pass filters out the other frequencies except the low frequency. With a lower parameter you will hear it more.
- High Pass filters out the other frequencies except the high frequency. With a higher parameter you will hear it more.
- Band Pass filters out the other frequencies except the mid-range frequency. With the parameter setting in the middle you will hear it more.
- REVERSE: The REVERSE (36) button simply plays the track in reverse.
- SCRATCH: SCRATCH (39) will simulate scratching with a record on a turntable. Use the JOG WHEEL (23) with this feature to create precise cuts and scratches.
- MEMO: The MEMO (15) button allows you to begin storing your CUE POINT(S) (16) and SAMPLE(S) (18).
- SAMPLER: Use the SAMPLE (18) button(s) to play a section of a track, stored in sample memory, over the track playing to provide an extra layer to your mix. You may store 4 samples in the SAMPLE (18) button(s). Once a sample is stored the respective LED will remain lit indicating that the sample is ready to be used at the press of the button(s).
- CUE POINTS: There are 5 CUE POINT(S) (16) that may be created on the fly. You may create an entry point in a track from which you will begin play instantly. By pressing the CUE POINT(S) (16) you may jump to different sections of a song or a CD without any breaks. This feature helps you eliminate pauses involved in track search and/or play various points of a song to shorten or enhance a mix.
34.CUE: The purpose of the CUE (7) button is to preset a point in a track from which play will begin. Use the CUE (7) button to aid in program mixing. - HOT START: The HOT START (17) button is used for instant play at the master CUE (7) point. Once a CUE (7) point has been stored and set to play, press HOT START (17) for instant play. SEE CUE instruction for more info.
- BPM: Use the BPM (27) button to count the beats per minute on a track. This feature will allow you to beat match faster and easier. Press the BPM (27) button once to activate the BPM (27); the LCD (12) will show the BPM icon and tempo info. Press the button again to deactivate the BPM (27), the LCD (12) will hide the BPM icon and not show the tempo info.
- DRY/WET: Use the DRY/WET (28) rotary control to adjust the volume of the effects entered into the program output via the DSP effects buttons. Turn the rotary control clockwise for WET effects. The WET effect occurs when the music is drowned out with effects. Turn the rotary control counterclock wise for DRY effects, a lower volume for effects. The DRY effect occurs when the music will be heard clearly over the effect.
- DIMMER: Use the DIMMER (29) rotary control to adjust the brightness of the LCD (12). Turn the rotary control clockwise to brighten the LCD (12). Turn the rotary control counterclockwise to dim the LCD (12).
- START: Use the START (30) rotary control in conjunction with the BRAKE (38) button and PLAY/PAUSE (8) button to adjust the delay time in starting a track.
- BRAKE: Use the BRAKE (31) rotary control in conjunction with the BRAKE (38) button and PLAY/PAUSE (8) button to adjust the delay time in stopping a track.
OPERATIONS:
- Place a CD in the DISC IN SLOT (10) and push it in so the unit accepts the CD. The disc will enter into the unit.
- Adjust the TRACK SKIP (13) rotary control or press the track number in the DIRECT SELECT (14) section to select the track you want to play.
- Press the PLAY/PAUSE (8) buttons and the unit will instantly play.
SAMPLES:
To store a sample, first you must press the MEMO (15) button, the blue MEMO (15) LED will be lit indicating that the unit is ready for sample storage. When the track has reached the desired point at which you would like the sample to begin, select a SAMPLE (18) button where you would like the sample to be stored. Press the button. The green SAMPLE (18) LED will blink indicating that the MEMO (15) is actively recording the sample.
When the desired selection has reached the point at which you want the sample to end press the same SAMPLE (18) button you have chosen to save the sample again to end recording. The green SAMPLE (18) LED will remain lit once you have ended the recording. The sample is now stored and ready for play. You may press the SAMPLE (18) button to layer the sample over any song. While the sample is playing, the green SAMPLE (18) LED will blink.
To stop a sample from playing, press the SAMPLE (18) button again while the sample is playing to cut it short. If you are not satisfied with the recording of the sample or its location, simply press the MEMORY (15) button. Then the select a SAMPLE (18) button at the point which you would like the sample to begin.
By selecting a SAMPLE (18) button that already has stored information, you will instantly erase that information and rerecord over top of this information.
CUE POINTS:
To use the CUE POINTS (16), you must first program the entry point. Press the MEMO (15) button first to begin storing your CUE POINTS (16). The MEMO(15) LED will illuminate to indicate that the unit is ready for cue storage. Select a location to store your CUE POINT (16) by choosing one of the 5 CUE POINTS (16) buttons.
When the track reaches the point at which you would like your cue to begin, press the CUE POINT (16) button. The CUE POINT (16) LED will blink when the selection has been stored. Press the CUE POINT (16) button to start from that cue point at any moment during play and the unit will automatically begin playing from that point. The CUE POINT (16) LED will continue blinking during play to indicate that it is in use. When the CUE POINT (16) is no longer in use, the CUE POINT (16) LED will remain on to indicate that this cue point is still stored in that location.
To rerecord a CUE POINT (16), repeat these instructions. By selecting a CUE POINT (16) that already has stored information, you will instantly erase that information and rerecord over top of this information.
CUE:
To use CUE (7) you must first find the point where you would like to begin play. Place the track in PAUSE mode. This will activate the stutter mode. Then use the JOG WHEEL (23) for fast, precise searching. SEE JOG WHEEL (23) for more info.
Once you have found the point at which you would like to begin playing, do not further adjust the JOG WHEEL (23). Then press PLAY/PAUSE (8) rapidly. Then CUE (7) LED will blink. Your CUE is now stored into the unit's memory.
Press CUE (7) to scan to the CUE point. This will pause the CD at the point of cue. Press and hold the CUE (7) button to begin CUE preview, which will allow you to judge whether the point of cue you have loaded is satisfactory.
If you are not satisfied with your point of cue, press PAUSE (8) and use the JOG WHEEL (23) to find the exact point you wish to begin play. Rapidly press PLAY (8) twice to enter and exit play mode. You will be in pause mode. The CUE (7) LED will blink. Repeat the steps for CUE preview, to make sure your new cue point is satisfactory.
When you are satisfied with your point of cue, leave the CUE (7) button alone, the CUE (7) LED will remain on to indicate that the point of cue is stored and ready to be used. Press HOT START (17) for instant play at your point of cue.
SEAMLESS LOOP:
Press the LOOP IN (40) button to enter an entry point into the memory, and the LOOP IN's (40) green LED will blink rapidly while memorizing loop entry and exit points.
After an entry loop point is memorized, press LOOP OUT (41) in play mode to complete the loop. The unit will automatically repeat the section between the loop's entry point, programmed with the pressing of the LOOP IN (40) button, and a second exit loop point, when the LOOP OUT (41) button is pressed. The loop is now programmed into the unit's memory.
While playing the loop, both the LOOP IN (40) and LOOP OUT (41) green LEDs will blink to indicate that the loop is in use. You will notice the LCD (12) will also indicate that the LOOP is in use with a blinking A1 icon that will remain steady once the loop has been stopped.
Press the RELOOP (42) for the unit to return to the previously set loop. Press the RELOOP (42) repeatedly for stuttering the loop entry point. The RELOOP (42) function automatically returns the music to the loop point and will play the loop until it is released with the LOOP OUT (41) button.
Press the B-EDIT (43) button to edit the loop created by your SEAMLESS LOOP. This feature allows you to adjust the exit point saved in your LOOP OUT(41) setting.
To exit the loop and resume play, press LOOP OUT (41) to stop the loop and continue play from the point where the loop ends.
START:
Turn the START (30) rotary control clockwise for a long, slow start. Turn the START (30) rotary control counter clockwise for a short, fast start. Make sure you activated the BRAKE (38) DSP button. The
BRAKE (38) LED will be illuminated when it has been activated. Then from pause mode, press PLAY (8) to enter into play mode. You may adjust this feature to the precise effect you wish by adjusting the START (30) rotary control. The effect's parameter will be displayed at the bottom of the LCD (12) listed BK START.
BRAKE:
Turn the BRAKE (31) rotary control clockwise for a long, slow stop. Turn the BRAKE (31) rotary control counter clockwise for a short, fast stop. Make sure you activated the BRAKE (38) DSP button. The BRAKE (38) LED will be illuminated when it has been activated. Then from play mode, press PAUSE (8) to enter into pause mode. You may adjust this feature to the precise effect you wish by adjusting the BRAKE (31) rotary control. The effect's parameter will be displayed at the bottom of the LCD (12) listed BK STOP.
PROGRAM:
The CFX-30 has the capability to program a set list from the CD. This will allow you to play selected tracks from the CD in the order you choose. To program a set list, load the CD in to the DISC IN SLOT (10). After the unit reads the CD, play should be stopped. Then press the PGM button in the DIRECT SELECT (14) section of your unit to begin programming your set list.
Select the first track with which you would like to start the set list with the DIRECT SELECT (14) buttons or the TRACK SKIP (13) rotary control. Once you have selected a track, press SET in the DIRECT SELECT (14) section of your unit to store this track into your program list. Repeat these steps until you have completed your set list.
If you would like to change a track in your set list, press PGM repeatedly until you have reached the track you wish to change. Use the DIRECT SELECT (14) buttons or the FOLDER/TRACK SKIP (13) rotary control to enter the track you wish to save to the set list. Then press SET and you will have stored the track into the set list. Press PLAY (8) to begin the set, and your set list will be completed.
You may scroll through this list, after pressing PLAY (8), with the FOLDER/TRACK SKIP (13) rotary control to make sure that the set is in the order that you wish.
TROUBLESHOOTING:
- If the disk will not play, check to see if the disc was loaded correctly (label side up). Also check the disc for excessive dirt, scratches, etc.
- If the disc turns but there is no sound, check the cable connections. If they are okay, check your amplifier or receiver.
- If the CD skips, check the CD for dirt or scratches. Do not assume that the CD player is defective. Many CDs are recorded out of spec and will skip on most or all CD players. Before sending the unit in for repair, try playing a CD that you are sure plays properly.
SPECIFICATIONS:
GENERAL:
Type....Single Mechanism Compact Disc Player Disc Type....Standard Compact discs (12cm, 8cm) Time Display....Track Elapsed, Track Remain, or Total Remain Variable Pitch.....±4%, ±8%, ±16%, +100% Slider with Resume Switch Pitch Bend....±4% Maximum Instant Start....Within 0.015 seconds Track Selection....1 to 99 Tracks
AUDIO SECTION:
Quantization....1 Bit Linear/Channel, 3 Beam Laser Oversampling Rate....8 Times Sampling Frequency....44.1 kHz Frequency Response....20 Hz to 20 kHz Total Harmonic Distortion....Less Than 0.05% Signal to Noise Ratio....90 dB Dynamic Range....< 80 dB Channel Separation....88 dB (1 kHz) Output Level....1.3 Volts R.M.S. Power Supply....AC 115/230V, 60/50 Hz Dimensions....8 1/2" W x 3 3/4" H x 12 1/2" D .....(216 x 95 x 320 mm) Weight.....Player Unit 6.62 lbs (3 kg)
NOTE: SPECIFICATIONS AND DESIGN ARE SUBJECT TO CHANGE WITHOUT NOTICE FOR PURPOSE OF IMPROVEMENT.
EINFÜHRUNG:
- 4%, 8%, 16% & 100% variabler Pitch, abschaltbar
Weight/Poids.....Player Unit 6.62 lbs (3 kg)
REMARQUE: GEMINI, DANS LE CADRE D'UN SOUCI CONSTANT D'AMELIORATION DE SES PRODUITS, SE RESERVE LE DROIT DE LES MODIFIER SANS AUCUN PREAVIS.
gemini®
IN THE USA: IF YOU EXPERIENCE PROBLEMS WITH THIS UNIT, CALL 1-732-738-9003 FOR GEMINI CUSTOMER SERVICE. DO NOT ATTEMPT TO RETURN THIS EQUIPMENT TO YOUR DEALER.
Parts of the design of this product may be protected by worldwide patents. Information in this manual is subject to change without notice and does not represent a commitment on the part of the vendor. Gemini Sound Products Corp. shall not be liable for any loss or damage whatsoever arising from the use of information or any error contained in this manual. No part of this manual may be reproduced, stored in a retrieval system or transmitted, in any form or by any means, electronic, electrical, mechanical, optical, chemical, including photocopying and recording, for any purpose without the express written permission of Gemini Sound Products Corp. It is recommended that all maintenance and service on this product is performed by Gemini Sound Products Corp. or its authorized agents. Gemini Sound Products Corp. will not accept liability for loss or damage caused by maintenance or repair performed by unauthorized personnel.