
MUSIC TRANSFER - Portable audio player AIWA - Free user manual and instructions
Find the device manual for free MUSIC TRANSFER AIWA in PDF.


| Product Type | Portable audio player with hard drive |
| Brand | AIWA |
| Model | MUSIC TRANSFER |
| Power Supply | AC adapter (included) and built-in rechargeable battery |
| Connection Interface | USB 1.1 / USB 2.0 High Speed (via included USB cable) |
| Supported Audio Formats | MP3 (playback only of files sent via the included software) |
| Maximum Storage Capacity | Up to 1,000 MP3 files |
| Maximum Number of Playlists | 99 playlists, each can contain up to 500 files |
| Included Software | Music Transfer Hard Disk Player Edition (CD-ROM) |
| Compatible Operating Systems | Windows XP Home Edition/Professional, Windows 2000 Professional, Windows Millennium Edition |
| Minimum System Requirements | Pentium MMX 166 MHz, 96 MB RAM, 50 MB free disk space, CD-ROM drive |
| Main Functions | Transfer MP3 files from computer, create and edit playlists, update firmware |
| Care and Cleaning | Use a soft dry cloth; do not use solvents |
| Safety | Do not disconnect the USB cable during transfer; use the AC adapter to avoid data loss |
| Spare Parts and Repairability | Consult the nearest AIWA dealer for the USB cable or battery |
Frequently Asked Questions - MUSIC TRANSFER AIWA
User questions about MUSIC TRANSFER AIWA
0 question about this device. Answer the ones you know or ask your own.
Ask a new question about this device
Download the instructions for your Portable audio player in PDF format for free! Find your manual MUSIC TRANSFER - AIWA and take your electronic device back in hand. On this page are published all the documents necessary for the use of your device. MUSIC TRANSFER by AIWA.
USER MANUAL MUSIC TRANSFER AIWA
Operating Instructions
Read this manual before using the portable hard disk player.
Mode d'emploi
Music Transfer Hard Disk Player Edition is a software utility specially designed for your portable hard disk player. You can send audio files in MP3 format* on your computer to the player's built-in hard disk using Music Transfer Hard Disk Player Edition. For details, refer to the following pages indicated in ( ).
- Software for creating MP3 files is not supplied with this product.
1 Install the software. (Page 8)
2 Send MP3 files to the hard disk player. (Page 10)
1 Turn on the player. (Page 10)
Connect the player to your computer. (Page 11)

Connect the AC power adaptor to the player when connecting the player to your computer.
If the player is operated on the built-in rechargeable battery and the battery becomes exhausted while sending, files and data being sent may be destructed.
Note
First start your computer, and then connect the player to the computer. Before restarting your computer, you should disconnect the player from the computer.
Start Music Transfer Hard Disk Player Edition, and then send MP3 files to the player.

① Specify the folder containing MP3 files.
② Select the MP3 file you want.
③ Press [Add].
④ Press [Update].
3 Disconnect the hard disk player from the computer. (Page 20)
Disconnect the player correctly according to the operating system.

4 Enjoy music with the hard disk player.
Table of contents
Overview 2
Before using this product 5
When using Music Transfer Hard Disk Player Edition 5
When listening to music with the hard disk player 5
About Music Transfer Hard Disk Player Edition 6
System requirements 7
Installing the software 8
Installing Music Transfer Hard Disk Player Edition 8
Sending MP3 files to the hard disk player..... 10
Specifying which files to send or not to send 14
Viewing all MP3 files stored in the hard disk player 15
Deleting MP3 files from the player..... 15
Creating your own Playlist 16
Deleting a Playlist 17
Editing the FAVORITE and the
Playlist 18
Adding an MP3 file to the FAVORITE 19
Changing the playing order of MP3 files 19
Deleting an MP3 file from the FAVORITE or the Playlist 19
Disconnecting the hard disk player from the computer 20
Other information 21
Updating the firmware of the hard disk player 21
Recovering the firmware of the hard disk player 22
Uninstalling Music Transfer Hard Disk Player Edition 23
For Windows XP users 23
For Windows 2000 users 24
For Windows Millennium Edition users 24
Troubleshooting 25
Messages 31
Index 34
- Microsoft, Windows and Windows NT are trademarks or registered trademarks of Microsoft Corporation in the United States and/or other countries.
- IBM and PC/AT are registered trademarks of International Business Machines Corporation.
- Macintosh is a trademark of Apple Computer, Inc. in the United States and/or other countries.
- Pentium is a registered trademark of Intel Corporation.
- All other trademarks and registered trademarks are trademarks or registered trademarks of their respective holders.
TM and marks are omitted in this manual.
Program © 2004 Sony Corporation / Documentation © 2004 Sony Corporation
This manual explains the installation and basic use of the supplied Music Transfer Hard Disk Player Edition software.
For details on the various operations of the hard disk player, refer to the separate manual for the player.
When using Music Transfer Hard Disk Player Edition
- Music Transfer Hard Disk Player Edition (this manual)
- Aiwa official website (http://www.aiwa.com/)
You can view the latest support information, etc.
When listening to music with the hard disk player
- Operating instructions for the Portable Hard Disk Player (separate manual)
Copyright laws prohibit reproducing the software or the manual accompanying it in whole or in part, or renting the software without the permission of the copyright holder.
In no event will SONY be liable for any financial damage, or loss of profits, including claims made by third parties, arising out of the use of the software.
In the event a problem occurs with this software as a result of defective manufacturing, SONY will replace it. However, SONY bears no other responsibility.
The software cannot be used with equipment other than that which is so designated.
Please note that, due to continued efforts to improve quality, the software specifications may be changed without notice.
Note
Sony is not responsible for music data that cannot be transferred, or damaged or deleted music data due to any failure of this product or your computer.
About Music Transfer Hard Disk Player Edition
Music Transfer Hard Disk Player Edition is a software utility that allows you to send audio files in MP3 format* on your computer to the hard disk player. The hard disk player plays only MP3 files sent to it using Music Transfer Hard Disk Player Edition.
You can edit (delete, change the order of) MP3 files before and after sending them to the player. You can also create your own Playlists in which you can freely arrange MP3 files in your desired order.
You can send and store up to 1,000 files to the hard disk player. A maximum of 99 Playlists can be created, and each Playlist can contain up to 500 files.
Notes on using Music Transfer Hard Disk Player Edition
-
Do not disconnect the USB cable while reading or writing data. Before disconnecting the USB cable, follow the necessary steps required by each operating system.
Data may be destructed in the following cases: -
The USB cable is disconnected or the built-in rechargeable battery is exhausted while reading or writing data.
-
When the player is used in a location subject to static electricity or electric noise.
-
Creating backup copies of important data is recommended.
Note
You cannot edit MP3 files using Music Transfer Hard Disk Player Edition. If you want to change a file name, change it before starting Music Transfer Hard Disk Player Edition.
For information on how to handle data that has been recorded using software other than Music Transfer Hard Disk Player Edition, refer to the instruction manual that comes with the software with which the recording has been done.
Notes
- The hard disk player cannot play MP3 files that have been copied to the player or edited using Windows Explorer.
- You cannot send MP3 files from the player to the computer.
System requirements
The following hardware and software are required in order to use the Music Transfer Hard Disk Player Edition software.
| Computer | IBM PC/AT or compatible • CPU: Pentium MMX 166 MHz or higher • Hard disk drive space: 50 MB or more • RAM: 96 MB or more • CD-ROM drive |
| Connection interface | USB 1.1/USB 2.0 High Speed* * If the player is connected to a USB port that is not compatible with USB 2.0 (Hi-Speed USB), the actual data transfer rate will be limited to that for USB 1.1 (Full-Speed transfer). |
| Operating System | Factory installed: Windows XP Home Edition/Windows XP Professional/Windows Millennium Edition/Windows 2000 Professional |
| Display | High Color (16 bit) or higher, 800×600 dots or better |
This software is not supported by the following environments:
- NEC PC-98 series or compatible machines, Macintosh systems
- Windows XP versions other than Home Edition or Professional
- Windows 2000 versions other than Professional
- Windows 98 Second Edition
- Windows 98
- Windows NT
- Windows 95
- Personally constructed PCs or operating systems
- An environment that is an upgrade of the original manufacturer-installed operating system
Multi-boot environment - Multi-monitor environment
Notes
- We do not ensure trouble-free operation on all computers that satisfy the system requirements.
- We do not ensure trouble-free operation of the system suspend, sleep, or hibernation function on all computers. (See page 28 for details.)
- Be sure to use the USB cable supplied with the player. Other USB cables may have connectors in different shapes and cannot be inserted to the player, or may cause a malfunction. When the supplied USB cable is damaged or lost, consult your nearest Aiwa dealer.
Installing Music Transfer Hard Disk Player Edition
Notes
- Do not connect the player to your computer before installing Music Transfer Hard Disk Player Edition.
- Close all Windows applications before starting the installation.
1 Turn on your computer and start up Windows.
2 Log on with the following user name.
The log-on method differs depending on the operating system or software. Check your operating system before logging on.
For Windows XP*1 users
You must log on with a "Computer Administrator" user name.
For details, refer to the operating instructions of your computer.
For Windows 2000*2 users
You must log on as an administrator.
For details, refer to the operating instructions of your computer.
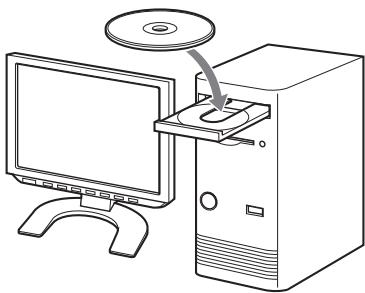
3 Insert the Music Transfer Hard Disk Player Edition CD-ROM into the CD-ROM drive of your computer.
The setup program starts automatically and the installation window appears.
If the setup program does not start automatically, double-click [Launcher.exe] included in the CD-ROM using Windows Explorer.
4 Click and select a language, and then click [Select]. Select a language to be used by the software for displaying menus and messages.

5 Click [Install Music Transfer Hard Disk Player Edition].
6 Follow the displayed instructions.
7 After the installation is finished, restart the computer. Restart your computer following the displayed instructions.
- Be sure to restart your computer after the installation is finished.
Was the installation successful?
If any trouble occurs during the installation, see page 26.
Notes
- For Windows XP or Windows Millennium Edition users, if you use the "System Restore" function in "System Tools," Music Transfer Hard Disk Player Edition may not run properly. An error dialog box may appear. If this occurs, follow the instructions given in the messages displayed.
- For Windows XP users, make sure to close Windows Messenger before installing the software. If anti-virus software is running, Windows Messenger may not close. If this occurs, check the website of the anti-virus software you are using.
- Music Transfer Hard Disk Player Edition uses the installed folders. Do not delete, move or change the contents of the installed folders.
- While the installation is still in progress, do not interrupt the operation or take the CD-ROM out of the CD-ROM drive. Doing so may render it impossible to install the software thereafter.
Connect the AC power adaptor to the player when connecting the player to your computer.

Before starting
You must log on to your computer as an administrator to use Music Transfer Hard Disk Player Edition.
1 Turn on the player.
For how to turn on the power of your player, see the operating instructions for the portable hard disk player.
2 Connect the player to your computer.
Connect the player to the USB port on your computer using the supplied USB cable. If the player is not recognized, reconnect the player or connect it to another USB port.

Note
Connect the AC power adaptor to the player when connecting the player to your computer. If the player is operated on the built-in rechargeable battery and the battery becomes exhausted while sending, files and data being sent may be destructed.
3 Start Music Transfer Hard Disk Player Edition.
Do one of the following:
- Double-click the desktop icon of Music Transfer Hard Disk Player Edition.
- Click [start] - [All Programs] (or [Programs]) - [Music Transfer Hard Disk Player Edition] - [Music Transfer Hard Disk Player Edition].
Music Transfer Hard Disk Player Edition starts up and the main window appears. MP3 files already sent and stored in the player are displayed in the Playlist window. If the Playlist window does not show the latest information on your player, click [View] - [Refresh].
Notes
- Do not disconnect the USB cable while Music Transfer Hard Disk Player Edition is running.
- Depending on the setting made on the computer, a window may open. If this happens, click × at the top-right corner of the window to close it.
(Continued)
4 Select the folder where MP3 files are stored.
If you click the folder, all the MP3 files in the selected folder appear in the Explorer window of Music Transfer Hard Disk Player Edition. Files other than MP3 files and those which cannot be played on the player will not be displayed.
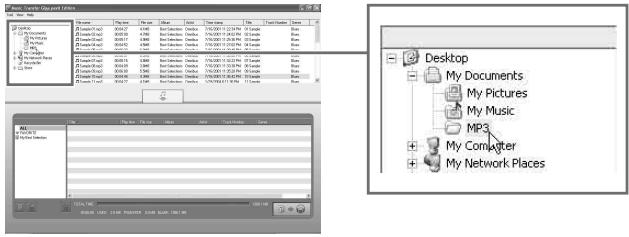
5 Select the MP3 file you want from the Explorer window.


The selected MP3 files appear in the Playlist window. A (check mark) is displayed to the added files. (Files with will be sent to the player.)
Alternatively, drag the desired folder in the Folder window to the Playlist window.

You can drag MP3 files and folders across the windows as indicated by the arrows.
The Playlist image is made but not yet sent to the player.
If there are files you do not want to send to the player
1 Click [ALL] in the left part of the Playlist window.
2 Select files you do not want to send.
3 Click [Delete Track] to delete them from the Playlist window.
Alternatively, click to uncheck the boxes.
Tips
- You can undo the last operation by pressing Ctrl and Z keys at the same time.
- If two different folders contain the same MP3 file, this file is regarded as two different files, and can be sent to the player separately.
(Continued)
7 Click [Update] to send the MP3 files to the player. Do not disconnect the USB cable from the computer while sending files.
Viewing the Status bar
The status bar shows the player's hard disk usage and free space.

Note
If you quit Music Transfer Hard Disk Player Edition before you click [Update], the selected MP3 files will not be sent. Be sure to click [Update] to send the files to the player.
Specifying which files to send or not to send
When [ALL] in the left part of the Playlist window is selected, and if there are files not yet sent to the player, you can use the check boxes to select files to be sent and not to be sent.
Check the boxes for the files you want to send to the player, and uncheck the boxes for the files you do not want to send.
Viewing all MP3 files stored in the hard disk player
Click and select [ALL] in the left part of the Playlist window.
All the MP3 files stored in the player are displayed in the Playlist window.
You can sort the files by clicking [Title], [Time], [Size], [Album], [Artist], [Track Number] or [Genre] in the title bar of the Playlist window.
Note
The actual playing order of MP3 files in the player will not be changed by this sorting operation, even if you click [Update].
Deleting MP3 files from the player
1 Click [ALL] in the left part of the Playlist window.
2 Select file(s) you want to delete.
3 Click [Delete Track], and then click [OK].
If two or more files are selected, click [All Delete] to delete all the selected files at a time.
4 Click [Update].
Files deleted from the [ALL] part of the Playlist window are also deleted from the
FAVORITE and the Playlist.
To quit the software
Click [Tools], then [Exit], or click × on the top right corner of the window.
Notes
- If you quit Music Transfer Hard Disk Player Edition before you click [Update], the selected MP3 files will not be sent. Be sure to click [Update] to send the files to the player.
- This player can only play MP3 files that have been sent to it using Music Transfer Hard Disk Player Edition. Data stored using other software cannot be played on this player.
Creating your own Playlist
You can create your own Playlist in which you can arrange MP3 files to be played in your desired order.
What is a Playlist?
Playlist is a list that you create using Music Transfer Hard Disk Player Edition. You can freely select and add MP3 files (up to 500 files) to your Playlist and designate their playing order. Since you can create more than one Playlist (up to 99 Playlists), it is possible to add the same or different files to different Playlists in different playing orders.
1 Click [Create Playlist] to create a new Playlist.
![AIWA MUSIC TRANSFER - Click [Create Playlist] to create a new Playlist. - 1](/content/2020/05/175729/images/be74178480c7678ea8a102c64f54f132ac82ab2f2bc8035b6239f61674b37190.jpg)
2 Enter the name for the Playlist, and then press the Enter key.
3 In the Explorer window, select the MP3 files you want to add to the Playlist.
4 Click [Add].
The selected files appear in the Playlist window. A (check mark) is displayed to the added files. (Files with will be sent to the player.)
Alternatively, drag the desired MP3 file from the Explorer window to the Playlist window. If you want to add all MP3 files in a folder to the Playlist window, drag the folder directly from the Folder window to the Playlist window.
The Playlist image is made but not yet sent to the player.
You can change the order of files, delete unnecessary files, etc. in the Playlist window. For details, refer to "Editing the 心 FAVORITE and the Playlist" (page 18).
Tip
You can undo the last operation by pressing Ctrl and Z keys at the same time.
5
Click [Update].
Do not disconnect the USB cable from the computer while sending files.
Note
You cannot send a Playlist that does not contain any file to the player.
Tips
- Up to 99 Playlists can be created and stored in the player.
- A Playlist can contain up to 500 files.
Notes
- You cannot create two or more Playlists having the same name.
- It is not possible to create a Playlist on the player.
Deleting a Playlist
1 Select the Playlist you want to delete.
2 Click [Delete Playlist].
The message "The selected playlist will be erased. Is it all right?" appears. Click [Yes].
3 Click [Update].
Note
If you click [Delete Playlist] while [ALL] or [FAVORITE] is selected, all the files in the Playlist will be deleted.
Editing the 心 FAVORITE and the Playlist
The FAVORITE, which is considered a variant of the Playlist, is specially provided to hold the MP3 files you want to play most frequently. Adding and deleting MP3 files to/from the FAVORITE can also be done on the player without connecting it to your computer.
In the Playlist window, you can carry out editing of the FAVORITE and the Playlist, such as changing the playing order and deleting unnecessary files.
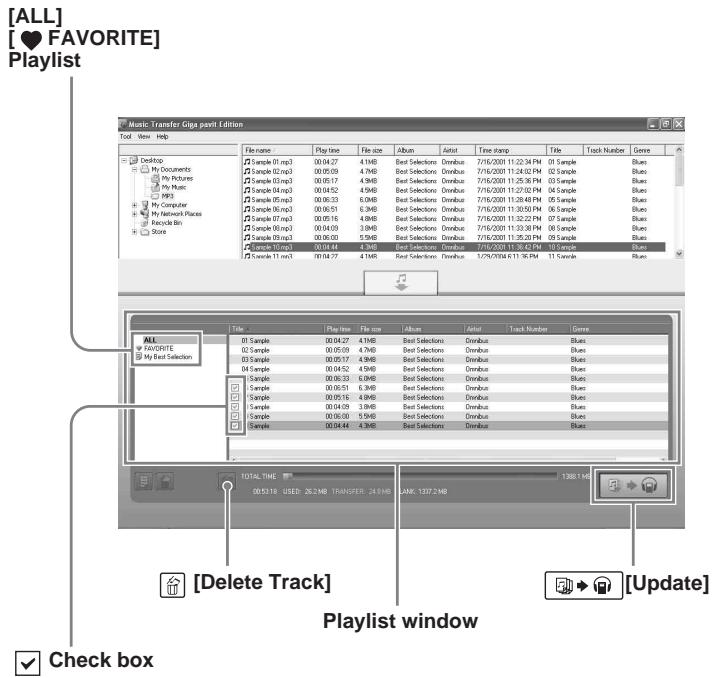
You can select files in [ALL] (showing files already stored in the player) and enter them into the
♥ FAVORITE or add them to the Playlist. You can also copy files from the Playlist to the
- FAVORITE, or from a Playlist to another Playlist.
Adding an MP3 file to the 心 FAVORITE
1 Click [♥FAVORITE] in the left part of the Playlist window.
MP3 files already entered in the 心 FAVORITE are displayed in the Playlist window.
2 Follow steps 4 to 6 of "Sending MP3 files to the hard disk player" (pages 12-13).
You cannot add the same file that has already been added to the Playlist window.
3 Click [Update] to send the MP3 files to the player.
Tip
You can also add MP3 files already stored in the player to the FAVORITE, while listening to music on the player. For details, refer to the operating instructions for the portable hard disk player.
Changing the playing order of MP3 files
In the Playlist window, click and select [♥FAVORITE] or the Playlist you want to edit.
Change the file order by dragging each file to the desired position, and then click
[Update].
Deleting an MP3 file from the 心 FAVORITE or the Playlist
1 Click and select [♥FAVORITE] or the Playlist you want to edit.
2 Click and select the file you want to delete.
The selected file is indicated in yellow.
3 Click [Delete Track].
4 Click [Update].
Notes
- MP3 files will remain in the player, even after you delete the files from the FAVORITE or the Playlist by using the above procedure. To delete an MP3 file from the player, click and select [ALL], and then delete it. Note that when you delete a file from the player in this way with [ALL] selected, the file is also deleted from the FAVORITE and the Playlist.
- If you uncheck the boxes for the files in [ALL], these files will not be added to the Playlist even when you click [Update].
Disconnecting the hard disk player from the computer
Disconnect the player from the computer by following necessary steps according to your computer and the operating system.
Following is the example for Windows XP users.
1 Double-click in the Windows Task bar. "Safely Remove Hardware" (Windows XP)/"Unplug or Eject Hardware" (Windows 2000/ Windows Millennium Edition) window appears.
2 Click and select [USB Mass Storage Device], and then click [Stop]. "Stop a Hardware device" window appears.
3 Click and select [USB Mass Storage Device], and then click [OK]. The message "The 'USB Mass Storage Device' device can now be safely removed from the system." appears.
4 Click [Close] and disconnect the player from your computer. The player will restart when it is disconnected from the computer. Turn off the power of the player if you are not to use the player right after disconnection.
Note
If the "safe removal" of the player ends unsuccessfully, refer to "You cannot perform the safe removal procedure to disconnect the player from the computer." (page 28) in "Troubleshooting."
Updating the firmware of the hard disk player
We recommend you visit the Aiwa official website (http://www.aiwa.com/) periodically to check the latest support information on your hard disk player, such as about adding a new function to the player or enhancing the player's performance.
When you have downloaded a firmware-updating program, follow the procedure below to carry out the firmware update.
Notes
- Read the description on the website about the firmware update as well.
- You have to log on to your computer as an administrator to carry out a firmware update.
1 Turn on the player, and connect it to the computer.
2 Start up Music Transfer Hard Disk Player Edition.
3 Click [Tools] - [Firmware Update].
4 Select the designated file, and then click [Open]. For how to install the firmware-updating program and how to update the firmware, see also the Aiwa official website.
Recovering the firmware of the hard disk player
If an error message appears in the player's display repeatedly even after you have reset the player, you can use the following procedure to recover the firmware of the player.
1 Turn on the player, and then connect the player to your computer.
In case the player is not recognized, turn off the player with the USB cable connected, and then turn on the player again. If it is not possible to turn off the player, reset the player, and then turn on the player.
2 Insert the Music Transfer Hard Disk Player Edition CD-ROM into the CD-ROM drive of the computer.
The setup program starts automatically and the installation window appears.
If the setup program does not start automatically, double-click [Launcher.exe] included in the CD-ROM using Windows Explorer.
3 Click and select a language, and then click [Select].
Select a language to be used by the software for displaying menus and messages.


4 Click [Firmware Recovery].
5 Follow the displayed instructions.
If the firmware recovery operation does not solve the problem, refer to "Troubleshooting" in the operating instructions for the hard disk player as well as "Troubleshooting" in this manual. If the problem persists, consult your nearest Aiwa dealer.
Note
If you perform the firmware recovery operation, all the files sent to the player using Music Transfer Hard Disk Player Edition and the settings you have made on the player will be erased.
Uninstalling Music Transfer Hard Disk Player Edition
For Windows XP users
Log on with a "Computer Administrator" user name, and then follow the procedure below. Refer to the operating instructions of your computer for details on logging on as a computer administrator.
1 Click [start] - [Control Panel].
The "Control Panel" window appears.
2 Double-click [Add or Remove Programs].
The "Add or Remove Programs" dialog box appears.
3 Click [Change or Remove Programs].
Currently installed programs are displayed.
4 Click [Music Transfer Hard Disk Player Edition] in the "Currently installed programs" list, and then click [Change/Remove].
Follow the displayed instructions, and restart the computer.
For Windows 2000 users
Log on as an administrator, and then follow the procedure below. Refer to the operating instructions of your computer for details on logging on as an administrator.
1 Click [Start] - [Settings] - [Control Panel]. The "Control Panel" window appears.
2 Double-click [Add/Remove Programs]. The "Add/Remove Programs" dialog box appears.
3 Click [Change or Remove Programs].
4 Click [Music Transfer Hard Disk Player Edition] in the "Currently installed programs" list, and then click [Change/Remove]. Follow the displayed instructions.
For Windows Millennium Edition users
1 Click [Start] - [Settings] - [Control Panel]. The "Control Panel" window appears.
2 Double-click [Add/Remove Programs]. The "Add/Remove Programs Properties" dialog box appears.
3 Click [Music Transfer Hard Disk Player Edition] in the list of programs for automatic removal, and then click [Add/Remove]. Follow the displayed instructions.
Troubleshooting
Please perform the following steps if you encounter a problem while using the Music Transfer Hard Disk Player Edition software. If a message appears, it is recommended that you write it down.
Step 1: Check the symptoms in this "Troubleshooting" section.
Refer to the corresponding section in the following pages.
Step 2: Check the symptoms on the Aiwa official website.
Visit the local website of the region you live from the Aiwa global website (http://www.aiwa.com/).
You can find updated support information about this product, frequently asked questions and answers.
Step 3: If the problem cannot be solved after checking the above references
Consult your nearest Aiwa dealer.
If the installation was not successful
- Did you log on to your computer properly?
→ To use this software, you have to log on as an administrator. Consult your computer administrator or try logging on again as an administrator. - Make sure that the operating system you are using is compatible with Music Transfer Hard Disk Player Edition.
→ Refer to "System requirements" on page 7. - Be sure to close all Windows applications before you start the installation.
→ If you start the installation while other programs are running, a malfunction may occur. This is especially true for programs that require large amounts of system resources, such as anti-virus software.
→ If you are using Windows XP, close Windows Messenger before you start the installation.
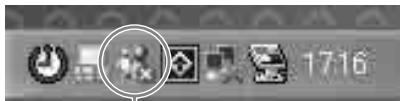
Right-click and select [Exit].
- Do not connect the player to your computer before you install the software.
If the player is connected to your computer before you install the software, the installation may not be done correctly. Connect the player after the installation is completed. - Make sure your computer has enough hard disk drive space.
→ 50 MB of free space or more on the hard disk drive is required. If your computer does not have enough space, installation may not be possible. - If the installation is still unsuccessful after all that you have done,
→ The installation may be carried out by copying all files to the hard disk of your computer as follows:
1 Create a new folder on the hard disk of your computer.
2 Insert the supplied CD-ROM (Music Transfer Hard Disk Player Edition) into the CD-ROM drive.
3 When the language selection window appears, click [Exit] to cancel the installation.
4 Right-click [start] and start up Windows Explorer.
5 Select the CD-ROM drive, and then click [Edit] - [Select All].
6 Click [Edit] - [Copy To Folder...] (or [Edit] - [Copy]) to copy all files to the folder that you created in step 1.
7 Remove the CD-ROM from the CD-ROM drive, open the folder that was copied to the hard disk and double-click [Launcher.exe].
8 When the installation window appears, follow the displayed instructions to install Music Transfer Hard Disk Player Edition.
The player is not recognized by the computer.
Is the player connected to your computer securely?
→ If the player is not connected to the computer securely, the computer does not recognize the player. Disconnect and connect the USB cable again.
- If another USB device is connected to your computer, disconnecting the USB device may remedy the problem.
Is the power of the player turned on?
If the rechargeable battery is drained or the player is turned off, the computer does not recognize the player.
It is recommended to connect the AC power adaptor to the player when the player is connected to the computer.
- Is the player connected via a USB hub or USB extension cable?
→ Normal operation when connecting via a USB hub or USB extension cable is not guaranteed. Connect the player directly to the USB port on your computer using the supplied USB cable.
Files do not appear on the display.
- Are the MP3 files included in the folder selected?
Select a folder where MP3 files are included. - Is the Playlist window showing the latest information on your hard disk player?
Click [View] - [Refresh] to update the display.
There are some characters that do not appear on the display.
- User-created characters and some special characters may not be displayed.
Sending files was unsuccessful.
- Are you performing operations other than sending files on your computer?
→ Depending on the configuration of your computer, a Buffer Under Run error is likely to happen if you start up and use other applications while sending files. When sending files, make sure to stop other operations. Also make sure that the screen saver is turned off and your computer will not enter hibernation mode. - Is the player connected via a USB hub or USB extension cable?
→ Normal operation when connecting via a USB hub or USB extension cable is not guaranteed. Connect the player directly to the USB port on your computer using the supplied USB cable. - If another USB device is connected to your computer, disconnecting the USB device may remedy the problem.
You cannot use Music Transfer Hard Disk Player Edition.
- Does the hard disk drive of your computer have enough free space?
Erase unnecessary files to increase free space. - Did you log on to your computer properly?
To use this software, you have to log on as an administrator. Consult your computer administrator or try logging on again as an administrator. - Did you change the user's account while the software is running?
→ Restart your computer with the name you used when starting up Music Transfer Hard Disk Player Edition and shut down the program. - Does the player's hard disk drive have enough free space?
Delete unnecessary files to increase free space (page 15). - Check if the number of files you are sending to the player exceeds the maximum number set for the player.
→ You can send up to 1,000 files to the player.
You cannot perform the safe removal procedure to disconnect the player from the computer.
- Quit Windows Explorer and other software currently running.
→ If the files in the player are being used or open by Windows Explorer, etc., it may not be possible to disconnect the player from the computer. - Repeat the "Safely Remove Hardware" operation for several times.
→ If it is still impossible to disconnect the player, quit Windows, and then disconnect the player.
Notes on system suspend/hibernation mode
- If the computer changes to system suspend/hibernation mode while sending files to the player, the audio data may be lost or the computer may not wake up properly. The computer suspend/hibernation function should therefore be turned off.
- If you disconnect the player while the computer is in system suspend/hibernation mode, the data may be lost after the computer wakes up.
- If the computer changes to system suspend/hibernation mode, the computer may not recognize the player when it wakes up. If this happens disconnect the player and reconnect it again.
Notes on the built-in hard disk
- The built-in hard disk is formatted using the FAT32 file system.
In the following cases, a hard disk format-related error may occur:
- The USB cable was disconnected while tracks are sent to the player.
- An error was detected and the player was turned off while tracks are sent to the player.
- The built-in hard disk was formatted using the file system other than FAT32. If a hard disk error is detected, recover or format the hard disk as required.
Recovering the firmware after checking the hard disk error
- Follow the steps specified by your operating system to check the built-in hard disk error, and recover the hard disk if necessary.
- The player will not start up if the system file necessary to the player was destructed, even though the built-in hard disk was recovered. Use the Music Transfer Hard Disk Player Edition CD-ROM to recover the firmware (page 22).
Recovering the firmware after formatting the hard disk
- If you cannot check the hard disk error, or if the built-in hard disk cannot be recovered by checking the hard disk error, first format the built-in hard disk of the player using the FAT32 file system, and then recover the firmware. Format the built-in hard disk of the player by following the steps specified by your operating system. When formatting is finished, use the Music Transfer Hard Disk Player Edition CD-ROM to recover the firmware (page 22).
Notes
- If you format the built-in hard disk using the file system other than FAT32, the firmware can be recovered but the player does not operate normally. It is not recommended to use the quick format method.
- Make sure not to format other devices by mistake. It is recommended to disconnect devices other than the player.
- If you perform the firmware recovery operation, all the files sent to the player and the settings you have made on the player will be erased.
Important
After performing the firmware recovery operation, the version of the firmware in the built-in hard disk coincides with that of the firmware stored in the CD-ROM.
It is recommended to visit the Aiwa official website to download a firmware-updating program and update the firmware (page 21).
When you contact us with a question, we may ask for the following information about your computer. Use the table below.
| Computer (check the following information) | ||
| Manufacturer: | ||
| Model: | ||
| Type: | Desktop type / Laptop type | |
| Type of operating system | ||
| OS: | Windows XP Home Edition / Windows XP Professional / Windows 2000 Professional / Windows Millennium Edition | |
| RAM capacity | ||
| RAM capacity: | ||
| Hard disk drive (containing Music Transfer Hard Disk Player Edition and audio data) | ||
| Capacity of the drive: | ||
| Free space: | ||
| Installed folder containing Music Transfer Hard Disk Player Edition (if other than the default folder)*1 | ||
| Location of the installed folder: | ||
| Version of the Music Transfer Hard Disk Player Edition software *2 | ||
| Version: | ||
| Error message (if one appears) | ||
| Error message: | ||
1 If you do not specify the destination, the software is installed at C:\Program Files\AIWA\Music Transfer Hard Disk Player Edition.
2 Click [Help] - [Software Version] to confirm the version.
Messages
| Message | Meaning | Remedy |
| You must log on as the administrator for installation. | It is going to perform installation/recovery, without having as the Administrator. | You have to log on as the Administrator (page 8). |
| You cannot install in this version of Windows. | You cannot install because of the version of Windows which is not supported. | Make sure that the operating system you are using is compatible with Music Transfer Hard Disk Player Edition (page 7). |
| You have to install Music Transfer in advance. | It is going to perform recovery, without having Music Transfer Hard Disk Player Edition software installed. | Install Music Transfer Hard Disk Player Edition software. |
| The player cannot be recognized. | A message when failed recovery: The player is not connected to your computer securely. | • Connect the player to your computer securely. • Make sure that the power of the player turned on. |
| The writing to a player failed. | A message when failed recovery: The folder/file deletion in the player failed. | Recover the firmware of the player again. If an error message appears even after you have recovered the player, format the player's hard disk. Before you format the player, make sure about the handling of data. |
| An unexpected error occurred. | A message when failed recovery: Displayed the cases other than the above. | Recover the firmware of the player again. If an error message appears even after you have recovered the player, install the Music Transfer Hard Disk Player Edition again. |
| Firmware recovery cannot be performed. Update the firmware from the menu of Music Transfer. | Firmware cannot be updated. | • Recover the firmware of the player using supplied CD-ROM. • Click [Tools] - [Firmware Update] to update the firmware of the hard disk player. |
| 99 playlists already exist. You cannot create any more playlist. | Displays when [Create Playlist] is pressed where there are 99 Playlists. | Up to 99 Playlists can be created and stored in the player. Create after deleting some Playlists first. |
(Continued)
| Message | Meaning | Remedy |
| The player is not connected. | • Displays when the player is disconnected from your computer. • Displays when the player is not connected while updating the firmware. | • Connect the player to your computer securely. • Make sure that the power of the player is turned on. |
| Since the memory is insufficient, cannot continue editing. Close unnecessary applications. | Displays when the capacity of your computer's memory becomes insufficient. | When software other than Music Transfer Hard Disk Player Edition is activated, deactivated other software. |
| The selected file is unauthorized. | Displays when the selected file is unauthorized while updating the firmware. | Choose the correct firmware. |
| Firmware update failed. | Displays when failing the firmware updating. | An error occurred during updating. • Connect the player to your computer securely. • Make sure that the power of the player is turned on. |
| Cannot access to the player. | Displays when the player cannot be recognized. | Disconnect and connect the player. |
| Cannot send 1,001 or more tracks. | Displays when it is going to register 1,001 or more tracks into the player. | You cannot send and store 1,001 or more tracks to the player. |
| Cannot register 501 or more tracks to a playlist. | Displays when it is going to register 501 or more tracks into the FAVORITE or Playlist. | A maximum of 500 tracks can be registered for each Playlist. Erase unnecessary tracks until it becomes less than 501 tracks. |
| Cannot send 1,001 or more tracks. | Displays when it is going to register 1,001 or more tracks into the player. | • You cannot send and store 1,001 or more tracks to the player. |
| Cannot register 501 or more tracks to a playlist. | Displays when it is going to register 501 or more tracks into the FAVORITE or Playlist. | • A maximum of 500 tracks can be registered for each Playlist. |
| The player's memory is insufficient. | Displays when registering files and updating a Playlist cannot be performed, or when the eliminable file does not exist. | The capacity of the hard disk of the player is insufficient. Erase unnecessary files before sending files. |
| Since the player's memory is insufficient, there are some files that cannot be registered. Do you want to continue processing? | Displays when updating the Playlist can be performed but the capacity of sending files is insufficient. | Since the capacity of the hard disk of the player is insufficient, all the files cannot be sent. Yes: Send the number of files into which it can be registered to the player. No: Cancel the process. |
| Perform firmware update. | Displays when Music Transfer Hard Disk Player Edition is activated but no firmware can be found. | A firmware does not exist in the player. Click [Tools] - [Firmware Update] to update the firmware of the player. |
| High-speed transfer mode is selected. This mode becomes effective after restarting Windows. Do you want to restart Windows now? | Displays when the player is recognized for the first time after installation. | The High-speed transfer mode becomes effective after restarting Windows. It is recommended to restart your computer. When not restarting your computer, the transfer speed does not change. |
Index
A, B, C
Aiwa official website 5, 25
D
Disconnecting the hard disk player from the computer 20
E
Explorer window 10
F, G, H
FAVORITE 18
Firmware recovery 22
Firmware update 21
Folder window 10
I, J, K, L
Installing Music Transfer Hard Disk Player Edition 8
M, N, O
MP3 files 2, 6
Music Transfer Hard Disk Player Edition
install 8
start up 11
install 23
P, Q, R
Playlist 16
Edit 18
Playlist window 10
S
Sending MP3 files to the hard disk player 10
System requirements 7
T
Troubleshooting 25
U, V, W, X, Y, Z
USB port 11
Programme © 2004 Sony Corporation/Documentation © 2004 Sony Corporation
[Delete Track (Supprimer piste)]

[Delete Playlist (Supprimer liste lecture)]

[Create Playlist (Créer liste lecture)]
Fenêtre Playlist
Case à cocher
Avant le démarrage
Programa © 2004 Sony Corporation / Documentation © 2004 Sony Corporation
- MODE D'EMPLOI
- 1 INSTALL THE SOFTWARE. (PAGE 8)
- 2 SEND MP3 FILES TO THE HARD DISK PLAYER. (PAGE 10)
- NOTE
- TABLE OF CONTENTS
- OVERVIEW 2
- BEFORE USING THIS PRODUCT 5
- INSTALLING THE SOFTWARE 8
- SENDING MP3 FILES TO THE HARD DISK PLAYER..... 10
- DISCONNECTING THE HARD DISK PLAYER FROM THE COMPUTER 20
- OTHER INFORMATION 21
- WHEN USING MUSIC TRANSFER HARD DISK PLAYER EDITION
- WHEN LISTENING TO MUSIC WITH THE HARD DISK PLAYER
- ABOUT MUSIC TRANSFER HARD DISK PLAYER EDITION
- NOTES ON USING MUSIC TRANSFER HARD DISK PLAYER EDITION
- NOTES
- SYSTEM REQUIREMENTS
- THIS SOFTWARE IS NOT SUPPORTED BY THE FOLLOWING ENVIRONMENTS
- INSTALLING MUSIC TRANSFER HARD DISK PLAYER EDITION
- 1 TURN ON YOUR COMPUTER AND START UP WINDOWS
- 2 LOG ON WITH THE FOLLOWING USER NAME
- 3 INSERT THE MUSIC TRANSFER HARD DISK PLAYER EDITION CD-ROM INTO THE CD-ROM DRIVE OF YOUR COMPUTER
- BEFORE STARTING
- 1 TURN ON THE PLAYER
- 2 CONNECT THE PLAYER TO YOUR COMPUTER
- 3 START MUSIC TRANSFER HARD DISK PLAYER EDITION
- 4 SELECT THE FOLDER WHERE MP3 FILES ARE STORED
- 5 SELECT THE MP3 FILE YOU WANT FROM THE EXPLORER WINDOW
- IF THERE ARE FILES YOU DO NOT WANT TO SEND TO THE PLAYER
- TIPS
- VIEWING THE STATUS BAR
- SPECIFYING WHICH FILES TO SEND OR NOT TO SEND
- VIEWING ALL MP3 FILES STORED IN THE HARD DISK PLAYER
- DELETING MP3 FILES FROM THE PLAYER
- TO QUIT THE SOFTWARE
- CREATING YOUR OWN PLAYLIST
- WHAT IS A PLAYLIST
- 1 CLICK [CREATE PLAYLIST] TO CREATE A NEW PLAYLIST
- 2 ENTER THE NAME FOR THE PLAYLIST, AND THEN PRESS THE ENTER KEY
- 3 IN THE EXPLORER WINDOW, SELECT THE MP3 FILES YOU WANT TO ADD TO THE PLAYLIST
- 4 CLICK [ADD]
- TIP
- DELETING A PLAYLIST
- EDITING THE 心 FAVORITE AND THE PLAYLIST
- ADDING AN MP3 FILE TO THE 心 FAVORITE
- CHANGING THE PLAYING ORDER OF MP3 FILES
- DELETING AN MP3 FILE FROM THE 心 FAVORITE OR THE PLAYLIST
- DISCONNECTING THE HARD DISK PLAYER FROM THE COMPUTER
- UPDATING THE FIRMWARE OF THE HARD DISK PLAYER
- RECOVERING THE FIRMWARE OF THE HARD DISK PLAYER
- UNINSTALLING MUSIC TRANSFER HARD DISK PLAYER EDITION
- FOR WINDOWS XP USERS
- FOR WINDOWS 2000 USERS
- FOR WINDOWS MILLENNIUM EDITION USERS
- TROUBLESHOOTING
- IF THE INSTALLATION WAS NOT SUCCESSFUL
- RIGHT-CLICK AND SELECT [EXIT]
- THE PLAYER IS NOT RECOGNIZED BY THE COMPUTER
- FILES DO NOT APPEAR ON THE DISPLAY
- THERE ARE SOME CHARACTERS THAT DO NOT APPEAR ON THE DISPLAY
- SENDING FILES WAS UNSUCCESSFUL
- YOU CANNOT USE MUSIC TRANSFER HARD DISK PLAYER EDITION
- YOU CANNOT PERFORM THE SAFE REMOVAL PROCEDURE TO DISCONNECT THE PLAYER FROM THE COMPUTER
- NOTES ON SYSTEM SUSPEND/HIBERNATION MODE
- NOTES ON THE BUILT-IN HARD DISK
- IN THE FOLLOWING CASES, A HARD DISK FORMAT-RELATED ERROR MAY OCCUR
- RECOVERING THE FIRMWARE AFTER CHECKING THE HARD DISK ERROR
- RECOVERING THE FIRMWARE AFTER FORMATTING THE HARD DISK
- IMPORTANT
- MESSAGES
- INDEX
- A, B, C
- D
- E
- F, G, H
- I, J, K, L
- M, N, O
- P, Q, R
- S
- T
- U, V, W, X, Y, Z
- AVANT LE DÉMARRAGE
Brand : AIWA
Model : MUSIC TRANSFER
Category : Portable audio player