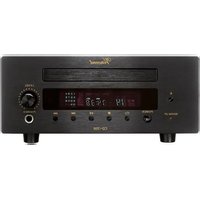
SAV-C2 - AV amplifier VINCENT - Free user manual and instructions
Find the device manual for free SAV-C2 VINCENT in PDF.
User questions about SAV-C2 VINCENT
0 question about this device. Answer the ones you know or ask your own.
Ask a new question about this device
Download the instructions for your AV amplifier in PDF format for free! Find your manual SAV-C2 - VINCENT and take your electronic device back in hand. On this page are published all the documents necessary for the use of your device. SAV-C2 by VINCENT.
USER MANUAL SAV-C2 VINCENT
Instructions for use
english

we thank you for the confidence you prove in purchasing our product. It will match your high demands towards sound and manufacturing quality. Though it is understandable that you want to plug and play this product instantaneously, we encourage you to read this manual carefully before installation.
It will help you in handling and operating this machine in your system and obtaining the best possible performance, even if it was installed by your dealer.
Please follow the security precautions, though some of those things may seem obvious.
In the appendix to this manual you will find a glossary explaining some established technical terms.
If there are open questions your audio specialist dealer will help you. He also represents your contact person in case of needed warranty service or repairs after the warranty period and is interested to hear from your experiences with Vincent products.
We wish you plenty of joy with your / our product,
your Vincent-Team
Cher client,
| Security precautions | 42 |
| User Information | 43 |
| Scope of delivery | 44 |
| Description of the device | 44 |
| Remote control | 47 |
| Installation | 50 |
| Speaker configuration | 60 |
| Operation | 66 |
| Tips | 71 |
| Troubleshooting | 72 |
| Technical Specifications | 75 |
| Glossary | 75 |
english
Dolby Surround Prologic
DTS Digital Surround 5.1
DTS ES Digital Surround 6.1
This appliance was produced under strict quality controls. It complies with all established international safety standards. Nonetheless, the following instructions should be fully read and observed in order to prevent any hazard:

Do not open the appliance! RISK OF ELECTRIC SHOCK!
There are no parts in the appliance that require maintenance by the user.

Maintenance/Alterations
All equipment that is connected to the domestic mains voltage can be dangerous to the user if not handled properly. Leave maintenance work to qualified professionals. The product is only permitted for connection to AC 230Volt/50Hz, for earthed sockets and use in enclosed areas. Altering the product or manipulating its serial number voids the warranty. After a fault, leave the appliance's fuse to be replaced only by a professional with one of the same kind.
Power Cable Connection
Always pull the plug and never the power cable if you want to disconnect the appliance from the mains power. Make sure when setting up the appliance that the power cable is not squashed, severely bent or damaged by sharp edges. Do not touch the power lead with wet or damp hands. Use the power cable supplied or another one from Vincent.

objects get inside the appliance (ventilation slots etc.). It must be disconnected from the mains power immediately and examined by a professional if this happens. Never expose the appliance to high temperatures (direct sunshine) or strong vibration.

Heat Build-up
All amplifiers generate heat as part of their design. Make sure that a gap of 5cm remains around the appliance and that the surrounding air can circulate (do not install in enclosed cupboards). Vents must not be covered up.
Switching Off
Switch the appliance off every time before you connect or remove other components or loudspeakers, disconnect or connect it to the mains power, leave it unused for a longer period or want to clean its outside. On all amplifiers and receivers, wait approx. 1 minute after this before disconnecting or reconnecting the cable.

Moisture/Heat/Vibration
Contact of electrically operated equipment with liquids, moisture, rain or water vapour is dangerous for such equipment and the user and must be avoided without fail. Take care that no liquids or
Volume
The maximum tolerable volume is always reached well below the maximum possible setting on the amplifier. Be careful with the volume setting, therefore, in order to prevent damage to hearing. So that you do not expose yourself to high volumes unintentionally, always set to a low level before changing the input channel.


Cleaning
Pull out the plug before cleaning the outside of the product. Whenever possible, use a soft, lint-free cloth that has been dampened. Do not use abrasives, solvents, thinners, flammable chemicals, polishes and other cleaning products that leave marks.

Batteries
Take note of the instructions for using batteries in the chapter "Remote Control".
USER INFORMATION


Setting up the appliance
How the system is set up has an effect on the sound quality. Therefore only place it on a suitable, stable surface. To make the most of your system's sound quality, we recommend placing the equipment on Vincent racks and not putting them on top of each other.

Old electronic equipment
This appliance is subject to the conditions set out in the European Directive 2002/96/EC, whose implementation is regulated in Germany by the Electrical and Electronic Equipment Act (ElektroG). This is identified by the symbol of a crossed out waste bin on the appliance.
What this means for you as a consumer:
All old electrical and electronic equipment that is no longer used must be disposed of separately from domestic waste using places provided by the authorities. By doing so you can prevent damage to the environment and help to encourage manufacturers to produce more durable or reusable products. For further information about disposing your old appliance, please consult your local authority, waste disposal agency or the shop where you bought the product.

CE sign
This appliance complies with the current EU directives about attaining the CE mark and thus meets the requirements for electrical and electronic equipment (EMC regulations, regulations and regulations for low voltage equipment.)
Declarations
This document was written by Andreas Boer. It is a product of Sintron Vertriebs GmbH, 76473 Ilfezheim and may not be copied or distributed partly or in full without express, written consent.
Vincent is a registered trademark of Sintron Vertriebs GmbH, 76473 Iffezheim.
"Dolby", "Prologic II", "Dolby Digital EX", the Double-D-Symbol, "dts", "dts Surround", "dts-ES", the dts-Logo, "HDCD" and "High Definition Compatible Digital" are registered trademarks of their owners.
Vincent works continually to improve and develop its products. Therefore, the appearance and technical design of the appliance are subject to changes, as long as they are in the interest of progress.
The content of these instructions is for information purposes only. It can be changed at any time without prior notice and does not constitute any obligation on the part of the trademark's owner. The latter assumes no responsibility or liability for errors or inaccuracies, which may be included in these operating instructions.
Explanation of the symbols
The lightening bolt tells you that dangerous voltages are present in the appliance, which can cause an electric shock.

This symbol brings your attention to particularly important information regarding operation and maintenance.

This symbol identifies useful information and advice about how to handle the appliance.
INCLUDED IN DELIVERY
Please check the contents of the packaging, which in addition to the appliance should contain the following accessories:
1 AVR-2 remote control
2 AAA (LR3) batteries
1 power cable
- this manual
DESCRIPTION OF THE DEVICE
Home cinema systems should be able to play back original films authentically and enable them to become an experience. Total home-cinema solutions based particularly on tailored Vincent components take high-grade movie material to the highest form. Due to the careful design of circuits, current decoder technology, the solid mechanical construction and reserve power from the power supply, they master film scenes with explosive dynamics as well as quiet and tender passages of the film soundtrack. Doing all that, they constantly set price-performance yardsticks.
The SAV-C2 is a 6-channel decoder/preamplifier stage that fulfils every wish in the multi-channel range: it offers superb quality sound, high-grade processing and comprehensive equipment. Digital conversion is not carried out via several analogue sound inputs to play back analogue sources such as an analogue CD-player in the best quality. In combination with one or more Vincent main amplifiers a system can be created, which makes a separate stereo system redundant.
The machine offers
- decoder technology for dts 5.1, dts ES 6.1 Matrix, Dolby Prologic II, Dolby Digital 5.1, Dolby Digital EX 6.1 and PCM-Stereo
- various DSP sound-processing programs for simulation of spatial acoustics
- a clear, high-contrast display to show selected settings and the operating mode
- remote control of all functions
- the ability to allocate digital sound connections to selectable pre-amplification inputs as the listener wants
- audio input connections, by means of which up to 8 sources (3 coaxial digital, 1 optical digital, 7 high-level stereo inputs and a 5.1 RCA multi-channel input) can be connected
- the ability to use various video signal formats: Component YPbPr, S-Video or Composite
- an audio output (stereo) for a recorder (REC OUT)
All user settings are made directly at the machine without the need to use complex screen menus.
FRONT VIEW
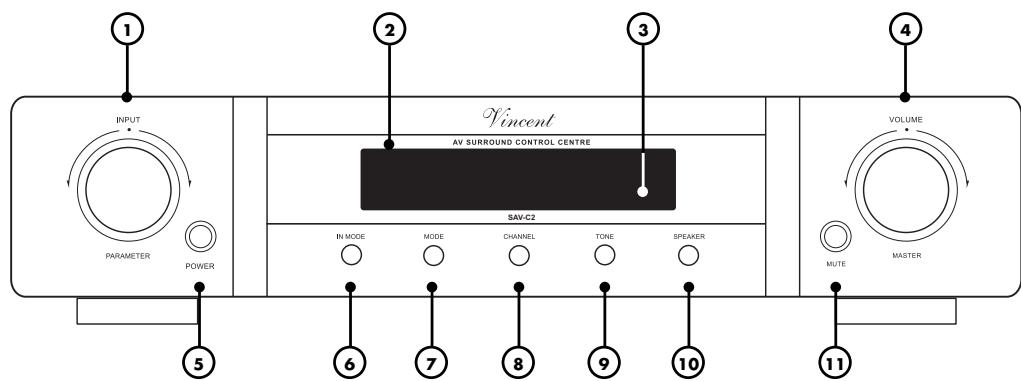
- INPUT/PARAMETER To select the input channel and to be used as multi-function button for the "SPEAKER", "CHANNEL", "DELAY" and "TONE" settings.
- Display Shows information regarding the mode and the name of the selected input channel. Selectable parameters are to be seen while settings are being made.
- Infrared receiver for the remote control
- MASTER VOLUME
Locking, continuously rotating knob for adjusting the master volume of the system.
- POWER: Mains Switch
Switches the machine on and off.
- IN MODE Use this to switch between use of the analogue sound connection and the currently allocated digital sound connection for the preamplifier inputs "CD", "DVD", "SAT", and "D-TV". Use "DIN.SET" (22) for the allocation.
-
MODE: Sound Playback Mode To switch between different two- or multi-channel sound-playback modes such as "STEREO" or "DTS5.1". No alternative sound playback mode can be selected for the inputs "CD", "DVD" (if set to analogue sound) and "6.1 CHANNEL".
-
CHANNEL Changes the volume of the individual speaker channels and adjusts the stereo balance. The values are adjusted using the "PARAMETER" knob (1) or the "SET" keys (30). They can only be set for the channels currently supported in the playback mode presently selected (STEREO, DTS, etc.).
- TONE: Sound Control For raising or lowering bass and treble, as well as switching off the TONE function. Changes are made using the "PARAMETER" knob (1) or the "SET" keys (30).
- SPEAKER: Speaker Configuration
For storage of various data on the speaker system for optimum signal adaptation by using the "SET" keys (30) or the "PARAMETER" knob (1). This cannot be adjusted if one of the "CD", "DVD" (if set to analogue sound), "6.1 CHANNEL" inputs is selected.
11.MUTE: Mute Volume
To switch off the signals to the preamplifier outputs in the "ANALOG AUDIO OUTPUT" (16) connection field. Pressing it again restores the original volume.
REAR VIEW
12. DIGITAL INPUT: digital inputs for
the sound Connection for source devices with digital sound outputs (DVD/CD-player, digital TV tuner). These digital connections can be allocated to different input channels selectable on the machine.
13. 2 CHANNEL ANALOG AUDIO INPUT:
sound inputs for sources with stereo-analogue sound If the sound input mode of their preamplifier inputs is set to "digital" using "IN MODE" (6)(21), the RCA connectors "CD", "DVD", "SAT" or "D-TV" (14) are deactivated. The corresponding video sockets are located in the connection fields "VIDEO INPUT" (17).
14. REC OUT: analogue stereo recording
output The unchanged stereo sound or the sound from both front speakers of the currently selected source is output here for recording purposes.
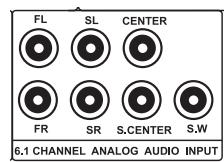
15. 6.1 CHANNEL ANALOG AUDIO INPUT
Connection for a source device having analogue multi-channel sound, e.g. SACD-Player or digital TV-receiver. The associated video connector in the "VIDEO INPUT" (17) field is labelled "6.1CH".
16. ANALOG AUDIO OUTPUT
RCA connections (preamplifier output connections) for transferring sound signals separated according to speaker channels to one or more power amplifiers. Connecting the two types of connectors with power amplifiers at the same time is unnecessary.
17. VIDEO INPUT: Input connectors for the video signals of the AV-sources
Can be found in the two connection fields labelled "VIDEO INPUT". For the SAV-C2 inputs "DVD" and "D-TV" three different connection types are possible.
18. VIDEO OUTPUT: Output connectors for the connection of the SAV-C1 and the
video display Located in the two segments of the "VIDEO" connection fields labelled "OUT-PUT". Only one of all three possible connection types is needed.
19. POWER CONTROL: Outputs for the
Standby Controller The SAV-C2 can use this to switch two standby-capable hi-fi components also fitted with this trigger into standby mode when the preamplifier is switched off and back into standard mode.
20. Mains connector and fuse holder box
Connect the mains cable to this connector and the power supply. The small plastic casing at the connector contains the fuse. Follow the safety instructions on this point.
Point the front of the remote control directly at the front of the appliance, making sure there are no objects between the remote control and the appliance. The distance between the remote control and the appliance should not be more than 7m as the reliability of the remote control is affected beyond this range.
REMOTE CONTROL
Make sure that you do not point the remote control at an angle to the appliance, as beyond an angle of ± 30^ to the centre axis the appliance may not respond as well to the remote control. Change both batteries if the distance at which the remote control can be used effectively decreases.
BATTERIES
Using batteries
Handling batteries incorrectly can cause battery acid to escape or an explosion in extreme cases.
The batteries must be correctly inserted taking note of the polarity, which is marked in the inside of the battery compartment.
In order to make full use of the batteries' life, do not mix new and used batteries. Make sure that you insert batteries of the same type.
Some batteries are rechargeable, others are not however. Take note of the precautions and instructions that are included on all batteries.
Remove the batteries if the remote control is not going to be used for a long time.
Under no circumstances must batteries be short-circuited, taken apart or heated up. For environmental reasons, used batteries should be disposed of in accordance with local environmental regulations and not put with domestic waste.

Only use AAA (LR3)
size batteries.
Changing/Inserting batteries
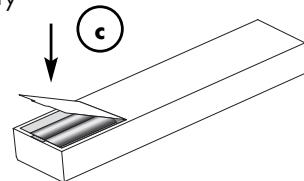
a) Open and remove the battery compartment lid of the remote control by tugging sharply on the fishplate on the edge of the remote control. The battery compartment lid is held in place magnetically, there is no need to loosen the screws!
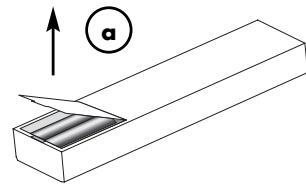
b) If necessary, remove used batteries and insert new ones correctly as shown by the diagram in the battery compartment.
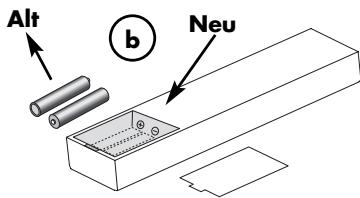
c) Put the compartment cover back on and
close the battery
compartment.
BUTTONS OF THE REMOTE CONTROL
21. IN MODE
Use this to select whether the digital or the analogue sound connection is to be used for the changeable preamplifier inputs. This is only possible for the inputs "CD/AV1", "DVD/AV2", "SAT/AUX1" and "D-TV/AUX2".
22. DIN. SET
Using this you allocate one of the four digital sound connectors "OPTICAL", "COAXIAL1", "COAXIAL2" and "COAXIAL3" (12) to each of the inputs "CD/AV1", "DVD/ AV2", "SAT/AUX1" and "D-TV/AUX2". Make the selection using the input selector button (24).
23. NIGHT
This option can only be activated by pressing a key, if a digital sound connection is selected and a Dolby-Digital-Signal is being received. It reduces the dynamics of the sound (loud sounds are made quieter and quiet sounds are made louder) so that the film sound remains comprehensible and volume nuisance is reduced for involuntary listeners. Pressing the button again switches this option off again.
24. Input selector keys
Used to select the connected source to be switched to for playback.
25. MODE
Use "MODE" to select the required audio playback mode (Dolby Digital, Prologic, Stereo, etc.). Not every playback mode is available for every preamplifier input. See chapter "Audio playback modes ("MODE" key)".
26. TEST
After this button is pressed a test signal noise runs through each of the speaker channels in sequence. You can use this to check whether the volume for all channels is perceived equally loudly at your listening position in the room. The channel volume can be set during this test by using the "SET" key (30) or the

rotating "INPUT/PARAMETER" knob (1). Pressing the "TEST" button a second time switches the setting function off again. The test cannot be carried out if "STEREO" has been set as the audio playback mode or the preamplifier input "6.1CHANNEL" has been selected. See chapter "Channel-Volume-Setting and Channel Test ("CHANNEL" and "TEST" keys").
27. DSP
Repeatedly pressing this button lets you select different digital stereophonic effects such as Hall or Concert Hall simulation. The DSP programmes can be switched off again using the "MODE" key (7)(25). The DSP option cannot be used for the "CD/AV1" and "DVD/AV2" inputs set to analogue sound ("IN MODE" key (6)(21)) and for the inputs "CD/AV1", "DVD/AV2" and "6.1CHANNEL". See chapter "Digital Sound Effects ("DSP" key)".
28. DELAY
By using this and the "SET" button (30), store time delay values for Surround channel signals (in the "Prologic II" and "Dolby Digital" modes) and for the Centre channel (effective in "Dolby Digital" mode). See chapter "Surround delay of the speaker channels ("DELAY" key)".
29. SPEAKER
Use this button and the "SET" keys (30) to set the speaker properties after connecting all the speakers, so that the machine can adapt signal processing to it. This cannot be done if one of the inputs "CD/AV1" and "DVD/AV2" (set to analogue sound ("IN MODE" key (6)(21)) or one of the inputs "LINE/AV4" and 6.1 CHANNEL are currently set as the source. See chapter "Speaker configuration and HDCD-mode ("SPEAKER" key)".
30. SET Keys
The "SET+" and "SET-" keys, like the rotating "INPUT/PARAMETER" knob (1) on the front of the SAV-C1 are used shortly after pressing one of the change-settings operating keys (CHANNEL, TONE,
SPEAKER, DELAY) as multi-function keys to scroll through the various values and options. Unlike the rotating knob mentioned, these keys cannot be used to change the input channel.
31. T/B
Using this key, the TONE function (changing the treble and bass of the sound) can be switched off and on again without changing the set values.
32. CHANNEL
Use this button and the "SET" keys (30) to set the difference in volume between the speaker channels. This is the equivalent, for the front channels, of the balance control on stereo amplifiers. See chapter "Channel-Volume-Setting and Channel Test ("CHANNEL" and "TEST" keys").
33. TONE
Using the "TONE" key and the "SET" buttons (30) the low tones (bass) and the high tones (treble) of the sound can be raised or lowered if desired. In addition, this change in the acoustic pattern (Tone Function) can be switched off and on again without changing the set values. See chapter "Operating the appliance - General".
34. VOL buttons
Using the keys "VOL+ and "VOL-" you change the (Master) volume of the system. This affects the signal of the preamplifier outputs "ANALOG AUDIO OUTPUT" (16).
35. MUTE
Silences the system's sound in that the signal of the preamplifier outputs "ANALOG AUDIO OUTPUT" (16) is switched off. Pressing it again restores the original volume.
INSTALLATION
Home cinema systems can be built with different levels of complexity. This decoder preamplifier is the central control of your system. Components of your AV-system, which you wish to playback through the SAV-C2, are variously called "sources", "signal sources" or "unit sources" in the following pages. These include CD-players, DVD-players, tuners, cassette players, DAT-recorders, personal computers, record-players, portable audio systems and many more. "AV-sources" are components of your system, which play back video signals as well as audio signals. If a variety of units is to be connected, it is more difficult to give an overview of the full system. Therefore imagine your home cinema system to be a general system, which receives input signals by means of different cables and transmits output signals.
In doing so, this preamplifier assumes the following tasks: commutation of audio and video signals from various sources to be played back, preparation of different input signals, decoding digital signals, system volume control, control of the treble and bass of sounds, adaptation of the sound to different speaker configurations by channel management and switching between different stereo, DSP and surround playback modes. To make this possible, the SAV-C2 must be properly installed and configured so that the audio/video signals from different media (CD, DVD, TV, Tuner) can be fed into the system via the SAV-C1 inputs, be processed there and output to power amplifier(s) and video display.
Here it is already clear that you can also feed the video signal directly of the AV-source to the video display directly and not through the preamplifier. This may make sense, for example, if you only have one source unit, the video signals from which you want to see, while the preamplifier processes the associated sound (in this case you exclude any, even minimal, loss of quality by passing the video signal through the preamplifier). Or even if one of the source units outputs a video format not supported by the SAV-C2 (VGA, DVI, etc.). The advantage of using the video signal path through the preamplifier lies in also being able to switch over the video signals of the AV-sources by selecting the input on the SAV-C2.
First connect the cables for all input connections, then for all output connections of the preamplifier. Lastly connect the power cable to the unit and plug it into a socket. There are different standards for audio and video connections of the SAV-C2.
The three possible video signal connections, which can be selected to connect AV sources and the video display, will be described in the following paragraphs.
"VIDEO" connection: Composite Video signal
This signal connection is supported by the majority of AV components.

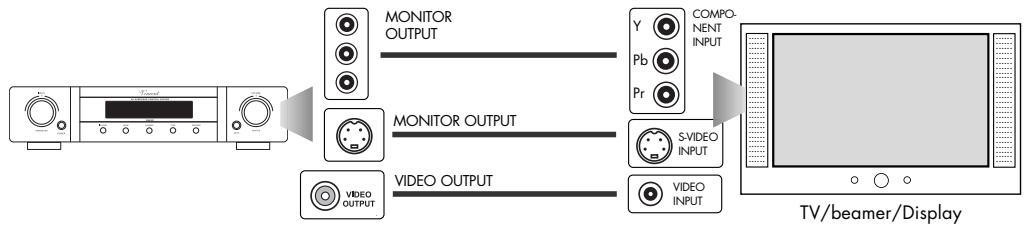
The corresponding terminal socket is often labelled "VIDEO" or "COMPOSITE" and marked yellow like the plug. The signal is always in Interlaced Scan mode, Progressive Scan is impossible. You need a 75 signal cable with RCA plugs for this connection. The picture quality achieved depends greatly on the quality of the composite cable used. Of all the possible video connections used, this one offers the lowest picture quality. It should only be
used if the AV source or the video display (e.g. TV, projector) supports none of the other formats.
"S-VIDEO" connection: S-Video signal
Most home-cinema components support this type of signal. The associated

connector is often labelled "S-VIDEO" or "Y/C". The S-Video signal is always in Interlaced Scan mode, Progressive Scan is impossible. You need a special S-Video cable with Mini DIN plugs for this connection. The picture quality achieved depends on the quality of the cable used. The signal stan
dard offers greater picture quality than the Composite Signal, but is superseded by the Component Signal. Therefore it should be used if the AV source or the video display (e.g. TV, projector) does not support the "Component" standard.
"YPbPr" Connection: Component Video Signal
This connection is often found on higher-grade AV components. The three connector sockets of this signal standard are often
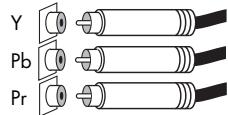
labelled "YPbPr" or "COMPONENT" and colour-marked (red, green, blue). Dependent on the abili
ties of the AV source and the video display, the Component Signal may be present in Interlaced Scan or Progressive Scan mode. Basically, you need three 75 RCA cables for this connection. However a cable suitable for the Component Signal should be used, which combines all three lines in a cord and has three RCA plugs on each end coloured red, green and blue. This standard offers the highest picture quality and should be used if the source and the video display (e.g. TV, projector) support this format.

Only one of the three video connection standards needs to be used. Which one is selected, depends on the availability of input sockets on your video display and this preamplifier. Only two of the selectable inputs on the SAV-C1 offer S-Video and Component connections! Note that there is no conversion between the three different picture formats (S-Video, Component and Composite), therefore a video display (TV, projector) will only receive video signals from AV sources which use the same type of connection as the video display itself. You are, however, free to feed the video signal from AV sources that have a different video standard direct to the display unit.
For connection of the audio signals from the source units, one analogue and two digital standards are used at the unit.
Analogue sound via RCA connections (stereo or multi-channel)
This signal connection is used by almost all hi-fi or AV components.
One analogue sound signal can be transferred per plug connection; this
is associated with one speaker channel (right, left, centre, etc.). Coaxial cables with RCA plugs and sockets (RCA) are coming into use. Some sources with digitally stored or digitally received sound (DVD, SACD, TV-receiver, etc.) and most AV receivers and preamplifiers have the multi-channel ana
logue sound connection. In the case of stereo transmission, the corresponding connector sockets are generally labelled "LINE IN/OUT", "2 CHANNEL IN/OUT", or "AUDIO IN/OUT". Multichannel connector sockets generally carry the designation "6.1 CHANNEL", "ANALOG INPUT" or a similar label. Connector sockets and plugs for the right channel are marked red, those for the left channel white. These connections are not designed for digital audio transfer and therefore also not for DTS or Dolby Digital formats. The quality of the sound transmitted depends on the quality of the cable used.
INSTALLATION
Optical digital connection (Toslink) for audio signals
This digital connection is used on many hi-fi and

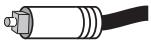
AV components processing digital sound and is suitable for two and multi-channel audio transmission and therefore also PCM (digitally sampled stereo signals), Dolby Digital and DTS bit streams. The different digital signal formats transmitted by optical conducting cable are the same as those of the coaxial digital connection. Connections are generally labelled "OPTICAL" or "DIGITAL IN/OUT".
Coaxial digital connection for audio signals
This digital connection is likewise suitable for dual and multi-channel audio transmission and therefore also PCM (digitally sampled stereo signals), Dolby Digital and DTS bit streams. CD and DVD players, as well as digital TV receivers often have this connection. The signal format transmitted is equivalent to that of the optical digital connection. The connections comprise 75 coaxial cables fitted with RCA plugs (RCA). The stereophonic quality of the signal transmitted depends on the quality of the cable used. Connections are generally labelled "COAXIAL" or "DIGITAL IN/OUT".

One analogue stereo sound connector (with RCA sockets) and one of the four digital sound connectors (OPT, CO1, CO2, CO3) is provided for each of the SAV-C2 inputs "CD/AV1", "DVD/AV2", "SAT/AUX1" and "D-TV/AUX2". For each of these inputs therefore you can choose to use an analogue or a digital sound connector. Which of the four digital sound connectors is allocated to which SAV-C2 input can be freely programmed using the DIN SET (22) function. See section "Operating the Unit": DIN SET (22) key. Only one optical digital sound input is provided, which can be allocated to only one of the four preamplifier inputs mentioned above.

Remove plastic protective covers
Prior to the first installation the protective plastic cap must be removed from all the connections used at the rear of the unit.
RCA Connection
Make sure that you do not mix up the analogue inputs for right and left. The RCA plugs for these are colour coded as follows: red for the right channel, black or white for the left channel.
Connections
Mechanically identical RCA plugs are available for inputs and outputs as well as for analogue and digital connections.
Make sure that you do not

get these connections confused during installation!
Optical Connection
The dust cap protecting the optical digital input should only be removed if a cable is inserted. After a connection is removed from this input, the cap should be replaced.
Connection quality
Make sure that all plugs fit tightly. Inadequate connections can cause noise interference, failures and malfunctions.

-Falsch-

-Richtig -
Cable Connetions
To exploit the acoustic potential of the components fully, only high-grade speaker and connection cables, such as Vincent cables should be used. Give preference to screened audio cables. Your audio specialist dealer will be pleased to advise you with this.
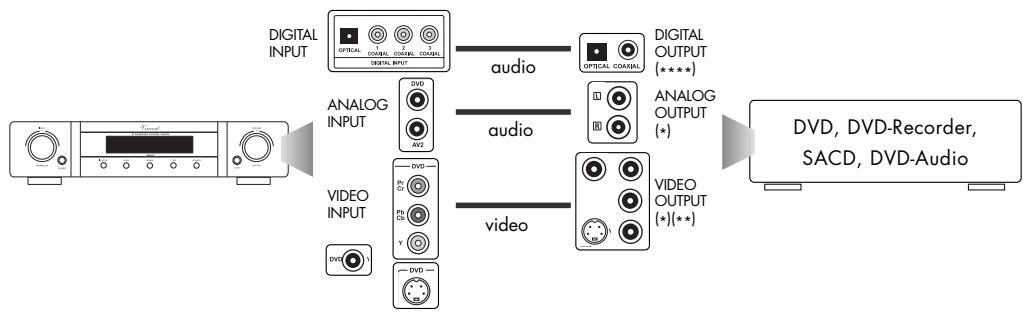
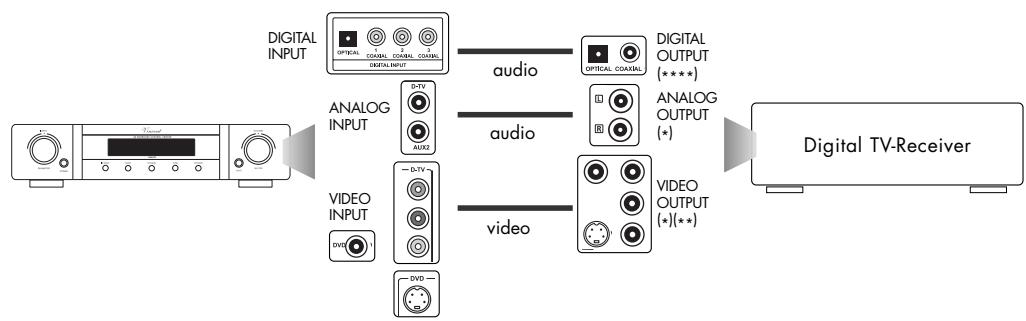
CONNECTION OF THE SOURCE UNITS
In selecting which source unit to connect to which selectable input on the preamplifier, it helps to consider the connection standards available for the preamplifier inputs. Digital sound connection is only possible for the "CD/AV1", "DVD/AV2", "SAT/AUX1" and "D-TV/AUX2" inputs. By using RCA connections, analogue stereo sound can be used on all inputs of the preamplifier except
"6.1 CHANNEL" and "LINE/AV4". All inputs can accept Composite video signals; the "DVD/AV2" and "D-TV/AUX2" inputs are the only ones designed for Component and S-Video connection. The following table shows which connection standards for sound and picture can be used for the different SAV-C2 inputs.
| Input Name | Type of Audio Connection | Type of Video Connection |
| CD/AV1 | stereo analogue (RCA) or digital (coaxial or optical) | Composite (RCA) |
| DVD/AV2 | stereo analogue (RCA) or digital (coaxial or optical) | Composite (RCA), S-Video (Mini-DIN), Component YPbPr (RCA) |
| SAT/AUX1 | stereo analogue (RCA) or digital (coaxial or optical) | Composite (RCA) |
| D-TV/AUX2 | stereo analogue (RCA) or digital (coaxial or optical) | Composite (RCA), S-Video (Mini-DIN), Component YPbPr (RCA) |
| VCR/AUX3 | stereo analogue (RCA) | Composite (RCA) |
| TUNER/AV3 | stereo analogue (RCA) | Composite (RCA) |
| LINE/AV4 | stereo analogue (RCA) | Composite (RCA) |
| 6.1 CHANNEL | 7-channel analogue (RCA) | Composite (RCA) |
If the source units at the inputs "DVD2/AV2" and "D-TV/AUX2" provide several possible video connections, only the highest-grade connection accepted by the video display should be used, even if the following connection diagrams show all three connections.
If the source unit provides several possible audio connections, generally only one standard is used. In
some cases, if a DVD-player or CD-player is equipped with high-grade DA-converters, it may be desirable to have digital AND analogue sound connection for these units. Even external decoders or some multi-format disc-players with SACD or DVD-Audio playback must in addition have analogue multi-channel connection (at the "6.1CHANNEL" (15) input), so as to be available in the Surround sense for every format played.

To use a record player you need a so-called equaliser preamplifier (also called a phono preamplifier), which is installed in the signal path between the record player and one of the high-level inputs. Some models of record player already include this preamplifier and can be connected directly. You will find further information in this appliance's operating manual.
The stereo sound of appliances that use output connectors other than RCA (DIN plugs, jack plugs) can often also be used with the aid of adaptors.
One audio connection has to be created for every source unit. Moreover, every AV source also needs a video connection. After you have selected which source is to be connected to which preamplifier input, connect the dual RCA connector for stereo sound (LINE OUT) of one such signal source to the corresponding input in the terminal field
"2 CHANNEL ANALOG AUDIO INPUT" (13). In addition, a coaxial or optical digital connection can be made with one of the sockets in the "DIGITAL INPUT" terminal field (12) of the preamplifier for up to four source units. Please note that, on the preamplifier, there is no more than one Optical digital input. The Composite outputs "VIDEO
OUTPUT" of all AV-sources should then be connected to the corresponding inputs in "VIDEO INPUT" (17) terminal field of the preamplifier.
A Component or S-Video cable can also be used for the video signal path instead of this only for units on the "DVD/AV2" and "D-TV/AUX2" pre-amplifier inputs. You only need the multi-channel
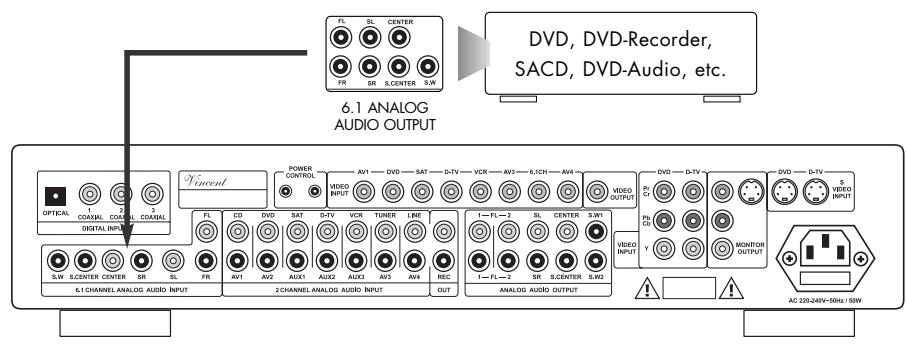
input "6.1CHANNEL ANALOG AUDIO INPUT" (16) for external decoders and multi-format players (SACD, DVD-Audio etc.).
Please note that the SAV-C2 does not divert the channel signal if the analogue multi-channel input is selected. You need a minimum of a 5.1 set of speakers to play back multi-channel material via this inputs.
The following sketches simplify the allocation of cable connections for the most widely used signal sources for you.


) Use an empty socket, depending on the preamplifier input to which you have allocated the source unit.
*) You generally only have to connect one of the three video connections. This depends on which standards your AV-sources and the Video display support.
***) If you have a video recorder with an S-Video output, it can be used provided that one of the preamplifier inputs "DVD/AV2" or "D-TV/AUX2" is not occupied by another source unit and can be used instead of the preamplifier input "VCR/AUX3" to connect the video recorder.
****] The digital terminals belong to the preamplifier inputs "CD/AV1", "DVD/AV2", "D-TV/AUX2" or "SAT/AUX1". They can be distributed as desired over them.
CONNECTION OF ONE OR MORE
POWER AMPLIFIERS AND THE SUBWOOFER
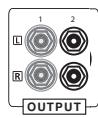
You will find the terminals for the power amplifiers in the "ANALOG AUDIO OUTPUT" terminal field (16). The multi-channel input "6.1 CHANNEL ANALOG AUDIO INPUT" (15) must not be confused with the RCA multi-channel output!
Our sketch shows possible connections. Several mono or stereo power amplifiers and one multi-channel power amplifier can both be used. As one possible solution, a multichannel power amplifier is shown in the sketch.
Power amplifier channels for up to 2 pairs of front speakers (Front: right, left), one Centre speaker, two Surround speakers (Rear: right, left), one rear centre speaker (Surround Centre) and up to two subwoofoers can be connected using RCA connections in the bottom part of the terminal field. The additional pair of RCA outputs for the Front signals (right, left) can be used to carry sound to a second zone (another room) using a separate stereo power amplifier and speakers.
Connect "FL" and "FR" to the channel inputs of the power amplifier(s) for the front channels. The "CENTER" connector should be connected to the channel input of the power amplifier for the centre speaker. "SL", "SC" and "SR" should be connected to the power amplifier(s) for the Surround speakers.
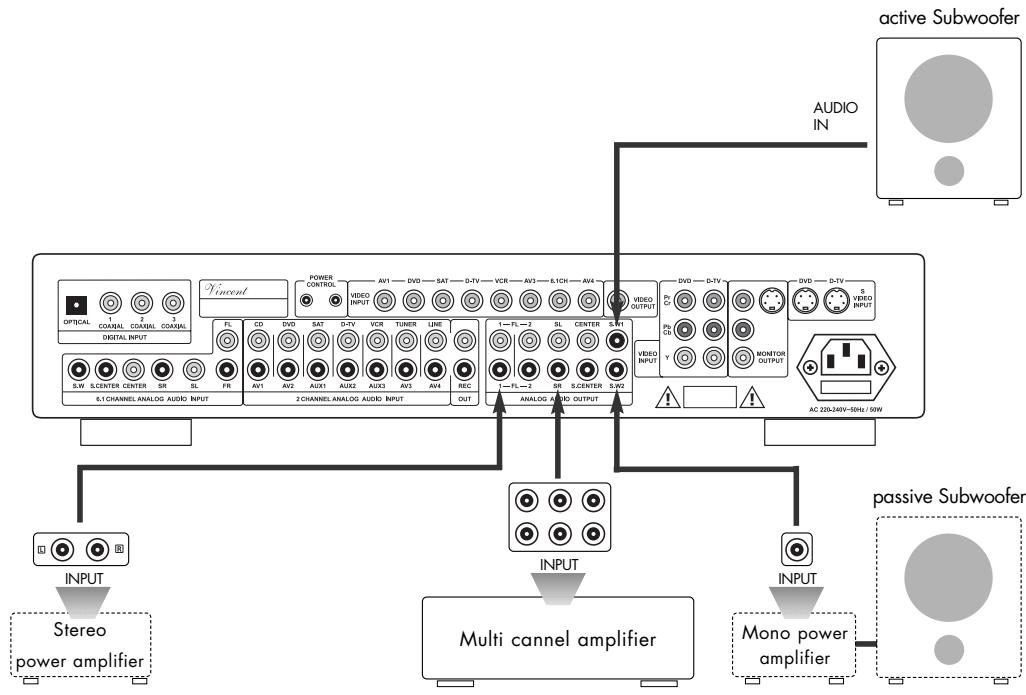
An active subwoofer is generally used in home-cinema systems. Its Line Input can be connected directly to one of the outputs "S.W1" or "S.W2" in the "ANALOG AUDIO OUTPUT" field (16). An active subwoofer has its own built-in amplifier, a passive subwoofer does not. You will recognize an active sub
woofer by the power cord or a power socket on the back. A passive bass speaker has to be connected to the speaker terminals of a suitable main amplifier; this main amplifier's Line Input then needs to be connected to one of the three outputs "S.W1" or "S.W2" of the SAV-C2.
CONNECTION OF THE VIDEO DISPLAY
The preamplifier has three Video outputs: one Composite Video (RCA) connection, one S-Video connection and one Component-Video connection. These are located in the terminal fields at the rear of the unit, which are labelled "VIDEO OUTPUT" and "MONITOR OUTPUT" (18). Most display units supporting one of these standards can be used.
The connection transmitting the best picture quality (see Section "Installation") and supporting all the AV-sources connected to the preamplifier should be selected. The video display often has to be configured to the input used; the method for doing so is then described in its operating instructions.

Please note that the properties of the video signal output, such as the aspect ratio, picture system (PAL/NTSC), Scan Mode (Progressive/Interlaced), for example, depend on the settings on the source unit. They cannot be influenced at the SAV-C2.
CONNECTION OF A REORDER
If you want you can use the "REC OUT" RCA socket (14) on the back of the appliance to connect an analogue stereo recording device (e.g. CD recorder, cassette recorder, video recorder) or another appliance
that is intended for receiving the unchanged, fixed stereo output level (line level) from the signal source selected on the SAV-C2 at any given time. The output level is independent from the volume and mute functions.

To do this, connect this signal output (REC Output) to the signal input ("RECORD", "LINE IN" or "INPUT")
of the recorder using a pair of RCA cables.

Please note that sound fed in at the digital inputs is not output for recordings at the "REC OUT" analogue output. If the CD-player is connected to one of those digital inputs, for example, CD signals cannot be recorded via the SAV-C2.

AV-recordings can also be made if the "VIDEO OUTPUT" (18) is fed to the recorder instead of the video display.
"POWER CONTROL" TRIGGER OUTPUTS
Many AV-systems are made up of a variety of individual components. So as not to have to switch them on and off before and after every use, some manufacturers have equipped the units with what is known as a "TRIGGER"-circuit, also called "POWER CONTROL"(19). This type of remote-controlled standby circuit is used primarily for power amplifiers.
To this end, the units are interconnected by a dual cable. Mono-3.5 mm jack plugs and their socket
are used as connectors. Using this, preamplifiers, main amplifiers and receivers can electrically signal switching on and off. All other classes of device fitted with this connection and having a Ready or Standby circuit, receive the signal, pass it on via an identical connector socket and switch themselves into standby or on again in synchrony with the transmitting unit. The trigger outputs output a 12 V direct-current signal. Trigger inputs generally require a voltage of 5 - 12 Volts.

Only units that have what is called a "Ready" or "Standby" circuit can support this function. The trigger signal cannot affect the setting of the mains power switch of the receiving unit.
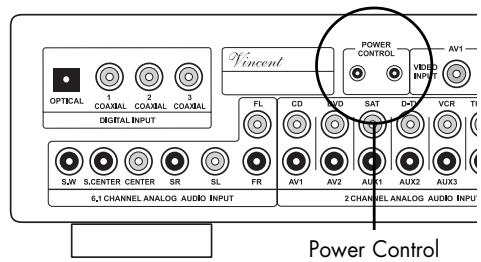
Because most of the units receiving the trigger signal also have a trigger-signal output, these units need no more than these two trigger connections. The signal is spooled sequentially through all the units in this chain of components. If components in your system support this circuit, connect them in sequence using the requisite cables. If these are not supplied with the components, you will obtain them from your audio specialist dealer.
Check whether the wall socket provides the appropriate mains power, which is the case if it is supplied with 230V AC 50Hz . Push the safety plug on the
power cable supplied firmly into the power socket on the back of the appliance. Plug the other end of the power cable into a mains wall outlet.
SPEAKER SETTINGS
Home cinema systems are designed for a variety of combinations with other consumer electronics and many different environments. That is why it is necessary to configure the system before first use and every time the speaker system is changed.
Usually, a quick setup procedure must be absolved, where audio/video settings have to be made.
This setup has been reduced to the minimum requi
red steps at this preamplifier, to keep it user friendly. No video settings have to be taken on for this preamplifier. So only the speaker configuration, the required channel volume differences and delay times have to be defined. Note that some settings can only be made using the remote control.
It is best to follow the sequence displayed in the following table:
| Function | at front panel / with remote control | Available Parameters | |
| 1 Button(s) SPEAKER (10)(29) | Speaker configuration (and on-off-switch for the HDCD playback mode, see chapter „Operating the device“) | both | S: SMALL L: LARGE N: NONE Y: YES N: NO 50/100/150/200: crossover frequency for the subwoofer |
| 2 CHANNEL (8)(32) TEST (26) | Stereo balance and volume level difference of center, surround and subwoofer signals in relation to front channel volume level The speaker channel test sound is used to check the channel volume differences (set using „CHANNEL“ (8)(32)) at the listening position in the room, also while making these settings | both remote control only | Speaker channel volume differences in dB |
| 3 DELAY (28) | Delay times of the center and surround signals in relation to front channel signal (effective only in audio playback modes „Dolby Digital" and „Dolby Prologic II“) | remote control only | Delay time in ms (milliseconds) |
SPEAKER CONFIGURATION AND HDCD-MODE
("SPEAKER" KEY)
Two different functions of the preamplifier can be affected in this menu. Firstly, automatic signal detection for HDCD, effective with digital playback, can be switched on and off again. Second, some information about the connected speakers can be stored. These settings influence the distribution of the source signals to the different speaker channels. Since every surround sound system needs "bass management" to bring bass frequencies from specific or all channels to those speakers that are best adapted for the reproduc
tion of those, it is necessary to give the preamplifier information about the kind of speakers used. The type of subwoofer signal, for example, depends on what size settings have been selected for the speakers connected. Because very small speakers are not capable of reproducing bass sounds, therefore the subwoofer has to take care of this. Furthermore, in the case of multi-channel sound, for example, the Centre channel signal is admixed with the front-channel signals in case the centre-channel speaker is not used.

These settings are impossible if one of the "6.1CHANNEL" or "LINE/AV4" inputs was selected. If one of the "CD/AV1" or "DVD/AV2" inputs was selected, these settings are only possible if the digital sound connection ("IN MODE" key (6)(21)) is selected. These settings also cannot be completed in the "STEREO" audio playback mode.
After the SPEAKER key (10)(29) of the preamplifier has been pressed again from normal mode, automatic HDCD-decoding on detection of an HDCD-signal can be switched on or off using the rotating PARAMETER knob (1) or using the "SET" keys (30). The SAV-C2 preamplifier is equipped with an HDCD-decoder, which allows it to play discs of this format from a standard non-HDCD capable CD or DVD-player, if it is connected via a digital sound connection. Therefore the HDCD setting in the SPEAKER menu only affects the four inputs that
have a digital connection (CD, DVD, SAT, D-TV). In the display, "HDCDON" is now shown constantly instead of the audio playback mode. Despite this, the audio playback mode can be changed by using "MODE" (7)(25). If the setting is active and an HDCD signal is received, this is shown in the display by the symbol "HDCD IN". Because the unit automatically distinguishes between the standard CD signal and the HDCD signal, the HDCD option can remain switched on even when playing conventional CD's.

The HDCD option is global, which means the setting is retained if another input channel is selected or the audio playback mode is changed. The setting also does not change if the analogue sound connection ("IN MODE" (6)(21)) of one of the inputs "CD", "DVD", "SAT" or "D-TV" was temporarily selected.
After the "SPEAKER" key (10)(29) was pressed several times from standard mode, you enter the possible settings for the type and size of the speakers used. Every additional pressing of the "SPEAKER" key (10)(29) advances to the setting for the next speaker or group of speakers. The settings described below for the currently selected speaker channel can be changed using the rotating "PARAMETER" knob (1) or the "SET" keys (30).
back ability are declared, irrespective their size. "LARGE" speakers are all used speakers that have the ability to playback low bass frequencies. No speaker (, NONE) means that it is not used in the system. If, for example, no rear surround speakers have been installed, the required setting is "NONE". A separate setting can not be made for the Rear Centre channel. This channel is activated or deactivated together with the right and left rear channel.
As "SMALL" speakers all speaker models without nameable bass (frequencies below 80 Hz) play
Make your settings as described in the following:
| Front speakers | If the front speakers are able to transmit the complete audio frequency spectrum or if no subwoofer will be installed, choose "L", otherwise choose "S". |
| Center speaker | L (large Center speaker) - S (small Center speaker) - N (no Center speaker) |
| Rear speakers | L (large Surround speakers) - S (small Surround speakers) - N (no Surround speaker) |
| Subwoofer | Y (Subwoofer used) - N (no Subwoofer used) |
| Subwoofer Crossover | The lowest frequency your front speakers are able to reproduce and thus the upper Frequency SWCR limit for the subwoofer signal frequencies. You can choose from 50Hz (very large front speakers), 100Hz, 150Hz and 200Hz (very small front speakers). This setting has no effect on the signals of the front/center/surround speaker channels. |
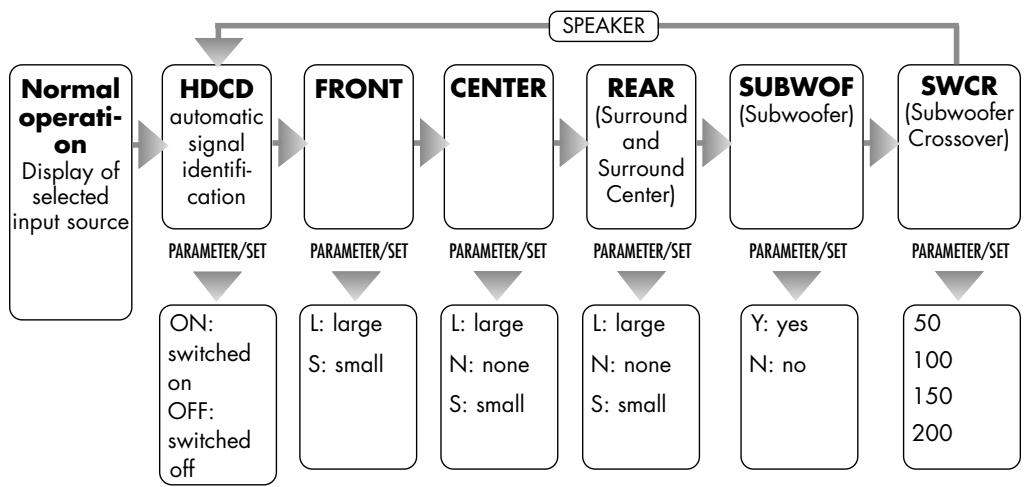
If none of the settings keys is pressed, this setting mode is left into the standard mode (display of the selected input channel) after a few seconds.

All Speaker settings are "global", they have effect on all source input channels except "6.1 CHANNEL" and in all sound playback modes.
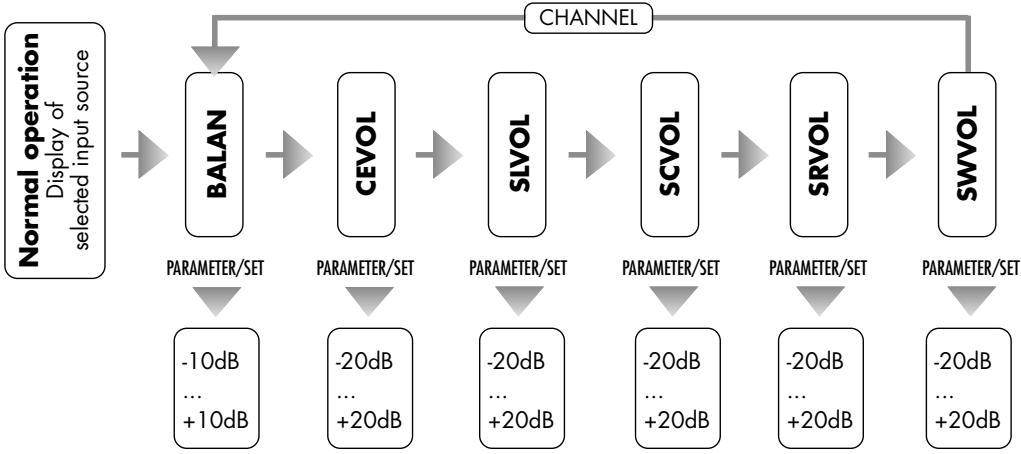
CHANNEL-VOLUME-SETTING AND CHANNEL TEST
("CHANNEL" AND "TEST" KEYS)
In most cases the viewing/listening position must be chosen in a way that the distances to the different speakers are not equal. Additionally, efficiency of different speaker types varies, so that the experienced
volume level at identical signal at the speaker output can be very different. This can reduce or undo the "surround" effect of movies. To avoid that, every speaker channel is separately adjustable in volume level.

If one of the inputs "CD/AV1", "DVD/AV2" (sound connection set to analogue) or "LINE/AV4" is selected, the speaker differences of the surround channels, the subwoofer and the centre channel (SL, SC, SR, SW and CE) cannot be changed.
Only the volume of those channels active in the currently selected playback mode can always be changed. See section "Sound playback modes ("MODE" key)". For example, the relative volume of the rear centre channel can only be adjusted in the "DIG.EX", "DTS.EX" or "PLOGII" modes. Also, it is impossible to adjust all channels deactivated by setting them to "N" using "SPEAKER" (10)(29).
The test sound cannot be activated for the "CD/AV1", "DVD/AV2" inputs (sound connection set to analogue) or the "LINE/AV4" and "6.1CHANNEL" inputs. The "TEST" (26) is also impossible if the audio playback mode was set to "STEREO".
Ensure that the volume is set to a low level. Select a preamplifier input, for which an audio playback mode is adjustable, which supports all speaker channels ("CD/AV1", for example, with the digital sound connection selected). Use the "MODE" key (7)(25) to select an audio playback mode, which also supports all speaker channels ("DIG.EX", for example).
Activate the Test sound by using the "TEST" key (26) on the remote control, while you are in the position that you mainly want to be in during audio or video playback. A hissing sound is to be heard in sequence on all the connected speakers not deactivated in the "SPEAKER" menu.
L→C→R→SR→SC→SL→SW
Adjust the volume so that the test sound can be heard clearly. Check which speaker's volume has to be changed in comparison to the front left channel. You can now remove the difference in volume of the requisite audible channel using the rotating "PARAMETER" knob (1) on the unit or the "SET" keys. The signals of the individual channels can be raised or lowered by a maximum of 20 dB. Exit Setting mode by pressing the
"TEST" key (26) again. The adjustment process can also be carried out without the test sound. Repeatedly pressing the "CHANNEL" key (8)(32) scrolls through the speaker channels. The values can be adjusted using the "PARAMETER" knob (1) or the "SET" keys (30) as already described.

All settings are "global", they have effect on all source input channels and in all audio playback modes.
The test sound can also be used to check that the connected speakers are working.
The following summary exemplifies menu control for you:
In order to achieve a homogeneous sound field at your position in the room, it is necessary to adjust the delay times for the Rear speaker channels and the Center speaker channel.
This is necessary, because in a speaker arrangement typical for a living room the front speaker distance to the listening position is usually larger than the rear speaker distance to the listeners. Irritations of the perception of direction by early surround signals are avoided by delaying the signal for the rear speakers. In some speaker arrangements a delay time must also
be adjusted for the Center speaker. As the result the sound signals of all speakers arrive at the listener at the same time.
In the mode Prologic 2 additional 15ms (milliseconds) of delay cause the back channel sound to arrive later than the front channel sound. This is part of the "Dolby Surround Prologic" specification and reduces audibility of sound fractions crosstalked from the front channel signals and makes sure that the audio information, that is important for sensual location of acoustic sources, is first obtained from the front channels.

These settings are only effective in the Dolby Digital ("DIG5.1" and "DIG.EX"), and Dolby Prologic II (,PLOGII") audio playback modes. They can only be carried out while one of these sound playback modes is selected. To that end, a preamplifier input that supports these modes (see chapter "Sound playback modes ("MODE" key), must be selected.
The settings for Dolby Digital and Dolby Prologic II will be stored separately. No Centre channel delay can be set for Dolby Prologic II.
No separate signal delay can be set for the Rear Centre channel.
If the centre or rear speakers are further away from the listening point than the front speakers, no delay can be set for the front speakers. In that case leave the values at their minimum setting.
The SAV-C2 allows Surround delay times from 0ms to 15ms (milliseconds) in the „Dolby Digital" ("DIG5.1" and DIG.EX") modes and from 15ms to 30ms in the „Prologic II" ("PLOGII") mode. Additionally, in the
"Dolby Digital" modes, a Center delay time in the range 0ms...5ms must be set. All this has to be done after first installation of the system and to be repeated every time the speaker distances are changed.
In order to adjust the required delay settings proceed as follows:
Surround delay time in Dolby Digital mode
Measure the distance from your listening position to the front left or right speaker. Subtract from this value the distance from the listener's position to the rear speakers. Each 30cm of this difference should be related with a delay time of 1ms. Round to the closest multiple of 30cm . For example, a length difference of 120cm results in a required delay time of 4ms. The maximum value is 15ms.
Center delay time in Dolby Digital mode
Measure the distance from your listening position to the Center speaker and to one of the front speakers. Subtract the Center distance from the Front speaker distance. Again, 30cm of this difference should be related with a delay time of 1ms. Round to the closest multiple of 30cm . If the Center speaker is about 50cm closer to the listener, 2ms of delay time should be applied. The maximum value is 5ms.
Surround delay time in Dolby Prologic II mode
Add 15ms to the Surround delay time in Dolby Digital mode.
Setting the delay times for Dolby Digital
Select an input channel with digital sound connection ("CD/AV1", "DVD/AV2", "SAT/AUX1" or "D-TV/AUX2"). If necessary, select a digital sound format ("IN MODE" key (6)(21)). Now use the "MODE" key (7)(25) to select either "DIG.EX" or "DIG5.1" as the audio playback mode. Now press the "DELAY" key (28).
S-DEL 7ms
Use the "SET" keys (30) to set the value calculated for the Surround channels in the Dolby Digital mode. Enter the value for the centre channel in the same way after pressing the "DELAY" key (28) again.
C-DEL 3ms
If nothing is entered for several seconds, the Setting mode is returned to the standard mode.
Setting the delay time for Dolby Prologic II
Select one of the preamplifier input channels ("SAT/AUX1" or "D-TV/AUX2", "VCR/AUX3" or "TUNER/AV3"). If one of the inputs "D-TV/AUX2" or "SAT/AUX1" was selected and this is necessary, switch to an analogue sound connection ("IN MODE" key (6)(21)). Now use the "MODE" key (7)(25) to select either "PLOGII" as the audio playback mode. Now press the "DELAY" key (28). Use the "SET" keys (30) to set the value calculated for the Surround channels in the Prologic II mode.
S-DEL 17ms
If nothing is entered for several seconds, the Setting mode is returned to the standard mode.
OPERATING THE APPLIANCE
GENERAL
| Operation | Button | Description |
| Switch on and off | POWER(5) | When switched off the device is internally separated from the AC power. It has no standby circuit, it is switched on and off at the front panel and not from the remote controller. |
| Change the volume value | MASTER VOLUME (4)VOL+ (34)VOL- (34) | At the front panel: Turn the knob „MASTER VOLUME" clockwise to increase the volume, and counter clockwise to decrease it.Using remote control: Keep the button „VOL+“ pressed to increase the volume. Use the button „VOL-“ to decrease it.In the process of changing volume the display changes to indicating the momentary numerical value of the setting. The volume minimum appears at -80dB, the maximum volume setting is 00dB. |
| Select the input source | INPUT (1)Input selector keys(24) | At the front panel: Turn the button „INPUT"Using remote control: Shortly press the corresponding touch button to change to the desired input channel (for example „CD" or „VCR").The display now shows the name of the selected input channel.As a precaution, prior to changing the input channel the value of the volume setting should be reduced! |
| Mute the volume | MUTE (35) | The mute function can be activated only from the remote control.It cuts off the preamplifier's output signals and thereby silences the loudspeakers. The next push on the button will recover the original volume.While the system is muted, the display (2) shows “MUTE”. |
| Change Bass and Treble settings | TONE(9)(33)SET (30)PARAMETER(1)T/B (31) | Here, if required, you can increase or decrease the Treble and Bass.Maximum increased intensity is achieved at +10 and maximum decreased intensity at -10.After pressing “TONE” for the first time, the proportion of the higher frequencies of the acoustic pattern (Treble) can be changed using the rotary “PARAMETER” control or the “SET” keys. If the “TONE” key is pressed a second time, the proportion of the lower frequencies of the acoustic pattern (Bass) can be changed.If the tone is not to be changed, it is recommended that the tone control (“TONE” function) be switched off and not only set to 00. To do this, the “TONE” key is pressed three times until “TONE ON” appears in the display and then either one of the “SET” keys is pressed or the rotary “PARAMETER” knob is used. Bypassing the tone control can be achieved more quickly by using the remote-control button “T/B”. “BYPASS” appears in the display. The set values are being stored. To switch Tone Control back on again, repeat one of the steps just described. |
| Operation | Button | Description |
| Automatic detection and decoding of HDCD signals with digital sound connection. | SPEAKER(10)(29)PARAMETER(1)SET(30) | After the "SPEAKER" key of the preamplifier has been pressed again from normal mode, automatic HDCD-decoding on detection of an HDCD-signal can be switched on or off using the rotating "PARAMETER" knob or the "SET" keys. The SAV-C2 preamplifier is equipped with an HDCD-decoder, which allows it to play discs of this format from a standard non-HDCD capable CD or DVD-player, if it is connected via a digital sound connection. Therefore the HDCD setting in the "SPEAKER" menu only has an effect on the four inputs that have a digital sound connection (CD, DVD, SAT, D-TV). In the display, "HDCDON" is now shown constantly instead of the audio playback mode. Despite this, the audio playback mode can be changed by using "MODE" (7)(25). If the setting is active and an HDCD signal is also received, this is shown in the display by the symbol "HDCD IN". Because the unit automatically distinguishes between the standard CD signal and the HDCD signal, the HDCD option can remain switched on even when playing conventional CD's. The setting is retained if another input channel is selected or the audio playback mode is changed. The setting also does not change if one of the preamplifier inputs "CD", "DVD", "SAT" or "D-TV" has been set to analogue input connection and back to digital signal input connection using "IN MODE" (6)(21). |
| Switch between use of the analogue and digital sound connection for the four preamplifier inputs CD/AV1, DVD/AV2, SAT/AUX1 and D-TV/AUX2 | IN MODE(6)(21) | One analogue stereo sound connector (with RCA socket) and one of the four digital sound connectors (OPTICAL, COAXIAL1, COAXIAL2, COAXIAL3) is provided for each of the preamplifier inputs "CD/AV1", "DVD/AV2", "SAT/AUX1" and "D-TV/AUX2". For each of these inputs therefore you have the choice of using the analogue or the currently allocated digital sound connector. Which of the four digital sound connectors is allocated to which preamplifier input can be changed using the "DIN_SET" (22) function. The "IN MODE" key is used to switch between analogue and digital sound. It must be remembered that the current setting (AIN = analogue input, DIN = digital input) is not stored separately for each of the four preamplifier inputs, but that they are switched over globally. Therefore this switchover may have to be reset after an input is changed. |
| Change the allocation of the four digital sound connections OPT, CO1, CO2 and CO3 to the four preamplifier inputs "CD/AV1", "DVD/AV2", "SAT/AUX1" and "D-TV/AUX2" | DIN.SET (22) | One analogue stereo sound connection (with RCA socket) and one of the four digital sound connectors (OPT, CO1, CO2, CO3) is provided for each of the preamplifier inputs "CD/AV1", "DVD/AV2", "SAT/AUX1" and "D-TV/AUX2". For each of these inputs therefore you can choose to use an analogue or a digital sound connector. Which of the four digital sound connectors is allocated to which preamplifier input can be changed using the "DIN_SET" function. After pressing once on this button, the unit expects the four input selector keys "CD/AV1", "DVD/AV2", "SAT/AUX1", and "D-TV/AUX2" to be pressed in sequence. And indeed in the sequence, in which you wish to allocate these inputs to the digital sound connections at the back of the unit shown respectively in the display. This operation cannot be cancelled; if a wrong button was pressed, the setting process must be repeated. |
| Compress the sound's dynamics in "Dolby Digital" mode | NIGHT (23) | Movie sound has such an impressive effect particularly because of its dynamics, that is the occasionally large and fast changes in volume. So as other people are less disturbed by having to listen involuntarily, many home-cinema systems provide a switch for reducing the dynamics of the sound (loud passages are quieter and quiet ones louder), so that quiet film passages can still be understood at low volumes and the noise nuisance is reduced during loud sound sequences Activate this option, which is also known by the terms "Midnight" and "Late Night" by briefly pressing the "NIGHT" key; pressing it again switches this type of sound-processing off again. This function can only be operated with the remote control and is only possible for Dolby Digital ("DIG5.1" or "DIG.EX")! |
Audio playback modes ("MODE" key)
The preamplifier provides the possibility of playback from source units that output analogue and digital sound signal formats. Different playback modes are possible for some sound formats. An analogue stereo signal, for example, can be played back via the front speakers only or on all the connected speakers by using Dolby Prologic II.

Switching over the sound format is impossible if one of the "CD/AV1", "DVD/AV2" (each set to analogue sound), "LINE/AV4" or "6.1CHANNEL" inputs was selected.
The "DIG.EX" and "DTS.ES" formats can only be selected if a digital sound connection is used and the "SPEAKER" setting (10)(29) for the rearward speaker is not deactivated (set to "N").
The "MODE" key found on the front of the unit (7) and on the remote control (25) is used to select the playback mode. Not all playback modes can always be selected:
- If one of the inputs "CD/AV1" or "DVD/AV2" (each set to analogue sound) or "LINE/AV4" is selected, only the following playback mode is effective, whereby the subwoofer does not receive a signal:
STEREO
- If "6.1CHANNEL" was selected as the input channel, the signal is output for each channel present at the associated input connection on the back of the unit. Therefore only the following type of playback mode is active:
DIRECT
- If one of the "SAT/AUX1", "D-TV/AUX2" (each set to analogue sound), "VCR/AUX3" or "TUNER/AV3" inputs is selected, the "MODE" key (7)(25) switches between the modes specified below. The subwoofer is always supplied with a signal if it has not been deactivated in its "SPEAKER" setting (10)(29).
STEREO 3-ST PLOGII
- If one of the preamplifier inputs with digital sound ("CD/AV1", "DVD/AV2", "SAT/AUX1" or "D-TV/AUX2" (each set to digital sound connection) is selected, a choice of the following modes is available through the "MODE" key (7)(25), whereby the subwoofer is always supplied with a signal in the "STEREO" and "3-ST" modes if it has not been deactivated in its "SPEAKER" setting (10)(29):
(A) The following types of output can be selected if the source outputs a PCM signal:
PLOGII STEREO 3-ST
(B) The following types of output can be selected if the source outputs a Dolby Digital signal:
DIG5.1 DIG.EX STEREO
(C) The following types of output can be selected if the source outputs a dts signal:
DTS5.1 DTS.ES STEREO
The following table summarizes for every audio format which speaker channels are active and what conditions have to be met for them to be available.
| Audio format | Display | Active Channels | Conditions for activation | |||
| Front Channels (L+R) | Center Channel (C) | Surround Channels (SR, SL, SC) | Subwoofer Channel (SW) | |||
| Direct playback of the respectively connected channels | DIRECT | * | * | * | * | Only for the preamplifier input "6.1CHANNEL". |
| Stereo | STEREO | * | -- | -- | -- | Selected preamplifier input is "CD", "DVD" (each set to analogue audio connection) or "LINE". |
| Stereo with Subwoofer | STEREO | * | -- | -- | (*) | Selected preamplifier input is "SAT", "D-TV", "VCR" or "TUNER". Also possible for the inputs "CD", "DVD", if set to digital audio connection. |
| 3 Stereo (Stereo with Center channel and subwoofer) | 3-ST | * | (*) | -- | (*) | Selected preamplifier input is "SAT", "D-TV", "VCR" or "TUNER". Also possible for the inputs "CD", "DVD", if set to digital audio connection. Not possible if a dts or a Dolby-Digital signal is being received. |
| Dolby Prologic II (analoges Mehr-Kanalformat) mit Subwoofer | PLOGII | * | (*) | (*) | (*) | Selected preamplifier input is "SAT", "D-TV", "VCR" or "TUNER". Also possible for the inputs "CD", "DVD", if set to digital audio connection. Not possible if a dts or a Dolby-Digital signal is being received. |
| Dolby Digital 5.1 | DIG5.1 | * | (*) | (*) | (*) | If a preamplifier input with digital audio connection is selected and no PCM or dts signal is being received. |
| Dolby Digital EX | DIG.EX | * | (*) | * | (*) | If a preamplifier input with digital audio connection is selected and no PCM or dts signal is being received. Rearward speakers must be activat-ed in "SPEAKER" (10)(29). |
| dts 5.1 | DTS5.1 | * | (*) | (*) | (*) | If a preamplifier input with digital audio connection is selected and no PCM or Dolby Digital signal is being received. |
| dts ES | DTS.ES | * | (*) | * | (*) | If a preamplifier input with digital audio connection is selected and no PCM or Dolby Digital signal is being received. Rearward speakers must be activated in "SPEAKER" (10)(29). |
- Channel active
(*) Channel active if corresponding speaker has been made available in the „SPEAKER" menu
-- Channel inactive
DIGITAL SOUND EFFECTS ("DSP" KEY)
DSP is especially effective with material from CD, TV and FM radio. Just try different DSP-Modes when using the SAV-C2 to listen to a concert or watch a sports broadcast!
Repeated use of the button „DSP" (27) changes the used DSP-mode:

The simulation of different environments is created by adding reverberation and changing the frequency content of the sound signal without degrading the signal quality. The DSP mode "LIVE" creates the atmosphere of a Live-Concert at the playback of different input sources.
Press "MODE" (7)(25) to switch off the DSP programmes.

It is impossible to use DSP programmes if one of the inputs "CD/AV1", "DVD/AV2" (each set to analogue audio connection), "LINE/AV4" or "6.1CHANNEL" is currently selected.
TIPS
Burn in/ Warm up
Your audio components need a certain time period until they reach maximum performance. The duration of this "warm up" time is very different for the various elements of your audio system. Higher and homogeneous sound quality is achieved while keeping the device switched on.
Your audio specialist dealer has enough experience to give you more information.
Net frequency noise
Some audio source devices may together with the amplifier cause a humming noise at power line frequency audible from your speakers. Usually its volume is variable with the volume setting of the amplifier.
This is no sign of a defect or fault of your audio products but has to be eliminated.
Generally, every wall-powered device connected to the ground wire of the power plug can cause
this problem when connected to the amplifier. Experience shows that this problem is mainly caused by antenna-connected components (as TV-sets or Tuners), personal computers, electrostatic loudspeakers, subwoofer, record players or headphone amplifiers that are connected to the audio inputs of the amplifier. Another possible reason for humming noise is electromagnetic interference of other components' power supplies with pick-up systems of record players (change the place of the record player for a test).
Some main amplifiers are equipped with a "Ground Lift"-switch. If it is activated, ground potential of the chassis and the protective ground wire are being separated from the central signal ground point. The protective ground wire keeps its function. Sometimes this helps prevent noise caused by errors in grounding.
If the problem occurs and cannot be solved by yourself your audio specialist dealer will help you.
TROUBLESHOOTING
| Symptom | Possible Reason | Countermeasure |
| Unit does not work after pressing the power button. | Mains cable is not connected to a ready socket.Mains cable has not been firmly inserted in the power socket and the unit socket or it is defective.Unit fuse or unit is defective. | Connect to a functioning socket using a suitable mains voltage Check the power cable, if necessary, swap it with a cold unit cable and push its plug firmly into the socket and into the transformer on the other side of the unit.Contact your dealer. |
| No sound on all channels when the unit is ready for use. | Source unit is not switched on or playback has not been started.Unsuitable material was played using the source unit.The audio output of the source unit is configured wrongly.The audio output of the source unit or the desired audio input of the AV preamplifier was not connected, or connected too loosely to the audio signal cable.The wrong audio output of the source unit was connected to the preamplifier.The audio signal cable to the source is defective.The source unit's signal cable is connected to the wrong input of the AV preamplifier.The desired source input was not selected at the AV preamplifier.The Volume has been set too low or the "MUTE" function (11)(35) is switched off.The wrong choice was made between digital and analogue sound ("IN MODE" key (6)(21)).The digital sound connection to which the source unit is connected was allocated to the wrong input channel ("DIN SET" key (22)).The preamplifier outputs of the AV preamplifier were not connected to the power amplifier(s).The output amplifier is not switched on or the speaker is not properly connected to the output amplifier.The AV preamplifier, power amplifier or source unit is defective. | Switch on the source unit and begin playback.Check the CD's, DVD's, videocassette, aerial connections, etc. on the source unit.Correct the settings of the source unit with regard to the audio output and the audio signal format used.If necessary, check and correct the plug connection.Correct the connection.Check and replace the cable(s) if necessary.Correct this.Use the input selector buttons on the remote control or the multifunction knob on the unit to set the input channel to which the source is connected.Correct the volume setting and deactivate the "MUTE" function (11)(35) if appropriate.Correct this setting.Carry out the procedure to reallocate the digital connections.Connection the output amplifier(s).Check the function of the output amplifier and attach the speaker cable to the output amplifier and speaker connections.By playing in conjunction with other units, check which system component has failed and contact the relevant dealer. |
| Symptom | Possible Reason | Countermeasure |
| No sound on some channels when the unit is ready for use. | The signal source settings have been wrongly selected in respect of the sound. | Correct the configuration of the source unit (PCM/RAW-setting, Down-mix, Dolby settings, configuration of multi-channel outputs, analogue/digital switching, etc.). |
| The material to be played back contains no signals for these channels. | Sometimes playback can be achieved via all channels in the "Prologic II" mode or the DSP modes. | |
| The Audio playback mode setting on the AV preamplifier has not been set correctly. | Check the "MODE" setting (7)(25). | |
| You are using the analogue audio connection of one of the "CD", "DVD" or "LINE" inputs. | For these channels only the front left and right channel is always active. | |
| Speakers or pairs of speakers have been deactivated using the "SPEAKER" function (10)(29). | Configure the speakers accordingly. | |
| The settings for the "CHANNEL" volume balance (8)(32) on the AV preamplifier have been seriously misaligned. | Set these relative channel-volume differences to the desired setting. | |
| One or more of the audio signal cables between the preamplifier and the power amplifier is defective or the plugs are loose. | Check and clamp these cables. | |
| The power amplifier is defective. | Check the power amplifier. | |
| The subwoofer is not ready for use. | Check the connections, function and settings of the subwoofer. | |
| Bad-quality sound | The cable connection terminals are loose, the terminals are dirty or a cable is defective. | Check the audio terminals and cables. |
| The dynamics reduction (NIGHT) function has been activated at the preamplifier with Dolby Digital Playback. | Deactivate this function using the "NIGHT" button (23). | |
| No picture | Source unit is not switched on or playback has not started. | Switch on the source unit and begin playback. |
| Unsuitable material was played using the source unit. | Check the DVD's, videocassette, aerial connections, etc. on the source unit. | |
| The video output of the source unit is configured wrongly. | Correct the settings of the source unit with regard to the video output and the video signal format used. | |
| The video output of the source unit or the desired video input of the AV preamplifier was not connected, or connected too loosely to the video signal cable. | If necessary, check and correct the plug connection. | |
| The video signal cable to the source is defective. | Check and replace the cable(s) if necessary. | |
| The wrong video input on the AV preamplifier has been used. | Check the video input used on the AV pre-amplifier. | |
| A different Video Connection Standard was used for the video input and output connection of the AV preamplifier. | The AV preamplifier does not convert signals, the same standard (Composite, S-Video, etc.) has to be used for Video In and Video Out. | |
| No picture | The desired source input was not selected at the AV preamplifier.The display unit (TV, etc.) was not switched on.The video output of the AV preamplifier was not connected to the display unit (TV, etc.).The signal cable between the preamplifier and the display unit (TV, etc.) is defective or the plug is loose.The video cable was not connected to the correct input terminal on the display unit.The desired input channel was not selected at the display unit.The video input of the display unit was not configured correctly.The AV preamplifier, display unit or source unit is defective. | Use the input selector buttons on the remote control or the multifunction knob on the unit to set the input channel to which the source is connected.Switch the display unit on.If necessary, check and correct the plug connection.If necessary, check and correct the plug connection.If necessary, check and correct the plug connection.Correct the input selection.Correct the settings of the display unit with regard to the video input and the video signal format used.By playing in conjunction with other units, check which system component has failed and contact the relevant dealer. |
| Bad-quality picture | The picture system setting (PAL, NTSC) of the display unit was wrongly selected at the signal source.The picture mode (Progressive Scan or Interlaced Scan) was wrongly selected on the source unit.The setup settings of the source unit or the video display have been wrongly selected in respect of the video signal properties (e.g. aspect ratio). | Correct these settings.Correct these settings.Correct this at the display unit (TV, projector, etc.) or the source. |
| The remote control cannot perform any functions. | No batteries inserted in the remote control, batteries are not inserted correctly or are depleted.The line-of-sight between the remote control and the unit is obstructed, the range was exceeded or the hand unit was operated from a position too far to one side.The unit is not switched on. | Check and replace the batteries if necessary.Try to point the remote control at the front of the unit only when the sight-line is clear, within a 7-metre distance and, if possible, facing the unit.Switch the unit on. |
| Bass sound - humming can be heard | See Section “Net frequency noise” in the chapter “Tips”. | |
TECHNICAL SPECIFICATIONS
| Frequency Range: | 20 Hz - 20 kHz ± 0.5 dB |
| Nominal Output Voltage: | 2 V |
| Total Harmonic Distortion: | < 0.1% (1 kHz, 1 W) |
| Input Sensitivity: | 250 mV |
| Signal-Noise-Distortion: | > 90 dB |
| Input Impedance: | 47 kΩ |
| Inputs: | 6x RCA, 6.1 RCA, 1x XLR stereo, 3x Coaxial Digital, 1x Optical Digital, 8x RCA Video, 2x S-Video, 2x Component YPbPr |
| Outputs: | 1x 6.1 RCA (pre), 1x stereo RCA (pre), 1x mono RCA (SW2), 1x 6.1 XLR (pre), 2x power control trigger, 1x stereo RCA (rec), 1x Video RCA, 1x YPbPr Component Video, 1x S-Video |
| Mains supply: | 230 V/50 Hz |
| Power Consumption: | max. 50W |
| Dimensions (WxHxD): | 430 x 106 x 390 mm |
| Weight: | 10 kg |
| Colour: | black/silver |
GLOSSARY
RCA
RCA is the American name for coaxial Cinch connectors and sockets, originally the abbreviation for "Radio Corporation of America", the name of a United States company. Both the plug and cable consist of a rod-shaped inner lead and a cylindrical-shaped outer lead. This enables a mono audio signal or a video signal to be transmitted. Compared to the XLR plug connector, this type of connection is also called "unbalanced signal connection".
Dynamics
The volume difference between the quietest and the loudest sounds possible in audio signals (without distortion or transition to noise). Dolby-Digital and DTS soundtracks allow very high dynamics and produce excellent cinema-like effects.
dB-Level
This is a way of describing any physical quantity; it is a common measurement for signal voltages and the volume. It is given in decibels (dB). Alternating signal voltages below 1V (RMS) are described as "line level" voltages, which are suitable as music signals for amplifier inputs. Inputs on amplifiers (mostly represented by RCA sockets), which are designed for signals on the CD player, tape recorder, DVD player etc. are also referred to as "line level inputs" or "high-level inputs". Thos signal inputs must not be confused with inputs that accept preamplified signals.
Input sensitivity
Term for the smallest average (RMS) input voltage which causes the maximum output power at the maximum volume setting on the amplifier. Examples: 100mV to 500mV (Millivolts) on high level inputs, 2mV to 5mV on the phono MM input or 0.1mV to 0.5mV on the phono MC input.
GLOSSARY
Composite Video, FBAS
Video signal format very similar to the PAL television signal, using the YUV colour model. It actually comprises three signals, which can be transmitted over a single cable due to technical tricks. These three component signals are the YUV signals derived from the Red/Green/Blue (RGB) portions of a video recording. 75 coaxial cables are used for the transmission, the terminal box is generally a RCA socke labelled "Video". Plug and socket are generally marked yellow. The picture quality with the use of other signal standards (Component Video, S-Video, HDI, HDMI,...) is almost always better.
S-Video
An analogue video signal standard, which transmits what is called a Y/C signal. The brightness signal Y (Luminance) and the colour signal C (Chrominance) are transmitted via two separate cables. Most home-cinema components support this type of signal. It provides greater picture quality than the Composite Signal, but is superseded by the Component Signal. The associated terminal box on AV units is often labelled "S-VIDEO" or "Y/C". The S-Video Y/C signal can either be fed via a Mini-DIN (Hosiden) socket or via the SCART connection. The S-Video signal is always output in the "Interlaced Scan" mode, Progressive Scan is impossible (in this setting the output is switched off). The picture quality achieved depends on the quality of the cable used. This transmission system is often also wrongly called S-VHS transmission.
Component Video
Alternative signal presentation form for colour video signals calculated from the RGB format. Here, too, three individual signals are used together, but are not separated are "Red," "Green" and "Blue" intensity signals, but as one brightness signal Y and two colour difference signals. The YUV (used for the PAL signal, Composite Video signal and S-Video), YIQ (used for NTSC signals), YPbPr (used for the video component signal in hi-fi electronics) and YCbCr (digital colour video signal standard corresponding to the analogue YPbPr) formats are distinguished
dependent on the calculation formulae in respect of RGB. However, the designation "Component Video" generally means the YPbPr standard.
YUV
An analogue standard for the presentation of a colour video signal used for different analogue video transmission standards. It describes the representation of the video signal using three signal components, very similar to the signal components used for YPbPr. This standard is applied to PAL-TV, Composite Video and S-Video. As part of this, the individual signals can be transmitted over one line (the UV signal modulated to a carrier frequency, as with Composite Video) or separated over two lines (as with S-Video). The three components are firstly the brightness signal (Y), a difference signal between the brightness signal and the signal of the blue portion (U) and a difference signal between the brightness signal and the signal of the red portion (V). These components can be derived and converted from the RGB or the YPbPr signal. Advantage: The brightness and the colour information are transmitted separately.
YPbPr, Component Video
One analogue colour video model used for Component Video. It is similar to the YUV colour model used for Composite Video, only different coefficients are used in the calculation of the colour difference signals from the RGB colour video model. The three components are firstly the brightness signal (Y), a difference signal between the brightness signal and the signal of the blue portion (Pb) and a difference signal between the brightness signal and the signal of the red portion (Pr). Advantage: The brightness and the colour information are transmitted separately. The YPbPr and RGB standards merge (convert) into each other easily. The three individual signals are generally transmitted via three RCA connections. YPbPr signals can contain video information either line-wise in full images (Progressive Scan) or line-wise in half-images (Interlaced Scan).
GLOSSARY
YCbCr, Digital Component Video
The digital colour video model used for Component Video. A digital representation of the YPbPr standard. It is transmitted in a digital data stream via a cable or a line in a loom of cables (DVI, HDMI). MPEG videos (as used on the DVD) are stored in digital component form (YCbCr), on playback they can be converted to analogue and output via the YPbPr outputs or via digital interfaces (DVI, HDMI) without conversion.
Surround sound
Enhancement of the conventional stereo technology, a Surround system produces stereophonic effects, which give the listener the impression of being in the middle of events. The "live" experience begins if the sound seems to come from a direction that the video scene suggests. Surround sound systems solve this problem by multi-channel sound transmission; it is not two (right and left) sound signals that are stored and played back, but four or more. These are then played by four or more speakers arranged around the listener. However, there are analogue as well as digital surround sound systems. As mentioned above, the superior-sound digital variant not only has more channels, but the data required for stereophonic sound are also stored in digital format. Digital formats therefore spread mainly on DVD's, CD's or on digital television. Analogue formats are found on videocassettes and in analogue television signals. Each standard in the home-cinema range requires a specific decoder and some formats are compatible with each other.
Dolby
A company located in the Bay area near San Francisco (Dolby Laboratories, Inc), named after its founder and president Ray Dolby. In the recent decades this company developed many technologies and signal processing standards for the improvement of audio playback and recording. Most famous products are „Dolby NR" (noise reduction for audio tape playback), „Dolby Surround Prologic" (analog multi channel audio standard)
and „Dolby Digital" (digital multi channel audio standard).
Dolby Surround Prologic
Dolby Prologic is an analog four-channel audio system including two front channels, one Center channel and one Surround channel. The signals of both additional channels are integrated in a clever way into the Stereo signal (of VHS-Cassettes, LD's und DVD's, as well as diverse TV programmes), so that even conventional equipment, that cannot process surround sound, can use the integrated stereo sound as usual. A decoder separates the four channels. The Dolby Surround Prologic sound quality is not perfect: the surround channel is monophonic and has a cut frequency range of 100 to 7000Hz . Moreover, as opposed to the digital surround systems a considerable crosstalk into both additional channels is present.
Dolby Prologic II (5.1)
From conventional two channel signals, for example digital PCM, analogue Stereo or Dolby Surround Prologic signals 5.1 separate channels are calculated. All Dolby Surround software offered up to now contains decoders for Prologic II. As opposed to Prologic the full HiFi frequency range is covered for all channels and there are two surround channels.
Dolby Digital 5.1 (AC-3)
Dolby Digital 5.1 (firstly named AC-3) is a digital audio multi channel format developed in 1992 for the movie sound recording and playback in the Dolby Laboratories. It contains up to six independent channels (two front channels, one center channel, two surround channels and one low-frequency channel (LFE)). The first mentioned five channels can transfer the full audible frequency range (20 to 20,000Hz ), the LFE channel only the low bass frequency range (20 bis 120Hz ). All separate digital signals are interleaved into one digital data stream that can be transferred via ONE digital cable. Compression techniques are used to reduce the huge data rate necessary for this high quality signal
GLOSSARY
data transfer by the factor of eight. The effective data rates are 384 and 448 kbit/s. Since 1997 Dolby Digital 5.1 is the standard DVD audio format.
Dolby Digital Surround EX 6.1
Dolby Digital Surround EX 6.1 (extended surround) reproduces film sound using signals for seven speaker channels. Compared to Dolby Digital 5.1 a rear centre channel is added. The stored signal still contains 5.1 channels and is recognised and played back by earlier decoders as Dolby Digital 5.1. An additional, phase-shifted Centre Surround Signal is mixed in with the two rear signals. As a result of the phase shift, the three signals can be properly separated from each other for playback. The additional signal is used as a pure effect channel to support the two regular rear speaker channels. Even if EX-coding is not present in the sound material to provide the extra channel, the special algorithm derives a signal for the rear centre channel. This sound process was developed jointly by Dolby Laboratories and Lucasfilm and used for the first time in May 1999 in "Star Wars - Episode 1" and was previously marketed only in conjunction with THX. However, this coupling has since been dissolved. From 2001 it was also possible to set an EX flag in the data stream using the Dolby Digital Professional Encoders, which automatically switches a corresponding decoder detecting this flag into EX mode. This switching previously had to be done manually, because there was no EX-identifier in the data stream and Dolby Digital 5.1 and Dolby Digital Surround EX signals have no recognisable difference.
DTS Digital Surround 5.1
"Digital Theater Systems Digital Surround" (called DTS) is a digital multichannel audio system similar to Dolby Digital 5.1, had been developed for movie theaters first and uses the same channels and similar frequency ranges (20Hz to 20kHz at 20 bit, LFE channel: 20Hz to 80Hz). It uses higher data rates than Dolby Digital (768kbit/s) and thus requires more space on the media. As data reduction
techniques for the picture improve reducing space for the picture data, more and more DVD's are provided with dts. It is believed that dts provides better sound quality because of less data compression (4:1). Compared to cinema DTS (20 bit resolution and 5-channel-system) the LFE is integrated in the surround channels) the Home Cinema dts standard is a true 5.1 system with up to 24 bit resolution. Dts may only be added to the DVD as bonus audio stream. The standard still is Dolby Digital.
DTS ES Digital Surround 6.1
Extension of DTS Digital Surround 5.1. There are different variants of DTS ES (extended surround). In DTS ES Matrix 6.1, as with Dolby Digital Surround EX 6.1, there is one additional Centre Surround Channel compared to dts; here, too, this additional channel is produced in the recording, is mixed into the two Surround channels and is not stored separately on the disc. As a result, older dts decoders can also play this seven-channel sound material. On playback, the Surround Centre signal is calculated from these two rear channels by ES decoders using a special matrix-decoding process. In DTS ES Discrete 6.1, as the name suggests, the Rear Surround Centre channel is stored as an equal channel data stream. As DTS was designed for a total of 8 channels, the DTS-ES Discrete 6.1 process was introduced in the year 2000. For downward compatibility, soundtracks of this format also have to be playable on old DTS-Matrix decoders. That is why in "DTS-ES Matrix 6.1", the Rear Centre Channel has been mixed into the two stereo Rear Surround channels using Matrix coding. In old DTS decoders the additional channel is simply ignored and one actually hears a DTS-ES Matrix 6.1 format. The acoustic pattern is even more real, because new combinations of effects, which cannot be presented just with the aid of a matrix, can now be compiled: therefore combined effects can, for example, come from the left Surround speaker and the Centre Surround speaker, while the right Surround speaker is silent. Likewise, the dynamics of the discrete channel are far higher than those of
GLOSSARY
the matrix channel, as the additional channel covers the full frequency spectrum from 20Hz to 20 kHz. If an AV unit displays the "DTS ES Compatible 6.1" logo and not the DTS-ES logo on the front plate of the unit, it contains a matrix decoder for the Back Surround channel developed by the manufacturer in question and fitted without an official DTS licence.
PCM
The PCM format is the original format of all digital sound signals. It is the term for the conventional digital representation of a signal, having sampled values using a constant resolution in bits and a constant sampling frequency. Therefore every analogue signal, regardless of whether an audio or a video signal, can be represented and stored on digital media. The original analogue signal is sampled at a specific frequency in equal time intervals; this produces a pulsed amplitude modulated signal initially with any desired number of amplitude values. This is now quantised in the AD-converter; to that end the amplitude values are divided into a limited number of quantisation stages (= sampling resolution). If linear quantisation is used in the digitising process (differences in signal values of neighbouring stages are of equal size), which is generally the case, the resulting data stream is called LCPM (Linear Pulse-Code Modulation). A codeword containing the amplitude data is calculated from every sampled value. A digital signal is produced from the time sequence of the binary codewords. However, PCM is not the name for digitised video signals, as in this case multiple component signals, which can be blended to a data stream, are generally used for the representation of a colour picture. The stereo audio signal stored on audio CD's or in WAV file formats is generally meant by this. The resolution (sampling depth) in a CD is 16-bit, which equates to 65,536 gradations in volume at a scanning rate of 44.1kHz , which allows a maximum frequency resolution of 22.05 kHz, but is limited internally to 20kHz . A sampling frequency of up to 96kHz is possible in the DVD Video, which therefore enables a maximum fre
quency resolution of 48kHz , and in a resolution of 24-bits, corresponds to 16.7 million volume values. DVD Audio even allows sampling frequencies of up to 192kHz and therefore achieves a frequency resolution of up to 96kHz . Digital PCM sound can also contain more than two channels and have sampling frequencies of 44.1kHz , 96kHz and 192kHz .
DSP
stands for "Digital Signal Processor". This is a small microcomputer (IC, chip) designed for the processing of digital signals (audio or video). It can, for example, be used to add reverberation or echo to an audio signal. One of the most important factors in the perception of sound is reverberation, that is the way how the sound is reflected continuously by different objects and walls (similar to echoes) in the room.
HDCD
(High Definition Compatible Digital)
Listening tests showed that an increase in the resolution of digital CD recordings starting from 16 bits represents improvements in sound. HDCD is a recording/playback process for standards CD's with a sampling depth of 20 bits and data compression. In this patented procedure the sound material is recorded at a 20-bit sampling resolution. The sound quality compared with standard Audio-CD's is improved as a result. These discs labelled HDCD are downward-compatible to standard players, but can only be played to their full quality in special players. HDCD-signalling is stored in the lower value bits of the conventional sound sample, which represents inaudible alterations there. Only very few CD titles are obtainable in this extended format.
CONSIGNES DE SECURITE
Composants (Component) Video
Dolby Surround Prologic
DTS Digital Surround 5.1
DTS ES Digital Surround 6.1
Please keep the receipt, store it together with this manual. The receipt is your proof for the beginning of the warranty period. Note the serial number in the following box, you can read it from the rear side of the device.
www.sintron-audio.de