
DESTINATOR 8 - GPS navigation software DANEW - Free user manual and instructions
Find the device manual for free DESTINATOR 8 DANEW in PDF.


| Product Type | GPS navigation software |
| Brand | DANEW |
| Model | DESTINATOR 8 |
| Pre-installed maps | Memory card included with map data |
| Main functions | Road navigation, address search, points of interest (POI), QuickNav, voice and visual guidance |
| Display | 2D/3D view, day/night mode |
| Installation | Suction cup mount for windshield, cigarette lighter power |
| Power supply | Built-in rechargeable battery, charges via cigarette lighter |
| Update | Software and map update via CD or website |
| Languages | Multilingual (French included) |
| Support | Downloadable PDF manual, online Q&A |
| Compatibility | Requires an external or built-in GPS receiver |
Frequently Asked Questions - DESTINATOR 8 DANEW
User questions about DESTINATOR 8 DANEW
0 question about this device. Answer the ones you know or ask your own.
Ask a new question about this device
Download the instructions for your GPS navigation software in PDF format for free! Find your manual DESTINATOR 8 - DANEW and take your electronic device back in hand. On this page are published all the documents necessary for the use of your device. DESTINATOR 8 by DANEW.
USER MANUAL DESTINATOR 8 DANEW
Personal Navigation System for the Microsoft® Windows® based
Quick Start Guide

GB
F
English
1 Welcome to Destinator 8
We are delighted that you have chosen Destinator 8! This Quick Start Guide tells you how to use the navigation software. You will find a detailed printable user manual in PDF format on your Destinator 8 CD.
2 | Preparing Device (Pre-installed Memory Card)
- Ensure the memory card is properly inserted.
Do not remove the memory card before the installation is complete. - Plug the device into the cigarette lighter.
- Turn on the device by pressing the On/Off button.
- If the device is plugged in, a icon is displayed on the map. If the device is running on battery, a icon means that you're device is fully-charged.
- Secure a satellite signal. Be outside. Do not try to find a signal when you're in a tunnel or parking structure, or near tall buildings.
3 | Installing Device
- Attach device cradle to suction cup mount.
- Attach suction cup mount to window shield, so it does not obstruct driver view.
- Place device into device cradle.
4 Map
You can use the icons displayed on this screen to plan and view your route:
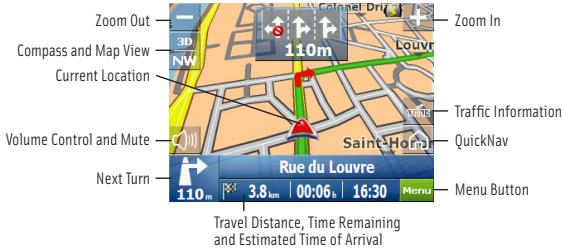
Tap GPS Status Bar 3.8km 00:06, 16:30 to display:
Travel Distance, Time Remaining, Estimated Time of Arrival.
Current Street.
5 | Menus
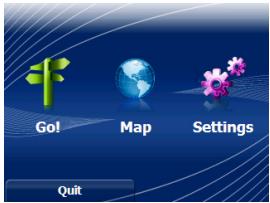
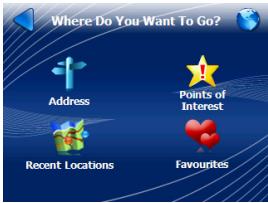
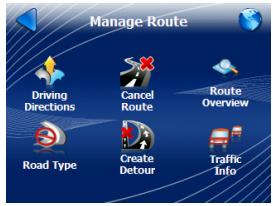
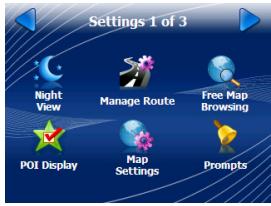
6 | First Time Use
- Tap Go button.
-
Tap Address button and enter your destination:
-
Tap In Other Countries (if required).
-
Select country.
Tap City First.
Enter city, street, and address number. -
Tap Go button.
- Destinator will guide you on screen and by voice.
7 Finding POI
- Tap Go button.
- Tap POI button.
- Select an option, such as My Current Location, My Destination, Another Location, and Along the Route.
- Select from POI categories such as Food, Lodging, Transport, or tap for a full POI list.
- Tap POI subcategories such as Coffee Shop, Restaurants, or Winery, and then the place you want to go.
- Tap Go button.
- Destinator will guide you on screen and by voice.
8 | Customizing Your Experience
QuickNav - One Touch Destination
From Map screen, tap the QuickNav button and select a destination address or POI.
After you have set the location, tap the button to start navigation to the QuickNav location.
Tap the Map
Tap anywhere on the Map to navigate there or to store the location to navigate there later.
Night/Day View
From Settings menu, tap toggle button to display night or day view.
2D/3D View
From map screen, tap 2D or 3D map compass button to display 2D or 3D map.
Turn-by-Turn Directions
From Map screen, tap the Next Turn Bar to display a complete turn-by-turn list of directions.

Support Hotline:
Please note: The content of this Quick Start Guide was correct as of January 2009. Any subsequent changes to the system, the features, the user interface, the maps or operation made due to technical updates may not be included in this document.
François
Assistance technique:

- English
- Welcome to Destinator 8
- | Preparing Device (Pre-installed Memory Card)
- | Installing Device
- Map
- | Menus
- | First Time Use
- Finding POI
- | Customizing Your Experience
- QuickNav - One Touch Destination
- Tap the Map
- Night/Day View
- 2D/3D View
- Turn-by-Turn Directions
- Support Hotline:
- François
- Assistance technique:
Brand : DANEW
Model : DESTINATOR 8
Category : GPS navigation software