
E135 ALL ROAD GPS - Gps DANEW - Free user manual and instructions
Find the device manual for free E135 ALL ROAD GPS DANEW in PDF.


| Product Type | GPS Navigation Device |
| Brand | Danew |
| Model | E135 ALL ROAD GPS |
| Display Size | 5.0 inches (typical) |
| Display Type | TFT color touchscreen |
| Dimensions | Approx. 130 x 85 x 15 mm |
| Weight | Approx. 180 g |
| Power Supply | Built-in rechargeable lithium-ion battery, 12V car charger |
| Battery Life | Up to 3 hours (typical) |
| Maps | Pre-loaded regional maps (e.g. Europe) |
| Navigation Functions | Turn-by-turn voice guidance, lane assist, speed camera alerts |
| Connectivity | USB for charging and data transfer |
| Memory | Internal storage (4 GB typical) + microSD slot (up to 32 GB) |
| Mounting | Windshield suction cup mount included |
| Languages | Multiple language support (menu & voice) |
| Operating Temperature | 0°C to 45°C |
| Maintenance & Cleaning | Clean screen with soft dry cloth; avoid liquids |
| Safety | Do not use while driving; secure mount prevents obstruction |
| Spare Parts & Repairability | Contact Danew support; battery replacement possible by qualified technician |
| General Information | Free manual available in PDF; use at your own risk |
Frequently Asked Questions - E135 ALL ROAD GPS DANEW
User questions about E135 ALL ROAD GPS DANEW
0 question about this device. Answer the ones you know or ask your own.
Ask a new question about this device
Download the instructions for your Gps in PDF format for free! Find your manual E135 ALL ROAD GPS - DANEW and take your electronic device back in hand. On this page are published all the documents necessary for the use of your device. E135 ALL ROAD GPS by DANEW.
USER MANUAL E135 ALL ROAD GPS DANEW
Warnings and Notices
For your safety, do not operate the controls of the product while driving.
GPS satellite signals cannot typically pass through solid materials (except glass). GPS location information is not typically available inside buildings, tunnels, or underground parking lots.
A minimum of 4 GPS satellite signals is needed to calculate your GPS position. Signal reception can be affected by weather events or overhead obstacles (e.g. dense foliage and tall buildings).
Other wireless devices in the vehicle may interfere with the reception of satellite signals and cause the reception to be unstable.
Adapter
Do not attempt to service the unit. There are no serviceable parts inside. Replace the unit if it is damaged or exposed to excess moisture.
Do not use the adapter if the cord becomes damaged.
Connect the adapter to the proper power source. The voltage requirements are found on the product case and/or packaging.
Battery
This unit contains a replaceable Li-ion battery. The battery could be bursting or exploding and
releasing hazardous chemicals in case of over battery specification and using in an abnormal conditions;
disassemble, crush, puncture, or dispose of the battery in fire or water. Abnormal operation could be dangerous
to your human body. Please be aware.
Use only the specified charger approved by the manufacturer.
Risk of explosion if battery is replaced by an unofficial type. Dispose of used batteries according to the
instructions.
WARNING: The Lithium-Ion battery in the device must be recycled or disposed of properly.
Table of Contents
Chapter 1 Features and Specifications ....4
1.1 E135 PND features....4
Chapter 2 Getting Started....5
2.1 Hardware overview....5
2.2 Installation on a Motorcycle....7
2.3 Installation in a Car....9
2.4 Charging your E135 device 10
Chapter 3 Using the E135....10
3.1 E135 Operating Basics 10
3.2 Reset 12
3.3 Set the Quick menu bar:....13
Chapter 4 E-compass....13
4.1. Settings....13
Chapter 5 Multimedia....15
5.1. Music player....15
5.2. Photo Viewer....16
Chapter 6 Bluetooth....17
6.2. Bluetooth connection....17
Chapter 7 Troubleshooting and Maintenance....18
GPS Speedcamera locator....19
Chapter 1: Features and Specifications
1.1 E135 PND features
The E135 Portable Navigation Device is a powerful multifunction GPS/multimedia navigation and entertainment device.
• 3.5"with TSP (Touch Screen Panel)
- Sun light readable
• High sensitivity Broadcom GPS
- Bluetooth audio communication
• MP3 player/Photo viewer
• Recharge and replace battery
- IPX7 water proof in out door application
| Temperature | Operating Temperature: -10 °C to +55 °CStorage Temperature: -30 °C to +70 °C |
| Language | English / German / French / Spanish / Italian |
| Weight | 190 g |
| Dimension | L: 105 mm, W: 81.9 mm, H: 26.2 mm |
| Chassis | |
| Specifications | Chassis is made of sunlight/UV-proof material and coating. Meet IPX7 waterproof standard |
| Color | Gray / Black, Gray / Green |
| Component | Specification |
| CPU | ARM9 @400MHz |
| Operation System | Windows CE 5.0 core version |
| GPS | Broadcom host based chipset |
| TFT LCD | TFT, 3.5", 240x320 QVGA |
| SDRAM | 128 MB mDDR |
| NAND Flash memory | 2 GB MLC |
| Battery | 1800 mAh rechargeable ad replaceable Li-ion |
| Power Management | Yes |
| I/O | MiniUSB Client connectorMicroSD card |
| Button | Power button x 1 |
| Display | |
| Screen Type | TFT-LCD with touch panel |
| Screen Size | 3.5” |
| Resolution | 240 x 320 pixel QVGA |
| Color | 65536 colures |
| Backlight | Most 6 LED backlight |
| USB | |
| USB Connector | MiniUSB B-type connector for factory test, battery charging, power supply and PC connection |
| Button / Slot | |
| Power button | Yes for power on and off |
| Mini-USB Slot | Yes for factory test, battery charging ,power supply and PC connection |
| Micro SD/MMC Slot | Yes for software update |
| Bluetooth 2.0 | |
| Application | Connect with Bluetooth headset to make a Stereo/Mono audio communication |
Chapter 2 : Getting Started
2.1 Hardware overview
| Packaging standard | 1 | Device, E135 |
| 2 | Cradle | |
| 3 | USB cable | |
| 4 | AC adapter | |
| 5 | Car mounting kit | |
| 6 | Car Charger | |
| 7 | Quick Start Guide | |
| 8 | User Manual CD | |
| 9 | Warranty Statement Card | |
| 10 | Handlebar base accessories | |
| 11 | Double-socket arm |
Front View Rear View

| NO | Function | Description |
| 1 | Touch Screen | Displays the applications, data, and map images. |
| 2 | USB Port/Docking connector | Mini-USB connector serves as the power connector for charging the device or as the dock for uploading files from computers. |
| 3 | Power Button | Long press 5 seconds to turn on/off the PND. |
| 4 | Speaker | Emits system sounds. |
| 5 | Ring Lock | To tighten the rear cover. |
Rear View (without rear cover)

| Component | Description | |
| 1 | Battery Slot | Put the battery on the slot, before use the device. |
| 2 | Micro SD slot | Accepts Micro SD storage cards, allowing you use audio and image files stored in it for use with internal applications |
Assembly your E135:
- Put the battery on your E135
- Insert the Battery in your E135 (Photo 1-1)
- Put on the rear cover on your E135 (Photo 1-2)
- Fix the lock button by turning the ring.

Photo 1-1

Photo 1-2
2.2 Installation on a Motorcycle.
Install the U-Bolt, Holder and Handlebar base:
-
Place the U-Bolt and the holder around the handlebar, and thread the ends through the handlebar base. (Photo 3-1)
-
Tighten the bolts to secure the base. Do not over tighten.

Photo 3-1
- Thread the bolt through double-socket arm to knob. (Photo 3-3)

Photo 3-3
Fix the double-socket arm to knob:
Attach the Base Plate to the E135 Mount

Photo 3-4
Attach the Base Plate to the Handlebar Base

Install the E135 in the Cradle
- Flip the lever up
- Place the E135 in to the cradle, and flip the lever down.
- Tighten the security screw.
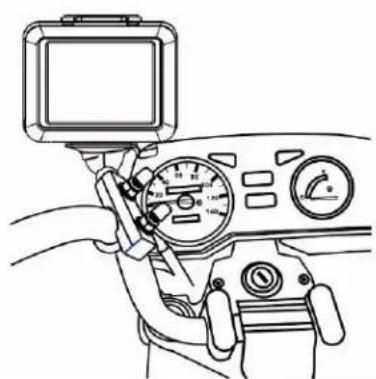
Photo 3-6
2.3 Installation in a Car
Install the car mount on the selected area.
- Press the suction cup of the car mount firmly against to the windshield.(Photo 4-1)

Photo 4-1

Photo 4-2
Install the E135 in the Cradle

Photo 4-3
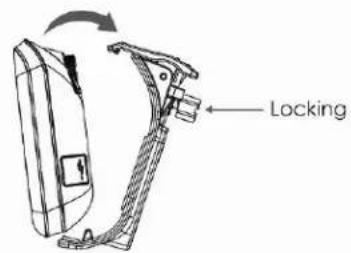
Photo 4-4

Photo 4-5
2.4 Charging your E135 device
- Plug the car charger to the 12 V outlet of your car and then connect the charger cable to the Mini USB port of the E135.(Photo 5-1)
- You now can let your E135 have the continuous power by the car charger.

Photo 5-1
NOTE: Your car may be required to switch the vehicle ignition into the accessories position to power the cigarette lighter. Your E135 will not charge with the ignition off.
Chapter 3: Using the E135
3.1 E135 Operating Basics
After fully charging the E135 it is ready to be used. You can now turn it on and proceed to system settings configuration.
After turn on the device, main page will display. This is also referred to the Favorite page.

To configure system settings:
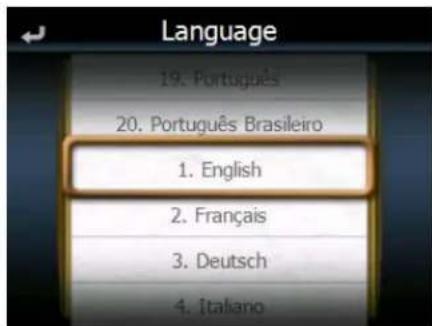
If you intend to start using your E135 at once, we recommend that you configure the language and time zone settings first. The rest of the user preferences can be set up later.
Tap "System" in the right category bar

Drag the wheel to scroll the languages.area
Tap "Language" on the System page.

To set the system time zone, tap "Time Zone" in System
- Tap the icon to set up the function of daylight saving s time.
a. represent enable the function of daylight savings time.
b. represent disable the function of daylight savings time. - Drag the Map to adjust the time zone.

3.2 Reset
- GPS Reset: : When user wonder if GPS receiver perform properly or not .( ex : Change the region)
- Factory Reset : The factory reset function not only resets the operating system settings to default factory values, but also reset the GPS settings.
- Calibration : When the touch screen does not respond well, calibrate the screen of your device.
Tap the "Reset" icon in the System Menu.
Tap the "GPS Reset" icon in the Reset Menu.

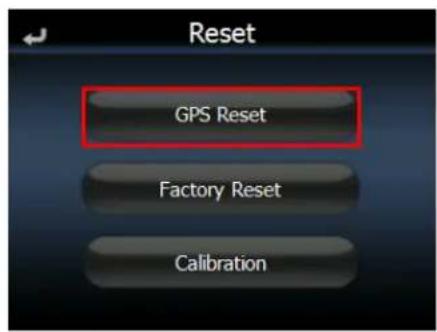

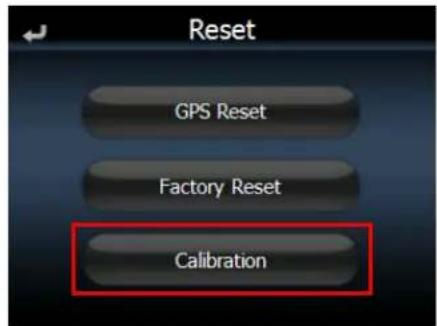
Tap the "Calibration" icon in the Reset Menu

Tap on the center of the target. Repeat as the target moves around the screen.
3.3 Set the Quick menu bar:
Otherwise, provide more organized and friendly application management interface for user organize their own favorite application category by drag-and-drop, the maximum number of favorite application shortcut is 6.
Add icon to the favorite page
- Drag the icon to the category bar of favorite.


Delete icon to the favorite page
Drag the icon from Favorite page to category bar and drop it. Confirm dialog will pop up, just tap "YES" to delete.
Chapter 4: E-compass
E135 has integrated 3D E-compass, a Barometer and an Altimeter to let you know not only your direction but also the altitude.
NOTE : Altitude is calculated by barometer, accuracy will depend on pressure environment. Ex: Different weather or in car.
4.1. Settings
- Tap "Compass" to turn on 3D e-compass.

| Name | Description |
| Elevation Current elevation | |
| Location | Current location |
| Return | Back to main menu |
| Battery | Battery Level |
| GPS signal | GPS signal level |
| Compass | Compass need to calibrate. (please do ∞ circle to calibrate) Icon will disappear once finishing calibration |
| Setting | Altimeter calibration and About |
You can caliber the Altimeter.
1. Tap

to enter setting menu.

Tap "Altimeter Calibration"

- Select one way to calibrate current altitude
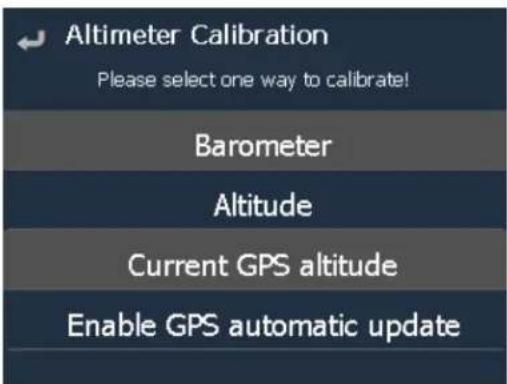
By Barometer: Enter the barometric pressure to calibrate.
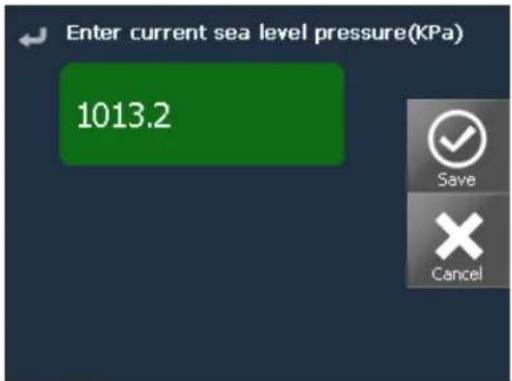
By Altitude: Enter the altitude to calibrate
Current GPS altitude: Calibrate by GPS data


Enable GPS automatic update: Will auto-calibrate altitude by GPS data every 5 minutes. The column will be marked as green frame once you tap this function.

Chapter 5 : Multimedia
The E135 is a fully capable multimedia player that can enhance your portable entertainment. In addition to its navigating function, the E135 is also a mobile entertainment tool to let you enjoy digital music, view photos. These functions make the E135 a true multimedia device. To enable access of multimedia files from your device's mass storage folder and transfer these files, do either of the following:
- Using the USB cable to connect the device to your computer, and then use File Explorer to copy digital music and image files into the device's MyflashDisk folder.
- Using a compatible card reader, directly copy digital music and image files to the Micro SD card.
It is recommended to organize files into subfolders. These folders will make files easier to find and play.
5.1. Music player
Enjoy your favorite music on the road. The program features:
- Play with Navigation guidance
• Support for MP3 files Constant bit rate only (Sampling Rate: 8 -48 KHz, Bit Rate: 8-320 Kbps)
• Auto-scanning of supported files in the device's Micro SD card and Flash memory - Separate volume control enabling you to adjust the playback sound level while retaining the volume level set for system sounds
Each sub directory containing compatible music files is treated as an individual playlist. For a more organized file search, it is advisable to named sub directories based on genre or listening preferences.
Tap "Music" icon in the Main Menu.
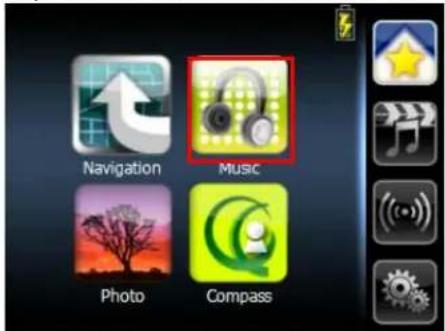
The MP3 player window below controls playback.
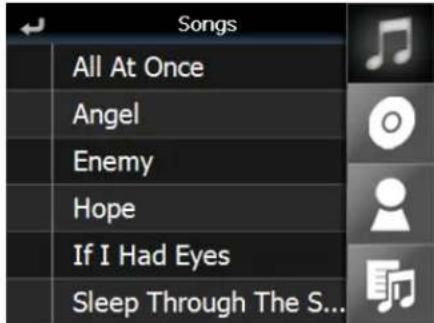
| NO | Function | |||
| 1 |  | Return | Return to list page | |
| 2 |  | Songs List all song by alphabet | ||
| 3 |  | Album List all albums by alphabet. | ||
| 4 |  | Artist List all Artists by alphabet | ||
| 5 |  | Search Current play list | ||
5.2. Photo Viewer
The E135 has a great photo viewing option that makes it easy to share and view digital photos anywhere on the go. The program features:
• Support for JPEG files (Support Max. 500 photos)
• Auto-scanning of supported files in the device's Micro SD card & Flash disk
• Three viewing modes: Thumbnail, Full Screen, and Slide Show
Each subdirectory can hold multiple images and be used as an individual album. For a more organized file search, it is advisable to sort image files into sub directories based on meaningful name or date. An example could be “summer vacation pictures” or “New baby” or “2005 Best.”
Viewing files in Slide Show mode
You have the option to view images in a slide show much like viewing a Power- Point presentation in your computer. Images are adjusted to fit the entire display area and are shown in a 5-second interval.
Chapter 6: Bluetooth
Once your Bluetooth-enabled Headset is paired with your E135, you can enjoy listening to the music through the Bluetooth headset.
NOTE : Make sure the Bluetooth switch is set to "ON" or "enable".
6.2. Bluetooth connection
Tap "Settings" to turn on Bluetooth function

Back to "Communication" screen, and tap "Connection"

Tap "Search" to look for Bluetooth on of mobile phones

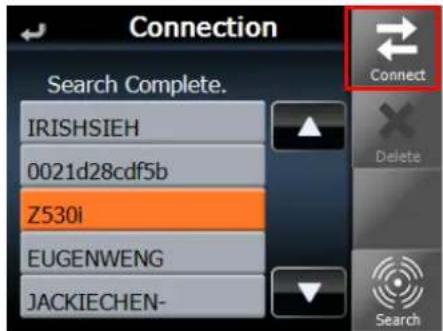
Choose one which you want to connect to, and tap "Connection
- Choose "Stereo" or "Mono"
- Once the choice is made and the connection established, the name of the connected device is displayed on the title bar of the "communications" screen.
NOTE : Bluetooth function has a limited range. If the connection is lost, E135 will try to re-connect within 10 seconds.
Chapter 7: Troubleshooting and Maintenance
If your device does not respond, do a "hard reset."
To do a "hard reset," Disconnect all cables, including the AC adapter, from your device. By sliding the hard reset switch on the primary ON/OFF switch on the right side of the device form OFF to ON position then tap the power button.
Users can also perform a "system reset."
To do a "system reset," in the Main menu, tap System, then tap System Info. This will allow you to do a factory reset (restore to default set- tings), reset the GPS and recalibrate the touch screen interface.
Screen responds slowly
Make sure you have enough battery power.
Inaccurate response to taps.
Recalibrate the touch screen.
Connection Problems with PC.
Make sure that the cable is securely plugged into the USB port on your computer and on the device. Connect the USB cable directly to your computer—do not run the cable through a USB hub.
Reset your device before connecting the cable. Always disconnect your device before you restart your computer.
No GPS connection
Make sure that the GPS antenna has a clear view of the sky.
Note that the GPS reception can be affected by:
Bad weather
Dense overhead obstacles (e.g. trees and tall buildings)
Other wireless devices in the car
No sound coming from the device.
Make sure mute is not selected for Volume in system settings. The built-in speaker turns off when the headphone jack is being used.
Can't I see my photos.
Make sure you are using supported image formats JPG.
Takes longer than normal time to get a GPS fix.
If the previous GPS fix position was more than 500 km or 12 hours apart from your current position and time, it will also take significantly longer than the standard TTFF time to get a GPS fix. This is due to the nature of the GPS algorithm and rotational velocity between the satellites and planet Earth, and deemed normal.
Perform a GPS reset in the main/system/system info menu to get a faster GPS fix.
Factory reset does mean a GPS reset.
Yes. The Factory Reset function resets the OS settings to their default factory values and it will reset the GPS settings.
Maintenance
- Avoid exposing your device to direct sunlight or strong ultraviolet light for extended periods of time.
- Do not drop your device or subject it to severe shock.
- Do not subject your device to sudden and severe temperature changes. This could cause moisture condensation inside the unit, which could damage your device. In the event of moisture condensation, allow the device to dry out completely before use.
- The screen surface can be easily scratched. Sharp objects may scratch the screen. You may use non-adhesive generic screen protectors designed specifically for use on portable devices with LCD panels to help protect the screen from minor scratches.
Never clean your device with it powered on.
Never use organic solvents such as benzene or paint thinner to clean your device. Use of these solvents can cause deformation or discoloration.
Use a soft, clean, lint-free cloth to clean the display screen. Moistened
LCD screen wipes could also be used as required.
- Never attempt to disassemble, repair or make any modifications to your device.
Disassembly, modification or any attempt at repair could cause damage to your device and even bodily injury or property damage and will void any warranty.
Storage precautions
- Do not store your device anywhere it may be exposed to water or in conditions of high humidity.
- When the device is not in use for an extended
period of time, bring it indoors and store it in cool dry area.
Accessories and repair precautions
- Only authorized accessories should be use with the device. The use of incompatible accessories could result in bodily injury and/or damage to the device.
• The use of unauthorized accessories will also void your warranty.
• Never attempt to disassemble, repair or make any modification to your device.
GPS SpeedCamera locator
Turn your GPS into a speed camera locator. Please visit our website www.danew.com

- WARNINGS AND NOTICES
- ADAPTER
- BATTERY
- TABLE OF CONTENTS
- CHAPTER 1 FEATURES AND SPECIFICATIONS ....4
- CHAPTER 2 GETTING STARTED....5
- CHAPTER 3 USING THE E135....10
- CHAPTER 4 E-COMPASS....13
- CHAPTER 5 MULTIMEDIA....15
- CHAPTER 6 BLUETOOTH....17
- CHAPTER 7 TROUBLESHOOTING AND MAINTENANCE....18
- GPS SPEEDCAMERA LOCATOR....19
- CHAPTER 1: FEATURES AND SPECIFICATIONS
- 1.1 E135 PND FEATURES
- CHAPTER 2 : GETTING STARTED
- 2.1 HARDWARE OVERVIEW
- ASSEMBLY YOUR E135
- 2.2 INSTALLATION ON A MOTORCYCLE
- ATTACH THE BASE PLATE TO THE HANDLEBAR BASE
- INSTALL THE E135 IN THE CRADLE
- 2.3 INSTALLATION IN A CAR
- 2.4 CHARGING YOUR E135 DEVICE
- CHAPTER 3: USING THE E135
- 3.1 E135 OPERATING BASICS
- TO CONFIGURE SYSTEM SETTINGS
- 3.2 RESET
- 3.3 SET THE QUICK MENU BAR
- ADD ICON TO THE FAVORITE PAGE
- DELETE ICON TO THE FAVORITE PAGE
- CHAPTER 4: E-COMPASS
- SETTINGS
- TAP
- CHAPTER 5 : MULTIMEDIA
- MUSIC PLAYER
- PHOTO VIEWER
- CHAPTER 6: BLUETOOTH
- BLUETOOTH CONNECTION
- CHAPTER 7: TROUBLESHOOTING AND MAINTENANCE
- MAINTENANCE
- STORAGE PRECAUTIONS
- GPS SPEEDCAMERA LOCATOR
Brand : DANEW
Model : E135 ALL ROAD GPS
Category : Gps