
7T84 - Quartz watch SEIKO - Free user manual and instructions
Find the device manual for free 7T84 SEIKO in PDF.
| Brand | SEIKO |
| Model | 7T84 |
| Product type | Quartz analog watch |
| Caliber | 7T84 |
| Movement | Quartz |
| Functions | Hours, minutes, seconds, date, chronograph up to 12 hours, alarm |
| Power supply | Button cell battery (type SR927SW or equivalent) |
| Battery life | Approximately 2 to 3 years |
| Water resistance | Up to 100 meters (depending on model) |
| Glass material | Mineral glass |
| Case material | Stainless steel |
| Strap material | Stainless steel or leather (depending on model) |
| Case dimensions | Approximately 40 mm diameter, 11 mm thickness |
| Weight | Approximately 80 g (depending on strap) |
| Care and cleaning | Wipe with a soft dry cloth. Avoid chemicals. Rinse with fresh water after contact with seawater. |
| Usage precautions | Do not use the buttons underwater. Avoid strong shocks and powerful magnetic fields. |
| Spare parts and repairability | Battery, crown, glass, strap available at an authorized watchmaker. Repair possible by SEIKO or authorized center. |
| Warranty | 2 years (depending on retailer) |
Frequently Asked Questions - 7T84 SEIKO
User questions about 7T84 SEIKO
0 question about this device. Answer the ones you know or ask your own.
Ask a new question about this device
Download the instructions for your Quartz watch in PDF format for free! Find your manual 7T84 - SEIKO and take your electronic device back in hand. On this page are published all the documents necessary for the use of your device. 7T84 by SEIKO.
USER MANUAL 7T84 SEIKO
INSTRUCTIONS (P. 79)
ISTRUZIONI (P. 117)
INSTRUCCIONES (P. 155)
INSTRUÇÉS (P. 193)
用法說明 (231頁)
You are now the proud owner of a SEIKO Analogue Quartz Watch Cal. 7T84. For best results, please read the instructions in this booklet carefully before using your SEIKO Analogue Quartz Watch. Please keep this manual handy for ready reference.
CROWN WITH DRIVING WHEEL 7
MODE CHANGE 8
TIME MODE 10
Yacht TIMER MODE 13
TIMER MODE 22
STOPWATCH MODE 24
ALARM MODE 26
LOCAL TIME MODE 31
BATTERY CHANGE 32
NECESSARY PROCEDURE AFTER BATTERY CHANGE 34
HAND POSITION ADJUSTMENT 35
TROUBLESHOOTING 38
SPECIFICATIONS 40
For the care of your watch, see TO PRESERVE THE QUALITY OF YOUR WATCH in the attached Worldwide Guarantee and Instruction Booklet.
SEIKO
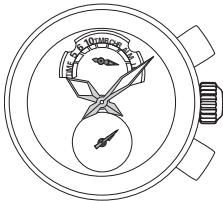
CAL. 7T84
FEATURES
TIME mode
Time is indicated by the hour, minute and small second hands.
YACHET TIMER mode
Yacht timer combines the functions of a count down timer and a stop watch that starts operating automatically when the timer finishes counting down. This function is particularly useful in yacht racing. 5-, 6- & 10-minute preset timers are available.
TIMER mode
The timer can be set to a maximum of 15 minutes in 1-minute increments.
STOPWATCH mode
The stopwatch can measure 12 hours in 1/5-second increments. When the measurement reaches 12 hours, the stopwatch automatically stops.
ALARM mode
-
Single time alarm: sounds only once at a designated alarm time within 12 hours.
-
Regular alarm: set to sound at a designated time everyday on a 12-hour basis.
LOCAL TIME mode
The time in another time zone area can be shown in 1-minute increments, offering a dual time display.
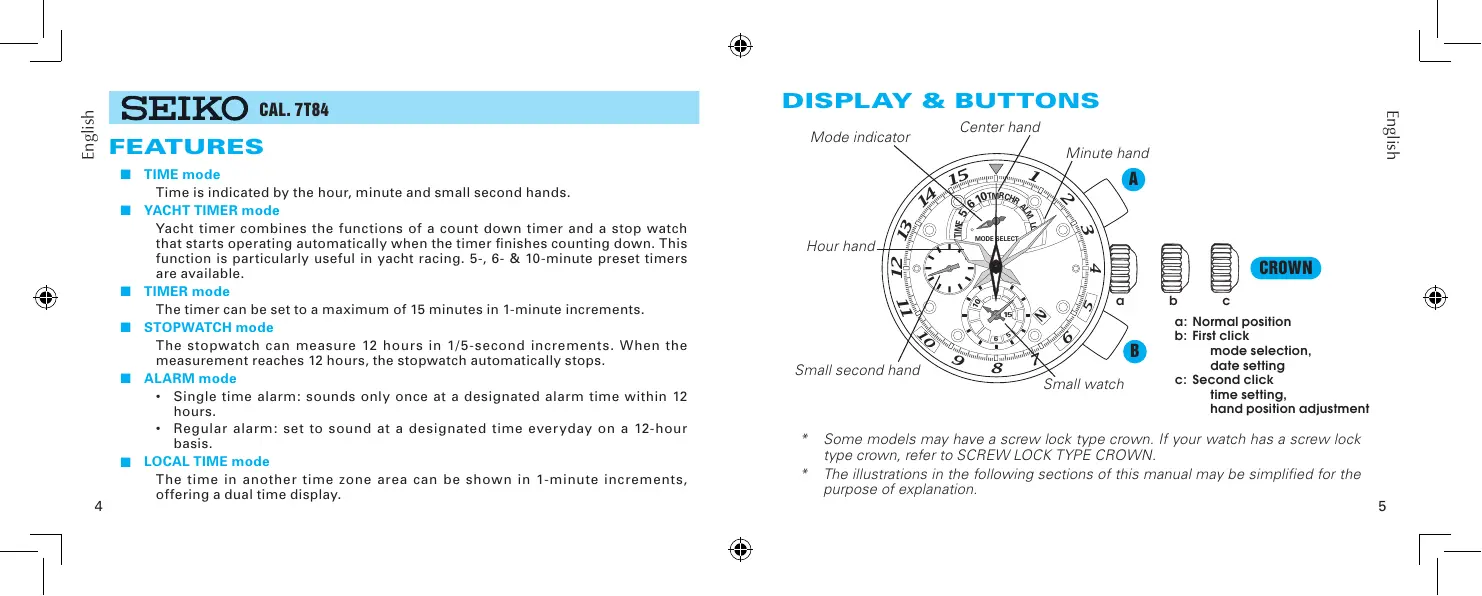
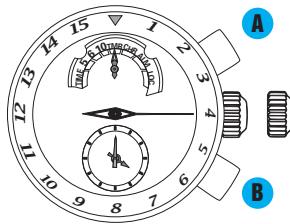
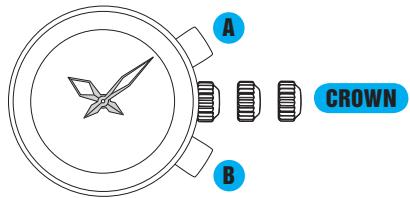
DISPLAY & BUTTONS


b

C
CROWN
a: Normal position
b: First click mode selection, date setting
c: Second click time setting, hand position adjustment
- Some models may have a screw lock type crown. If your watch has a screw lock type crown, refer to SCREW LOCK TYPE CROWN.
- The illustrations in the following sections of this manual may be simplified for the purpose of explanation.
Some models may have a screw-lock mechanism that can securely lock the crown by screw when they are not being operated.
Locking the crown will help to prevent any operational errors and enhance the water resistant quality of the watch.
It is necessary to unlock the screw lock type crown before operating it. Once you have finished operating the crown, make sure to relock it.
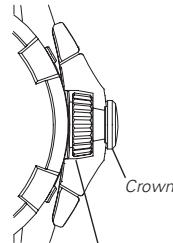
How to use the screw lock type crown
Keep the crown securely locked unless you need to operate it.
[How to unlock the screw lock type crown]
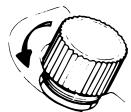
Turn the crown counterclockwise.
The crown is unlocked and can be operated.
[How to lock the screw lock type crown]
Once you have finished operating the crown, turn it clockwise while gently pressing it in toward the watch body until it stops.
- When locking the crown, turn it slowly with care, ensuring that the screw is properly engaged. Be careful not to forcibly push it in, as doing so may damage the screw hole in the case.
![SEIKO 7T84 - [How to lock the screw lock type crown] - 1](/content/2025/01/173194/images/5200983f3ed3e314324e7751ce4dcfb97dfd321cef8755b6d6c6715d9b56455e.jpg)
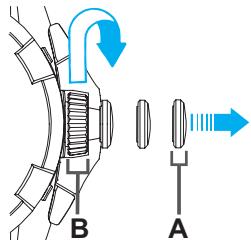
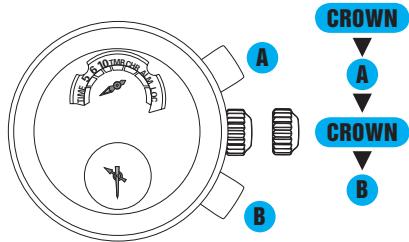
CROWN WITH DRIVING WHEEL
Some models may have a crown with a special structure as illustrated below. Refer to the following instructions when operating this type of crown, as it should be operated in a different way from that of ordinary ones.
Normal position
Driving wheel
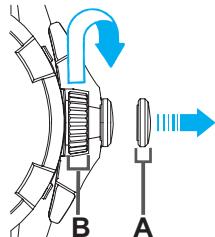
First click position
Second click position
To pull out the crown, pull out the A portion (crown). To turn the crown, turn the B portion (driving wheel).
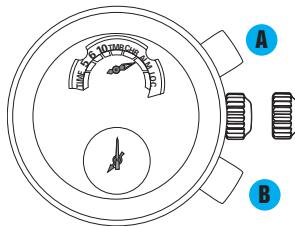
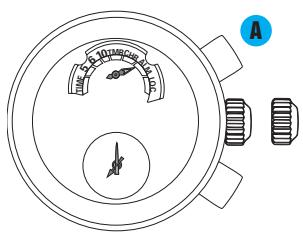
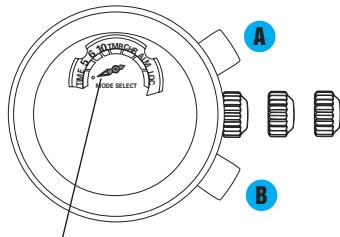
MODE CHANGE
Mode indicator
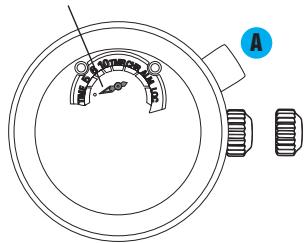
CROWN
Pull out to first click.

Press to set the mode indicator pointing at your desired mode.
CROWN
Upon completion of selecting the desired mode, push back in to normal position.
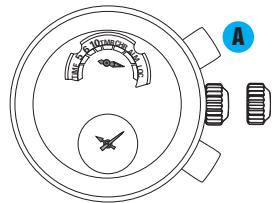
With each press of button A, the mode indicator turns in the following order to show the selected mode.
TIME mode
YACHT TIMER mode
(5-minute timer)
Yacht TIMER mode
(6-minute timer)
Yacht TIMER mode
(10-minute timer)


- When the mode changes to the TIME mode from the LOCAL TIME mode, the mode indicator turns counterclockwise.


LOCAL TIME mode
ALARM mode
STOPWATCH mode
TIMER mode
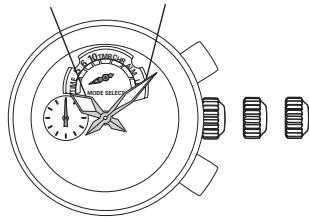
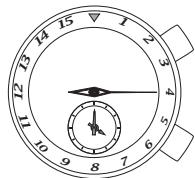
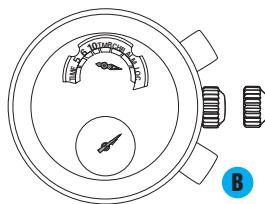
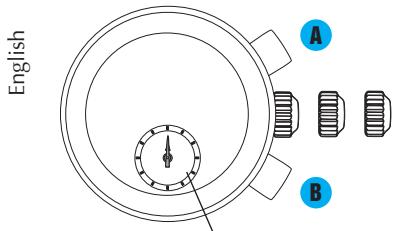
TIME MODE
- Time setting procedures include hand settings of the main watch and small watch to the current time.
- The hands should be correctly aligned to the 0 position (initial position) before starting to set the time. If they are not correctly aligned to the 0 position, it is necessary to correct their alignment before setting the time. To correct the hand alignment, refer to HAND POSITION ADJUSTMENT.
- How to set the time (main watch and small watch)

Small second hand
CROWN

Pull out to second click when the small second hand is at the 12 o'clock position.
The small second hand will stop on the spot.
- If the crown is pulled out while the timer or stopwatch is measuring time, the measurement will be forcibly terminated and the timer or the stopwatch will be reset.
Hour hand Minute hand
CROWN

Turn to set the time of the main watch.
- The moment the date changes is midnight. When setting the hour hand, be sure that AM/PM is set correctly.
- While doing so, set the minute hand 4 to 5 minutes ahead of the correct time, and then slowly move it back to the exact minute(s).
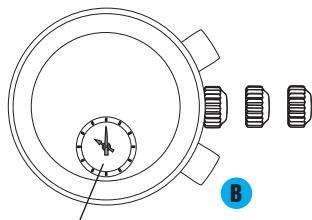
Small watch

Press to set the time for the small watch.
With each press of button B the small watch hands will advance 1 minute. Pressing and holding button B will advance the small watch hands rapidly.
CROWN
Upon completion of all settings, push back in to normal position simultaneously with a time signal.
How to set the date
Date setting should always be carried out after the time is correctly set.
Manual date adjustment is required on the first day after a month that has less than 31 days: February, April, June, September and November.
CROWN
Pull out to first click.
CROWN
Turn clockwise to set the date.
- While you are setting the date, do not press either button A or B, as pressing button A or B while the crown is at the first click position can change the mode and the settings in some modes.
- Do not set the date during any time between 9:00 P.M. and 1:00 A.M. Date setting during this time period may cause failure of date change on the following day.
CROWN
Push back in to normal position.
Yacht TIMER MODE
Yacht timer combines the functions of a count down timer and a stop watch that starts operating automatically when the timer finishes counting down. This function is particularly useful in yacht racing.
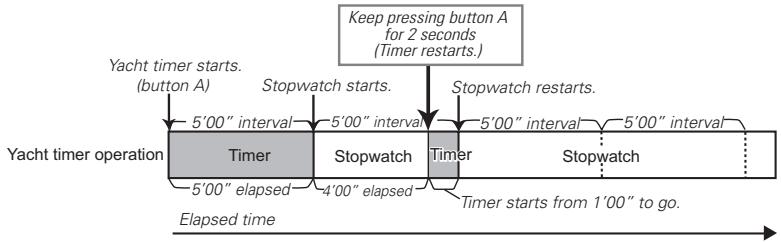
Yacht timer operation
- There are 3 pre-set yachting timer modes: 5-minute, 6-minute and 10-minute timers.
- Upon activating the yacht timer function, the selected yacht timer starts counting down in 1-second increments.
- The remaining time is indicated by the center hand and the two hands of the small watch, which turn counterclockwise while the yacht timer is counting down.
- When the yacht timer finishes counting down, the beep will sound indicating that time is up and the measurement is automatically switched to the stopwatch.
-
The stopwatch can measure 12 hours in 1-second increments. When the measurement reaches 12 hours, the stopwatch automatically stops.
-
The illustration below shows the operation of yacht timer using a 5-minute yacht timer as an example.

- Only one yacht timer can be used at one time.
- You cannot change the selected timer while it is working. To change the timer, it is necessary to stop the currently working timer first, and then change to another.
- When the timer is changed to another timer, the previously selected timer will be automatically cancelled.
How to use the yacht timer

- The operation method of the yacht timer is the same as that of the timer in the TIMER mode.

- Yacht timer can be reset only when the timer is stopped.
- How to read the yacht timer measurement
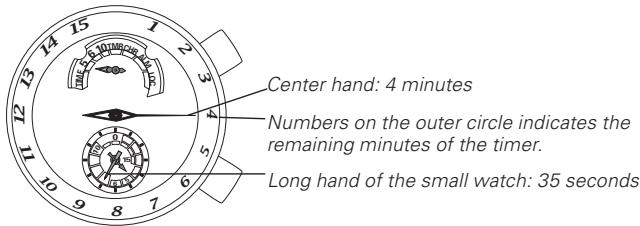
The center hand indicates the remaining minutes and the long hand of the small watch indicates the remaining seconds. When the remaining time is shorter than 60 seconds, the center hand also begins to countdown in one second increments.
Example: Display when the remaining time is 4 minutes and 35 seconds in a 5-minute yacht timer measurement
- The center hand and the two hands of the small watch turn counterclockwise while the yacht timer is counting down.
- When the yacht timer finishes counting down, the time up beep will sound.
- The short hand of the small watch also indicates the remaining minutes.
- The display of the yacht timer is the same with that of the timer in the TIMER mode.
Automatic relay function of the stopwatch
When the yacht timer finishes counting down, the measurement is automatically switched to the stopwatch.
The stopwatch can measure 12 hours in 1-second increments. When the measurement reaches 12 hours, the stopwatch automatically stops.
Measured time is indicated by the center hand and the hour and minute hands of the small watch.
Split time measurement is possible.
How to reset the yacht timer
To reset the yacht timer, it is necessary to stop the stopwatch.
While the STOPWATCH hands are moving
- Press button A to stop the stopwatch.
- Press button B to reset the yacht timer.
While the STOPWATCH hands are stopped
[When the stopwatch is stopped]
- Press button B to reset the yacht timer.
[When the split time measurement is displayed while the stopwatch is measuring.]
- Press button B to fast-forward the stopwatch hands. Subsequently the stopwatch hands return to the ongoing measurement movement.
- Press button A to stop the stopwatch.
- Press button B to reset the yacht timer.
[When the split time measurement is displayed and the stopwatch is stopped.]
- Press button B to fast-forward the stopwatch hands. Subsequently the stopwatch hands will stop.
- Press button B to reset the stopwatch.
Yacht TIMER-STOPWATCH OPERATIONAL FLOW
Yacht timer finishes counting down.

Stopwatch automatically starts.


Yacht timer finishes counting down.

Stopwatch automatically starts.


*Restart and stop can be repeated as many times as required by pressing button A.
Yacht timer finishes counting down.

Stopwatch automatically starts.


SPLIT
RELEEACE
*Measurement and release of the split times can be repeated as many times as required by pressing button B.
Yacht timer finishes counting down.

Stopwatch automatically starts
ISH TIME
OF 1ST
COMPETITOR
2ND
COMPETITOR
FINISHES

FINISH TIME
OF 2ND
COMPETITOR


Restart setting function
Yacht timer mode features a restart setting function, which enables you to restart the measurement correctly and easily after an interruption during the stopwatch measurement. This function is particularly useful when you have to restart after a premature start in a yacht race.
The restart setting function can be used anytime while the stopwatch is measuring following the yacht timer counting.
Pressing button A for approximately 2 seconds will activate the restart setting function.
Restart of the measurement will be made at regular intervals from the initial start of the measurement.
The intervals between the initial start of the measurement and the subsequent restarts are automatically decided according to the selected yacht timer which had finished its counting before the stopwatch had started.
Example: When the restart setting function is activated during the stopwatch measurement after the 5-minute yacht timer finishes counting down, and 4 minutes has elapsed since then.
- For the 5-minute yacht timer, restarts of the stopwatch occur at 5-minute intervals from the start of measurement.
- For the 6-minute or 10-minute yacht timer, restarts of the stopwatch occur at 6-minute or 10-minute intervals respectively from the start of measurement.
For actual yacht racing, the restart setting function can be used in 5 minute yacht timer measurements as follows:
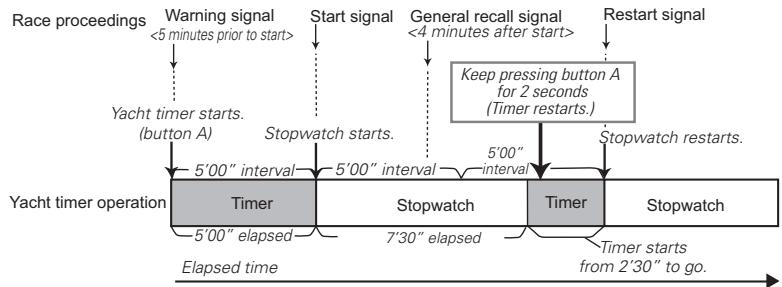
- The general recall signal is a signal issued when a number of yachts make false starts or violate racing rules and the race committee is unable to identify or the starting procedures are incorrect.
- For detailed rules on yacht racing, check the appropriate racing rules of each race.
TIMER MODE
The timer can be set to a maximum of 15 minutes in 1-minute increments.
The remaining time is indicated by the center hand and the two hands of the small watch, which turn counterclockwise while the timer is counting down.
When the timer finishes counting down, the beep will sound indicating that the time is up.
How to use the timer
- The numbers on the outer circle of the dial indicated by the center hand shows the timer time. (The short hand of the small watch also indicates the timer time.)
CROWN
Pull out to first click.


Press to set the mode indicator pointing at the TIMER mode.
Press to set the center hand to show your desired timer time.
- With each press of button B, the center hand moves one minute forward, adding one minute to the timer time.
CROWN
Push back in to normal position. Now the timer is ready for use.
Example: Timer mode display when the timer is set for 4 minutes
- If you press button B once again after the timer time is set for 15 minutes, the timer time returns to one minute.
-
The set timer time will be retained even if the TIMER mode is changed to another mode.
-
The operation method of the timer is the same with that of the yacht timer. For details, refer to • How to use the yacht timer and • How to read the yacht timer measurement.
- The automatic relay function of the stopwatch cannot be activated in the TIMER mode.

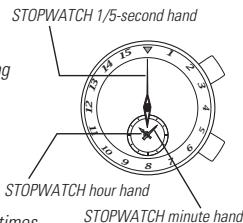
STOPWATCH MODE
The stopwatch can measure up to 12 hours in 1/5-second increments. When the measurement reaches 12 hours, the stopwatch automatically stops.
Measured time is indicated by the center hand and the two hands of the small watch.
Split time measurement is possible.
How to reset the stopwatch
While the STOPWATCH hands are moving
- Press button A to stop the stopwatch.
- Press button B to reset the stopwatch.
While the STOPWATCH hands are stopped
[When the stopwatch is stopped]
- Press button B to reset the stopwatch.
[When the split time measurement is displayed while the stopwatch is measuring.]
- Press button B to release the split time display and return to the ongoing measurement movement.
- Press button A to stop the stopwatch
- Press button B to reset the stopwatch
[When the split time measurement is displayed and the stopwatch is stopped.]
- Press button B to release the split time display.
- Press button B to reset the stopwatch.
STOPWATCH OPERATION


- Restart and stop can be repeated as many times as required by pressing button A.

- Measurement and release of the split times can be repeated as many times as required by pressing button B.

ALARM MODE
The single-time alarm is set in the TIME mode.
- The single-time alarm sounds only once at a designated alarm time and it is automatically disengaged.
- The alarm time can be set within 12 hours from the current time in 1-minute increments.
The regular alarm can be set to sound at a designated time everyday.
- The regular alarm is set in the ALARM mode.
- The set alarm time can be used as many times as required.
- You can preview the alarm sound by using the sound demonstration function.
| Mode indicator | Single-time alarm | Regular alarm |
| TIME | Settable | OFF |
| ALARM | Unsettable | ON |
- The single-time alarm can be used only in the TIME mode.
How to use the single-time alarm
The single-time alarm is used in the TIME mode.
The single-time alarm time can be set within 12 hours from the current time.
* The two hands of the small watch show the single-time alarm time.
Pull out to first click.
Press to set the mode indicator pointing at the TIME mode.
Push back in to normal position.
Press to set the small watch to show your desired single-time alarm time.
- With each press of button B the small watch hands will advance 1 minute. Pressing and holding button B will advance the small watch hands rapidly.
After completing the setting, wear the watch as it is.
- If the alarm time is set to the current time, the single-time alarm is automatically canceled.
- Be careful not to press button B while wearing the watch, as pressing button B may advance the set alarm time.
- If you change the TIME mode to another, the single-time alarm will be automatically canceled.
- How to stop the single-time alarm manually while sounding
The single-time alarm sounds for 20 seconds at the designated time. To stop the single-time alarm manually while sounding, press either button A or B.
- The single-time alarm will be automatically canceled once it sounds at the designated time.
- How to change or cancel the single-time alarm
Press button B to change the single-time alarm setting.
Keep pressing button B to fast-forward.
To cancel the single-time alarm, chose either of the following two methods.
- Press button B to set the alarm time to the current time. The easy way to do this is to keep pressing button B to fast-forward the small watch hands which will automatically stop when they reach the current time, and then release the button B.
- Change the TIME mode to another mode.
Regular alarm
The regular alarm is used in the ALARM mode.
The regular alarm can be set on a 12-hour basis.
* The two hands of the small watch show the regular alarm time.

Pull out to first click.
Press to set the mode indicator pointing at the ALARM mode.
Press to set the small watch to show your desired regular alarm time.
- With each press of button B the small watch hands will advance 1 minute. Pressing and holding button B will advance the small watch hands rapidly.
- The regular alarm can be set on a 12-hour basis.

Upon completing the alarm setting, push back in to normal position.
- If the crown remains at the first click, the alarm does not sound.
- How to stop the regular alarm manually while sounding
The regular alarm sounds for 20 seconds at the designated time. To stop the regular alarm manually while sounding, press either button A or B.
Sound demonstration function (Alarm sound preview)

Pull out to first click.
Press to set the mode indicator pointing at the ALARM mode.
Push back in to normal position.
Press for longer than 2 seconds. The alarm sound can be heard while button A is kept pressed.
LOCAL TIME MODE
The small watch can be set to show the time in another time zone.
Two different times can be shown at the same time using the main watch and the small watch as a dual time display.
How to set the local time

Pull out to first click.
Press to set the mode indicator pointing at the LOCAL TIME mode.
- The small watch shows the current time.

Press to set the local time.
- With each press of button B the local time hands will advance 1 minute. Pressing and holding button B will advance the local time hands rapidly.
- The local time can be set on a 12-hour basis.
- The small watch shows the time in another time zone.
CROWN
Push back in to normal position.
BATTERY CHANGE
3 Years
The miniature battery which powers your watch should last approximately 3 years. However, because the battery is inserted at the factory to check the function and performance of the watch, its actual life once in your possession may be less than the specified period. When the battery expires, be sure to replace it as soon as possible to prevent any malfunction. For battery replacement, we recommend that you contact an AUTHORIZED SEIKO DEALER and request SEIKO SR927W battery.
- If the yacht timer is used more than 6 hours per week, the timer is used more than 15 minutes per day, the stopwatch is used more than 60 minutes per day and the alarm sounds more than 40 seconds per day, the battery life may be less than the specified period.
Battery life indicator
When the battery nears its end, the small second hand moves at two-second intervals instead of normal one-second intervals. In that case, have the battery replaced with a new one as soon as possible.
- The watch remains accurate while the small second hand is moving at two-second intervals.

WARNING
- Do not remove the battery from the watch.
- If it is necessary to take out the battery, keep it out of the reach of children. If a child swallows it, consult a doctor immediately.

CAUTION
- Never short-circuit, tamper with or heat the battery, and never expose it to fire. The battery may burst, become very hot or catch fire.
The battery is not rechargeable. Never attempt to recharge it, as this may cause battery leakage or damage to the battery.
NECESSARY PROCEDURE AFTER BATTERY CHANGE
After the battery is replaced with a new one, or when an abnormal display appears, follow the procedures below to reset the built-in IC. The watch will resume its normal operation.
HOW TO RESET THE IC
- Pull out the crown to the second click.
- Press button A and B at the same time.
- Push the crown back in to normal position and check if the hands move as normal.
- Resetting the IC will initialize the watch. Before starting to use the watch, it will be necessary to set the time and adjust the STOPWATCH hands to the 0 position.
Refer to HAND POSITION ADJUSTMENT and TIME MODE sections of this manual.
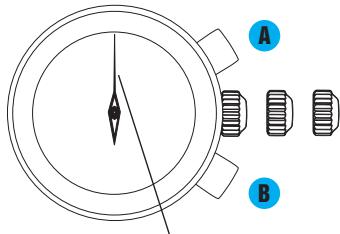
HAND POSITION ADJUSTMENT
(mode indicator, center hand, hands of the small watch)
Hand position adjustment is a procedure required when the hands are not correctly aligned for use in the STOPWATCH or TIMER functions, or after the battery is changed or the built-in IC is reset. For example, when the hands are not pointing to the 0 position even after the stopwatch is reset. After hand position adjustment is carried out, it is necessary to set the time.
- How to adjust the positions of the mode indicator, center hand and the hands of the small watch

Pull out to second click.
The small second hand will stop on the spot.
- If the crown is pulled out while the timer or stopwatch is measuring time, the measurement will be forcibly terminated and the timer or the stopwatch will be reset.
Small watch
Center hand
A Keep pressing for approximately 5 seconds. The small watch hands start moving.
Press to set the small watch hands to 12 o'clock, which is the initial position of the small watch hands. Keep pressing to fast-forward.
Press to turn the center hand a full circle.
Press to set the center hand to the 0 position. Keep pressing to fast-forward.
Mode indicator
Press to turn the mode indicator a full circle.
Press to set the mode indicator pointing at the TIME mode, which is the initial position of the mode indicator.
Keep pressing to fast-forward.
- Set the mode indicator exactly pointing at the dot marker.

Upon completion of all settings, push back in to normal position.
- After hand position adjustment is carried out, it is necessary to set the time. Refer to ● How to set the time.
TROUBLESHOOTING
| Trouble | Possible causes |
| The watch stops operating. | The battery has run down. |
| The small second hand moves in 2-minute increments. | The battery nears its end. |
| The watch temporarily gains or loses time. | The watch has been left or worn in extremely high or low temperatures. |
| The watch has been left close to an object with a strong magnetic field. | |
| You drop the watch, hit it against a hard surface, or wear it while playing active sports. The watch is exposed to strong vibrations. | |
| The STOPWATCH hands do not return to the 0 position when the stopwatch is reset. | The watch has been affected by magnetism or exposed to strong shocks or vibrations. |
| The inner surface of the glass is clouded. | Moisture has entered the watch because the gasket has deteriorated. |
| The date changes at 12 o'clock noon. | AM/PM is not properly set. |
| Solutions |
| Have the battery replaced with a new one immediately by the retailer from whom the watch was purchased. |
| Return the watch to a normal temperature so that it works accurately as usual, and then reset the time. The watch has been adjusted so that it works accurately when it is worn on your wrist under a normal temperature range between 5 °C and 35 °C. |
| Correct this condition by moving and keeping the watch away from the magnetic source. If this action does not correct the condition, contact the retailer from whom the watch was purchased. |
| Reset the time. If the watch does not return to its normal accuracy after resetting the time, contact the retailer from whom the watch was purchased. |
| Adjust the positions of the mode indicator, center hand and two hands of the small watch, and then reset the time. Follow the instructions in HAND POSITION ADJUSTMENT and TIME MODE. |
| Contact the retailer from whom the watch was purchased. |
| Advance the hour hands for 12 hours to correctly set the time and date. |
- In the event of any other problem, please contact the retailer from whom the watch was purchased.
SPECIFICATIONS
1 Frequency of crystal oscillator
2 Loss/gain (Monthly rate)
3 Operational temperature range.
4 Driving system
5 Display system
Time
Yacht timer/Timer
Stopwatch
Alarm
Local time
6 Battery
7 Battery life
8 IC (Integrated Circuit)
32,768 Hz (Hz = Hertz...Cycles per second)
Less than 15 seconds when used on the wrist within normal temperature range (5^ 35^)
Between -10^ and +60^
Step motor 4 pieces
Hour, minute and small second hands in 1-second increments
Center hand: 1-minute and 1-second increments (when the remaining time is less than 1 minute) exclusively for timer
Small watch: 1-second increments
Center hand: 1/5-second increments
Small watch (hour and minute hands): 1-minute increments
Small watch : Regular alarm time
Small watch : Local time in 1-minute increments
SEIKO SR927W, 1 piece
Approximately 3 years
If the yacht timer is used less than 6 hours per week, the timer is used less than 15 minutes per day, the stopwatch is used less than 60 minutes per day and the alarm sounds less than 40 seconds per day.
C-MOS-IC: 1 piece
- SEIKO
- FEATURES
- DISPLAY & BUTTONS
- How to use the screw lock type crown
- [How to lock the screw lock type crown]
- CROWN WITH DRIVING WHEEL
- MODE CHANGE
- CROWN
- TIME MODE
- - How to set the time (main watch and small watch)
- How to set the date
- Yacht TIMER MODE
- Yacht timer operation
- How to use the yacht timer
- - How to read the yacht timer measurement
- Automatic relay function of the stopwatch
- How to reset the yacht timer
- Yacht TIMER-STOPWATCH OPERATIONAL FLOW
- Restart setting function
- Example: When the restart setting function is activated during the stopwatch measurement after the 5-minute yacht timer finishes counting down, and 4 minutes has elapsed since then.
- TIMER MODE
- How to use the timer
- Example: Timer mode display when the timer is set for 4 minutes
- STOPWATCH MODE
- How to reset the stopwatch
- STOPWATCH OPERATION
- ALARM MODE
- How to use the single-time alarm
- - How to stop the single-time alarm manually while sounding
- - How to change or cancel the single-time alarm
- Regular alarm
- - How to stop the regular alarm manually while sounding
- Sound demonstration function (Alarm sound preview)
- LOCAL TIME MODE
- How to set the local time
- Press to set the local time.
- BATTERY CHANGE
- Years
- Battery life indicator
- WARNING
- CAUTION
- NECESSARY PROCEDURE AFTER BATTERY CHANGE
- HOW TO RESET THE IC
- HAND POSITION ADJUSTMENT
- (mode indicator, center hand, hands of the small watch)
- TROUBLESHOOTING
- SPECIFICATIONS
Brand : SEIKO
Model : 7T84
Category : Quartz watch