RAPIER V1 - Computer Mouse VERBATIM - Free user manual and instructions
Find the device manual for free RAPIER V1 VERBATIM in PDF.

User questions about RAPIER V1 VERBATIM
0 question about this device. Answer the ones you know or ask your own.
Ask a new question about this device
Download the instructions for your Computer Mouse in PDF format for free! Find your manual RAPIER V1 - VERBATIM and take your electronic device back in hand. On this page are published all the documents necessary for the use of your device. RAPIER V1 by VERBATIM.
USER MANUAL RAPIER V1 VERBATIM
Whatis in the Pack 3
Key Features 3
Button Assignment 3
Rapier V1 Installation 4
Software Introduction 4
Rapier V1 Gamer Toolkit 4
Funtion Assignment 5
Keep shot function 5
Emulate Keyboard 6
Emulate HID 7
Script 7
Script Programming in More Detail 8
Interface 8
Example 9
DPI Level Up / Down 9
Rapier V1 Feature Configure 9
USB Report Rate 10
Delay Time Base Unit 10
Resolution Level 10
My Favourite Profile 10
Q&A 11
Technical Support 11
Limited Warranty Terms 11
WEEE Notice 11
FCC Compliance 12
CE Declaration - EC DECLARATION OF CONFORMITY 12
RoHS Compliance 12
Welcome!
Welcome to the Verbatim Rapier V1 Laser Gaming Mouse. The Rapier V1 offers you 3200dpi laser precision and is designed for use with all game types. With on board data store technology macro, keyboard, and mouse functions can be saved directly to the Rapier V1 and transferred from PC to PC without the need of the Gaming Software.
It comes with 7 programmable buttons allowing you to easily set your profiles for your favourite games.
Note:
- Rapier V1 has two modes; standard and gaming mode. The 7 buttons can be redefined in gaming mode and all the definitions are saved directly to the mouse.
- The 'click' and 'select' function is attached to the left button (Button 1) and must always exist. To redefine this button another button on the mouse has to be redefined as the left button.
What's in the Pack
Rapier V1 Laser Gaming Mouse
- Mouse Carry pouch
Weight pouch
Quick Start Guide
- CD ROM containing Gamer Toolkit Software & User Guide
Key Features
- 9 Button Laser Gaming mouse
- 7 programmable buttons
Adjustable dpi setting: 800 - 3200 dpi 'on the fly' sensitivity adjustment - 7 dpi settings available via the software: 400 - 3200dpi
- Weight adjustment for your preferred set up (5 x removable 4.5gram weights)
Supports 3 group macro setting directly to the mouse (3 scripts) - Gold plated USB connector
- Frame rate: up to 7,800 FPS (frames per second)
- Tracking speed: up to 65 IPS (inches per second)
Acceleration: 20G - Hotkey design for 'Triple Click' function
- USB full speed / Adjustable USB report rate: 125 1,000Hz
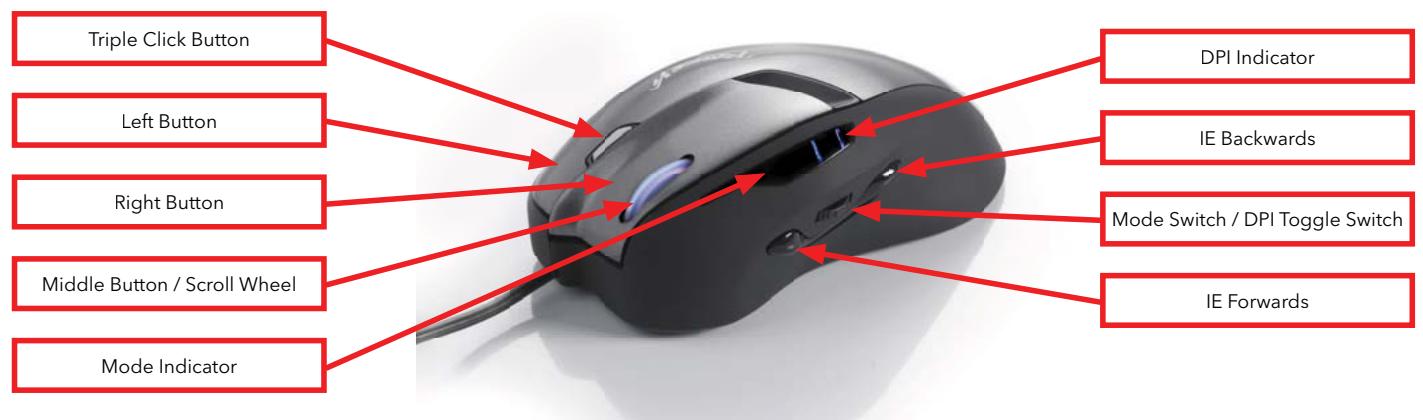
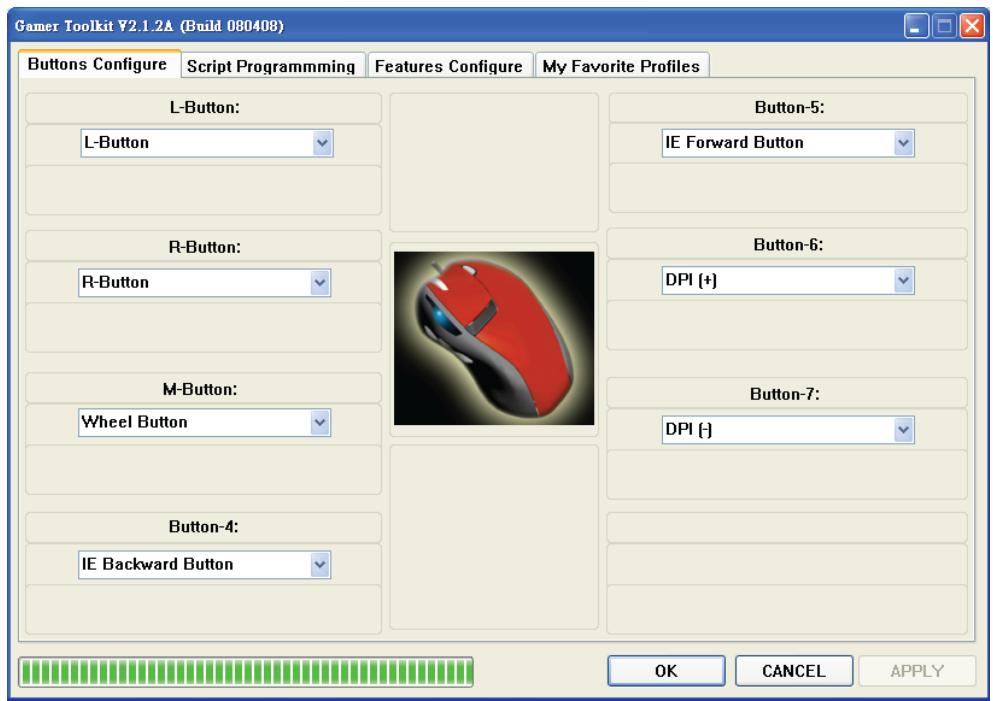
Button Assignment
There are 9 buttons of the Rapier V1. The buttons definitions are as follow:
The Rapier V1 Laser Gaming Mouse is a USB mouse. It has plug 'n' play functionality however for optimum performance it is advised that the USB plug is connected directly to the PC or laptop, and not via a USB Hub.
The first time you install Rapier V1 switch off your PC / lap top, plug in Rapier V1 and then switch on your PC.
Note:
- Rapier V1 has on board memory so for data transfer it is recommend that it is plugged directly into the USB port of the PC
- If your computer do not support USB 2.0 please reduce the USB report rate to 125Hz in the Feature Config section of the Gamer Toolkit Software
Software Introduction
The software is an auto run CD. Please follow the steps below to install:
- Insert the CD into CD-ROM drive; the installation menu will be executed automatically. (If the auto-run does not function itself, double-click the "setup.exe" icon in CD files.)
- The setup program will guide you through the installation step by step
Note:
- Before running the program, make sure the mouse is connected with the computer.
Rapier V1 Gamer Toolkit
There are two modes built into Rapier V1, standard mode and gaming mode. In standard mode Rapier V1 is a standard 7 button laser mouse with ability to switch from 800 dpi to 3200dpi. In gaming mode the functions of these 7 buttons can be redefined. All the redefined data will be stored on Rapier V1's internal memory. You can use the same functions you saved on Rapier V1 from PC to PC without the need of the Gaming Software.
Note:
- The 'click' and 'select' function is attached to the left button (Button 1) and must always exist. To redefine this button another button on the mouse has to be redefined as the left button.
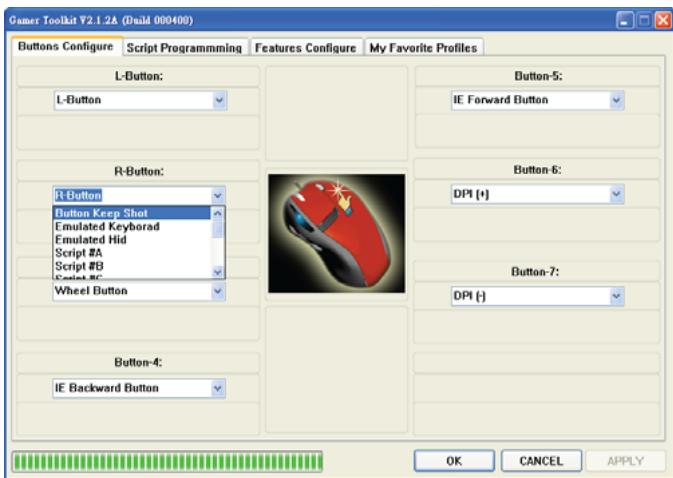
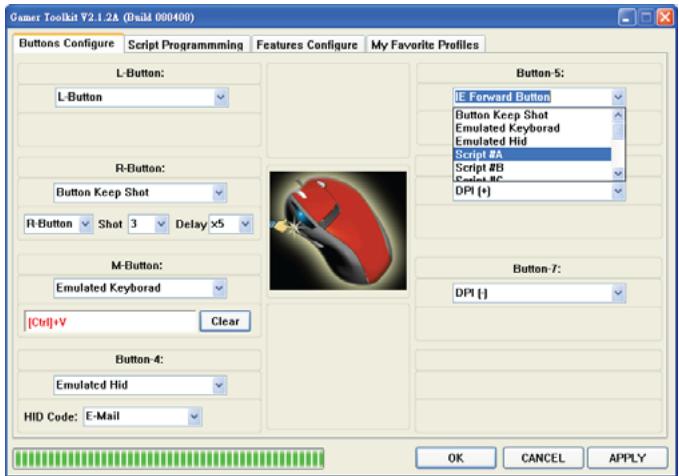
Function Assignment
Under each button are the following functions you can assign to the button:
- Button Keep Shot
Emulated Key Board
Emulated HID
Script # A
Script # B
Script # C
DPI (+)
DPI(-) - L Button
R Button
Wheel Button
IE Backward Button
IE Forward Button - Disable Button
These functions appear under the drop down menu on each button.
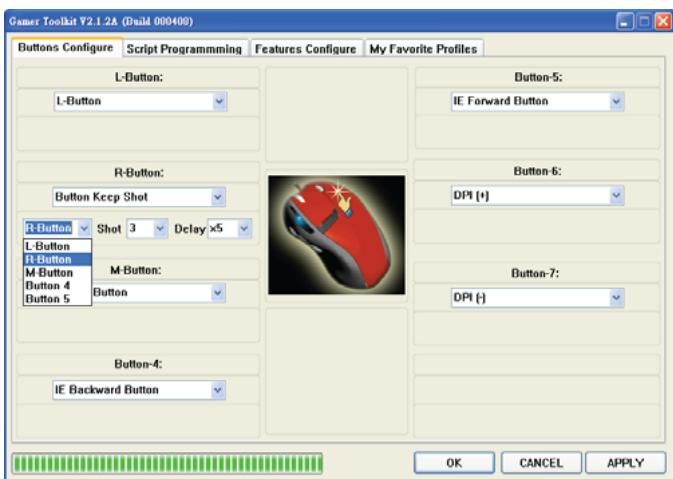
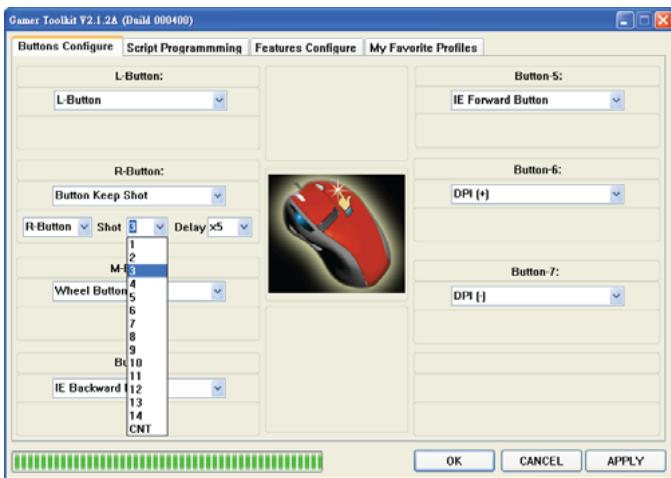
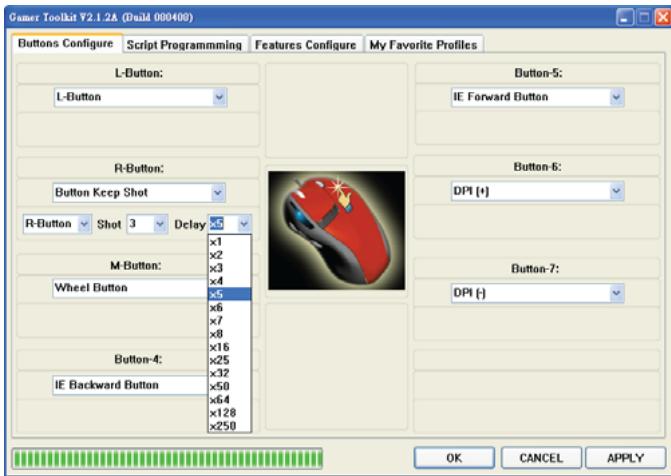
A. Keep shot function
In Gaming mode, the keep shot function can be assigned to any button of Rapier V1. You can set the number of shots you require by one button click, and the interval time between each shot taken on the mouse click. Set as follow:
-
Choose a button and select the function "Button Keep Shot".
-
Define a button to emulate.
-
Select the number of shots
-
Select the interval time
-
Delay time setting is the basic interval time of two actions, such as 2 shots. Smaller number means shorter time.
- Interval time = Delay Time Base Unit 4ms

- Press "Apply" to active new setting.
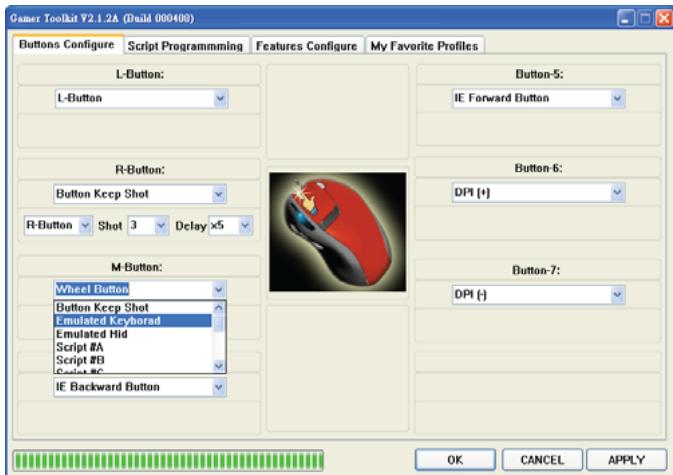
B. Emulate keyboard
In gaming mode, the entire button can be assigned as a keyboard command, the single command or a compound command. The process is as follow.
- Choose a button and select the function of "Emulated Keyboard".
- Input the command by keyboard. (Using "Clear" can clear the command)
- Press "Apply" to active new setting.
C. Emulated HID
Rapier V1 can emulate consumer control device (Human Interface Device, HID) by specific code.
The process is as follow.
-
Choose a button and select the function of "Emulated Hid"
-
Select a function or Input the specific code.
- Press "Apply" to active new setting.
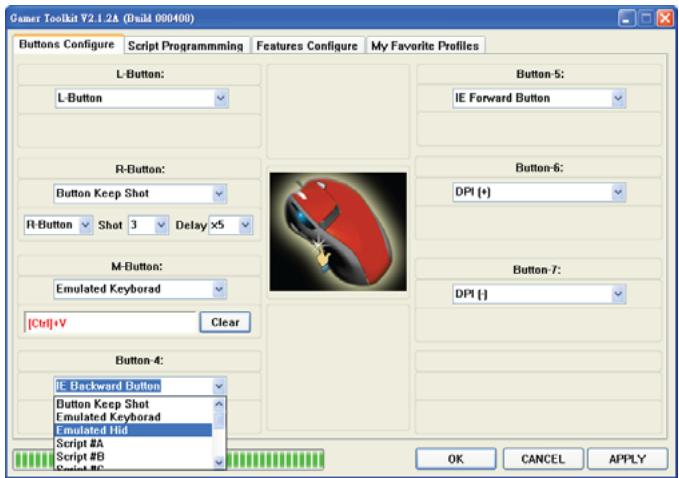
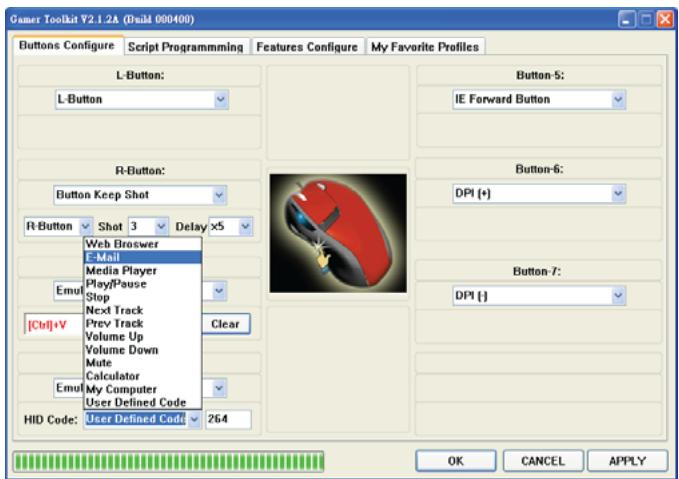
Note:
- The code can be found in HID table. PDF. (EX. 0x221 is "Search" function), some of the code was limited by system.
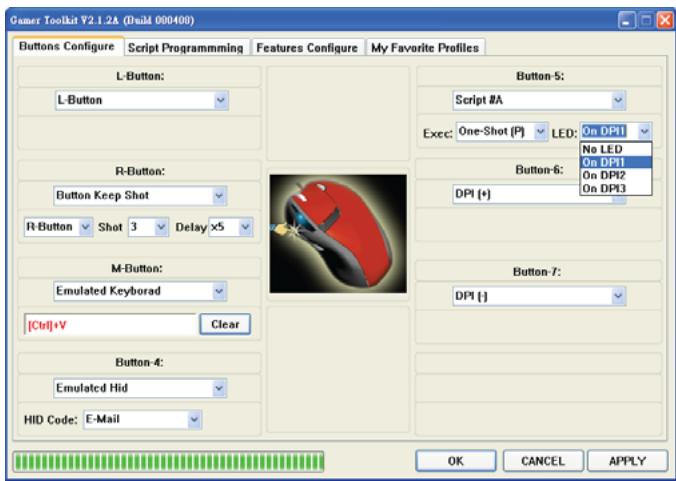
D. Script
This function looks like "Macro", but is much more powerful than Macro. Rapier V1 upgrades the Macro into "Script", to save a series of mouse and keyboard movement into a button. The movement include: the mouse movement, mouse scrolling movement, button clicks, keyboard commands and compound commands. The Rapier V1 can store 3 groups of scripts. Via the Rapier V1 utility, these 3 group scripts can be edited at the same time and saved on the Rapier V1 hardware. The function remains built into the mouse even when you change to a different PC.
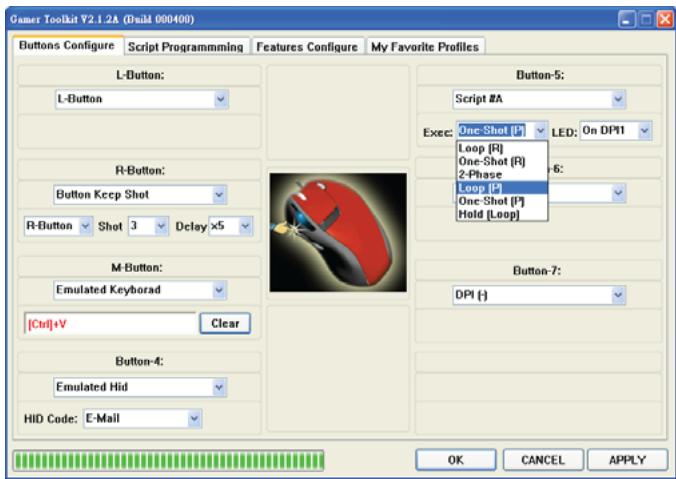
- Choose a button and select the function of "Script #A" (or #B, #C)
- Select the operation mode.
Mode explanation:
- Loop (R): The command will be executed cyclically after you press and release the button. Click the button again to stop it.
- One-Shot (P): The command will be executed when you press the button.
- One-Shot (R): The command will be executed after you press and release the button.
- Hold (1-Shot): The command will be executed while you press and hold the button.
- Loop (P): The command will be executed by cyclically when you press the button.
- Hold (Loop): The command will be executed cyclically when you press and hold the button.
-
2-Phase: You can combine two commands groups, group 1 will be executed when press the button, group 2 will be executed when release the button. You must insert "Pause" command between ground 1 and 2.
-
Setup the LED indicator.
- Press "Apply" to active new setting.
- Then go to "Script Programming" page.
Script Programming in more detail.
Interface
- Input Area: command input area. All the process of command input or movement will be input in this area.
- Load Area: load script file from file or mouse.
- Edit Area: modify script process or description.
- Save Area: save script process or description into file or mouse.
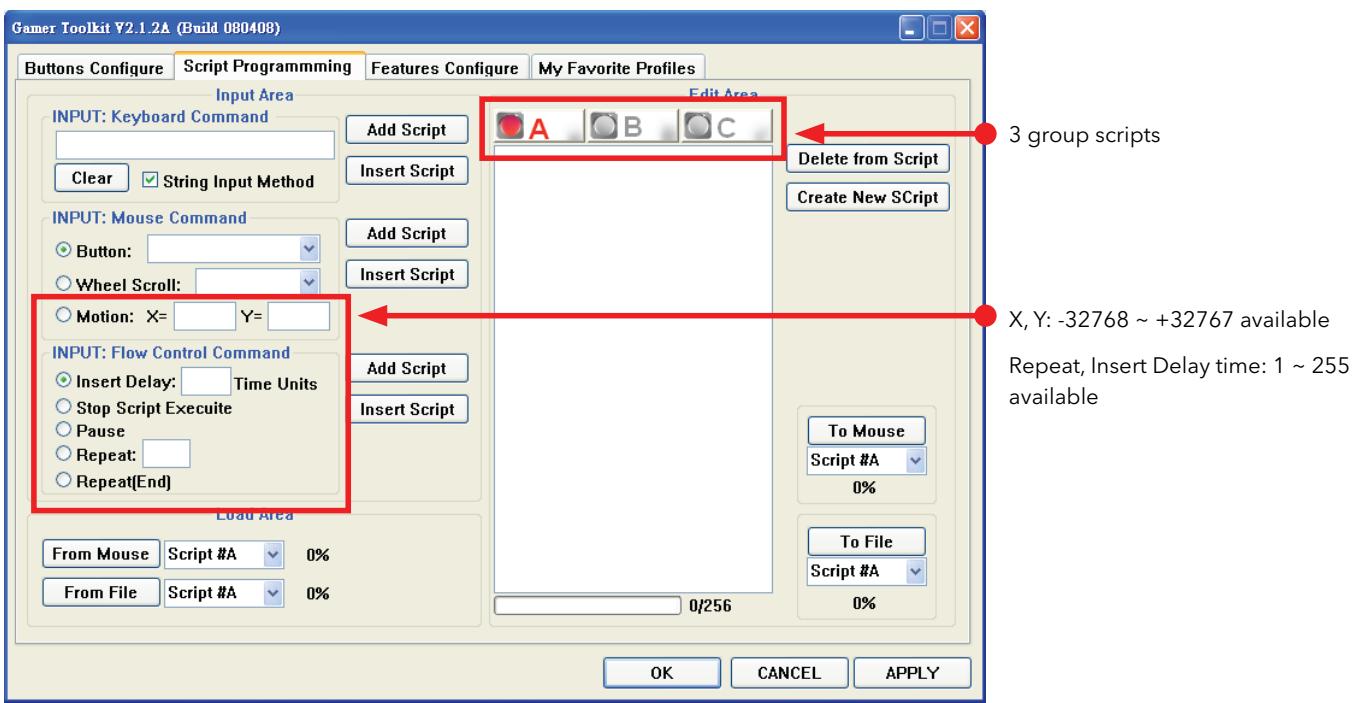
Example
- Define a button for "Script #A" in Buttons Configure page then go to "Script Programming" page to create a script.
- Tick "String Input Method", then key-in "Good Morning" and click "Add Script", you will see the result in "A Edit Area" like the picture. If you want to delete some scripts, click "Delete from Script". If you want to change the existing scripts, then click "Create New Script"
- Click "To Mouse" to save your command to the mouse directly.
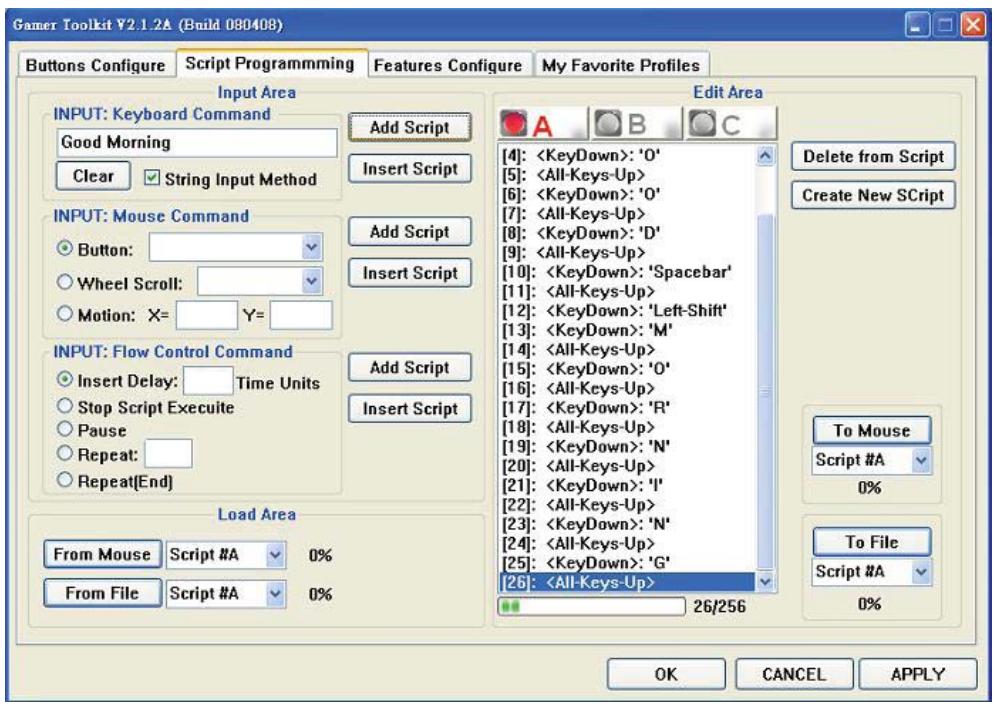
Note:
- You can use the same way to define the command for mouse button or combine the keyboard and mouse command as well.
E. DPI level up/ down
You can set this function to any button on Rapier V1. There are 4 hardware based DPI levels in Rapier V1.
Rapier V1 Feature Configure
This part is the core control features of Rapier V1. In here, the resolution, LED control, delay time base unit, USB report rate can be modified.
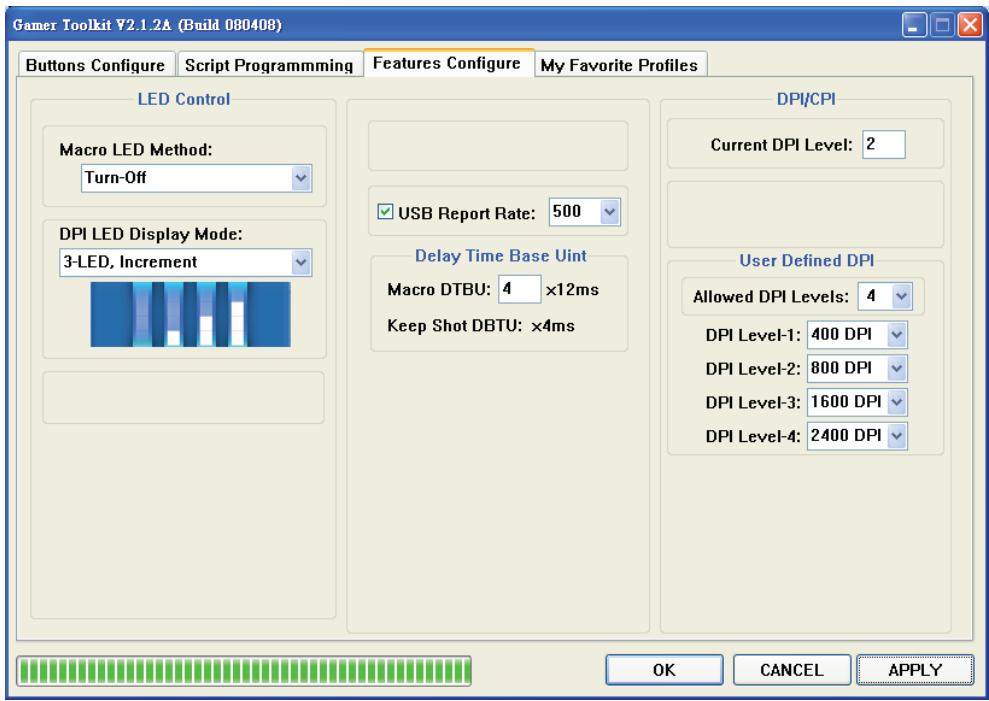
A. USB Report rate
The USB report rate can be adjusted from 125Hz to 1,000Hz .
Note:
1. Some computers do not support USB 2.0 or high report rate. If this is the case please reduce the report to 125Hz
2. After changing the USB Report Rate setting you will need to reboot your system to activate the function.
B. Delay time base unit
Is the basic interval time of two actions, such as 2 shots. The smaller the number means the shorter the time.
C. Resolution level
4 levels of resolution can be adjusted and saved.
My Favourite Profile
In "My Favourite Profile" page, you may save the button functions in a profile. For profile set up, there are two different ways based on the button function including the scripts or not including the scripts.
Process for no Script profile:
- Click "ADD" button to create a profile. E.G. Hot Key, then you will see the profile name in left and middle column.
- Click "EDIT" button, and you will be automatically taken back to "Buttons Configure" page. Please assign the button functions you want, E.G. Define "Button 4" to be "Ctrl + Alt + Del" function, and click the "APPLY" button.
- Next time when you want to use this profile, you just need to choose the profile name in the Quick Switch Profile List.
Process for Script profile:
- Click "ADD" button to create a profile.
-
Click "EDIT" button, and you will be automatically taken back to "Buttons Configure" page. Please assign the button functions you want, E.G. Define "Button 4" to be "Script A" then go to "Scripts Programming" page to define "Script A". Don't forget to click "APPLY" to set.
-
When you want to use this profile, please follow up the instructions:
i. Tick "With All Scripts" option.
ii. Choose the profile listed in middle column.
iii. Click "Download" button then Scripts will be imported from system to mouse hardware.
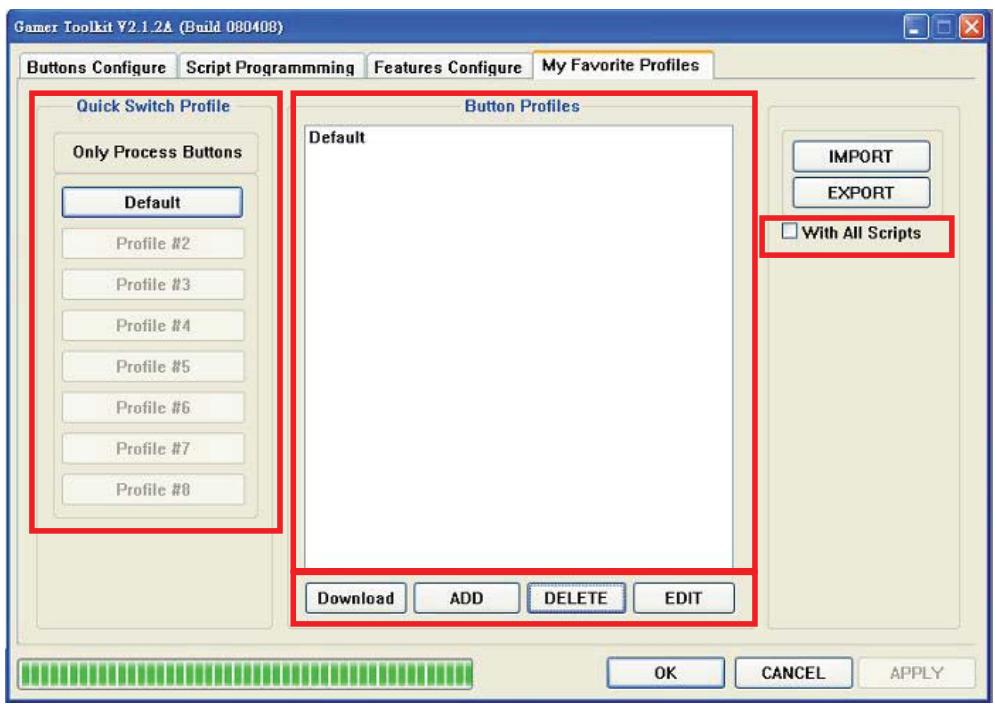
If you want to share the Button Profile for the other PC, select the Profile Name, and click on "EXPORT" to create profile setting files. You can copy these files to the other PC, and click on "IMPORT" to add Button Profiles list.
Q. Before I changed any features the cursor does not work well on screen?
Ans.: Please check the mouse pad you are using. For optimum performance use the Verbatim Rapier Gaming Mouse pad.
If you are using a computer that does not support USB 2.0 reduce the USB report rate under the Features Configure page on the software.
Q: What are the indicator functions, and how can I tell the status of mouse?
Ans There are 4 indicators in Rapier V1, the default setting are:
| Location | Function | Colour | Number |
| Indicator | Resolution indicate | Blue | 3 |
| Indicator | Mode indicate | Red | 1 |
Blue LED can be set as a function indicator by the software.
Red LED means mouse is in gaming mode. When the LED is off it is in standard use mode.
Q. How do I create a profile with "Default Function"?
Ans Open the software and do not change anything.
Go to "My Favourite Profiles" page then click "ADD" button, create the file name "Default" then you will see a profile called "Default" in profile list.
Technical Support
If you are experiencing difficulty installing or using your Verbatim product, please visit the main Verbatim Technical Support website at www. verbatim-europe.com. From this page you can access our library of user documentation, read answers to frequently asked questions, and download available software updates. Although most of our customers find this content sufficient to put them back on the right track, this page also lists ways in which you can contact the Verbatim Technical Support Team directly.
Europe: For technical support in Europe e-mail drivesupport@verbatim-europe.com or call 00 800 3883 2222 in the following countries: Austria, Belgium, Denmark, Finland, France, Germany, Hungary, Italy, Luxembourg, Monaco, Netherlands, Norway, Poland, Portugal, Republic of Ireland, Spain, Sweden, Switzerland and the United Kingdom. All other countries call +353 61 226586.
Limited Warranty Terms
Verbatim Limited warrants this product to be free from defects in material and workmanship for a period of 2 years from date of purchase. This warranty excludes batteries. If this product is found to be defective within the warranty period, it will be replaced at no cost to you. You may return it with your original cash register receipt to the place of purchase or contact Verbatim.
In the following European countries, Austria, Belgium, Denmark, Finland, France, Germany, Greece, Hungary, Italy, Luxembourg, Monaco, Netherlands, Norway, Poland, Portugal, Republic of Ireland, Spain, Sweden, Switzerland, and the United Kingdom call 00 800 3883 2222. All other European countries call +353 61 226586. You can email drivesupport@verbatim-europe.com.
Product replacement is your sole remedy under this warranty, and this warranty does not apply to normal wear or to damage resulting from abnormal use, misuse, abuse, neglect or accident, or to any incompatibility or poor performance due to the specific computer software or hardware used. VERBATIM WILL NOT BE LIABLE FOR DATA LOSS OR ANY INCIDENTAL, CONSEQUENTIAL OR SPECIAL DAMAGES, HOWEVER CAUSED, FOR BREACH OF WARRANTYES OR OTHERWISE. This warranty gives you specific legal rights and you may also have other rights which vary from state to state or country to country
WEEE Notice
The Directive on Waste Electrical and Electronic Equipment (WEEE), which entered into force as European law on 13th February 2003, resulted in a major change in the treatment of electrical equipment at end-of-life.

The WEEE logo (shown at the left) on the product or on its box indicates that this product must not be disposed of or dumped with your other household waste. For more information about electronic and electrical waste equipment disposal, recovery, and collection points, please contact your local municipal household waste disposal service or shop from where you purchased the equipment.
FCC Compliance
This equipment has been tested and found to comply with the limits for a Class B digital device, pursuant to Part 15 of the FCC Rules. These limits are designed to provide reasonable protection against harmful interference in a residential installation. This equipment generates, uses and can radiate radio frequency energy and, if not installed and used in accordance with the instructions, may cause harmful interference to radio communications. However, there is no guarantee that interference will not occur in a particular installation. If this equipment does cause harmful interference to radio or television reception, which can be determined by turning the equipment off and on, the user is encouraged to try to correct the interference by one or more of the following measures:
Reorient or relocate the receiving antenna.
Increase the separation between the equipment and receiver.
Connect the equipment into an outlet on a circuit different from that to which the receiver is connected.
Consult the dealer or an experienced radio/TV technician for help.
CE Declaration EC DECLARATION OF CONFORMITY
It is hereby declared that this product complied with the essential protection requirements of Council Directive 2004/108/EC and its amendments on the approximation of the laws of the Member States relating to electromagnetic compatibility.
This declaration applies to all specimens manufactured identical to the model submitted for testing/evaluation.
EN 55022 2006 Class B
EN 61000-3-2 2006
EN 61000-3-3 1995 + A1 2001 + A2 2005
EN 55024 1998 + A1 2001 + A2 2003
IEC 61000-4-2: 1995 + A2 2000
IEC 61000-4-3:2002
IEC 61000-4-4:2004
IEC 61000-4-5: 1995 + A1 2000
IEC 61000-4-6: 1996 + A1 2000
IEC 61000-4-8: 1993 + A1 2000
IEC 61000-4-11: 1994 + A1 2000
RoHS Compliance
This product is in compliance with Directive 2002/95/EC of the European Parliament and of the Council of 27 January 2003, on the restriction of the use of certain hazardous substances in electrical and electronic equipment (RoHS) and its amendments.
THIS DEVICE COMPLIES WITH PART 15 OF THE FCC RULES. OPERATION IS SUBJECT TO THE FOLLOWING TWO CONDITIONS:
(1) THIS DEVICE MAY NOT CAUSE HARMFUL INTERFERENCE, AND
(2) THIS DEVICE MUST ACCEPT ANY INTERFERENCE RECEIVED, INCLUDING INTERFERENCE THAT MAY CAUSE UNDESIRED OPERATION.