
PR3MBE - Electric heater ALPATEC - Free user manual and instructions
Find the device manual for free PR3MBE ALPATEC in PDF.

| Brand | ALPATEC |
| Model | PR3MBE (1500W and 2000W versions) |
| Product type | Electric radiator |
| Heating technology | Micathermic |
| Power (1500W model) | 1500 W (full power), 1000 W (reduced power) |
| Power (2000W model) | 2000 W (full power), 1300 W (reduced power) |
| Operating modes | Low (LOW), High (HIGH), Auto (AUTO) |
| Temperature range (Auto mode) | 7°C to 35°C |
| Timer | 1 to 16 hours |
| Delayed start | 1 to 8 hours |
| Protection rating | IP24 (protection against water splashes) |
| Electrical class | Class I |
| Installation | On feet (with casters) or wall mounting |
| Remote control | Yes |
| Display | Digital display with temperature and timer |
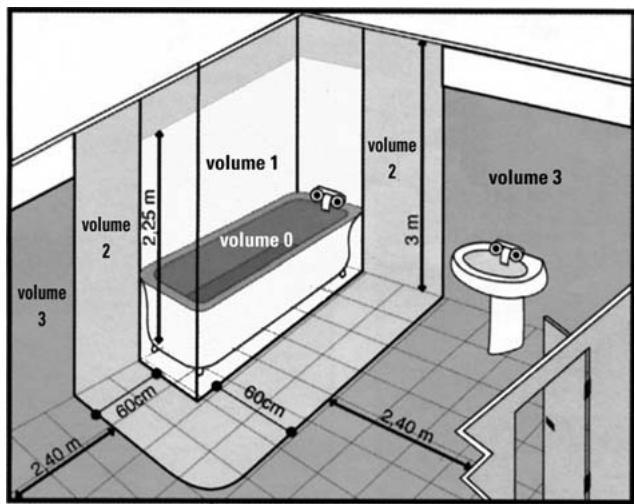
| Bathroom use | Yes (zone 2, respect distances) |
| Grid material | Metal |
| Integrated handle | Yes |
| Cleaning | With a dry cloth, do not use solvents or abrasive products |
| Automatic shut-off | Yes, programmable via timer |
| Safety | Do not cover, keep 1 m away from flammable objects, do not use outdoors |
Frequently Asked Questions - PR3MBE ALPATEC
User questions about PR3MBE ALPATEC
0 question about this device. Answer the ones you know or ask your own.
Ask a new question about this device
Download the instructions for your Electric heater in PDF format for free! Find your manual PR3MBE - ALPATEC and take your electronic device back in hand. On this page are published all the documents necessary for the use of your device. PR3MBE by ALPATEC.
USER MANUAL PR3MBE ALPATEC
ALPATEC thanks you for buying this product and hope you will be totally satisfy with it. For your comfort and security all the steps of the manufacturing have been checked and the product succeeded in all our quality tests. ALPATEC's products : their design and facility of use make you like them.
CAUTION
Read all these instructions carefully before using this product.
- Make sure that the voltage rating on the type plate corresponds to your main voltage. If not, see your retailer and do not connect the appliance.
- Keep out of children or incompetent persons and do not allow them to operate this appliance.
- Only use the appliance for domestic purposes and in the way indicated in these instructions.
- From time to time, check the cord for damages. Never use the appliance if cord or appliance show any sign of damage.
- Never place the appliance under any electrical connector.
- Make sure that the connection cord does not touch any hot surface.
- Keep combustible materials such as drapes, clothing, towels away from the appliance.
- Do not cover the appliance.
- Keep the appliance at least 1 meter away from walls and any other thing, to permit a good air circulation.
- Never immerse the product in water or any liquid for any reasons. Do not use it at less than 60~cm of a shower, a bath-tub or a swimming-pool.
- Do not use the appliance outdoor.
- Do not use if you have wet hands.
- Never use the appliance on or near hot surfaces.
- Never move or range the appliance by pulling the cord.
- To avoid any risk of burn, never move the appliance when it is hot.
- Before tidying the appliance, make sure that it is unplugged from the power and that it is completely cooled.
- Unplug the appliance before cleaning.
- Do not clean the appliance with abrasive chemicals.
- Do introduce neither metallic objects, nor fingers inside the appliance in order to protect you from electrical shock.
- Never use accessories that are not recommended or supplied by the manufacturer. It could constitute a danger to the user and risk to damage the appliance.
- All interventions made by a non-qualified person can be dangerous; in this case guarantee conditions would cancel. As all electrical products, a competent electrician must repair it.
THE MANUFACTURER WILL NOT ASSUME ANY RESPONSIBILITY IN CASE OF NON ADHERENCE TO THIS RECOMMENDATION
SAVE THESE INSTRUCTIONS CAREFULLY
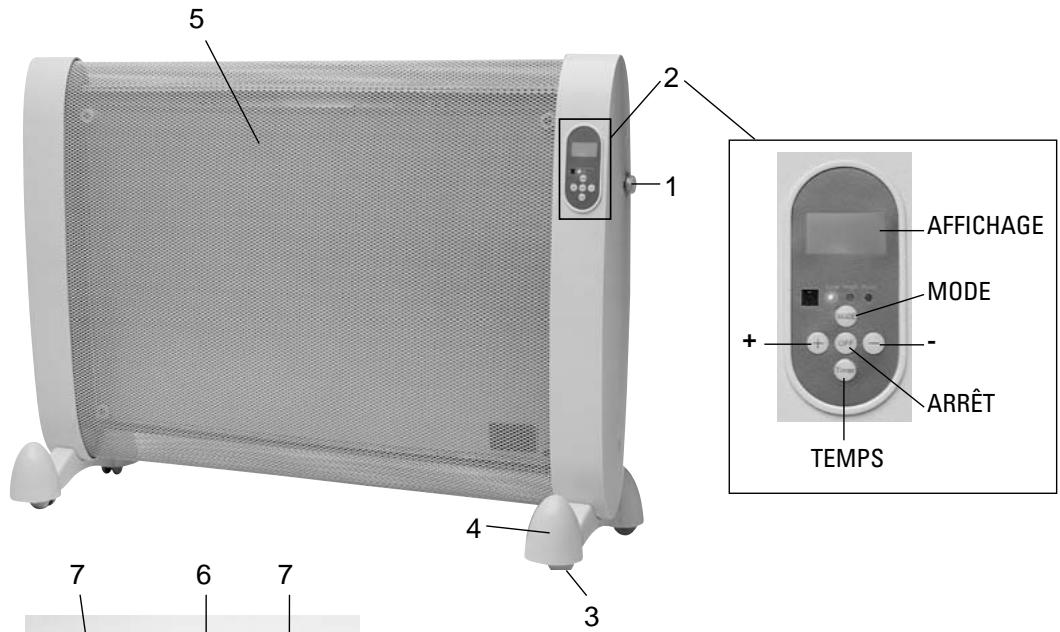
DESCRIPTION
- This new type of heater uses MICATHERMIC heating element which is the leading heating technology.
- This appliance can be used in bathroom (degrees of protection IP 24, Class I: volume 2).
1-Power switch
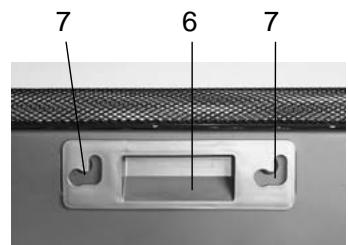
2- Control panel
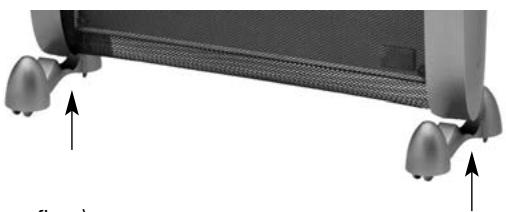
3-Caster
4-Caster frame
5-Metal grid
6-Built-in handle
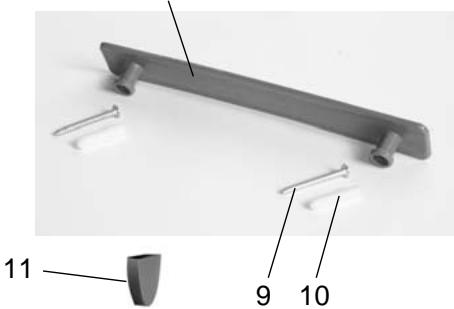
7-Mounting hole
8-Mounting support
9-Screws
10- Mounting anchor for wall mounting
11-Cover feet
12- Remote control
8
8

INSTALLATION
On the floor :
Fix the two caster frames (6) at each side of the heater as shown in the following diagram.
- Chek the caster frames installation before using.
On the wall :
- Mark first screw hole on the wall (about one meter from floor).
- Drill first hole, then insert first screw anchor (12) into the first hole with a hammer.
- Put mounting support (10) on the wall and tighten lightly the first screw (11).
- Mark second screw hole on the wall by raising the support in parallel to the floor. (at about 158mm )
- Drill second screw into the second hole and then insert the screw anchor (12).
- Tighten both screws.
Fix the cover feet - Place the mounting holes of the support (9) at level of screws. Then the appliance is fixed.
MODE
3 RUNNING MODES :
"LOW": it runs in low power for the desired time (never use this function without timer)
"HIGH": it runs in high power for desired time (never use this function without timer)
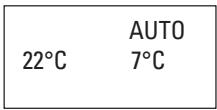
"AUTO": set the desired temperature from 7^ to 35^ . If the difference between room temperature and desired temperature is
- more than 6^ , the appliance runs in high fan heater
- less than 6^ , the appliance runs in low fan heater
| HIGH POWER | LOW POWER | |
| PR3MBE 1500 | 1500 W | 1000 W |
| PR3MBE 2000 | 2000 W | 1300 W |
Turn the power switch to 1 position, as sound can be heard.
WITH REMOTE CONTROL OR CONTROL PANEL :
- Press MODE touch. The appliance starts in LOW mode (Its power is 1000 W for PR3MBE 1500 and 1300 W for PR3MBE 2000), the timer is set on 4 hours. To modify selected time, press + or - touch (from 1 hour to 16 hours). If you select 0h, the appliance stops automatically a few seconds later.
| LOW | |
| 22°C | |
| TIME | 4H |
- To select HIGH mode, press again MODE touch. The timer is set on 4 hours. To modify selected time, press + or - touch (from 1 hour to 16 hours). If you select Oh, the appliance stops automatically a few seconds later.
HIGH
22^ C
TIME 4H
- To select AUTO mode, press again MODE touch. Set desired temperature by pressing + or - touch. To use timer, press TIMER touch. Set desired time by pressing + or - touch. If you select Oh, the appliance stops automatically a few seconds later.
To cancel timer function, press MODE touch until reselect AUTO mode.
- To stop the appliance, press ARRET touch.
If you did not use the appliance for a long time, turn the power switch to 0 position and unplug the appliance.
TIMER
SETTING OF THE TIME OF START
Press MODE button and choose the operating mode.
Press down buttons MODE and TIMER simultaneously for few seconds. Then the heater stops working and displays the time of start.
Press + and - buttons to set the time: from 1h to 8h. When it reaches the set time of start, the heater will automatically be restored to the operating mode set and starts to heat.
TIME 8H
TO CANCEL TIMER
Press MODE button, and the appliance starts immediately.
Press On/off button (1) and the appliance is off.
MAINTENANCE
- Before any cleaning or maintenance operation, switch off and unplug the appliance.
Ensure it is perfectly cooled. - To remove the dust, wipe your appliance with a cloth.
- Never use abrasives or detergents.
NORME DES APPAREILS DE SALLE DE BAIN
Instructions on environment protection
Do not dispose of this product in the usual household garbage at the end of its life cycle; hand it over a collection point for the recycling of electrical and electronic appliances. The symbol on the product, the instructions for use or the packing will inform about the methods of disposal. The materials are recyclable as mentioned in its marking. By recycling or others forms of re-utilization of old appliances, you are making an important contribution to protect our environment. Please inquire at the community administration for the authorized disposal location.
ALPATEC
SOLUTIONS CLIMATIQUES
03-07


Brand : ALPATEC
Model : PR3MBE
Category : Electric heater