
F 10 FC - Water fountain ALPATEC - Free user manual and instructions
Find the device manual for free F 10 FC ALPATEC in PDF.

| Brand | ALPATEC |
| Model | F 10 FC |
| Category | Water dispenser |
| Power supply | 230 V ~ 50 Hz |
| Total power | 565 W (cold: 65 W, hot: 500 W) |
| Hot water temperature | 90 °C |
| Cold water temperature | < 15 °C |
| Hot water production capacity | 5 L/h |
| Cold water production capacity | 1 L/h |
| Hot water tank capacity | 500 ml |
| Cold water tank capacity | 800 ml |
| Initial heating time | 9 minutes |
| Initial cooling time | 40 to 45 minutes |
| Compatible bottle types | 1.5 L, 2 L, 5 L with adapters |
| Indicator lights | Yes (heating, hot water ready, cooling) |
| Separate switches | For hot water and cold water |
| Drip tray | Yes |
| Draining | Drain plugs for each tank |
| Cleaning | Regularly with diluted bleach solution |
| Precautions | Do not use empty; drinking water only |
Frequently Asked Questions - F 10 FC ALPATEC
User questions about F 10 FC ALPATEC
0 question about this device. Answer the ones you know or ask your own.
Ask a new question about this device
Download the instructions for your Water fountain in PDF format for free! Find your manual F 10 FC - ALPATEC and take your electronic device back in hand. On this page are published all the documents necessary for the use of your device. F 10 FC by ALPATEC.
USER MANUAL F 10 FC ALPATEC
For your comfort and safety, ALPATEC has checked all the steps of manufacturing. The products have been made for you to enjoy their design and easiness to use. ALPATEC, a complete range of air conditioners, coolers, fans and heaters for you to be completely satisfied.
CAUTION
Read all these instructions carefully before using this product.
- Make sure that the voltage rating on the type plate corresponds to your main voltage. If not, see your retailer and do not connect the appliance.
- Never leave the appliance unsupervised when in use.
- If you have to leave, even a short moment, stop the appliance.
- Keep out of children or incompetent persons and do not allow them to operate this appliance.
- Only use the appliance for domestic purposes and in the way indicated in these instructions.
- From time to time, check the cord for damages. Never use the appliance if cord or appliance show any sign of damage.
- Make sure that the connection cord does not touch any hot surface.
- Do not store or use gasoline or other flammables vapors and liquids in the vicinity of the appliance.
- Never immerse the product in water or any liquid for any reasons. Do not use it near a shower, a bath-tub or a swimming-pool.
- Do not use the appliance outdoor.
- Do not use if you have wet hands.
- Never use the appliance on or near hot surfaces.
- Never move or tidy the appliance by pulling the cord.
- Unplug the appliance before cleaning.
- Do not clean the appliance with abrasive chemicals.
- Do introduce neither metallic objects, nor fingers inside the appliance in order to protect you from electrical shock.
- Never use accessories that are not recommended or supplied by the manufacturer. It could constitute a danger to the user and risk to damage the appliance.
- All interventions made by a non-qualified person can be dangerous; in this case guarantee conditions would cancel. As all electrical products, a competent electrician must repair it.
Specific recommendation :
- Do not use this dispenser to dispense anything other than water.
- Wipe up any water spills immediately after loading or unloading water bottles.
- Do not use with water that is microbiologically unsafe or of unknown quality.
- The dispenser heats water to a temperature approximately 190^ (88^) . Children, the disabled and the elderly are at highest risk of being scalded.
- Allow at least 1'' (2.5cm) of space between the back of the water dispenser and the wall to allow proper air circulation.
- Do not install the water dispenser where the temperature will go below 10^ or above 32^ .
- Install the water dispenser on a level floor or counter strong enough to support it when fully loaded.
- Do not install where it will be subject to direct sunlight, heat or moisture.
CAUTION
Do not plug in the power cord or turn on the power switches when the waterdispenser is empty.
THE MANUFACTURER WILL NOT ASSUME ANY RESPONSIBILITY IN CASE OF NON ADHERENCE TO
THIS RECOMMENDATION
SAVE THESE INSTRUCTIONS CAREFULLY
DESCRIPTION
1.- Top cup
2.- Light indicators
3.- Hot water pushbutton
4.- Water outlet
5.- Cold water pushbutton
6.-Drip tray
| Power | Temperature | Production capacity | Water tank capacity | First time to cool / first time to warm | |
| Cold | 65 W | < 15°C | 1 l/h | 800 ml | 40 - 45 min |
| Hot | 500 W (550 W maxi) | 90°C | 5 l/h | 500ml | 9 min |
USING
1- LOADING THE DISPENSER
-
Make sure the dispenser is unplugged with both the hot and cold power switched off.
-
Wash hands and wipe the adaptor and the top of the bottle with a clean cloth.
- Avoid touching the part of the bottle and adaptor that will be in contact with the water dispenser.
- Make sure the water level in the top of the dispenser is low enough to allow for proper bottle installation. Failure to do so may cause the dispenser to overflow.
-
Please refer to "care and cleaning of the dispenser" for using the water dispenser for the first time or after its maintenance.
-
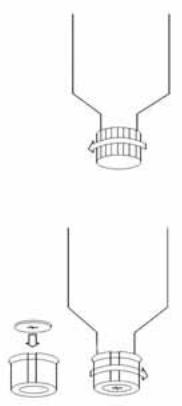
Remove the cover on the bottle.
- Use the correct adaptor (13) or (14) (part 16 closed) inside the bottle and screw.
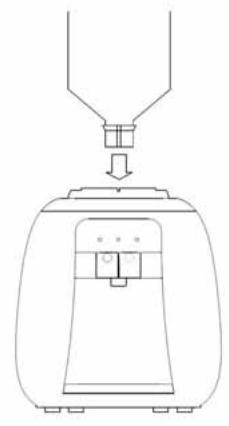
- Remove the dust protection stopper (15) from adaptor and put the bottle with adaptor into the top cup from the water dispenser.
2-BEFORE USING
Press the hot water and cold water pushbuttons together until water is flowing out.
3-USING
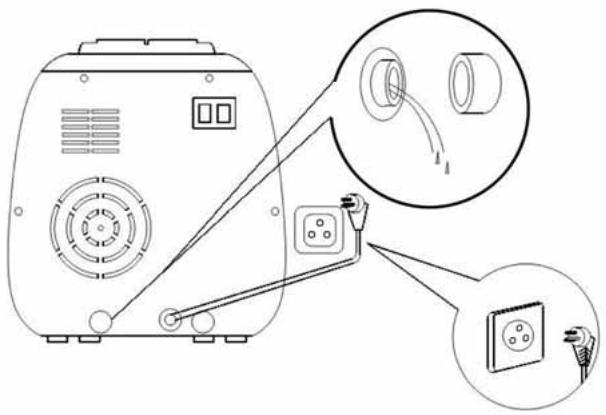
Plug the appliance.
Switch on the appliance (switches on are on the back of the water dispenser (7) and/or (8).
COLD WATER:
- If you switch on the cooling water switch, cool light indicator lights on in orange. Ventilation and cooling process starts. You can use the water dispenser but water will be not at < 15^ C temperature. When cooling process will be finished,cool light indicator lights off.
Press corresponding button cold water (5) to fill the glass with water.
HOT WATER:
- If you switch on the heating water switch, heating light indicator lights on in red.
Heating process starts. When temperature reaches 90^ , heating light indicator switches off and hot light indicator lights on in green. When temperature of hot water into the tank is not enough hot, hot light indicator will switch off and heating light indicator will switch on again (to restart heating process).
Press corresponding button hot water (3) to fill the glass with water.
Hot water use advice:
As the heating process is extremely fast, we advice you to switch off the hot water switch (8) as soon as you finish to use it. Moreover, this will allow you to make economies on energy.
CARE AND CLEANING OF THE DISPENSER
Drain from water dispenser
The remaining water should be drained from the water tank when the tank is to be cleaned or the water dispenser will not be used for a long time.
- Set the switch on the back of water dispenser to off position, and unplug the power cord of the water dispenser.
- Remove the bottle from the water dispenser.
- Drain the water in the water dispenser until no water flows out from the tap.
- Put the water dispenser on a basin, and lift it. Unscrew the cold and hot water drain buttons and complete drain the water from the water dispenser.
- After complete draining, fit on the plug, cover and screw again.
Warning:
- Do not hold the dispenser up side down to drain the water. It may cause the water flow about the inside unit and short circuit may occurs.
- It is strictly forbidden to remove the silica gel plug when there is hot water in the water dispenser.
- Before turning on the power supply and connect the power switch on the water dispenser, make sure there is a bottle with sufficient water on the water dispenser, and water can flow out from both taps. (Please refer to "Loading the dispenser").
CLEANING THE WATER TANKS
-
Periodically the water dispenser tanks must be cleaned to prevent unpleasant tastes in the water and to remove mineral deposits that can impair flow.
-
Before cleaning, set the power switch to off, and unplug the power cord. For a water dispenser used for the first time, go to Step 5.
- Remove the bottle or the filtering tank.
- Drain water from the water tank of the water dispenser. (See Drain from water dispenser)
- Replace the silica gel plug and bottom cover.
- Do not directly inject bleaching powder into the water dispenser, as concentrated bleaching powder solution may damage plastics. Fill a 2L bottle with water, and add about 2.5ml bleaching agent of 6.0% , and gently swing it to get it homogeneous. Fit an adaptor onto the bottle and place it on the water dispenser (See Loading the dispenser).
- Press the hot water key, cold water key and cool water key (depending on respective types), so that water flows out homogeneously from both taps of the water dispenser.
- Wait for about 10-15 min.
- Completely drain the water from the bottle, and remove the bottle. Drain water from the water tanks of the water dispenser (see Drain from water dispenser), and put on the water dispenser plug.
- Add clean water into the water dispenser bottle and drain water from the taps until no more water flows out, and drain water from the water tanks of the water dispenser (see Drain from water dispenser).
- Repeat previous Step (9) for 2 3 times.
- Drain water from the water tanks of the water dispenser (see Drain from water dispenser), put on the plug, fit the bottom cover and screws with a screwdriver.
- Operate as per "Loading the dispenser", and the water dispenser can be used normally.
CAUTION
The power supply to the water dispenser can be turned ON only when water can flow
out from both taps of the water dispenser homogeneously.
Troubleshooting tips
| Problem | Possible Causes | What To Do |
| Water has poor taste or odor. | Unit needs to be cleaned. | See Cleaning and the Water Tanks. |
| Water is not hot enough or cold enough. | Dispenser is unplugged. | Push the plug completely into the outlet. |
| The fuse is Blown/ circuit breaker is tripped. | Replace house fuse or reset the house circuit breaker. If too many items are plugged into a single circuit, move some items to a different circuit. | |
| All the water in the water tank has been used. | Wait 30 minutes for heating or cooling. | |
| When you use the appliance for the first time, the water has an unpleasant taste. | Antibacterial plastic water circuits are new. | The water is all the same drinkable and the quality is not changed. Never the less you can rinse the circuits with water until the bad taste disappears. |
When using 5L water bottle, ensure that plastic is rigid enough in order that the bottle does not break.
CE
Instructions on environment protection
Do not dispose of this product in the usual household garbage at the end of its life cycle; hand it over a collection point for the recycling of electrical and electronic appliances. The symbol on the product, the instructions for use or the packing will inform about the methods of disposal. The materials are recyclable as mentioned in its marking. By recycling or others forms of re-utilization of old appliances, you are making an important contribution to protect our environment. Please inquire at the community administration for the authorized disposal location.
ALPATEC
SOLUTIONS CLIMATIQUES
11/09 - V1

