
TV023 - TV SWEEX - Free user manual and instructions
Find the device manual for free TV023 SWEEX in PDF.
User questions about TV023 SWEEX
0 question about this device. Answer the ones you know or ask your own.
Ask a new question about this device
Download the instructions for your TV in PDF format for free! Find your manual TV023 - SWEEX and take your electronic device back in hand. On this page are published all the documents necessary for the use of your device. TV023 by SWEEX.
USER MANUAL TV023 SWEEX
| 1 | PREFACE | 3 |
| 2 | SAFETY PRECAUTIONS | 3 |
| 3 | IN THE CARTON | 5 |
| 4 | FRONT&BACK 4 CONNECTIONS OF LCD | 6 |
| 5 | INSTALLATION DRAWINGS | Power Cord Connection 7 Antennas Connection 7 SCART Connection 8 YPbPr Connection 8 S-Video Connection 9 VGA Connection 9 HDMI Connection 10 DVD&CI CARD Connection 10 |
| 6 | REMOTE CONTROL | Remote control instructions in TV mode 11 Remote control instructions in TELEXT mode 12 Remote control instructions in DTV mode 13 Remote control instructions in DVD mode 14 Remote control setup 15 |
| 7 | ACCESSORIES | 15 |
| 8 | TV OPERATION | First Time Installation | 16 |
| TV Information | 17 | ||
| VIDEO menu options | 18 | ||
| Audio menu options | 19 | ||
| Setup menu options | 19 | ||
| Timer menu options | 23 | ||
| Function menu options | 23 | ||
| 9 | DTV OPERATION | Program List | 26 |
| Channel List options | 26 | ||
| Favorite List options | 26 | ||
| Channel Search options | 27 | ||
| EPG MENU | 28 | ||
| 10 | DVD OPERATION | Basic operation | 29 |
| MP3/JPEG Playback | 29 | ||
| DVD Function General setup | 30 | ||
| System Setup | 30 | ||
| Language Setup | 33 | ||
| Audio Setup | 34 | ||
| Video Setup | 34 | ||
| Dolby Digital Setup | 35 | ||
| 11 | TROUBLESHOOTING AND ADVICE | 36 |
PREFACE
Thank you for buying this TV! Please read this manual thoroughly before operating the TV. Make sure the TV was not damaged in transit. Should the TV is damaged, do no install it and contact your dealer. Check that you have all the accessories according to the model.
SAFETY PRECAUTIONS
Preparation

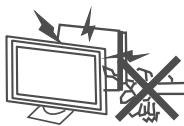
Put the TV on a stable surface.

Do not place any material on the TV.
Do not use the TV with fixtures other than those provided or suggested by the manufacturer.
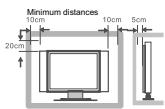
Do not block or cover the ventilation openings on the TV. If you have a wall mount, check that it is steady.

Connexion cables
Power cord and cables must be properly routed and protected to prevent people from stepping on them and causing the TV to fall.
Heating sources and humidity
Keep the TV dry and away from humidity.

Keep the TV away from heat sources.
Cleaning and maintenance
Unplug the TV before cleaning it. Do not use solvent or liquid to clean the TV.
Only clean the TV with a soft and dry cloth.
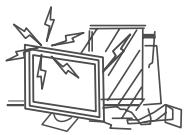
In case of troubleshooting, do not use spare parts other than those suggested by the manufacturer. Using inadequate spare parts can lead to electric shocks, short-circuits fire or other incidents.

Departure in holidays
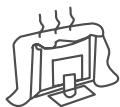
Unplug the TV during lightening storms or when unused for long periods of time.
IN THE CARTON
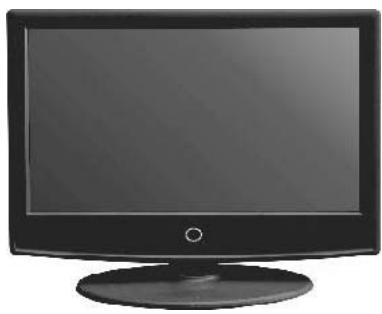
LCD TV SET
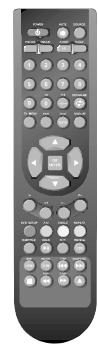
Remote Control
User Manual
AAA Batteries
FRONT&BACK CONNECTIONS OF LCD
Front View
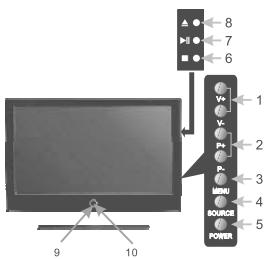
- Press "V+" or "V-" to increase or decrease the sound level;
- Press "P+" or "P-" to scan through channels;
- Press "MENU" to bring up the main menu to the screen;
- Press "SOURCE" to select the input source;
- Press "POWER" button to turn standby mode on or off;
- STOP in DVD mode;
7.▶II PLAY/PAUSE in DVD mode; - OPEN/CLOSE in DVD mode;
- POWER INDICATOR: show red in standby mode, show green when your TV is switched on;
- REMOTE SENSOR: infrared sensor for the remote control.
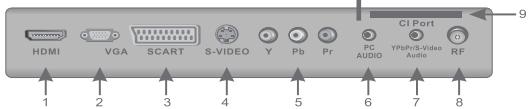
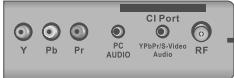
Back View and Control Connections
- HDMI: Connect the HDMI output jack of DVD;
- VGA: Connect the PC-RGB output jack of PC;
- SCART: Connect the SCART jack of VCR;
- S-VIDEO: Connect the S-VIDEO output jack of DVD or VCR;
- YPbPr: Connect the YPbPr output jack of DVD or VCR;
- PC AUDIO: Connect the Audio output jack of PC;
- YPbPr/S-VIDEO AUDIO: Connect the Audio output jack of DVD or VCR for YPbPr/S-VIDEO;
- RF: Connect the antenna;
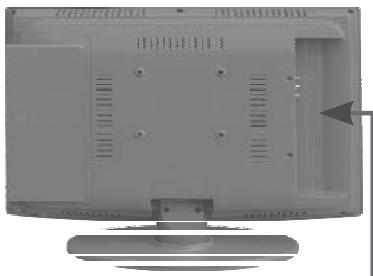
- CI Port: Connect the CI CARD.
INSTALLLION DRAWINGS
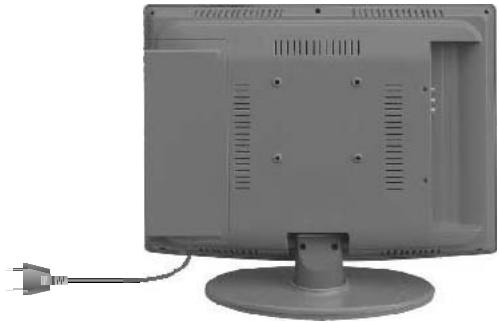
Power Cord Connection
- Connect the power cord correctly as shown.
- Press the POWER switch of your LCD V to switch on the LCD TV. The power indicator on the front panel lights up in Green
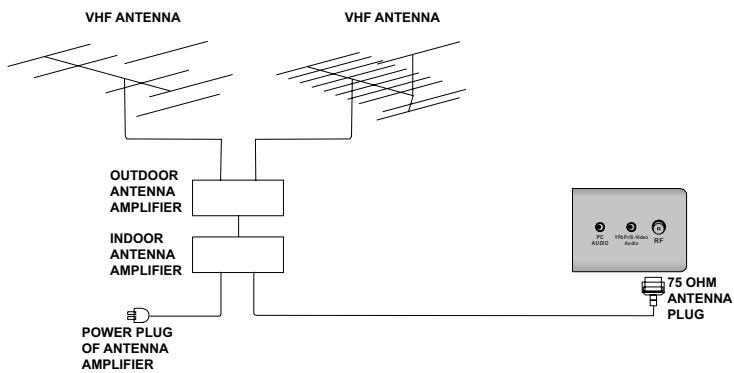
Antennas Connection
To ensure good picture and sound, TV antenna system needs to be installed. The antenna system as Shown above can be sourced from TV equipment shops, which will provide service for correct installation and connection. After installation, insert the 75-ohmantenna plug into the antenna jack as shown above.
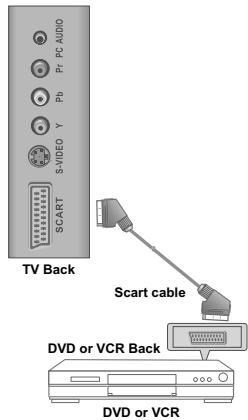
SCART Connection
Connect the SCART connector on the external video device to the SCART connector on the set using a SCART cable.
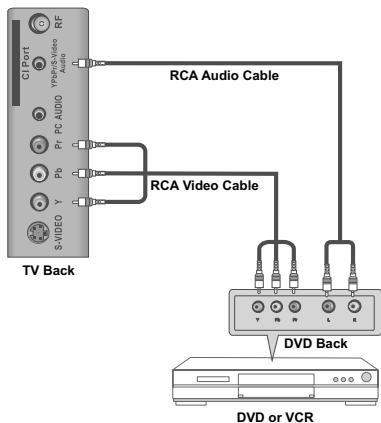
YPbPr Connection
Connect the YPbPr output of the DVD or VCR to the YPbPr input on the set. The picture quality is improved compared to connecting a regular VCR to the video input. Connect the Audio output of the DVD or VCR to the Audio input jacks on the set using the RCA cable.
Match the jack colors :Y is green, Pb is blue, and Pr is red, Audio left is white and Audio right is red. Select YPbPr input source with using the SOURCE button on the remote control.
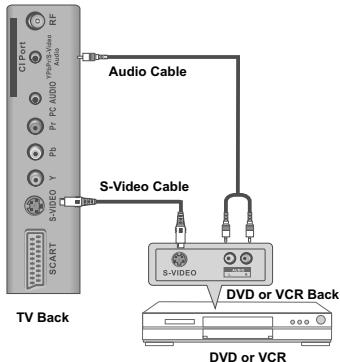
S-Video Connection
Connect the S-VIDEO output of the DVD or VCR to the S-VIDEO input on the set. The picture quality is improved compared to connecting a regular VCR to the video input.
Connect the Audio output of the DVD or VCR to the Audio input jacks on the set using the RCA cable. Select S-VIDEO input source with using the SOURCE button on the remote control.
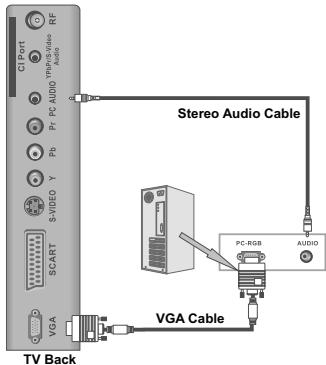
VGA Connection
Connect the RGB output of the PC to the VGA jack on the set. Connect the AUDIO output of the PC to the PC AUDIO jack on the set. Select the VGA input source with using the SOURCE button on the remote control.
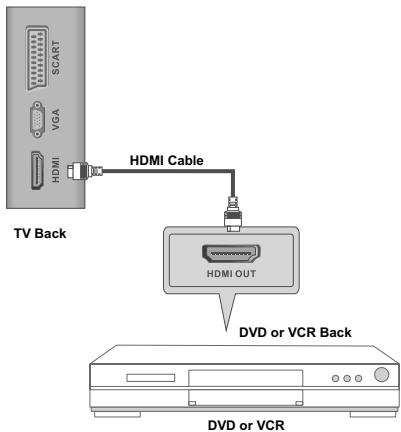
HDMI Connection
Connect HDMI output of the DVD to the HDMI input jack on the set. Select the HDMI Input source with SOURCE button on the remote control.
DVD&CI CARD Connection
WARNING:
MIRROR SIDE TOWARDS USER
DISK SLOT

CICARD

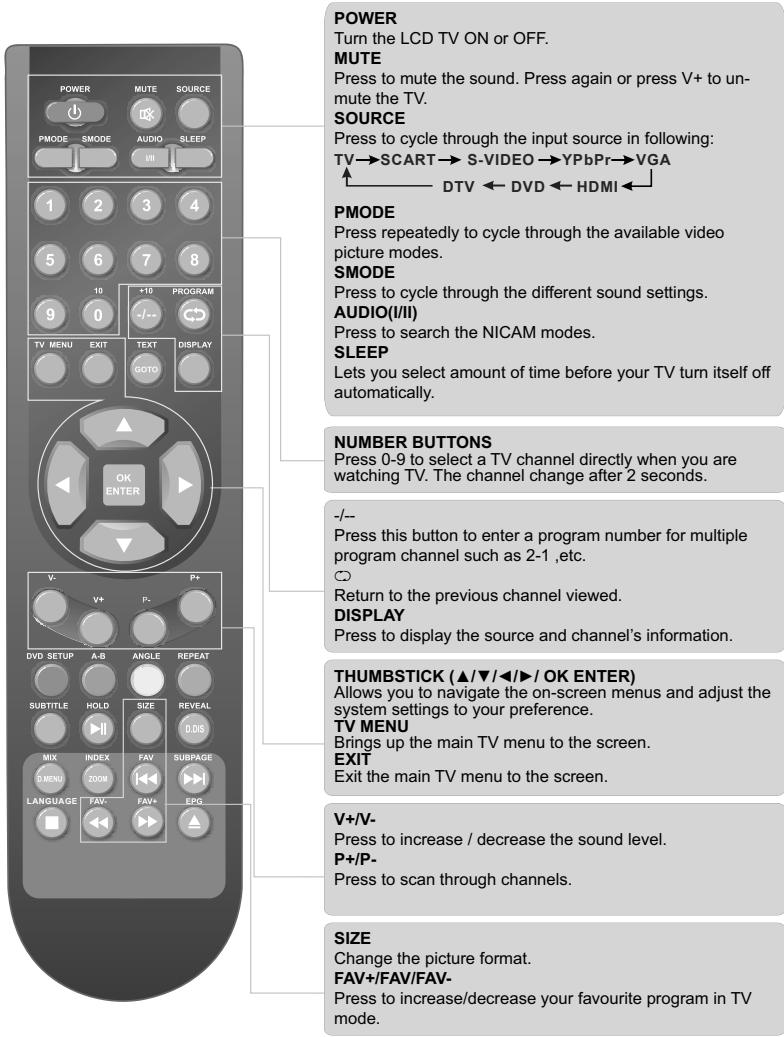
REMOTE CONTROL
Remote control instructions in TV mode
Remote control instructions in TELETEXT mode
NUMBER BUTTONS
Press 0-9 to select a teletext page.
TEXT
Press to switch between TV and Teletext mode.
P+/P-
Page up and Page down.
COLOR BUTTONS
Select 4 Preferred TELETEXT page.
SUBTITLE
To display subtitle.
HOLD
Freeze the current page.
SIZE
Change the picture size.
REVEAL
Reveal or hide the hidden words.
MIX
TV and TXT pictures are mixed together in transparent background.
INDEX
Request index page when index link is valid.
SUBPAGE
TELETEXT Subpage.
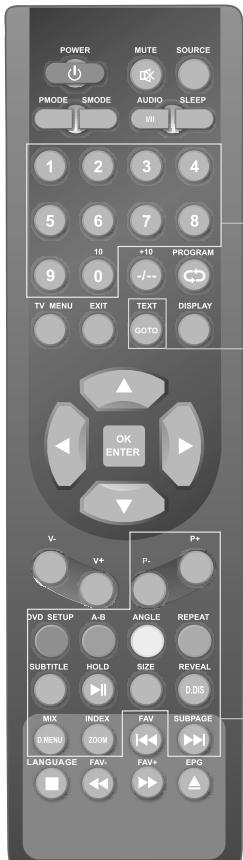
Remote control instructions in DTV mode

NUMBER BUTTONS
Press 0-9 to select a channel.
TV MENU
Brings up the main DTV menu to the screen.
DISPLAY
Press to display the source and channel's information.
THUMBSTICK ( / / / OK ENTER)
Allows you to navigate the on-screen menus and adjust the system settings to your preference.
P+/P-
When watching a channel, changes the channel.
COLOR BUTTONS
Color buttons (respectively red, green, yellow and blue) used in a few sub-menus.
SUBTITLE
To display subtitle.
SIZE
Change the picture format.
LANGUAGE
Shows the list of audio languages available for the current channel.
FAV+/FAV/FAV-
Press to increase/decrease your favourite program in DTV mode.
EPG
Launches the EPG (Electronic Program Guide) in DTV mode.
Remote control instructions in DVD mode
AUDIO (I/II)
AUDIO selection buttons in DVD mode.
NUMBER BUTTONS
Numerical buttons for various data.
PROGRAM
Program a disc playing in a desired sequence.
GOTO
It is possible to get access to any point on the directly using the "GOTO" menu.
Press GOTO to access the "GOTO" menu.
THUMBSTICK ( / / / / OK ENTER)
Allows you to navigate the on-screen menus and adjust the system settings to your preference.
DVD SETUP
Used for selecting programs. It may also be used to execute commands.
A-B
This button enables you to repeat a selected section from the disc.
ANGLE
Selects various camera angles for certain scenes or passages on the DVD during playback.
REPEAT
Press REPEAT to cycle through the repeat play options
SUBTITLE
Select a different subtitle language (the DVD disc must have the subtitle you selected.
#
PLAY/PAUSE in DVD mode.
D.DIS
Press to display the DVD information of DVD mode.
SIZE
Change the picture format.
D MENU
DVD disc menu Access to menu.
ZOOM
In play state, press ZOOM, the player will zoom in the picture one time.
#
Jump to previous and next track.
#
DVD STOP
#
Fast backward and forward key.
#
To eject the disc.
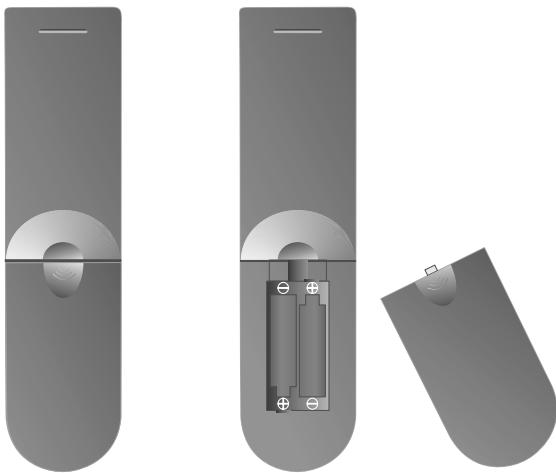
Remote control setup
- Open the cover;
- AAA size batteries, When inserting the batteries, make sure correct polarities as per "+"and "-" marks on the batteries and within the battery compartment;
- Replace the battery cover.
To prevent battery leakage which may result in bodily injury or damage to the remote:
- Install all batteries correctly as marked on the remote control.
- Do not mix batteries:(OLD and NEW or CARBON and ALKALINE, etc)
Remove batteries when the remote is not used for a long time.
ACCESSORIES
- One Remote Control;
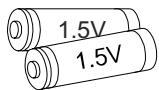
- Two Batteries 1.5V;
- One User's Manual.
8. TV Operation

In this manual, the OSD (On Screen Display) may be different from your TV's, because this is just an example for the TV operation.
First Time Installation
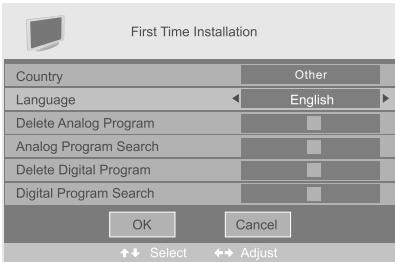
If this is the first time you open the TV and there is no programs in the TV memory, the First Time Installation menu will appear in the picture.
Country
Press / button and then use / to select the country.
Language
Press / button and then use / to select the OSD language.
Delete Analog Program
Press / button and then use / to select whether to delete all the analog programs.
Analog Program Search
Press / button and then use / to select whether to start searching analog programs.
Delete Digital Program
Press / button and then use / to select whether to delete all the digital programs.
Digital Program Search
Press / button and then use / to select whether to start searching digital programs
After setting the items, select OK to finish the first time installation, or select Cancel to exit this menu.
If you cancelled the first time installation, it will remind you whether to set the first time installation next time.

TV Information
Program Information
Press DISPLAY or NICAM button to display the program information.

- The number of current program.
- The colour system of current program, could be selected in Manual Tuning menu (an option of SETUP menu).
- The name of current program.
- The label of current program, you can label it in Manual Tuning menu (an option of SETUP menu).
- The sound system of current program, could be selected in Manual Tuning menu (an option of SETUP menu).
- The NICAM mode of current program.

If the icon of NICAM mode is red, it means the current program supplies multi NICAM signals, and you can select it by pressing NICAM button.
The NICAM modes and relative icons:

Mono

Stereo

Duel I

Duel II
VIDEO menu options
Press MENU button on the front panel or TV MENU on the remote control to display the main menu.
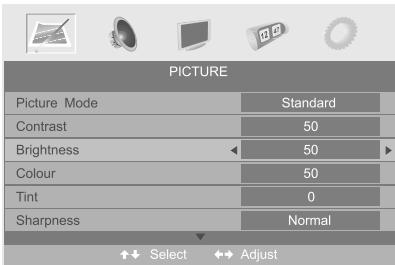
- Press / button to select PICTURE in the main menu.
- Press button to select the option that you want to adjust in the PICTURE menu.
- Press / button to adjust.
- When you are satisfied with your adjustment, press the TV MENU button to return to the previous menu or press the EXIT button to exit the main menu.
Picture Mode
Select Picture Mode in PICTURE menu. (Available picture mode: Standard, Personal, Movie, Sport, Mild, Game.) If you change the value of Contrast, Brightness, Colour, Tint, Sharpness or Colour temperature on the picture menu, the picture mode will be changed to "Personal" automatically. You may select the picture mode directly by pressing PMODE button.
TIPS: You can press PMODE button on the remote control to select the Picture Mode directly.
Contrast
Press / button and then use / to adjust the contrast of the picture.

After adjust the value you want, press TV MENU button to return to the preview MENU.
Brightness
Press / button and then use / to adjust the brightness of the picture.
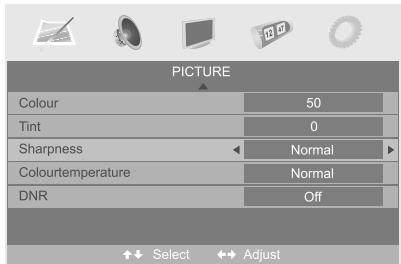
Colour
Press / button and then use to adjust the colour saturation.
NOTE: This option is invalid in PC mode, and it will be shown in gray.
Tint
Press / button and then use / to adjust the tone of colour when your system is in NTSC.
Sharpness
Press to select the sharpness mode of your TV. (Available Sharpness Mode: Normal, Sharp, Sharpest, Softest, Soft.)
Colour temperature
Select an optimum colour temperature mode to suit your eyes for viewing among Normal, Warm and Cold.
NOTE: This option is available only in PC mode.
DNR (Digital Noise Reduction)
If the broadcast signal received is weak, you can select the DNR option to reduce the video noise level between Off, Low, Mid and High.
AUDIO menu options
Press MENU button on the front panel or TV MENU on the remote control to display the main menu.
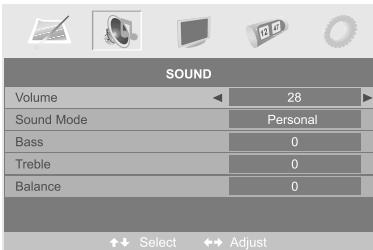
- Press the button to select in SOUND the main menu.
- Press the / button to select the option that you want to adjust in the SOUND menu.
- Press the / button to adjust.
- When you are satisfied with your adjustment, press the TV MENU button to return to the previous menu or press the EXIT button to exit the main menu.
Volume
Press / button and then use / to adjust the sound level.

After adjust the value you want, press TV MENU button to return to the preview MENU.
Sound Mode
Select Sound Mode in SOUND menu. (Available sound mode: Personal, Voice, Music, Theatre.) If you change the value of Bass and Treble on the Sound menu, the sound mode will be changed to "Personal" automatically. You may select the sound mode directly by pressing SMODE button.
TIPS: You can press SMODE button on the remote control to select the Sound Mode directly.
Bass
Press / button and then use / to increase or decrease the level of the lower-pitched sounds.
Treble
Press / button and then use / to increase or decrease the level of the higher-pitched sounds.
Balance
Press / button and then use / to adjust the audio output between / speakers.
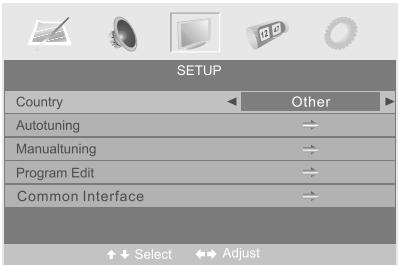
Setup menu options
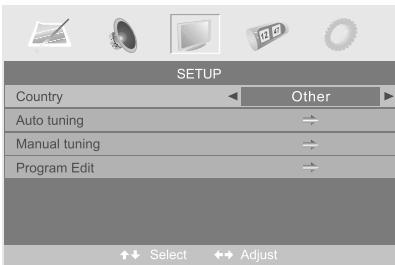
- Press the / button to select SETUP in the main menu.
- Press the / button to select your option what you want to adjust in the SETUP menu.
- Press the / button to adjust.
- When you are satisfied with your adjustment, press the TV MENU button to return to the previous menu or press the EXIT button to exit the main menu.
Country
This option allows you to select the country.
Auto tuning
This option allows you to tune the channels that can be received automatically.
Note: Before you performAuto Tuning, you must choose the country where you are by selecting COUNTRY option.
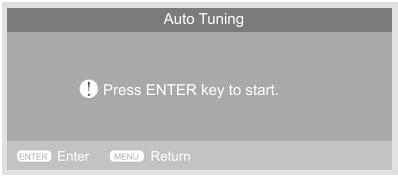
Press ENTER key to start.
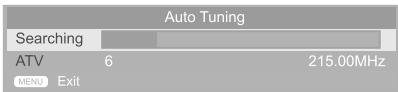
You can press TV MENU button to stop auto tuning and close the OSD menu.
Manual Tuning
This option allows you to perform Manual Tuning.
Note: Before you perform Manual Tuning, you must choose the country where you are by selecting Country option in the FUNCTION menu.
- Press / to select Manual tuning in SETUP menu.
- Press / to perform your selection, the menu of Manual tuning will display on the screen.
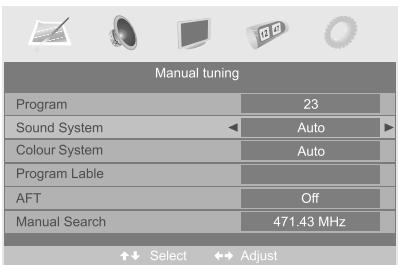
Program
The current program number. Press / to select the upper or lower program.
Sound System
Press / to select a corresponding sound system, such as DK, L/L', BG, I.
Colour System
Press to select a corresponding colour system, such as Auto, PAL, SECAM.
ProgramLabel
This option allows you to label a channel, you can also relabel the programs have been labeled.
- Select a channel you want to labeled.
- Press / select Program Label in SETUP menu.
- Press / to perform your selection. The menu of program label will display as below:
Program Label

- Press the numeric buttons to input the numbers directly or press / to select the letters.
- Press / to move the cursor.
- Press ENTER, TV MENU or EXIT button to confirm and return to previous menu.
AFT (Auto Fine Tune)
Due to weak signals or a wrong antenna configuration, some of the channels may not be tuned to the best reception condition. AFT function allows you to fine tune channel selected (the frequency of channel is around the value in Manual Search option.
Manual Search
Manual Search

This option has two functions:
- Set the frequency of channel for AFT option.
- Press button for 3+ seconds and it will start auto tuning from this frequency.
Program Edit
This function allows you to sort the TV programs according to your preferences, as following:
- Press / to select Program Edit in SETUP menu.
- Press / to enter into the sub menu, a channel list will display.
- Press / to select the channel in the list which you would like to sort.
- Press to perform your selection.
- Press / to select the location you would like to place the channel.
- Press to perform you selection.
- Press TV MENU to return to the previous menu or press EXIT to exit.
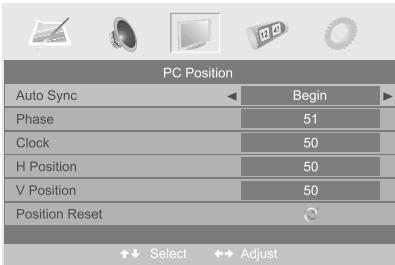
SETUP menu of VGA input (for setting the PC picture position):
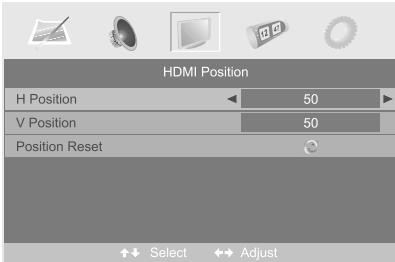
SETUP menu of HDMI input (for setting the HDMI picture position):
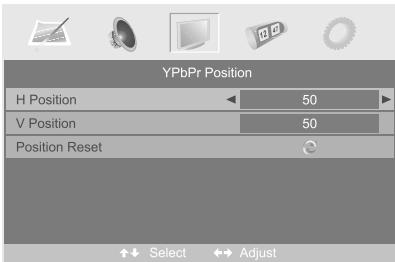
SETUP menu of YPbPr input (for setting the YPbPr picture position):
Timer menu options
Press MENU button on the front panel or TV MENU on the remote control to display the main menu.
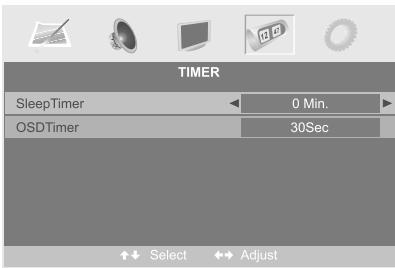
- Press the / button to select TIMER in the main menu.
- Press the / button to select your option what you want to adjust in the TIMER menu.
- Press the / button to adjust.
- When you are satisfied with your adjustment, press the TV MENU button to return to the previous menu or press the EXIT button to exit the main menu.
Sleep Timer
Select the sleep time to put automatically the TV in standby mode. Timer can be selected as 0min, 15min, 30min, 45min, 60min, 75min, 90min, 105min, 120min. Also you can select the sleep time by pressing SLEEP button repeatedly.
OSD Timer
You can select the time when the OSD display on the screen such as: 5Sec, 10Sec, 15Sec, 20Sec, 25Sec, 30Sec.
Function menu options
Press MENU button on the front panel or TV MENU on the remote control to display the main menu.
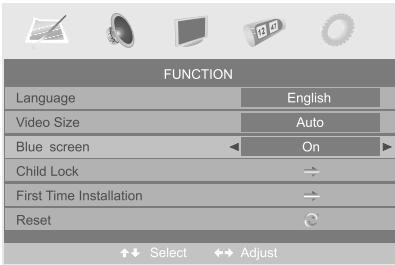
- Press the / button to select FUNCTION in the main menu.
- Press the / button to select your option what you want to adjust in the FUNCTION menu.
- Press the / button to adjust.
- When you are satisfied with your adjustment, press the TV MENU button to return to the previous menu or press the EXIT button to exit the main menu.
Language
Press to select the OSD language.
Video Size
This option allows you to select the screen display mode which best corresponds to your viewing requirements.
Note: The available aspect mode may be different in different input signal.
Blue screen
This option allows you to select the blue background on or off. If on, the screen background will turn blue at very weak or no signal condition.
Child Lock
Press ENTER or button to set the child lock.
PIN Code:
Delete 0~9 Input ENTER Enter
You need to enter the PIN code if the Child lock is set "on", and the default PIN code is empty, you can press ENTER button directly to enter.

TIPS: The superuser's (administrator's) password 8329.
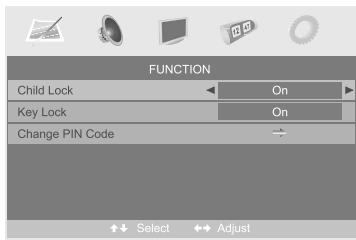
Child Lock
Press ENTER or button to set the child lock.
Key Lock
Press ENTER or button to set the key lock.
Change PIN Code
Press button to enter Change PIN Code menu.
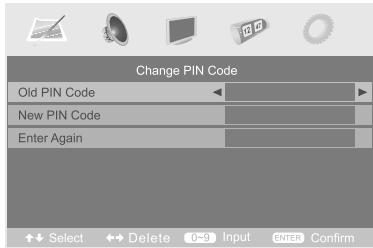
Old PIN Code
Press 0~9 buttons to enter the correct old PIN code, you can not change the PIN code if you entered a wrong PIN code.
New PIN Code
Press 0~9 buttons to enter the new PIN code you want
Change PIN Code
Press 0~9 buttons to enter the PIN code you entered in the New PIN Code menu again to confirm the new PIN code.
First Time Installation
Press button to open the first time installation menu, and the operation of this menu is in page 3.
Reset
Press ENTER or button to reset the TV to the factory default.
DTV Operation
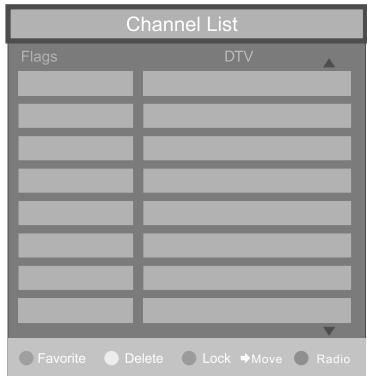
Program List
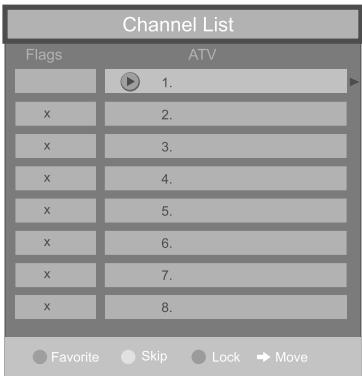
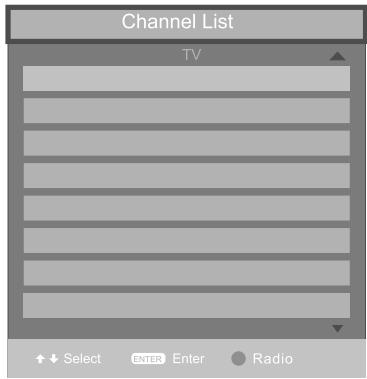
Channel List options
Press ENTER button to open the Channel List, then Press / to select the channel you want to watch.
Favourite List options
Press FAV button to open the Favourite List, then Press / to select the channel you want to watch.
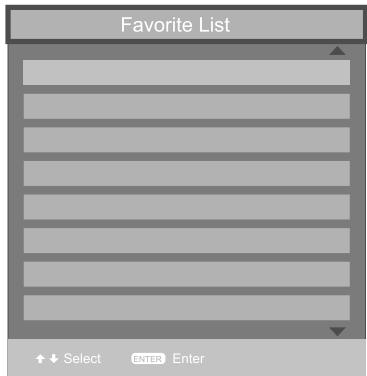
NOTE: Only the channels that you selected to FAV in Program Edit Menu could be displayed in Favourite List.
Channel Search options
- Press the / button to select SETUP in the main menu.
- Press the / button to select your option what you want to adjust in the SETUP menu.
- Press the / button to adjust.
- When you are satisfied with your adjustment, press the TV MENU button to return to the previous menu or press the EXIT button to exit the main menu.
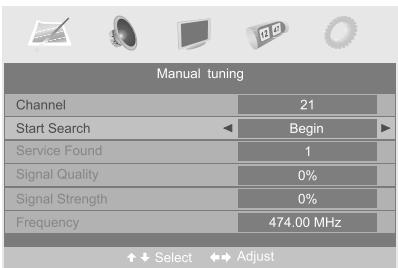
Press / button to select Manual Search, Press ENTER or button to set the Manual Tuning.
Channel
The current channel number. Press / to select the upper or lower channel, Press 0-9 to select the channel directly.
Start Search
To select whether to start searching in begin/searching/finished.
Service Found
Signal Quality
Signal Strength
The services be found.
The signal quality of current channel.
The signal strength of current channel.
Frequency
The frequency of current channel.
Program Edit
This function allows you to edit the DTV programs according to your preferences, as following:
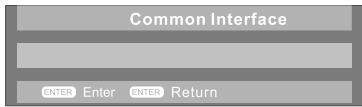
Common Interface
If you have inserted the CI card to the TV, you can see the information of the it.
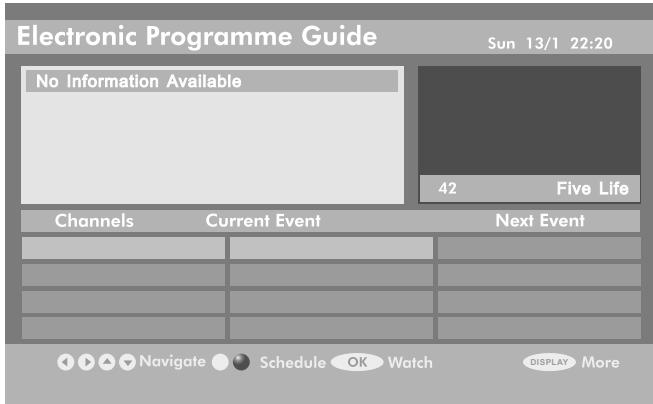
EPG Menu
- Press EPG button on the remote control to display the EPG menu directly as below:
Basic operation
1. Select DVD.
Turn on the TV and press the SOURCE button and then the / to select DVD. Press OK to confirm.
2. Playing discs.
Insert the disc with the label facing AWAY from you. The disc will either automatically start to play, or will display a menu. Use the navigation buttons to select the item you require and press OK.
3. Program playback
Using Program playback, you can select max. 16 chapters from the disc to playback in programmed order. OSD for program playback as below.
Digital Audio/JPEG Playback
After loading and scanning the Digital Audio / JPEG CD&DVD, it will initially display the - Digital Audio contents automatically and start to play the first file (highlighted file). Screen as follow:

Press the or button select the icons to select your file type. Music, Picture and Video.
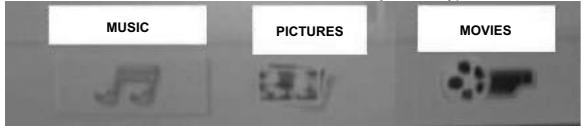
Press the button in the opposite direction to select the file type, then press ENTER on the remote control. Now you can choose from the list of files to play.
Using the navigation buttons enables you to select the folder, press OK and then select the file you want to play.
NOTE:
- Press buttons to move the highlighted files to folders, documents or mode selection.
- Press numeric buttons to select the contents directly. For number over 10, press +10 button first. (e.g. File number 15, press +10 then 5.)
- When playing Digital Audio files, there is no picture display, only audio output.
- Playing JPEG discs: Press the PROGRAM button to select slide effects. There are 12 slide modes, press the PROGRAM button to toggle between different modes in sequence. (Start from top, Start from bottom, Start from left, Start from right, Start from upper left corner, Start from upper right corner, Merge from left/right, Horizontal blades, Vertical blades, Merge form 4 corners, Random Playback Slide effect, OFF).
-
When playing or pausing images, you may use navigation buttons to flip / rotate the picture.
-
button to flip horizontally.
- button to flip vertically.
- button to rotate left 90^ .
-
button to rotate right 90^ .
-
When playing or pausing images, you may use the D.MENU button to enter preview mode to display 12 pictures. Press 1 / button to select next / previous page or press numeric buttons to view the corresponding pictures.
The maximum JPEG image size that can be displayed is 1280 × 1024 .
Function Settings
DVD Function General setup
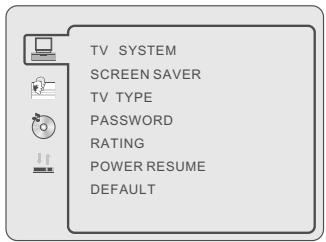
- Press the DVD SETUP button to activate the DVD player OSD menu;
- Press / buttons to move and highlight between different sub-menus. Press / ENTER button to enter the highlighted sub-menu.
- Press the DVD SETUP button to exit the OSD menu, or move the highlight to EXIT DVD SETUP then press ENTER button to exit.
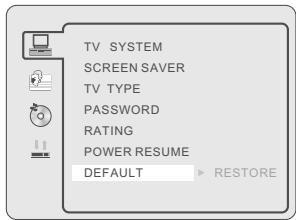
System Setup
TV SYSTEM
- Press button to enter the TV SYSTEM, and then press / to select one from below:
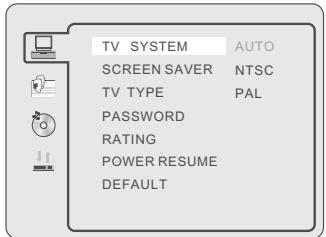
NTSC
This format is used by some other countries, e.g. USA
PAL
This is the format used in the UK.
AUTO(Default setting)
This format can be used if your DVD is capable of both PAL and NTSC formats.
SCREENSAVER
If the screen saver option is on, when your DVD player is in Stop, Open, or No Disc state, or there is a frame frozen for more than 60sec, the screen saver will be displayed. This feature can protect the screen from damage.
ON: Choose this setting to activate the screen saver.
OFF: Choose this setting to cancel the screen saver
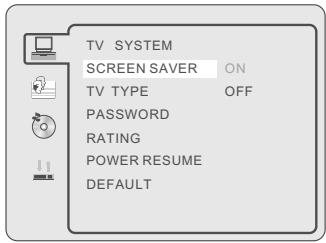
TV TYPE
DVD's are produced in a variety of screen aspect ratios. This menu enables you to select one of the three aspect ratios:
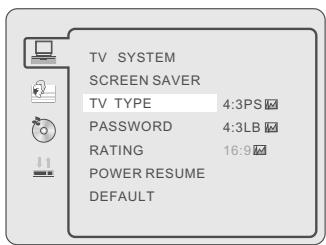
4:3 PS (Normal)
4:3 LB (Normal)
16:9 (Wide)
- Select the most appropriate aspect ratio for the JPG being viewed.
NOTE:
- Playback screen size may vary according to the disc contents.
- For media with 4:3 contents, using any mode would only display a 4:3 screen
- Screen ratio selection should be according to the connected TV / Display aspect ratio.
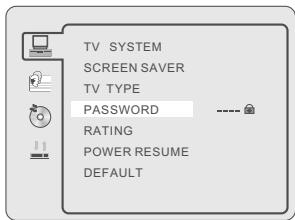
password
- The default setting is locked. No Rating selection or change password could be done. To edit the Rating setting, please enter default password "0000" using the numeric buttons, then press ENTER button to confirm.
- To change password, input any 4 digit number when the lock is unlocked. Once the 4 digit number is entered, that will be your new password.
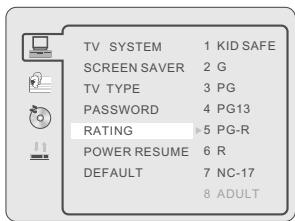
RATING
You can select the rating setting according to your preference. Rating restriction is divided into eight different category from KID SAFE to ADULT.
NOTE: Only editable when password is unlocked.
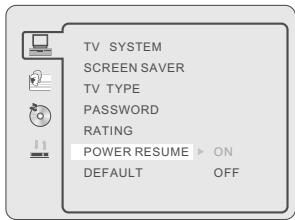
POWER RESUME
Select "ON" and the disc will resume paying from where it was stopped.
Select "OFF" the disc will start playing from the start.
DEFAULT SETTING
- Press ENTER button to restore factory default.
NOTE: This can only be set if the password is locked. It will not reset the Password or Rating settings.
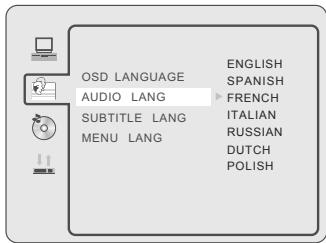
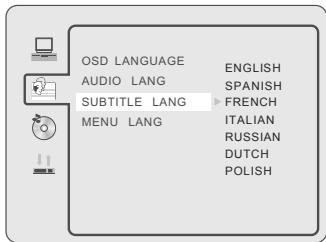
Language Setup
Press DVD SETUP button to enter the DVD OSD menu.
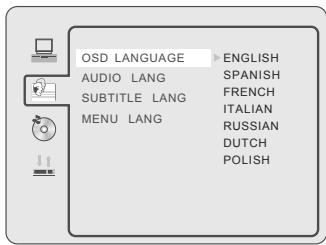
OSD Language
Use navigation buttons to select the OSD LANGUAGE setup icon, press ENTER button to confirm. There are 7 languages for your selection, press & buttons to toggle between different languages, Press ENTER button to confirm.
AUDIO LANGUAGE
Use navigation buttons to select the AUDIO LANG setup icon, press ENTER button to confirm. There are 7 languages for your selection. Press & buttons to toggle between different languages. Press ENTER button to confirm.
SUBTITLE LANGUAGE
Use navigation buttons to select the SUBTITLE LANG setup icon, press ENTER button to confirm. There are 7 languages for your selection. Press & buttons to toggle between different languages. Press ENTER button to confirm.
MENULANGUAGE
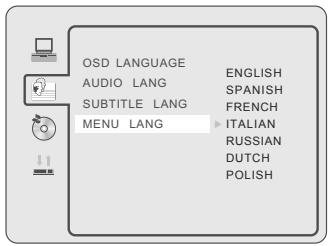
Use navigation buttons to select the MENU LANG setup icon, press ENTER button to confirm. There are 7 languages for you selection, press & buttons to toggle between different Languages. Press ENTER button to confirm.
Audio Setup
AUDIO setup
The audio setup options are illustrated below:

KEY
- Use the Up and Down arrow button to move the scroll and adjust the KEY.
Audio compression setup
DYNAMIC RANGE
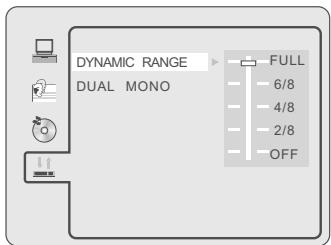
- Switch the compress mode to "Audio output" to adjust the compression ratio for different effects. When selected FULL, the peak signal value is smallest. When selected OFF, the peak signal value is largest.
DUAL MONO
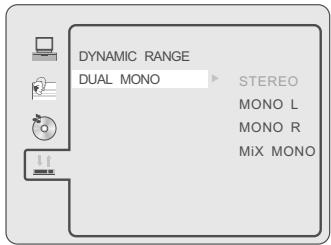
- You can select four different audio output, STEREO, MONO L, MONO R, MIX MONO. The audio out description of these Selections is shown in the table below.
| MODE | LEFT SPEAKER | RIGHT SPEAKER |
| STEREO | STEREO-L | STEREO-R |
| L-MONO | L-MONO | L-MONO |
| R-MONO | R-MONO | R-MONO |
| MIX-MONO | L-MONO+R-MONO | L-MONO+R-MONO |
TROUBLESHOOTING AND ADVICE
Please check if you can solve the troubleshooting by yourself.
| Troubleshooting | Control |
| No signal | Please check that all cables and cord's are correctly plugged in. |
| No color shades | Adjust the contrast, the color and the brightness |
| Stain show on the screen. | Maybe result from a lighting signal from car, motor, neon light and other electrical devices or appliances. |
| Double or multiple display image | Maybe the result of an electrical wave disturb from other TV, Computer and Game machine or Radio |
| Snow on the screen | The cables of the antenna are not correctly plugged in. |
| The remote control does not work | Please check the batteries order and alignment. Check that the IR of the remote control is not hidden by something. |
| "Zip" made noise on TV cover | Even if the display image is correct, the noise may come from an unsteady fixation of the panel. |
| No sound | Make sure that you have not press the MUTE button of the panel or of the remote control. |
| No DVD | Make sure if the TV Set have been switched to DVD mode |
| DVD player not working properly | Ensure disc is correctly inserted into the player. Ensure the disc does not damaged and with correct format. Please wait patiently as some discs need longer time to play. |