
DS001 - USB Docking Station SWEEX - Free user manual and instructions
Find the device manual for free DS001 SWEEX in PDF.
| Product type | USB docking station |
| Brand | SWEEX |
| Model | DS001 |
| Dimensions (L x W x H) | 187 x 73 x 27 mm |
| Weight | 200 g |
| Power supply | DC 5V, 1.2A (power adapter included) |
| Upstream port | 1 USB-B port |
| Downstream ports | 2 USB-A 2.0 ports |
| PS/2 port | For keyboard and mouse |
| Serial port | 1 RS-232 port |
| Parallel port | 1 port |
| Ethernet port | 1 10/100 RJ-45 port |
| File transfer port | 1 USB-B port (USB 1.1) for PC Linq |
| Supported operating systems | Windows ME, 2000, XP |
| Minimum requirements | IBM PC, 64 MB RAM, Pentium 233 MHz, 1 free USB port |
| Box contents | Docking station, USB cable, power adapter, CD-ROM |
| Operating temperature | 0 to 72 °C |
| Storage temperature | -10 to 80 °C |
| Humidity | 0 to 90% RH |
| Certifications | CE, FCC |
| Warranty | 3 years |
| Maintenance | Clean with a soft, dry cloth |
| Safety | Use only the supplied power adapter |
Frequently Asked Questions - DS001 SWEEX
User questions about DS001 SWEEX
0 question about this device. Answer the ones you know or ask your own.
Ask a new question about this device
Download the instructions for your USB Docking Station in PDF format for free! Find your manual DS001 - SWEEX and take your electronic device back in hand. On this page are published all the documents necessary for the use of your device. DS001 by SWEEX.
USER MANUAL DS001 SWEEX
natural_image
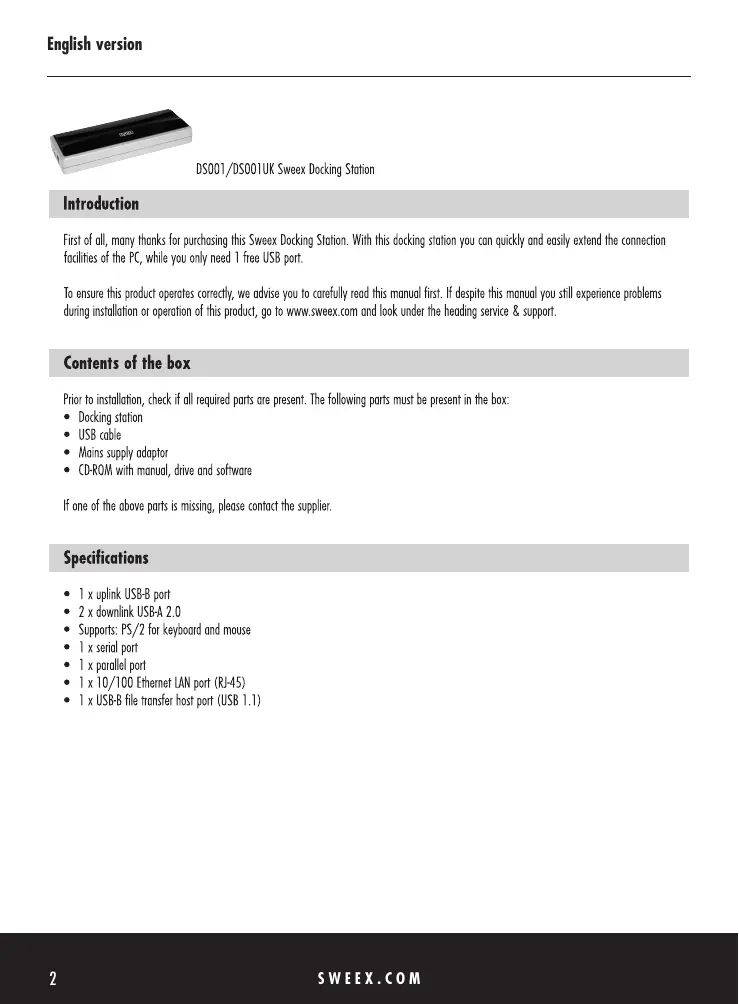
Exterior view of a rectangular electronic device with black and silver casing (no visible text or symbols)DS001/DS001UK Sweex Docking Station
Introduction
First of all, many thanks for purchasing this Sweex Docking Station. With this docking station you can quickly and easily extend the connection facilities of the PC, while you only need 1 free USB port.
To ensure this product operates correctly, we advise you to carefully read this manual first. If despite this manual you still experience problems during installation or operation of this product, go to www.sweex.com and look under the heading service & support.
Contents of the box
Prior to installation, check if all required parts are present. The following parts must be present in the box:
- Docking station
- USB cable
- Mains supply adaptor
• CD-ROM with manual, drive and software
If one of the above parts is missing, please contact the supplier.
Specifications
- 1 x uplink USB-B port
- 2 x downlink USB-A 2.0
• Supports: PS/2 for keyboard and mouse - 1 x serial port
- 1 x parallel port
• 1 x 10/100 Ethernet LAN port (RJ-45) - 1 x USB-B file transfer host port (USB 1.1)
Additional specifications
• Dimensions: 187 x 73 x 27 mm (w x d x h)
• Weight: 200 grams
- Input voltage: DC 5V
- Input current: 1.2A
- Operating temperature: 0^ 72^ C
• Storage temperature: -10^ \~ 80^ C
• Humidity level: 0\~90%RH
• EMI: CE & FCC
• Supports: Windows ME, 2000 and XP
System requirements
- IBM-compatible PC
- Windows ME, 2000 or XP
- 1 available USB port
- 64 MB of RAM
- Pentium 233 MHz or higher
Installation
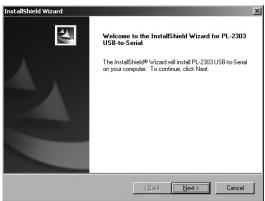
Before installing the docking station, it must have a power supply. This is done by connecting the docking station to the mains supply adaptor. Before connecting the PC to the docking station, the serial port driver must be installed. The link to this driver is shown in the menu that appears automatically when the CD-ROM is placed in the drive. If automatic start is disabled, the driver Serial Driver Installer.exe can be found on the CD-ROM in the "drivers" folder.
When executed, the following screen appears:
text_image
InstallShield Wizard Welcome to the InstallShield Wizard for PL 2303 USB to Send The InstallShield Wizard will install PL 2303 USB to send on your computer. To continue, click Next OK Next CancelPush the next button.
text_image
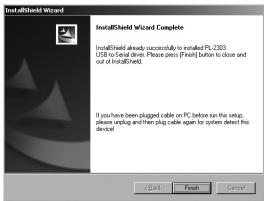
InstallShield Wizard InstallShield Wizard Complete InstallShield already successfully to installed PL 2003 USB to Install Drive. Please press [Form] button to close and out of InstallShield. If you have been plugged cable on PC before run the setup, please upzug and then plug cable again for system detect this device!Push Finish to complete the installation successfully.
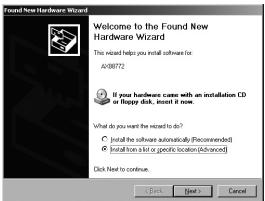
Then the docking station must be connected to the computer by means of the USB-B cable supplied. Connect the USB-B cable to the Upstream port (next to the supply inlet).
Windows now automatically detects the hardware, and the following window will appear:
text_image
Found New Hardware Wizard Welcome to the Found New Hardware Wizard This wizard helps you install software for: AV00772 If your hardware came with an installation CD or Happy disk, insert it now. What do you want the wizard to do? • Install the software automatically (Recommended) • Install from a slot or specific location (Advanced) Click Next to continue. OK Next CancelSelect the second option and click on "next".
text_image
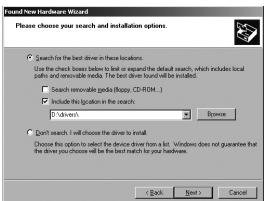
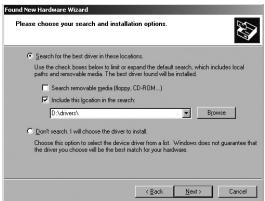
Find new hardware Wizard Please choose your search and installation options. Search for the best drive in these locations. Use the check boxes below to list or expand the default search, which includes local parks and renewable media. The best drive should be installed. Search removable goods (happy, CD-ROM...) Include this location in the search. *Driven Browse Don't search. I will choose the drive to install. Choose this option to select the device from a list. Windows does not guarantee that the drive you choose will be the best match for your hardwares. < Back Next > CancelOn the CD-ROM, look for the folder "Drivers" and select it.
text_image
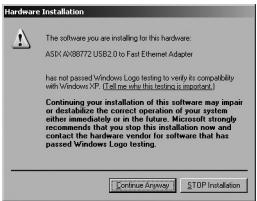
Hardware Installation The software you are installing for this hardware: ASIA AV80772 USB2.0 to Fast Ethernet Adapter has not passed Windows Logo testing to verify its compatibility with Windows XP (I'll me who this test is important.) Continuing your installation of this software may impair or destabilize the correct operation of your system either immediately or in the future. Microsoft strongly recommends that you stop this installation now and contact the hardware vendor for software that has passed Windows Logo testing. Continue Anyway STOP InstallationDuring installation, click on "Continue anyway" if Windows requests this. Finally, click on finish in order to complete the installation of this component. A new component is detected automatically and generates the following window:
text_image
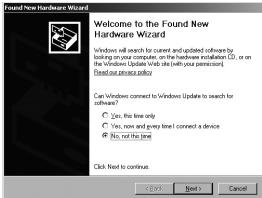
Found New Hardware Wizard Welcome to the Found New Hardware Wizard Windows will search for current and updated software by launching on your computer on the hardware installation (L), or on the Windows Update Web site (with your permission) Read our instructions policy. Can Windows connect to Windows Update to search for software? ○ Yes, this line only ○ Yes, now and given line! Connect a device ● No, not the line! Click to continue. OK Next > CancelSelect "no, not at this moment" and click "next".
text_image
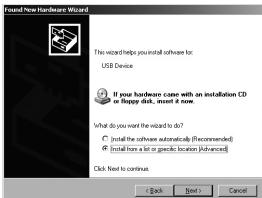
Found New Hardware Wizard This wizard helps you install software for: USB Device If your hardware cane with an installation CD or floppy disk, insert it none. What do you want the wizard to do? © (install the software automatically) (Recommended) © (install items a lot or specific location Advanced) Click Next to continue. < Back Next > CancelSelect the second option and click on "next".
text_image
Found New Hardware Wizard Please choose your search and installation options. Search for the best drive in these locations. Use the check boxes below to list or expand the default search, which includes local walls and wireless media. The best drive found will be installed. Search remote pins (appy, CD-ROM...) Include this linkout in the search. * I'm drawn... Browse Don't search. I will choose the drive to install. Choose this option to select the device from a list. Windows does not guarantee that the drive you choose will be the best match for your hardwares. < Back Next > CancelOn the CD-ROM, look for the folder "Drivers" and select it. Then click on "next". Another window opens, i.e. that for the PCLinQ installation. See the chapter PCLinQ for more information. Finally, click on finish in order to complete the installation of this component.
PC Linq
PC Linq is the programme that enables you to exchange files between 2 PCs. To this end, connect the docking station (after it has been installed) to a second PC via the "Transfer" USB-B port.
text_image
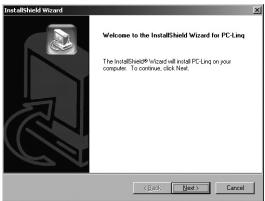
InstallShield Wizard Welcome to the InstallShield Wizard for PC Ling The InstallShield Wizard will install PC Ling on your computer. To continue, click Next. Next CancelClick on "next" to continue.
text_image
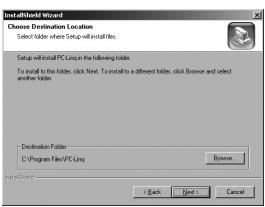
InstallShield Wizard Choose Destination Location Select folder where Setup will install files. Setup will install PC Long in the following folder. To install to the folder, click New. To install to a different folder, click Browse and select another folder. Destination Folder C:\Program Files\PC Long Browse InstallShield < Back Next > CancelThen select the location where you wish to install the programme. Click on "next" in order to finish the installation.
USB printer setup
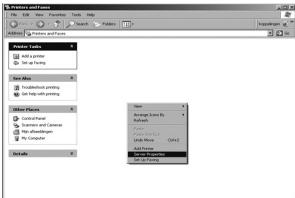
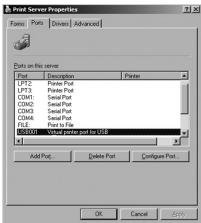
If you wish to use a printer via the docking station, do not forget to change the printer port. You can do this by selecting the "Virtual printer port for USB" when installing the printer. If a printer has already been installed and you wish to connect it to the docking station, do not forget to change the port. You can do this by right-clicking in the Printers and faxes menu and selecting "server properties", which you can see in the window below.
text_image
New Settings Add Settings Set up New New Data Set up New New Settings Add Settings Set up New New Settings Add Settings Set up New New Settings Add Settings Set up New New Settings Add Settings Set up New New Settings Add Settings Set up New New Settings Add Settings Set up New New Settings Add Settings Set up New New Settings Add Settings Set up New New Settings Add Settings Set up New New Settings Add Settings Set up New New Settings Add Settings Set up New New Settings Add SettingsRight-click and go to "server properties".
text_image
Print Server Properties Forms: Ports | Drivers | Advanced Data on this server Port 1 Description Printer LPT2. Printed Port LPT3. Printed Port COM1. Serial Port COM2. Serial Port COM3. Serial Port COM4. Serial Port PLC. Print to File P50001. Valid printed port to USB Add Port. Delete Port. Configure Port. OK Cancel SaveIn the window that appears next, click on the second tab. You will see the following screen.
Here, you change the printer port to "Virtual printer port for USB". The printer now has the correct port in order to print.
Warranty
Any products under the Sweex brand are warranted for a period of three years. The Sweex Digital photo cameras, however, are warranted for two years. We do not grant support or warranties for any software and/or (rechargeable) batteries included. Warranty claims are only settled via the dealer where the product concerned was purchased.
The rightful owner has and retains title to all brand names and related rights mentioned on this packaging/in this manual.