
CRUISER PRO - Car seat KIDDY - Free user manual and instructions
Find the device manual for free CRUISER PRO KIDDY in PDF.

User questions about CRUISER PRO KIDDY
0 question about this device. Answer the ones you know or ask your own.
Ask a new question about this device
Download the instructions for your Car seat in PDF format for free! Find your manual CRUISER PRO - KIDDY and take your electronic device back in hand. On this page are published all the documents necessary for the use of your device. CRUISER PRO by KIDDY.
USER MANUAL CRUISER PRO KIDDY
natural_image
Illustration of a person sitting in a blue car seat with red straps, no text or symbols present
natural_image
Illustration of an open book with a yellow arrow pointing left and an 'i' symbol on the right page (no text or symbols beyond the icon)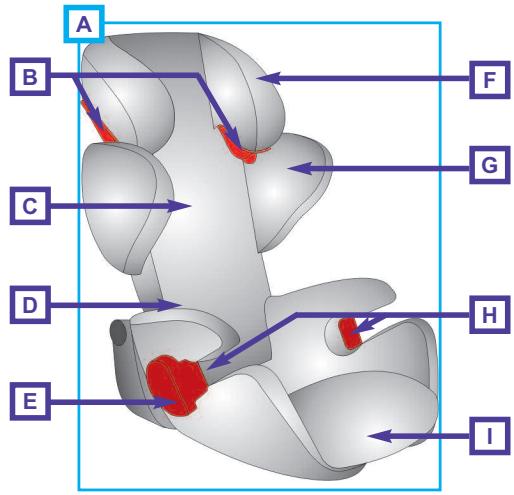
text_image
A B C D E F G H I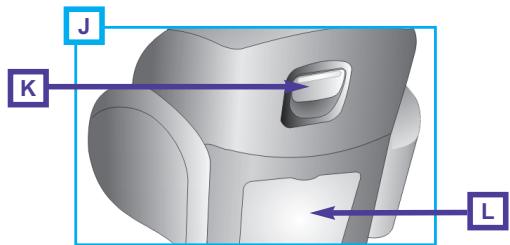
text_image
J K L
text_image
Diagram showing a mobile phone call with checkmarks and red X marks indicating failure or rejection, alongside a checklist of checkmarks.1
natural_image
3D illustration of a car seat with a red X mark on the top side (no text or symbols)2
text_image
Illustration showing correct and incorrect face-to-face classification with red X marks indicating error or misclassification.3
text_image
≈5cm4
natural_image
Illustration of a robotic device with yellow directional arrows indicating movement or force (no text or symbols)5
natural_image
Illustration of a hand pressing down on a blue object with yellow arrows indicating motion (no text or symbols)6
text_image
klick7
natural_image
Illustration of a child wearing a car seatbelt with red and yellow arrows indicating seatbelting (no text or symbols)8
text_image
Illustration showing car seatbelt usage with arrows indicating changes, including a child's seatbelt highlighted.9
natural_image
3D illustration of a mechanical joint or clamping mechanism with red ribbon-like components (no text or symbols)10
text_image
Illustration showing a child wearing a car seat with a red belt and yellow directional arrows indicating force or movement.11
natural_image
Diagram of a red tool interacting with a gray cylindrical object, showing a yellow directional arrow (no text or symbols)Inhaltsverzeichnis
- Introduction...... 3
- Suitability.... 3
- General safety instructions.... 4
- Seat selection and adjustment.... 6
- Adjustments.... 6
5.1 Adjusting the head and shoulder rest.... 6
5.2 Adjustment of leg extension (AG II-III, 15-36kg)....7 - In-vehicle installation for Age Groups II & III (15-36kg).... 7
6.1 Opening the diagonal belt guide.... 8 - Removing and replacing the cover.... 8
7.1 Removing the headrest and backrest cover.... 8
7.2 Removing the shoulder rest covers.... 9
7.3 Removing the seat cover.... 9
7.4 Replacing the cover.... 9 - Instructions for care.... 10
8.1 Cleaning the cover.... 10
8.2 Cleaning plastic parts.... 10 - Steps to take after an accident.... 10
- Warranty.... 10
kiddy cruiser pro – operating manual
1. Introduction
We're happy that you have decided on the kiddy cruiser pro as your choice for a child restraint system (A).
The kiddy cruiser pro is the latest innovative product in our Pro product line. Our special energy-absorbent materials provide the greatest possible safety in the event of a lateral impact. Your child safety car seat is also equipped with kiddy shock absorbers (E), which provide extensive protection during frontal impact.
To gain the most comprehensive protection for your child, the kiddy cruiser pro must be used exactly as described in this manual.
The kiddy cruiser pro parts are indicated by a letter in brackets in this user manual and are explained at the beginning under the point with the same descriptor.
2. Suitability
The kiddy cruiser pro has been tested and licensed according to the latest version of the ECE-R44/04 licensing specifications. It received the design certification for the “universal” class of products. This means that the kiddy cruiser pro is suitable for use in all types of vehicles in any seat with a three-point restraint compliant with ECE 16 or comparable specifications.
The kiddy cruiser pro child restraint system is suitable for weight classes II to III, i.e. for children weighing between 15 and 36kg (approximately 3 years to 12 years of age) or up to a height of 150cm.
Age Groups (Weight Classes):
AG II: 15 kg – 25 kg
AG III: 22 kg – 36 kg
For use in your vehicle, please follow the manufacturer's recommendations in your owner's manual, or contact your dealership.
3. General safety instructions

Please read the entire instruction manual thoroughly before installing the child restraint system for the first time. Improper installation can endanger the life of your child.
Most injuries, caused by mere thoughtlessness, are easily avoided.

Use the child restraint system only for weight classes II to III (from 15kg up to 36kg maximum).

Check to make sure the child restraint system (A) is properly adjusted to the size of your child prior to the trip. Do not attempt to make adjustments during travel.

Make sure that all parts are properly locked in place.

Always secure the child restraint system (A) with your vehicle's own three-point restraint system.

Make sure that none of the child restraint system's (A) parts are caught in doors or reclining seats.

In vans and minivans it is particularly important to ensure that the child restraint system (A) is installed in an easily accessible seat in the event that third-party rescue is required.

The seatbelt should never be loose. During an accident strain on the body from a loose seatbelt is significantly higher than from a tight seatbelt. Make sure the seat belt buckle is properly fastened.

Never leave your child unattended in the child restraint system (A).

Do not place any heavy items on the rear window shelf; these can become dangerous projectiles in an accident.

Even when transporting the child restraint system (A) in your car unoccupied, always secure it in the prescribed fashion with your vehicle's three-point restraint.

Making any modifications to the child restraint system (A) is not permitted. Doing so nullifies or impairs its effectiveness in protection. If difficulties arise, please consult your dealer or the manufacturer.

Keep the child restraint system (A) out of direct sunlight to prevent uncomfortable heating of the surface.

The child restraint system (A) may be used only in seats with three-point restraints compliant with ECE 16 or comparable specifications.

Ensure that the child restraint system (A) was installed in the vehicle in accordance with this manual.

Permit your child to take breaks during longer trips, and be sure that she does not step out of the vehicle into traffic unattended. Always use the child safety locks in your vehicle's passenger doors, if available.

Do not use the child restraint system (A) any further if parts have been damaged or loosened after an accident (with an impact speed greater than 10 km/h) or through other causes (See Section 9).

Use only the seatbelt configuration prescribed by the manufacturer.
4. Seat selection and adjustment
Please familiarise yourself thoroughly with the use of child restraint systems (A) as described in your vehicle's owner's manual.
The child restraint system (A) kiddy cruiser pro can be installed in vehicles on any seat with a three-point restraint system (Fig. 1).
The kiddy cruiser pro can also be used in rear-facing car seats that are equipped with a three-point restraint system (Fig. 1).
* If the motor manufacturer allows child restraint systems on the passenger seat, the seat should be moved to the position furthest back.
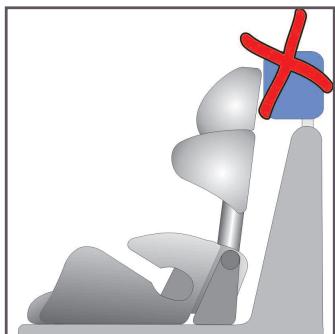
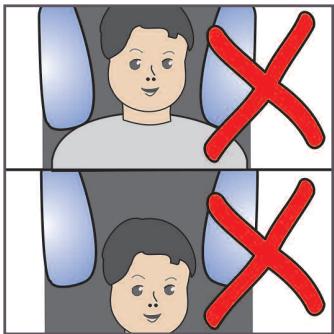
If installation is prevented by a headrest, it must be set at the highest position or removed (Fig. 2).
The kiddy cruiser pro's adjustable backrest (C) ensures that it can rest securely against the backrest of the car seat.
Position the vehicle's reclining backrests accordingly.
5. Adjustments
5.1 Adjusting the head and shoulder rest
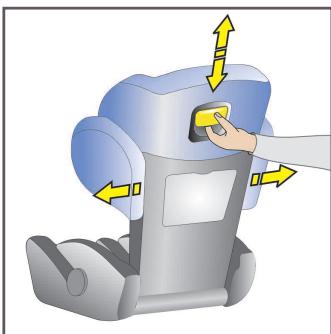
The innovative adjustment system of the kiddy cruiser pro provides the optimal adjustment to the size of your child by adjusting the headrests (F) and shoulder rests (G) in one movement.
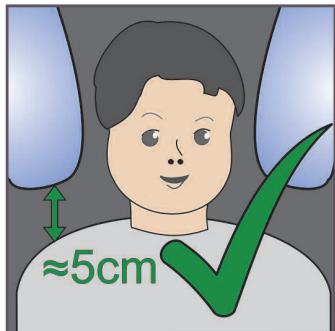
The correct headrest setting is achieved when the head of your child lies in the narrowest position of the headrest (F) (Fig. 4).
To adjust the head (F) and shoulder rests (G), grasp the height adjustment handle (K) on the back of the headrest (F) and pull it out gently, while simultaneously raising or lowering the headrest (F) to the desired height (Fig. 5).
Check to see that the headrest (F) is firmly locked in place by gently pressing down on it.
5.2 Adjustment of leg extension (AG II-III, 15-36kg)
Your child can enjoy substantially better seating comfort by adjusting the leg extension (I). The leg extension (I) can be adjusted to 4 positions.
Pull or push the leg extension (I) into the required position (Fig. 6).
6. In-vehicle installation for Age Groups II & III (15-36kg)
Position your kiddy on the vehicle seat as described in Section 4.
Place the child in the seat and satisfy yourself that your kiddy has been adjusted according to the child's body size (Section 5).
Take the following steps to secure your child with the vehicle's own 3-point belt:
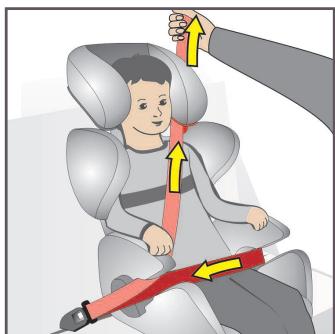
Pull out the vehicle restraint and place the lap belt under both armrests (D) of the seat.
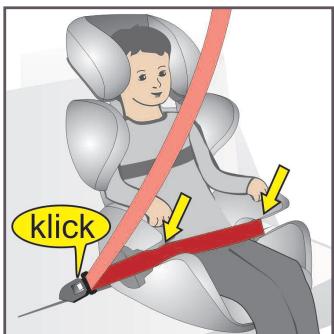
Now close the belt buckle. Check to see whether the belt buckle is properly locked in place (Fig. 7).
Tighten the lap belt and place the diagonal belt on the side of the belt buckle under the armrests (D) (Fig. 8).
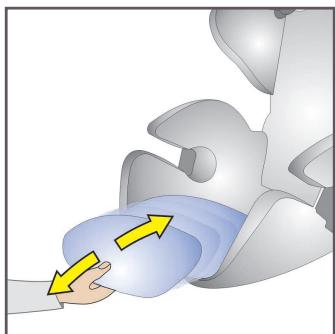
Take the diagonal belt and feed it in from the front over the hooks of the red diagonal belt guide (B) on the headrest (Fig. 9). You can also open the hooks by hand by pressing downwards (Fig. 12).
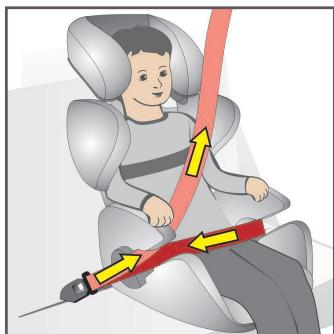
Please ensure that the belt guide opposite the belt buckle is used (Fig. 9).
Make sure that the diagonal belt lies in the belt guide and is not jammed at the front of the hook (Fig. 10).
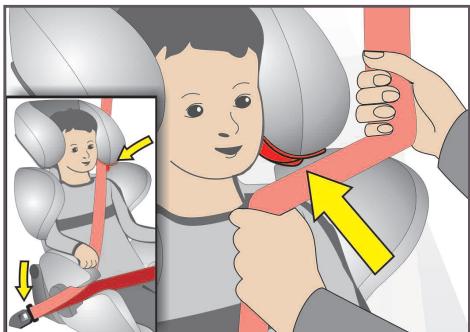
Make sure that the belts are not twisted and do not run too close to the child's body. Also check that the belt buckle is correctly positioned.
Now pull the belt system tight (Fig. 11).
Examine the belt distribution regularly during longer trips.
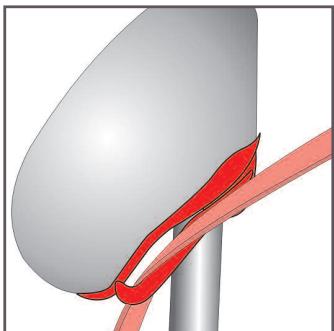
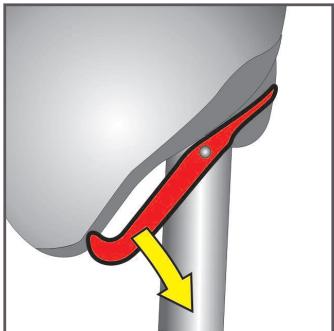
6.1 Opening the diagonal belt guide
To open the diagonal belt guide (B), push the hook downwards (Fig. 12) and then remove the belt to the front.
7. Removing and replacing the cover

Never use your kiddy without its original cover. The cover forms part of the safety concept.
7.1 Removing the headrest and backrest cover
The headrest and backrest cover are sewn together as a single unit.
Slide the adjustable headrest (F) up to the highest position.
Free the cover around the height adjustment handle (K) at the back of the headrest (F) and below both diagonal belt guides (B). Pull the cover off the headrest (F) from the back toward the front.
7.2 Removing the shoulder rest covers
Slide the adjustable headrest (F) down to the lowest position. Unsnap the buttons on the rears of the shoulder rests. Now you can pull the covers off the shoulder rests (G) from the bottom to the top.
7.3 Removing the seat cover
The leg support (I) cover is fastened with a rubber band. You can carefully pull off the cover upwards.
In order to take off the seat cover, open the fastener at the bottom of the seat. Then open the press studs or Velcro® fasteners underneath the leg extension (I) and at the bottom of the seat. Remove the retaining belt from the backrest (C) and pull the cover forward from under the two lap belt guides (H).
Now the seat cover can be removed.
7.4 Replacing the cover
To replace the cover, follow the steps for removing the cover in reverse order (see Sections 7.1 - 7.3).
8. Instructions for care
8.1 Cleaning the cover
The covers are an essential component of the safety concept. Therefore, you should use only original covers from the manufacturer. If you require replacement covers, you can order them from the manufacturer.
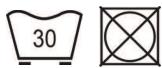
The cover and removable retainer strap for the toy figures are machine washable at 30^ C in the delicates cycle. Do not spin or put into the dryer.
text_image
308.2 Cleaning plastic parts
The plastic parts can be cleaned with a mild cleanser or with a damp cloth. Never use aggressive cleansing agents (e.g. solvents).
9. Steps to take after an accident
After an accident with an impact speed greater than 10 km/h, the child restraint system must be sent back to the manufacturer without fail, to be checked for possible damages and replaced at no charge if deemed necessary.
10. Warranty
For the kiddy cruiser pro we extend a warranty against defects in materials and workmanship for up to two years. The warranty period begins on the date of purchase.
A receipt is required for all claims.
The warranty covers child restraint systems that have been handled properly and are returned in a clean and orderly condition.
The warranty does not cover:
- Normal wear and tear and damage due to unreasonable use
- Damages due to improper or inordinate usage.
Fabrics: All of our fabrics meet the highest standards regarding colourfastness against UV radiation. Nevertheless, all fabrics fade when exposed to UV radiation. This is not due to defective material but to normal wear and tear, which is not covered by the warranty. Please contact your specialist dealer immediately in the event of warranty claim.
The kiddy team wish you and your child a good and safe trip at all times.
Inhoudsopgave
Website: www.kiddy.de