
PBP5360X - Built-in oven PROGRESS - Free user manual and instructions
Find the device manual for free PBP5360X PROGRESS in PDF.
| Product type | Built-in oven |
| Brand | PROGRESS |
| Model | PBP5360X |
| Dimensions (W x H x D) | 560 x 600 x 550 mm (column height: 587 mm) |
| Cavity dimensions (W x H x D) | 395 x 335 x 400 mm |
| Capacity | 53 L |
| Power supply | 230 V ~ 50 Hz - 2740 W |
| Number of cooking levels | 4 levels |
| Cooking functions | Fan forced, conventional (top/bottom), bottom heat, grill, ventilated grill, rotisserie, defrost |
| Cleaning | Pyrolytic (2 levels: 2h or 2h30) + manual cleaning |
| Interior lighting | 1 bulb 40 W (type E14, resistant to 300°C) |
| Safety | Safety thermostat, automatic door lock during pyrolysis, child safety, automatic shutdown after inactivity |
| Door | Removable triple glazing for cleaning |
| Supplied accessories | Grid, drip tray, rotisserie spit, spit handle |
| Temperature range | From room temperature (defrost) up to 250°C |
| Control type | Electronic with digital display and touch buttons |
Frequently Asked Questions - PBP5360X PROGRESS
User questions about PBP5360X PROGRESS
0 question about this device. Answer the ones you know or ask your own.
Ask a new question about this device
Download the instructions for your Built-in oven in PDF format for free! Find your manual PBP5360X - PROGRESS and take your electronic device back in hand. On this page are published all the documents necessary for the use of your device. PBP5360X by PROGRESS.
USER MANUAL PBP5360X PROGRESS
Warnings and important safety information 42
Description of appliance 44
Control panel 45
Before using for the first time 46
Function symbols 49
Using the oven 50
Programming the oven 57
Special functions 59
Cooking tables 62
Cleaning and maintenance 64
Troubleshooting 75
Technical data 76
Instructions for the Installer 77
Installation instructions 78
Customer services 79
How to read the instruction book

Safety information

Step by step instructions

Hints and tips

Environmental information
CE This appliance conforms to the following ECC Directives:
- 2006/95 (Low Voltage Directive);
- 89/336 (EMC Directive);
93/68 (General Directive); and subsequent changes

Always keep these user instructions with the appliance. Should the appliance be passed on to third persons or sold, or if you leave this appliance behind when you move house, it is very important that the new user has access to these user instructions and the accompanying information.
These warnings are provided for the safety of users and co-residents. So read them carefully before connecting and/or using the appliance.
Installation
- The installation must be performed by a qualified person in accordance with the rules and regulations in force. The individual operations for installing the appliance are described under the instructions for the installer.
- Have the appliance installed and connected by a qualified person with specialist knowledge, who will carry it out in accordance with the directives
If any modifications to the power supply are required because of the installation, these should also be carried out by a qualified electrician.
This oven was made as a single appliance or as a combination appliance with electrical hotplate, depending on the model, for single-phase connection to 230V .
Operation
This oven is intended for cooking food; never use it for other purposes.
- Be very careful when using the oven. The extreme heat of the heating elements makes the shelves and other parts very hot
If you should for whatever reason use aluminium foil to cook food in the oven, never allow it to come into direct contact with the floor of the oven.
- When cleaning the oven, proceed with care: never spray anything onto the grease filter (if fitted), the heating elements or the thermostat sensor.
It is dangerous to make any types of modifications to this appliance itself or its characteristics.
During the baking, roasting and grilling process, the oven window and the other parts of the appliance get hot. Therefore, children should be kept away from the appliance. When connecting electrical appliances to sockets near the oven, take care that cables do not come into contact with hot rings or get caught in the oven door.
Always use oven gloves to take hot ovenproof dishes or pots out of the oven.
- Regular cleaning prevents the surface material from deteriorating.
Before cleaning the oven, either turn the power off or pull the mains plug out.
- Make sure that the oven is in the "OFF" position, when the oven is no longer being used.
- The forks and the spit of the turnspit are pointed and sharp. When using, manipulate them with caution to avoid any injury.
- The appliance must not be cleaned with a superheated steam cleaner or a steam jet cleaner.
- Do not use abrasive cleaners or sharp metal scrapers. These can scratch the glass in the oven door, which may result in the shattering of the glass.
Personal safety
This appliance is intended for use by adults. It is dangerous to allow children to use it or play with it.
Children should be kept away while the oven is working. Even after you have switched the oven off, the door remains hot for a long time.
This appliance is not intended for use by children or other persons whose physical, sensory or mental capabilities or lack of experience and knowledge prevents them from using the appliance safely without supervision or instruction by a responsible person to ensure that they can use the appliance safely.
Disposal

Packaging material
- The packing materials are environmentally friendly and recyclable. The plastic parts are marked, e. g. >PE> , >PS< etc. Dispose of the packing material according to their marking in the corresponding collection bins at the municipal waste disposal centres.

Old appliance
The symbol on the product or on its packaging indicates that this product may not be treated as household waste. Instead it should be taken to the appropriate collection point for the recycling of electrical and electronic equipment. By ensuring this product is disposed of correctly, you will help prevent potential negative consequences for the environment and human health, which could otherwise be caused by inappropriate waste handling of this product. For more detailed information about recycling of this product, please contact your local council, your household waste disposal service or the shop where you purchased the product.

Warning: To ensure that the appliance does not pose a danger, it should be made inoperable prior to disposal.
Pull the mains plug from the socket and remove the mains cable from the appliance.
Customer service
- Have checks and/or repairs carried out by the manufacturer's service department or by a service department authorised by the manufacturer and use only original spare parts.
- Do not attempt to repair the appliance yourself in the event of malfunctions or damage. Repairs carried out by untrained persons may cause damage or injury.
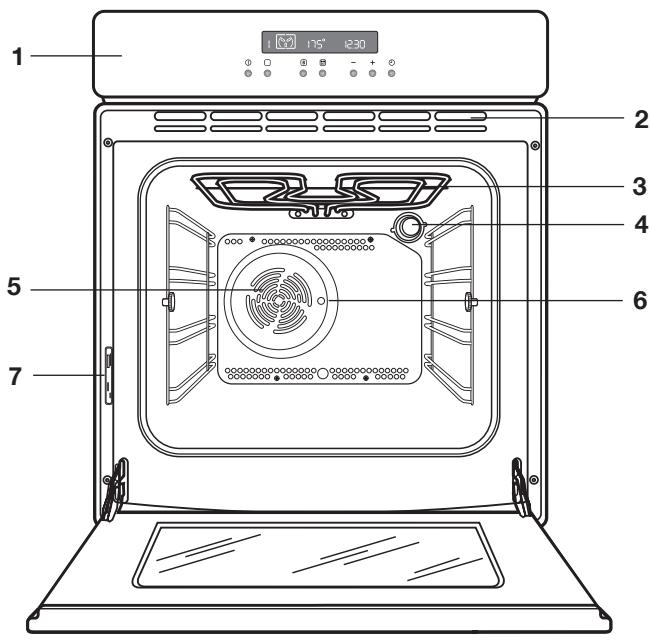
- Control panel
- Air vents for cooling fan
- Grill
- Internal lighting
- Oven fan
- Rotisserie opening
- Rating plate
Accessories

Baking tray
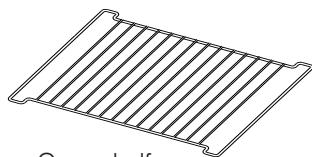
Oven shelf
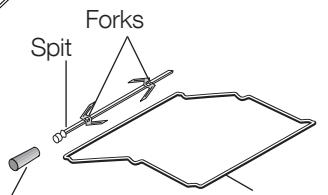
Removable spit handle

Rotisserie
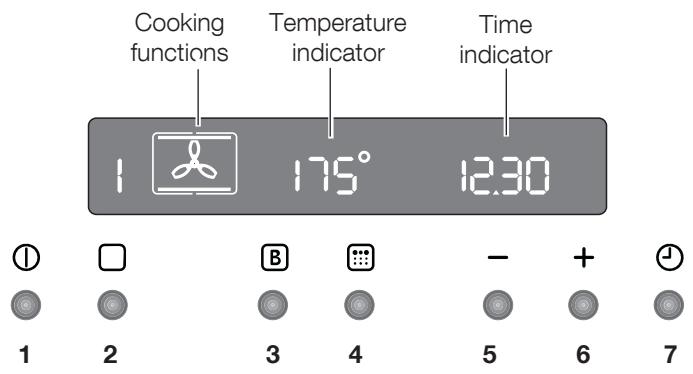
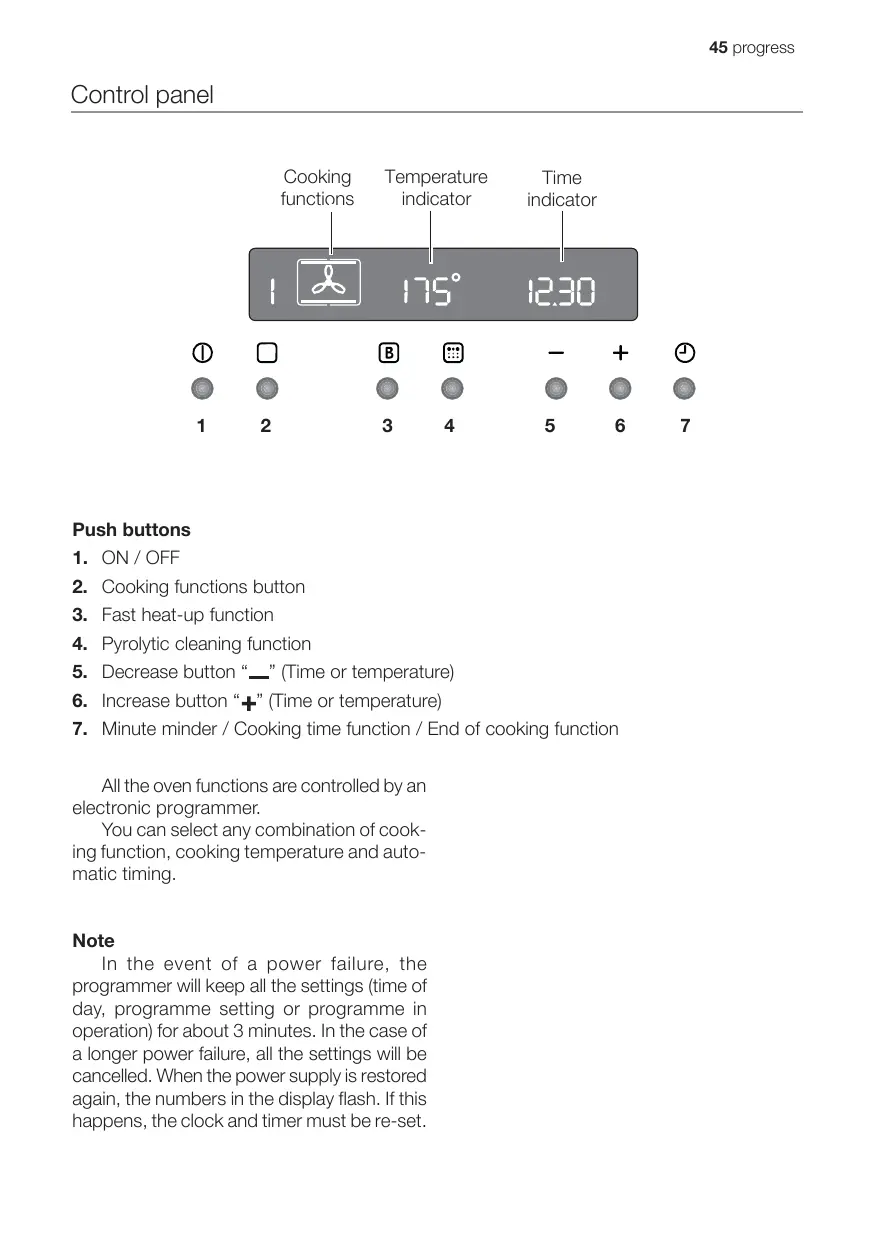
Push buttons
- ON/OFF
- Cooking functions button
- Fast heat-up function
- Pyrolytic cleaning function
- Decrease button “—” (Time or temperature)
- Increase button “+” (Time or temperature)
- Minute minder / Cooking time function / End of cooking function
All the oven functions are controlled by an electronic programmer.
You can select any combination of cooking function, cooking temperature and automatic timing.
Note
In the event of a power failure, the programmer will keep all the settings (time of day, programme setting or programme in operation) for about 3 minutes. In the case of a longer power failure, all the settings will be cancelled. When the power supply is restored again, the numbers in the display flash. If this happens, the clock and timer must be re-set.

Remove all packaging, both inside and outside the oven, before using the oven.
When the oven is first connected to the electrical supply, the display will automatically show 12:00 and the symbol flashes.
Ensure the correct time of day is set before using the oven.
Setting the clock:
- Press the button l and, while the symbol is flashing, set the correct time of day by pressing buttons “-” or “+” (Fig. 1).
The time arrow symbol will disappear about 5 seconds after the correct time is displayed.
- As soon as the symbol stops flashing, press button twice.
Then, proceed as described in point 1.
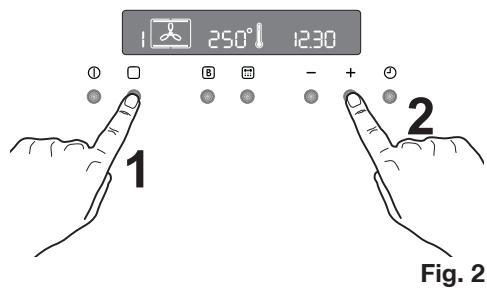
Before first use
Before the first use, the oven should be heated while empty.
To do this, proceed as follows:
- Press the button ① to switch on the oven.
- Press the button twice and select the «Hot air» function (Fig. 2).
- Set the temperature to 250^ by using the button " + " .
- Allow the oven to run empty for approximately 45 minutes.
- Open a window for ventilation.
This procedure should be repeated with the function «Top and bottom heating element» and «Thermal grill» for about 5-10 minutes.
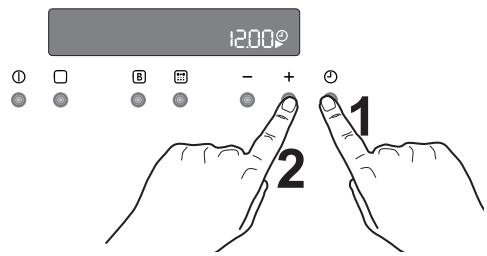
Fig. 1
During this time, an unpleasant odour may be emitted. This is absolutely normal. It is caused by manufacturing residues.
Once this operation is carried out, let the oven cool down, then clean the oven cavity with a soft cloth soaked in warm soapy water. Before cooking for the first time, thoroughly wash the shelves and the baking tray. To open the oven door, always hold the handle in the centre (Fig. 3).
"On/Off" - button
The oven must be switched on before setting any cooking functions or programmes. After the button ① is pressed, the oven symbol will appear in the display, and the oven light will switch on (Fig. 4).
To switch off the oven, you can press button ① . This is possible at any time. Any cooking function or programme will stop, the oven light will switch off and the time display will show the time of day only.
It is possible to switch off the oven at any time.
How to select a cooking function
- Switch on the oven by pressing the ① button.
- Press the button to select the required oven function. Each time button is pressed, a cooking symbol will come on in the display and the corresponding cooking function number will appear to the left of the currently selected cooking function symbol (Fig. 5).
- If the pre-set temperature is not suitable, press button “—” or “+” to set the correct temperature. The temperature is adjusted in 5 degree steps.
- As soon as the oven heats up, the thermometer symbol rises slowly indicating the degree to which the oven is currently heated. When the required temperature is reached, an acoustic alarm will sound for a short time and the thermometer symbol will lights up.
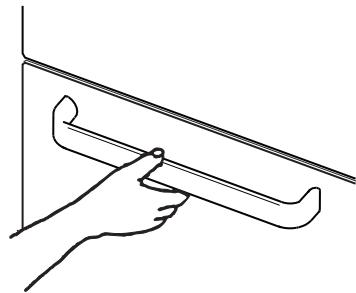
Fig. 3
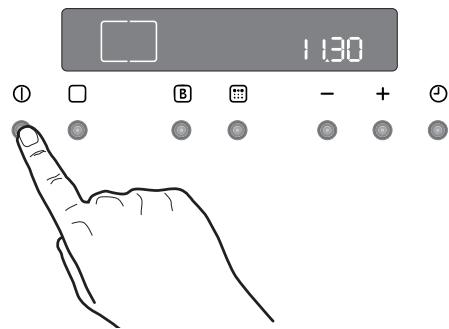
Fig. 4
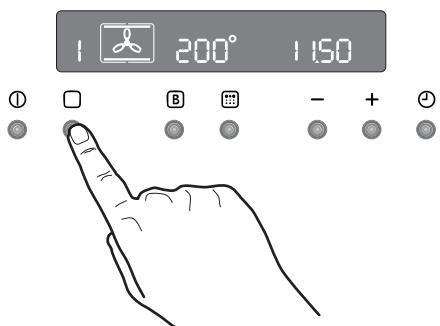
Fig. 5
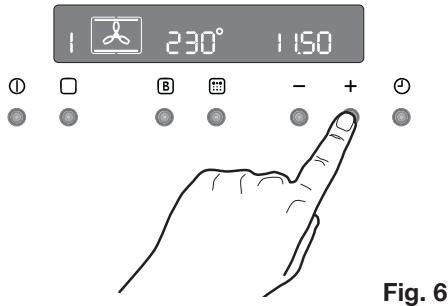
To set the temperature and cooking time
Press the buttons “—” and “+” to increase or decrease the pre-set temperature while the “0” symbol is flashing (Fig. 6). The maximum temperature is 250^ .
Press the buttons “—” and “+” to increase or decrease the pre-set cooking time while the symbol flashes.
Safety thermostat
To prevent dangerous overheating (through incorrect use of the appliance or defective components), the oven is fitted with a safety thermostat, which interrupts the power supply. The oven switches back on again automatically, when the temperature drops.
Should the safety thermostat trigger due to incorrect use of the appliance, simply remedy the error after the oven has cooled down. If, on the other hand, the thermostat triggers because of a defective component, please contact Customer service.
Cooling fan
The cooling fan is designed to cool the oven cavity and the control panel. The fan switches on automatically after a few minutes of cooking. Warm air is blown out through the slots near to the oven door handle. The fan may continue to run after the oven is switched off to cool the appliance. This is absolutely normal.

The action of the cooling fan will depend on how long the oven has been used and at what temperature. It may not switch in at all at lower temperature settings or run on if the oven has only been used for a short time.
Hot air - With this setting, you can roast or roast and bake on several levels at the same time without this leading to any flavour transfer. Pre-set temperature: 175^
Top and bottom heating element - The heat comes from above and below and is evenly distributed in the oven compartment. Pre-set temperature: 200^
Bottom oven element - The heat only comes from the bottom heating element in the oven compartment. This setting is very good for finishing off dishes. Pre-set temperature: 250^
4 Thermal grill - This is an alternative cooking method for food that would otherwise be cooked with the normal grill. The grill element and the oven fan operate simultaneously, circulating hot air around the food. Pre-set temperature: 180^
Highest temperature: 200^
5 Grill and rotisserie - The rotisserie can be used either for grilled meat or for kebabs and smaller pieces of meat. Preset temperature: 250^
6 Defrosting - The fan circulates unheated air at room temperature in the oven compartment. This function is particularly suitable for defrosting delicate food which could be damaged by heat, e.g. cream filled gateaux, iced cakes, pastries, bread and other yeast products.
7 Pyrolytic cleaning - The oven compartment can be thoroughly cleaned with this function.

Important! - Do not lay aluminium foil, or place baking trays, etc. on the oven floor, as the heat built up will damage the oven surface enamel. Always place pans and pots, ovenproof pans and pots as well as aluminium trays on the shelf which has been inserted in the shelf runners. When food is heated, steam is created, similar to a kettle. When the steam comes into contact with the glass in the oven door, it condenses and creates water droplets.
To reduce condensation, always preheat the empty oven for 10 minutes.
We recommend you wipe the water droplets away after every cooking process.

Always cook with the oven door closed.
Always open the oven door carefully. Do not allow the door to "fall open", support the door using the door handle, until it is fully open

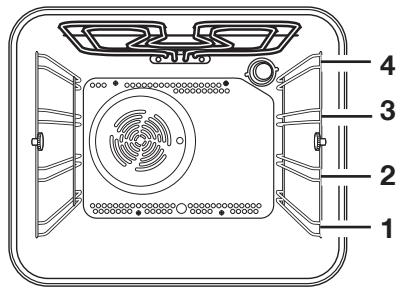
The oven has four shelf levels. The shelf positions are counted from the floor of the oven upwards, as shown in the figure.
The slide-in components must always be properly inserted (see figure).
Do not place cookware and pots directly on the floor of the oven.
Hot air
The food is cooked by means of preheated air force-blown evenly round the inside of the oven by a fan set on the rear wall of the oven itself.
The heat reaches all parts of the oven evenly and fast. This means that you can simultaneously cook different types of food positioned on the various oven shelves.
The advantages of cooking with this function are:
- Faster preheating
As the fan oven quickly reaches temperature, it is not usually necessary to preheat the oven although you may find that you need to allow an extra 5-7 minutes on cooking times. For recipes which require higher temperatures, best results are achieved if the oven is preheated first, e.g. bread, pastries, scones, souffles, etc.
- Lower temperatures
Fan-assisted cooking generally requires lower temperatures than conventional cooking.
Follow the temperatures recommended in the cooking chart. Remember to reduce temperatures for top and bottom heat by about 20-25 ^ C for your own conventional recipes.
Even heating for baking
The fan oven has uniform heating on all shelf positions. This means that batches of the same food can be cooked in the oven at the same time. However, the top shelf may brown slightly quicker than the lower one.
This is absolutely normal. There is no flavour transference between dishes.
How to use the fan oven
-
Switch the oven on.
-
Press the cooking functions button until the symbol appears in the display.
-
If necessary adjust temperature setting using the “+” or “-” buttons.
Top and bottom heating element
- The middle shelf position allows for the best heat distribution. If you want a base browning, simply place the cakes and pastries on to a lower shelf position in the oven. To increase top browning, raise the shelf position.
- The material and finish of the baking trays and dishes used will affect base browning. Enamelware, dark, heavy or non-stick utensils increase base browning, while oven glassware, shiny aluminium or polished steel trays reflect the heat away and give less base browning.
Always place dishes centrally on the shelf to ensure even browning. - Stand dishes on suitably sized baking trays to prevent spillage onto the base of the oven and make cleaning easier.
- Do not place dishes, tins or baking trays directly on the oven base as it becomes very hot and damage will occur. When using this setting, heat comes from both the top and bottom elements. This allows you to cook on a single level. This is particularly suitable for dishes which require extra base browning such as, e.g. quiches and flans.
Gratins, lasagne and hotpots which require extra top browning also cook well in the conventional oven.
How to use the conventional oven
- Switch the oven on.
- Select the top and bottom heating element function; to do this, press the cooking functions button until the symbol appears in the display.
- If necessary, adjust temperature setting using the “+” or “-” buttons.
Bottom oven element
This function is particularly useful when baking cakes and pastry bases as well as finishing off quiches or flans, to ensure that the quiche or pastry base is cooked through.
Grilling
- Most foods should be placed on the grid in the grill pan to allow maximum circulation of air and to lift the food out of the fats or juices. If preferred, foods such as, e. g. fish, liver and kidneys may be placed directly on the grill pan.
- Food should be thoroughly dried before grilling to minimise splashing. Brush lean meats and fish lightly with a little oil or melted butter to keep them moist during cooking.
- Accompaniments such, e. g. tomatoes and mushrooms may be placed underneath the grid when grilling meats.
- When toasting bread, we suggest that the top runner position is used.
- The food should be turned over during cooking, as required.
How to use the grill
The grill provides quick direct heat to the central area of the grill pan. By using the inner grill element for cooking small quantities, it can help to save energy.
- Switch the oven on.
- Select the function grill; to do this, press the cooking functions button , until the symbol appears in the display.
- If necessary adjust temperature setting using the “+” or “-” buttons.
- Select the grid and grill pan runner position to allow for different thicknesses of food. Then follow the instructions for grilling.
Thermal grill
Thermal grill offers an alternative method of cooking food items normally associated with conventional grilling. The grill element and the oven fan operate simultaneously, circulating hot air around the food. The need to check and turn the food is reduced. Thermal grill helps to minimise cooking smells in the kitchen.
With the exception of toast and rare steaks, you can thermally grill all the foods you would normally cook under a conventional grill. Cooking is more gentle; therefore food generally takes a little longer to cook with thermal grilling compared with conventional grilling. One of the advantages is that larger quantities can be cooked at the same time.
- Switch the oven on.
- Select the function thermal grilling; to do this, press the cooking functions button , until the symbol appears in the display.
- If necessary, press the buttons “+” or “—”, to adjust the temperature setting. Highest temperature: 200^ .
- Select the grid and grill pan runner position to allow for different thicknesses of food. Then follow the instructions for grilling.
Grill and rotisserie

Please follow these instructions:
- Push the meat onto the rotisserie and fix it using the forks.
- Fit the spit on the support and slide the whole assembly in on the second level up.
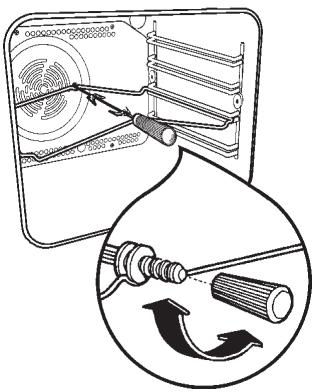
- Insert the point of the spit in the rotisserie motor opening on the back wall of the oven.
- Unscrew the handle from the spit.
- Fill the drip pan with approx. 1/2 l. of water and slide it in on the first level.
- Select the rotisserie function by pressing the oven functions button until the symbol appears in the display.
Always keep the oven door closed.
The forks and the spit of the turnspit are pointed and sharp (if your appliance is equipped with). When using, manipulate them with caution to avoid any injury.
Defrosting
The oven fan operates without heat and circulates the air, at room temperature, inside the oven. This increases the speed of defrosting. However, please note that the temperature of the kitchen will influence the speed of defrosting. This function is particularly suitable for defrosting delicate food which could be damaged by heat, e.g. cream filled gateaux, iced cakes, pastries, bread and other yeast products.
How to use defrosting function
- Switch the oven on by pressing button
①
- Select the function defrosting; to do this,
press the cooking functions button
until the symbol appears in the display.
- The display will show the indication "def".

Hints and tips
On baking:
Cakes and pastries usually require a medium temperature (150^ - 200^) . Therefore, it is necessary to pre-heat the oven for approx. 10 minutes.
Do not open the oven door before 3/4 of the baking time has elapsed.
Shortcrust pastry is baked in a springform tin or on a tray for up to 2/3 of the baking time and then garnished before being fully baked. This further baking time depends on the type and amount of topping or filling. Sponge mixtures must separate with difficulty from the spoon. The baking time would be unnecessarily extended by too much liquid.
If two baking trays with pastries or biscuits are inserted into the oven at the same time, a shelf level must be left free between the trays.
If two baking trays with pastries or biscuits are inserted into the oven at the same time, the trays must be swapped and turned around after about 2/3 of the baking time.
When roasting:
Do not roast joints smaller than 1kg . Smaller pieces could dry out when roasting. Dark meat, which is to be well done on the outside but remain medium or rare inside, must be roasted at a higher temperature (200^ - 250^)
White meat, poultry and fish, on the other hand, require a lower temperature (150°C- 175°C). The ingredients for a sauce or gravy should only be added to the roasting pan right at the beginning if the cooking time is short. Otherwise add them in the last half hour.
You can use a spoon to test whether the meat is cooked: if it cannot be depressed, it is cooked through. Roast beef and fillet, which is to remain pink inside, must be roasted at a higher temperature in a shorter time.
If cooking meat directly on the oven shelf, insert the roasting pan in the shelf level below.
Leave the joint to stand for at least 15 minutes, so that the meat juices do not run out.
To reduce the build up of smoke in the oven, it is recommended to pour a little water in the roasting pan. To prevent condensation forming, add water several times. The plates can be kept warm in the oven at minimum temperature until serving.

Important! Do not line the oven with aluminium foil and do not place baking trays, pots, etc. on the oven floor, as the heat that builds up will damage the oven enamel.
Cooking times
Cooking times can vary according to the different composition, ingredients and amounts of liquid in the individual dishes.
Note the settings of your first cooking or roasting to gain experience for later preparation of the same dishes.
Based upon your own experiences you will be able to alter the values given in the tables.
To set the minute minder
- Using the button to select the minute minder function. The relevant symbol will flash and the control panel will display "0.00" (Fig. 7).
- Using the button “+” to enter the required time. The maximum time is 23 hours 59 minutes. After it has been set, the minute minder will wait 3 seconds and then start running.
- When the programmed time has elapsed, an acoustic alarm will be heard.
- To switch off the acoustic alarm, press any button.

The oven will NOT switch off if in use. The minute minder function can be used as well when the oven is off.
To use or to change the minute minder setting:
Press the buttons until the symbols
and flash.
Now you can change the settings of the minute minder. To do this, press the button "—" or "+".
To cancel the minute minder:
Press the buttons until the symbols
and flash.
Press the button " " to decrease the time until 0.00 is displayed (Fig. 8).
To programme the oven to switch off
- Place food in the oven, switch on the oven, select a cooking function and adjust the cooking temperature, if required.
- Press the button to select the «Cooking time» function. The cooking time symbol will flash and the control panel will display «0.00» (Fig. 9).
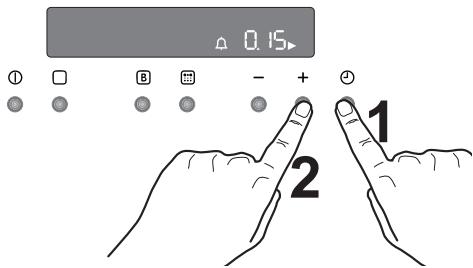
Fig. 7
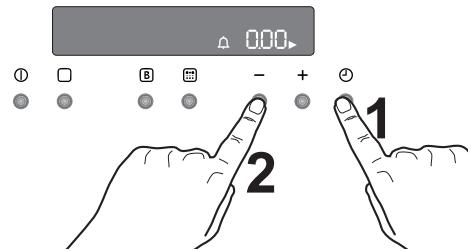
Fig. 8

Fig. 9
- While the symbol is flashing, press the button “+” to select the required time. The maximum time is 23 hours 59 minutes. The programmer will wait 3 seconds and then start running.
- After the time programmed has elapsed, the oven switches off automatically. An acoustic alarm will be heard and "0.00" will appear on the control panel.
- To switch off the acoustic alarm, press any button.
To cancel the programmed cooking time:
- Press the button 1 , until the symbol flashes.
- Press the button “—” to decrease the time until the display shows “0.00” (Fig. 10).
To programme the oven to switch on and off
- Carry out the "Cooking time" setting as described in the relevant chapter.
- Press the buttons 4 until the «End of Cooking» function is selected and the relevant symbol flashes. The control panel will display the end of cooking time (that is, the actual time + Cooking time - Fig. 11).
- Press the button “+” to select the required end of cooking time.
- Once the setting has been made, the programmer will wait 3 seconds and then start running.
- The oven will switch on and off automatically. The end of cooking will be marked by an acoustic alarm.
- To switch off the acoustic alarm, press any button.
To cancel the programme, simply cancel the Cooking Time.
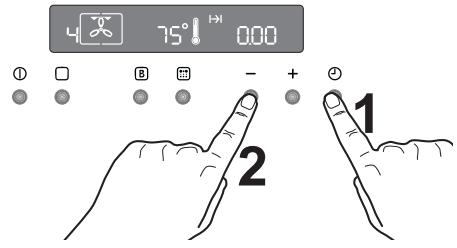
Fig. 10
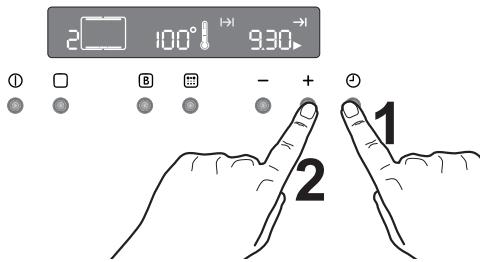
Fig. 11
Oven safety switch-off
The oven will switch off automatically if any change of setting is made, according to the following table (Fig. 12).
| Temperature setting: | the oven will switch off: |
| 250°C | after 3 hours |
| from 200 up to 245°C | after 5.5 hours |
| from 120 up to 195°C | after 8.5 hours |
| less than 120°C | after 12 hours |
Residual heating function
When a cooking time is set, the oven will automatically switch off a few minutes before the end of the programmed time, and use the residual heat to finish your dishes without energy consumption. All current settings will be displayed until the cooking time is over.
This function will not operate when the cooking time is less than 15 minutes.
Child lock for the oven
To prevent children from switching on the oven, it is possible to lock the oven controls.
- Turn off the oven by pressing button ①.
- Press the and “-” buttons at the same time for about 3 seconds. An acoustic signal will be emitted and the indication 'SAFE' will appear in the display (Fig. 13).
- The oven is now locked. Neither oven functions nor temperatures can be selected.
To unlock the oven:
Press the and “—” at the same time and keep them pressed for about 3 seconds. An acoustic signal will be emitted and the indication “SAFE” will go out. The oven can now be operated.
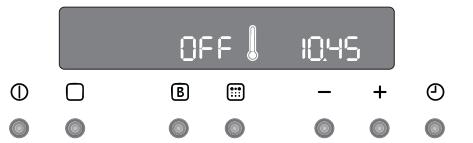
Fig. 12
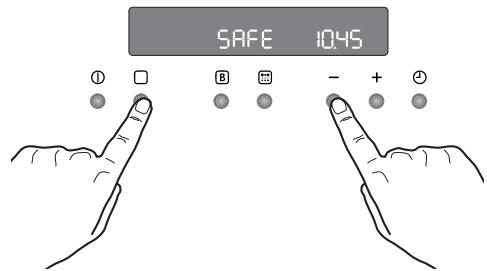
Fig. 13
Fast heat-up function
After a cooking function and the temperature have been selected, the cavity will gradually heat up until the selected temperature is reached. This will take from 10 to 15 minutes, depending on the selected function and temperature.
If it is necessary to reach the required temperature in a shorter time, the "Fast Heat Up" function can be used.
- Switch the oven on by pressing button ①.
- Set the required cooking function and temperature as explained in the previous pages.
- Set the temperature by pressing button “—” or “+”. The temperature will appear in the display.
- Press the buttons . The temperature display will show "FHU" (Fig. 14).
- Press the buttons The symbol "o" will flash for approximately 10 seconds. Now it is possible to select the required temperature. To do this, press the button " " or " +".
- When the required temperature is reached, the electronic control beeps for a short time, and the temperature display reverts to the selected temperature.
This function can be used with any cooking function or temperature.
Demo mode
This mode is intended to be used in shops to demonstrate the oven functionality without any power consumption except the interior light, the display and the fan. This function can only be switched on when the appliance is first connected.
If there is a power failure, when the power supply is restored again the Demo function can only be switched on if, in the display, 12:00 and the symbol 1 are flashing automatically.
- Press the button for approx. 2 seconds. A short acoustic alarm will be heard.
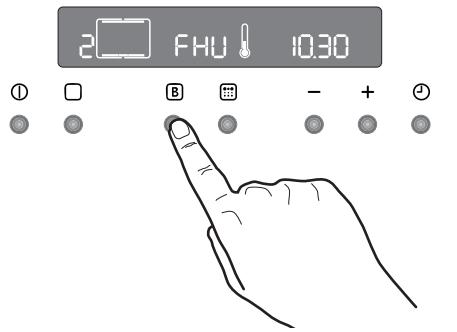
Fig. 14
- Press the bottoms ① and “_” at the same time. A short acoustic alarm will be heard and the time 12:00 appears in the display (Fig. 15).
When the oven is switched on, the symbol appears 1 in the display. This means that the demo function is activated.
All oven functions can be selected.
The oven is not really working and the heating elements do not switch on.
Switch off the oven and follow the above described procedure to disable the demo mode.

The demo mode remains saved in the programme in the event of a power failure.
Beep on touch
You can choose to make the electronic control beep each time that a button is pressed. To enable this function, the oven must be off.
- Press the buttons and “+” at the same time and keep them pressed for about 3 seconds. The alarm signal beeps once (Fig. 16).
To disable the beep on touch:
- With the oven switched on, press the button to switch the oven off.
- Press the buttons and “+” at the same time and keep them pressed for about 3 seconds. The electronic control beeps once.
Error codes
The electronic programmer does a continuous diagnostic check of the system. If some parameters are not correct, the control unit will stop the activated functions and it will display the corresponding error code (Fig. 17).
For further details, refer to chapter "Troubleshooting".
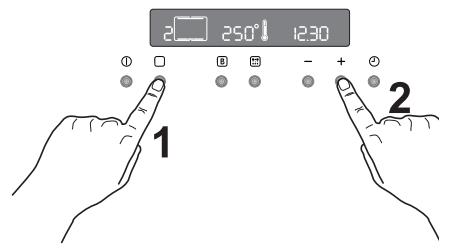
Fig. 15
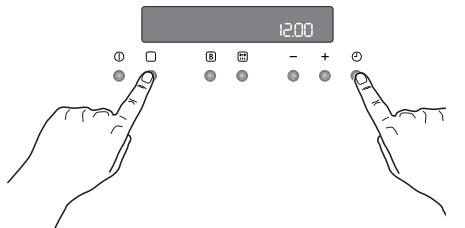
Fig. 16
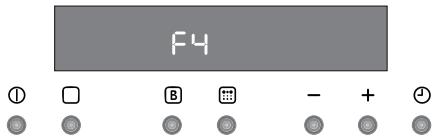
Fig. 17
Top and bottom heating element and hot air

Timings do not include pre-heating.
The empty oven should always be pre-heated for 10 minutes.
| TYPE OF DISH | Top and bottom heating element | Hot air | Cooking time In minutes | NOTE | ||
| level | Temp. (°C) | level | Temp. (°C) | |||
| CAKES | ||||||
| Whisked recipes | 2 | 170 | 2 (1 and 3)* | 160 | 45-60 | Cake tin |
| Shortbread dough | 2 | 170 | 2 (1 and 3)* | 160 | 20-30 | Cake tin |
| Buttermilk cheese cake | 1 | 175 | 2 | 165 | 60-80 | Cake tin |
| Apple cake | 1 | 170 | 2 (1 and 3)* | 160 | 90-120 | Cake tin |
| Strudel | 2 | 180 | 2 | 160 | 60-80 | Baking tray |
| Jam tart | 2 | 190 | 2 (1 and 3)* | 180 | 40-45 | Cake tin |
| Fruit cake | 2 | 170 | 2 | 150 | 60-70 | Cake tin |
| Sponge cake | 1 | 170 | 2 (1 and 3)* | 165 | 30-40 | Cake tin |
| Christmas cake | 1 | 150 | 2 | 150 | 120-150 | Cake tin |
| Plum cake | 1 | 175 | 2 | 160 | 50-60 | Bread tin |
| Small cakes | 3 | 170 | 2 | 160 | 20-35 | Baking tray |
| Biscuits | 2 | 160 | 2 (1 and 3)* | 150 | 20-30 | Baking tray |
| Meringue | 2 | 135 | 2 (1 and 3)* | 150 | 60-90 | Baking tray |
| Fancy biscuits | 2 | 200 | 2 | 190 | 12-20 | Baking tray |
| Pastries: Choux pastry | 2 or 3 | 210 | 2 (1 and 3)* | 170 | 25-35 | Baking tray |
| Tartlets | 2 | 180 | 2 | 170 | 45-70 | Cake tin |
| BREAD AND PIZZA | ||||||
| White bread | 1 | 195 | 2 | 185 | 60-70 | |
| Rye bread | 1 | 190 | 1 | 180 | 30-45 | Bread tin |
| Bread rolls | 2 | 200 | 2 (1 and 3)* | 175 | 25-40 | Baking tray |
| Pizza | 2 | 200 | 2 | 200 | 20-30 | Baking tray |
| FLANS | ||||||
| Pasta flan | 2 | 200 | 2 (1 and 3)* | 175 | 40-50 | Baking tin |
| Vegetable flan | 2 | 200 | 2 (1 and 3)* | 175 | 45-60 | Baking tin |
| Quiches | 1 | 210 | 1 | 190 | 30-40 | Baking tin |
| Lasagne | 2 | 200 | 2 | 200 | 25-35 | Baking tin |
| Cannelloni | 2 | 200 | 2 | 200 | 25-35 | Baking tin |
| MEATS | ||||||
| Beef | 2 | 190 | 2 | 175 | 50-70 | Shelf |
| Pork | 2 | 180 | 2 | 175 | 100-130 | Shelf |
| Veal | 2 | 190 | 2 | 175 | 90-120 | Shelf |
| English roast beef | ||||||
| rare | 2 | 210 | 2 | 200 | 50-60 | Shelf |
| medium | 2 | 210 | 2 | 200 | 60-70 | Shelf |
| well done | 2 | 210 | 2 | 200 | 70-80 | Shelf |
| Shoulder of pork | 2 | 180 | 2 | 170 | 120-150 | with rind |
| Knuckle of pork | 2 | 180 | 2 | 160 | 100-120 | 2 pieces |
| Lamb | 2 | 190 | 2 | 175 | 110-130 | Leg |
| Chicken | 2 | 190 | 2 | 200 | 70-85 | Whole |
| Turkey | 2 | 180 | 2 | 160 | 210-240 | Whole |
| Duck | 2 | 175 | 2 | 220 | 120-150 | complete |
| Goose | 2 | 175 | 1 | 160 | 150-200 | complete |
| Rabbit | 2 | 190 | 2 | 175 | 60-80 | In pieces |
| Hare | 2 | 190 | 2 | 175 | 150-200 | In pieces |
| Pheasant | 2 | 190 | 2 | 175 | 90-120 | complete |
| Meatloaf | 2 | 180 | 2 | 170 | complete.. 150 | Bread tin |
| FISH | ||||||
| Trout / Sea bream | 2 | 190 | 2 (1 and 3)* | 175 | 40-55 | 3-4 fish |
| Tuna fish / Salmon | 2 | 190 | 2 (1 and 3)* | 175 | 35-60 | 4-6 Filets |
The temperatures quoted are guidelines. If necessary, the temperatures should be adjusted to personal requirements.
(*) If you cook several dishes at the same time, we recommend that you place them on the levels quoted between brackets.

Timings do not include pre-heating.
The empty oven should always be pre-heated for 10 minutes.
Grilling
| TYPE OF DISH | Quantity | Grilling | Cooking time in minutes | |||
| Pieces | g | level | Temp. (°C) | 1st side | 2nd side | |
| Fillet steaks | 4 | 800 | 3 | 250 | 12~15 | 12~14 |
| Beef steaks | 4 | 600 | 3 | 250 | 10~12 | 6~8 |
| Sausages | 8 | / | 3 | 250 | 12~15 | 10~12 |
| Pork chops | 4 | 600 | 3 | 250 | 12~16 | 12~14 |
| Chicken (cut in 2) | 2 | 1000 | 3 | 250 | 30~35 | 25~30 |
| Kebabs | 4 | / | 3 | 250 | 10~15 | 10~12 |
| Breast of chicken | 4 | 400 | 3 | 250 | 12~15 | 12~14 |
| Hamburger* | 6 | 600 | 2 | 250 | 20-30 | |
| *Pre-heat 5'00" | ||||||
| Fish Fillet | 4 | 400 | 3 | 250 | 12~14 | 10~12 |
| Toasted sandwiches | 4~6 | / | 3 | 250 | 5~7 | / |
| Toast | 4~6 | / | 3 | 250 | 2~4 | 2~3 |
Thermal grill

With the thermal grill, select a maximum temperature of 200^ .
| TYPE OF DISH | Quantity | Thermal grilling | Cooking time in minutes | ∅ | ||
| Pieces | g | level 4/3 1 | Temp.(°C) | 1st side | 2nd side | |
| Rolled joints (turkey) | 1 | 1000 | 3 | 200 | 30~40 | 20~30 |
| Chicken (cut in two) | 2 | 1000 | 3 | 200 | 25~30 | 20~30 |
| Chicken drumsticks | 6 | - | 3 | 200 | 15~20 | 15~18 |
| Quail | 4 | 500 | 3 | 200 | 25~30 | 20~25 |
| Vegetable gratin | - | - | 3 | 200 | 20~25 | - |
| pieces. Scallops | - | - | 3 | 200 | 15~20 | - |
| Mackerel | 2-4 | - | 3 | 200 | 15~20 | 10~15 |
| Fish slices | 4-6 | 800 | 3 | 200 | 12~15 | 8~10 |
Grill and rotisserie

Timings do not include pre-heating.
The empty oven should always be pre-heated for 10 minutes.
| TYPE OF DISH | Quantity (g.) | Level 4 3 2 1 | Temp. °C | Cooking time in minutes |
| Poultry | 1000 | 2 | 250 | 50/60 |
| Roast | 800 | 2 | 250 | 50/60 |

The temperatures quoted are guidelines. If necessary, the temperatures should be adjusted to personal requirements.

Before any cleaning, switch the oven off and let it cool down.

The appliance must not be cleaned with a superheated steam cleaner or a steam jet cleaner.
Important: Before carrying out any cleaning operation, the device must be disconnected from the power supply.
To ensure a long life for your appliance, it is necessary to perform the following cleaning operations regularly:
- Only perform when the oven has cooled down.
- Clean the enamelled parts with soapy water.
- Do not use abrasive cleaners.
- Dry the stainless steel parts and glass with a soft cloth.
- If there are stubborn stains, use commercially available cleaners for stainless steel or warm vinegar.
The oven's enamel is extremely durable and highly impermeable. The action of hot fruit acids (from lemons, plums or similar) can, however, leave permanent, dull, rough marks on the surface of the enamel. However such marks in the brightly polished surface of the enamel do not affect the operation of the oven. Clean the oven thoroughly after every use. This is the easiest way to clean dirt off. It prevents dirt being burnt on.
Cleaning materials
Before using any cleaning materials on your oven, check that they are suitable and that their use is recommended by the manufacturer
Cleaners that contain bleach should NEVER be used as they may dull the surface finishes. Harsh abrasives should also be avoided.
External cleaning
Regularly wipe over the control panel, oven door and door seal using a soft cloth well wrung out in warm water to which a little liquid detergent has been added.
To prevent damaging or weakening the door glass panels avoid the use of the following:
Household detergents and bleaches
- Impregnated cleaning pads that are unsuitable for non-stick saucepans
Brillo/Ajax pads or steel wool pads
Chemical oven pads or aerosols
Rustremovers
- Bath/Sink stain removers
Clean the outer and inner door glass using warm soapy water. Should the inner door glass become heavily soiled it is recommended that a cleaning product such as "Hob Brite" is used Do not use paint scrapers to remove soilage.
Pyrolytic cleaning
The oven cavity is coated with a special enamel resistant to high temperatures.
During the pyrolytic cleaning operation, the temperature inside the oven can reach about 500^ thus burning food residues.
For your security, during the pyrolytic cleaning operation, the oven door automatically locks when the temperature inside the oven approaches about 500^ . 300^ has been reached.
Upon completion of the cleaning operation, the oven door will be locked until the oven cavity has cooled down.
The cooling fan operates during cooking until the oven has cooled down. After cooking, it is advisable to remove all the food residues with a wet sponge.
However, from time to time, it will be necessary to do a more complete and thorough cleaning, using the pyrolytic cleaning function. You can select two different levels of pyrolytic cleaning depending on how dirty the oven is.
If the oven cavity is not very dirty, we recommend that you select the pyrolytic 1 function (P I) in the programmer display.
It is advisable to wipe the oven over with a soft sponge soaked in warm water after each pyrolytic cleaning cycle is carried out.
If the oven cavity is very dirty, we advise you to select the pyrolytic 2 function (P 2) in the programmer display.
During the pyrolytic cleaning function, it is not possible to use the oven for 2 hours when selecting the Pyr 1 function and up to 2 1/2 hours when the Pyr 2 function is active.

The Pyro reminder recommends that a pyrolytic cleaning function should be carried out after several baking and roasting processes and depending on dirty the oven is. An acoustic signal will be heard and the indication Pyro is displayed for approx. 15 seconds and then a second acoustic signal can be heard. Depending on how dirty the oven is, select the most suitable pyrolytic cleaning function.
For as long as no complete cleaning function is carried out, Pyro reminders are displayed each time the oven is switched off.
How to use the pyrolytic cleaning function

Before activating the pyrolytic cleaning function, remove any excessive spillage and make sure that the oven is empty. Do not leave anything inside it (e.g. pans, grids, baking tray, drip pan, etc.) as they could become severely damaged.

Ensure that the oven door is closed before activating the pyrolytic cleaning function.

When the pyrolytic cleaning function is on, it is advisable not to use the hob as this could cause overheating and damage the appliance.

During the pyrolytic cleaning cycle the oven door becomes very hot. Children should be kept away until it has cooled.
Choose this function to clean the oven by pyrolysis.
The following pyro levels are available:
Pyrolytic 1 (P I), Time: 2 hours. = 30 mins Heating-up +1 hour. at 480^ + 30 mins Cooling down time.
Pyrolytic 2 (P 2), Time: 2 hours. 30 mins. = 30 mins Heating-up +1 hour. 30 mins. at 480^ + 30 mins Cooling down time.
The pyro duration time cannot be changed.

Before performing the pyrolysis, all side rails must have been removed.
Removal
Take hold of the side rails on one side of the oven and undo the knurled nut at the front. Lift the side rails at the back in order to unhook them.
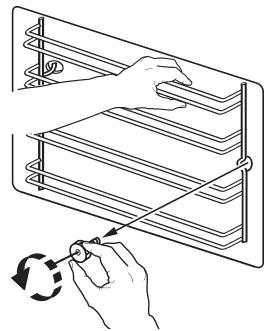
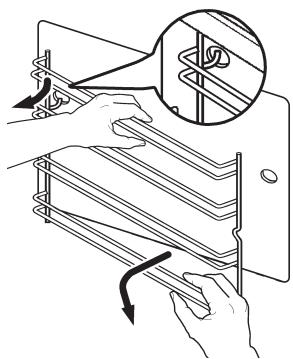
Do the same thing on the other side of the oven.
Cleaning
Clean the two sets of side rails on the outside only with commercially available detergents.
The side rails must not be cleaned in the dishwasher.
Once the cleaning is carried out; refit the shelf supports following the procedure in reverse.

Please ensure that the retaining nuts are secure when refitting the shelf support.
To activate the pyrolytic cleaning function proceed as follows:
- Using the button switch on the oven.
Press the button as often as necessary, until the Pyro function symbol (level 1 - P I) appears in the display (Fig.) 18.
and the symbol |---| and the indicator Pyro flashes in the display at the same time and an acoustic signal is emitted (Fig. 19).
This means that, before activating the pyrolytic cleaning function, you have to remove all the oven accessories and the side rails from the oven cavity.
- The "Cooking time" symbol || will flash for 5 seconds; during this time, press the button or + to select the pyrolytic 1 (P I) or pyrolytic 2 (P 2) function (Fig. 20).
- Once you have chosen the desired pyrolytic function, Pyro will flash in the display waiting for confirmation to start the pyrolytic cleaning function.
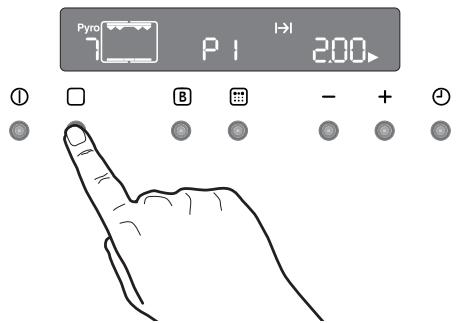
Fig. 18
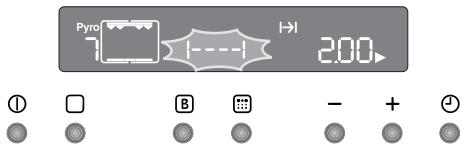
Fig. 19
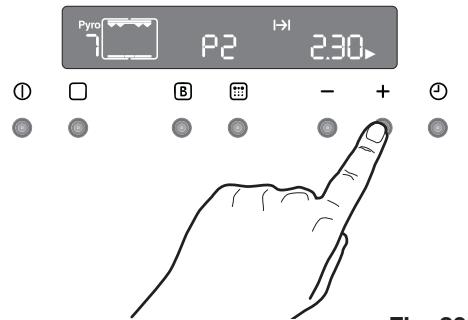
Fig. 20
- To confirm the desired pyrolytic cleaning function, press the button . The display Pyro stops flashing and the symbol - - - - will disappear, the acoustic signal will stop, the oven lamp will switch off and the pyrolytic cleaning cycle starts (Fig. 21).
As soon as the temperature in the oven increases, the thermometer symbol increases slowly, indicating that the temperature inside the oven is increasing. - After some time the door lock will be activated and the respective symbol will be displayed (Fig. 22). Now the button is no longer active.
After ending the pyrolytic cleaning process, the display shows the time of day. The oven door is still locked.
Once the oven has cooled down, an acoustic signal will be emitted, the symbol will disappear and the door will unlock.
To stop the pyrolytic cleaning cycle at any time; press the button ①.

NOTE: The time indication includes the cooling down time. If you select a cooking function while the pyrolytic function is active, the cleaning cycle will be interrupted.

If the oven door lock is activated, it is impossible to select any cooking function until the door lock is off.

Wait until the door lock is off to use the oven.
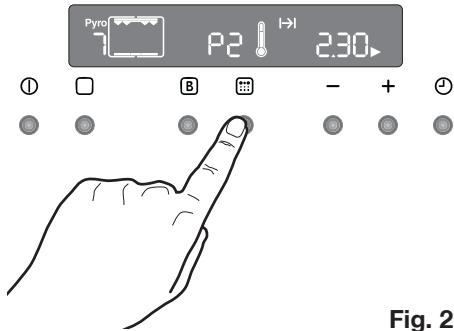
Fig. 21
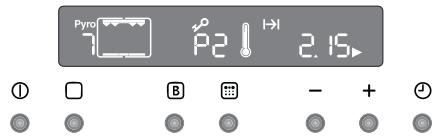
Fig. 22
To programme the pyrolytic cleaning cycle (delayed start, automatic stop)
If you desire, you can programme the starting and ending time of the pyrolytic cleaning cycle.
- Use the button ① to switch on the oven.
Press the button as often as necessary, until the Pyro function symbol (level 1 - P I) appears in the display.
Simultaneously the "Pyro indicator and the symbol |---| will flash in the display and an acoustic signal will be emitted. This means that, before activating the pyrolytic cleaning function, you have to remove all the oven accessories and the side rails from the oven cavity (see the previous chapter).
- The Cooking Time symbol | | will flash for some seconds; during this time push the button ‘-’ or ‘+’ to select the pyrolytic 1 (P I) or pyrolytic 2 (P 2) function.
- Once you have chosen the desired pyrolytic function, Pyro will flash in the display waiting for confirmation to start the pyrolytic cleaning function.
At this time, push the time function button
(1) (Fig. 23). "The End of Cooking" symbol → and the arrow symbol ▷ flash. On the control panel, the cleaning cycle (that is, the actual time + cooking time) will displayed.
Press the or ^+ buttons to select the required end of cycle time (Fig. 23). After a few seconds, the word Pyro and the symbol I- will stop flashing, the acoustic signal will stop while the Cooking time symbol will flash until the pyrolytic cleaning cycle starts.
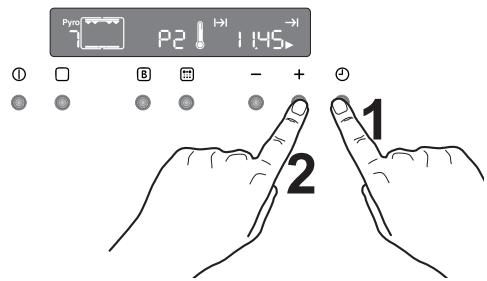
Fig. 23
- After some time the door lock will be
Activated and the respective symbol will be displayed.
At the end of the pyrolytic cleaning process, the display shows the time of day. The oven door is locked.
Once the oven has cooled down, an acoustic signal will be emitted and the door will unlock.
To stop the pyrolitic cleaning cycle at any time: press the button ①.
The oven door
The oven door consists of three panes of glass. The oven door can be disassembled and the internal panes can be removed to make cleaning easier.

Important - Remove the oven door before cleaning it. The oven door could abruptly close if you try to remove the internal panes of glass when the door is still assembled.

To do so, proceed as follows.
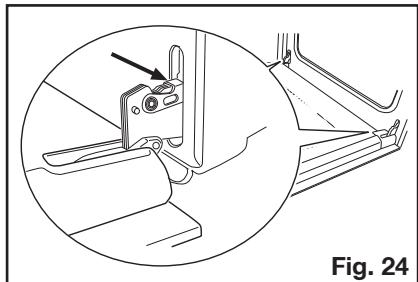
- open the door fully.
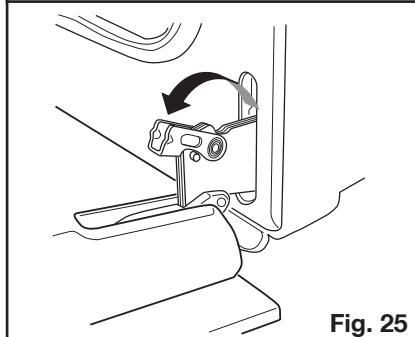
- Locate the two door hinges (Fig. 24).
- Lift and turn the levers on the two hinges (Fig. 25).
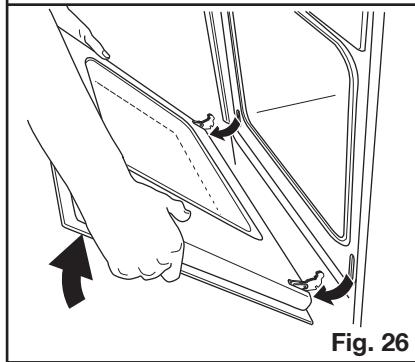
- Hold the door by the side edges and close it slowly but not COMPLETELY (Fig. 26).
- Pull the door forward, removing it from its seat (Fig. 26).
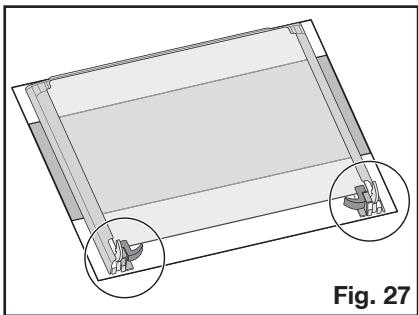
- Place the door on a stable surface protected by a soft cloth to prevent the handle surface from being damaged (Fig. 27).
- Release the locking system to remove the internal panes of glass (Fig. 28).
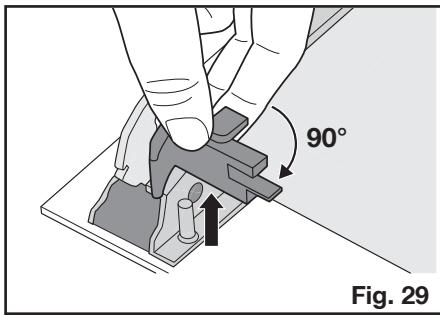
- Turn the 2 fasteners 90^ and extract them from their seats (Fig. 29).
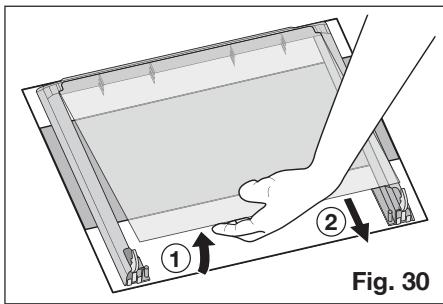
- Gently lift and carefully take off the uppermost pane (Fig. 30).
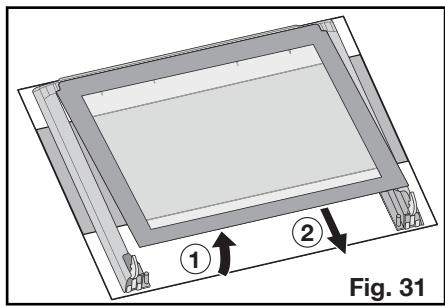
- Repeat the procedure described in point 9. for the middle pane marked by a decorative frame on 4 sides (Fig. 31).


Clean the oven door with lukewarm water and a soft cloth. Do not use products such as scouring pads, steel wool, abrasive sponges or acids because they could damage the special heat-reflecting surface of the internal panes of glass.
After cleaning, reassemble the panes in the door and then the oven door, following the procedure described above in reverse. Make sure you reposition the panes correctly.

To perform this operation correctly, proceed as follows:
a) the decorated middle pane with a frame on the 4 sides must be reassembled so that the screen-printing is facing outwards. The side of the pane of glass is correct if you do not feel any roughness near the screen printing when you pass your fingers over the surface.
The middle pane of glass must be put back into the right seats as shown in Fig. 32.
b) the uppermost panemustbereassembled as shown in Fig.33.
After the panes of glass have been reassembled in the oven door, perform the procedure described in point 8. in reverse to ensure they are locked.

Never clean the oven door when it is warm as the panels might shatter. If you can see scratches or cracks in the glass panel, call your nearest service centre immediately to have the panel replaced.
Models in stainless steel or aluminium:
Clean the oven door and operating panel in stainless steel or aluminium with a damp sponge and then dry carefully with a soft cloth. Never use metal pads, metal wool, acids or abrasives for cleaning because they may scratch the surfaces.
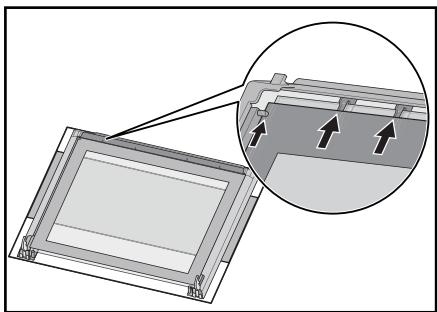
Fig. 32
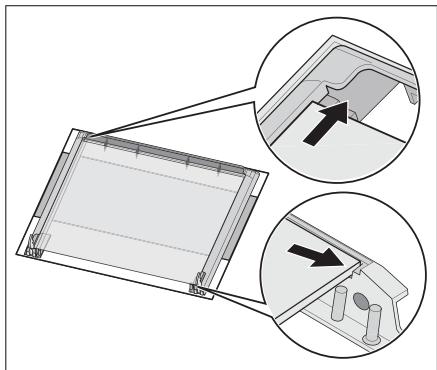
Fig. 33
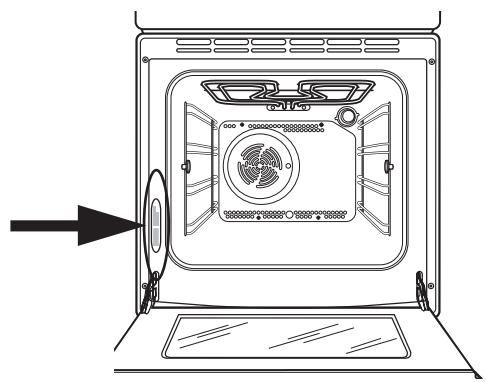
Cleaning the oven door seals
A seal is fitted around the opening of the oven.

Check the condition of the seal on a regular basis.
If you notice damage to the seal, please contact the nearest service centre immediately. Do not use the oven until the seal has been replaced.
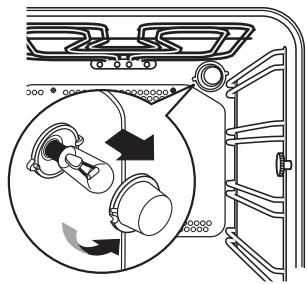
Replacing the oven light

Separate the appliance from the power supply by switching off the fuse.
If the oven bulb needs replacing, the new bulb must have the following specifications:
- Electric power: 40 W
- Electrical rating: 230 V( 50 Hz)
- Heat resistance up to 300^
- Connection type: E14
These replacement bulbs can be purchased from your dealer.

To change the oven light:
- Before proceeding ensure the oven is cool and is disconnected from the electricity supply.
- Push in and turn the glass cover anticlockwise
- Remove the faulty bulb and replace with the new one.
- Refit the glass cover and restore the electrical supply.
If the appliance is not working correctly, please check the following before contacting the Electrolux Service Centre.
| PROBLEM | SOLUTION |
| ■ The oven does not switch on. | ◆ Press the button ① and then select a cooking function. or ◆ Has the fuse in the domestic electrical installation been tripped? or ◆ Is the child lock for the oven or the automatic deactivation active? or ◆ Was the Demo mode accidentally activated? or ◆ Check whether the appliance is correctly connected and the socket switch or the mains supply to the oven is ON. |
| ■ The internal oven light does not come on. | ◆ Press the button ① and then select a cooking function. or ◆ check the bulb and replace if necessary (see "Replacing the oven light"). |
| ■ It takes too long to cook the dishes or they cook too quickly. | ◆ Adjust the temperature if necessary, or ◆ follow the advice contained in these instructions, especially the section "Using the oven". |
| ■ Steam and condensation settle on the food and in the oven cavity. | ◆ Leave dishes inside the oven no longer than 15 - 20 minutes after the cooking is completed. |
| ■ Oven fan is noisy. | ◆ Check that shelves and bakeware are not vibrating in contact with the oven back panel. |
| ■ The error code „F“ followed by digits appears on the control panel. | ◆ Please take note of the error code and pass to our nearest Customer Service office. |
| ■ The display shows „12.00“. | ◆ Set the time of day (see chapter "Setting the clock"). |
Heating element ratings
Bottom oven element 1000 W
Top and bottom heating element 1800 W
Hot air 1825W
Grill 1650W
Thermal grill 1675 W
Pyrolytic cleaning 2475 W
Oven light 40W
Total connection rating 2740 W
Operating voltage (50 Hz) 230 V
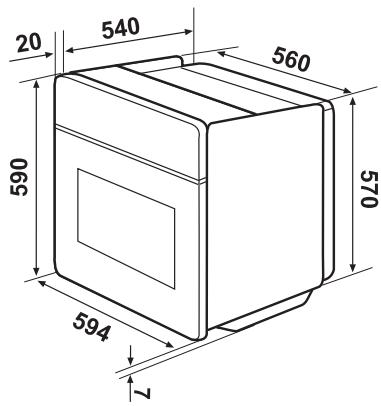
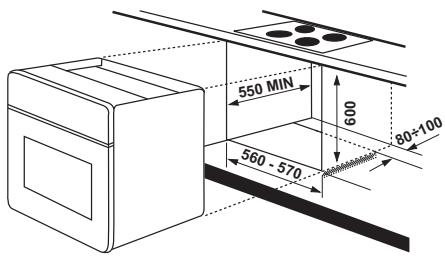
Dimensions of the recess
Height Under the upper edge 600 mm in column 587 mm
Width 560 mm
Depth 550 mm
Oven levels
Height 335 mm
Width 395 mm
Depth 400 mm
Oven capacity 531

Installation and connection must be done in compliance with the regulations in force. Any interventions must be carried out when the appliance is switched off. Only qualified service engineers may repair the appliance
The manufacturing company disclaims any liability if the safety measures are not observed.
Connecting to the electrical supply
Before connecting to the electrical supply, please make sure:
- The fuse and the domestic electrical installation must be designed for the max. load of the appliance (see rating plate).
- The domestic electrical installation must be equipped with a proper earth connection in accordance with the regulations in force.
- The socket or the multi-pole off switch must be easy to access after the appliance has been installed.
This appliance is supplied with a connection cable incorporating a standard plug, suitable for the total electric load shown on the rating plate. The plug is to be inserted into a suitable wall socket.
The following types of mains cable are suitable, taking the necessary rated cross section into account:
H07RN-F, H05RN-F, H05RR-F, H05VV-F, H05V2V2-F (T90), H05BB-F.
If the appliance is connected without a plug, or if the plug is not accessible, a multipole off switch (e.g. fuses, circuit breaker) with a minimum gap of 3mm between the contacts must be installed between the appliance and mains cable. The switch must not interrupt the earth wire at any point. The yellow-green earth wire should be 2-3 cm longer than all other cables.
The connection cable must always be laid out so that at no point does it reach 50^ (over room temperature).
After the connection has been carried out, the heating elements must be tested by being operated for about 3 minutes.
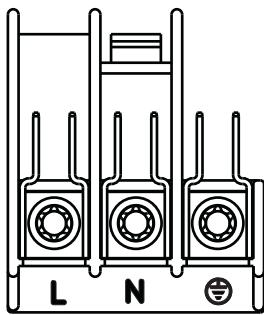
Terminal block
The oven is fitted with an easily accessible terminal block which is designed to operate with a single-phase power supply of 230V .
For ensuring a trouble free use of the installed appliance, the unit or the column where the appliance is to be installed should have appropriate dimensions.
In accordance with the regulations in force, all parts which ensure the shock protection of live and insulated parts must be fastened in such a way that they cannot be undone without tools.
These also include the fixing of any end walls at the beginning or end of a line of built-in units.
The shock protection must in any case be ensured by the building in of the appliance.
The appliance can be placed with its back or a side wall against higher kitchen units, appliances or walls. However, only other appliances or units of the same height as the appliance can be placed against the other side wall.
Oven dimensions (see figure)
Instructions for building in
For ensuring a trouble free use of the installed appliance, the unit or the column where the appliance is to be installed should have appropriate dimensions.
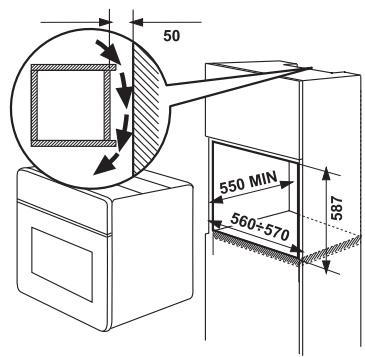
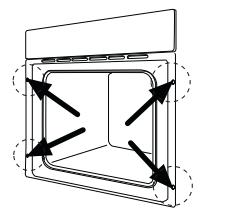
Securing the oven to the cabinet
- Open the oven door.
- Fix the oven into the unit using the four distance brackets (see figure - A).
These fit exactly into the holes in the frame. Then tighten the four wood screws supplied (see figure B).

Customer service
If the problem persists after the checks described, contact your nearest service centre and describe the fault, appliance model (Mod.), product number (Prod. No.) and series number (Ser. No.) which you will find on the oven rating plate.
- How to read the instruction book
- Installation
- Operation
- Personal safety
- Disposal
- Packaging material
- Old appliance
- Customer service
- Accessories
- Push buttons
- Note
- Remove all packaging, both inside and outside the oven, before using the oven.
- Setting the clock:
- Before first use
- "On/Off" - button
- How to select a cooking function
- To set the temperature and cooking time
- Safety thermostat
- Cooling fan
- Highest temperature: 200°C
- To reduce condensation, always preheat the empty oven for 10 minutes.
- Always cook with the oven door closed.
- Hot air
- The advantages of cooking with this function are:
- - Faster preheating
- - Lower temperatures
- Even heating for baking
- Top and bottom heating element
- Bottom oven element
- Grilling
- How to use the grill
- Thermal grill
- Grill and rotisserie
- Defrosting
- Hints and tips
- On baking:
- When roasting:
- Cooking times
- To set the minute minder
- To use or to change the minute minder setting:
- To cancel the minute minder:
- To programme the oven to switch off
- To cancel the programmed cooking time:
- To programme the oven to switch on and off
- To cancel the programme, simply cancel the Cooking Time.
- Oven safety switch-off
- Residual heating function
- Child lock for the oven
- To unlock the oven:
- Fast heat-up function
- Demo mode
- Beep on touch
- To disable the beep on touch:
- Error codes
- Top and bottom heating element and hot air
- Timings do not include pre-heating.
- Cleaning materials
- External cleaning
- Pyrolytic cleaning
- How to use the pyrolytic cleaning function
- Removal
- Cleaning
- Please ensure that the retaining nuts are secure when refitting the shelf support.
- To programme the pyrolytic cleaning cycle (delayed start, automatic stop)
- The oven door
- Models in stainless steel or aluminium:
- Cleaning the oven door seals
- Replacing the oven light
- Heating element ratings
- Dimensions of the recess
- Oven levels
- Connecting to the electrical supply
- Terminal block
- Oven dimensions (see figure)
- Instructions for building in
- Securing the oven to the cabinet
Brand : PROGRESS
Model : PBP5360X
Category : Built-in oven