
BFP703CE - Blender CUISINART - Free user manual and instructions
Find the device manual for free BFP703CE CUISINART in PDF.
| Product type | Blender with food processor function |
| Brand | Cuisinart |
| Model | BFP703CE |
| Blender bowl capacity | 1250 ml (graduated glass) |
| Food processor bowl capacity | Not specified, max 250 g of food to chop |
| Blade material | Stainless steel |
| Blender bowl material | Thick glass |
| Number of speeds | 6 speeds + 1 sequential speed (SEQ) + ice crush function |
| Main functions | Mix, chop, puree, blend, beat, liquefy, slice, grate, crush ice |
| Included accessories | Blender bowl, food processor bowl, chopping blade, reversible slicing/grating disc, pusher, disc rod, 60 ml graduated measuring cup |
| Power | Approximately 600 W (estimated) |
| Power supply | 220-240 V, 50/60 Hz |
| Dimensions (L x W x H) | Approximately 20 x 20 x 40 cm (estimated) |
| Weight | Approximately 3 kg (estimated) |
| Non-slip feet | Yes |
| Cleaning | Blender bowl and accessories (except food processor base) are dishwasher safe; motor unit cleaned with a damp cloth |
| Safety | Lid lock, automatic shut-off if overloaded, do not immerse motor unit, very sharp blades |
| Repairability | Do not open the base; return to manufacturer for repair |
| Warranty | Not specified (consult manufacturer) |
Frequently Asked Questions - BFP703CE CUISINART
User questions about BFP703CE CUISINART
0 question about this device. Answer the ones you know or ask your own.
Ask a new question about this device
Download the instructions for your Blender in PDF format for free! Find your manual BFP703CE - CUISINART and take your electronic device back in hand. On this page are published all the documents necessary for the use of your device. BFP703CE by CUISINART.
USER MANUAL BFP703CE CUISINART
- Product description and features 13
- Assembly of the blender 14
- Using the blender 14
- Cleaning & maintenance 15
- Important helpful hints 15
Reference guide to the blender features 15
Speed selection guide 15
B. The Food Processor 16
- Product description and features 16
- Assembly of the food processor 16
A. With the chopping blade 16
B. With the reversible slicing/grating disc 16
- Using the food processor 17
- Cleaning and storage 17
Preparing food to chop 18
Preparing food to slice and grate 18
Safety Instructions 19
INHALTSVERZEICHNIS
Einleitung 20
A.DerBlender 20
ATTENTION, LA LAME HACHOIR EST EXTREMEMENT TRANCHANTE
The Cuisinart blender/food processor is an improved all-round tool which you can use for performing innumerable culinary preparations in no time at all.
Thanks to its blending feature it is possible to purée, blend or mix all sorts of foodstuffs. You can also use it to crush ice or prepare milk-shakes with.
By attaching the food-processor bowl to the base, your product can chop raw uncooked or cooked foodstuffs to a very fine consistency. The reversible disc allows you to grate or thinly slice foodstuffs in a matter of seconds.
Being easy to clean, your product guarantees you years of highly successful culinary preparations.
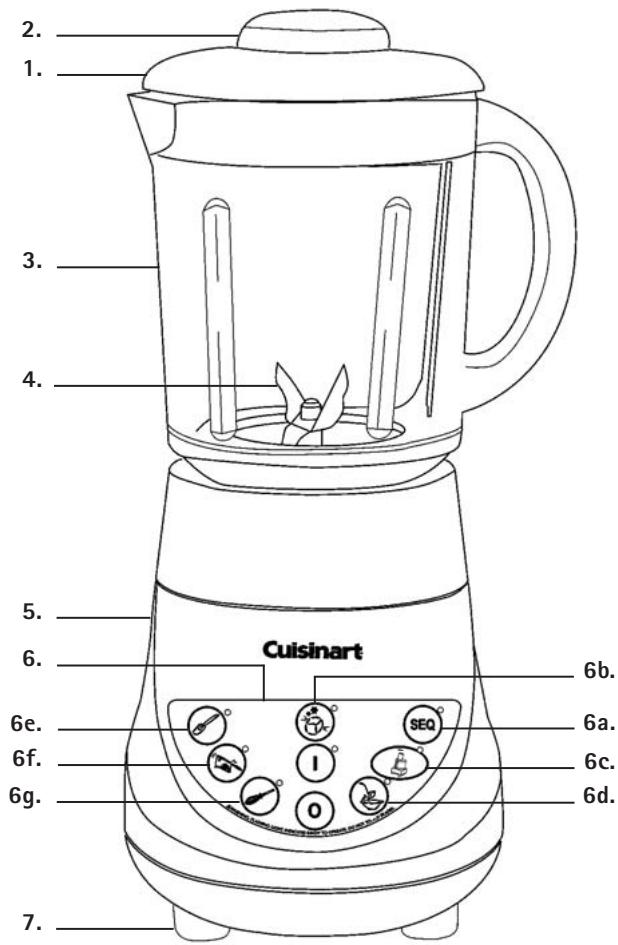
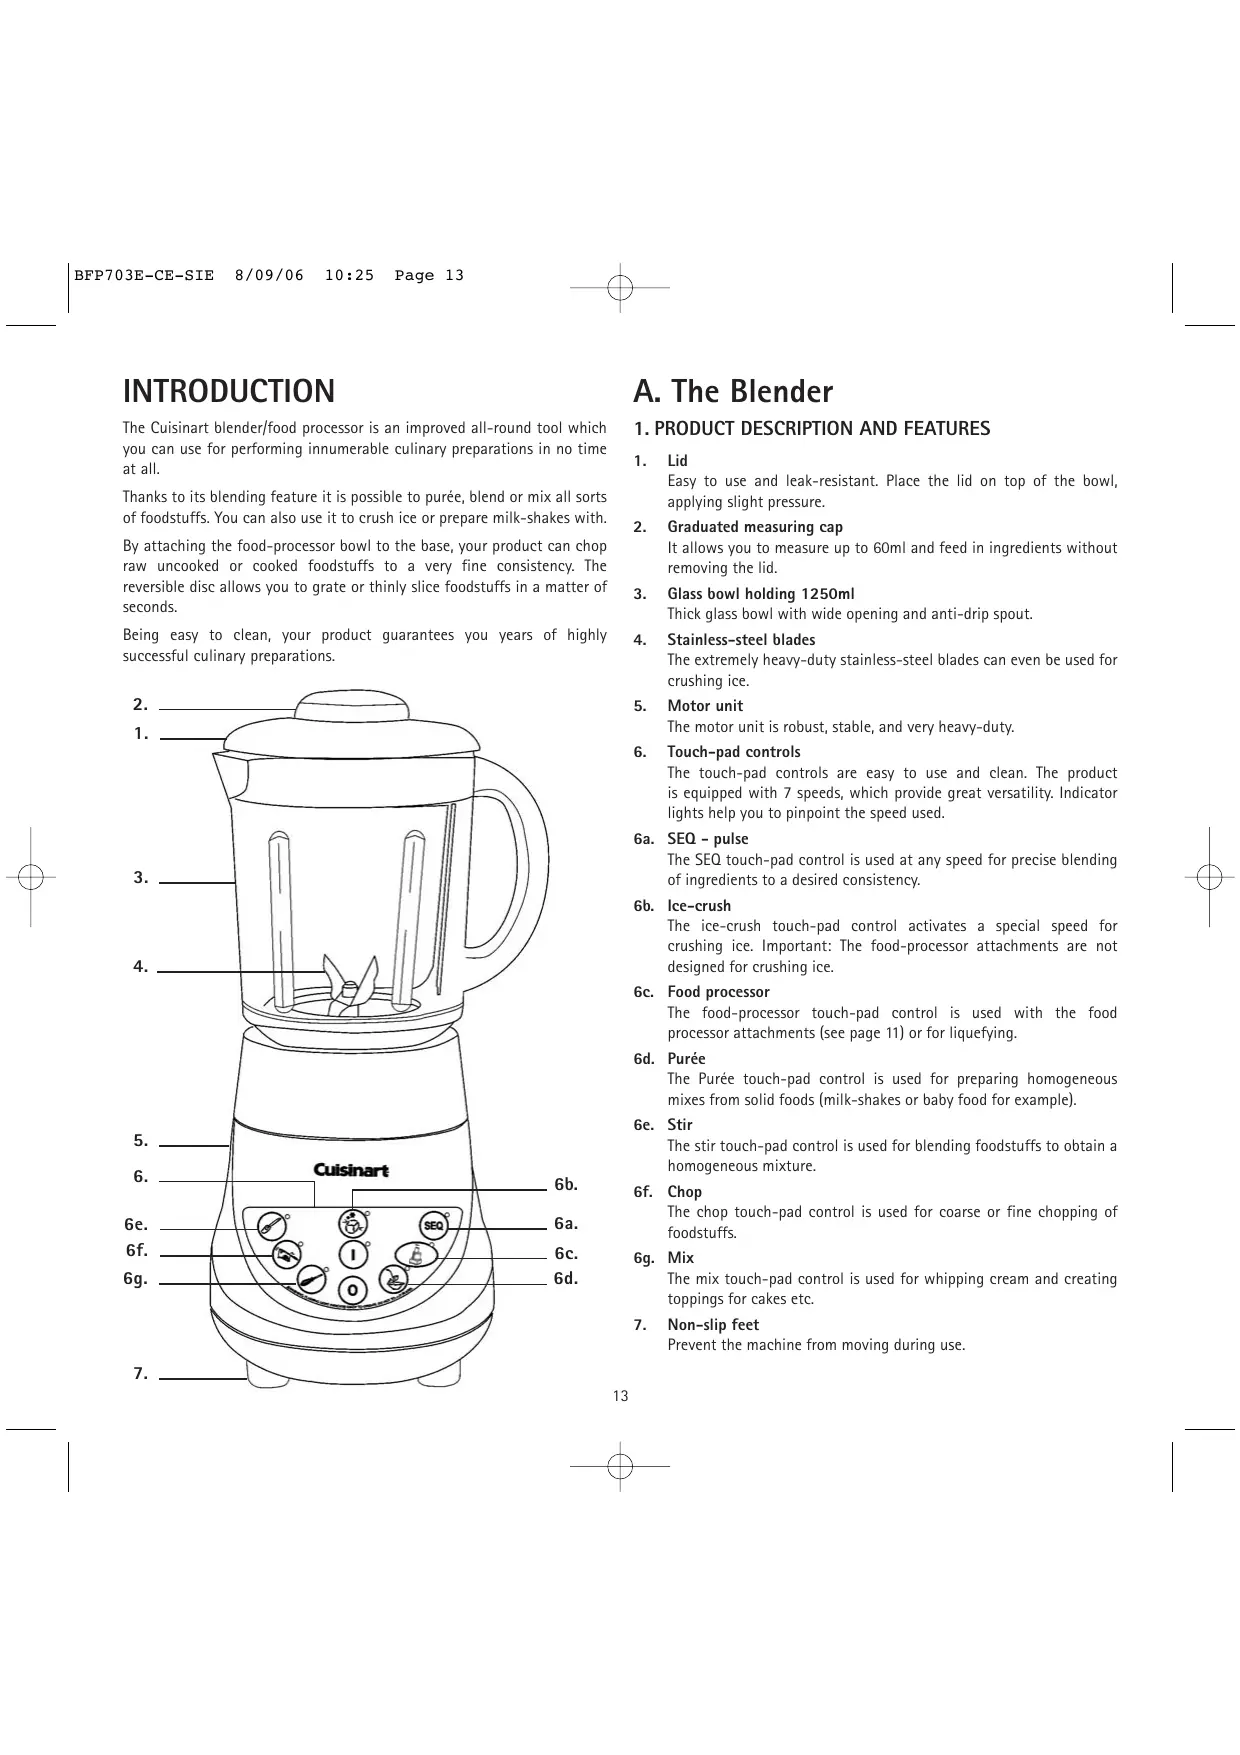
A. The Blender
1.PRODUCT DESCRIPTION AND FEATURES
- Lid
Easy to use and leak-resistant. Place the lid on top of the bowl, applying slight pressure.
- Graduated measuring cap
It allows you to measure up to 60ml and feed in ingredients without removing the lid.
- Glass bowl holding 1250ml
Thick glass bowl with wide opening and anti-drip spout.
- Stainless-steel blades
The extremely heavy-duty stainless-steel blades can even be used for crushing ice.
- Motor unit
The motor unit is robust, stable, and very heavy-duty.
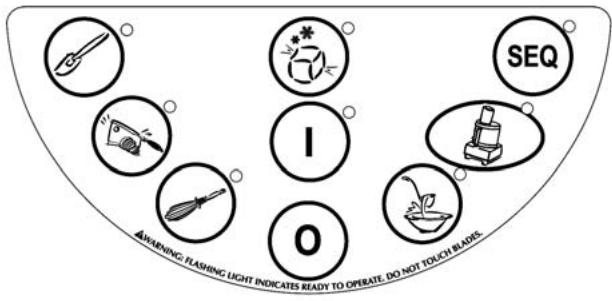
- Touch-pad controls
The touch-pad controls are easy to use and clean. The product is equipped with 7 speeds, which provide great versatility. Indicator lights help you to pinpoint the speed used.
6a. SEQ - pulse
The SEQ touch-pad control is used at any speed for precise blending of ingredients to a desired consistency.
6b. Ice-crush
The ice-crush touch-pad control activates a special speed for crushing ice. Important: The food-processor attachments are not designed for crushing ice.
6c. Food processor
The food-processor touch-pad control is used with the food processor attachments (see page 11) or for liquefying.
6d. Puree
The Puree touch-pad control is used for preparing homogeneous mixes from solid foods (milk-shakes or baby food for example).
6e. Stir
The stir touch-pad control is used for blending foodstuffs to obtain a homogeneous mixture.
6f. Chop
The chop touch-pad control is used for coarse or fine chopping of foodstuffs.
6g. Mix
The mix touch-pad control is used for whipping cream and creating toppings for cakes etc.
- Non-slip feet
Prevent the machine from moving during use.
2. HOW TO ASSEMBLE THE BLENDER
To use the blender, simply place the bowl on the motor unit in such a way that the indicators marked on the bowl are facing you, with the handle at the side. Now place the lid on the bowl and fit the measuring cap into the lid. Plug the product in and switch on. It is now ready for use.
3. USING THE BLENDER
- Add the ingredients and place the lid on the bowl. It is also possible to place the lid on first, then add the ingredients through the measuring cap. Put the measuring cap back in place after all ingredients have been added. Additional ingredients can also be added through the measuring cap during the blending cycle.
Note: First add the liquid ingredients, then the solid ingredients. In this way you will obtain a more homogeneous mixture and prevent unnecessary stress on the motor.
- STARTING THE BLENDING CYCLE: press the I touch-pad control. The red light flashes to indicate that the blender is switched on.
- SELECTING A BLENDING SPEED: press the speed touch-pad control you have selected. The blender starts to operate. To change the speed, simply press another touch-pad control. It is not necessary to switch the appliance off.
- MIXING TIME: take care not to overprocess the food. The results are achieved in seconds, not minutes.
-
STOPPING THE BLENDING CYCLE: Press the touch-pad control already selected. The machine stops. The control light flashes, indicating that it is still switched on. To disconnect, press 0.
-
SEQ MODE: start SEQ-mode blending by pressing the I touch-pad control, then the SEQ touch-pad control. The SEQ control light flashes. Then press the touch-pad control of the speed desired and release it. Repeat as many times as you wish. Each time you press the SEQ touch-pad control, all control lights (position I, SEQ and selected speed) light up.
The SEQ mode is used to process greater amounts of food or to monitor the texture of foodstuffs when you chop them. The SEQ feature is also effective at the start of blending, or when you feed in foodstuffs which only require low-key blending.
- TO CRUSH ICE: Use the blender bowl only. To help you monitor the process better, the "ice crush" feature functions like the SEQ mode. Place the ice cubes in the blender bowl, insert the lid and press the I touch-pad control. Then press the "ice crush" touch-pad control in short sharp bursts until the ice has reached the desired consistency.
8 DETACHING WEDGED FOOD: use a spatula to remove the food wedged around the chopping unit. ENSURE THE MACHINE IS SWITCHED OFF AND UNPLUGGED BEFORE USING THE SPATULA. Afterwards, insert the lid and continue the blending operation if necessary. Never turn on the blender when the spatula is in the bowl. - AFTER BLENDING: Press the 0 touch-pad control to switch off, and unplug the machine. Then remove the bowl from the motor unit by lifting it off.
IMPORTANT
- Never place the blender bowl on the base, nor remove it while the machine is running.
- Never pour boiling liquid food into the bowl or introduce frozen solid food (with the exception of ice cubes or pieces of frozen fruit). Allow ingredients to cool for at least 5 minutes before placing them in the blender bowl.
- If you are blending hot liquids, remove the measuring cap (central piece of the lid) to allow the steam to escape.
4. CLEANING AND MAINTENANCE
Always switch off and unplug the appliance before cleaning it. Clean the blender bowl before using it for the first time, and immediately after each use.
To clean it, remove the bowl from the motor unit by lifting it off. Wash the bowl in warm soapy water, then rinse and dry it thoroughly. The bowl can also be washed in a dishwasher.
Do not attempt to dismantle the blender bowl. Clean it extremely cautiously to avoid any risk of injury.
To clean the motor unit, use a damp cloth to remove the residue, then wipe clean. Never immerse the motor unit into water or in any other liquid, and never put it in a dishwasher.
5. IMPORTANT HELPFUL HINTS ON USING THE BLENDER
Always place the motor unit on a clean, dry and steady surface.
- Always add the liquid ingredients first before adding the other ingredients. Using this method, the ingredients will always be uniformly blended.
- Cut the majority of foodstuffs into 1 to 5-cm cubes to obtain a more uniform result. Chop all cheeses into approximately 1-cm pieces.
- Use the measuring cap to measure liquid ingredients such as alcohol. Re-insert the measuring cap once the ingredients have been added.
- Use a spatula if necessary, but only when the blender has been switched off. Never use metal utensils, since these could damage the bowl or the blades.
- If you scrape the blender bowl with a spatula, remove the food stuck to the internal sides of the bowl and place it above the blades.
- If you are chopping fresh herbs, garlic, onion, zests, nuts and spices etc., ensure that the blender bowl and blades are completely dry.
- If the food tends to stick to the internal sides of the bowl during use, operate the machine in short sharp bursts.
Stagger the pulses so that the blades stop turning in between these consecutive pulses.
- Do not store foodstuffs or liquids in the bowl.
- This machine is not intended for mashing potatoes, kneading dough or stiffly beating egg whites.
- Do not over-process the foodstuffs. The results expected are achieved in a few seconds, not minutes.
- Do not overload the blender. If the motor stalls, switch off the machine and unplug it. Remove some of the food, then switch on again.
| REFERENCE GUIDE TO THE BLENDER FEATURES | |
| To activate the blender | Press the 1 touch-pad control - The blender is switched on. |
| To start blending | Press the selected speed touch-pad control. |
| To change the speed | Press the selected speed touch-pad control. |
| To boost | In mode 1, press SEQ, then press and release the speed touch-pad control as many times as necessary. |
| To crush ice | In mode 1, press and release the ICE CRUSH touch-pad control as many times as necessary. |
| To switch off the blender | Press the 0 touch-pad control. |
| To stop the blender (in the stirring, chopping, blending or purée modes) | Press the Speed touch-pad control again. The blender will switch back to Position 1 mode. Press touch-pad control 0 to stop the blender. |
| SPEED SELECTION GUIDE FOR BLENDER FEATURES | |||
| INGREDIENT/RECIPCE | SPEED | SYMBOL | RESULT |
| Mayonnaise | Stir | Thick and creamy | |
| Salad sauces | Stir | Desired consistence | |
| Restoring frozen concentrated orange juice | Stir | Homogeneous | |
| Nuts | Chop | Fine to coarse | |
| Whipped cream | Mix | Thick topping | |
| Lemon zests | Purée | Evenly fine | |
| Milk-Shakes | Purée | Homogeneous and creamy | |
| Baby foods | Purée | Homogeneous and creamy | |
| Natural drinks | Liquefy | Homogeneous and creamy | |
| Ice-cold cocktails | Liquefy | Thick liquid | |
| Mashed soft cheese | Liquefy | Fine to coarse | |
| Spices | Liquefy | Fine to coarse | |
| Ice | Ice crush | Snow-like | |
B. The Food Processor
1.PRODUCT DESCRIPTION AND FEATURES
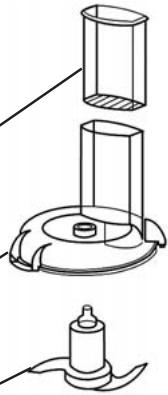
- Food pusher
- Bowl lid with feedtube
- Stainless-steel blade. Chops both raw uncooked foodstuffs as well as cooked food. Capable of producing any desired consistence, from coarse chopped vegetable or minced meat to a fine purée.
- The reversible stainless-steel grater/slicer disc enables you to produce perfect slices or grate a great variety of fruits, vegetables, meats and cheeses.
- Spindle for holding disc
- Preparation bowl
- Food-processor base
- Motor unit
Food pusher (1)
Bowl lid with feed tube (2)
Stainless steel chopping blade (3)
Reversible grater/slicer disc (4)
Spindle for holding disc (5)
Preparation bowl (6)
Food processor base (7)
Motor unit (8)


2. HOW TO ASSEMBLE THE FOOD PROCESSOR
A. WITH CHOPPING BLADE
- Hold the food-processor base with one hand and the bowl handle with the other. Screw the bowl onto the base by rotating it in a clockwise direction.
- Place the bowl and base onto the motor unit.
Note: The bowl and food-processor base fit onto the motor unit in 8 different positions. The handle can face forwards or sideways, and the feedtube can face forwards, backwards or sideways.
- Fit the chopping blade onto the central stem in the bowl. The blade should easily sink to the bottom of the bowl and almost touch the bottom of the bowl.
CAUTION! THE CHOPPING BLADE IS EXTREMELY SHARP
- Place the food in the bowl. Fit the lid on top by rotating it in a clockwise direction until it locks into position. There should be an audible click when it locks into position. If you have difficulty fitting the lid onto the bowl, give the hub of the blade a slight turn and re-insert the lid.
- The food pusher fits into the feedtube, with the rounddest side pointing towards the outside of the bowl. ALWAYS USE THE PUSHER TO GUIDE THE FOOD THROUGH THE FEEDTUBE. NEVER push with YOUR FINGERS OR A SPATULA.
- Plug in and switch on by pressing touch-pad control 1, then press the food-processor touch-pad control to start chopping. We recommend that you place your hand over the lid of the food processor while it is operating in order to prevent it from moving. If the machine does not start up, check that it is plugged in and switched on, and that the bowl and lid are securely locked in place.
B. WITH THE REVERSIBLE SLICING/GRATING DISC
- Place the bowl on the food-processor base, then fit this set onto the motor unit.
- Fit the disc spindle into the disc.
For slicing: Attach the disc to the spindle with the slicing blade facing upwards.
For grating: Set the disc on the spindle, with the grater slots facing upwards. Then place the disc onto the central stem of the bowl.
Important: hold the disc by the rim to avoid any risk of injury.
- Place the lid on the bowl and insert the food into the feedtube.
- Place the pusher in the feedtube above the food. Always use the pusher to guide the food through the feedtube. Never use your hands or a spatula.
- Plug in and switch on the machine to start grating or slicing.
3. USING THE FOOD PROCESSOR
The food-processor touch-pad control provides the ideal speed for using the machine as a domestic food processor. You can also use the SEQ touch-pad control with this feature.
Press the 1 touch-pad control. For a continuous operation, press the food-processor touch-pad control. To stop the machine, press the food-processor touch-pad control again, or press 0.
To activate the SEQ feature, press the 1 touch-pad control, then the SEQ touch-pad control, then press and release the food-processor touch-pad control as many times as necessary. By using the appliance in this way, it is easy to control the duration and frequency of the pulses. Leave enough time in between pulses to allow the food to fall to the bottom of the bowl.
A. CHOPPING AND PRODUCING PUREES
-
Cut the food into pieces of a similar size, then place into the bowl. You can put up to 250g of food into the food processor at the same time.
-
Place the lid and lock in place. Insert the pusher. We recommend that you hold the food processor with one hand while it is operating. Press the 1 touch-pad control, then the SEQ touch-pad control. Press and release the food-processor touch-pad control two or three times. Each time you release the button, allow the food to fall to the bottom of the bowl before pressing the button again. Check the texture by looking through the bowl. Ensure you do not chop too finely
Note : From time to time, a piece of food may become wedged between the blade and the bowl. In this case, remove the lid, carefully lift out the blade and remove the wedged piece. Empty the bowl, re-insert the blade and the food, lock the lid into position, and continue the operation.
- If you want finer chopped vegetables or minced meat, or a finer purée, press the 1 touch-pad control, then the food-processor touch-pad control and allow the machine to operate uninterrupted until the foodstuffs have been chopped as fine as desired. Make frequent checks through the bowl to avoid the food being chopped too finely. If necessary, use a spatula to scrape all the pieces remaining stuck to the inside of the bowl.
To purée foodstuffs, follow the same procedure as that used for chopping, but allow the machine to continue operating until you have obtained a homogeneous purée. Caution! Some foods (potatoes for example) may produce a gluey texture if processed for too long.
There is a hole in the pusher which allows you to add liquid ingredients slowly and evenly. If you wish to add some liquid while the machine is running, pour it through this hole. This step is particularly useful when you are making mayonnaise or sauces.
To add foodstuffs which are small in size or cut into pieces, like cheese, meat or cloves of garlic, add them through the feedtube opening. Ensure you replace the pusher immediately after adding the ingredients, to avoid any risk of splashes or injury.
C. REMOVING FOOD FROM THE FOOD PROCESSOR
Before anything else, press the 0 touch-pad control and wait until the blade stops turning. Then remove the lid by rotating it in an anticlockwise direction. Never attempt to remove the lid and bowl together; you risk damaging the bowl.
When you empty the bowl, ensure that the blade does not fall out to avoid any risk of injury.
D. SLICING AND GRATING
-
Fit the grater/slicer disc into the food processor. Always handle the disc by the rim. Close the lid and insert the food through the feedtube.
-
Insert the pusher. Press the I touch-pad control then the food processor touch-pad control. Push the food to the bottom, exerting light pressure. You can remove the pusher to add more food without switching off the appliance. However, ensure that you never put your fingers in the feedtube.
After having sliced or grated all the foodstuffs, press the food-procesor or 0 touch-pad controls. Wait until the disc stops turning before removing the lid. Then remove the disc by lifting it up. Now remove the bowl and pour out the food.
4. CLEANING AND STORAGE OF THE ATTACHMENTS
Store the blade and slicer/grater disc out of reach of children.
All the attachments can be washed in a dishwasher, except the food-processor base unit, which must not be immersed in water. Wipe it with a damp cloth.
If you clean the blade(s) and discs by hand, be very careful. Avoid letting them soak in soapy water, where they could disappear from view.
PREPARING FOOD TO CHOP
| TYPE OF FOOD | METHOD OF PREPARATION |
| Fruit and vegetables | Peel and core if necessary. Remove the hard bits, and stones and pips. Cut into ±2 cm-size pieces, and process in the food processor (max. 250 g at a time). |
| Meat, poultry and fish | Foodstuffs of this type must be very cold, but not frozen. Cut into 2 cm-size pieces. Place up to 250 g in the bowl. Press the CHOP/SEQ touch-pad controls, or allow the processor to run without stopping until you obtain the desired consistence. Check the texture every 2 or 3 seconds to avoid the food being chopped too finely. |
| Hard «grated» cheese | Cut into 2 cm-size pieces. Press the CHOP/SEQ touch-pad controls until you obtain small grains, then process non-stop in the food processor. You can chop it as fine as you like. Simply run the machine longer to obtain finer grains. Process up to 85 g at a time. If the cheese is too hard to cut with a knife, do not attempt to chop it in the food processor – you risk damaging the blade. |
| Whipped cream | The whipped cream you obtain using the food processor is excellent as a topping for desserts or hot drinks. Cream must be at refrigerator temperature. |
| Parsley and other fresh herbs | The herbs, bowl and metal blade must be clean and dry. Remove the stalks and only use the leaves. The more herbs you chop at a time, the finer the end result. Chopped herbs can be kept for several days in hermetically-sealed bags in the refrigerator, or can be deep-frozen. |
PREPARING FOOD TO SLICE AND GRATE
| TYPE OF FOOD | SLICING | GRATING |
| Long, thin food (carrots, celery, cucumber and aubergines) | Cut into even lengths. Insert the pieces vertically into the feedtube, flat side downwards, adding enough pieces to avoid any toppling over. | For long thin strips, cut into pieces which are just big enough for fitting sideways through the feedtube. Tightly fill the feedtube to ±2.5cm from the top. For fine grating, insert the pieces vertically into the feedtube, flat side downwards. |
| Round fruit and vegetables (apples, onions, potatoes, green peppers and tomatoes) | Cut one end flat. Pack the food well into the feed-tube to avoid them top-pling over. Press gently to moderately with the pusher. | Same method as that given for slicing. Place horizontally in the feedtube to obtain long thin strips, or vertically for finely grated. |
| Small fruit and vegetables (strawberries, mushrooms and radishes) | Fill the feedtube and press gently with the pusher. | Fill the feedtube and press gently with the pusher. Food must be hard enough to grate (radishes for example). |
| Cabbage and crispy let-tuce | Cut off the outer leaves and the base. Cut into pieces in such a way that the food can be guided vertically through the feedtube. | Do not grate. |
| Raw uncooked meat and poultry (250 g maximum at a time) | Use boned and half-frozen meat (hard to the touch but capable of being cut with a knife). Cut into pieces the length of the feedtube. | Same method as that given for slicing. |
| Soft cheeses (mozzarella) | Do not slice. | Place in the refrigerator until the cheese is hard to the touch. Press gently with the pusher. Grate a max. 125 g at a time. |
| Semi-hard cheese (gruyère) | Cut into pieces and guide vertically through the feedtube. Press gently with the pusher. | The cheese must be very cold. Place it in the feedtube and press gently with the pusher. Grate a max. 125 g at a time. |
| Hard cheese (parmesan) | Do not slice. | Do not grate (use the chopping blade). |
SAFETY CAUTIONS
- Caution! When unpacking, ensure you handle the blade and disc with the greatest care, since they are extremely sharp. Place the box on an even surface, then remove the accessories without touching the metal parts.
- Do not immerse the motor unit into water or any other liquid.
- Increased supervision is necessary when this appliance is used near children. This appliance must not be used by children. Store out of children's reach. Never leave the appliance unsupervised.
- Switch off and unplug the appliance immediately after use, before fitting or removing attachments, before cleaning and before removing the contents of the bowl.
IMPORTANT: Never put your fingers in the bowl and never handle the blades when the appliance is plugged in and switched on.
- Avoid all contact with the moving parts.
- Do not use the appliance if the cord is damaged or if the appliance was dropped or shows signs of damage. If the cord is damaged, it must be replaced by the manufacturer. Return the appliance to the manufacturer for any repair or electrical or mechanical adjustments. No repair may be carried out by the user.
- Do not use any attachments other than those supplied with the product. Do not use the bowls on any other base except on that supplied.
- Do not use outside.
- Do not leave the cord hanging over the edge of a kitchen table or worktop. Avoid any contact with hot surfaces, to avoid any risk of damage.
- When the motor unit is plugged in and switched on, do not touch the blades or remove the lid from the blender bowl. Inadvertently touching another touch-pad control can trigger the operation of the appliance.
- Always have the lid locked into position when the food processor is operating. Do not attempt to force the lid-locking mechanism.
- Never put food into the food processor by hand. Always use the pusher for guiding it in.
- Always ensure that the blade and disc have stopped turning before removing the lid.
14.IMPORTANT: Do not open the motor unit. None of the parts contained in this appliance may be repaired or replaced by the user. Repairs must be undertaken solely by the manufacturer. -
This appliance complies with the basic requirements of directives 89/336/CEE (electromagnetic compatibility) and 73/23/CEE (safety of electro-domestic appliances), amended by directive 93/68/CEE (CE marking).
-
This appliance should be used solely for cooking, following the instructions in this manual.
EINLEITUNG
- INHALTSVERZEICHNIS
- ATTENTION, LA LAME HACHOIR EST EXTREMEMENT TRANCHANTE
- The Blender
- 1.PRODUCT DESCRIPTION AND FEATURES
- HOW TO ASSEMBLE THE BLENDER
- USING THE BLENDER
- IMPORTANT
- CLEANING AND MAINTENANCE
- IMPORTANT HELPFUL HINTS ON USING THE BLENDER
- The Food Processor
- HOW TO ASSEMBLE THE FOOD PROCESSOR
- WITH CHOPPING BLADE
- CAUTION! THE CHOPPING BLADE IS EXTREMELY SHARP
- WITH THE REVERSIBLE SLICING/GRATING DISC
- USING THE FOOD PROCESSOR
- CHOPPING AND PRODUCING PUREES
- REMOVING FOOD FROM THE FOOD PROCESSOR
- SLICING AND GRATING
- CLEANING AND STORAGE OF THE ATTACHMENTS
- SAFETY CAUTIONS
- EINLEITUNG
Brand : CUISINART
Model : BFP703CE
Category : Blender