HA 200 - Audio Amplifier T+A - Free user manual and instructions
Find the device manual for free HA 200 T+A in PDF.
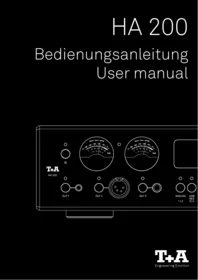


| Brand | T+A |
| Model | HA 200 |
| Product Type | Hi-Fi Headphones Amplifier |
| Dimensions (H × W × D) | 10 × 32 × 34 cm (4 × 12.6 × 13.4 in) |
| Weight | 6.5 kg (14.4 lbs) |
| Power Supply | 200–240 V, 50–60 Hz, 100 W |
| Standby Power Consumption | < 0.5 W |
| Frequency Response | 0.1 Hz – 200 kHz (+0/-3 dB) |
| Signal-to-Noise Ratio | 110 / 114 dB |
| THD / Intermodulation | < 0.001% / < 0.001% |
| Channel Separation | > 108 dB |
| Headphone Outputs | 6.35 mm jack, 4.4 mm Pentaconn, XLR-4 pin; impedances: 8, 12, 18, 25, 40, 80 Ω |
| Analog Inputs | RCA (unbalanced), XLR (balanced); 250 mVeff – 4.5 Veff / 10 kΩ; 500 mVeff – 9 Veff / 20 kΩ |
| Digital Inputs | AES/EBU, 2× coax S/P-DIF, 2× optical TOSLINK, 1× BNC, USB (PCM up to 768 kHz, DSD up to 1024), 2× HDMI (optional) |
| Bluetooth | A2DP, AVRCP 1.4; aptX HD, SBC, AAC |
| D/A Converter | Quadruple 32-Bit Sigma-Delta per channel; T+A True-1Bit DSD converter |
| Upsampling | 4 selectable algorithms: FIR, Bezier/IIR, Bezier, NOS |
| Volume Control | Relay controlled, 1 dB steps, -60 dB to 0 dB |
| Class A Operation | Up to 700 mA |
| Energy Saving | Automatic power down after 60 min (ECO mode), standby < 0.5 W |
| Cleaning | Soft dry cloth only; never use solvents or abrasives |
| Safety | Disconnect mains before cleaning; only qualified technicians may open the case |
| Spare Parts & Repair | Authorized T+A workshops only; genuine T+A parts |
Frequently Asked Questions - HA 200 T+A
User questions about HA 200 T+A
0 question about this device. Answer the ones you know or ask your own.
Ask a new question about this device
Download the instructions for your Audio Amplifier in PDF format for free! Find your manual HA 200 - T+A and take your electronic device back in hand. On this page are published all the documents necessary for the use of your device. HA 200 by T+A.
USER MANUAL HA 200 T+A

ANALOG
1 | 2


USB
AES
3|4
Deutsch
Seiten 5 - 28
English
Pages 31 - 54
Willkommen
① Digitale Eingänge
We are delighted that you have decided to purchase a T+A product. Your new T+A headphones amplifier is a Hi-Fi unit of the highest quality, designed and developed with a single aim as top priority: to satisfy the requirements of the audiophile music lover.
This unit is the embodiment of innovative thinking and solid quality, exploiting the finest materials and components available, and all these factors contribute to a machine which will satisfy you're most stringent demands and your most searching requirements for a period of many years.
Our production areas are supervised by highly qualified expert staff, and all final production units are checked comprehensively by a fully automated, computer-controlled system to ensure uniformly high quality. We guarantee that our products meet our own specifications to the full.
At all stages of production we avoid the use of substances which are environmentally unsound or po-
tentially hazardous to health, such as chlorine-based cleaning agents and CFCs.
We also aim to avoid the use of plastics in general, and PVC in particular, in the design of our products. Instead we rely upon metals and other non-hazardous materials; metal components are ideal for recycling, and also provide effective electrical screening.
Our robust all-metal cases exclude any possibility of external sources of interference affecting the quality of reproduction. From the opposite point of view our products' electro-magnetic radiation (electro-smog) is reduced to an absolute minimum by the outstandingly effective screening provided by the metal case.
We would like to take this opportunity to thank you for the faith you have shown in our company by purchasing this product, and wish you many hours of enjoyment and sheer listening pleasure with your HA 200.
Content
Notes 33
Safety notes 34
Controls and functions 36
On / Off switch 36
Meter 36
Display 36
Volume control and menu operation 37
Headphones outputs 37
Source selection 37
Tone and system settings 37
Remote control receiver 37
Remote control 38
On / Off Switch 38
Source selection 38
Volume control 38
Menu operation 38
Settings 38
Range 39
Charging the remote control 39
Important information 39
Connections 40
Digital inputs 40
Analog inputs 40
Bluetooth 40
USB inputs 40
Charging port 41
HDMI inputs 41
Mains input 41
Installation and wiring 42
Installation 42
Connecting the headphones 42
Connection of digital source devices 42
Connection of analog source devices 42
Connecting the Bluetooth antenna 42
Connection of HDMI devices 43
Connecting a Computer 43
Connecting the mains cable 43
Wiring diagram 43
Playback 44
Analogue source 44
Digital source 44
Bluetooth 44
Playback from a computer (USB-DAC) 45
Playing back an HDMI source 45
System and tone settings 46
Menu operation 46
System settings 47
Tone settings 48
Status information 49
Meter 50
General information 50
Status LED 50
VU-Meter [Scale -50..+5 dB] 51
Temperature [Scale 0...100] 51
Stream quality [Scale - 0 + and 0...100] 51
Troubleshooting 52
Notes on energy saving 53
General information 53
Automatic power down function 53
Technical Specifications 54
Notes
⚠️ Text passages marked with this symbol contain important information which must be observed if the machine is to operate safely and without problems.
This symbol marks text passages which provide supplementary notes and background information; they are intended to help the user understand how to get the best out of the machine.
CE All components used in the product comply with the applicable German and European safety norms and standards. This product complies with EU directives. If required, the declaration of conformity can be found under www.ta-hifi.com/DoC.
Qualcomm® aptX™

Qualcomm is a trademark of Qualcomm Incorporated, registered in the United States and other countries, used with permission. aptX is a trademark of Qualcomm Technologies International, Ltd., registered in the United States and other countries, used with permission.
Safety notes
For your own safety please consider it essential to read these operating instructions right through, and observe in particular the notes regarding setting up, operation and safety.
The operation instructions, the connection guidance and the safety notes are for your own good - please read them carefully and observe them at all times. The operating instructions are an integral part of this device. If you ever transfer the product to a new owner please be sure to pass them on to the purchaser to guard against incorrect operation and possible hazards.
The device is intended to be connected to a mains outlet with protective earth connector. Please connect it only with the mains cable supplied to properly installed mains outlets with protective earth connector. The power supply required for this unit is printed on the mains supply socket. The unit must never be connected to a power supply which does not meet these specifications.
This device is connected to the power supply as long as the power cord is connected. Even if the device is switched off and the status indicators are dark, the device still carries mains voltage inside. To disconnect the device completely from mains power supply, the mains plugs must be withdrawn from the wall socket. Please make sure that the mains plugs are easily accessible. Even when the unit is in standby mode, it has a low power consumption. If the unit is not to be used for a long period disconnect it from the mains supply at the wall socket.
The device is designed to operate in a temperate climate and altitudes up to 2000 m above sea level. The range of permissible operating temperatures is +10 ... +35°C. This device is designed exclusively for reproducing sound and/or pictures in the domestic environment. It is to be used in a dry indoor room which meets all the recommendations stated in these instructions. Where the equipment is to be used for other purposes, especially in the medical field or any field in which safety is an issue, it is essential to establish the unit's suitability for this purpose with the manufacturer, and to obtain prior written approval for this usage.
If the unit gets very cold (e.g. when being transported), condensation may form inside it. Please do not switch it on until it has had plenty of time to warm up to room temperature, so that any condensation evaporates completely.
Before placing the unit on sensitive lacquer or wood surfaces please
check the compatibility of the surface and the unit's feet on a non-visible point and if necessary use an underlay. We recommend a surface of stone, glass, metal or the like.
Please consider the weight of the device. Never place the device on an unstable surface; the machine could fall off, causing serious or even fatal injury. Many injuries, especially to children, can be avoided if the following simple safety precautions are observed: - Use only such items of furniture which can safely bear the weight of the device. - Ensure that the device does not project beyond the edges of the supporting furniture. - Do not place the device on tall furniture (e.g. book-helves) without securely anchoring both items, i.e. furniture and device. - Explain to children the hazards involved in climbing on furniture to reach the device or its controls.
The unit should be set up in a well ventilated dry site, out of direct sunlight and away from radiators. The unit must not be located close to heat producing objects or devices, or anything which is heat sensitive or highly flammable.
The ventilation openings must not be covered or closed. If the system components are to be stacked then the device must be the top unit. Do not place any object on the top cover.
When installing the unit on a shelf or in a cupboard it is essential to provide an adequate flow of cooling air, to ensure that the heat produced by the unit is dissipated effectively. Any heat build up will shorten the life of the unit and could be a source of danger. Be sure to leave free space of 10 cm around the unit for ventilation.
Liquid or particles must never be allowed to get inside the unit through the ventilation slots. Mains voltage is present inside the unit, and any electric shock could cause serious injury or death. Never exert undue force on mains connectors.
Protect the unit from drips and splashes of water; never place flower vases or fluid containers on the unit. Do not place naked flame sources, such as candle lights on the device.
Disconnect the mains plug at the wall socket before cleaning the case.
The surfaces of the case should be wiped clean with a soft, dry cloth only.
Never use solvent-based or abrasive cleaners!
Before switching the unit on again, check that there are no short-circuits at the connections, and that all cables are plugged in correctly.
If the device has been in storage, or has not been used for a protracted period (> two years), it is essential to have it checked by a specialist technician before re-use.
The terminals (marked with the Ⓐ symbol) can carry high voltages.
Always avoid touching terminals and sockets and the conductors of cables connected to them. Unless ready-made cables are used, all cables connected to these terminals and sockets must always be deployed by a trained person.
In its original condition the unit meets all currently valid European regulations. It is approved for use as stipulated within the EC.
By attaching the CE symbol to the unit T+A declares its conformity the EC directives and the national laws based on those directives. The declaration of conformity can be downloaded from www.ta-hifi.com/DoC. The original, unaltered factory serial number must be present on the outside of the unit and must be clearly legible! The serial number is a constituent part of our conformity declaration and therefore of the approval for operation of the device. The serial numbers on the unit and in the original T+A documentation supplied with it (in particular the inspection and guarantee certificates), must not be removed or modified, and must correspond.
Infringing any of these conditions invalidates T+A conformity and approval, and the unit may not be operated within the EC. Improper use of the equipment makes the user liable to penalty under current EC and national laws.
Any modifications or repairs to the unit, or any other intervention by a workshop or other third party not authorised by T+A, invalidates the approval and operational permit for the equipment.
Only genuine T+A accessories may be connected to the unit, or such auxiliary devices which are themselves approved and fulfil all currently valid legal requirements.
The only permissible method of disposing of this product is to take it to your local collection centre for electrical waste.
Registration according to the EU directive “Waste Electrical and Electronic Equipment”
WEEE-Reg.-No.: DE 72473830W
The case should only be opened by a qualified specialist technician. Repairs and fuse replacements should be entrusted to an authorised T+A specialist workshop. With the exception of the connections and measures described in these instructions, no work of any kind may be carried out on the device by unqualified persons.
If the unit is damaged, or if you suspect that it is not functioning correctly, immediately disconnect the mains plug at the wall socket, and ask an authorised T+A specialist workshop to check it.
The unit may be damaged by excess voltage in the power supply, the mains circuit or in aerial systems, as may occur during thunderstorms (lightning strikes) or due to static discharges.
Special power supply units and excess voltage protectors such as the T+A, Power Bar' mains distribution panel offer some degree of protection from damage to equipment due to the hazards described above.
However, if you require absolute security from damage due to excess voltage, the only solution is to disconnect the unit from the mains power supply and any aerial systems.
To avoid the risk of damage by overvoltages we recommend to disconnect all cables from this device and your HiFi system during thunderstorms.
All mains power supply and aerial systems to which the unit is connected must meet all applicable safety regulations and must be installed by an approved electrical installer.
The device is not designed for use by children. The device must not be operated unsupervised. Make sure that it is out of reach of children.
Batteries shout not be exposed to excessive heat like sunshine, fire or the like.
Very loud continuous listening to program material via earphones, headphones and loudspeakers can lead to permanent loss of hearing. Prevent health risks and avoid permanent hearing at high volume.
If the device has to be stored, place it in its original packaging and store it in a dry, frost-free location. Storage temperature range 0...40 °C



Controls and functions
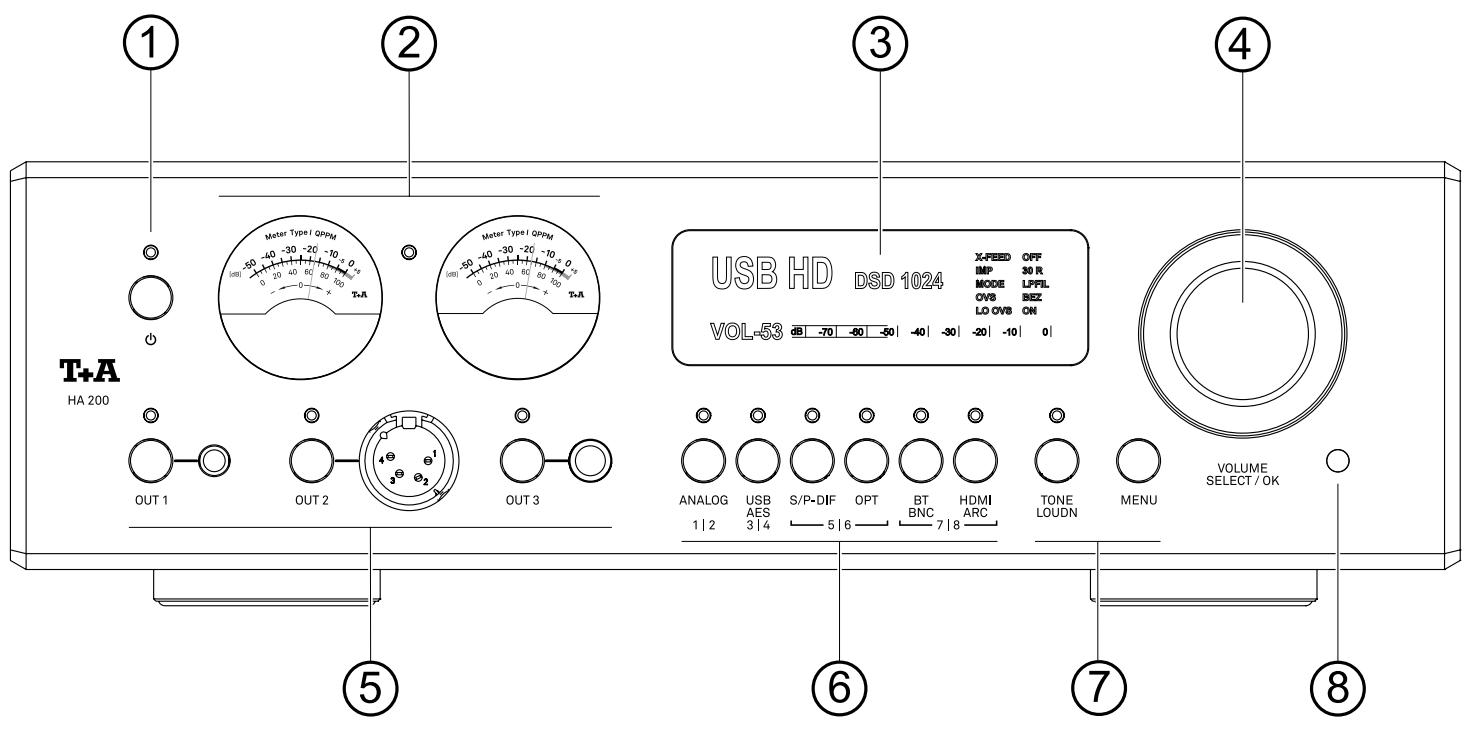
① On / Off switch

Pressing this button briefly switches the device on and off. When the unit is switched on the indicator LED above the button glows.
Please note the hints in the chapter Automatic power down function on page 53.
② Meter
The meters of the HA200 are used for various monitoring functions. There are 3 scales available for the different measurements:
• VU Scale for level measurement
• 0...100 Scale for temperature and relative % measurements
- 0 + Scale for frequency offset and trend measurements
The desired display mode is selected in the system menu.
See chapter System and tone settings.
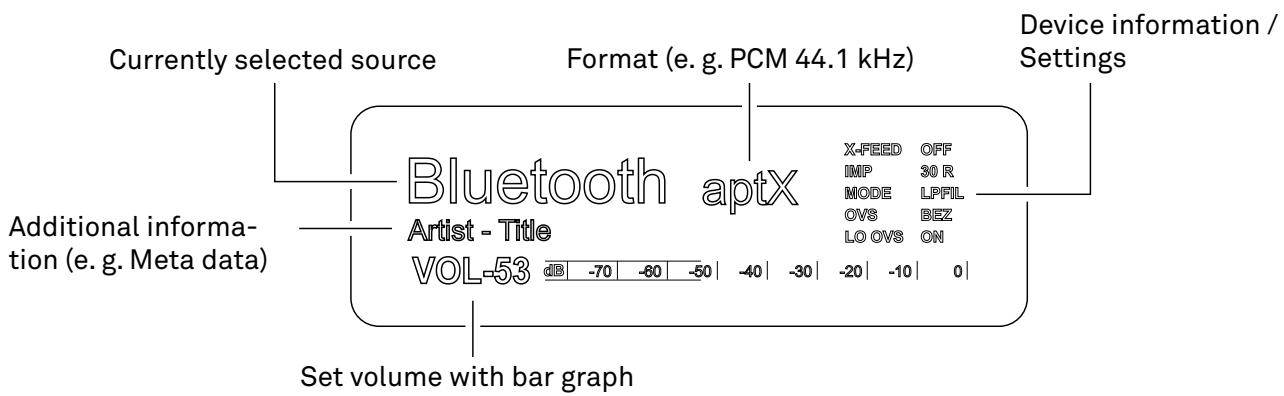
③ Display
④ Volume control and menu operation
| VOLUME | The desired volume can be set by turning this control knob. The currently set value is shown in the display.A brief press on the knob mutes the output. |
| SELECT / OK | In addition to volume control, this control knob is also used to configure the menus for system settings and tone controls. |
⑤ Headphones outputs
| OUT1 ... OUT3 | Output sockets for stereo headphones with a minimum impedance of 10 Ohm. Connection via a balanced Pentaconn* jack plug 4.4 mm, a balanced XLR 4-pin connector or a standard jack plug 6.35 mm.The outputs can be switched on and off using the buttons.The status LEDs above the buttons indicate which output is currently active.To operate two outputs in parallel, press and hold the corresponding button until the second output switches on. |
It is possible to operate two headphones in parallel. When using two headphones, the impedance per headphone must be at least 20 ohms.
⑥ Source selection
| ANALOG | Selects the analog inputs Analog IN 1 (RCA) and Analog IN 2 (XLR) To switch between Analog RCA and Analog XLR, press the button twice if necessary. |
| USB | Selects the digital inputs USB IN and AES / EBU. |
| AES | Press the button again to switch between the two inputs. |
| S/P-DIF | Selects the coaxial digital inputs S/P DIF 1 and 2Press the button again to switch between 1 and 2. |
| OPT | Selects the optical TOSLINK digital inputs Optical 1 and Optical 2.Press the button again to switch between 1 and 2. |
| BT | Selects the Bluetooth connection and the digital BNC input. |
| BNC | Press the button again to switch between the two inputs. |
| HDMI | Selects the digital inputs HDMI 1, HDMI 2 or the return channel ARC. |
| ARC | To switch between the inputs, press the button repeatedly if necessary. |
⑦ Tone and system settings
| TONE LOUDN | Switches the tone control (TONE) and loudness function (LOUDN) on and off.A brief press: Switches the tone control (bass and treble) on and off.A long press: Switches the loudness function on and off. |
| MENU | A brief press of this button opens and closes the tone control menu.(see chapter System and tone settings)A long press opens and closes the system settings menu.(see chapter System and tone settings) |
⑧ Remote control receiver
When operating by remote control, please point FM8 in the direction of the receiver.
Remote control

On / Off Switch

A brief press switches the HA 200 on.
Hold the button pressed in to switch the device off.
A brief press when the machine is operating switches the outputs off and on (Muting).
Please note the chapter Automatic power down function on page 53.
Source selection
| 1/2 | Selects the analog inputs Analog IN 1 (RCA) and Analog IN 2 (XLR) To switch between Analog RCA and Analog XLR, press the button again if necessary. |
 | Selects the digital inputs USB IN and AES / EBU.Press the button again to switch between the two inputs. |
 | Selects the digital inputs S/P DIF 1 and 2 and the optical digital inputs OPT 1 and 2To switch between the inputs, press the button repeatedly if necessary. |
 | Selects Bluetooth connection, digital BNC input and HDMI inputs 1,2 and ARC.To switch between the inputs, press the button repeatedly if necessary. |
Volume control

Rocker for controlling the volume.
Press „plus“ or „minus“ to adjust the volume in fine steps. If the button is kept pressed longer, the volume is increased/decreased continuously until the button is released.
Menu operation

Cursor buttons for menu operation.
Use the ▲ ▼ buttons to select a menu item.
Press the OK button to activate the selected menu item.
Press the ◀ ▶ buttons to change the settings.
Then press the OK button to confirm the setting.
Settings

A brief press: Opens the menu for tone controls.
A long press: Opens the system settings menu.
See also chapter System and tone settings.
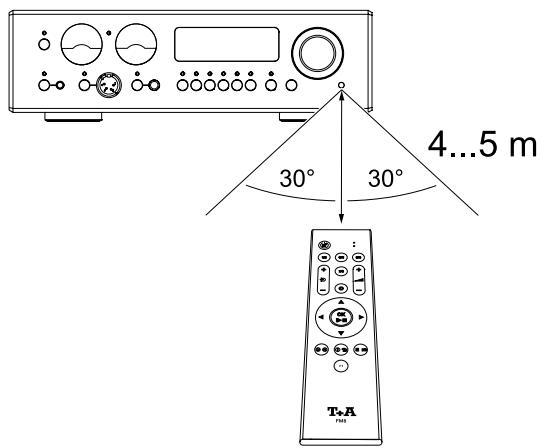
When operating by remote control, please hold the FM8 in the direction of the remote control receiver. The range of the remote control is approx. 4..5 m. The line of sight between FM8 and the remote control receiver must not be interrupted by obstacles. The direct incidence of interfering light (e.g. from fluorescent and energy-saving lamps) into the receiver should be avoided at all times, as otherwise the range of the remote control can be considerably reduced.
Charging the remote control
The FM8 has an internal rechargeable battery (Li-ion battery) that cannot be removed or replaced by the user.
To charge the remote control, connect it to the CHARGE connector on the back of the HA 200.
The charging process is indicated by the flashing red LED on the remote control. As soon as the battery is fully charged, the LED lights up red continuously.

Important information
- The FM8 cannot be used to control the amp when the battery is on charge.
- Do not charge the FM8 without supervision.
- The FM8 is fitted with an internal rechargeable battery (Li-Ion battery), which cannot be removed or replaced by the user. If you eventually notice that the battery only retains a little of its original capacity, and the period you can use the FM8 is greatly reduced, then it is time to contact your T+A dealer and ask him to fit a replacement battery
- If the battery is replaced improperly, there is danger of explosion. Always replace batteries by batteries of the same or an equivalent type.
- Batteries shout not be exposed to excessive heat like sunshine, fire or the like.
- Protect the FM8 from humidity, coldness, heat and dust.
- The FM8 contains a Li-Ion battery. Like any other electrical device, the FM8 must not be discarded in the normal domestic waste. It must be taken to your local collection point for electrical scrap.
- Exhausted batteries must never be thrown into the household waste! They should be returned to the battery vendor (specialist dealer) or your local toxic waste collection point, so that they can be recycled or disposed in a proper way. Most local authorities provide collection centres for such waste, and some provide pick-up vehicles for old batteries.
Connections
This and the following chapter describe all things of fundamental importance for installation and setup that are not relevant for the daily use of the device, but which should be read and observed before the first use.
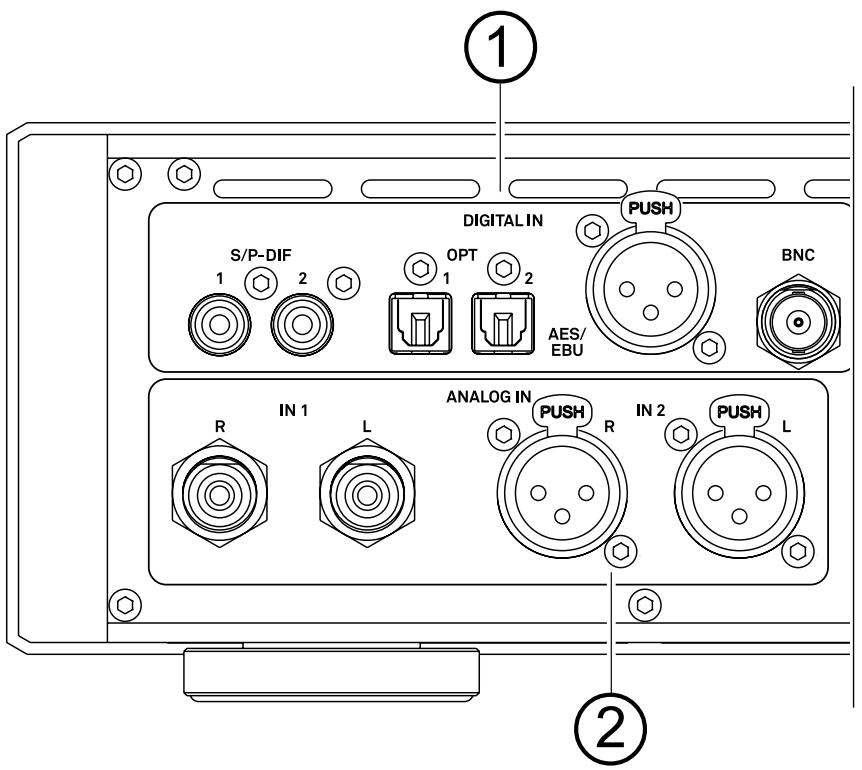
① Digital inputs
| S/P-DIF | Inputs for digital source devices with a coaxial (Cinch / RCA) digital output. |
| OPT | Inputs for digital source devices with optical digital output. |
| AES/EBU | Inputs for digital source devices with AES/EBU digital output. |
| BNC | Inputs for digital source devices with digital BNC output. |
The HA 200 accepts digital stereo signals according to the S/P-DIF standard with sampling rates from 32 to 192 kHz at all inputs.
② Analog inputs
| IN 1 | Universal line input for connecting any stereo audio device or TV set with unbalanced RCA output. |
| IN 2 | Universal line input for connecting any stereo audio device with balanced XLR output. |
③ Bluetooth
| BT ANT | Connection for the Bluetooth antenna. |
④ USB inputs
| USB IN | Connection socket for a PC or MAC computer.The HA 200 accepts digital PCM stereo signals with sampling rates of 44.1...768 kSps and digital DSD stereo signals from DSD64 to DSD1024* at this input.* DSD512 to DSD1024 only from a Windows PC. |
| USB SYS | USB interface for possible future extensions. |
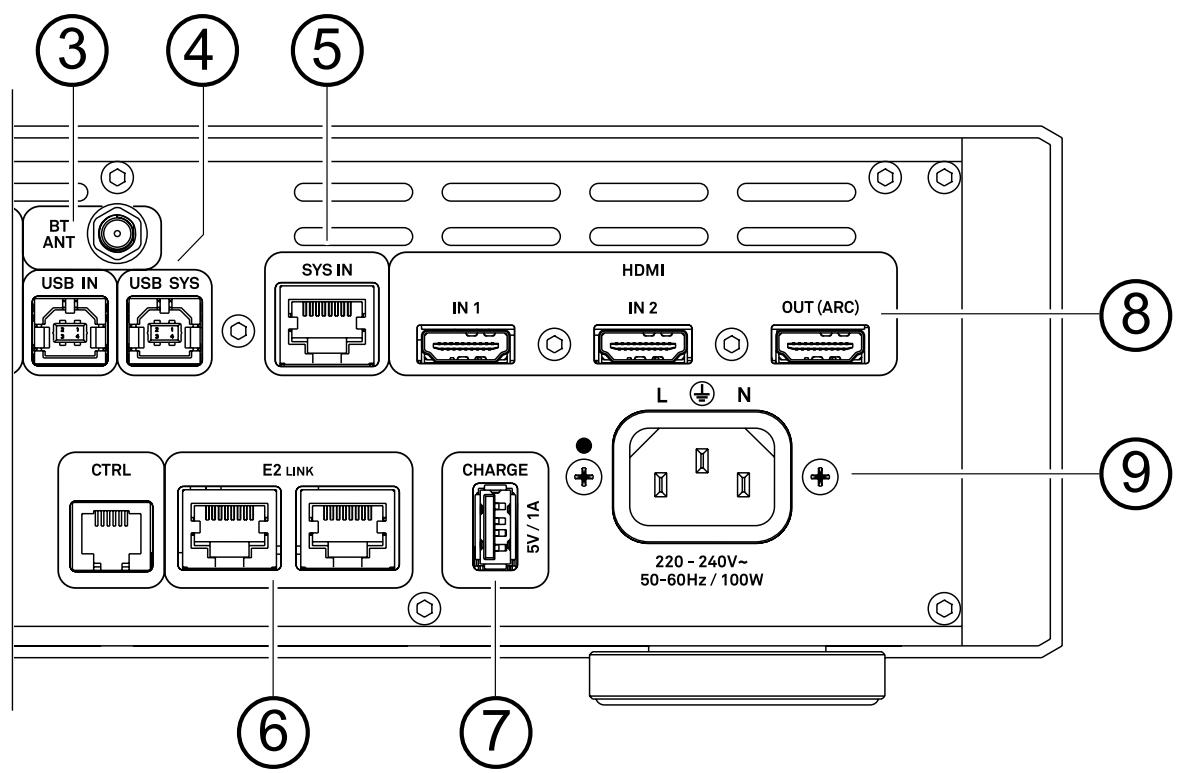
⑤ System interfaces
⑥
| SYS IN | System interface for possible future extensions. | |
| E2 LINK | Sockets for diagnostic functions and updates. | |
| CTRL | Interface for possible future extensions. | |
| 7 | Charging port | |
| CHARGE | Connector for charging the remote control FM8. | |
| 8 | HDMI inputs | (optional) |
| HDMI | IN1 and IN2 for connecting a Blu-Ray player or similar.The OUT (ARC) output is for connecting a television set. | |
| If your TV set features the ARC function, the TV sound can be played back via the HA 200. | ||
| 9 | Mains input |
To this socket the mains cable is connected.
Installation and wiring
Installation
Carefully unpack the unit and store the original packing material carefully. The carton and packing are specially designed for this unit and will be needed again if you wish to move the equipment at any time. Install the unit in a suitable location. Please observe all information on connection and installation in chapter Safety notes on page 34.
Connecting the headphones
| Depending on the connection type you are using, connect the headphones to the corresponding headphones output on the front of the HA 200.OUT 1 - 4,4 mm balanced (Pentaconn)OUT 2 - XLR-4-pin balancedOUT 3 - 6,35 mm stereo jack unbalanced | |
| i | If the headphones used have interchangeable connection cables and the possibility of a balanced connection, we recommend using the balanced connection cable for maximum sound quality. |
| All three connection sockets can be used simultaneously. Any two of the three outputs can be switched on at the same time. | |
| The headphones connected must have an impedance of at least 10 Ohms. If two headphones are operated simultaneously, the impedance of each headphone must be at least 20 ohms. | |
| ⚠️ | Continuous listening to programme material at very high volume using headphones or earphones can result in permanent loss of hearing. You can avoid subsequent health problems by avoiding continuous listening at high volume through headphones or earphones |
Connection of digital source devices
| You can connect devices with electrical coax, BNC, AES/EBU or optical fibre output to the digital inputs of the HA 200 (Digital IN). |
| i The HA 200 accepts S/P-DIF digital stereo signals at all inputs with sampling rates from 32 kHz to 192 kHz. |
Connection of analog source devices
| When you connect the input sockets of the HA 200 to the output sockets on the source devices always connect like to like, i. e.,R‘ to ,R‘ and ,L‘ to ,L‘. If you fail to heed this then the stereo channels will be reversed. | |
| i Be sure to push all plugs firmly into their sockets. Loose connections can cause hum and other unwanted noises. |
Connecting the Bluetooth antenna
To use the Bluetooth function of the HA 200, the supplied antenna must be connected to the „BT ANT“ socket.
Connection of HDMI devices *
Connect source devices such as a BluRay player or game console to the HDMI inputs (IN 1 and IN 2). At the „OUT“ socket, the picture signals of the two input sockets „IN1“ and „IN2“ are available for transmission to a television.
At the HDMI 1 and HDMI 2 inputs, the HA 200 accepts digital PCM coded stereo signals with sampling rates of 44.1 ... 384 kHz and DSD data with a sampling rate of DSD64
If your TV set features the ARC function, the TV sound can be played back via the HA 200.
Connecting a Computer
The HA 200 can be used with MAC and Windows operating systems for audio playback. To do this, connect the USB IN port of the HA 200 to a free USB port at your computer using the USB connection cable supplied.
On MAC operating systems the playback of DSD streams up to DSD256 and PCM streams up to 768 kHz is possible. For operation on Windows operating systems the installation of a dedicated driver is required. With the driver installed, playback of DSD streams up to DSD1024 and PCM streams up to 768 kHz is possible.
Connecting the mains cable
Connect the power cord to the HA 200's AC power input, then connect the device to the power supply. To achieve maximum possible interference rejection the mains plug should be connected to the mains socket in such a way that phase is connected to the mains socket contact marked with a dot. The phase of the mains socket can be determined using a special meter. If you are not sure about this, please ask your specialist dealer.
Do not connect the HA 200 and the other components to the mains until all necessary connections between the devices have been established.
Wiring diagram

* Only possible with optional available factory-installed HDMI module
Analogue source
- If necessary, first reduce the set volume.
- Select the analog input to which you have connected the source device to be played using the source selection buttons on the device or the remote control.
- As soon as the source device delivers music, the music signal will become audible.
Digital source
- If necessary, first reduce the set volume.
- Select the analog input to which you have connected the source device to be played using the source selection buttons on the device or the remote control.
- As soon as the source device delivers digital music data, the HA 200 automatically adjusts itself to the format and sampling rate of the signal, and you will hear the music.
Bluetooth
- If necessary, first reduce the set volume.
- Select the Bluetooth source by pressing the IN5/BT source button twice if necessary.
- In order to play music from a Bluetooth capable device via the HA 200, the external device must first be connected to the HA 200.
- The HA 200 is ready for connection when message Bluetooth not connected is displayed.
- If a device is already connected, the existing connection must first be disconnected.
- If the HA 200 is found, connect it to your mobile device.
- Playback can now be started on the mobile device.
- Some Bluetooth devices can also be controlled by the HA 200's FM8 remote control. The operation and behaviour of the connected device depends on the device itself. Usually the buttons on the FM8 remote control have the following functions:

For Bluetooth playback, the supplied antenna must be connected to the „BTANT“ socket on the back of the device.
If your device requests a PIN code, this should always be '0000'.
The mobile device must support the A2DP Bluetooth audio transfer protocol if you wish to transfer Bluetooth audio from a mobile device to the sound system.
Please note that many AVRCP-capable mobile devices do not support the controlling through the HA 200. In case of doubt, please ask the manufacturer of your mobile device.
The HA 200 has been tested with a large number of Bluetooth-capable mobile devices. However, we are unable to guarantee general compatibility with all devices available commercially since the range of equipment is so wide, and the various implementations of the Bluetooth standard differ widely in some cases. If you encounter a problem with Bluetooth transfer, please contact the manufacturer of the mobile device.
Playback from a computer (USB-DAC)
| Minimum system requirementsIntel Core i5 or higher or a comparable AMD Processor, 4 GB RAM, USB 2.0 Interface, Microsoft Windows 10, 8.1, 8 or 7 or MAC OS X 10.13.6 or higher version |
| Driver installationFor playback via USB, from a connected Windows PC, specific driver software is required on the computer.The required drivers and a detailed installation manual are available for download on our homepage at http://www.ta-hifi.com/support.No drivers are required when using a computer with Mac OS X 10.6 or later. |
| System settingsA number of system settings have to be altered if you wish to operate HA 200 with your computer. These changes must be made regardless of the operating system. The installation instructions provide detailed information on how and where the settings are to be changed. |
| PlaybackIf necessary, first reduce the set volume.Switch on the computer.Select the USB input using the source selection buttons on the device or the remote control.If necessary, select the HA 200 as the output device in the system settings of the operating system.Open the playback software on the computer. |
| Do not disconnect the USB connection during operation. Do not turn off the HA 200 during playback. This can lead to malfunctions and crashes.If there is a malfunction during playback, restart the computer. |
The playback of files stored on the computer cannot be controlled by the HA 200 or FM8.
Playing back an HDMI source
| If necessary, first reduce the set volume.Use the source select buttons on the unit or the remote control to select the HDMI input to which you have connected the source device to be played back.If a TV set is connected to the HDMI OUT output, the TV sound can be transmitted to the HA 200 via ARC (Audio Return Channel) if supported by the TV set. Select the source HDMI ARC for the TV sound.As soon as the source device delivers digital music data, the HA 200 automatically adjusts to the format and sampling rate of the signal and the music signal becomes audible. | |
| i | Playback via HDMI is only available with the optional built-in HDMI module. |
| To use the ARC function, the TV must support it and the HA 200 must be connected to an ARC compatible input on the TV. |
Since the HA 200 is designed for pure stereo playback, only the two front channels can be played back when playing multi-channel material. Depending on the source device, the signal can also be muted. If possible, the connected source device should therefore be switched to stereo playback (downmix function) and, if available, the stereo track should be selected in the menu of the disc.
Operation on the device
- To call up the system settings menu, press and hold the MENU button ① on the front of the HA 200.
- To call up the menu for tone settings, briefly press the MENU button ① on the front of the HA 200.
- Select an item in the menu with the SELECT knob ②.
- To change a selected menu item, confirm by pressing the SELECT knob and then change it by turning the knob.
- To confirm the setting, press the knob again after the change.
- If you wish to cancel a change, press the MENU button to abort at any time.
- By pressing the SELECT knob for a long time, you can return to the previous menu level.
- To exit the menu, press the MENU button.
Operation by remote control
- To open the system settings menu, press and hold the Ⓕ button on the remote control.
- To enter the sound settings menu, press the button on the remote control briefly.
- Use the buttons ▲ ▼ to select an item in the menu.
- To change a selected menu item, first press the button and then use the ◀ ▶ buttons to alter the setting.
- To confirm the setting, press the OK button again after changing it.
- If you do not want to save a setting, you can cancel it at any time by pressing the ⏻ button.
- Press and hold the OK button to return to the previous menu level.
- To exit the menu, press the Ⓕ button.


| Meter mode | Under this menu item the display mode of the meters can be set.The following measurement types are available: | |
| Input level | - Level of the input signal | |
| Output level | - Level of the output signal | |
| Temperature | - Temperature monitor of the device and the Class A output stages | |
| Signal quality | - Displays the quality (frequency deviation and error rate) of the input digital signal. | |
| Meters off | - Meters switched off | |
| i For detailed information on the various meter settings and display types, refer to chapter „Meters“ on page 50. | ||
| Source configuration | Under this menu item, sources which are not needed can be deactivated.Deactivated sources can no longer be called up using the source buttons on the device and the remote control.After calling up this menu item with the @ button, a list of all sources of the HA 200 appears.Each source is followed by a remark indicating whether the source is activated (enabled) or deactivated (disabled). | |
| Display brightness | Here you can adjust the brightness of the display during normal operation to your personal preferences in 9 steps. | |
| Display mode | Here you can set whether the display will be switched on permanently or only temporarily, when the device is being operated.If the setting temporary is selected, the display is switched on during operation of the HA 200 only and then automatically switched off again after a short delay.If the Always ON setting is selected, the display remains permanently on. | |
| Colour profile | Under this menu item you can adjust the brightness of the status LEDs and the brightness and illumination color of the meters to your personal preferences.Select the menu item Default colours to reset the displays to the default settings. | |
| Energy saver | The energy saving mode can be switched on and off here.The machine has an Auto Power Down function.If the ECO option is selected, the HA 200 automatically switches to standby mode if no music signal and no operation is detected for more than 60 minutes.If the Comfort setting is selected, the unit remains switched on until it is manually switched to standby mode. | |
| i In Ländern außerhalb der EU in denen die EuP Richtlinie nicht gilt, kann die automatische Abschaltung des Gerätes (Einstellung ECO) bei Bedarf deaktiviert werden. | ||
| Device info | Menu item to display the installed firmware versions and the option to reset the device to the factory default settings. | |
Tone settings
| Balance | This menu item allows you to alter the level balance between the left and right channel. |
| Bass | In this menu item the bass response can be adjusted. |
| Treble | In this menu item the playback of the high frequencies can be adjusted. |
| Cross - Feed | The cross-feed function can be switched on and off under this menu item.The cross-feed function reduces the high channel separation between the right and left channel which is characteristic for headphones. This creates a sound image that is closer to that of listening with stereo loudspeakers. As a result, the stage builds up further in front of the head.In early stereo recordings, sometimes the audio signals have been heavily mixed to one or the other side to give the stereo effect special accentuation. This is often very tiring and unpleasant when listening with headphones. The cross-feed function can significantly reduce this effect. |
| Upsampling | The HA 200 features four different upsampling types with different sound characteristics.FIR 1 is a classic FIR filter with an extremely linear frequency response.FIR 2 is a FIR filter with improved peak handling.BEZ 1 is a Bezier interpolator combined with a IIR filter. This process produces a result very similar to an analogue system.BEZ 2 is a pure Bezier interpolator – offering perfect “timing” and dynamics.For special applications, e.g. if the source device is doing the upsampling (such as a PC with Signalyst® HQ player), the upsampling in the HA 200 can be deactivated.NOS 1 - With this setting the upsampling of the HA 200 is deactivated and the analog output filter is automatically set to 60 kHz for sampling rates of 44.1 and 48 kHz. For higher sampling rates, the setting you selected under the Bandwidth menu item is used.NOS 2 - If you select this setting, upsampling of the HA 200 is deactivated. The analogue output filter always has the value selected under the menu item Bandwidth. |
| These settings only have effect for the digital sources during playback of PCM encoded material. | |
| Bandwidth | Under this menu item the analog output filter can be switched from 60 kHz (LP 60 kHz) to 120 kHz (Wide) bandwidth. The Wide mode allows a more spatial music reproduction. |
| Loudness level | At this menu item the loudness function can be adjusted in its intensity to the efficiency of the headphones used.The HA 200 is equipped with an aurally correct volume control (LOUDNESS), which compensates the frequency-dependent sensitivity of the human ear at very low volumes in accordance with the physiology of hearing.Set the LOUDNESS level so that the same listening impression is obtained at both low and higher listening levels. |
| Impedance | This menu item is used to optimize the output impedance of the amplifier in six steps to match the headphones in use.The output impedance can be set separately for each of the three headphone outputs (OUT1 ... OUT3).Switch on the respective headphones output before you open the tone settings menu and set the desired impedance. |
| This setting does not depend on the impedance of the connected headphones. By default, the output impedance is set to 8 Ohm. This setting can be used for all headphones. To achieve the best possible sound quality, it can make sense to select a higher output impedance, depending on the headphones and your personal hearing preferences.In order to avoid tonal interferences between the headphones, the output impedance is automatically set to 8 Ohm when two headphones are used in parallel. | |
Status information
| The status display provides a quick overview of the current settings.The individual status messages are explained below. | 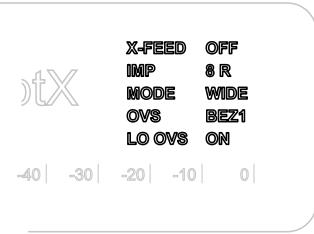 | |
| X-FEED | Indicates whether the cross-feed function is ON or OFF. | |
| IMP | The currently set impedance in ohms (R) is displayed here.Possible values are 8, 12, 18, 25, 40 or 80 Ohm. | |
| MODE | Current setting of the bandwidth of the output filter.WIDE (120 kHz) or LP 60 (60 kHz) | |
| OVS | The currently selected upsampling type is displayed here.Possible displays are FIR1, FIR2, BEZ1 or BEZ2. If upsampling is disabled NOS1 or NOS2 is displayed. | |
| LO OVS | If LO OVS ON is displayed here, the HA 200 has switched to its internal precision clock oscillator (LO = Local Oscillator) during playback via the digital inputs. This causes an elimination of the jitter, but is only possible if the quality (of the clock) of the connected signal is sufficient (max. +- 150 ppm deviation).If the quality of the clock is insufficient, the internal precision clock oscillator switches off. The display changes to LO OVS OFF. | |
Meter

General information
The meters of the HA 200 are used for various display functions. There are 3 scales available for the different measurements:
- VU Scale [-50...+5 dB] for level measurements
- 0...100 Scale for temperature and relative % measurements
- 0 + scale for frequency offset and trend measurements
The scaling and characteristics of the meter corresponds to those for QPPM meters of type I (DIN PPM).
Status LED
The status LED between the two meters indicates the current display function.
| Status-LED | Display function |
| Off | VU-Meter - Input level |
| On | VU-Meter - Output level |
| Flashing | Special operating mode - Display of temperature or stream quality |
The VU meter function displays the current signal level. The level at the D/A converter as well as the level at the amplifier output can be displayed. The meters are peak meters (QPPM = Quasi-Peak Program Meter). The scaling and characteristics of the meter corresponds to those for QPPM meters of type I (DIN PPM).
Input-level
Level control of the input signal. For digital sources the 0 dB point corresponds to the D/A converter full scale (0 dB FS). For analog sources, the 0dB point corresponds to a input level of 2,35 Volt eff.
Output-level
Output level - voltage delivered to the headphones.
The 0-dB point corresponds to amplifier full scale.
Temperature [Scale 0...100]
The sound characteristics depend, among other things, on the temperature of the electronic components. There is an optimal temperature for each component at which the sound quality reaches its optimum. HiFi equipment therefore usually sounds better after a warm-up phase than it does when cold. In the HA200 the temperature is constantly monitored by the control processor. The meters show the temperature as follows:
- The left meter shows the system temperature (Inside the case).
The best operating temperature is about 30...50 °C.
- The right meter shows the temperature of the Class-A output stages.
The best operating temperature is about 55...85 °C.
Stream quality [Scale - 0 + and 0...100]
- The left meter [scale - 0 +] shows whether the clock frequency of the incoming data stream of the currently active source is operating at the standard frequency. If the needle is exactly in the middle of the scale, the frequency of the source is exactly at the standard frequency. The display range covers 150 ppm to +150 ppm. Normgerechte Quellen sollten im Bereich + / 50 ppm liegen.
- The right meter [scale 0...100] indicates the error rate of the currently active input. With good transmission quality, the display should be at 0.
If frequent needle deflections are observed on the right-hand meter, the cables for the relevant input should be checked first and replaced if necessary. If this does not bring any improvement, the source device should be checked.
The internal precision clock oscillator (Status display LO OVS) in the HA200 can resynchronize signals from -150 to +150 ppm and remove any jitter.
Troubleshooting
Many problems have a simple cause and a correspondingly simple solution. The following section describes a few difficulties you may encounter, and the measures you need to take to cure them. If you find it impossible to solve a problem with the help of these notes please disconnect the unit from the mains and ask your authorised T+A specialist dealer for advice.
Device does not switch on
| Cause 1:Mains lead not plugged in correctly.Remedy:Check connection, push connector in firmly. |
| Cause 2:Mains fuse burned out.Remedy:Have the mains fuse replaced by an authorised specialist workshop. The rating of the replacement fuse must agree with the specification printed on the unit. |
The device responds correctly to manual operation of the buttons on the front panel, but does not respond to remote control commands
| Cause:The battery of the FM8 remote control is completely discharged.Remedy:Charge the FM8's built-in battery at the Charge socket on the back panel of the HA 200. |
No audio files can be played from a Windows computer connected via USB
| Cause:For the playback via USB from a Windows PC drivers must be installed.Remedy:Download the driver package from the T+A homepage and install it as described in the installation instructions. |
One or more sources cannot be selected using the source selection buttons on the device and the remote control.
| Cause: |
| The source in question has been disabled. |
| Remedy: |
| Open the system settings menu and activate the deactivated source. |
Notes on energy saving
General information
The HA 200 satisfies the requirements of the latest directives concerning energy-saving measures (EuP directive). The modern design of the mains power supply makes an important contribution to this.
The internal micro-processor constantly ensures that sub-assemblies which are not currently required are automatically switched off. The micro-processor itself operates in stand-by mode at a relatively low clock speed, and only responds to the remote control receiver.
In stand-by mode the current drain of the HA 200 is less than 0.5 Watt.
If you intend not to use the amplifier for a long period, it should be disconnected from the mains socket, i.e. the mains plug should be withdrawn from the wall socket.
Automatic power down function
The device features an automatic power-down function. If the HA 200 detects no operation or no music signal for a period longer than sixty minutes, it automatically switches to stand-by mode
In countries outside the EU, in which the EuP directive has no validity, the automatic power-down feature can be disabled if necessary See chapter „System and tone settings“.
Technical Specifications
| Analog section | |
| Frequency response +0/-3 dB | 0,1 Hz - 200 kHz |
| Signal / noise ratio | 110/114 dB |
| THD / Intermodulation | <0,001%/<0,001% |
| Channel separation | >108 dB |
| Class A operation | up to 700 mA |
| Volume control | Relay controlled in 1 dB steps, - 60 dB to 0 dB |
| Loudness | switchable, adjustable to the headphones efficiency |
| Sound control | switchable, bass and treble -6 dB to + 8 dB |
| Headphone outputs | 6.35 mm plug, 4.4 mm Pentaconn, XLR-4 pin |
| Impedances: 8, 12, 18, 25, 40, 80 Ohms | |
| Analog inputs | |
| High level (RCA) / balanced (XLR) | 250 mVeff ... 4,5 Veff / 10 kOhms | 500 mVeff ... 9 Veff / 20 kOhms |
| Digital inputs | |
| 1 x AES-EBU 32...192 kHz / 16-24 BitS/P-DIF: 2 x Standard Coax, 2 x optical TOS-Link 32...192 kHz / 16-24 Bit,1 x BNC 32...192 kHz / 16-24 Bit,2 x USB DAC: Device-Mode up to 768 kSps (PCM) and DSD1024*, supports asynchronous data transfer. *DSD 512 and DSD 1024 with Windows PC and appropriate driver installed only.2 x HDMI IN, 1 x HDMI OUT with ARC (as an option) | |
| Bluetooth | A2DP (Audio), AVRCP 1.4 (Control) / aptX® HD, SBC, AAC |
| D/A converter section | |
| PCM | Double-Differential-Quadruple-Converter with four 32-Bit Sigma-Delta D/A converter per channel, 705,6 / 768 kSps conversion rate |
| DSD | T+A-True-1Bit DSD D/A converter, up to DSD 1024 (49,2 MHz), native bitstream |
| Upsampling | T+A signal-processor - synchronous upsampling with four selectable oversampling algorithms. FIR short, FIR long, Bezier/IIR, Bezier, NOS (non-oversampling) |
| Analog filter | Phase-linear Bessel filter 3rd order, switchable with 60 or 120 kHz cut of frequency |
| Mains | 200 - 240V, 50 - 60Hz, 100 Watts |
| Standby | <0,5 Watts |
| Dimensions (H×W×D) | 10 × 32 × 34 cm, 4 × 12.6 × 13.4 inch |
| Accessories | Remote control FM8, power cord, USB-cable for charging RC, USB cable 2.0 for DAC, RCA cable, Bluetooth antenna |
| Weight | 6,5 kg, 14.4 lbs |
T+A
32052 Herford | Germany
T +49 5221 76760
F +49 5221 767676
info@ta-hifi.com
www.ta-hifi.com




- DEUTSCH
- ENGLISH
- WILLKOMMEN
- CONTENT
- NOTES
- SAFETY NOTES
- CONTROLS AND FUNCTIONS
- REMOTE CONTROL
- CONNECTIONS
- INSTALLATION AND WIRING
- PLAYBACK
- SYSTEM AND TONE SETTINGS
- METER
- TROUBLESHOOTING
- NOTES ON ENERGY SAVING
- TECHNICAL SPECIFICATIONS
- ① ON / OFF SWITCH
- ② METER
- ③ DISPLAY
- ON / OFF SWITCH
- SOURCE SELECTION
- VOLUME CONTROL
- MENU OPERATION
- SETTINGS
- CHARGING THE REMOTE CONTROL
- IMPORTANT INFORMATION
- ⑤ SYSTEM INTERFACES
- INSTALLATION
- CONNECTING THE HEADPHONES
- CONNECTION OF DIGITAL SOURCE DEVICES
- CONNECTION OF ANALOG SOURCE DEVICES
- CONNECTING THE BLUETOOTH ANTENNA
- CONNECTION OF HDMI DEVICES
- CONNECTING A COMPUTER
- CONNECTING THE MAINS CABLE
- WIRING DIAGRAM
- ANALOGUE SOURCE
- DIGITAL SOURCE
- BLUETOOTH
- OPERATION ON THE DEVICE
- OPERATION BY REMOTE CONTROL
- GENERAL INFORMATION
- STATUS LED
- INPUT-LEVEL
- OUTPUT-LEVEL
- TEMPERATURE [SCALE 0...100]
- STREAM QUALITY [SCALE - 0 + AND 0...100]
- AUTOMATIC POWER DOWN FUNCTION
- T+A
Brand : T+A
Model : HA 200
Category : Audio Amplifier