
P1033E - Lawn mower PARTNER - Free user manual and instructions
Find the device manual for free P1033E PARTNER in PDF.


User questions about P1033E PARTNER
0 question about this device. Answer the ones you know or ask your own.
Ask a new question about this device
Download the instructions for your Lawn mower in PDF format for free! Find your manual P1033E - PARTNER and take your electronic device back in hand. On this page are published all the documents necessary for the use of your device. P1033E by PARTNER.
USER MANUAL P1033E PARTNER
natural_image
Line drawing of a lawn mower with open handle and wheels (no text or symbols)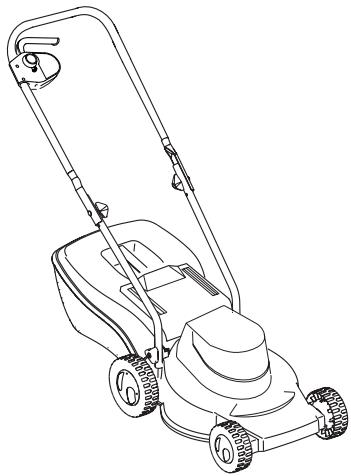
natural_image
Line drawing of a lawn mower with open handle and side wheels (no text or symbols)GB
IMPORTANT INFORMATION
Read before use and retain for future reference
DE
WICHTIGE INFORMATION
natural_image
Diagram of a mechanical device with a rotating lever and housing (no text or symbols)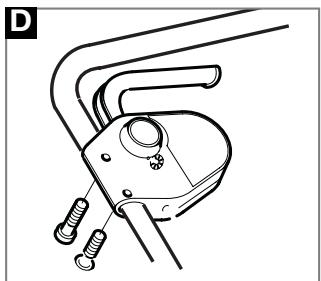
natural_image
Technical line drawing of a mechanical clamp or bracket assembly (no text or symbols)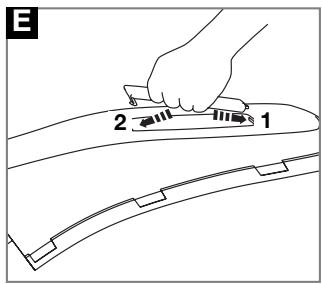
text_image
E 2 1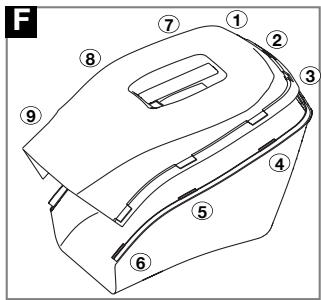
text_image
F ① ② ③ ④ ⑤ ⑥ ⑦ ⑧ ⑨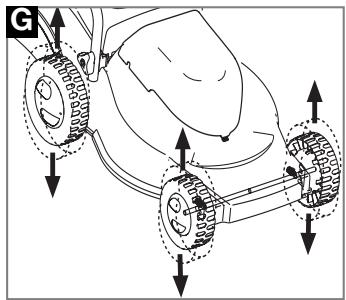
natural_image
Diagram of a robotic car with wheels and directional arrows indicating motion (no text or symbols)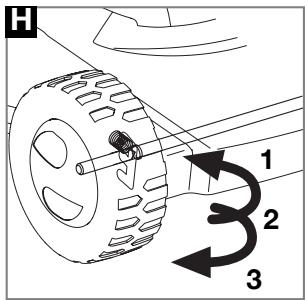
text_image
H 1 2 3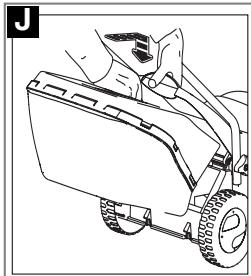
natural_image
Line drawing of a person using a wheeled vehicle (no text or symbols)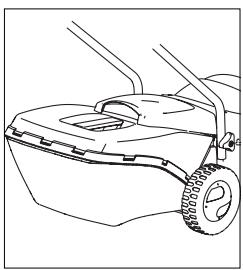
natural_image
Line drawing of a lawn mower with visible blades and wheels (no text or symbols)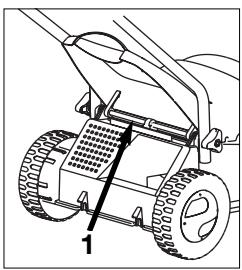
natural_image
Technical line drawing of a grass lawn mower with labeled component (no text or symbols beyond label)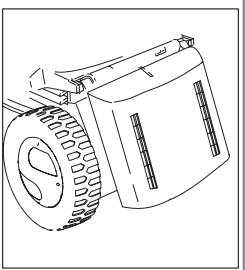
natural_image
Technical line drawing of a mechanical component with gears and housing (no text or symbols)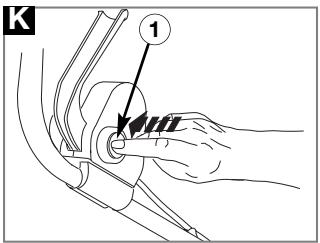
text_image
K 1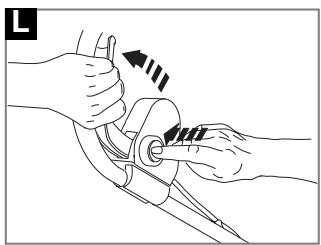
natural_image
Illustration of hands using a tool to adjust or install a mechanical component (no text or symbols visible)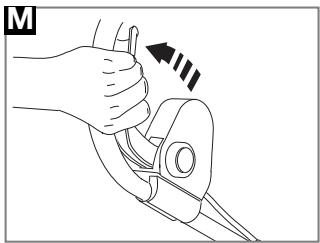
natural_image
Line drawing of a hand gripping a mechanical component with an arrow indicating rotation (no text or symbols)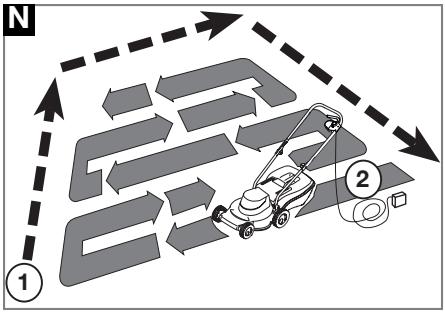
flowchart
graph TD
    A["Left Wing"] --> B["Right Wing"]
    B --> C["Left Wing"]
    C --> D["Right Wing"]
    D --> E["Left Wing"]
    E --> F["Right Wing"]
    F --> G["Left Wing"]
    G --> H["Right Wing"]
    H --> I["Left Wing"]
    I --> J["Right Wing"]
    J --> K["Left Wing"]
    K --> L["Right Wing"]
    L --> M["Left Wing"]
    M --> N["Right Wing"]
    N --> O["Left Wing"]
    O --> P["Right Wing"]
    P --> Q["Left Wing"]
    Q --> R["Right Wing"]
    R --> S["Left Wing"]
    S --> T["Right Wing"]
    T --> U["Left Wing"]
    U --> V["Right Wing"]
    V --> W["Left Wing"]
    W --> X["Right Wing"]
    X --> Y["Left Wing"]
    Y --> Z["Right Wing"]
    Z --> AA["Left Wing"]
    AA --> AB["Right Wing"]
    AB --> AC["Left Wing"]
    AC --> AD["Right Wing"]
    AD --> AE["Left Wing"]
    AE --> AF["Right Wing"]
    AF --> AG["Left Wing"]
    AG --> AH["Right Wing"]
    AH --> AI["Left Wing"]
    AI --> AJ["Right Wing"]
    AJ --> AK["Left Wing"]
    AK --> AL["Right Wing"]
    AL --> AM["Left Wing"]
    AM --> AN["Right Wing"]
    AN --> AO["Left Wing"]
    AO --> AP["Right Wing"]
    AP --> AQ["Left Wing"]
    AQ --> AR["Right Wing"]
    AR --> AS["Left Wing"]
    AS --> AT["Right Wing"]
    AT --> AU["Left Wing"]
    AU --> AV["Right Wing"]
    AV --> AW["Left Wing"]
    AW --> AX["Right Wing"]
    AX --> AY["Left Wing"]
    AY --> AZ["Right Wing"]
text_image
P 1 2 3 4 5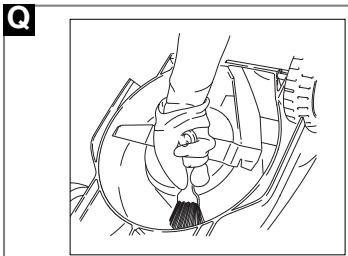
natural_image
Line drawing of a hand pressing down on a car tire (no text or symbols)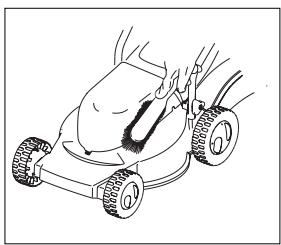
natural_image
Line drawing of a lawn mower with visible tire tracks and motion arrows (no text or symbols)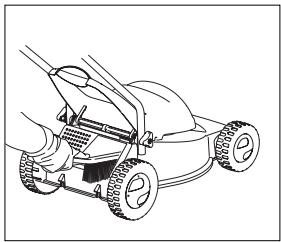
natural_image
Line drawing of a lawn mower with visible tracks and wheels (no text or symbols)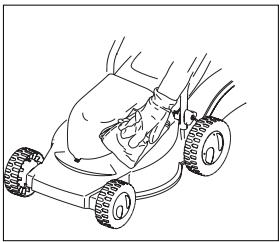
natural_image
Line drawing of a person using a lawn mower on a grassy vehicle (no text or symbols)GB - CONTENTS
-
Switchbox
-
Start/stop lever
-
Lock off button
-
Switchbox screws x 2
-
Upper handle
-
Cable clip x 2
-
Upper Handle Bolt x 2
-
Upper handle Washer x 2
-
Upper Handle Wing Knob x2
-
Upper Handle Wing Knob Nut x 2
-
Lower handle x 2
-
Lower Handle Wing Knob Nut x 2
-
Lower handle Wing Knob x 2
-
Lower Handle Washer x 2
-
Motor Cover
-
Deck
17 Grassbox Handle (if applicable)
18.Grassbox Upper
19.Grassbox Lower
20.Spanner
21.Instruction Manual
-
Safety Flap
-
Warning Label
24.Product Rating Label
DE - INHALT
20.Schraubenschlüssel
text_image
Exploded view diagram of a lawn mower with numbered parts for identificationSafety Precautions

If not used properly this lawnmower can be dangerous! This lawnmower can cause serious injury to the operator and others, the warnings and safety instructions must be followed to ensure reasonable safety and efficiency in using this lawnmower. The operator is responsible for following the warning and safety instructions in this manual and on the lawnmower. Never use the mower unless the grassbox or guards provided by the manufacturer are in the correct position.
Explanation of Symbols on the 33cm

Warning

Read the user instructions carefully to make sure you understand all the controls and what they do

Always keep the lawnmower on the ground when mowing. Tilting or lifting the lawnmower may cause stones to be thrown out
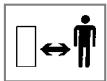
Keep bystanders away. Do not mow whilst people especially children or pets are in the mowing area
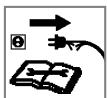
Switch off! Remove plug from mains before adjusting, cleaning or if cable is entangled or damaged. Keep the cable away from the blade.
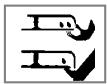
Beware of severing toes or hands. Do not put hands or feet near a rotating blade.

Blade continues to rotate after the machine is switched off. Wait until all machine components have completely stopped before touching them.

Do not mow in the rain or leave the lawnmower outdoors while raining
General
- Never allow children or people unfamiliar with these instructions to use the mower. Local regulations may restrict the age of the operator.
- Only use the lawnmower in the manner and for the functions described in these instructions.
- Never operate the lawnmower when you are tired, ill or under the influence of alcohol, drugs or medicine.
- The operator or user is responsible for accidents or hazards occurring to other people or their property.
Electrical
- The use of a Residual Current Device (R.C.D.) with a tripping current of not more than 30mA is recommended. Even with a R.C.D. installed 100% safety cannot be guaranteed and safe working practice must be followed at all times. Check your R.C.D. every time you use it.
- Before use, examine cable for damage, replace it if there are signs of damage or ageing.
- Do not use the lawnmower if the electric cables are damaged or worn
-
Immediately disconnect from the mains electricity supply if the cable is cut, or the insulation is damaged. Do not touch the electric cable until the electrical supply has been disconnected. Do not repair a cut or damaged cable. Replace it with a new one.
-
Your extension cable must be uncoiled, coiled cables can overheat and reduce the efficiency of your mower.
- Keep cable away from lawnmower, always work away from the power point mowing up and down, never in circles.
- Do not pull cable around sharp objects.
- Always switch off at the mains before disconnecting any plug, cable connector or extension cable.
-
Switch off, remove plug from mains and examine electric supply cable for damage or ageing before winding cable for storage. Do not repair a damaged cable, replace it with a new one. Use only Electrolux replacement cable.
-
Always wind cable carefully, avoiding kinking.
-
Never carry the product by the cable.
-
Never pull on the cable to disconnect any of the plugs.
-
Use only on AC mains supply voltage shown on the product rating label.
-
Electrolux products are double insulated to EN60335. Under no circumstances should an earth be connected to any part of the product.
Cables
Use only 1.00mm^2 size cable up to 40 metres length maximum.
Maximum rating:
1.00mm ^2 size cable 10 amps 250 volts AC
-
Mains cables and extensions are available from your local Electrolux Outdoor Products Approved Service Centre.
-
Only use extension cables specifically designed for outdoor use.
Preparation
- While using your product always wear substantial footwear and long trousers.
- Make sure the lawn is clear of sticks, stones, bones, wire and debris; they could be thrown by the blade.
- Before using the machine and after any impact, check for signs of wear or damage and repair as necessary.
- Replace worn or damaged blades together with their fixings in sets to preserve balance.
Use
- Use the lawnmower only in daylight or good artificial light.
-
Avoid operating your lawnmower in wet grass, where feasible.
-
Take care in wet grass, you may lose your footing.
-
On slopes, be extra careful of your footing and wear non-slip footwear.
-
Mow across the face of slopes, never up and down.
-
Exercise extreme caution when changing direction on slopes. Walk never run.
-
Mowing on banks and slopes can be dangerous. Do not mow on banks or steep slopes.
-
Do not walk backwards when mowing, you could trip.
-
Never cut grass by pulling the mower towards you.
-
Switch off before pushing the mower over surfaces other than grass.
-
Never operate the lawnmower with damaged guards or without guards in place.
-
Keep hands and feet away from the cutting means at all times and especially when switching on the motor.
Safety Precautions
- Do not tilt lawnmower when the motor is running, except when starting and stopping. In this case, do not tilt more than absolutely necessary and lift only the part which is away from the operator. Always ensure that both hands are in the operating position before returning the appliance to the ground.
- Do not put hands near the grass discharge chute.
- Never pick up or carry a mower when it is operating or still connected to the mains supply.
- Remove the plug from the mains :
- before leaving the mower unattended for any period;
- before clearing a blockage;
- before checking, cleaning or working on the appliance;
- if you hit an object. Do not use your lawnmower until you are sure that the entire lawnmower is in a
safe operating condition.;
- if the lawnmower starts to vibrate abnormally. Check immediately. Excessive vibration can cause injury.
Maintenance and storage
- Keep all nuts, bolts and screws tight to be sure the lawnmower is in safe working condition.
- Check the grassbox/grassbag frequently for wear or deterioration.
- Replace worn or damaged parts for safety.
- Only use the replacement blade, blade bolt, spacer and impeller specified for this product.
- Be careful during adjustment of the lawnmower to prevent entrapment of the fingers between moving blades and fixed parts of the machine.
Assembly Instructions
Assembly of Lower Handles to Deck
- Insert the nuts into the lower handle wing knobs. (A1)
- Place the hole in the lower handle over the end of the tie rod (A)
- Place the washer and wing knob onto the end of the tie rod and firmly tighten. (A)
- Repeat on the other side.
Assembly of Upper Handles to Lower Handles.
- Insert the nuts into the upper handle wing knobs. (B1)
- Ensure the upper handle and the lower handle are aligned correctly. (B)
- Fit the bolts, washers and wing knobs..(B)
- Fit the cable to the handles with the clips provided, making sure the cables are not trapped between the upper and lower handles.
Assembly of Switchbox to Upper Handle
- Insert the studs in the switchbox hinge into the holes in the upper handle as illustrated in Fig C
- Firmly secure with the two screws (D).
Grassbox Assembly.
- Insert the grassbox handle into the grassbox upper, as illustrated in fig E, and press firmly down until the handle clicks into place - (if applicable).
- Align the grassbox upper with the grassbox lower.
- Locate the clips in the order illustrated in Fig F, ensuring all the clips are firmly in place.
Adjusting the Cutting Height
Cutting Height Adjustment (G) and (H)
- Height of cut is adjusted by raising or lowering the wheels.
• There are five heights of cut on this product.
NOTE
A medium height of cut is recommended for most lawns.
The quality of your lawn will suffer and collection will be poor if you cut too low.
HEIGHT OF CUT Low
Low to Medium
Medium
Medium to High
High
WHEELS POSITION Front position 1 Back position 1
Front position 1 Back position 2
Front position 2 Back position 2
Front position 2 Back position 3
Front position 3 Back position 3
Grassbox
Fitting Fully Assembled Grassbox to Lawnmower. See Fig J.
- Lift safety flap.
- Make sure the discharge chute is clean and free from debris.
- Locate fully assembled grassbox onto the location point at the rear of the deck (J1)
- Locate safety flap onto the top of the grassbox. Ensure the grassbox is securely located.
- IMPORTANT! AFTER FITTING ENSURE NO GAP REMAINS BETWEEN THE SAFETY FLAP AND THE GRASSBOX.
- Removal is the reverse procedure.
- For larger areas of grass where grass collection is not required you can use your lawnmower without the grassbox. Ensure the Safety Flap is fully closed. The design of the safety flap permits the cut grass to be discharged downward behind the machine.
Starting and Stopping
To Start your Lawnmower
- Connect female extension cable connector to the back of the switchbox.
- Connect plug to mains and switch on.
- Tilt the handle downwards to slightly raise the front of the lawnmower and to reduce the risk of lawn damage whilst starting.
The switchbox is provided with a lock-off button (K1) to prevent accidental starting.
- Press and hold the lock off button on the switchbox,(K1) then squeeze the Start/Stop lever towards the upper handle as shown on Fig. L.
- Continue to squeeze the start/stop lever towards the upper handle and release the lock-off button.(M)
- Lower the lawnmower to its proper operating position and commence mowing.
To Stop your Lawnmower
- Release the pressure on the Start/Stop lever.
How to Mow
- For the best results, mow the outside edge of the lawn in a clockwise direction first.(N1)
- Then start mowing the edge of the lawn nearest to the power point so the cable is laid out on the lawn you have already cut. (N2)
- For best grass collection, always mow in a straight line, do not swing the lawnmower from side to side.
Do Not Overload Your Mower
Mowing long thick grass may cause the motor speed to drop, you will hear a change in the motor sound. If the motor speed drops you may overload your lawnmower which may cause damage. When mowing in long thick grass a first cut with the cutting height set higher will help reduce the load. See Adjusting the Cutting Height. Mow twice a week during the growing season, your lawn will suffer if more than a third of its length is cut at one time and this may also result in poor collection.
Removing and Fitting the Blade and Fan
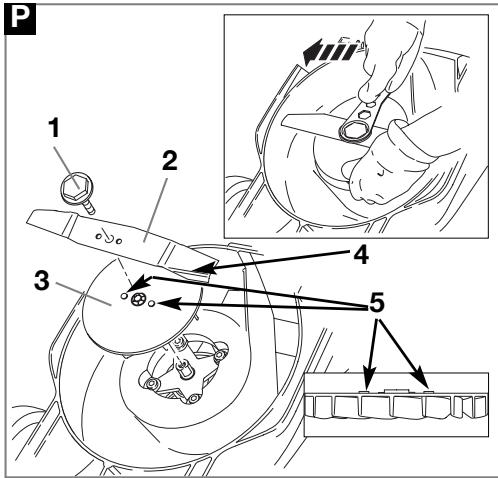
P1 - Blade bolt
P2 - Blade
P3 - Fan
- Always handle the blade with care - sharp edges could cause injury. USE GLOVES.
Removing the Blade and Fan
- To remove the blade bolt, hold the fan firmly and with the spanner provided loosen the blade bolt by turning it anti-clockwise (P).
- Remove the blade bolt, blade and fan. (P)
- Inspect for damage and clean as necessary.
- Renew your metal blade after 50 hours mowing or 2 years whichever is the sooner - regardless of condition.
- If the blade is cracked or damaged replace it
with a new one.
- Never use a blade bolt if the insulated head is damaged cracked or missing.
Fitting the Blade and Fan
- Ensure the fan is located correctly.(P)
- Fit the blade to the fan with the tilt edges of the blade (P4) facing towards the mower, ensuring the blade is located onto the fan location points (P5) correctly
- Re-assemble blade bolt through blade and fan.
- Hold the fan firmly and tighten blade bolt firmly with the spanner provided. Do not over tighten.
- Do not use a longer spanner.
Caring for your Lawnmower
Cleaning (Q)
- USE GLOVES
- IMPORTANT
It is very important that you keep your lawnmower clean. Grass clippings left in any of the air intakes or under the deck could become a potential fire hazard.
-
Remove grass from under the deck with brush.
-
Using a soft brush - remove grass clippings from all air intakes, the discharge chute and the grass box.
-
Remove the blade, see Figure P, to gain access to the fan and clean with a soft brush.
-
Wipe over the surface of your lawnmower with a dry cloth.
- IMPORTANT
Never use water for cleaning your lawnmower. Do not clean with chemicals, including petrol, or solvents - some can destroy critical plastic parts.
At the End of the Mowing Season
- Replace blade, bolts, nuts or screws, if necessary.
- Clean your lawnmower thoroughly.
- Make sure that the electric cable is coiled properly.
Storing your Lawnmower
Store in a dry place where your lawnmower is protected from damage.
Service Recommendations
- Your product is uniquely identified by a silver and black product rating label.
- We strongly recommend that your product is serviced at least every twelve months, more often in a professional application.
Environmental Information
Electrolux Outdoor Products are manufactured under an Environmental Management System (ISO 14001) using, where practical, components manufactured in the most environmentally responsible manner, according to company procedures, and with the potential for recycling at the end of the products' life.
- Packaging is recyclable and plastic components have been labelled (where practical) for categorised recycling.
- Awareness of the environment must be considered when disposing of ‘end-of-life’ product.
- If necessary, contact your local authority for disposal information.

The symbol 📋 on the product or on its packaging indicates that this product may not be treated as household waste. Instead it shall be handed over to the applicable collection point for the recycling of electrical and electronic equipment.
By ensuring this product is disposed of correctly, you will help prevent potential negative consequences for the environment and human health, which could otherwise be caused by inappropriate waste handling of this product.
For more detailed information about recycling of this product, please contact your local council office, your household waste disposal service or the shop where you purchased the product.
Fault Finding Hints
Fails to Operate
- Is the correct Starting procedure being followed? See ‘To Start your Lawnmower’
- Is the Power Turned On?
- Check the fuse in the plug, if blown replace.
- Fuse continues to blow? Immediately disconnect from the mains electricity supply and consult your local approved Service Centre.
Poor Grass Collection
- Disconnect from the mains electricity supply.
- Clean the outside of the air intakes, the discharge chute and the underside of the deck.
- Raise to a higher height of cut. See Adjusting the Cutting Height
- Clean Fan Blades.
- If poor collection persists. Immediately disconnect from the mains electricity supply and consult your local approved Service Centre.
Excessive Vibration
- Disconnect from the mains electricity supply.
- Check that the blade is fitted correctly?
- If the blade is damaged or worn, replace it with a new one.
- If vibration persists, turn the blade through 180^ by first loosening the blade bolt, turning the blade and re-tightening the blade bolt.
- If vibration persists? Immediately disconnect from the mains electricity supply and consult your local approved Service Centre.
Lawnmower becomes heavy to push
- Disconnect from the mains electricity supply.
- In long grass or uneven ground, the height of cut should be raised to a higher position. See Adjusting the Cutting Height
- Check that the wheels and rollers can rotate freely.
- If problem persists?
Immediately disconnect from the mains electricity supply and consult your local approved Service Centre.
Guarantee and Guarantee Policy
If any part is found to be defective due to faulty manufacture within the guarantee period, Electrolux Outdoor Products, through its Authorised Service Repairers will effect the repair or replacement to the customer free of charge providing:
(a) The fault is reported directly to the Authorised Repairer.
(b) Proof of purchase is provided.
(c) The fault is not caused by misuse, neglect or faulty adjustment by the user.
(d) The failure has not occurred through fair wear and tear.
(e) The machine has not been serviced or repaired, taken apart or tampered with by any person not authorised by Electrolux Outdoor Products.
(f) The machine has not been used for hire.
(g) The machine is owned by the original purchaser.
(h) The machine has not been used commercially.
* This guarantee is additional to, and in no way diminishes the customers statutory rights.
Failures due to the following are not covered, therefore it is important that you read the instructions contained in this Operator's Manual and understand how to operate and maintain your machine:
Failures not covered by guarantee
* Replacing worn or damaged blades.
* Failures as a result of not reporting an initial fault.
* Failures as a result of sudden impact.
* Failures as a result of not using the product in accordance with the instructions and recommendations contained in this Operator's Manual.
* Machines used for hire are not covered by this guarantee.
* The following items listed are considered as wearing parts and their life is dependent on regular maintenance and are, therefore not normally subject to a valid warranty claim: Blades, Electric Mains cable.
\* Caution!
Electrolux Outdoor Products does not accept liability under the warranty for defects caused in whole or part, directly or indirectly by the fitting of replacement parts or additional parts that are not either manufactured or approved by Electrolux Outdoor Products, or by the machine having been modified in any way
| I, the undersigned M. Bowden of Electrolux Outdoor Products, Aycliffe Industrial Park, NEWTON AYCLIFFE, Co. Durham. DL5 6UP. Certify that the Lawnmower:-Category......Electric Wheeled Rotary Make......Electrolux Outdoor ProductsConforms to the specifications of Directive 2000/14/EEC | I, the undersigned M. Bowden of Electrolux Outdoor Products, Aycliffe Industrial Park, NEWTON AYCLIFFE, Co. Durham. DL5 6UP Certify that a sample of the above product has been tested using directive 81/1051/EEC as a guide. The maximum A-weighted sound pressure level recorded at operator position under free field semi anechoic chamber conditions was :- | I, the undersigned M. Bowden of Electrolux Outdoor Products, Aycliffe Industrial Park, NEWTON AYCLIFFE, Co. Durham. DL5 6UP Certify that a sample of the above product has been tested using ISO 5349 as a guide. The maximum weighted root mean square value of vibration recorded at operator's hand position was:- |
| Type of Cutting Device....Rotary BladeIdentification of Series......See Product Rating Label Conformity Assesment Procedure....ANNEX VINotified Body......I.T.S., Cleeve Road, Leatherhead, Surrey. KT22 7SB EnglandOther Directives:-......98/37/EEC, 89/336/EEC, 73/23/EEC & applicable standards:-. EN60555-2:1987, EN60555-3:1987, EN55014:1993, EN55014:1995, EN836:1997, IEC335-1:1991, IEC335-2-77:1996 | Type......RE330Width of Cut......33cmSpeed of Rotation of Cutting Device......2,800 RPMGuaranteed sound power level......86 dB (A)Measured Sound Power Level......84 dB (A)Level......73.5 dB (A)Value......3.49 m/s ^2 Weight......10.1 kg | |
| Ich, der Unterzeichner M. Bowden of Electrolux Outdoor Products, Aycliffe Industrial Park, NEWTON AYCLIFFE, Co. Durham. DL5 6UP. bescheinige hiermit, dass der Rasenmäher:-Kategorie.....Elektrorasenmähe Fabrikat......Electrolux Outdoor Productsdie Spezifikationen der Direktive 2000/14/EG erfüllt | Ich, der Unterzeichner M. Bowden, Electrolux Outdoor Products, Aycliffe Industrial Park, NEWTON AYCLIFFE, Co. Durham, DL5 6UP, bescheinige hiermit, daß eine Probe des obigen Produkts getestet wurde und dabei Direktive 81/1051/EWG als Richtschnur verwendet wurde. Der maximale A-gewichtete Schalldruckpegel, der an der Bedienerposition unter Freifeld-Halbschalltot-Kammerbedingungen gemessen wurde, betrug:- | Ich, der Unterzeichner M. Bowden, Electrolux Outdoor Products, Aycliffe Industrial Park, NEWTON AYCLIFFE, Co. Durham, DL5 6UP, bescheinige hiermit, daß eine Probe des obigen Produkts getestet wurde und dabei ISO 5349 als Richtschnur verwendet wurde. Der maximale gewichtete Vibrationseffektivwert, der an der Handposition des Bedieners gemessen wurde, betrug:- |
| Schneidwerktyp......Rotierendes MesserIdentifizierung der reihe......Siehe Produkttypenschild Konformitätsbestätigungsverfahren...ANNEX VIBenachrichtigte Behörde......I.T.S., Cleeve Road, Leatherhead, Surrey. KT22 7SB EnglandAndere Direktiven......98/37/EEC, 89/336/EEC, 73/23/EECund Normen:-......EN60555-2:1987, EN60555-3:1987, EN55014:1993, EN55014:1995, EN836:1997, IEC335-1:1991, IEC335-2-77:1996 | Typ......RE330Schnittbreite......33cmUmdrehungsgeschwindigkeit des Schneidwerks....2,800 RPMGarantiertter Geräuschpegel......86 dB (A)Gemessener Geräuschpegel......84 dB (A)Höhe......73.5 dB (A)Wert......3.49 m/s ^2 Gewicht......10.1 kg | |
| Je soussigné M. Bowden of Electrolux Outdoor Products, Aycliffe Industrial Park, NEWTON AYCLIFFE, Co. Durham. DL5 6UP. certifie que la tondeuse:-Catégorie...Rotative à roues électrique Marque...Electrolux Outdoor Products est conforme aux spécifications de la Directive 2000/14/EEC | Je soussigné M. Bowden, Electrolux Outdoor Products, Aycliffe Industrial Park, NEWTON AYCLIFFE, Co. Durham, DL5 6UP, Grande-Bretagne, certifie qu'un échantillon du produit ci-dessus a été essayé selon les indications de la directive 81/1051/EEC. Le niveau maximum pondéré de pression acoustique enregistré à la position de l'opérateur en champ libre en chambre demi-sourde était de:- | Je soussigné M. Bowden, Electrolux Outdoor Products, Aycliffe Industrial Park, NEWTON AYCLIFFE, Co. Durham, DL5 6UP, Grande-Bretagne, certifie qu'un échantillon du produit ci-dessus a été essayé selon les indications de la norme ISO 5349. La moyenne quadratique pondérée des vibrations enregistrées à la position de la main de l'opérateur était de:- |
| Type d'outil de coupe......Lame rotativeIdentification de la serie......Voir la PlaquetteD'identificationProcédure d'évaluation de la conformité......ANNEX VIOrganisme notifié....I.T.S., Cleeve Road, Leatherhead, Surrey. KT22 7SB EnglandAutres directives....98/37/EEC, 89/336/EEC, 73/23/EEC et aux normes......EN60555-2:1987, EN60555-3:1987, EN55014:1993, EN55014:1995, EN836:1997, IEC335-1:1991, IEC335-2-77:1996 | Type......RE330Largeur de coupe......33cmVitesse de rotation de l'outil de coupe......2,800 RPMNiveau garanti de puissance sonore......86 dB (A)Niveau mesuré de puissance sonore......84 dB (A)Niveau......73.5 dB (A)Valeur......3.49 m/s ^2 Poids......10.1 kg | |
| Ik, ondergetekende M. Bowden of Electrolux Outdoor Products, Aycliffe Industrial Park, NEWTON AYCLIFFE, Co. Durham. DL5 6UP. verklaar dat de grasmaaimachine:-Categorie...Elektrische grasmaaier op wielenMerk......Electrolux Outdoor Products Voldoet aan de specificaties van directief 2000/14/EEC | Ik, ondergetekende M. Bowden, Electrolux Outdoor Products, Aycliffe Industrial Park, NEWTON AYCLIFFE, Co. Durham, DL5 6UP, verklaar hierbij dat een proefexemplaar van het bovengenoemde product is getest volgens richtlijn 81/1051/EEC. Het maximale A-belaste geluidsdrukniveau dat is geregistreerd bij de positie van de bediener in een semi geluiddichte ruimte bij vrije veld condities bedraagt:- | Ik, ondergetekende M. Bowden, Electrolux Outdoor Products, Aycliffe Industrial Park, NEWTON AYCLIFFE, Co. Durham, DL5 6UP, verklaar hierbij dat een proefexemplaar van het bovengenoemde product is getest volgens ISO 5349 als richtlijn. De maximale belaste effectieve waarde van trilling, geregistreerd bij de positie van de hand van de bediener, bedraagt:- |
| Type maaier......Roterend mesIdentificatie van serie......Zie ProductlabelProcedure voor het beoordelen van conformiteit......ANNEX VIOp de hoogte gestelde instantie...I.T.S., Cleeve Road, Leatherhead, Surrey. KT22 7SB EnglandAndere directieven......98/37/EEC, 89/336/EEC, 73/23/EEC en aan de volgende normen......EN60555-2:1987, EN60555-3:1987, EN55014:1993, EN55014:1995, EN836:1997, IEC335-1:1991, IEC335-2-77:1996 | Type......RE330Maabreedte......33cmToerental maaier......2,800 RPMGegarandeerd geluidsvermögen......86 dB (A)Gemeten geluidsvermögen......84 dB (A)Niveau......73.5 dB (A)Waarde......3.49 m/s ^2 Gewicht......10.1 kg | |
| Já, níže podepsaný M. Bowden of Electrolux Outdoor Products, Aycliffe Industrial Park, NEWTON AYCLIFFE, Co. Durham. DL5 6UP. potvrzuji, že sekačka:-Kategorie......Elektrická rotační kolová sekačkaZnačka......Electrolux Outdoor Productssplňuje specifikace Směrnice2000/14/EEC | Já, níže podepsaný M. Bowden, Electrolux Outdoor Products, (Aycliffe Industrial Park, NEWTON AYCLIFFE, Co. Durham. DL5 6UP) prohlašuji, že exemplář svrchu uvedeného výrobku byl odzkoušen za použití směrnice81/1051/EEC jako vodítka. Maximální A-vážená úroveň zvukového tlaku, kterábyla zaznamenána pro pozici uživatele za podmínek volného pole polo-bezdozvukové komory, byla- | Já, níže podepsaný M. Bowden, Electrolux Outdoor Products, (Aycliffe Industrial Park, NEWTON AYCLIFFE, Co. Durham. DL5 6UP) prohlašuji, že exemplář svrchu uvedeného výrobku byl odzkoušen za použití normy ISO 5349 jako vodítka. Maximální vážená odmocnina střední kvadratické hodnoty vibrace, která byla zaznamenána v pozici ruky uživatele, byla:- |
| Typ řezného nástroje......Rotační nůžIdentifikace Série......Viz Štítek Technických Údajů VýrobkuPostup vyhodnocování souladu......ANNEX VIOznámeno orgánu......I.T.S., Cleeve Road, Leatherhead, Surrey. KT22 7SB EnglandJiné směrnice......98/37/EEC, 89/336/EEC, 73/23/EECa normy......EN60555-2:1987, EN60555-3:1987, EN55014:1993, EN55014:1995, EN836:1997, IEC335-1:1991, IEC335-2-77:1996 | Typ......RE330Šířka sekání......33cmRotační rychlost řezného nástroje......2,800 RPMZaručená hladina akustického výkonu......86 dB (A)Naměřená hladina akustického výkonu......84 dB (A)Úroveň......73.5 dB (A)Hodnota......3.49 m/s ^2 Hmotnost......10.1 kg | |
Electrolux Outdoor Products
Aycliffe Industrial Park
NEWTON AYCLIFFE
Co.Durham DL5 6UP
ENGLAND
Telephone - (00) 44 1325 300303 Fax - (00) 44 1325 310339
Our policy of continuous improvement means that the specification of products may be altered from time to time without prior notice. Electrolux Outdoor Products manufacture products for a number of well known brands under various registered patents, designs and trademarks in several countries.
© Electrolux Outdoor Products Ltd. Registered Office, Electrolux Works, Oakley Road, Luton LU4 9QQ
Registered number 974979 England

The Electrolux Group. The world's No.1 choice.
The Electrolux Group is the world's largest producer of powered appliances for kitchen, cleaning and outdoor use. More than 55 million Electrolux Group products (such as refrigerators, cookers, washing machines, vacuum cleaners, chain saws and lawn mowers) are sold each year to a value of approx. USD 14 billion in more than 150 countries around the world.