PEN TRANSLATOR 6 - Electronic translator IRIS - Free user manual and instructions
Find the device manual for free PEN TRANSLATOR 6 IRIS in PDF.


User questions about PEN TRANSLATOR 6 IRIS
0 question about this device. Answer the ones you know or ask your own.
Ask a new question about this device
Download the instructions for your Electronic translator in PDF format for free! Find your manual PEN TRANSLATOR 6 - IRIS and take your electronic device back in hand. On this page are published all the documents necessary for the use of your device. PEN TRANSLATOR 6 by IRIS.
USER MANUAL PEN TRANSLATOR 6 IRIS
IRISPen Translator 6 (Windows)
User's Guide
English
Table of Contents
Copyrights 1
Chapter 1 Introducing the IRISPen. 3
What is the IRISPen? 3
How does it work? 6
The steps to follow. 9
Chapter 2 Installation 11
System requirements. 11
Installing the IRISPen software 11
Installing the pen scanner 14
Uninstalling the IRISPen software. 16
How to get product support? 17
How to register? 17
Chapter 3 Starting up 19
Running the IRISPen 19
User interface. 21
Calibrating the pen scanner. 23
Changing the user interface language 25
The Scan Test window 25
The IRISPen Wizard 28
Chapter 3 Basic settings. 31
Reading options 31
Scan type 31
Language 32
Other. 34
Target. 34
Scanning mode 36
Chapter 4 Frequent commands 37
Pen Buttons 37
Delimiters 39
Speech synthesis 42
Beep Sound 43
Chapter 5 Learn how to... 45
Customize/save/reopen settings 45
Read numeric data 47
Read small print. 48
Scan multiple lines 49
Scan from right to left. 50
Define the symbol for unknown characters. 51
Replace vertical lines 52
Program hotkeys 54
Translate text 55
Index 59
Copyrights
Copyrights ©1993-2007 I.R.I.S. All Rights Reserved.
The IRISPen Mini, the IRISPen Express, the IRISPen Executive, the IRISPen Translator software were designed and developed by I.R.I.S. OCR ("Optical Character Recognition") and Linguistic technology by I.R.I.S.
I.R.I.S. detains the copyrights of the IRISPen Mini software, the IRISPen Express software, the IRISPen Executive software, the IRISPen Translator software, Read & Speak, the PBR ("Pen Bar Code Reading") technology, the PCR ("Pen Character Recognition") technology, the PHR ("Pen Handprinting Recognition") technology, the linguistic technology, the on-line help system and this manual.
The I.R.I.S. logo, IRISPen, PBR, PCR, I.R.I.S. Linguistic Technology and Read & Speak are trademarks of I.R.I.S.
All other products mentioned in this user's guide are trademarks or registered trademarks of their respective owners.
CE and FCC conformity The IRISPen was tested to comply with the EEC standards (EMC Directive 89/336/EEC amended by 92/31/EEC & 93/68/EC) as well as the FCC Standards for Home or Office Use (47 CFR Part 15 regulation & ANSI C63.4).
CHAPTER 1
INTRODUCING THE IRISPEN
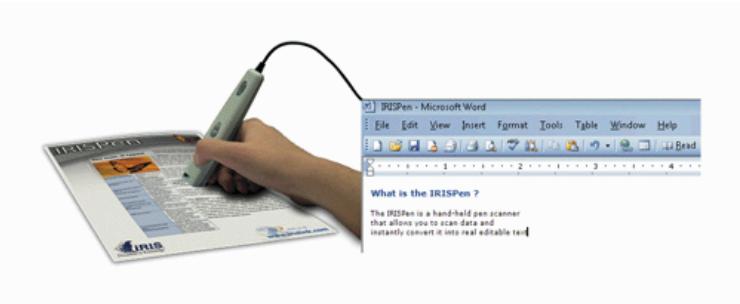
The IRISPen is a hand-held pen scanner and software that allows you to scan data and instantly convert it into real editable text with the OCR (Optical Character Recognition) technology of I.R.I.S. The result is directly available in any Windows or Mac application.
Major applications
You will use the IRISPen to scan and enter into your active application any of the following:
- notes and short entries like addresses, phone numbers, etc.,
- figures and tables from checks, invoices, bank statements, etc.,
- excerpts of texts from books, magazines, newspapers, etc.,
- small graphics like signatures, logos, handwritten notes, etc.
Depending on the IRISPen version used, you will also be able to read
barcodes, handprinting, dot matrix text, scan multiple lines at a time, or even read out or translate the scanned lines.
The IRISPen series
Here is the IRISPen series. Each version offers a different range of functionalities.
- IRISPen Mini (+ Asian version)
- IRISPen Express (+ Asian version)*
- IRISPen Executive (+ Asian version)*
- IRISPen Translator
(*) Available for Windows and for Mac OS X.
| IRISPen Mini | IRISPen Express | IRISPen Translator | IRISPen Executive |
| Basic features | Basic features | Basic features | Basic features |
| User interface in 15 languages | User interface in 15 languages | User interface in 15 languages | User interface in 15 languages |
| 47 recognition languages + 4 languages in Asian version (*) | 121 recognition languages + 4 languages in Asian version (*) | 121 recognition languages (**) | 121 recognition languages + 4 languages in Asian version (*) |
| Programmable pen buttons: 4 possible operations (simple click only) | Programmable pen buttons: 5 possible operations (simple click only) | Programmable pen buttons: 12 possible operations (simple and double click) | Programmable pen buttons: 13 possible operations (simple and double click) |
| Customizable hotkeys | Customizable hotkeys | Customizable hotkeys | |
| Save default settings | Save default settings | Save default settings | |
| IRISPen Wizard | IRISPen Wizard | IRISPen Wizard | |
| Replace vertical lines | Replace vertical lines | Replace vertical lines | |
| Delimiters | Delimiters | ||
| Multiline scanning | Multiline scanning | ||
| Speech synthesis | Speech synthesis | ||
| Image adjustment | |||
| Replace character string | |||
| Customizable character subset | |||
| Reading of handprinting | |||
| Reading of dotmatrix | |||
| Reading of barcodes | |||
| Reading of CMC7 | |||
| Translation of recognized data |
() The Asian version of the IRISPen allows you to recognize 4 additional languages: Traditional Chinese, Simplified Chinese, Japanese, Korean.
(*) No Asian version available.
The pen scanner
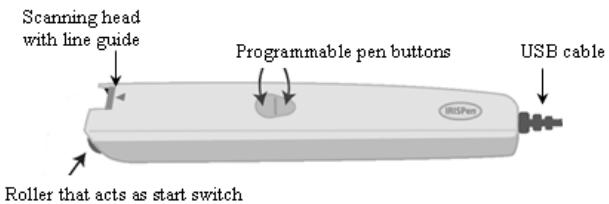
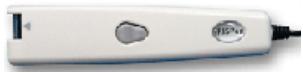
The IRISPen is a pen scanner that has the size and shape of a highlighter. It connects to your computer's USB port and does not require any external power supply. The IRISPen is equipped with a scanning head and a line guide, a roller, and two programmable buttons.
The line guide is used to properly position the pen on the line to be captured.
The roller enables to easily roll the pen onto the paper and acts as a start switch.
The two pen buttons are programmable.
When you press the IRISPen onto a piece of paper, you turn it on, and when you lift the IRISPen away, the scanning ends. A green beam lights up the text area as you scan it.
The OCR technology
The IRISPen integrates the latest OCR (Optical Character Recognition) engine developed by I.R.I.S. It is able to recognize lines of text with top accuracy in up to 125 languages. All
American and European languages are supported, including Central-European languages. Greek, Turkish, the Cyrillic
("Russian") and the Baltic languages and Hebrew are also supported. Optionally, the IRISPen reads Asian documents in Japanese, Simplified Chinese, Traditional Chinese and Korean
The IRISPen reads virtually any font, in a wide variety of styles and point sizes (from 8 to 20 points), as well as special characters, reading marks, special symbols, and formatting elements such as vertical lines separating table cells.
HOW DOES IT WORK?
The IRISPen functions as a camera that sends an image to the computer. The image is recognized by the recognition routines. The "read" data is inserted in the target application.
To scan the data with the IRISPen, you must simply slide the pen scanner over the line of text or area.
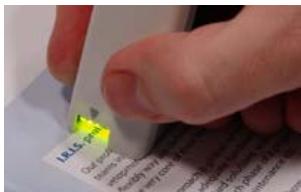
Operate as follows:
- Hold the IRISPen like a pencil and place it a few millimeters before the first characters or data to be recognized. The pen scanner must be positioned so that the text line to be read is right in the center of the scanning head, directly under the guide line.
! Yellow is the IRISPen's invisible color. It cannot be picked up by the scanner. Do not scan any data printed in yellow.
Also see: Learn how to... Scan from right to left,
Warning:
The pen scanning band is 0.41" (10.5mm.) high and covers in many cases several lines of text. As the pen only picks the "central" line within the scanning band, position the line to be scanned properly.
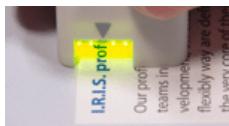
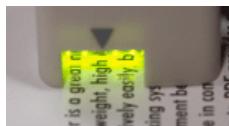
- Press the pen onto the paper and roll it over the text line at a steady rate. Once pressed, the start switch is activated and the data is illuminated by a green light.
Warning:
Make sure you hold the pen at the correct angle, otherwise the data may not be scanned properly.
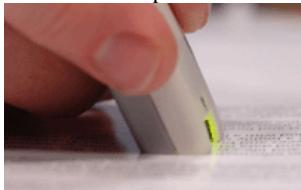
Correct position
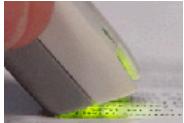
Incorrect positions
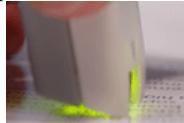
- Once you have reached the end of the line, lift the IRISPen. Make sure you lift it after the last character of the line.
! Do not scan a line longer than 12'' (30.5 cm). The scanning stops as soon as this line length is exceeded.
- Operate exactly the same way for the next line. Also see: Learn how to... Scan multiple lines.
Tip: Check the image you generate
Use the Image Quality Check and the Scan Test windows (see: Starting up, User interface) to check the quality of the images you produce and improve your scanning skills.
Tip: Train yourself with the testsheets
We recommend you use the testsheets provided with your IRISPen to experiment and get acquainted with the pen scanner. The testsheets are available as printed matter as well as in PDF format for possible reprint (the testsheet.pdf file is automatically installed in the installation folder).
THE STEPS TO FOLLOW...
Here are the main guidelines to follow for using your IRISPen. Detailed instructions are provided later in this manual. Use the Table of Contents and the Index at the end of the manual to find the needed information.
1. Define your settings in the IRISPen application
Before you start using the IRISPen, you must tune the software. Depending on the type of data you intend to read - text, barcodes, dot matrix text, etc. - and in which language, you must select the appropriate basic settings and if necessary, fine-tune these settings via the frequent commands.
See: Basic settings and Frequent commands. Also refer to the section Learn how to... for more details.
2. Open the target application and position your cursor
Choose the application in which you want to insert the read data: open your target document, spreadsheet, database, etc. Place your cursor at the position where you want to insert the data.
You can choose the way the data must be transferred in the active application: either direct transfer or via the clipboard. See: Basic settings, Target.
3. Take the original document and scan the data to be picked up
Get back to the document, magazine, etc. containing the data to be transferred and scan the data with the pen scanner: simply slide your pen over the text lines, images, etc. Scrupulously follow the instructions given under: Introducing the IRISPen, How does it work?. After each scan, the data instantly appears in the target application.
Important tip: Check the scanning quality
Check the quality of your first scans before you actually start with definitive scanning. Use the Image Quality Check and the Scan Test windows (see: Starting up, User interface) to judge the image quality and the recognition results.
CHAPTER 2 INSTALLATION
SYSTEM REQUIREMENTS
Here is the minimal system configuration required to use the IRISPen:
- A Pentium-based Intel PC or compatible. A Pentium III-based PC is recommended.
- 64 MB RAM.
- 100 MB of free hard disk space, 150 MB for the IRISPen Translator software.
- The Windows Vista, XP or 2000 operating system.
- A free USB port to connect the IRISPen scanner.
INSTALLING THE IRISPEN SOFTWARE
The IRISPen package contains the pen scanner itself and a self-running CD-ROM containing the IRISPen software. You must install the IRISPen software before you install or connect the pen scanner.
Caution:
Please install the IRISPen software before connecting the pen scanner!
To install the software:
- First start your computer and log onto Windows.
Caution: You must log on as administrator or make sure you have the necessary administration rights to install the software.
- Insert the CD-ROM in your CD-ROM drive.
Users of Windows Vista:
Click on Run setup.exe to install the program, then follow the on-screen instructions.
Users of Windows XP and Windows 2000:
Simply wait for the installation program to start running. Should the installation not begin to run automatically, run the setup.exe file located on the CD-ROM.
- Choose the installation language and click OK.

Welcome to the InstallShield Wizard for IRISpen
The InstallShield Wizard will install IRISpen on your computer. To continue, click Next.
- Accept the terms of the license agreement.
- Installation options are offered. Select the required options and click on Next each time you are ready to get to the next screen. Dictionaries: do install the dictionaries as this improves OCR and translation accuracy.
Caution:
Users of Windows XP must ignore the following message and click on Continue Anyway to continue the installation procedure:
Software Installation

The software you are installing has not passed Windows Logo testing to verify its compatibility with Windows XP. (Tell me why this testing is important.)
Continuing your installation of this software may impair or destabilize the correct operation of your system either immediately or in the future. Microsoft strongly recommends that you stop this installation now and contact the software vendor for software that has passed Windows Logo testing.
- Users of Windows Vista must confirm the installation of the device software by clicking on Install.
- When the installation of the IRISPen is complete, click on Next to initiate the installation of the translation software package @promt Express 7 Giant.

InstallShield Wizard Complete
The Pen Scanner is successfully installed. You will now be prompted to install the translation software.

Welcome to the InstallShield Wizard for @promt Express 7 Giant
The InstallShield(R) Wizard will install @promt Express 7 Giant on your computer. To continue, click Next.
- Minimize or close the @promt Express 7 Readme file.
- Accept the terms of the license agreement.
-
Follow the on-screen instructions:
-
Enter your user name and organization.
-
Enter your license number (you will find it at the back of the DVD box containing the installation CD-ROM).
-
Select the type of installation (we recommend to set the Complete setup type).
-
Click on Install to begin the installation.
- When the installation of the translation software package is complete, click on Finish, then remove the CD-ROM from the CD-ROM drive.
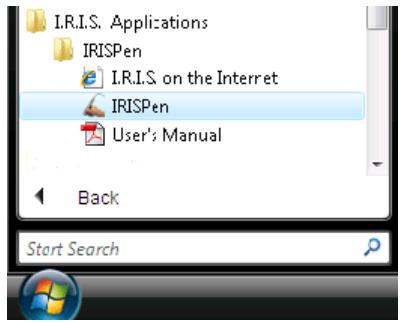
The submenu I.R.I.S. Applications - IRISPen under the Windows Programs menu is created automatically by the installation program.
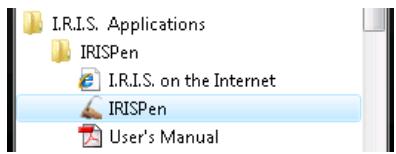
The installation program also creates a shortcut for the IRISPen application on the Windows desktop.
INSTALLING THE PEN SCANNER
Once the IRISPen software installation is complete, you can install the pen scanner.
To install the pen scanner:
- Plug the pen scanner USB cable into a free USB port of your computer. A message confirms that the device has been installed.

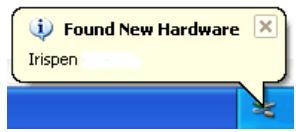
Caution:
Users of Windows XP, Service Pack 2: the wizard offers to search for more recent drivers on the Internet. Select "No, not this time".
Can Windows connect to Windows Update to search for software?

Yes, this time only

Yes, now and every time I connect a device

No, not this time.
- Simply follow the on-screen instructions to install the IRISPen driver. Click on Next each time you are ready to get to the next screen.
- Select Install the software automatically (recommended).
Caution:
Users of Windows XP must ignore the following message and click on Continue Anyway to continue the installation procedure:
Hardware Installation

The software you are installing for this hardware:
Irispen
has not passed Windows Logo testing to verify its compatibility with Windows XP. [Tell me why this testing is important.]
Continuing your installation of this software may impair or destabilize the correct operation of your system either immediately or in the future. Microsoft strongly recommends that you stop this installation now and contact the hardware vendor for software that has passed Windows Logo testing.
- When the installation is complete, click on Finish.
Tip:
Once the pen scanner has been installed (see above), it can be disconnected then reconnected without having to reconfigure or reboot the PC. Users of Windows XP should always reconnect the IRISPen on the same USB port, otherwise the device driver must be reinstalled.
UNINSTALLING THE IRISPEN SOFTWARE
There is only one correct way of uninstalling the IRISPen: by using the Windows (un)install wizard. You are strongly recommended not to uninstall the IRISPen or any of its software modules by manually erasing the program files.
To uninstall the IRISPen:
- Exit the application and disconnect the USB connector of the pen scanner.
- From the Windows Start menu, select Control Panel and click Add/Remove/Uninstall programs.


Programs
Uninstall a program
Change startup programs
- Select the IRISPen from the list and click the Uninstall/Change/Remove button to remove the software.
- Follow the on-screen instructions.
HOW TO GET PRODUCT SUPPORT?
If you have registered your product, you are entitled to free product support. Contact I.R.I.S.:
Europe
- Hotline: 32-10-45 13 64 (working hours)
Fax:32-10-45 3443 - support@irislink.com
USA
- Hotline 1-561-921-0847 / 800-447-4744 (working hours)
- Fax: 1-561-921-0854
- support@irisusa.com
HOW TO REGISTER?
Don't forget to register your IRISPen! By doing so, you will:
- be kept informed of future product developments and related
I.R.I.S. products,
- be entitled to free product support
- be entitled to special offers on I.R.I.S. products
How to register?
Registration wizard
You can use the Registration Wizard available from the Register menu (main toolbar). Simply follow the on-screen instructions.
IRISPen Executive registration wizard


Welcome to the IRISPen Executive registration wizard.
It allows you to register your IRISPen Executive software license.
Registering allows us to keep you informed of future product developments and related I.R.I.S. products.
Registering entitles you to free product support and special offers.
Next>
Registration form
You may also directly access the registration form on the I.R.I.S. Web site: http://www.irislink.com/register.
Telephone
Or register by phone:
- Europe: 32-10-45 13 64
- USA: 1-561-921-0847 / 800-447-4744
CHAPTER 3
STARTING UP
RUNNING THE IRISPEN
To start the IRISPen:
- From the Windows Start menu, select All Programs, I.R.I.S. Applications, then IRISPen, or click the application shortcut on your desktop.
The IRISPen startup screen appears for a few seconds. It displays the version and copyrights of the IRISPen software. Next, the IRISPen Application window and two additional windows are displayed: the Image Quality Check window and the Status window. The IRISPen icon appears in the notification area of the Windows task bar. When running the software for the first time, one more window
automatically appears on top of the others, prompting the user to calibrate the pen scanner.
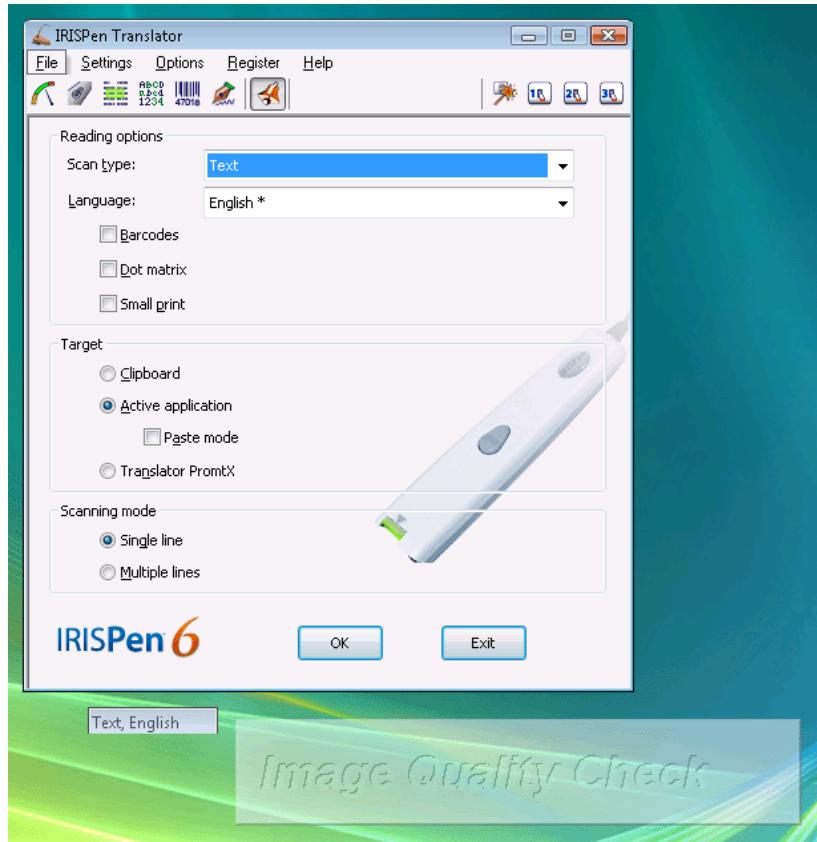
- If you are running the software for the first time, calibrate the pen scanner. See: Starting up, Calibrating the pen scanner.
USER INTERFACE
The user interface is composed of 3 windows: the Application window, the Image Quality Check window, and the Status window. The IRISPen icon appears in the Windows task bar and confirms that the application is running.
The Application window
The Application window is the IRISPen's main window. It contains a menu bar that gives access to all software commands, a toolbar for quick access to all frequent commands, and the a window pane containing the basic settings.
The window can be minimized with a click on the Minimize button or on the OK button. To reopen it, simply double-click or right-click on the Status window, or use the IRISPen icon on the Windows task bar (see below).
The Image Quality Check window
Image Quality Check
Learn how to use your IRISPen
The Image Quality Check window appears by default as a semitransparent window, below the Application window. When scanning, it displays the "raw" grayscale image of the scanned area. Its purpose is to enable the user to view and check the quality of his scans.
You can easily drag the window to another position on your screen. The chosen position will be maintained if you save your settings. You can remove the transparency of the window with a right-click of the mouse.
You can close the window. To reopen it, select Image Quality Check from the Application window's Options menu or use the IRISPen icon on the Windows task bar (see below).
The Status window
Text-Small print, Spanish, Multiple lines
The Status window appears by default below the Application window. It displays the OCR options that have been chosen in the Application window.
You can drag the window to another position on your screen. The chosen position will be maintained if you save your settings.
You can close the window. To reopen it, you will simply select the option Status Window from the Application window's Options menu or use the IRISPen icon on the Windows task bar (see below).
The IRISPen icon

The IRISPen icon appears by default in the notification area of the Windows task bar. It confirms that the application is running and that the pen scanner is connected. If the pen is detached from the USB port, the notification area will indicate it.
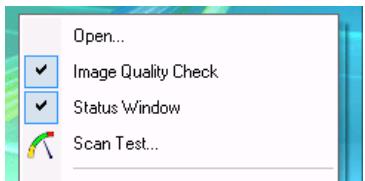
You can restore the application with a simple click on the icon. A right-click on the icon also allows you to enable the Image Quality Check window, the Status window, and the Scan Test window.
CALIBRATING THE PEN SCANNER
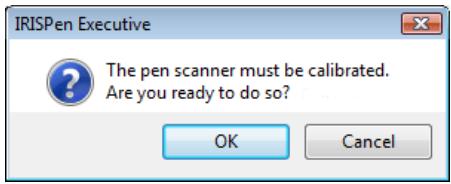
Before you start using the IRISPen, you must calibrate the pen scanner. If you don't calibrate the scanner, the image quality will be low and the recognition results may be mediocre.
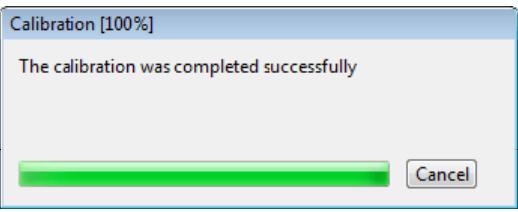
You are automatically prompted to calibrate the pen scanner when running the software for the first time. All you need to do is push your pen on a white piece of paper for a few seconds. The software indicates when the calibration is complete.
Caution:
If the ambient light changes - imagine you get from natural to artificial lighting or conversely, imagine you move to a much lighter or darker place, or even move to a completely different environment, etc., you may need to re-execute the calibration of your pen scanner.
Tip: Check the scanning quality
You can always check the scanning quality in the Image Quality Check and the Scan Test windows (see: Starting up, User interface). If the image quality appears degraded, please re-execute the calibration of your pen scanner.
To re-execute the calibration:
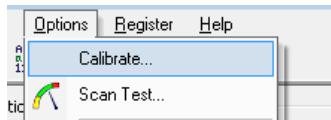
- Select Calibrate from the Options menu in the Application window or, from the Scan Test window, press the Calibrate button, then push again your pen on a white piece of paper for a few seconds. The software indicates when the calibration is complete.
CHANGING THE USER INTERFACE LANGUAGE
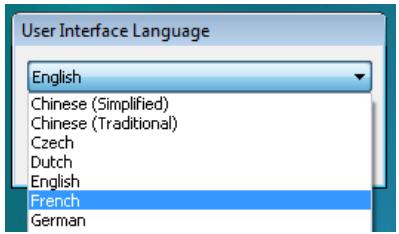
The user interface of the IRISPen is available in a wide range of languages. The language can be easily changed according to your needs.
To change the user interface language:
- Select User Interface Language from the Settings menu in the Application window.
- Select the needed language from the drop-down list, then click OK to confirm.
The user interface automatically appears in the newly chosen language.
THE SCAN TEST WINDOW
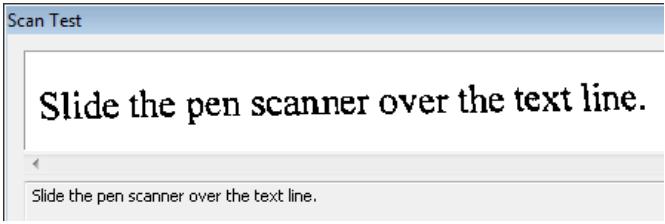
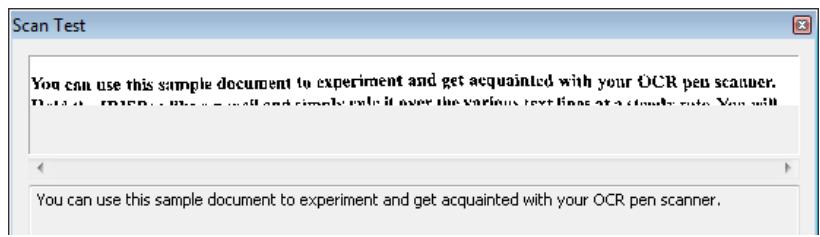
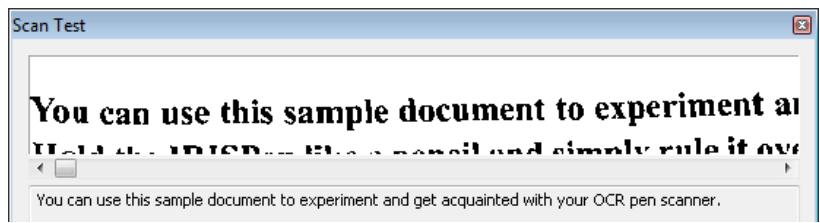
The Scan Test window displays the black-and-white version of the image you generate with the pen scanner. The recognized data appears just below the scanned image.
Thanks to the Scan Test window, you can test your first scans and check the results before you start with definitive scanning. You can
save your images, load and recognize previously scanned images, access the calibration dialog box, etc.
Bad quality images
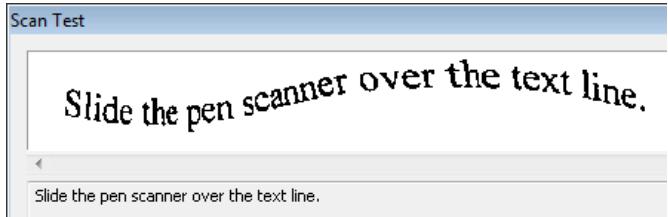
As you will notice, the IRISPen is able to recognize data on bad quality images, e.g. on low-contrast documents where the background nearly has the same color as the text, on highly distorted images with wavy, skewed or even contracted lines (see above figure). However, if the recognition result is not satisfactory, you should use the Scan Test window to make a few more tests.
To access the Scan Test window:
- In the Application window, click the Scan Test button on the toolbar or select Scan Test from the Options menu. As soon as you scan some data, the image produced appears in the upper part of the window. The recognized text is displayed just below the image. Any unrecognized character is marked with the rejection symbol "\~" (the rejection symbol can be modified - see: Learn how to... Define the symbol for unknown characters).
Load image: this option allows you to load prescanned images and perform character recognition on them; the supported file format is the Windows bitmap (.bmp) format.
Save image: this option allows you to save the images you generate; the available file formats are: black-and-white and grayscale Windows bitmaps (.bmp).
Calibrate: allows the user to re-execute the pen's calibration.
Fit to window
The option Fit to Window ensures that the entire image is displayed in the window, whatever the length of the scanned line may be. It is activated by default.
When a long line of text is being scanned, you can deactivate the option. If you do so, the scanned line will no more be compressed horizontally and only a portion of the line will be displayed. You can use the image scroll bar to view the scanned data entirely.
Recognize
The Recognize option is activated by default. All images you scan or open are thus automatically recognized.
Note that in the text zone, you can get directly to the end or the beginning of the recognized text: place your cursor in the text zone, then press the End or Home key from your keyboard.
The Recognize option is not useful when scanning graphics. If you have selected Grayscale image to clipboard or Black&White image to clipboard in the Application window, the Recognize option will be replaced by Image to clipboard.
THE IRISPEN WIZARD
The IRISPen Wizard offers the quickest and easiest way of defining your settings. It proposes a series of templates with pre-defined settings meant for the reading of certain types of data: text, text from columns, numeric tables, etc. These templates can be either used as such, or modified to fit more particular needs. Up to three (modified) templates can be further assigned to a preset button directly accessible from the Application window (or, alternatively, set to function as current settings). When it comes to actually capture a certain type of data, all you need to do is press the right preset button, then start the scanning!
By default, the preset buttons are already assigned to the reading of English Text, Text from columns, Text tables.
The Wizard as well as the three presets can be accessed and activated directly from the toolbar. Once a preset button has been enabled, the corresponding settings become the current settings.
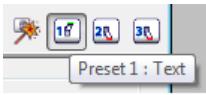
Tip: To save time, do not hesitate to use the wizard extensively. First make up your mind about the types of data to be read. Second, "prepare" the software for the reading by defining the corresponding presets. Whenever needed, just select the right preset and start the scanning!
You can save as many sets of settings as you wish. With the Save Settings and Open Settings options from the File menu, you will be able to save and reopen your custom presets and current settings. See: Learn how to... Customize/save/reopen settings.
How to define presets with the Wizard?
- Click the Wizard button on the toolbar. The Wizard workflow is divided up into different steps. You will get from one step to the other by simply clicking on Next.
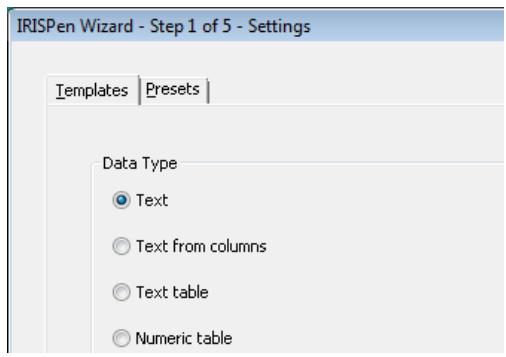
Step 1
In the list of proposed templates, choose the template that corresponds to the type of data to be read, e.g.: text, numeric table, etc. Remember that a set of options is already pre-selected in the Wizard.
Alternatively, select an already existing preset from the Presets tab. It will serve as a basis for your custom preset. Select either the current settings or one of the existing presets.
Click Next to get to the next step.
Step 2
If needed, change any of the basic settings: Reading options, Target.
Click Next to get to the next step.
Step 3
If needed, change any of the settings related to the recognition process in the various tabs proposed.
Click Next to get to the next step.
Step 4
Assign your settings to a preset button and give it a name, and/or apply your settings as current settings.

CHAPTER 3 BASIC SETTINGS
READING OPTIONS
Scan type
The Scan type determines the nature of the data to be scanned and read with your pen. Select the appropriate Scan type in the dropdown list.
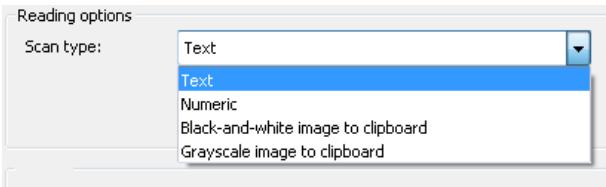
Text (default value):
To read machine-printed text in a certain language. This includes alphanumeric characters, punctuation marks, numeric data, etc. The set of characters used by the software to read such data directly depends on the language chosen for the reading.
Numeric:
To read machine-printed figures, numeric tables, etc. This includes special characters, mathematical symbols, punctuation marks, currencies, etc.
The set of characters used by the software to read such data is the same for all languages. You can freely customize this character set (see: Frequent command: Character Subset).
Also refer to: Learn how to... Read numeric data.
Black-and-white image to clipboard:
To scan small black-and-white graphics such as signatures, mathematical formulae, etc. The image will be sent to the clipboard before it can be pasted into the active application.
Grayscale image to clipboard:
To scan grayscale or color graphics and send them to your clipboard before they can be pasted in a chosen application.
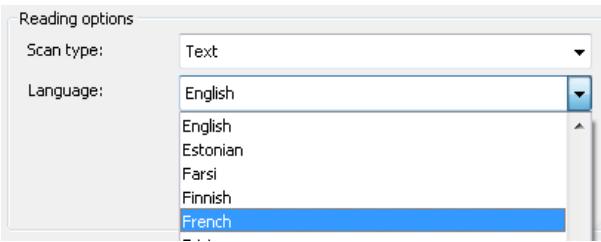
Language
The option Language is used to indicate the language in which the data is to be read.
Select the required language in the drop-down list. Either browse through the list or simply press the first letter of the needed language. ).
Mixed alphabets
You can activate a mixed alphabet of Greek or Cyrillic and Western characters. This is useful if Western words pop up in Greek of Cyrillic texts (this is often the case with proper names, brand names, etc.). The IRISPen will automatically switch languages whenever needed. In the Language drop-down list, select the required language pair, e.g.: Greek-English, Byelorussian-English, etc.
Bulgarian
Bulgarian-English
Byelorussian
Byelorussian-English
Asian languages (optional)
When choosing an Asian language, also indicate the text flow which is vertical rather than horizontal. See: Learn how to... Scan vertical text.
! Warning:
If you use the XP operating system, check that the appropriate
Regional and Language Options have been set to read Asian
languages. From the Windows Start menu, select Control Panel,
then Date, Time, Language, and Regional Options, then
Regional and Language Options, Languages tab).
If you use Windows 2000, check that it has been configured to be able to type the Asian language(s) required.
Supplemental language support
Most languages are installed by default. To install additional languages, select the appropriate check box below.

Install files for complex script and right-to-left languages (including Thai)

Install files for East Asian languages
Translation language
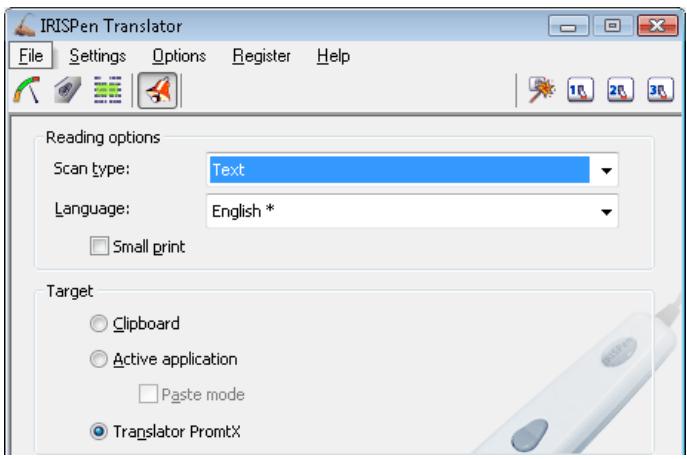
If you intend to translate text, you must select the source language for the translation, i.e. the language of the text to be scanned and translated. The languages that are available for translation are marked with an asterisk (a "* symbol) in the Language field. The target language must be further confirmed in the translation window that pops up when the option Translator PromptX is enabled. Also refer to: Learn how to... Translate text.
Other
Small print
Small print
The option Small print is used to get optimized results when reading small printed text. Select this option if you want to read text with a font size smaller than 10 points. Also refer to: Learn how to... Read small print.
TARGET
You may choose the way the read data is being inserted in the target application: either via the clipboard, or directly in the application, without having to operate manually (see below). If you wish to use the translation feature, you must also tell the software to send the read data to the translation software.
Tip:
The formatting that is active in the target application will apply to the data which is being inserted in the application: if you have selected, say, Palatino 12 point bold in the application, the text will be inserted in Palatino 12 point bold, whatever the original font or size may have been.
Target
Clipboard
Active application
Paste mode
Clipboard
If the option Clipboard is selected, the software will send the read data to the clipboard before you can paste it into the target application. You will then use the Paste or CTRL+V command to
actually paste the data.
Select this option if you want to manually paste the read data into your target application.
! Remember that the clipboard can only contain the data of the last scan.
Active application
This option is selected by default. The recognized data will be directly inserted at the cursor position in the target application.
Paste mode
If you select Paste mode, the recognized data is first sent to the clipboard, then automatically inserted at the cursor position in the target application. This operation is totally transparent for the user. You should not normally use this option. However, if you notice that the characters inserted in the target application do not correspond to the ones actually recognized by the software (see: Starting up, The Scan Test window), enable it.
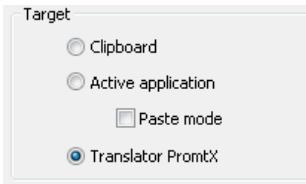
Translator PromtX
The option Translatoror PromptX is used to make the application send the recognized data to the translation software, Translatoror PromptX, and have it translated for you. The translation is carried out according to the language chosen in the IRISPen Application window. The translated text will be directly displayed in the PromptX translation window.
Target
Clipboard
Active application
Paste mode
Translatorator PromTX
SCANNING MODE
Scanning mode
Single line
Multiple lines
Single line
The option Single line is selected by default. It is used to indicate that a single line is being read per scan.
Multiple lines
The option Multiple lines is used to scan multiple lines at a time. It is particularly useful to scan full excerpts from books, magazines, etc. The various lines of text are first kept in the IRISPen, then released with the click on a pen button.
Select this option to indicate that several lines of text must be read within the same scan.
Also refer to: Learn how to... Scan multiple lines.
CHAPTER 4
FREQUENT COMMANDS
PEN BUTTONS
Your pen scanner is equipped with two buttons. The simple and double click of each pen button can be programmed so as to execute an operation in the target application. By simply pressing the pen buttons, you will thus be able to execute keyboard commands, add characters, switch from a scan type to another, etc. without having to touch your keyboard.
Tip: The buttons' programming is particularly useful, for example, when entering data into a database: you can program the
To program the pen buttons:
- In the Application window, click Pen Buttons on the toolbar or select the command Pen Buttons from the Settings menu. The Pen Buttons window opens with a default programming.
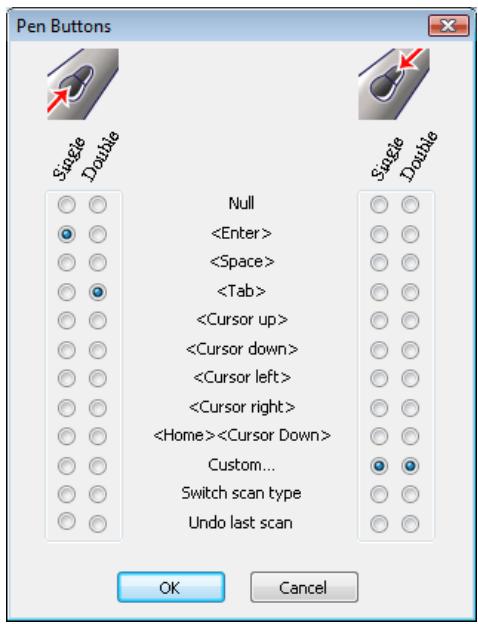
- Modify the default programming by selecting the required radio buttons on the left- and on the right-hand side. The left radio buttons refer to the left button, the right radio buttons refer to the right button.
Possible operations
Null: This corresponds to a "null" operation. In other words, a single click will not trigger off any action.
This option is usually used to deactivate a programmed operation.
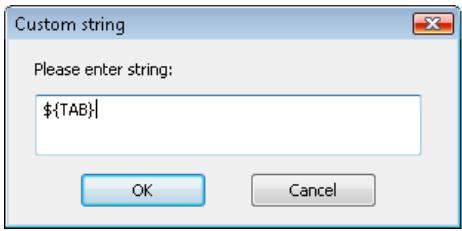
Custom....: This allows you to program your own custom operations, i.e.: any other keyboard command - including a combination of commands -, or the addition of characters, character strings, or even the combination of several operations. To enter the custom operation, select the required radio button,
then enter your keyboard commands or characters in the proposed field and click OK to confirm.
Switch scan type: This allows you to program the switch to the next scan type in the list of scan types available (see: Basic settings, Reading options, Scan type).
If the current scan type is Text, this will make you switch to Numeric. If the current scan type is Numeric, this will make you switch to the Black-and-White image. (Remember that the reading mode is always specified in the Status window).
Undo last scan: This is used to remove the last scan that was inserted in the target application.
- Click OK to confirm and close the window.
DELIMITERS
With the delimiters, you can indicate how the scanned lines must be delimited for the reading. Where should the reading actually start if a word has been cropped during scanning? How should hyphens be interpreted when occurring at the end of a line? Should keyboard commands or characters be added before and/or after the read line?
To set the reading delimiters:
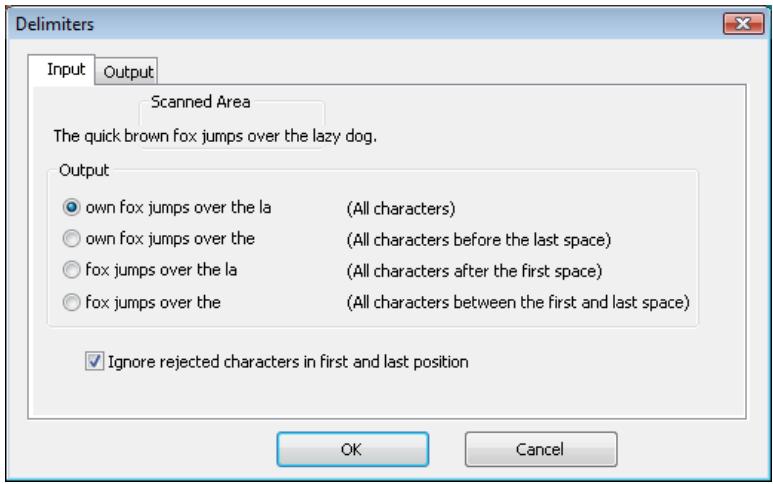
- In the Application window, click Delimiters on the toolbar or select Delimiters from the Settings menu. The window opens with an Input and an Output tab.
-
In the Input tab, indicate how the scanned area must be isolated and what the recognized text (output) should be. Delimit the text line according to the given example: "The quick brown fox jumps over the lazy dog".
-
keep all scanned characters
- keep all characters before the last space
- keep all characters after the first space
- keep all characters between the first and the last space
Ignore rejected characters in first and last position:
It may be that characters positioned at the beginning or at the end of a line are not properly scanned/read. This may happen if the word spacing is too small or if you scan text from columns, like in magazines, for example, and that you start scanning slightly on the previous word/column and end scanning on the next one. Those "bad" characters will automatically be rejected by the
software and represented by the "\~" symbol in the Scan Test window.
The best to do if you encounter such a situation is to make the software ignore the first and last position characters for the output, otherwise you will have to delete them manually once inserted in the active application.
- In the Output tab, select the options according to your needs:
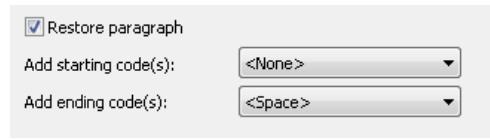
Restore paragraph:
You must indicate how to interpret hyphens occurring at the end of a line. If you scan the lines "The new presi-" and "dent waved from the balcony", the hyphen must obviously be dropped so as to recompose the word "president" in the output: "The new president waved from the balcony".
Select this option in order to delete all the end hyphens occurring in your text.
Note: If hyphens are deleted, the ending codes (see below) will automatically be deleted so that the words can be properly recomposed.
Add starting code:
You can have the IRISPen execute operations automatically in the target application before the output result is being inserted. You can for example have the software operate a carriage return before it inserts any read line. A series of possible codes are proposed by default, but you can also introduce your own starting code.
To insert a starting code, select a code from the drop-down list or select Custom to introduce our own code, then click OK to confirm. With the Custom code, you can add any combination of keyboard commands and/or characters.
The default starting code is:
Add ending code:
You can have the IRISPen execute operations automatically in the target application after the output result is being inserted. If you insert data into a database, you can for example define a tabulation as ending code to automatically position your cursor in the next field. A series of possible codes are proposed by default, but you can also introduce your own ending code.
To insert an ending code, select a code from the drop-down list or select Custom to introduce your own code, then click OK to confirm. You can add any combination of keyboard commands and/or characters.
The default ending code is:
- Click OK to confirm and close the window.
SPEECH SYNTHESIS
Thanks to the speech synthesis, you can make the IRISPen speak out the recognized data or its translation for you. Just scan some data and the computer reads it out for you!
The speech synthesis feature is available in the supported translation languages*.
(*) The list of supported languages directly depends on the language chosen for the installation of the IRISPen Translator. The supported languages are marked with an asterisk (a "+" symbol) in the Language field of the Application window.
To activate the speech synthesis:
-
In the Translation PromptX window, position your cursor on the data to be spoken out: either the recognized or the translated part.
-
Press the Speak button on the toolbar, or select Speech, then Speak from the Tools menu, or press F5. The data is directly spoken out by your computer.
BEEP SOUND
The Sound option enables to activate a beep sound during the scanning: if you activate the beep, you will hear a beep sound when the pen scanner stops scanning and when the recognized data is being sent to the target application or clipboard.
If the Sound option is enabled, you will also hear a beep sound whenever an error occurs or if you try to operate wrongly with the IRISPen.
Caution:
If the Speech option is activated, you cannot produce the system beeps as these two options are not compatible. You can either hear the beep, or the pronounced text.
To activate the beep sound:
- Click the Sound button on the toolbar or select Sound from the Options menu. The beep is activated. You can hear it during scanning.
CHAPTER 5 LEARN HOW TO…
CUSTOMIZE/SAVE/REOPEN SETTINGS
Customize the default settings
When you launch the IRISPen, options are selected by default. Some default presets are also available from the IRISPen Wizard (see: Starting up, The IRISPen Wizard). These selected options form the "default settings", also referred to as the "factory settings". You will of course change these default settings to make the IRISPen perfectly fit your particular needs. The changed settings become your own settings. They will normally be kept until you next modify them (see below).
Save Settings on Exit

The option Save Settings on Exit from the Options menu (toolbar) is enabled by default. This means that the settings that are active when closing the application will be active again when you next open the application. If you have modified the IRISPen Wizard presets, these will also be saved.
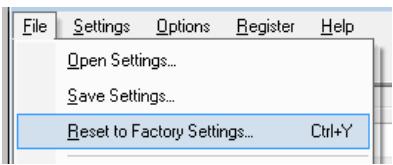
If you do not want to save your settings on exit, either disable the option Save Settings on Exit from the Options menu (toolbar), or select the option Reset to Factory Settings from the File menu before you exit.
Save Settings
You can save your settings in a file with the Save Settings option from the File menu. You will be able to reopen those settings whenever needed.
With the Save Settings option, you can save as many sets of settings as you wish. All you need to do is give them a name and save them with the *.IPC extension.

Open Settings
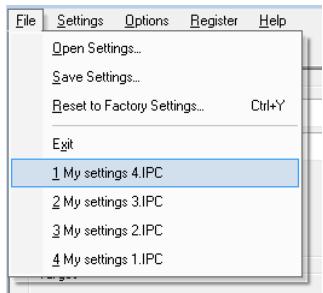
At any moment in time, you can reopen any saved settings. To open your saved settings, select Open Settings from the File menu and open the corresponding file with the *.IPC extension, or directly select the required file from the File menu (the last four saved files are listed).
READ NUMERIC DATA
The IRISPen is able to read all machine-printed figures. The recognition includes special characters, mathematical symbols, punctuation marks, currencies, etc. You can thus read all types of data such as: digits, codes, amounts, dates, account numbers, numeric tables, etc.
The set of characters used by the software to read such data is the same for all languages.
Default character subset used:
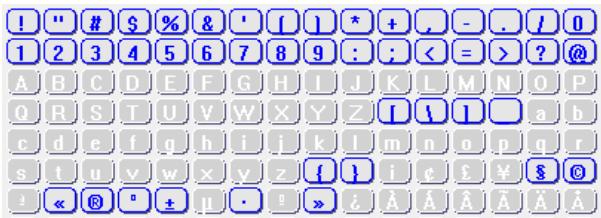
To read numeric data:
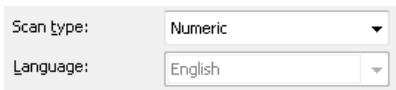
- In the Application window, select the Numeric scan type. See: Basic settings, Reading options, Scan type.
- Slide your pen over the numeric data. Operate as for any other type of printed data. See: Introducing the IRISPen, How does it work?
How to get auditive feedback?
You can activate the speech feature to get an auditive feedback of the scanned data. The speech feature incorporates intelligent
routines that allow it to read out numbers, telephone numbers, dates, etc. Also see: Frequent commands, Speech Synthesis.
READ SMALL PRINT
The IRISPen scanning band is 0.41" (10.5mm.) high. It can thus read characters having point sizes of 8 to 20.
8 point -- Times New Roman 20 point -- Times New Roman
If you have to read data printed in a font size smaller than 10 point, you must activate the Small print option. This will help you get optimized results with the IRISPen.
8 point -- Times New Roman-- This is small print
To read small text:
- Select the option Small print in the Application window. See: Basic settings, Reading options, Other.
Small print
- Operate as for any other type of printed data: just slide the pen scanner over the text line. See: Introducing the IRISPen, How does it work?
Warning:
Do not use the Small print option to read text above 10 points. This would decrease the recognition accuracy and would slow down the operation substantially.
SCAN MULTIPLE LINES
You can scan multiple lines at the same time, i.e. within the same scan. This is particularly useful if you want to capture whole excerpts of text from books, magazines, etc.
The various lines of text will be buffered, then released with the click on a pen button.
To read multiple lines:
- In the Application window, select the option Multilines. See: Basic settings, Scanning mode.
Scanning mode
Single line
Multiple lines
- Scan the various lines one by one. Make sure that each line is positioned directly in front of the pen's guide line.
After each scanned line, the Status window displays the message "Press pen button to flush". Go on scanning the next line immediately.
Important:
The pen scanning band is 0.41" (10.5mm.) high and covers in many cases several lines of text. This does not mean that all these lines are being read. Only one line, the central one, is picked and recognized by the pen. You must thus scan each line separately and make sure it is positioned right in the center of the scanning head.
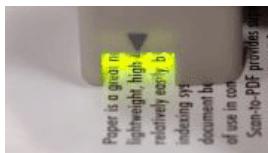
- At the end of your scan, click any pen button to insert the data into the active application.
SCAN FROM RIGHT TO LEFT
By default, the pen scanner is set to operate from left to right, but you can adapt the scanning direction and scan from right to left. You will follow this scanning direction if you are left-handed. You will also operate this way if you intend to read right-to-left text like e.g. in Hebrew.
To operate with the pen if you are left-handed:
- In the Application window, select the option Left-handed Scanning under the Options menu.

- Take the pen scanner in your left hand and turn it the other way around so as to lean it to the left. Position it at the right end of the text line and slide it over the line from right to left. Make sure you hold the pen with the right angle. See: Introducing the IRISPen, How does it work?
To scan right-to-left text (right-handed users):
- Simply take the pen scanner in your left hand and turn it the other way around so as to lean it to the left. Position it at the right end of the text line and slide it over the line from right to left. Make sure you hold the pen with the right angle. See: Introducing the IRISPen, How does it work?
To scan right-to-left text if you are left-handed:
- Operate exactly the same way as if you were right-handed (see above).
Note: If you select Hebrew as recognition language in the Application window, the option Left-handed Scanning will be grayed out as right- and left-handed users operate the same way.
DEFINE THE SYMBOL FOR UNKNOWN CHARACTERS
If characters are not properly recognized by the IRISPen, they are by default represented by a tilde, i.e. a "~" symbol, in the recognition result. If you wish to, you can choose another symbol.

To define a custom symbol for unknown characters:
- In the Application window, select the option Unknown Symbol from the Settings menu.
Unknown Symbol...
- Replace the symbol in the required field, then click OK to confirm.

REPLACE VERTICAL LINES
The IRISPen is able to detect and replace vertical lines separating data as e.g. table columns. By default, the software replaces vertical lines by the
Various keyboard commands are proposed for the conversion, but you will also be able to replace vertical lines by characters or any combination of characters and commands.
Tip: How to recompose a whole table?
If on top of the default
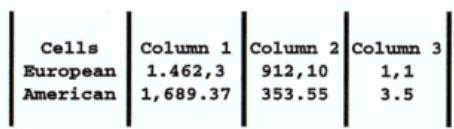
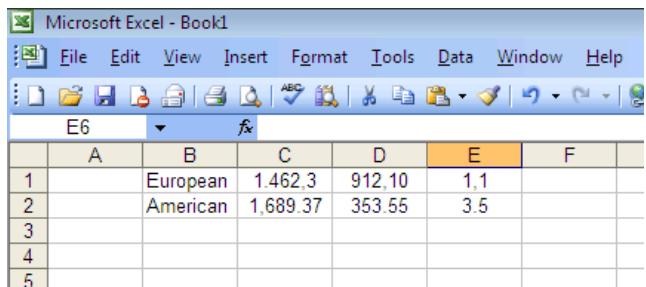
To replace vertical lines in the target application:
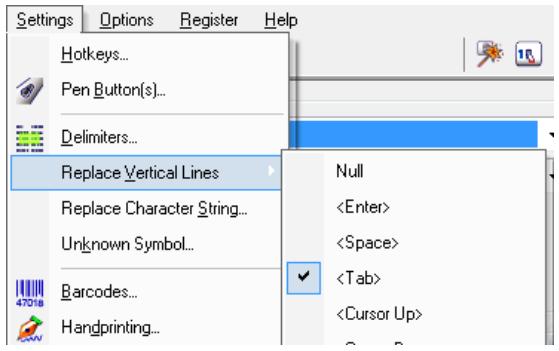
- In the Application window, select Replace Vertical Lines from the Settings menu, then select one of the proposed keyboard commands (by default, the command
is selected).
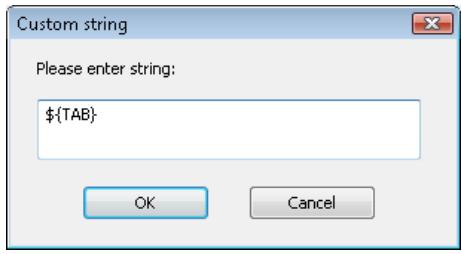
Select Custom to introduce your own set of conversion, then click OK to confirm. You can execute any keyboard command, add characters, or execute any combination of all.
Tip: If your table does not contain vertical bars, the easiest procedure is to quickly add them on the original document with a pen and a ruler.
PROGRAM HOTKEYS
The IRISPen allows you to program hotkeys for the execution of the following commands:
- Restore the application (reopen the Application window)
- Switch scan type (switch from one scan type to the next one - see: Basic settings, Reading options, Scan type)
This will make your work quicker and easier.
To program hotkeys for the proposed commands:
- In the Application window, select Hotkeys from the Settings menu on the toolbar.
Hotkeys...
-
Define a hotkey for one or several available commands. Operate as follows:
-
tick either the ALT or CTRL key
- introduce the clipboard key to be used in the key box
E.g.: ALT+X to restore the application.
Do not use key combinations that are used by your target application, such as: Ctrl+V in Microsoft Word.
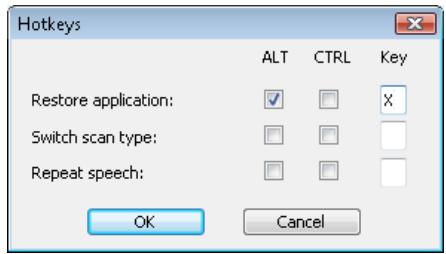
- Click OK to confirm.
TRANSLATE TEXT
Thanks to the PromptX translation software integrated in the IRISPen Translator, you can translate your scanned text lines into any of the languages supported* by the application. You scan the text and the translation directly pops up in a separate translation window.
() The list of supported languages directly depends on the language chosen for the installation of the IRISPen Translatorator. The supported languages are marked with an asterisk (a "" symbol) in the Language field of the Application window.

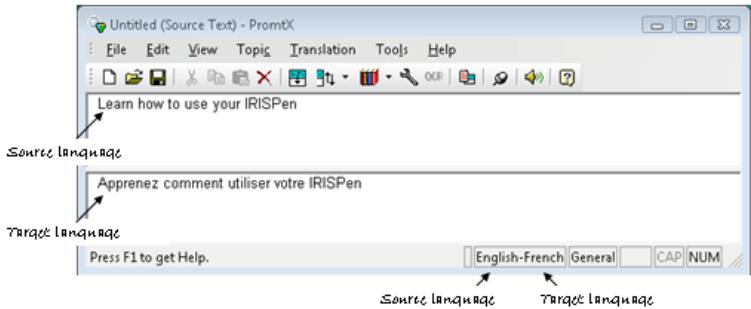
Translation window:
Warning:
Machine translation
The result you get from the IRISPen is machine translation. As you may know, this kind of translation is more an "information-only" translation that gives you the general meaning of a text. The IRISPen will thus work best in business-like, non-emotive contexts. Do not use it to translate literature, poetry, or any text containing metaphors, particular connotations or irony.
To translate text:
- In the Language field of the Application window, select the source language for the translation, i.e. the language of the text to be scanned and translated. The languages available for translation are marked with an asterisk (a "+" symbol).

- Select Translatorator PromptX in the Target section. See: Basic settings, Target. The translation window pops up on your screen.
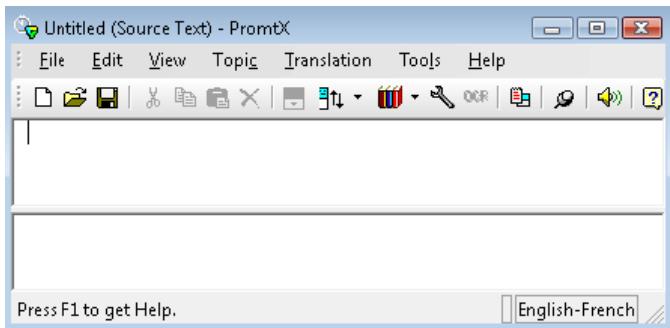
- In the translation window, check if the target language is the one you need: the active language pair is displayed in the bottom-right part of the window.
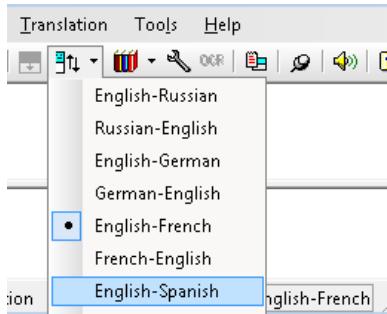
- If the target language is not the one you need, select another language pair in the translation window, then click on Translate in the translation window toolbar (or select Translate from the Translation drop-down menu, or press F9).
To select another language pair:
- Position your cursor in the translation window (PromtX).
-
From the Translation drop-down menu, select Change Direction of Translation and Topic Template, or press from the toolbar, or press F10.
-
Select the required translation pair and direction from the list of supported language pairs.
- Scan the text to be translated. The translation directly appears in the translation window.
Tip: Cut & Paste the translation into another application
You cannot only view the translation result in the Translation window, you can also Cut & Paste it into any application.
INDEX
A
activeapplication. 35
application window. 21
B
beep sound. 43
black-and-white image. 25
C
calibration 23
check the scanning. 8
clippboard. 34
columns 52
correct position of the pen 8
customize settings. 45
D
data type. 31
deinstallation. 16
delimiters 39
F
factory settings 45
G
grayscale image 22
H
holding the pen 8
hotkeys 54
1
image 32
Image Quality Check window ....22
installation (hardware) 14
installation (software) 11
invisible color. 6
IRISPen 3
IRISPen Wizard. 28
L
left-handed users. 50
M
multiline. 36, 49
N
numeric. 31, 47
P
pen buttons. 37
pen scanner. 3
pen scanner calibration 23
presets. 28
product registration. 17
product support. 17
programming hotkeys 54
programming pen buttons. 37
R
reading options 31, 34, 36
recognition results. 25
registration. 17
rejected characters 51
replacing vertical lines. 52
restore settings 45
restore to factory settings. 45
right-to-left text 50
S
save settings. 45
scan. 6
scan from right to left 50
Scan Test window 25
scan type. 31
scanning. 6
scanning band. 6
scanning mode. 36
settings (customize) 45
settings (restore) 45
settings (save) 45
single line 36
sliding the pen 6
small print. 48
Status window 22
support. 17
system requirements 11
T
tables 52
Index
target 34
target application 9
technical support. 17
templates. 28
text. 31
train to scan. 6
U
unknown characters 51
unknown symbol. 51
use the IRISPen 6,9
user interface 21
user interface language 25
V
vertical lines 52
W
Wizard 28
Y
yellow 6