BBL550XL - Blender BREVILLE - Free user manual and instructions
Find the device manual for free BBL550XL BREVILLE in PDF.

| Product type | Blender |
| Brand | Breville |
| Model | BBL550XL |
| Power supply | 110-120 V ~ 50/60 Hz |
| Bowl material | Glass (pyrex) or plastic? Not specified, but dishwasher safe |
| Bowl capacity | Up to MAX mark (approximately 1.5 L estimated) |
| Number of speeds | 5 (Snow, Knead, Blend, Liquefy, Smoothie) |
| Pulse function | Yes (PULSE) and automatic pulse/ice crush |
| Auto shut-off | Yes, after 60 seconds of continuous operation |
| Overload protection | Yes, automatic shut-off if overloaded, restart after 30 min cooling |
| Blade type | Hemisphere system, removable stainless steel blades |
| Lid | With Assist Lid lock and removable inner cap |
| Bowl cleaning | Dishwasher (bowl only, upside down), otherwise hand wash |
| Base cleaning | Wipe with a damp cloth, do not immerse |
| Blade maintenance | Removable for cleaning, removable silicone seal |
| Safety | Polarized plug, very sharp blades, do not process boiling liquids, child supervision |
| Use | Household use only, not for commercial use |
| Warranty | 1 year limited (defects in material and workmanship) |
| Customer service | 1-866-BREVILLE (1-866-273-8455) or askus@breville.com |
Frequently Asked Questions - BBL550XL BREVILLE
User questions about BBL550XL BREVILLE
0 question about this device. Answer the ones you know or ask your own.
Ask a new question about this device
Download the instructions for your Blender in PDF format for free! Find your manual BBL550XL - BREVILLE and take your electronic device back in hand. On this page are published all the documents necessary for the use of your device. BBL550XL by BREVILLE.
USER MANUAL BBL550XL BREVILLE
Breville is a registered trademark of Breville Pty. Ltd.
Breville Customer Service Center
US Customers
19400 South Western Avenue
Torrance
CA 90501
Service Center: 1 (866) BREVILLE
Email askus@brevilleUSA.com
www.breville.com
Canada Customers
Anglo Canadian
2555, De L'Aviation
Breville recommends safety first 4
Know your Breville Hemisphere Blender 5
Why is the Breville Hemisphere Blender superior? 6
Operating your Breville Hemisphere Blender 7
Care and Cleaning 13
Tips on how to use your Breville Hemisphere Blender 14
Suggested uses for your Breville Hemisphere Blender 15
Ice making capabilities of your Breville Hemisphere Blender 16
Trouble shooting 17
Warranty 18
French 22
Spanish 44
Congratulations
on the purchase of your new Breville ikon Hemisphere™ Blender
IMPORTANT SAFEGUARDS
We at Breville are very safety conscious. We design and manufacture consumer products with the safety of you, our valued customer, foremost in mind. In addition, we ask that you exercise a degree of care when using any electrical appliance and adhere to the following precautions:
IMPORTANT SAFEGUARDS FOR YOUR BREVILLE IKON BLENDER

- Read all instructions.
- To protect against electrical shock, do not immerse cord, plug or motor base in water or any other liquid.
Always use the appliance on a dry, level surface. - The use of attachment not sold or recommended by the manufacturer may cause fire, electric shock or injury.
- Do not remove the blender pitcher from the motor base while blender is in operation.
- Do not place hands in the pitcher unless the unit is disconnected from the power outlet. A scraper maybe used but must be used only when the blender is not running.
- Disconnect the blender from the power outlet before removing pitcher from base. Blades are sharp - handle carefully.
- To reduce risk of injury, never place blade assembly on base without jar properly attached.
- Always operate blender with cover in place.
- Do not use this blender for any purpose other than food or beverage preparation.
-
Do not blend a dry, thick or heavy mixture for more than 10 seconds without turning the blender off. Then, stir ingredients before continuing to blend.
-
Do not process boiling liquids. Let cool before placing in pitcher.
- Do not leave the appliance unattended when in use. Young children should be supervised when near the appliance.
- Do not allow cord to hang over the edge of a table or counter, touch hot surfaces, or become knotted.
- Do not place appliance on or near a hot gas or electric burner, or where it could touch any other source of heat.
- Unplug appliance from the power outlet when not is use, before putting on or taking off parts, and before cleaning.
- This appliance is for household use only. Do not use this appliance for anything other than its intended use. Do not use outdoors.
- This appliance has a polarized plug. To reduce the risk of electric shock, this plug will fit in a polarized outlet only one way. If the plug does not fit fully into the outlet, reverse the plug. If it still does not fit, contact a qualified electrician. Do not modify the plug in any way.
- Any maintenance other than cleaning should be performed at an authorized Breville Service Center.
SAVE THESE INSTRUCTIONS
Why is the Breville Hemisphere Blender superior?
Operating your Breville Hemisphere Blender
What makes this blender superior?
The secret to the Hemisphere™ Blade System is the continuous movement created inside the pitcher. It allows the ikon Hemisphere™ Blender to combine the functions of a blender with a mini food processor for the ultimate in versatility.
Combined with a powerful motor and heavy duty commercial grade components, the ikon Hemisphere™ Blender is built for durability, reliability and professional results superior to all other blenders.
Before first use
Before using your Breville Hemisphere Blender for the first time, remove any packaging material and promotional labels. Make sure the appliance is switched off at the power outlet and the power cord is unplugged. Wash the lid, inner lid, blender pitcher and blade assembly (refer to Disassembling the blender pitcher on Page 13) of the Breville Hemisphere Blender in warm, soapy water with a soft cloth. Rinse and dry thoroughly. You may opt to wash the parts in the top shelf of any dishwasher and the pitcher in the base section of the dishwasher You may opt to wash the parts in the top shelf of any dishwasher and the pitcher in the base section of the dishwasher. The motor base can be wiped with a damp cloth. Dry thoroughly.
- When using your Breville Hemisphere Blender for the first time, you may notice an odor coming from the motor. This is normal and will dissipate with use.
- The blending blades are extremely sharp. Avoid any contact with fingers and hands.
Note
Assembling and attaching the blender
Step 1.
Place the motor base on a flat, dry surface such as a table top. Make sure that the motor base is turned off at the power outlet and the power cord is unplugged.
Step 2.
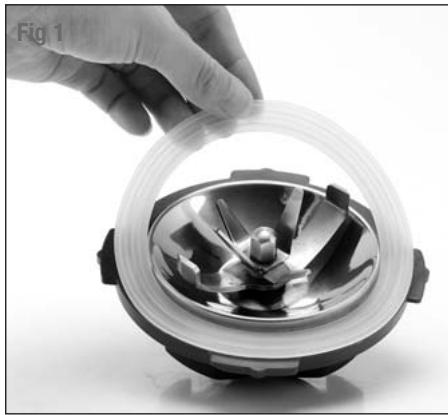
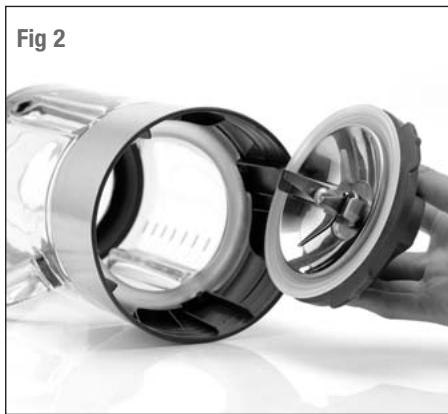
To reassemble the blender pitcher, replace the silicon seal onto the blade assembly (see Page 14 - Fig 1). Turn the blender pitcher over and insert the blade assembly housing into the pitcher base (see Page 14 - Fig 2). Twist the Blade Removal System counterclockwise until firmly locked into position.
Step 3.
Turn the blender pitcher upright and insert onto the motor base. The handle of the blender pitcher can be positioned to the left or right hand side of the appliance.
Step 4.
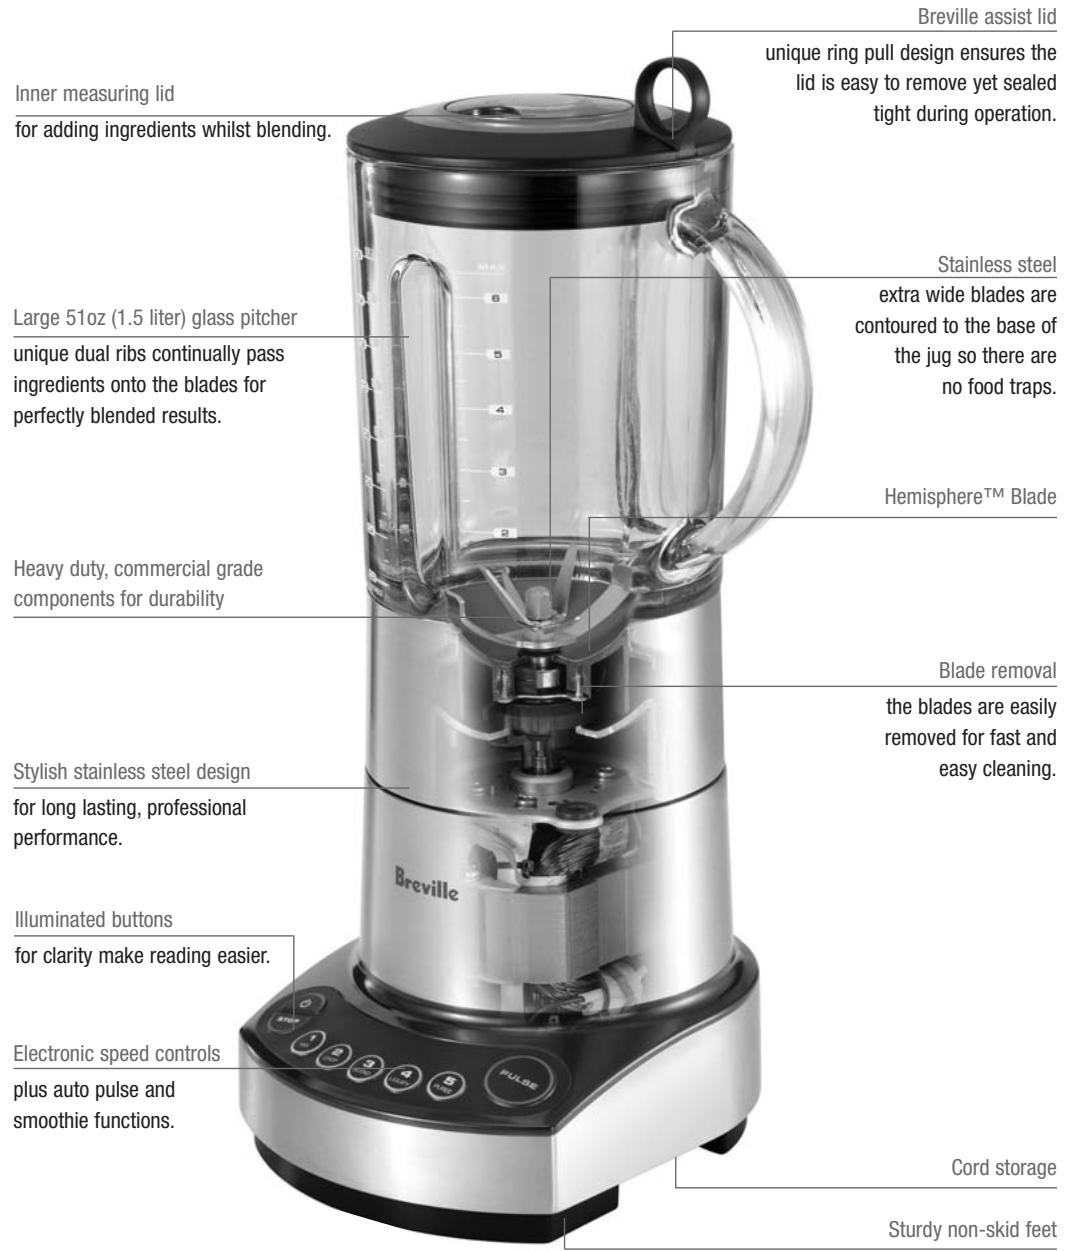
Add food or liquid into the blender pitcher ensuring not to exceed the 'MAX' mark. Place the blender lid firmly into position on the top of the blender pitcher. Insert the clear inner lid into the blender lid and turn clockwise to lock into position. (see Fig 1)
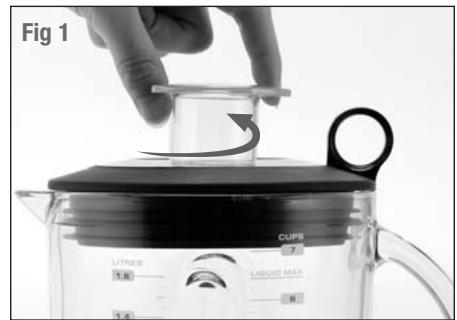
The Breville Hemisphere Blender features a patented assist lid. This allows the lid to fit tightly onto the blender pitcher, avoiding displacement during operation. The ring pull design allows the user to easily remove the lid with a simple leverage action. (See Fig 1)
Note
Step 5.
Plug the power cord into a 110/120V power outlet.
Step 6.
Press the 'Power' button on the far left of the control panel to turn the blender on. The 'Power' button will illuminate and flash.
Do not fill the blender pitcher above the 'MAX' line. When the blender pitcher is filled at or near the 'MAX' line place one hand on the blender lid to avoid displacement of the lid during operation.
Note
Step 7.
Select the required speed (1 to 4) by pressing the corresponding speed button. The blender will start to operate and the selected speed button will illuminate. The 'Power' button will illuminate and cease to flash. The 'Stop' button will illuminate and flash.
Operate the blender only for the appropriate amount of time required - do not over process.
Note

NEVER PLACE ANYTHING OTHER THAN FOOD AND LIQUIDS IN THE IKON BLENDER WHILE THE MOTOR IS RUNNING.
Step 8.
When 60 seconds is reached, the blender will automatically cease to operate and the selected speed button and 'Stop' button illumination will go out. The 'Power' button will illuminate and flash.
- The ikon Blender will automatically stop blending after 60 seconds. This is a safety feature.
- To stop blending at any time, press the 'Stop' button or the selected speed button. The 'Power' button can also be pressed, but this will also turn the appliance off and all illuminations will go out.
- The speed can be changed at any time during the blending process. Each time a new speed is selected its button will illuminate and the previous speed button illumination will go out.
- The maximum amount of ice cubes the blender can blend at any one time is 1 standard ice tray or 9 oz. Use Speed 2/Mix.
Note
Step 9.
For ingredients that require short bursts of power, select the 'AUTO PULSE' function. The 'AUTO PULSE' button will illuminate and remain illuminated while the button is pushed. Press the 'AUTO PULSE' button in short bursts until blending is complete.
Use the 'AUTO PULSE' button when the food that is being processed is too thick or coarse to circulate within the blender pitcher.
Note
Step 10.
The Breville ikon Hemisphere Blender features an additional 'SMOOTHIE' function. This is a preprogrammed cycle which automatically adjust the blending time and speeds to optimize blending results. Select the required function by pressing the corresponding function button. The blender will start to operate and the selected function button will illuminate. The 'Power' button will illuminate and cease to flash. The 'Stop' button will illuminate and flash. When the programmed cycle has finished, the blender will automatically cease to operate and the function button and 'Stop' button illumination will go out. The 'Power' button will illuminate and flash.
Step 11.
At the end of use, always make sure the Breville Hemisphere Blender is turned off by pressing the 'Power' button on the control panel. And then unplug the cord. Make sure the motor and blades have completely stopped before attempting to move the appliance, or when the Breville Hemisphere Blender is not in use and before disassembling, cleaning and storing.
The Breville ikon Hemisphere Blender features a motor overload protection feature. If the motor is being overloaded, the motor will stop and the function key LED's will illuminate and flash. To restart it again, unplug from the mains and let it cool down for 30 minutes or longer.
Note
- During the blending process, ingredients may stick to the sides of the blender pitcher. To push the food back onto the blades, press the 'Power' button on the control panel and remove the power cord. Remove the lid and use a plastic spatula to scrape down the sides of the pitcher. Replace the lid before recommencing blending.
- If any moisture or liquid appears on top of the motor base during blending, press the 'Power' button on the control panel, switch off at the power outlet and remove the power plug. Remove the blender pitcher. Wipe the motor base immediately with a dry cloth or paper towel to absorb the liquid. Check that the blender pitcher is correctly assembled.
Note
Disassembling your blender for cleaning, care and storage
Step 1.
Always make sure the Breville Hemisphere Blender is off by pressing the 'Power' button on the control panel. Then unplug the power cord.
Step 2.
Remove the blender pitcher from the motor base by grabbing the handle and lifting the jug in an upward direction.
Step 3.
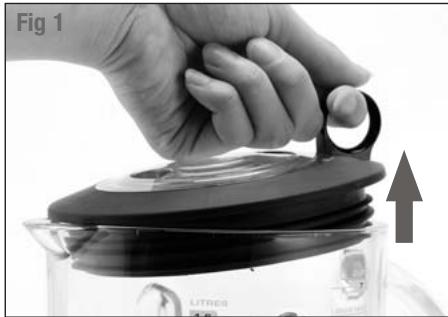
Remove the blade assembly by upturning the blender jug and twisting the Blade Removal System clockwise, (see fig 1) then lift upwards and away from the base of the blender. The circular plastic surround attached to the base of the blender jug is not removable.
Step 4.
Remove the silicon seal from the blade assembly
The Breville Hemisphere Blender features a one piece Blade Removal System for the easy removal of the blade and jug for cleaning.
Note
Reassembling your blender jug after cleaning
Step 1.
Make sure all parts are clean and completely dry.
Step 2.
To reassemble the blender, replace the silicon seal onto the blade assembly (see Fig 1). Turn the blender pitcher over and insert the blade assembly housing into the pitcher base (see Fig 2). Twist the Blade Removal System until firmly screwed into position.

BE CAREFUL WHEN HANDLING THE BLENDING BLADES AS THEY ARE SHARP. MISHANDLING OF THE BLADES MAY CAUSE INJURY.
Care and cleaning
Cleaning the motor base
- Wipe the motor base with a soft, damp cloth then dry thoroughly.
- Wipe any excess food particles from the power cord.
Do not use abrasive souring pads or cleaners when cleaning the motor base as they may scratch the surface.
Note
Cleaning the blender pitcher, lid, inner lid and blade assembly
- Wash all parts in warm soapy water with a soft cloth. Use a brush to dislodge stubborn foods. Rinse and dry thoroughly.
- The blender jug can be washed on a normal cycle in the dishwasher. Please place the blender jug upside down. If not placed upside down, the dishwasher heating element may damage the jug base.
Periodically, run a cycle with the jar filled 13 with warm soapy water to help clean in between the gaskets/washers of the blade assembly as fruit juices can get in and act somewhat like an adhesive which would make the blades difficult to turn and therefore put extra pressure and resistance on the motor.
Note
Removing stubborn or strong food stains and odors
Strong smelling foods such as garlic, fish and some vegetables such as carrots may leave an odor or stain on the blender pitcher and lid. To remove, soak blender pitcher and lid for 5 minutes in warm soapy water. Then wash with a mild detergent and warm water, rinse well and dry thoroughly.
Storage
Store your Breville Hemisphere Blender upright with the blender pitcher, lid and inner lid assembled and inserted on the motor base or beside it. Do not place anything on top.

THE BLENDING BLADES ARE EXTREMELY SHARP. AVOID ANY CONTACT WITH FINGER AND HANDS. USE CAUTION WHEN HANDLING AND STORING.
Tips on how to best use your Breville Hemisphere Blender
Suggested uses for your Breville Hemisphere Blender
Do
- Use Low speeds (1-3 - Snow, Mix and Blend) for drink or cocktail making and emulsions such as mayonnaise, dressings, marinades and foods that require mixing until just combined, such as batters.
- Use High speeds (Liquify and Smoothie) for pureeing soups and aerating liquids.
- Use 'AUTO PULSE' for foods that only require short bursts of power such as ice crushing or chopping nuts.
- Use Speed 1 / Snow or AUTO PULSE for ice crushed creations. The maximum amount of ice cubes the blender can blend at any one time is 1 standard ice try or 9 oz.
- Make sure all foods are cut into cubes (approx. 1 inch squares) where appropriate to achieve an even result.
- Do not put more than 2 cups of warm ingredients into the Breville Hemisphere Blender before blending. After the blending process has begun and the blades are turning you may slowly add another 1^1/2 cups of ingredients through the opening in the lid if desired.
- Thick mixtures puree more efficiently if the Breville Hemisphere Blender is 14 to 12 full.
- When using several ingredients, place liquid ingredients in the blender pitcher before solid ingredients, unless specified in the recipe.
- When blending thick or dry mixtures it may be necessary to stop the Breville Hemisphere Blender and scrape down the sides of the blender pitcher with a plastic or rubber spatula, once or twice during blending. Do not use metal utensils as they may damage the blades or blender pitcher.
Don't
- Do not operate a heavy mixture for more than 10 seconds. For normal blending tasks, for example, mayonnaise, dressings etc., do not operate for longer than 1 minute at a time without turning off the Breville Hemisphere Blender and stirring the ingredients, and then continue blending.
- Do not operate the Breville Hemisphere Blender without having the blender lid in position. To add additional ingredients while blending, remove the inner lid and place ingredients through the opening in the lid.
- Do not fill the blender pitcher above the 'MAX' line. When the blender pitcher is filled at or near the 'MAX' line, place one hand on the blender lid to avoid displacement of the lid during operation.
- Do not place any objects, other than food or liquid, into the Breville Hemisphere Blender while the motor is running.
- Do not use the blender pitcher to store food.
- The blender will not knead dough or mash potatoes.
- Do not remove the blender pitcher while the Breville Hemisphere Blender is operating. Always make sure the blender is off by pressing the 'Power' button, turn off the power at the power outlet and unplug the power cord from the power outlet.
- Do not overload the Breville Hemisphere Blender with more than the specified quantity of ingredients as doing so could cause the motor to stall. Turn the Breville Hemisphere Blender off by pressing the 'Power' button on the control panel, turn off the power at the power outlet and unplug the cord. Remove a portion of the mixture from the blender pitcher before continuing.
- Do not place hot or boiling ingredients into the Breville Hemisphere Blender; allow to cool before placing into the blender pitcher.
| Food | Preparation & Usage | Quantity | Function | Time |
| Lean meat/poultry | Trim excess fat and sinew, cut into 1inch cubes Use: mince | 9oz | Speed 2/Mix | 10-20 secs |
| Fish/seafood | Remove skin and bones and cut into 1inch cubes Use: mince | 10oz | Speed 2/Mix | 10-15 secs |
| Raw veg | Peel and cut into 1/2-1inch cubes Use: stuffing, filling, puree, soup | 7oz | Speed 2/Mix | 10-30 secs |
| Nuts | Remove skin Use: cakes, toppings, pastes | 7oz | Speed 2/Mix | 10-30 secs |
| Bread or biscuit crumbs | Cut bread into 1inch pieces, break up biscuits Use: cheeses | 3.5oz | Speed 2/Mix | 10-30 secs |
| Mayonnaise | Mix the egg yolk and vinegar. Add the oil Use: dressings | 4oz | Speed 2/Mix | 60 secs |
| Whipped cream | Add sugar or vanilla if desired Use: topping | 3/4cup | Speed 2/Mix | 60 secs |
| Herbs/spices | Whole or halve Use: pastes, sauces | 1 cup | Speed 2/Mix | 20-30 secs |
| Smoothie | Milk, whole fresh fruits, yoghurt, ice cream Use: milkshakes, frappes | Max 3¼cups | Smoothie | 20-30 secs |
| Fresh fruit | Whole, chopped berries Use: dessert sauce | 9oz | Speed 2/Mix | 30 secs |
| Dried Fruit | Chopped dry fruit Use: fruit mince | 10oz | Speed 2/Mix | 30 secs |
| Ice | Crush Use: mixed drinks, cocktails, slurries | Max 1 tray | Ice Crush or Speed 1/Snow | 10-20 secs |
Ice making capabilities of your Breville Hemisphere Blender
The revolutionary Breville Hemisphere Blender allows you to make different consistencies of ice depending on your blending needs. 'Speed 1/Snow' and 'AUTO PULSE / ICE CRUSH' offer two distinctly alternative icy results. When using ice on either setting, be sure to consider the actual condition of the cubes before proceeding, as it will affect the end consistency.
'Speed 1/Snow' is unique to the Breville Hemisphere Blender and will allow you to make even, powdery snow. When making Snow, be sure to use only large, solid, dry ice that has come straight from the freezer (22 °F / -5.6 °C, or below).
If using ice cubes with 'Speed1/Snow' that are small, slightly melted or even hollow, the end result may form an igloo and leave lumps of ice. If the condition of the ice cubes appear to be small, hollow or even slightly melted, only use with the AUTO PULSE/ICE CRUSH' setting.

For applications when you desire a coarse consistency, use with the 'AUTO PULSE / ICE CRUSH' setting, in which case any type of ice cubes may be used.

The ice cube matters.
To create even, powdery snow for flavored ice drinks, be sure to only use large, solid, dry ice that has come straight from the freezer, then press 'Speed 1/Snow'.
When coarser ice is required, use any type of ice, then press 'AUTO PULSE/ICE CRUSH'.
Note
Coarse ice is great for using as a base for fresh oysters. Snowed ice is great for Shrimp cocktails or slushie frozen treats!
Note
Trouble shooting
Trouble shooting chart
| Problem | Solution |
| Motor doesn't start or blade doesn't rotate | Check that the power plug is securely inserted into the power outlet and switched on. Check that the blender jug and lid are securely locked into position. Check that the 'Power' button and selected function or speed setting is illuminated. Be sure to press only one speed or function button at a time. |
| Food is unevenly chopped | Either too much food is being chopped at one time or the pieces are not small enough. Try cutting food into smaller pieces of even size and processing a smaller amount per batch. For best results the food should be chopped into pieces no larger than 2cm. |
| Food is chopped too fine or is watery | The food is over processed. Use brief pulses or process for a shorter time. |
| Food sticks to blade | Processing too much food. Turn the blender off by pressing the 'Power' button on the control panel. Then switch off at the power outlet and unplug the power cord. When the blade stops rotating, remove the blender lid and remove some food with a spatula. |
| Ice is not chopping to desired consistency | The actual condition of the ice cubes will impact the end consistency. Use larger, solid, dry ice on Snow/Speed 1 to create a snow consistency. Use any type of ice on 'ICE CRUSH' when coarser chopped ice is required. |
| Function LEDs start to flash and keys do not respond | The motor is being overloaded. Unplug the blender from the mains and let the blender cool down for 30 minutes or longer. |
One year limited warranty
Breville®* warrants this Breville® appliance against defects that are due to faulty material or workmanship for a period of (1) year from the date cited on the original purchase receipt. This warranty does not cover damage from abuse, neglect, use for commercial purposes, or any other use not found in the printed "Instructions for use" booklet. Should the consumer choose to tamper with, or intentionally dismantle the product, the Warranty will automatically be deemed void. There is no warranty for glass parts, glass containers, filter basket, blades and agitators. HWI Breville® expressly disclaim all responsibility for consequential damages for incidental losses caused by use of this appliance. Some states or provinces do not allow this exclusion or limitation for incidental or consequential losses, so the foregoing disclaimer may not apply to you.
ANY WARRANTY OF MERCHANTABILITY OR FITNESS WITH RESPECT TO THIS PRODUCT IS ALSO LIMITED TO THE ONE YEAR LIMITED WARRANTY PERIOD. Some states or provinces do not allow disclaimer of the implied warranty with respect to consumer goods, so the foregoing disclaimer may not apply to you.
This warranty gives you specific legal rights and you may also have other legal rights which vary from state to state or province to province.
If this appliance should become defective within the warranty period, do not return the appliance to the store. Please contact our Customer Service Center.
Toll free phone number:
1-866-BREVILLE (1-866-273-8455)
Internet email:
AskUs@BrevilleUSA.com
AskUs@BrevilleUSA.ca (in Canada)
ORIGINAL RECEIPT IS REQUIRED FOR ALL RETURNS
*HWI Breville® products are distributed in Canada by Anglo Canadian Housewares, L.P. and in USA by Metro/Thebe Inc.
19400 South Western Avenue
Torrance
CA 90501
Service Centre: 1 (866) BREVILLE
Email askus@brevilleUSA.com
www.breville.com
Clientèle du Canada
Anglo Canadian HWI
2555, De L'Aviation
19400 South Western Avenue
Torrance
CA 90501
IMPORTANT MEDIDAS PREVENTIVAS