
UD7006 - Media player MARANTZ - Free user manual and instructions
Find the device manual for free UD7006 MARANTZ in PDF.
User questions about UD7006 MARANTZ
0 question about this device. Answer the ones you know or ask your own.
Ask a new question about this device
Download the instructions for your Media player in PDF format for free! Find your manual UD7006 - MARANTZ and take your electronic device back in hand. On this page are published all the documents necessary for the use of your device. UD7006 by MARANTZ.
USER MANUAL UD7006 MARANTZ
/ Blu-Ray Disc player
UD7006

CAUTION
RISK OF ELECTRIC SHOCK DO NOT OPEN

CAUTION:
TO REDUCE THE RISK OF ELECTRIC SHOCK, DO NOT REMOVE COVER (OR BACK). NO USER-SERVICEABLE PARTS INSIDE. REFER SERVICING TO QUALIFIED SERVICE PERSONNEL.

The lightning flash with arrowhead symbol, within an equilateral triangle, is intended to alert the user to the presence of uninsulated "dangerous voltage" within the product's enclosure that may be of sufficient magnitude to constitute a risk of electric shock to persons.

The exclamation point within an equilateral triangle is intended to alert the user to the presence of important operating and maintenance (servicing) instructions in the literature accompanying the appliance.
WARNING:
TO REDUCE THE RISK OF FIRE OR ELECTRIC SHOCK, DO NOT EXPOSE THIS APPLIANCE TO RAIN OR MOISTURE.
CAUTION:
USE OF CONTROLS OR ADJUSTMENTS OR PERFORMANCE OF PROCEDURES OTHER THAN THOSE SPECIFIED HEREIN MAY RESULT IN HAZARDOUS RADIATION EXPOSURE.
THIS PRODUCT SHOULD NOT BE ADJUSTED OR REPAIRED BY ANYONE EXCEPT PROPERLY QUALIFIED SERVICE PERSONNEL
Laser Class (IEC 60825-1:2001)
CLASS 1
LASER PRODUCT
IMPORTANT SAFETY INSTRUCTIONS
- Read these instructions.
- Keep these instructions.
- Heed all warnings.
- Follow all instructions
- Do not use this apparatus near water.
- Clean only with dry cloth.
- Do not block any ventilation openings. Install in accordance with the manufacturer's instructions.
- Do not install near any heat sources such as radiators, heat registers, stoves, or other apparatus (including amplifiers) that produce heat.
- Do not defeat the safety purpose of the polarized or grounding-type plug. A polarized plug has two blades with one wider than the other. A grounding type plug has two blades and a third grounding prong. The wide blade or the third prong are provided for your safety. If the provided plug does not fit into your outlet, consult an electrician for replacement of the obsolete outlet.
- Protect the power cord from being walked on or pinched particularly at plugs, convenience receptacles, and the point where they exit from the apparatus.
- Only use attachments/accessories specified by the manufacturer.
- Use only with the cart, stand, tripod, bracket, or table specified by the manufacturer, or sold with the apparatus. When a cart is used, use caution when moving the cart/ apparatus combination to avoid injury from tip-over.
- Unplug this apparatus during lightning storms or when unused for long periods of time.
- Refer all servicing to qualified service personnel. Servicing is required when the apparatus has been damaged in any way, such as power-supply cord or plug is damaged, liquid has been spilled or objects have fallen into the apparatus, the apparatus has been exposed to rain or moisture, does not operate normally, or has been dropped.
- Batteries shall not be exposed to excessive heat such as sunshine, fire or the like.
CAUTION:
To completely disconnect this product from the mains, disconnect the plug from the wall socket outlet.
The mains plug is used to completely interrupt the power supply to the unit and must be within easy access by the user.
PRECAUTION:
FCC INFORMATION (For US customers)
1.COMPIANCE INFORMATION
Product Name: Super Audio CD / Blu-ray Disc player
Model Number:UD7006
This product complies with Part 15 of the FCC Rules. Operation is subject to the following two conditions: (1) this product may not cause harmful interference, and (2) this product must accept any interference received, including interference that may cause undesired operation.
Marantz America, Inc.
(a D & M Holdings Company)
100 Corporate Drive,
Mahwah, NJ, 07430, U.S.A.
Tel. (630) 741-0300
2. IMPORTANT NOTICE: DO NOT MODIFY THIS PRODUCT
This product, when installed as indicated in the instructions contained in this manual, meets FCC requirements. Modification not expressly approved by Marantz may void your authority, granted by the FCC, to use the product.
3. NOTE
This product has been tested and found to comply with the limits for a Class B digital device, pursuant to Part 15 of the FCC Rules. These limits are designed to provide reasonable protection against harmful interference in a residential installation.
This product generates, uses and can radiate radio frequency energy and, if not installed and used in accordance with the instructions, may cause harmful interference to radio communications. However, there is no guarantee that interference will not occur in a particular installation. If this product does cause harmful interference to radio or television reception, which can be determined by turning the product OFF and ON, the user is encouraged to try to correct the interference by one or more of the following measures:
- Reorient or relocate the receiving antenna.
- Increase the separation between the equipment and receiver.
- Connect the product into an outlet on a circuit different from that to which the receiver is connected.
- Consult the local retailer authorized to distribute this type of product or an experienced radio/TV technician for help.
For Canadian customers:
This Class B digital apparatus complies with Canadian ICES-003.
Thank you for purchasing this Marantz product. To ensure proper operation, please read this user guide carefully before using the product. After reading them, be sure to keep them for future reference.
Contents
| Getting started | 1 |
| Accessories | 1 |
| About this guide | 1 |
| Features | 2 |
| Cautions on handling | 3 |
| Cautions on handling for 3D video | 3 |
Simple version (Simple setup guide) 4
Basic version 9
| Basic connections | 10 |
| Important information | 10 |
| Connecting an AV receiver | 10 |
| Connecting a TV | 13 |
| Connecting a 2-channel audio amplifier | 14 |
| Connecting to a digital recording device | 15 |
| Playback (Basic operation) | 16 |
| About playback information | 16 |
| Playing BD and DVD-Video | 17 |
| Playing Super Audio CD | 18 |
| Playing CD | 19 |
| Playing DVD-Audio | 19 |
| Operations enabled during playback | 20 |
| Basic settings | 24 |
| Changing the brightness of the display (Dimmer control) | 24 |
| Playing high-quality audio (Pure direct function) | 24 |
| HDMI control functions | 24 |
| Video resolution | 25 |
| Adjusting the picture quality (Picture control) | 26 |
| Mode setting | 27 |
Advanced version 28
| Advanced connections | 29 |
| Connecting to a USB memory device | 29 |
| Connecting to a network | 29 |
| Remote control connection | 31 |
| Playback (Advanced operation) | 31 |
| Home menu screen | 31 |
| How to make detailed settings | 35 |
| Menu map | 35 |
| GUI menu operation | 36 |
| General Setting | 37 |
| Video Setting | 40 |
| Audio Setting | 41 |
| System Information | 42 |
Information 43
| Part names and functions | 44 |
| Front panel | 44 |
| Display | 44 |
| Rear panel | 45 |
| Remote control | 46 |
| About media | 48 |
| Playable media | 48 |
| Cautions on using media | 51 |
| Other information | 52 |
| About digital signal audio output | 52 |
| Trademark information | 53 |
| Explanation of Terms | 54 |
| Troubleshooting | 56 |
| Specifications | 59 |
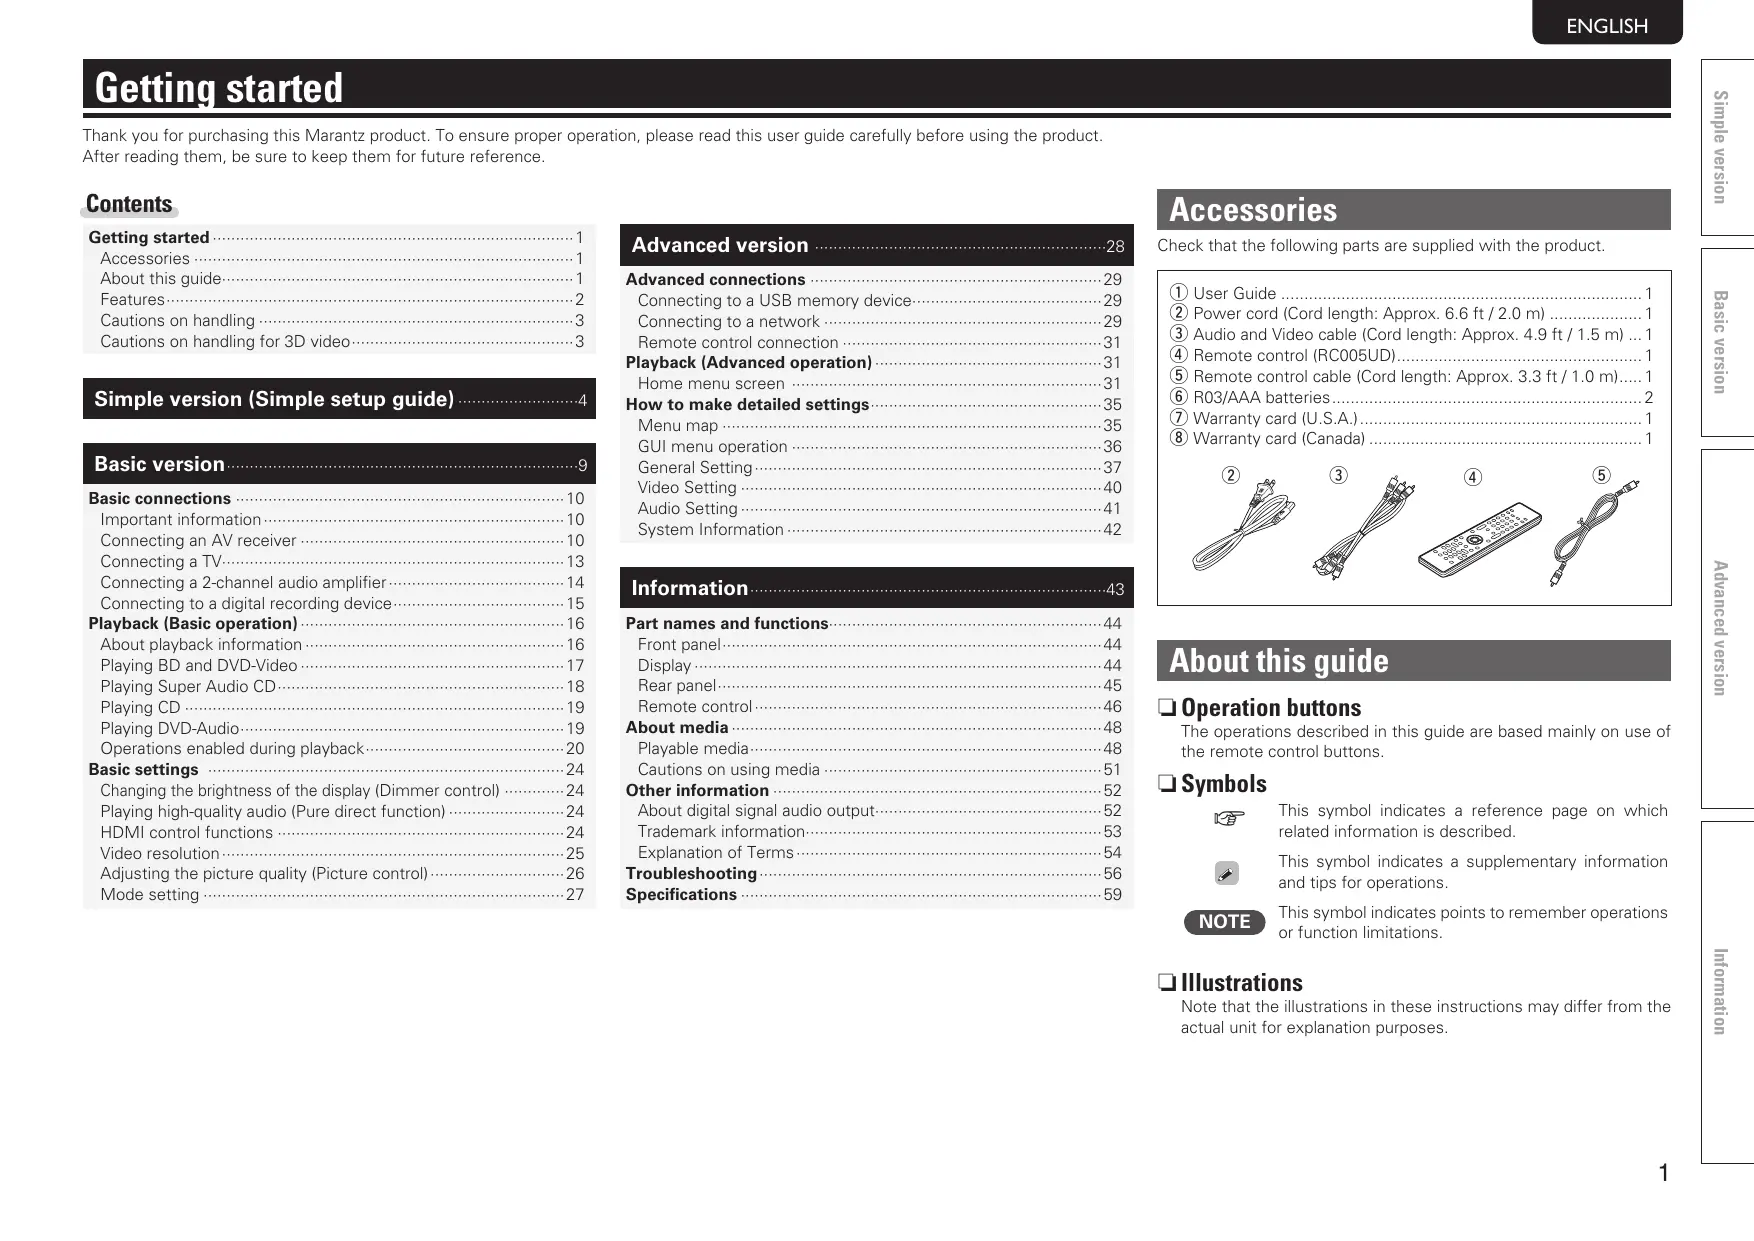
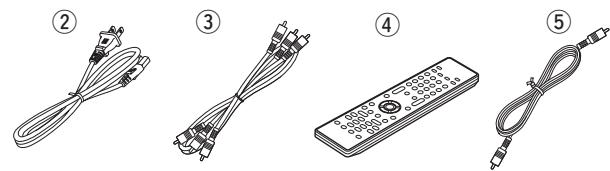
Accessories
Check that the following parts are supplied with the product.
①User Guide 1
② Power cord (Cord length: Approx. 6.6 ft / 2.0 m)
③ Audio and Video cable (Cord length: Approx. 4.9 ft / 1.5 m) ... 1
④ Remote control (RC005UD)
Remote control cable (Cord length: Approx. 3.3 ft / 1.0 m)....1
(6) R03/AAA batteries. 2
⑦ Warranty card (U.S.A.) 1
⑧ Warranty card (Canada) 1
About this guide
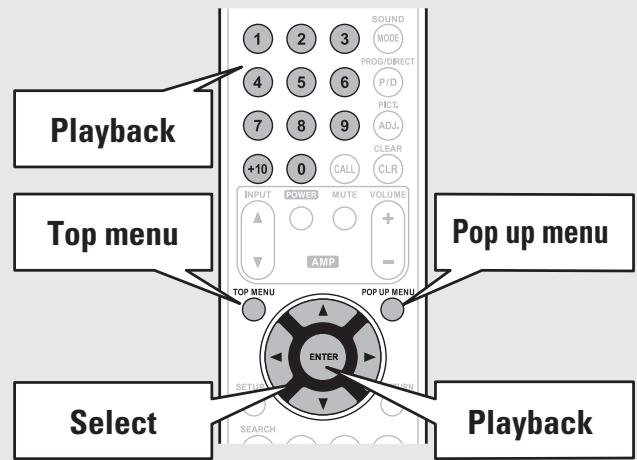
Operation buttons
The operations described in this guide are based mainly on use of the remote control buttons.
□ Symbols

This symbol indicates a reference page on which related information is described.

This symbol indicates a supplementary information and tips for operations.
NOTE
This symbol indicates points to remember operations or function limitations.
□ Illustrations
Note that the illustrations in these instructions may differ from the actual unit for explanation purposes.
Features
A Universal Audio/Video player that plays Super Audio CD and DVD-Audio formats
The unit supports a variety of media and enables video and audio playback of your disc libraries with high quality (12 page 48 "Playable media").
Supporting the Network operations
- When the unit is connected to the Internet, Netflix and YouTube service can be used.
- Music, photos, video files stored on the device connected via the network can be played.
- When the unit is connected to the Internet, privileged video can be downloaded from the Internet site to the built-in memory to enjoy BD-LIVE™ (12 page 29 "Connecting to a network").
3D video playback
When the unit is connected to a 3D enabled TV with a high speed HDMI cable, you can enjoy 3D video.
Direct Mechanical Ground Construction, supporting high-quality HD sound and video by suppressing vibration
The disc mechanism that causes vibration is arranged at the center of the unit to transmit vibration out through the base, enabling video and audio playback of high quality.
Independent Block Construction for playing video and audio signals with high fidelity
The electronic circuits are separated to prevent electronic and electromagnetic noise caused by various electronic signals in the unit.
A high-grade and high-bit i/pScaler for enjoying sensitive and colorful video
- The i/pScaler, which improves resolution of interlace materials, supports SD (Standard Definition) video as well as HD (High Definition) video. Sensitive and beautiful images are available when a BD or DVD is played.
High-bit video processor to reproduce beautiful and colorful images
GUI equipped for good operability and visibility
This unit is equipped with an easy to see "Graphical User Interface" that uses menu displays and levels. The use of level displays increases operability of the this unit ( page 36 "GUI menu operation").
HDMI control
By connecting a television or AV receiver that supports the HDMI control function to this unit using an HDMI cable, and enabling the HDMI control settings on each device, you can control other devices from one device (page 24 "HDMI control functions").
Cautions on handling
- Before turning the power switch on
Check once again that all connections are correct and that there are no problems with the connection cables.
- Power is supplied to some of the circuitry even when the unit is set to the standby mode. When leaving home for long periods of time, be sure to unplug the power cord from the power outlet.
- Image persistence (image burn-in)
Do not leave still images of the disc menu, the unit menu, etc., displayed on the TV screen for long periods. This can result in image persistence (image burn-in) on the screen.
- About condensation
If there is a major difference in temperature between the inside of the unit and the surroundings, condensation (dew) may form on the operating parts inside the unit, causing the unit not to operate properly.
If this happens, let the unit sit for an hour or two with the power turned off and wait until there is little difference in temperature before using the unit.
- Cautions on using mobile phones
Using a mobile phone near this unit may result in noise. If that occurs, move the mobile phone away from the unit when it is in use.
- Moving the unit
Be sure to remove a disc, turn off the power and unplug the power cord from the power outlet. Next, disconnect the connection cables to other system equipment before moving the unit.
- About Care
-
Wipe the cabinet and control panel clean with a soft cloth.
-
Follow the instructions when using a chemical cleaner.
-
Benzene, paint thinner or other organic solvents, as well as insecticide, may cause material changes and discoloration if brought into contact with the unit, and should, therefore, not be used.
- Sufficiently ventilate the place of installation
If the unit is left in a room full of the smoke from cigarettes, etc., for long periods of time, the surface of the optical pickup could get dirty, in which case it will not be able to read the signals properly.
Cautions on handling for 3D video
Before viewing 3D video, refer to the considerations described in the instruction manuals and other documents for your 3D enabled TV and 3D compatible glasses together with this manual.
- Do not view 3D video if you have epilepsy or heart disease, if you have had photosensitivity reactions before, or when you do not feel well.
Doing so may aggravate the symptoms.
- When you view 3D movies, etc., take a break adequately, once per movie as a guide.
Prolonged viewing of 3D video may cause eye strain.
- Restrict viewing of 3D video to those aged six and over as a guide.
Children do not respond to tiredness and discomfort expressly, so they may suddenly get sick.
When children view 3D video, parents should keep their eyes open for signs of eye strain in children.
- Stop viewing 3D video when you see double images or you can not see 3D effects.
Viewing 3D video continuously in these conditions may cause eye strain.
- Stop viewing 3D video when you feel something wrong, get tired, or get sick.
Viewing 3D video continuously in these conditions may cause poor physical condition. Take a proper break.
-
Pay attention to nearby people and objects.
-
Reaching for something without a sense of distance due to 3D video or moving your body suddenly in response to a 3D video image when you take it for a real object may cause injury to nearby people or cause damages to nearby objects resulting in injury. Keep fragile objects away from your viewing area.
-
Wear your vision correction glasses or contact lens under the 3D glasses if you have nearsightedness, farsightedness, anisometropia, or astigmatism.
Viewing 3D video without correcting your vision may cause eye strain or decreased vision.
- Sit at a proper distance from the screen when you view 3D video.
Sitting too close to the screen may cause eye strain or decreased vision. Sit at a distance that is recommended in the instruction manual for your TV.
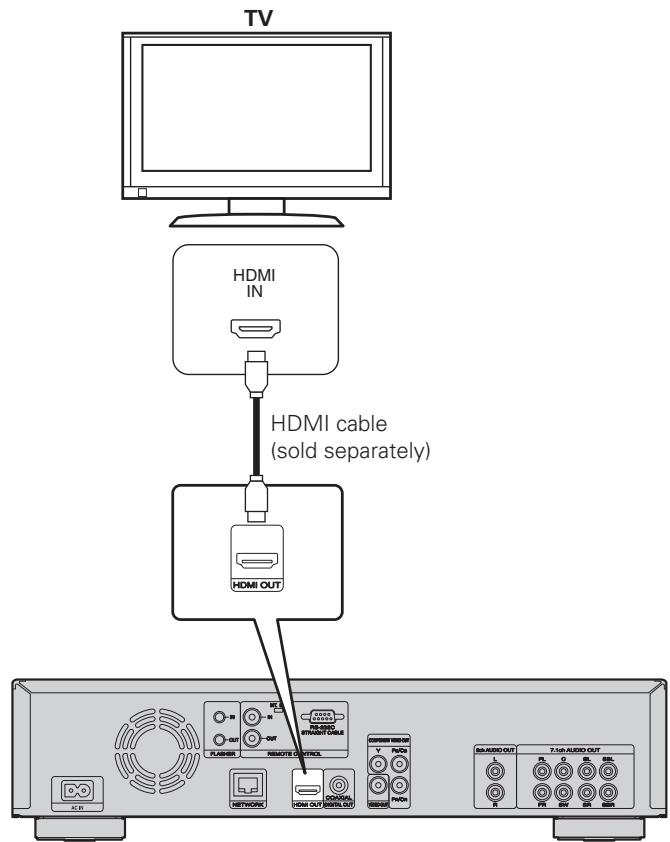
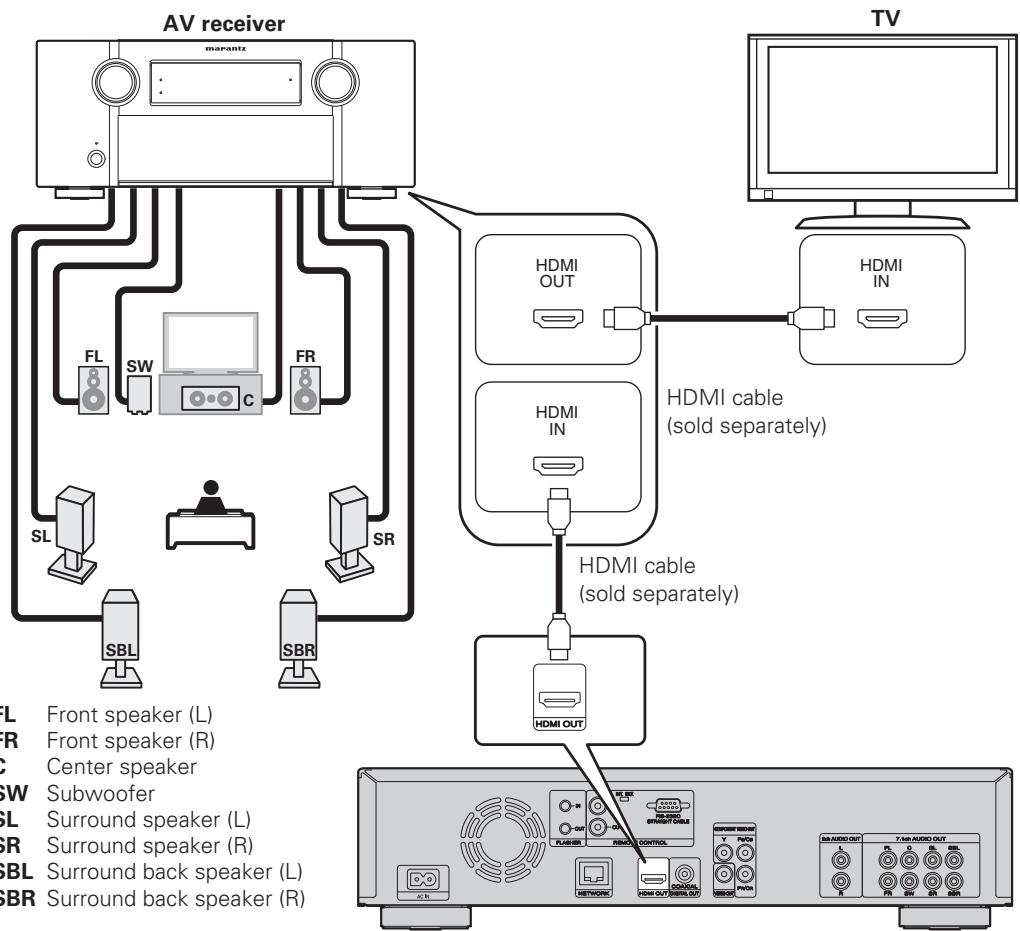
This section briefly describes the procedures from connecting this unit and a television or AV receiver, using an HDMI cable, to start playback after unpacking.
Before connecting the unit, turn off the power to all devices.
For operation of the connected devices, refer to the user manuals for each device.

1 ) Connect
This section describes two methods for connecting this unit and a television, connecting directly or via an AV receiver.
Use an appropriate method depending on the television to be used. For the connection, use an HDMI cable (sold separately).

If the device to be connected to the unit does not support the HDMI connection, see "Basic connections" (page 10), and make connections depending upon the conditions.
- Use only HDMI (High Definition Multimedia Interface) cable that bears the HDMI logo (genuine HDMI product). Using cable without the HDMI logo (non-genuine HDMI product) may result in abnormal playback.
- When outputting Deep Color or 1080p, etc., we recommend you use "High Speed HDMI cable" or "High Speed HDMI cable with Ethernet" for enhanced high-quality playback.
TV
This method is for connecting the unit and a television directly.
AV receiver and TV
This method is for connecting the unit to an AV receiver.
Power cord
Connect the supplied power cord to the unit, and plug it into an AC outlet.
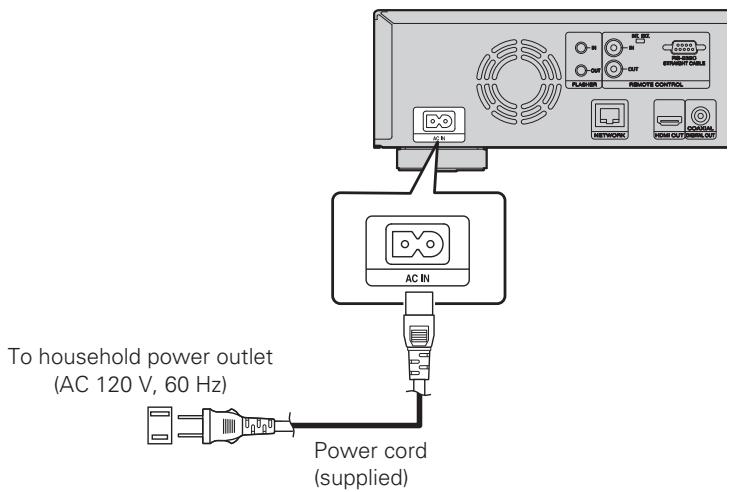
NOTE
- Be sure to insert the power plug firmly. Incomplete connection results in noise.
- Do not plug in the power cord until all connections have been completed.
- Do not bundle power cords together with connection cables. Doing so can result in humming or noise.
2) Turn on power
1 Turn on the power of the TV and AV receiver.
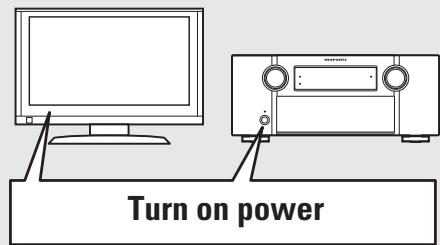
2 Set the TV and AV receiver source to the unit input.
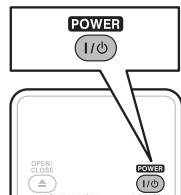
Press POWER to turn on power to the unit.
- The power indicator flashes red and the power turns on.
- Then the power indicator is turned off.
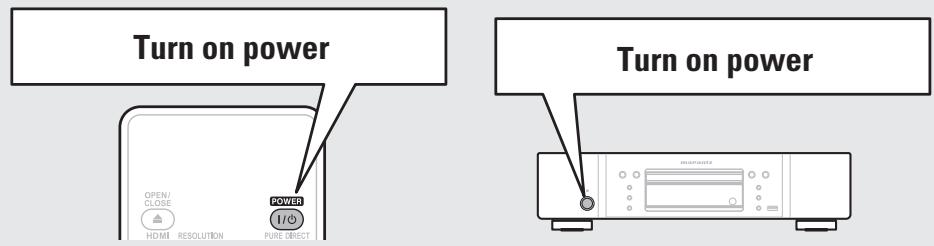
- "LOADING" appears on the display, and disc information is read.
- The "NO DISC" message is displayed if a disc is not loaded.

Before using a remote control, insert the batteries (47 page 47 "Inserting the batteries").

Set up the audio (HD Audio Setup)

An audio format recorded on a Blu-ray Disc is an HD Audio (High Definition Audio) format, such as Dolby TrueHD, Dolby Digital Plus, DTS-HD, etc. For playing back audio of an HD Audio format, the AV receiver to which the unit is to be connected must support HD Audio playback.
This section describes the setting for audio output depending on the AV receiver to be connected, outputting the Audio format as-is or converting to normal digital audio.
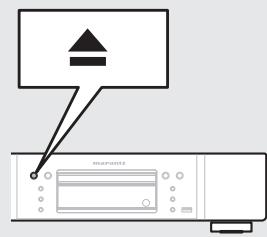
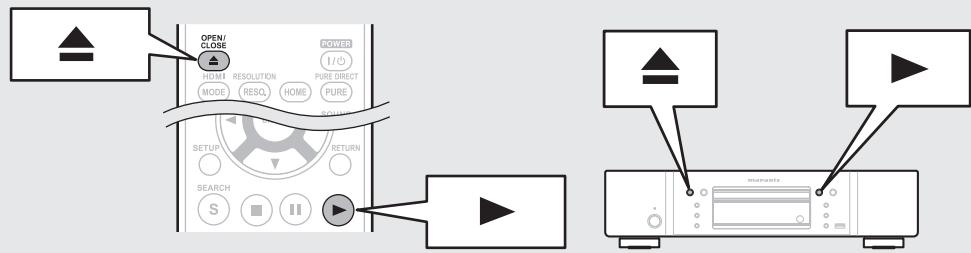
1 Press 4
The disc tray opens.
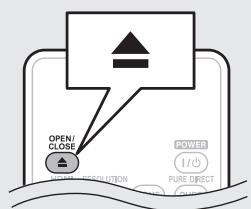
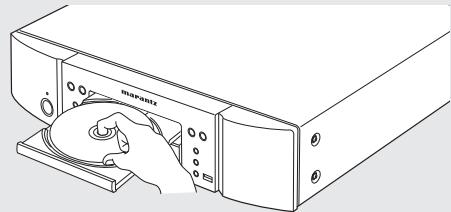
2 Place the disc on the disc tray with the label side up.
Press
The disc tray closes, and playback of the disc begins.
NOTE
- Do not push the disc tray in by hand. It may damage the player.
- Some discs require pressing to start playback. In this case, press to start playback.

Setting the audio during playback.
4
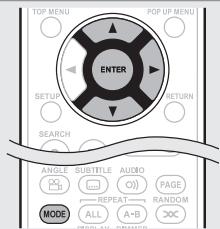
Press MODE.
Displays a menu of items that can be set.
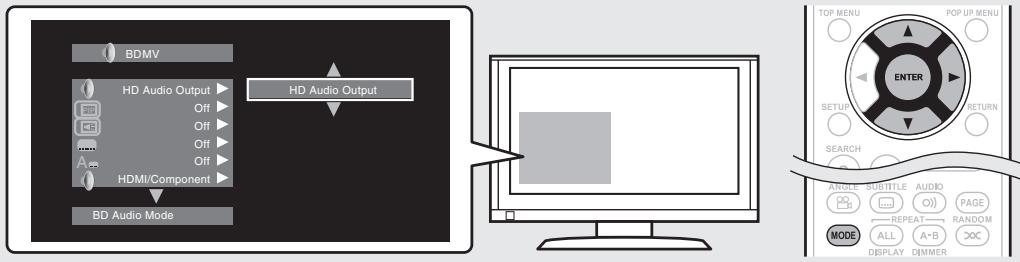
5
Use to select "BD Audio Mode", then press ENTER or >
6
Use to select "HD Audio Output" or "Mix Audio Output", then press ENTER.
For listening to a BD disc with high quality
Set "BD Audio Mode" to "HD Audio Output".
- HD audio of a BD disc is output from the unit.

- Only main audio of HD audio is output.
- Before connecting the unit to an AV receiver, check that the receiver supports HD audio playback. If it does not, the unit outputs the signal converted to LPCM from the HDMI output terminal. HD audio is not output.
For listening to subaudio of a BD disc (interactive audio or secondary audio)
Set "BD Audio Mode" to "Mix Audio Output".
- When the unit plays a BD, HD Audio of the BD is converted to normal digital audio and output.

Specifications of interactive audio or secondary audio differ depending on the Blu-ray Disc. For details, refer to the package or operation manual supplied with the Blu-ray Disc.
4 Play back disc
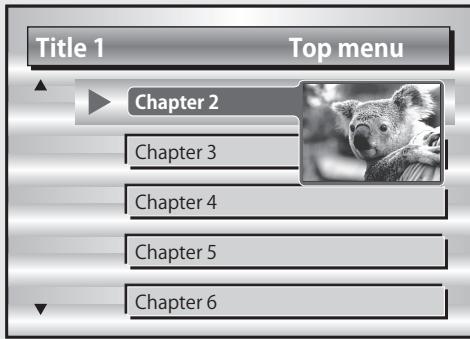
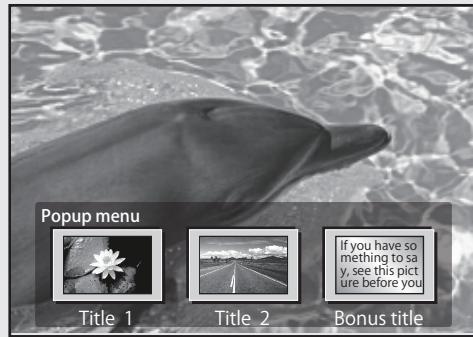
1 Press TOP MENU or MENU.
The menu stored on the disc is displayed.
2 Select the playback title or chapter from the top menu for playback.
[Example]
Disc menu
![MARANTZ UD7006 - [Example] - 1](/content/2025/01/166734/images/4b99f91e3e2f42749d39854d51985e628a5926f8bd4839515bfc1037bb16da5c.jpg)
Top menu
Pop up menu
When power is switched to standby
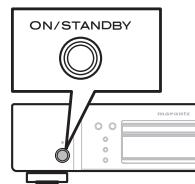
Press either POWER on the remote control, or ON/STANDBY on the unit.
- The power indicator flashes in red. Then the indicator lights in red and the power is turned off.

When "Auto Power Mode" is "On" (12 page 37), the following states are maintained for about 30 minutes, and then the power is automatically turned to standby.
- Disc not loaded
- Playback has stopped
- Stopped due to resume function
NOTE
During power standby, a slight amount of power is consumed. To totally cut off the power, remove the power cord from the power outlet.
Basic version
Basic version
This section describes the operations for enjoying video and audio on a disc.
Basic connections page 10
Playback (Basic operation) page 16
Basic settings page 24
Refer to the pages indicated below for information on connecting and playing back the various media and external devices.
| Audio and video | Connection | Playback |
| BD / DVD-Video | page 10 - 15 | page 17 |
| DVD-Audio | page 10 - 15 | page 19 |
| Audio | Connection | Playback |
| Super Audio CD | page 10 - 15 | page 18 |
| CD | page 10 - 15 | page 19 |
Basic connections
Important information
- Connect this unit as follows before using. Make connections according to the equipment you are connecting.
- Some settings of this unit may be necessary depending on the connection method. Check each connection item for more information.
- Select the cables (sold separately) according to the components being connected.
NOTE
- Do not plug in the power cord until all connections have been completed
- When making connections, also refer to the operating instructions of the other components being connected.
- Be sure to connect the left and right channels properly (left with left, right with right).
- Do not bundle power cords together with connection cables. Doing so can result in noise.
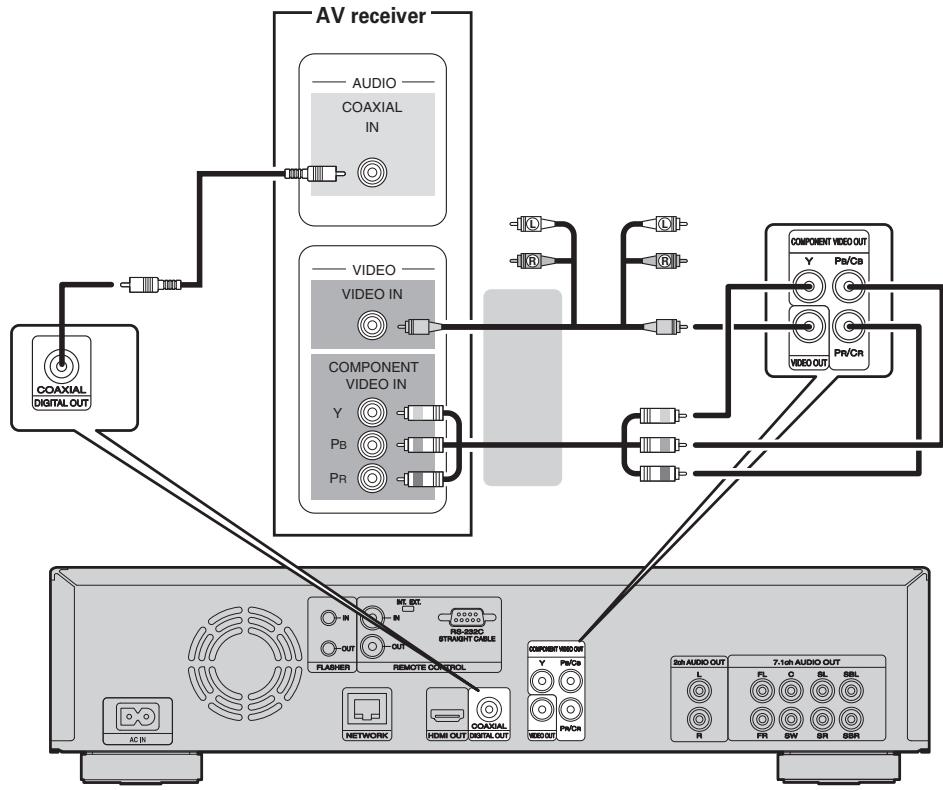
Connecting an AV receiver
For connecting using an HDMI cable, see "Connect" (14 page 5). This section describes the connections not using an HDMI cable.
Connecting to an AV receiver with an analog multi-channel audio input terminal
-
This connection is recommended when the specifications of an AV Receiver connected to the unit are as follows:
-
Not supporting HDMI input
- Not supporting digital audio(coaxial) input
- This connection enables decoding a playback signal of HD Audio on a Blu-ray Disc to an analog multi-channel signals with this unit and playing back of all channels on the Disc, including surround back channel signals, with high fidelity.
Cables used for connections
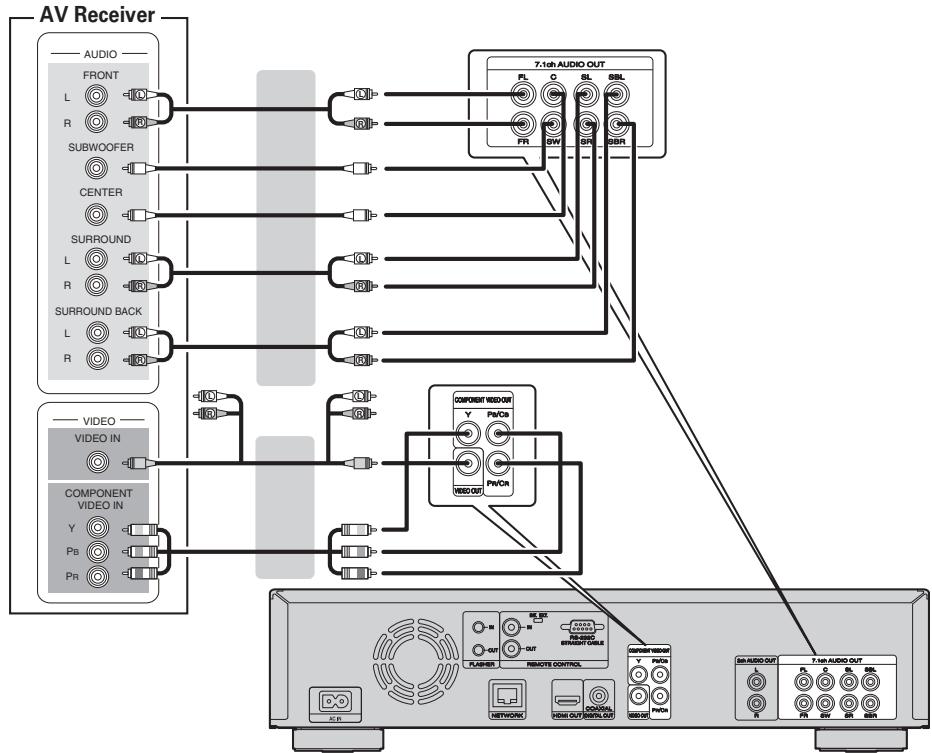

In the case of a 5.1-channel connection, you do not need to connect the SBR/SBL terminals.
Set "Speaker Setting" - "Configuration" to "5.1ch" (page 42).
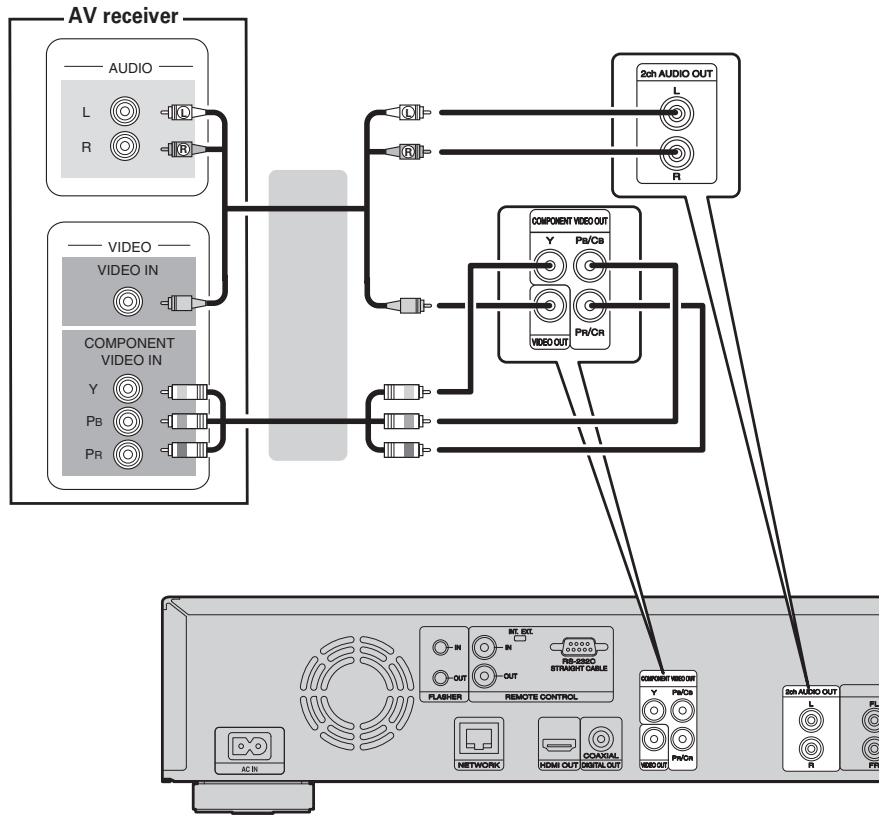
Connecting to an AV receiver with an analog 2-channel audio input terminal
-
This connection is recommended when the specifications of an AV receiver connected to the unit are as follows:
-
Not supporting HDMI input
-
Not supporting digital audio(coaxial) input
-
Select the connector to use and connect the device.
Cables used for connections
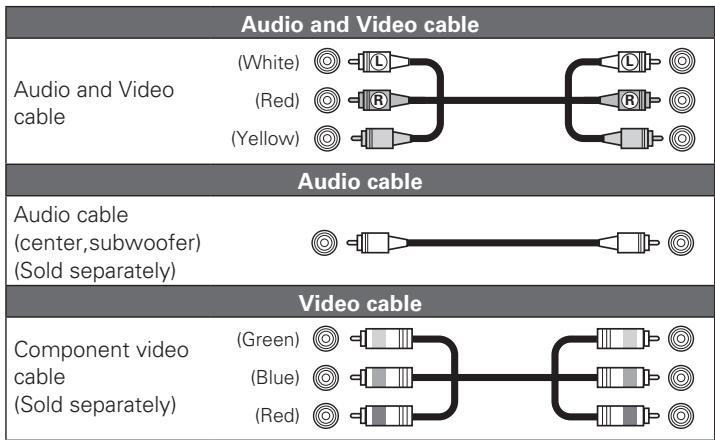
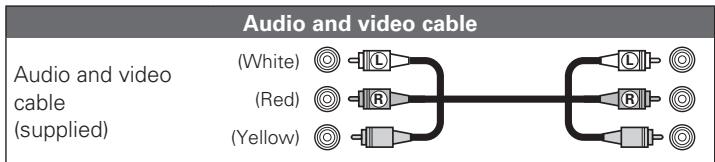
| Audio and video cable | |
| Audio and video cable (supplied) | (White) |
| (Red) | |
| (Yellow) | |
| Video cable | |
| Component video cable (sold separately) | (Green) |
| (Blue) | |
| (Red) | |
Connecting to an AV receiver with a digital audio input terminal
-
This connection is recommended when the specifications of an AV receiver connected to the unit are as follows:
-
Not supporting HDMI input
- Supporting digital audio(coaxial) input
- This connection enables faithfully playing a disc that supports 5.1-channel output.
- Select the connector to use and connect the device.
Cables used for connections
| Audio cable | |
| Coaxial digital cable (sold separately) | (Black) |
| Audio and video cable (supplied) | (White) |
| (Red) | |
| (Yellow) | |
| Video cable | |
| Component video cable (sold separately) | (Green) |
| (Blue) | |
| (Red) | |

When playing back Dolby Digital Plus/Dolby TrueHD/DTS-HD audio recorded on a BD disc, this unit outputs Dolby Digital or DTS bitstream from its digital audio output terminal.
NOTE
- Dolby TrueHD/Dolby Digital Plus/DTS-HD audio signals are not output with this connection. When outputting Dolby TrueHD/Dolby Digital Plus/DTS-HD audio signals, do so with an HDMI connection (10 page 5).
- Super Audio CD's DSD signal cannot be output. Also, during CD layer playback, 44.1 kHz/16-bit Linear PCM is output.
- Do not output DTS audio signals to an AV receiver that does not support DTS. Playing back a BD/DVD disc with recorded DTS content can generate noise and even damage your speakers.
Connecting a TV
- This connection is to connect the unit and a television directly.
- Check the television's audio and video terminals and connect to one of them.
Cables used for connections
| Audio and video cable | |
| HDMI cable (sold separately) | = = = = = |
| Audio and video cable (supplied) | (White) (Red) (Yellow) |
| Video cable | |
| Component video cable (sold separately) | (Green) (Blue) (Red) |
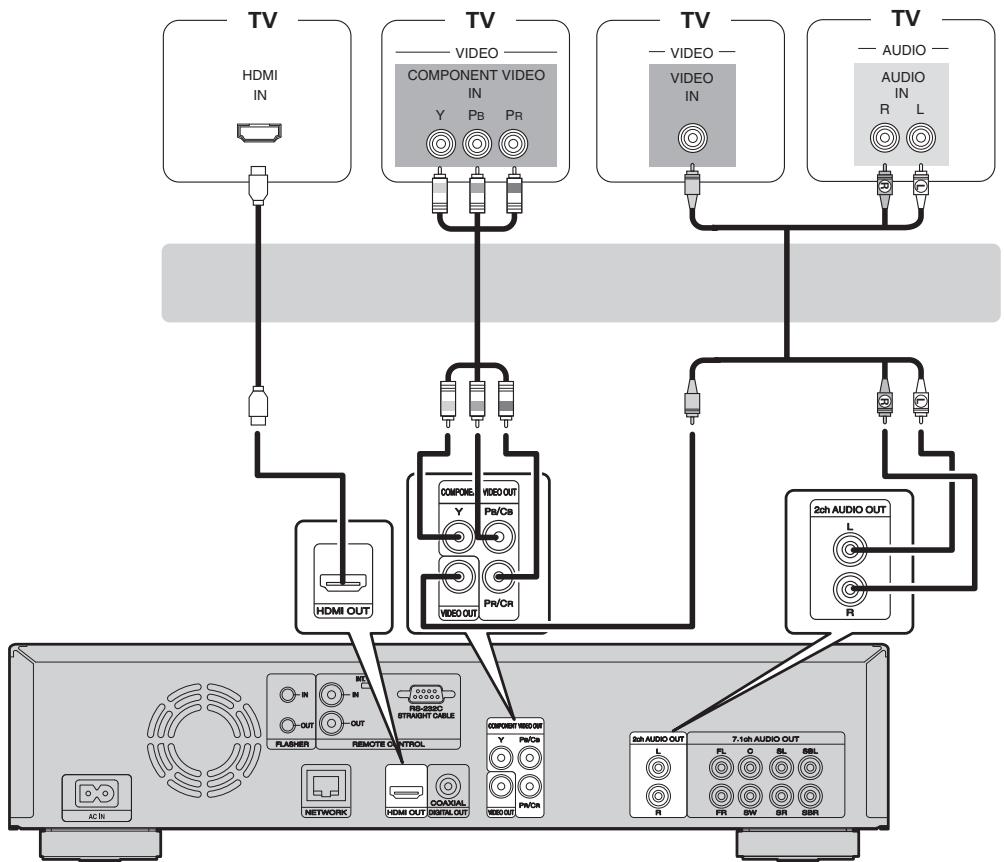
NOTE
- Do not connect this unit's video output via a VCR (Video Cassette Recorder). Some media contain copy prohibiting signals, which will disturb the screen image.
- The unit can play both NTSC and PAL discs.
- When connected to the television's component video input terminal
Press RESOLUTION according to the resolution of the connected television (B page 25).
- This unit's component video output supports 480i/576i/480p/576p/720p/1080i output.
- Images will not be projected normally if the television resolution and this unit's output resolution do not match.
Copyright protected DVD is output in 480i/576i or 480p/576p.

- Connecting to a device equipped with a DVI-D connector
Use an HDMI DVI-D conversion cable.
- The audio signal is not output. Make the appropriate audio connections for your devices.
The video signal will be in RGB format. - You cannot output to a DVI-D device that does not support HDCP (high-bandwidth digital content copyright protection system).
- Video may not be output depending on the combination of devices.
Connecting a 2-channel audio amplifier
This connection is for playback of audio of this unit, using a 2-channel audio device. Connect to either the 2ch Audio Out terminals or 7.1ch Audio Out terminals of this

For software recorded in multi-channel, an analog signal down-mixed to 2-channel is output.
Cables used for connections

Connecting to a device with analog 2-channel audio input terminals (7.1ch Audio OUT)
If the analog 7.1ch audio output terminals are to be used as the 2-channel output terminals, make this connection.
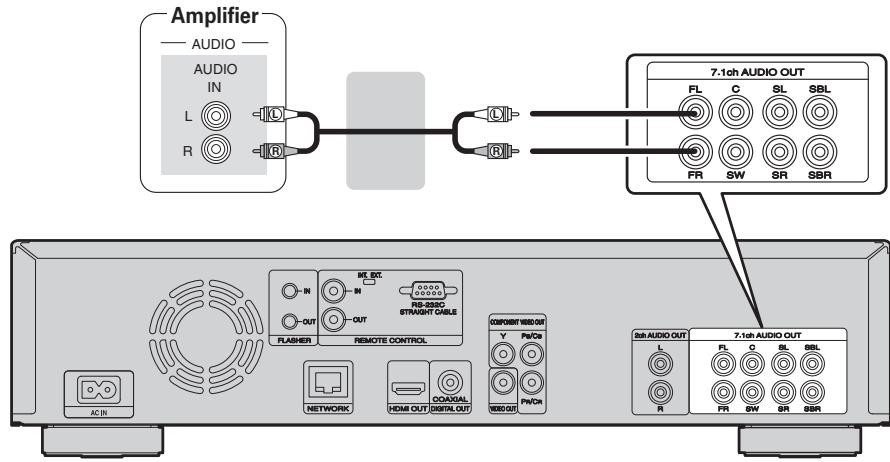

After connection, make settings for output of 2-channel audio from the 7.1ch Audio Output terminals. Set "Speaker Setting" - "Configuration" to "2.1ch" (page 42).
Connecting to a digital recording device
This connection is for recording audio from this unit, using an audio device with coaxial digital audio input terminals.
Cables used for connections

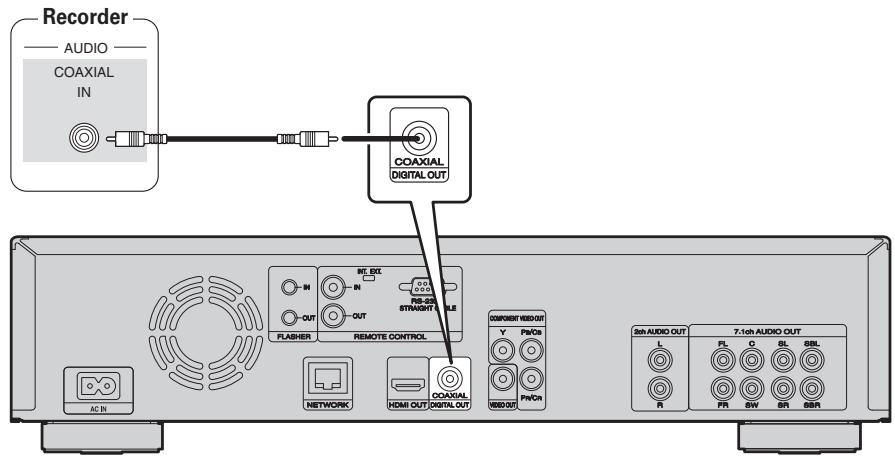

When multi-channel audio is to be converted to 2-channel audio and output, change the setting for a connected Coaxial digital output to PCM from Bitstream, then make the setting for the sampling rate for digital audio output, depending on the device ( page 41 "Down Sampling").
NOTE
If you play back BD/DVD or other media with an incorrect configuration, a deafening noise occurs that may damage your speakers.
Playback (Basic operation)
This section describes the display screen for each media and the procedures for playback.
The icons show the category of content applicable to each operation.
| Video: Blu-ray Disc, DVD-Video, DivX plus HD, MPEG, AVI, WMV, AVCHD | |
| Audio: Super Audio CD, CD, DVD-Audio, MP3, WMA, AAC, LPCM | |
| Photo: JPEG |
| □ About playback information (页面16) □ Playing BD and DVD-Video (页面17) □ Playing Super Audio CD (页面18) □ Playing CD (页面19) □ Playing DVD-Audio (页面19) |
| Operations enabled during playback (页面20) |
| Basic settings (页面24) |
NOTE
- The symbol (prohibited mark) may appear on the top left of the TV screen during an operation. This means that the operation being conducted is prohibited.
- Depending on the disc, certain operations may not be as described in this manual. Check each disc user guide for more information.
- During playback of a 2-layered disc, pictures may stop momentarily. This happens when the 1st layer switches to the 2nd layer. This is not a malfunction.
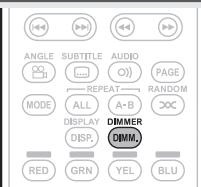
About playback information
Press DISPLAY to display the information bar display or media player display.
- To close the display, press DISPLAY until it goes away.
- Displayed content differs depending on the media being played.
Also, the information displayed while playing and stopped differs.
| MODE | ALL | A-B |
| DISPLAY | DIMMER | |
| DISP | DEMMA | |
| RED | GRN |
Information bar display

Media player display


This screen is displayed when video data such as on a Blu-ray Disc, DVD-Video, etc. are played.
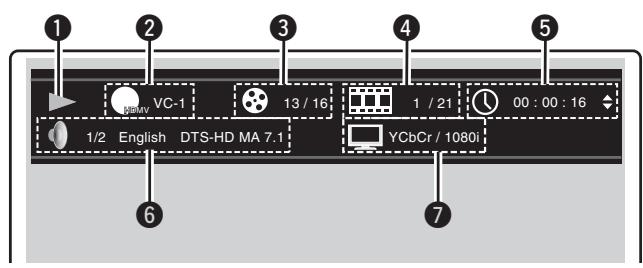
1Playback information
- Play ()
- Stop (■)
- Pause (II)
- Reverse Skip (I▲/ Forward Skip (▶I)
- Fast Reverse (▲▲) / Fast Forward (▶▶)
- Slow Reverse (▲) / Slow Forward (▶)
2 Video format display
3 Title / Group display
Chapter / Track display
Time display
- Title Elapsed / Remain time
Chapter Elapsed / Remain time - Group Elapsed / Remain time
- Track Elapsed / Remain time
Audio format display
HDMI output signal display
(When the connected HDMI device)
This screen is displayed when audio data is played.
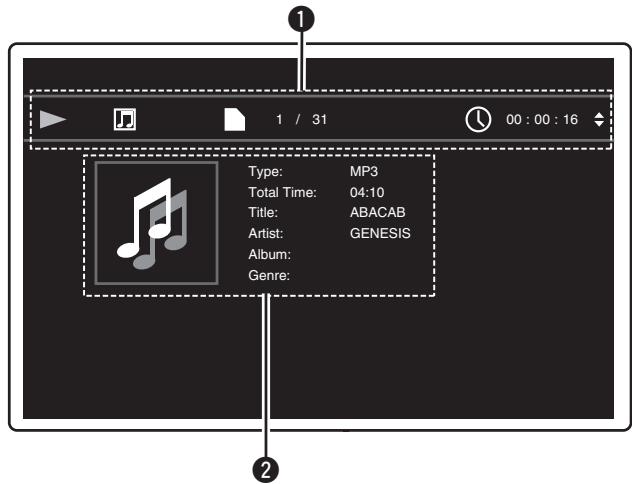
1Playback information
- Play (▶)
- Stop (■)
- Pause (II)
- Reverse Skip (I▲/Forward Skip (▶■)
- Fast Reverse (▲▲) / Fast Forward (▶▶)
- Slow Reverse (▲) / Slow Forward (▶)
2 Media information
- Type
Total Time
Title - Artist
- Album
Genre - Artwork
Playing BD and DVD-Video

1 Press POWER to turn on power to the unit.
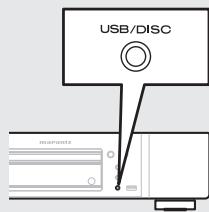
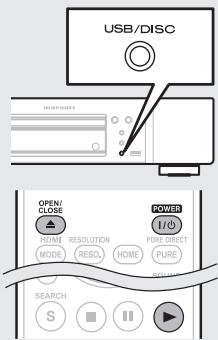
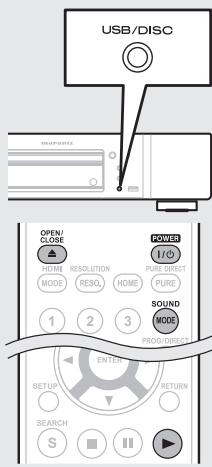
2 Press USB/DISC on the unit to select "DISC MODE".
3 Select "BD" with SOUND MODE.
- The Media changes each time SOUND MODE is pressed for 2 seconds.

Multi
Super Audio CD
Video
DVD-Audio
BD
Hybrid BD
4 Select "BD layer" or "DVD layer" for SOUND MODE for playback of a hybrid BD disc (page 50).
BD
Plays the BD layer of the BD hybrid disc.
DVD
Plays the DVD layer of the BD hybrid disc.
- The above setting is necessary only for BD hybrid discs.
NOTE
Select the disc layer before a disc is inserted.
Insert a disc.
Press to open/close the disc tray.
Press
Playback begins.
7 During DVD-Video playback, press TOP MENU or POP UP MENU to display the menu.

- If the menu continues, press to get to the next part.
- With BD, depending on the disc, you can select title and chapter from the pop up menu.

the settings shown below on the disc menu.
- Subtitle language
- Audio language
Audio format etc.
[Example]
Disc menu
Top menu
- Pop up menu

Pausing ( page 20)
Stopping (page 20)
□ Skipping to a desired chapter/track/file (page 20)
Fast-forward/fast-reverse (page 20)
Finding specific sections with search modes (page 21)
□ Memorizing locations to replay (Marker function) ( page 21)
□ Playing repeatedly (Repeat playback) (page 22)
Playing repeatedly between specified points (A-B repeat) (page 22)
Playing images frame by frame (page 22)
Slow-forward/slow-reverse (page 22)
Switching primary audio (page 22)
Changing the primary subtitle (page 23)
Switching the angle ( page 23)
Playing BD and DVD-Video
Playing BD-Video
compatible with Bonus View

With a disc that is compatible with bonus view (picture-in-picture), in addition to the main video (primary video) stored on the disc, you can play back the video director's commentary and simultaneously ongoing sub-story, as well as sub-video such as alternative camera angles (secondary video).
[Example] Bonus view
1 Press MODE (page 27).
2 Use to select "Secondary Video", and then press ENTER or .
3 Use to select the desired secondary video.
Off Does not display Secondary Video.
1/X Displays the first Secondary Video.
2/X Displays the second Secondary Video.
X/X Displays the X th Secondary Video.
- "X" is the number of Secondary Videos recorded and differs depending on the disc.

- For using Bonus View, some BD discs require built-in memory or external memory.
- The unit has a built-in memory. If capacity of more than 1 GB is required, using a USB memory device of 1 GB or more is recommended.
- The playback method, etc., is determined by the disc, and varies depending on the disc. Refer to the operation guide of the relevant disc.
Enjoying BD-LIVE™

If the unit is connected to the Internet environment, you can enjoy a BD-LIVETM function, using a disc that supports BD-LIVETM. For details on functions and operations of BD-LIVETM, see the information displayed on the screen after inserting a BD-LIVETM disc.
1 Select "Internal" of "BD Data Utility" - "BD-Live Memory" ( page 37).
2 Check that the connection and settings for the Internet are completed (13 page 38 “Connection Test”).
3 Insert a Blu-ray Disc that supports BD-LIVETM into the unit.
4 Select "BD-LIVETM" from the Disc menu.

- When BD-LIVE™ is used, the downloaded contents are stored in the built-in memory of the unit.
- The unit has a built-in memory. If capacity of more than 1 GB is required, using a USB memory device of 1 GB or more is recommended.
- Depending on your network environment, it may take time to connect to the network or connection may not be possible.
NOTE USB memory devices ( page 29, 48)
- For using a USB memory device, set "BD Data Utility" - "BD-Live Memory" to "External" (12 page 37).
- The USB memory device must have been initialized (10 page 37 "BD Data Utility" - "BD Data Information").
- Insert or remove a USB memory device while the power is in standby. If you insert a USB memory device while the power is ON, the USB memory device may not be access.
Playing Super Audio CD

1 Press POWER to turn on power to the unit.
2 Press USB/DISC on the unit to select "DISC MODE".
3 Select "Multi" with SOUND MODE.
- The Media changes each time SOUND MODE is pressed for 2 seconds.
Multi Video BD
Multi Super Audio CD
Video DVD-Audio
BD Hybrid BD

4 Select the playback area and layer with SOUND MODE (page 50).
Multi Plays the multi-channel area of the HD layer.
Stereo Plays the 2-channel area of the HD layer.
CD Plays the CD layer.
NOTE
Select the disc layer before a disc is inserted.
5 Insert a disc.
Press to open/close the disc tray.
6 Press▶. Playback of

- To play a disc in multichannel mode, connect the unit to an AV receiver, using an HDMI cable.
- The area/layer selected with SOUND MODE remains in the memory even when the power is turned off.
Playing Super Audio CD
Pausing (page 20)
Stopping (page 20)
□ Skipping to a desired chapter/track/file (page 20)
Fast-forward/fast-reverse (page 20)
Finding specific sections with search modes (page 21)
□ Playing repeatedly (Repeat playback) (page 22)
Playing repeatedly between specified points (A-B repeat) ( page 22)
Switching primary audio (page 22)
Playing in random order (Random playback) (page 23)
Playing in your preferred order (Program playback) ( page 23)
Playing CD

1 Press POWER to turn on power to the unit.
2 Press USB/DISC on the unit to select "DISC MODE".
3 Insert a disc. Press to open/close the disc tray.
4 Press▶. Playback begins.
Pausing (page 20)
Stopping (page 20)
□ Skipping to a desired chapter/track/file (page 20)
Fast-forward/fast-reverse (page 20)
Finding specific sections with search modes (page 21)
□ Playing repeatedly (Repeat playback) (page 22)
Playing repeatedly between specified points (A-B repeat) ( page 22)
Switching primary audio (page 22)
Playing in random order (Random playback) (page 23)
Playing in your preferred order (Program playback) ( page 23)
Playing DVD-Audio
1 Press POWER to turn on power to the unit.
2 Press USB/DISC on the unit to select "DISC MODE".
3 Select "Video" with SOUND MODE.
- The Media changes each time SOUND MODE is pressed for 2 seconds.

Multi Super Audio CD
Video DVD-Audio
BD Hybrid BD
4 Select the playback part with SOUND MODE (page 50).
Audio Plays the audio part.
Video Plays the video part.
NOTE
Select the disc layer before a disc is inserted.
Insert a disc.
Press to open/close the disc tray.
6 Press ▷.
Playback of the selected part begins.

□Playing bonus group
DVD-Audio discs may have a bonus group that can be played after entering a password.

If you enter the wrong password
Press CLEAR to erase the input number and then enter the correct number.
□ Selecting still images
When a DVD-Audio disc has still images on it, you can choose the image to display.
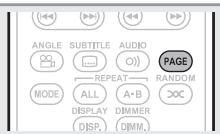
Press PAGE during playback.
The next still image is displayed.
Pausing ( page 20)
Stopping (page 20)
□ Skipping to a desired chapter/track/file (page 20)
Fast-forward/fast-reverse (page 20)
Finding specific sections with search modes (page 21)
□ Playing repeatedly (Repeat playback) (page 22)
Playing repeatedly between specified points (A-B repeat) (page 22)
Switching primary audio (page 22)
Playing in random order (Random playback) (page 23)
Playing in your preferred order (Program playback) ( page 23)
Operations enabled during playback
This section describes the operations enabled during playback for each media.
The icons show the category of content applicable to each operation.
| Video: Blu-ray Disc, DVD-Video, DivX plus HD, MPEG, AVI, WMV, AVCHD | |
| Audio: Super Audio CD, CD, DVD-Audio, MP3, WMA, AAC, LPCM | |
| Photo: JPEG |
Playback (Basic operation) (page 16)
Pausing ( page 20)
Stopping (page 20)
□ Skipping to a desired chapter/track/file (page 20)
Fast-forward/fast-reverse (page 20)
Finding specific sections with search modes ( page 21)
□ Memorizing locations to replay (Marker function) (1 page 21)
□ Playing repeatedly (Repeat playback) (page 22)
□ Playing repeatedly between specified points (A-B repeat) (page 22)
Playing images frame by frame (page 22)
Slow-forward/slow-reverse (page 22)
Switching primary audio (page 22)
Changing the primary subtitle (page 23)
Switching the angle ( page 23)
Playing in random order (Random playback) (page 23)
Playing in your preferred order (Program playback) ( page 23)
Basic settings (page 24)
Pausing


Press I during playback.
The indicator will light on the display.
- Resume normal playback by pressing .
Stopping


Press during playback.
Playback stops.


About the resume function
When playback is stopped, the stop position is memorized.
- The indicator flashes on the display. To resume play from the stop position, press while stopped.
To cancel the resume function
Perform one of the following operations.
- Press while stopped.
- Open the disc tray.
- Change the playback media mode with HOME.


- The resume function does not work with menu playback or BD-J (Blu-ray Disc Java) compatible discs.
- The resume function is cancelled when the power is cut off by unplugging the power cord and when the power is set to standby.
The resume function does not work depending on the disc.
Skipping to a desired chapter/track/file


During playback, press or
Playback begins from the start of the chapter/track/file being played.
▶▶ Playback begins from the start of the next chapter/track/file.
- Continue pressing and skip to the chapter/track/file by the number of times pressed.
NOTE
Skipping to the start of a title or group may be prohibited, depending on the disc.
Fast-forward/fast-reverse


During playback, press or
- The fast-forward/fast-reverse speed changes in the sequence of x1, x2, x3, x4, x5, and normal speed each time the button is pressed.
- The speed varies with the disc and file.
- Resume normal playback by pressing

- You cannot fast-forward/fast-reverse across files or tracks during program or random playback.
- Fast-forward/fast-reverse may be disabled with some DivX® files.
- Audio is not output during fast-forward/fast-reverse of a BD or DVD.
Operations enabled during playback
Finding specific sections with search modes


1 Press SEARCH to select a search.
The search mode setting bar is displayed at the top of the screen.
- The search mode changes each time the button is pressed.

2 Move the blue cursor at the upper part of the screen to the mode to be searched for, using then press ENTER.
Title/Group search display
Chapter/Track search display
- Enter the time, using the number buttons or , then press ENTER.
- The playback of the designated part begins.
3 Title Time search display
Chapter Time search display
- Select "Title Time search" or "Chapter Time search", using , then press ENTER.
- Then enter the time using the number buttons or then press ENTER.
- The playback of the designated part begins.
3 Enter search conditions or make settings on the search mode setting bar.
Once an entry is finalized, it searches for the specified location.
0-9, +10 Number entry
△V.. Select
ENTER Playback
CLEAR Clear

- Entering numbers
To enter 3. ENTER*
To enter 26. 2, 6, ENTER* or +10, +10, 6
To enter 138 1, 3, 8, ENTER*
- Depending on number of recorded songs or chapters, you may not need to use ENTER.
- Time search works with title and chapters playback time.
- When an input is not correct, press CLEAR. The previous status is retrieved.
[Search mode-compatible media and files]
| Contents Search mode | ||
| Title search | ○ | |
| Chapter search | ○ | |
| Title Time search | ○ | ○ |
| Chapter Time search | ○ |
NOTE
The search modes do not operate during program or random playback. Use I to cue.
Search modes may not operate with some discs.

- When the entry mode for title/chapter/title time/chapter time search continues for about 5 seconds with no operation, it is cancelled.
- When the power is set to standby or the disc is removed, the set marker is deleted.
Memorizing locations to replay (Marker function)

You can attach a marker to a location you want to view or hear again, so that playback begins at that location.
1 Press SEARCH to select a Marker search.
The Marker search mode setting bar is displayed at the top of the screen.

Press ENTER during playback.
- The location is registered for the selected marker number.
- The marker numbers "01" to "12" are registered in this order.
-
The registered number is displayed in white letters.
-
The elapsed playing time at the set location is displayed.

To play back memorized
locations
Use to select the marker number, then press ENTER.
To erase markers
Each time CLEAR is pressed, the marker number is erased from up to date registered.

- Subtitles may not appear depending on the locations you have memorized.
- The markers you have set will be erased if you turn the power to standby or eject the disc.
- The marker function does not operate across titles and groups.
- Marker search can only be performed during playback.
- The marker function does not work depending on the disc.
Playing repeatedly
(Repeat playback)


Press REPEAT ALL during playback.
The repeat mode icon is displayed at the top of the screen.

- The repeat mode changes each time the button is pressed.

- To resume normal playback, press REPEAT ALL, and select "Repeat Off".
[About repeat modes]
The available repeat modes vary depending on the disc or file you are playing.
| Contents Mode | Display | |||
| Title repeat | ○ | ○ | ||
| All repeat | ○ | ○ | ||
| Chapter repeat | ○ | ○1 | ||
| Track repeat | ○ | ○ |
![MARANTZ UD7006 - [About repeat modes] - 1](/content/2025/01/166734/images/ff29407c9a996ac49265fec490d0c0fb0e2131f173765b7c65ffb3e1d137fa68.jpg)
- Some repeat modes may not be accessible depending on some discs.
- With some discs, even when set to repeat playback, the disc may not return to the start of title or chapter, and may advance to the next scene.
- Repeat playback is not available during A-B repeat playback.
Playing repeatedly between specified points (A-B repeat)


1 During playback, press REPEAT A-B at the desired starting point (A).
The "A-" indicator will light on the display.
- To cancel the starting point (A), press CLEAR.
2 Press REPEAT A - B again at the desired ending point (B).
The "B" indicator will light on the display, and A-B repeat playback will start.
- The A-B repeat mode icon is displayed on the top of the screen.
To resume normal playback, press REPEAT A-B,and select "Repeat Off".


- You cannot skip a title/file with A-B repeat.
- If you perform a search operation during A-B repeat playback, A-B repeat playback is cancelled.
- A-B repeat playback may not be available with some scenes.
- A-B repeat playback is not available during repeat playback.
- A-B repeat playback may not be available with some DivX® files.
- A-B repeat playback is not available with BD-J (Blu-ray Disc Java) compatible discs.
Playing images frame by frame

Press while paused.
The disc advances frame by frame each time the button is pressed.
- Resume normal playback by pressing

Frame by frame reverse playback is not available with the unit.
Slow-forward/slow-reverse

Press or while paused.
The speed changes in the sequence of 1/16, 1/8, 1/4, 1/2, and normal speed each time the button is pressed.
- Resume normal playback by pressing

Audio is not output during slow-forward/slow-reverse playback.
Switching primary audio


With discs and files that have multiple audio track recording, you can change the audio during playback.
Press AUDIO during playback.
The audio number currently being played is displayed.
Each time AUDIO is pressed, the audio supported by a disc is changed.

1/2 English DTS-HD MA 7.1
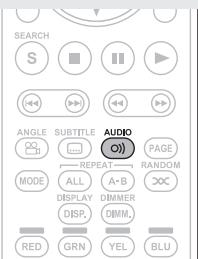
- If multiple audio items are recorded, the current audio number/number of recorded audio items is displayed.

- Depending on the disc, audio switching may be restricted to operation of the disc menu. In this case, switch the audio on the disc menu.
- With a DivX® file, "MP3" or "Dolby Digital" audio formats and the number of recorded audio modes are displayed. "---" appears for audio other than these.
- With DTS-CD (5.1 music disc), you cannot switch audio modes.
Operations enabled during playback
Changing the primary subtitle

During playback of a disc or file with recorded subtitles, you can switch the subtitles on/off as well as the subtitle language.
Press SUBTITLE during playback.
- The subtitle number currently being played is displayed.
Each time SUBTITLE is pressed, the subtitle language supported by a disc is changed.

1/3 English


- If a disc does not include subtitles, "Prohibited mark" is displayed.
- Depending on the disc, subtitle switching may be restricted to operation of the disc menu. In this case, switch the subtitles on the disc menu.
- With a DivX® file, the currently playing subtitle number and number of recorded subtitles are displayed; the language option is not displayed.
Switching the angle

During playback of a BD or DVD-Video recorded with several camera angles, you can change the angle.
Press ANGLE during playback.
- The angle number for current playback is displayed.
Each time ANGLE is pressed, the angle supported by a disc is changed.

Angle:
1/2
NOTE
Angle changing may be restricted, depending on the disc.
Playing in random order (Random playback)
Press RANDOM during playback.
The "RAND" lights on the display and "Random Mode" is displayed on the screen.

Resuming normal playback
Press RANDOM during random playback.

Random playback may not be available with some discs.
Playing in your preferred order (Program playback)

You can program up to a maximum of 15 tracks.
1 Press PROG/DIRECT during playback.
The "PROG" indicator lights on the display, and the program setting screen appears.
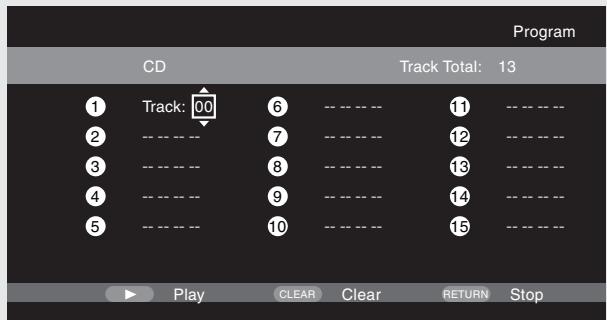

The program playback does not work with music file playback.
2 Enter the track numbers you want to program on the program setting screen.
0-9, +10 Number entry . Select
ENTER Set entry CLEAR Clear

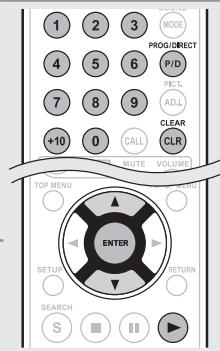
Checking the program contents
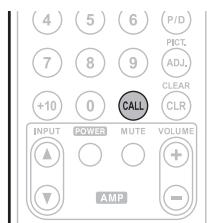
Press CALL while stopped.
- The programmed tracks are shown on the display of the unit each time the button is pressed.

- You can also check the contents of the program on the unit's display.
- Repeat playback is available during program playback.
Resuming normal playback
Press PROG/DIRECT during program playback.
- The program setting screen appears and press PROG/DIRECT.
Erasing programmed tracks one by one
Press CLEAR on the program setting screen.
- If the unit is set to standby or the disc tray is opened, the program is cleared.
For details of the media corresponding to each icon, see "Playable media" (page 48).
Basic settings
This section describes the setting operations for basic settings available with the remote control.
The icons show the category of content applicable to each operation.
| Video: Blu-ray Disc, DVD-Video, DivX plus HD, MPEG, AVI, WMV, AVCHD | |
| Audio: Super Audio CD, CD, DVD-Audio, MP3, WMA, AAC, LPCM | |
| Photo: JPEG |
Basic connections (page 10)
Playback (Basic operation) (page 16)
Changing the brightness of the display (Dimmer control) (page 24)
□ Playing high-quality audio (Pure direct function) (page 24)
HDMI control functions (page 24)
Video resolution (page 25)
Adjusting the picture quality (Picture control) (page 26)
Mode setting ( page 27)
Changing the brightness of the display (Dimmer control)


The brightness of the display can be changed.
Press DIMMER.
- The brightness changes each time the button is pressed.

- When the dimmer is set to off, the FL OFF indicator lights red.
Playing high-quality audio (Pure direct function)


This enables you to play high quality audio by stopping the video signal, etc., output, and outputting the analog audio signal only.
Press PURE DIRECT while stopped.
- The Pure Direct mode changes each time the button is pressed.

Pure Direct 1
Pure Direct 2
Off
This turns off the digital audio output, video output, and display. And the FL OFF indicator lights red.
This turns off the digital audio output and video output.
This turns off the pure direct function.

- You cannot use PURE DIRECT while the GUI menu is displayed.
- The pure direct setting returns to "Off" when the unit is put in standby mode.
HDMI control functions
When you make HDMI connections with a TV or AV receiver compatible with this unit and HDMI control functions, you can perform the following operations by setting up the HDMI control functions of each device.
- TV or AV receiver power is turned on by operating the unit and functions change with this unit input.
- Turning off the TV's power turns the unit's power to standby.
- Operating the unit via the TV's remote control. (When the TV's remote control has player operation buttons)

Set the HDMI control function to "On".
GUI menu "System" - "HDMI Control" (10 page 37).

Turn on all the equipment connected by HDMI cable.

Set the HDMI control function for all equipment connected by HDMI cable.
- Please refer to the user guides of connected devices for how to make settings.
- Carry out steps 2 and 3 if any of the equipment was unplugged.

To ensure that the unit's HDMI video output is projected on the TV screen, change the input function of the TV and AV receiver.

When you turn the TV's power to standby, check that the power of the unit and AV receiver also goes on standby.

If the HDMI control function does not operate properly, check the following points.
- Is the TV or AV receiver compatible with the HDMI control function?
- Are the HDMI control function settings of all equipment correct? (Step 3)
- After setting, did you add another HDMI device connection or make any changes in the connections? If so make the settings again.
NOTE
- Some functions may not operate depending on the connected TV or AV receiver. Check the user guide of each device for details beforehand.
- When "HDMI Power Off Control" (R2 page 37) is set to "Off", the unit does not go to standby even if the connected device is in the standby mode.
Video resolution
This section is for making the settings for television resolution. Set them depending on the connected television.
Press RESOLUTION.
- The resolution is changed as shown below each time RESOLUTION is pressed.
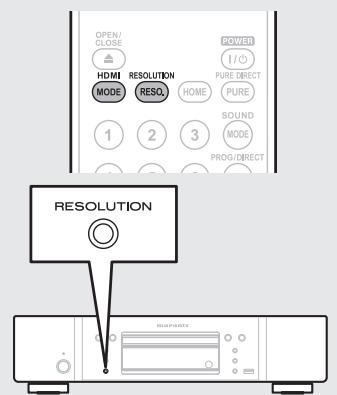
The default settings is underlined.


- This unit's component video output supports 480i/576i/480p/576p/720p/1080i output.
- If the Video resolution is not set to "Auto", set it to correspond with the resolution of your television.
- Images will not be projected normally if the television resolution and this unit's output resolution do not match.
- Audio and video will be temporarily interrupted if the power of the connected device currently playing is turned off, or the input is switched.
- When you change the HDMI video resolution of the unit, it takes a few seconds up to about 10 seconds for validation between the unit and the connected device. Audio/video is not output during this period.
NOTE
- When the HDMI video resolution is set to "1080P24", a HDMI video signal is output from the unit with a resolution of 1080P and a frame rate of 24 frames per second, regardless of the video signal on the disc being played. Because of this, when playing discs containing video signals recorded with a frame rate of something other than 24 frames per second, the movement of the picture may be unnatural. If this happens, set the HDMI video resolution to something other than "1080P24".
-
When you make the following settings, this unit will output video signals from an HDMI OUT connector with a resolution of 1080P24 (1080 progressive, 24-frame).
-
RESOLUTION setting: Set to "Auto", "Source Direct", or "1080P24".
- HDMI mode setting: Set to "24P ON".
- Television resolution supports 1080P24 (1080 progressive, 24-frame).
Under these setting conditions, no video signals are output from VIDEO OUT and COMPONENT VIDEO OUT connectors. To output video signals, press HDMI MODE and set HDMI output to "24P OFF".
HDMI output settings
Most movies on Blu-ray disc are recorded at 24 frames per second, the same as movie film. If the unit is set like this, images with the same quality as movies can be enjoyed.
The setting for outputting signals with 24 video frames in HDMI mode is made here. Then images with fluid motion can be enjoyed when video of 1080P24 (1080 progressive, 24-frame) is played.
NOTE
You can not use HDMI mode while the GUI menu is displayed.
Press HDMI MODE.
- The current status of HDMI output is displayed on the television screen.
Each time HDMI MODE is pressed, "24P ON" and "24P OFF" are toggled.
The default setting is "24P OFF".
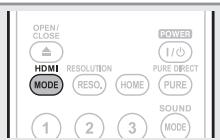
24P ON
- If the connected television supports "1080P24", use this setting.
- After making settings, set Video Resolution to "1080P24" or "SourceDirect".
24P OFF
- If the connected television does not support "1080P24", use this position.
Adjusting the picture quality (Picture control)
You can adjust the picture quality to your liking.
The adjusted values can be stored in Memory 1 through Memory 5.
1 Press PICT. ADJ.. The currently set status is displayed.
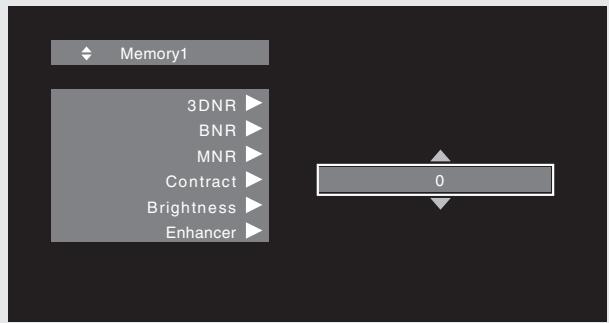
2 Press to select a memory number to be used, and then press ENTER.
Press to select an item then press ENTER or D.
4 Change the setting with Refer to the table on the right for information on the different settings.
To finalize picture adjustments
Press PICT. ADJ. after adjusting.
- The pop up menu of the picture adjustments is disappeared on the screen.

The picture adjustment settings are retained in memory even after the power is turned off.
| Setting items | Setting contents | Default |
| 3DNR | 0 – +3 | 0 |
| Reduces noise in the entire picture. | ||
| BNR | 0 – +3 | 0 |
| Reduces the block noise generated by digital processing. | ||
| MNR | 0 – +3 | 0 |
| Reduces the noise around the outline of an object generated by digital processing. | ||
| Contrast | -6 – +6 | 0 |
| Adjusts picture contrast. | ||
| Brightness | 0 – +12 | 0 |
| Adjusts picture brightness. | ||
| Enhancer (*1) | 0 – +11 | 0 |
| Strengthen the contours of the picture. | ||
| Gamma Correction | ||
| Changes the amount of gamma correction to adjust overall brightness of a picture. | -4 – +4 | 0 |
| Make Dark(-) / bright(+) section easier to see. | ||
| Sharpness | -6 – +6 | 0 |
| Adjusts picture sharpness for the higher frequency range. | ||
| Hue (color tone) | -6 – +6 | 0 |
| Adjusts the green and red color balance. | ||
| Chroma Level | -6 – +6 | 0 |
| Adjusts the color density. | ||
| Setup Level (*2) | 0 IRE | 7.5 IRE |
| Adjusts the black areas of the image. | 7.5 IRE | |
| White Level (*1) | -5 – +5 | 0 |
| Adjusts the white level. | ||
| Black Level (*1) | -5 – +5 | 0 |
| Adjusts the black level. | ||
| H.Position (*1) | -7 – +7 | 0 |
| Adjusts the left/right position | ||
| V.Position (*1) | -7 – +7 | 0 |
| Adjusts the top/bottom position. |
1 This has no effect with the video output.
2 Effective only for the 480i video signal from the video output terminal and component video output terminal.
Mode setting
You can make various mode settings during playback. The setting menu is displayed at the top of the screen.
1 Press MODE. Displays a menu of items that can be set.
2 Select a setting item using , and then press ENTER or .
3 Use to select a setting, and then press ENTER.
4 Press MODE. The setting screen is disappeared.
| Setting items | Setting details |
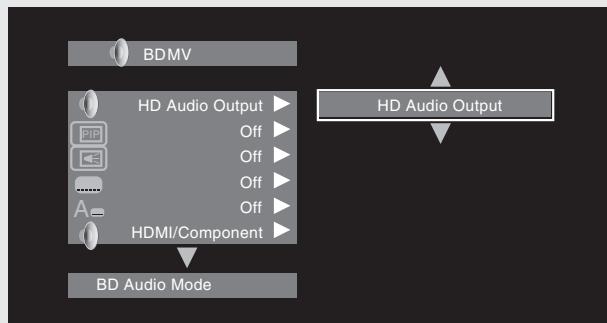
| BD Audio ModeSwitch Blu-ray Disc audio playback mode. | HD Audio Output : Can view by outputting high quality signals such as Dolby TrueHD, Dolby Digital Plus, or DTS-HD as its high sound quality bitstream. Cannot listen to interactive or secondary audio.Mix Audio Output : Outputs a mix of primary audio/interactive audio/secondary audio.NOTEWhen "BD Audio Mode" is set to "Mix Audio Output", DTS-HD MA 192 kHz 5.1ch audio is decoded to 96 kHz 5.1ch. |
| Secondary Video | Off : Does not display secondary video(Picture-In-picture).1/X* : Displays the first secondary video.2/X* : Displays the second secondary video.X/X* : Displays the X th secondary video.* "X" is the number of secondary video recorded and differs depending on the disc (12 page 18 "Playing BD-Video compatible with Bonus View"). |
| Secondary Audio | Off : Does not select the secondary audio. The interactive audio is also set to off.1/X* : Selects the first secondary audio.2/X* : Selects the second secondary audio.X/X* : Selects the X th secondary audio.* "X" is the number of secondary audio recorded on a disc and differs depending on the disc.NOTEWhen "BD Audio Mode" is set to "Mix Audio Output", secondary audio is output. |
| Secondary Subtitle | Off : Does not select the secondary subtitle.1/X* : Selects the first secondary subtitle.2/X* : Selects the second secondary subtitle.X/X* : Selects the X th secondary subtitle.* "X" is the number of secondary subtitle recorded on a disc and differs depending on the disc. |
| Subtitle Style | Switches the subtitle style recorded on a disc. |
| Audio/Video SyncCorrects displaced video and audio playback timing. | HDMI / Component : Audio output is synchronized to the video output from the HDMI terminal or component terminal.Video : Audio output is synchronized to the video output from the Video terminal. |
Advanced version
Advanced version
This section describes how to enjoy files stored in a USB memory device or in a server connected via the network, or the contents of the YouTube and Netflix.
Advanced connections page 29
Playback (Advanced operation) page 31
- How to make detailed settings page 35
Refer to the pages indicated below for information on connecting and playing back the various media and external devices.
| Video File / Music File / Photo File | Connection | Playback |
| MEDIA PLAYER (USB memory device / DLNA server) | page 29 | page 31 |
| Internet | Connection | Playback |
| YouTube | page 29 | page 34 |
| Netflix | page 29 | page 34 |
Advanced connections
Connecting to a USB memory device
MP3 or JPEG, etc. files stored on a USB memory device can be played.
- Connecting a USB memory device
Insert a USB memory device into the USB port firmly.
- After the USB memory device is inserted and the power of the unit is turned on, check that the "USB" indicator on the display of the unit lights.

- For files that can be played on the unit, see page 49.
- If the "USB" indicator does not light, turn the power off, reinsert the USB memory device, and turn the unit on again.
NOTE
- Insert a USB memory device straight into the USB port. If the USB memory device is forcibly inserted, the unit or the device may be damaged.
- Some USB memory devices may protrude from the USB port. Do not use excessive force to insert it into the USB port, or push the protruded part forcibly.
- Do not insert an object other than a USB memory device into the USB port. It may damage the unit.
- Do not leave a USB memory device near small children. A child may swallow it.
- For connecting a USB memory device, do not use an extension cable.
- The USB port of the unit and a computer cannot be connected with a USB cable.
- Do not use for charging portable audio players or mobile phones.
□ Removing a USB memory device
Press POWER to turn the power off then remove the USB memory device from the USB port.
NOTE
- Be sure to turn the power off when inserting or removing a USB memory device. Data stored in the USB memory device or the memory of the unit may be damaged.
- In any case where data stored in a USB memory device are damaged or deleted, we will not compensate for the stored contents or any associated damage or try to restore the contents stored in a USB memory device.
- Compatibility of all USB memory devices is not guaranteed.
- For reformatting a USB memory device, format it with FAT16 or FAT32.
Connecting to a network
When the unit is connected to the Internet, you can enjoy following functions.
- Playback of a Blu-ray disc supporting BD-LIVE™ (page 18).
- Playback of music, photos, video files stored on a device on the network (10 page 32).
- Playback of YouTube contents (1 page 34).
- Playback of Netflix contents (1 page 34).
- Downloading for updating the latest firmware via the network (page 37).
After connection, make settings for the Internet connection and check it before using Media Server, YouTube or Netflix.
Cables used for connections
| Audio and video cables | |
| HDMI cable (sold separately) | ●●●●●●●●●●●●●●●●●●●●●●●●●●●●●●●●●●●●●●●●●●●●●●●●●●●●●●●●●●●●●●●●●●●●●●●●●●●●●●●●●●●●●●●●●●●●●●●●●●●● ●●●●●●●●●●●●●●●●●●●●●●●●●●●●●●●●●●●●●●●●●●●●●●●●●●●●●●●●●●●●●●●●●●●●●●●●●●●●●●●●●●●●●●●●●●●●●●●●●●●● |
| Audio and video cable (supplied) | (White) ●●●●●●●●●●●●●●●●●●●●●●●●●●●●●●●●●●●●●●●●●●●●●●●●●●●●●●●●●●●●●●●●●●●●●●●●●●●●●●●●●●●●●●●●●●●●●●●●●●● |
NOTE
- Do not plug in the power cord until all connections have been completed.
- When making connections, also refer to the operating instructions of the other components being connected.
- Be sure to connect the left and right channels properly (left with left, right with right).
- Do not bundle power cords together with connection cables. Doing so can result in noise.
System requirements
Internet connection via broadband.
Modem
A device that connects to the broadband and conducts communications on the Internet.
Some modems also incorporate a router.
Router
When using the unit, we recommend a router with the following features.
- Built-in DHCP (Dynamic Host Configuration Protocol) server.
This function automatically assigns an IP address on the LAN. - Built-in 100BASE-TX switch (built-in switching hub compatible with speeds upwards of 100 Mbps)
Computer (recommended system)
- OS
Windows® XP Service Pack2 or more or Windows Vista
- Software
Server software supporting Windows Media Player ver.11 or DLNA.
Ethernet cable (CAT-5 or greater recommended)
- An ethernet cable is not included with the unit.
- Use only shielded STP or ScTP LAN cable which is available at retailer.
- We recommend a shielded straight cable (normal type) for Ethernet connections.
If you use the flat type or a non-shielded cable, the noise may adversely affect other devices.
Checking the network connection
After connection, test the Internet connection with "Connection Test" in "Network" on the GUI menu (10 page 38).
- If "Network is FAILED." is displayed in the test, check the IP address with "Network" in "Information" on the GUI menu, then set "DHCP" to "Manual" (page 38).

- The unit can use the DHCP function to automatically set up the network.
- When setting up your network manually, after subscribing to an ISP, make the settings according to directions in "Network" on the GUI menu (12 page 38).
- If you connect the unit to a network without a DHCP function, conduct IP address and other settings according to "Network" on the GUI menu (page 38).
- The unit does not support PPPoE. If you subscribe to a service that is set with PPPoE, a PPPoE compatible router is required.
- When setting up the network manually, consult with your network administrator for the settings to make.
Registering the connected device for the network
For playing files stored on a device connected via a network, the device must have the unit registered in advance.
- For registering, refer to the operation manual supplied with the server.

For Internet connections, use an ISP (Internet Service Provider). Ask your local dealer for details.
NOTE
- Do not connect an NETWORK connector directly to the LAN port/Ethernet connector on your computer.
- It is necessary to subscribe to an ISP in order to connect to the Internet. If you already have a broadband connection, there is no need to subscribe anew.
- The router you can use varies with the ISP. For more information, contact your ISP or PC dealer.
- Marantz assumes no responsibility whatsoever for any communication errors or problems resulting from customer's network environment or connected devices.
Remote control connection
When you use this unit connected to a Marantz amplifier, this unit receives operation signals sent from the amplifier and operates accordingly.
Connection
Use the supplied remote connection cable to connect the REMOTE CONTROL IN terminal of this unit to REMOTE CONTROL OUT terminal of the amplifier.
□ Setting
Set the remote control switch on the rear panel of this unit to "EXT. (EXTERNAL)" to use this feature.
-
This setting will disable remote sensor reception of this unit.
-
To operate the unit, point the remote control at the remote sensor of the amplifier.

To use this unit without connecting it to the amplifier, set the remote control switch to "INT. (INTERNAL)".
Flasher Input
This is used when controlling components from different rooms with a keypad or other input device.
Set the remote switch to "INT. (INTERNAL)" when using a flasher input.
Playback (Advanced operation)
This section describes the playback of files stored in the DVD, CD or USB memory device and the operation of Home menu.
Opening the Home menu screen ( page 31)
Playing files (MEDIA PLAYER) (page 32)
Playing YouTube video ( page 34)
Playing Netflix video picture (page 34)
How to make detailed settings ( page 35)
Home menu screen


The unit can play music, photos, video files stored in the USB memory device connected to the front panel of the unit or on the sever connected via the network. For playback operation, use the Home menu screen.
Opening the Home menu
screen
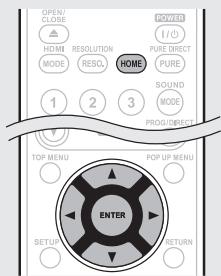
1 Press HOME.
The Home menu is displayed on the television screen.
Press △V△I
to the menu item to be used.
3 Press ENTER.


Home menu screen
Home menu screen
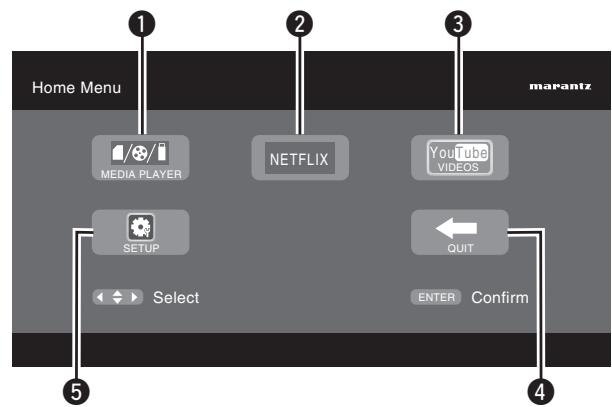
1 MEDIA PLAYER (page 32)
The unit can play music, photos, video files stored on the device connected via the network or in the USB memory device connected to the front panel of the unit.
2 NETFLIX (page 34)
The Netflix contents are played.
3 YouTube (page 34)
The YouTube contents are played.
4 QUIT
The Home menu is closed.
SETUP ( page 35)
The GUI menu setup screen is displayed for setting the unit.
Playing files
(MEDIA PLAYER)


Files on a USB memory device, disc or a server connected to the unit are played using the Media Player of the unit.
- Before operation, start the server software of the computer (Windows Media Player, etc.), and make settings for the server contents so that files can be played via the network.
- For details, refer to the operation manual supplied with the server software.
1 Select "Media Player" on the Home menu screen with < then press ENTER.
Devices connected to the unit are listed on the menu screen of Media Player.
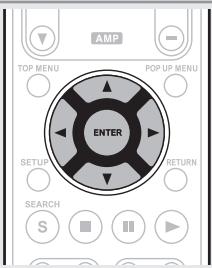
2 Select a device on which a file to be played is stored with then press ENTER.
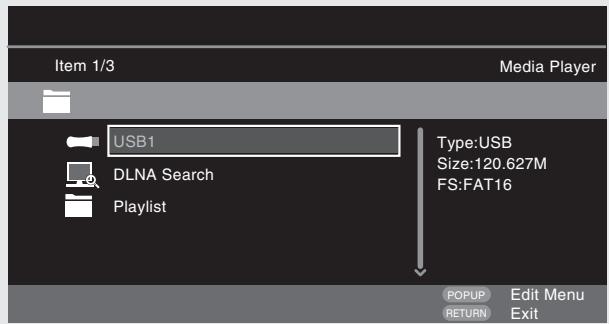

- If the server connected to the unit is not displayed on the menu screen of Media Player, select "DLNA Search" on the screen with , then press ENTER to search for the server.
- If the server is not displayed as a result of searching, check the connection of the server to the unit once again.
- If you perform such operations as adding or deleting a file on the connected DLNA server, information of the DLNA server may not be displayed. If this happens, turn off and on the unit's power again.
3 Select a folder to be played with , then press ENTER.
- Folders classified by file type are listed on the menu screen.
- Files are classified as follows:
Video: DivX, MPEG, AVI, WMV
Music: MP3, WMA, AAC, LPCMI
- Photo : JPEG
Here, "Photo" is selected as an example.
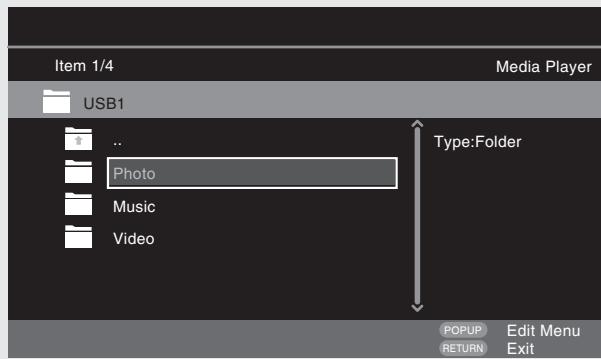
4 Select a file to be played on the file list on the screen with , then press ENTER.
Playback begins.
- A slide show begins and still images are switched at 1-10 second intervals.
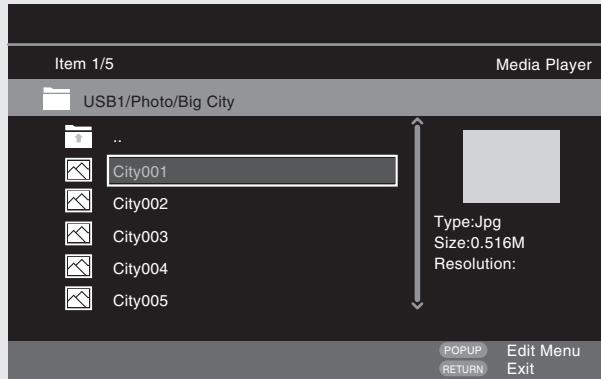

- With a large image file, the image may display for longer than the set time.
- For the file types that can be played, see "Files" (14 page 49).
Changing the still image being played
Press
- Before playback or display of next image.
Pausing the display
Press I.
- To cancel pause, press
Changing interval of slide show
Press
Changing the still image orientation
Press
Invert
V Mirror
Contrarotate
D Rotate clockwise
Change the media for playback of a file
When the source of a file for playback is changed to another media, press to return to step 2 and select the media to be played.
DISC MODE
If the source of a file to be played is changed from the USB media player or server to a disc, you can also change the media with the procedures below.
1 Press ■.
Playback of a file from a USB memory device or server stops.
Press USB/DISC.
The playback mode of the unit is changed to disc mode.
Press
Playback begins.

The playback media mode setting remains in the memory, even when the power is set to standby.
□ About playback information (16)
Pausing (page 20)
Stopping (page 20)
□ Skipping to a desired chapter/track/file (page 20)
Fast-forward/fast-reverse (page 20)
Finding specific sections with search modes (page 21)
□ Memorizing locations to replay (Marker function) (1 page 21)
□ Playing repeatedly (Repeat playback) (page 22)
Playing repeatedly between specified points (A-B repeat) ( page 22)
Playing images frame by frame (page 22)
Slow-forward/slow-reverse (page 22)
Switching primary audio (page 22)
Changing the primary subtitle (page 23)
Switching the angle ( page 23)

- Playback Video or audio may be interrupted or playback may be disabled, depending on the connection environment of devices connected via the network.
- If a file cannot be played on the unit, it may be played by converting the format on the connected device.
- The connected device cannot play data from the unit.
- It may require a little time to start playback, depending on the size of a file to be played.
- For the file types that can be played, see "Files" (12 page 49).
□ Playing playlist


Favorite files on a USB memory device, disc are played using the playlist.
1 Select a file to be played on the file list on the screen with , then press .
2 Press POP UP MENU. The menu of playlist is dis
3 Press ENTER. File is added to playlist.
4 Select a playlist on which a file to be played is stored with
5 Playing files.
See "Playing files (MEDIA PLAYER)" (page 32).
- If the unit is set to standby, the playlist is cleared.
□ Playing Kodak Picture CD

This unit can also run JPEG files stored on Kodak Picture CD. You can enjoy picture images on the display device set by playing back the picture CD. For details of Kodak picture CD, contact a shop that provides developing service of Kodak Inc.
1 If a Kodak Picture CD is inserted in the disc tray of the unit, a slide show begins on the screen.
2 Pressing stops the slide show, and the thumbnail screen is displayed.
3 Use to select a desired picture to be played back, then press ENTER.
An image will be played back from the selected track and go to the next one in turn.
4 Pressing POP UP MENU with the thumbnail screen displayed shows the screen for describing the playback operations.
Changing the still image being played
Press I.
- Before playback or display of next image.
Pausing the display
Press III.
- To cancel pause, press .
Changing the still image orientation
Press △▽
Invert
V Mirror
Contrarotate
Rotate clockwise
Returning to the thumbnail display screen
Press

Playing YouTube video
The operation for the video site YouTube is described here.
1 Select "YouTube" on the Home menu, then press ENTER.
The YouTube content screen is displayed.
Press < and ENTER to select the content to be played.
3 After selecting the content, press ENTER or . Playback begins.
About YouTube
YouTube is a video file-sharing service operated and managed by YouTube Inc.
- The unit can play video hosted by YouTube.
YouTube and the YouTube logo are the registered trademarks of Google Inc.
- The YouTube content is independently managed by YouTube, LLC.
- The unit cannot browse some content that can be browsed on a computer.
- YouTube content may include information that may be deemed inappropriate.
- We cannot be responsible for the content offered by YouTube.
- For questions on content, submit inquiries on the YouTube home page. http://www.youtube.com/t/contact_us
- Usable services and displays may be changed without notice.
Searching the content
You can use the virtual keyboard provided in the GUI menu of this unit to search for video content offered by YouTube.
1 Press SEARCH on the YouTube screen. A virtual keyboard will appear.
2 Enter a keyword that you want to search and then press ENTER.
The keyword that you typed in the search dialog box of the YouTube screen is displayed.
3 Press SEARCH to start the search operation.
Playing Netflix video picture


The operation for the Netflix streaming service is described here.
1 Select "NETFLIX" on the Home menu, then press ENTER.
Your instant Queue screen will appear on your TV.
2 Use to select highlight a movie on your instant Queue.
3 Press ENTER a title that you want to watch.
The second menu of title will appear.
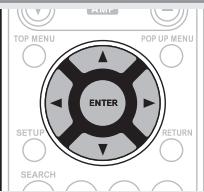
4 Select "play" on the second menu and then press ENTER.
Retrieving of title will be started.
Press to return to your instant Queue.

- For using "YouTube" and "Netflix", Internet connection is required. It is recommended to use a broadband line (effective speed 6 Mbps or more) such as FITH (optical) ADSL, CATV, etc.
- Even if the line speed is sufficient to make it viewable, pictures may be unstable, interrupted, or not viewed depending on the usage environment, communication environment, connecting line conditions, etc.
- The connection of Netflix may not be connected via proxy.
- For the usage conditions for Netflix, contact Netflix.
How to make detailed settings
Menu map
Pressing SETUP displays the GUI menu. From this menu, you can move to various setting screens.

General Setting ( page 37)
Settings for screen display, etc. are made.
System
Screen Saver
Initialize
Auto Power
□ Firmware Update
Mode
Update
Notification
Power Saving
BD Data Utility
HDMI Control
Control
Language
GUI Language
□ Dialog
Disc Menu
Subtitle
Ratings
Change
DVD Rating
Password
Level
BD Rating Level
Country Code
Network
Internet
DHCP
Connection
BD-LIVE
Information
Connection
ConnectionTest
Proxy Setting
Others
Closed Caption
DivX
Angle Mark
Registration
PIPMark
Remote ID
Secondary Audio
Netflix
Mark
Deactivate

Video Setting ( page 40)
Settings for a television and HDMI are made.
TV
TV Aspect
□ Wallpaper
Progressive Mode
HDMI
Color Space
HDMI Deep Color
3D
3D Output Setting
TV Screen Size Setting

Audio Setting (page 41)
Settings for speakers and audio output are made.
Audio Output
Coaxial
HDMI
Down Sampling
DRC
Speaker Setting
Configuration
TestTone

System Information (page 42)
MAC Address is displayed.
Display MAC Address.
GUI menu operation
1 Press SETUP. The GUI menu is displayed on the TV screen.
- The GUI menu is also displayed when you press SETUP of the Home menu.
2 Press to select the menu to be set or operated.
- To return to the previous item, press .
3 Press ENTER to enter a setting.

Text colors of selected items of the GUI menu are as follows:
- White : These items can be selected.
- Gray: These items cannot be selected.
NOTE
You must use the GUI menu to make settings or operate while a disc or USB memory device is not inserted. In cases in which the resume function is activated, you may not make correct settings.
Exiting the GUI menu
Press SETUP while the GUI menu is displayed.
- The GUI menu display disappears.
Examples of GUI menu screen displays
Typical examples are described below.
- Menu selection screen (Top menu)
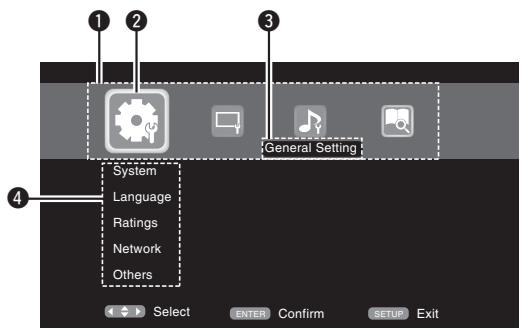
List of GUI menu setup icons
2 Currently selected setup icon
3 Currently selected setup item
List of currently selected setup items
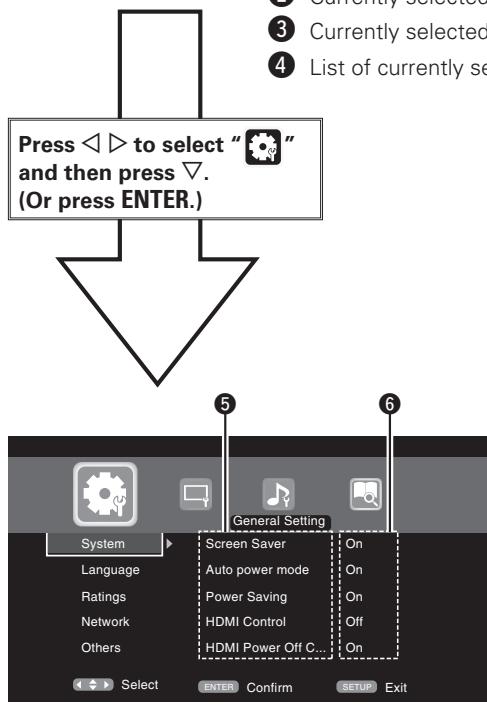
List of items of currently selected advanced settings
Currently selected advanced settings
List of items
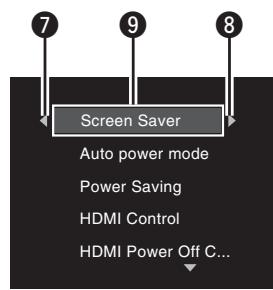
7 Returns to the previous item. Use to switch.
Switch to the next item. Use to switch.
9 Selected item. Switch the selected item using
System
Default settings are underlined.
Set the following settings.
- Screen saver settings
- Power saving mode settings
HDMI control function settings - Initialize settings
- Firmware update from the Internet
- BD-LIVE Memory switching settings
| Setting items | Setting details |
| Screen Saver Sets the Screensaver. | On: The screensaver function activates when stop or pause status continues for about three minutes. The screensaver function also activates during playback of a CD, Super Audio CD or audio file when no operations are performed for about three minutes. Off: Does not use the screensaver. |
| Auto Power Mode This setting automatically sets the power to standby. | On: This setting automatically sets the power to standby if any of the following states continues for approximately 30 minutes. • Disc not loaded • Playback stopped • Stopped due to the resume function Off: Does not use the auto power mode. |
| Power Saving Sets to power saving mode during standby. | Power Saving Standby: This is the lowest power consumption mode. During standby, operations are not accepted via HDMI control and RS-232C. Power indicator status in standby mode: Off Normal Standby: During standby, operations are accepted via HDMI control and RS-232C. Power consumption is slightly higher at this time. Power indicator status in standby mode: Red |
| HDMI Control Links the unit and a device connected with an HDMI cable that supports HDMI control. | On: Links with the device connected to HDMI. Off: Disables the HDMI control function. For the HDMI control function to operate, it is necessary for the unit or HDMI-compatible TV connected to the unit to have an HDMI connection. Refer to “HDMI control functions” (42 page 24) for more information on HDMI control functions. After the “HDMI Control” setting has been changed, always turn off the power to the connected equipment and then turn it back on. |
| HDMI Power Off Control Links the power of the unit and a device connected with an HDMI cable that supports HDMI control. | On: Turns the unit's power to standby through linkage to the TV. Off: Does not turn the unit's power to standby through linkage to the TV. |
| Setting items | Setting details |
| Initialize All settings including audio mode and picture quality are set to default settings. | Cancel: Does not initialize. OK: Executes initialization. |
| Firmware Update Updates the firmware of the unit via the Internet. | Check for Update: Checks if a newer version of firmware exists. You can also check approximately how long it will take to complete an update. If the firmware is already updated to the latest version, the firmware updating operation starts after you press ENTER. When updating starts, the power indicator lights red and the GUI menu screen shuts down. While updating, a rough estimate of remaining time is indicated on the display. When updating is complete the power indicator lights green and the normal status is resumed. |
| Update Notification Displays the message for updating on a television screen just after the power is turned on. | On: The message for updating is displayed on a television screen. Off: The message for updating is not displayed on a television screen. |
| BD Data Utility Initializes the BD data stored in the built-in memory or external memory used for BD-Live. | BD Data Information: The BD data used for BD-Live are initialized. The space remaining in the memory being used is displayed. FMT BD Data: Initialized the space for BD data being used for BD-Live. This operation deletes all data. When a USB memory device that stores the data is inserted, never execute this operation. |
| BD-Live Memory: Built-in memory or external memory is selected for the BD-Live memory. • Internal: The built-in memory is used. • External: The USB memory device inserted in the unit is used. If the capacity of BD-Live is more than 1 GB, select the external memory in advance (48 page 18). |
NOTE
When the following message is displayed after "Firmware Update" (K page 37), follow the instructions in the message to perform operations.
"Disconnect the power plug of the unit from the outlet, wait approximately 30 seconds, and then insert the plug again before use."
Language
Default settings are underlined.
Set the playback audio, subtitles, and menu display languages.
| Setting items | Setting details |
| GUI Language Sets the GUI language. | English / Français /spanoI |
| Disc Menu Sets the language used for BD or DVD menus. | English / French / Chinese / Spanish / German / Italian / Dutch / Portuguese / Danish / Swedish / Finnish / Norwegian / Russian / Korean / Japanese / More* |
| Dialog Sets the dialog used to play BD or DVD. | English / French / Chinese / Spanish / German / Italian / Dutch / Portuguese / Danish / Swedish / Finnish / Norwegian / Russian / Korean / Japanese / More* |
| Subtitle Sets the subtitle language used to play BD or DVD. | Off / English / French / Chinese / Spanish / German / Italian / Dutch / Portuguese / Danish / Swedish / Finnish / Norwegian / Russian / Korean / Japanese / More* • Off: No subtitles displayed. |
*Press More to select a language other than those displayed in the list.
Ratings
Default settings are underlined.
Set the BD and DVD playback settings and password settings.
| Setting items | Setting details |
| Change Password Sets the password for changing the parental control level and parental control country code of BD and DVD. | Change : Changes the password. Use 0 - 9 to enter a password and then press ENTER to finalize it. The default setting is “0000”. |
| BD Rating Level Sets the parental level for playing BD. | Level 0 - 254 : Sets the age allowed to play back media. Restricts playback of discs with relevant parental control. No Limit : Does not restrict playing of BD. |
| DVD Rating Level Sets the parental level for playing DVD. | Level1 - 8 : Sets the parental level for playing DVD. Lock All : Restrictions playing of all DVD. No Limit : Does not restrict playing of DVD. |
| Country Code Sets the standard country parental control. Applies the parental level of the set country. | Initial setting is United States. Select the parental lock code for another country with Δ∇. |
Network
Default settings are underlined.
Set Internet connection settings and BD-LIVE settings.
| Setting items | Setting details |
| Internet Connection Sets whether the Internet connection is to be used or not. | Enable: The Internet connection is to be used. Disable: The Internet connection is not to be used. |
| Information Displays the network information such as the IP address, subnet mask, etc. | Displays the network information shown below. • Address type • IP Address • Subnet Mask • Default Gateway • Primary DNS • Secondary DNS |
| Connection Test Performs the network connection test. | Perform the Internet connection test. • It is recommended to perform the connection test for the first Internet connection, or after the IP address or the settings for the network are changed. • If connection is not completed, a message is displayed. Check the connection settings and connection environment. |
| DHCP Sets how to perform network configuration, automatically or manually. Since the factory default setting is "Auto", you do not need to set items such as the IP address if the DHCP server of the broadband router is set to "Enable". Configure a proxy server if necessary. | Auto: Automatically configures the network via the DHCP function. Manual: When connecting to a network that lacks the DHCP function, manually configure the following network settings. Consult with the ISP or your network administrator for what settings to make. After use ▽ to clear value, use 0-9 to enter values and then press ENTER to finalize them. • IP Address: Manually configure the IP address. • Subnet Mask: If a xDSL modem or terminal adaptor is directly connected to the unit, enter the subnet mask provided by the ISP, usually in a document. Usually, "255.255.255.0" is set. • Default Gateway: If the device is connected to a gateway (router), enter its IP address. • Primary DNS: Enter the primary DNS. • Secondary DNS: Enter the secondary DNS. |
| BD-LIVE Connection Limits the access rights for the content on a BD-LIVE connection. | Permitted: All Internet accesses from BD-LIVE are permitted. Partial Permitted: Internet accesses from the certified BD-LIVE are permitted. Prohibited: All Internet accesses from BD-LIVE are prohibited. |
| Proxy Setting Setting for connecting to the Internet via a proxy server. | Disable: Does not use a proxy server. Enable: Uses the proxy server. • Proxy host: If Enable is selected for Proxy Setting, enter the proxy host from the virtual keyboard and press ENTER to register it. • Proxy port: If Enable is selected for Proxy Setting, enter the proxy port and press ENTER to register it. |
| Network proxy input screen (with virtual keyboard) | |
| General Setting | |
| System | |
| Language | |
| Ratings | |
| Network | |
| Others | |
| Select | Enter Confirm RETURN Exit |
Others
Default settings are underlined.
Set other functions.
| Setting items | Setting details |
| Closed CaptionThis setting outputs a subtitles signal to a closed caption decoder (sold separately). | Off: Does not output the closed caption (subtitle) signal.On: Outputs the closed caption (subtitle) signal. |
| Angle MarkFor making settings for the angle mark displayed in playback. | If multiple angle marks are recorded on the disc being played, an angle mark is displayed while the scene including an angle is being played.Off: An angle mark is not displayed.On: An angle mark is displayed. |
| PIP MarkFor making settings for the PIP mark displayed in playback. | If secondary video is recorded on the disc being played, a PIP mark is displayed while the scene including secondary video is being played.Off: A PIP mark is not displayed.On: A PIP mark is displayed. |
| Secondary Audio MarkFor making settings for the secondary audio mark displayed in playback. | If secondary audio is recorded on the disc being played, a secondary audio mark is displayed while the scene including secondary audio is being played.Off: A secondary audio mark is not displayed.On: A secondary audio mark is displayed. |
| DivX RegistrationDisplays the DivX®registration code. | Show Code: Displays the DivX®registration code. |
| Remote ID(Unit side)Sets the remote control ID(12 page 47). | Switches the unit's remote control ID code when other Marantz BD players are in the vicinity.BD 1: Set the code setting on the remote control to "1".BD 2: Set the code setting on the remote control to "2". |
| Netflix DeactivateFor deactivating the Netflix audience function. | No: For activating the Netflix audience function.Yes: For deactivating the Netflix audience function.Netflix ESN: A unique Netflix ESN (Electric Serial Number) that can use Netflix stream service is displayed. |
TV
Default settings are underlined.
Set the video output signal according to the connected TV.
| Setting items | Setting details |
| TV Aspect (Aspect ratio) | 16:9 Squeeze Auto : Outputs to a wide screen TV. For 4:3 video, displays in the center of the screen without changing the aspect ratio.*1 |
| Set the screen type and display mode of the TV. | WIDE (16:9) : Outputs to a wide-screen TV. 4:3 PS : Outputs to a 4:3 TV. For wide video, trim the left and right side of the image and display in 4:3 aspect ratio.*2 4:3 LB : Outputs to a 4:3 TV. Displays all of the wide video. |
| Wallpaper | Picture : Displays the Marantz logo. Black : Sets the background to black. Gray : Sets the background to gray. Blue : Sets the background to blue. |
| Setting for displaying the background when playback is stopped. | |
| Progressive Mode*3 | Auto : Detects the type of video material and automatically switches the mode. Normally, this setting is used. Video : Suitable for playing video material discs. Film : Suitable for playing film material discs. |
| Sets an appropriate progressive conversion mode for the source video material. |
1 This has no effect with the video output.
2 Depending on the video content, even though you set it to 4:3 PS (Pan Scan), the content may be output in 4:3 LB (Letter Box).
*3 This mode is activated for the video source of 480i/576i.
HDMI
Default settings are underlined.
Set the HDMI output signal.
| Setting items | Setting details |
| Color Space Sets the video signal system to be output from HDMI. | YCbCr : Outputs using the color difference video system (16 (black) to 235 (white)).RGB Normal : Outputs using the RGB video system (16 (black) to 235 (white)).RGB Enhanced : Outputs using the RGB video system (0 (black) to 255 (white)). |
| HDMI Deep Color Sets the HDMI terminal to output Deep Color. Expands the color depth (number of used colors) of the HDMI video signal, enabling playback with more natural colors and free of streaking. | Auto : Deep Color is automatically output when the connected HDMI device supports Deep Color.Off : No Deep Color output. |
3D
Default settings are underlined.
Sets up 3D video software playback.
| Setting items | Setting details |
| 3D Output Setting Sets up video outputs for 3D video playback (only for HDMI). | Auto: Automatically determines whether the video software is 3D or 2D and plays it back. • When you play 3D video, 3D and 2D video parts are played back as 3D and 2D, respectively. • Normally, use this setting. Off: Always outputs 2D video signals. |
| TV Screen Size Setting Sets up the screen size of your 3D enabled TV. | Use △∇◁ ▷ or 0 - 9 to enter three digits for the screen size of your TV in the setting screen, and press ENTER for confirmation. • The default setting is “046” (46’ TV screen size). NOTE Set up the correct size, otherwise you may not be able to view 3D video properly. |

3D video playback operations may differ according to the disc to be used. Refer to the instruction manual supplied with your disc.
NOTE
When passing 3D video signals output from this device through an AV receiver to a 3D enabled TV, the AV receiver must also be compatible with inputting / outputting 3D video signals.
To view 3D video, use a 3D enabled TV.
- To connect the unit with a 3D enabled TV, use a high speed HDMI cable.
- During 3D playback, you cannot adjust "Video Resolution" (25 page 25), "HDMI output Settings" (25 page 25), or "Adjusting the picture quality" (25 page 26).
Audio Output
Default settings are underlined.
Set the audio output.
| Setting items | Setting details |
| Coaxial For selecting the format output from the digital audio output terminals. | Bitstream: For selecting if the device connected to the unit supports Dolby Digital or DTS Digital Surround. PCM: For selecting when the device connected to the unit does not support Dolby Digital or DTS Digital Surround. Off: For outputting no audio signal from the digital audio output terminal of the unit. For converting audio signals, see "About digital signal audio output" (12 page 52). |
| HDMI For selecting the format output from the HDMI output terminals. | Bitstream: For selecting when the device connected to the unit supports Dolby TrueHD/Dolby Digital Plus/Dolby Digital or DTS-HD/DTS Digital Surround. The output format is automatically selected according to the audio format or the number of channels supported by the connected HDMI device. PCM: For selecting when a device connected to the unit does not support Dolby TrueHD/Dolby Digital Plus/Dolby Digital or DTS-HD/DTS Digital Surround. Off: For outputting no audio signal from the HDMI output terminal of the unit. For converting audio signals, see "About digital signal audio output" (12 page 52). |
| NOTE • If "BD Audio Mode" is set to "HD Audio Output" with MODE on the remote control, BD secondary audio and interactive audio are not output. • For playback of a super audio CD with DSD via the analog audio output terminals, set "HDMI" to "Off". | |
| Setting items | Setting details |
| Down SamplingFor selecting the sampling rate output from the digital audio output terminal. | Refer to the operation manual for the device connected to the unit, and make settings depending on the connected device. 48 kHz / 96 kHz / 192 kHz NOTE • For rights-protected content, the audio signal is down-sampled to 48 kHz, 16-bits, and output. • If the connected device does not support the sampling rate of 96 kHz or 192 kHz and the settings for the unit is made as 96 kHz or 192 kHz, much noise may be generated from the connected device. • When you want to view content that has a sampling frequency of 48 kHz or higher with 2 ch Audio Out, set "Audio Output" - "Down Sampling" in the GUI menu to "192 kHz". |
| DRCCompresses the dynamic range of Dolby TruHD/Dolby Digital Plus/Dolby Digital Audio. | Off: Dynamic range is not compressed. On: Dynamic range is compressed. Auto: Dynamic range of Dolby TrueHD audio is automatically compressed according to the material. Audio of Dolby TrueHD only is compressed. This setting compensates high volume to low and low volume to high when high volume is not desired at night. |
Speaker Setting
Default settings are underlined.
The settings for audio signals output from the analog 7.1ch output terminals are made.
- This setting is effective for analog audio output only.
- Initial setting for the speaker is 7.1ch. For multi-channel playback, be sure to make this setting.
| Setting items | Setting details |
| Configuration Set the number of speakers to be used. | 2.1ch: Front L and R speakers are used. 3.1ch: Front L and R and a center speakers are used. 4.1ch: Front L and R and surround L and R speakers are used. 5.1ch: For normal 5.1-channel surround system. 6.1ch: A surround back speaker is added to the 5.1-channel surround system (The surround back speaker is output from SBL ch.). 7.1ch: For normal 7.1-channel surround system The settings below can be made for all settings from “2.1ch” to “7.1ch”. • Speaker size: Large or Small • Subwoofer: Used or not used None: Subwoofer is not connected. LFE: Adds the low frequency signal of the channel for which the speaker size is set to “small” to the subwoofer signal and outputs it. LFE+Main: Adds the low frequency signal of all channels to the subwoofer signal and outputs it. • Sound level: 0 dB to 10 dB (initial setting: 0 dB) • Distance: 0 m to 10 m (initial setting: 3 m) □ When 2.1ch is selected Lt/Rt: For selecting down-mixing of multi-channel audio input of DTS-HD, DTS-Digital Surround, Dolby Digital Plus or Dolby Digital audio to a format supporting Dolby surround. If the unit is connected to an AV amplifier supporting Dolby surround, surround sound can be enjoyed. Stereo: Multi-channel sound is down-mixed to 2-channel stereo. NOTE “Lt/Rt” and “Stereo” are effective only when “2.1ch” is selected. |
| Test Tone | Check the speaker settings, using a test tone. Automatically switches the test tone output speaker. Press ENTER to manually set the values for the desired speaker. NOTE • Before starting the test tone, reduce the volume setting of the amplifier to an appropriate level. • The test tone is output soon after ENTER is pressed. • Pressing RETURN stops the test tone. |

System Information
MAC address is displayed.
| Setting items | Setting details |
| MAC Address Displays the MAC address. | Displays the MAC address. |
Information
Information
This section list various information related to this unit.
Please refer to this information as needed.
Part names and functions page 44
About media page 48
Other information page 52
Troubleshooting page 56
Specifications page 59
Index page 60
Part names and functions
Front panel
For buttons not explained here, see the page indicated in parentheses ( ).
Power operation button
(ON/STANDBY) (6,8)
Turns power to this unit on and off (standby).
STANDBY indicator (6,8)
PURE DIRECT button (24)
4 RESOLUTION button (13, 25)
⑤ SOUND MODE button (17-19)
6 FL OFF indicator (24)
Remote control sensor (47)
USB/DISC button (33)
USB port (29)
10 Reverse-skip/Forward-skip buttons
(I<1, >I) (20)
1 Stop button (■) (20)
12 Play button (▶) (7, 17 - 19)
13 Display (44)
14Disc tray (7)
15 Pause/Still button (II) (20)
16 Disc tray open/close button (△) (7, 17-19)

If 12 or 16 is pressed when the power is in standby, the power is turned on.
Display

1Playback mode indicators
During Playback
II : During pause and frame by frame playback
PROG:During program playback
RAND:During random playback
C1A-B:Duringrepeatplayback
Information display
Displays various information or playback elapsed time and so on of the disc.
3Playback format indicators
4 Downmix indicator
Displayed when playing back downmix permitted audio.
Angle information indicator
Displayed when a scene on the currently playing disc has been shot at various angles.
Audio channel indicators
Displays the number of audio signal channels during playback.
2CH : 2-channel playback
MULTI: Multi-channel playback
Time mode indicators
TOTAL: Total time of Super Audio CD and CD
SING: Elapsed time of title/chapter/track/file being played
REM: Remaining time of title/chapter/track/file being played
Group/Title/Track/Chapter indicators
9 HDMI output indicator
Display when HDMI video or audio signals are being output.

Does not display when the HDMI cable is not correctly connected or when the HDMI connection is not verified.
10 Media indicators
BD:BD
DVD : DVD-Video, DVD-R/+R/-RW/+RW
DVD AUDIO : DVD-Audio
SUPER AUDIO CD : Super Audio CD
CD:CD
USB : USB memory device
NET: NETWORK
Displays the inserted media and contents via Network.
Rear panel
For buttons not explained here, see the page indicated in parentheses ( ).
AC inlet (AC IN) (6)
2 NETWORK connector (30)
3 HDMI OUT connector (5)
4 DIGITAL OUT COAXIAL connector (12, 15)
⑤VIDEO OUT connector (10-13)
6 COMPONENTVIDEOOUT connectors (10-13)
72ch AUDIO OUT connectors (13, 14) For software recorded in multi-channel, analog signals that have been down-mixed into 2 channels are output.
7.1ch AUDIO OUT connectors (10, 14)
RC-232C connector Extension connector for future use.
10 REMOTE CONTROL IN/OUT connectors (31)
11 REMOTE CONTROL INT./EXT. switch (31)
12 FLASHER IN/OUT connectors (31)
Connect an external control device or other device for servicing.
NOTE
- Do not touch the inner pins of the connectors on the rear panel. Electrostatic discharge may cause permanent damage to the unit.
- Do not put your finger or foreign object in the fan opening. Doing so could cause injury or unit failure.
Remote control
For buttons not explained here, see the page indicated in parentheses ( ).
Remote control signal transmitter (47)
2 Disc tray OPEN/CLOSE button (△) (7, 17 - 19)
3 HDMI MODE button (25)
4 RESOLUTION button (13, 25)
5 Number buttons (0 - 9, +10) (21, 23)
6 AMP POWER button
⑦ AMP INPUT buttons (▲▼)
8 TOP MENU button (17)
ENTER button (21, 23, 36)
10 SETUP button (36)
1 SEARCH mode button (21)
12 Stop button (■) (20)
13 Revers-skip, Forward-skip buttons (I< ▶I) (20)
14 ANGLE button (23)
15 SUBTITLE button (23)
16 MODE button (7, 27)
17 REPEAT ALL button (22)
18 DISPLAY button (16)
19 POWER button (6)
20 PURE DIRECT button (24)
21 HOME button (31)
22 SOUND MODE button (17-19)
PROG/DIRECT button (23)
Picture adjust button (PICT. ADJ.) (26)
CALL button (23)
26 CLEAR button (21, 23)
27 AMP MUTE button
28 AMP VOLUME buttons (+ -)
POPUP MENU button (17)
30 Cursor buttons ( < >) (17, 36)
RETURN button (32, 33)
Pause/Still button (II) (20)
Play button (▶) (7, 17 - 19)
Fast-reversing, Fast-forwarding buttons (▲▲ ▲▶) …………………… (20)
35 AUDIO button (22)
56PAGE button (19)
57 RANDOM button (23)
REPEAT A-B button (22)
Dimmer button (DIMM.) (24)
40 RED/GRN/YEL/BLU buttons
NOTE
- When power is in standby, press 2 and 3 to turn the power on.
- You can use 40 when operating the BD pop up menu screen, etc.
- 6, 7, 27, 28 : These are used to operate the corresponding functions of a Marantz integrated amplifier. For each function, refer to User Guide supplied with the Integrated Amplifier.
Inserting the batteries
① Slide the rear lid in the direction of the arrow and remove it.
② Load the two batteries properly as indicated by the marks in the battery compartment.
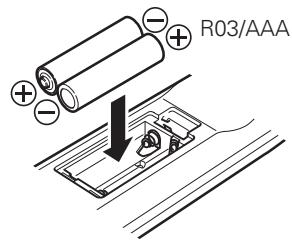
③ Put the rear cover back on.
NOTE
- Insert the specified batteries in the remote control.
- Replace the batteries with new ones if the set does not operate even when the remote control is operated close to the unit. (The supplied batteries are only for verifying operation.)
- When inserting the batteries, be sure to do so in the proper direction, following the and marks in the battery compartment.
- To prevent damage or leakage of battery fluid:
- Do not use a new battery together with an old one.
- Do not use two different types of batteries.
- Do not attempt to charge dry batteries.
- Do not short-circuit, disassemble, heat or dispose of batteries in flames.
- Do not keep the battery in a place exposed to direct sunlight or in places with extremely high temperatures, such as near a heater.
- If the battery fluid should leak, carefully wipe the fluid off the inside of the battery compartment and insert new batteries.
- Remove the batteries from the remote control if it will not be in use for long periods.
- Used batteries should be disposed of in accordance with the local regulations regarding battery disposal.
Operating range of the remote control
Point the remote control at the remote sensor when operating it.
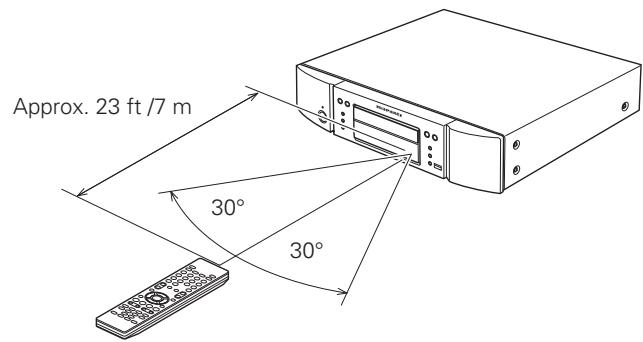
NOTE
The set may function improperly or the remote control may not operate if the remote control sensor is exposed to direct sunlight, strong artificial light from an inverter type fluorescent lamp or infrared light.
Remote control settings (remote control side)
Switches when this unit remote control operates another Marantz BD players in the vicinity.
Set the remote control code simultaneously on the unit, too ( page 39 "Remote ID").
[Remote control code setting]
- The supplied remote control has two remote control code settings: BD 1 and BD 2.
The code is set to "BD 1" at the factory. - To set the code to "BD 2", hold the and the Number button (2) pressed for more than five seconds.
- To set (return) the code to "BD 1", hold the and the Number button (1) pressed for more than five seconds.
![MARANTZ UD7006 - [Remote control code setting] - 1](/content/2025/01/166734/images/9ef3d2a7990b7dd921b64c6ed95e35a22c255b52d0d39c0b77006c78b20ec8f8.jpg)
If the signal code of the remote control does not match the signal code of the unit, the remote control code set on the unit is shown on the display.
[Example]
If the code setting on the unit is "BD1", and the setting on the remote control is "BD2", "BD1" is shown on the display.
NOTE
Match the signal code of the remote control with the signal code of the unit. If the remote control code is different, you cannot operate the this unit with the remote control.
About media
Playable media
Discs
| Playable media | Playable formats/ modes | Playable region codes | Symbols used in this User guide | |
| BD-Video *1,*2 | Blu-rayDisc | - | Discs with A | A |
| BD-R *3 | - | |||
| BD-RE *3 | ||||
| DVD-Audio *1 | AUDIO | - | - | E |
| DVD-Video *1,*2 | VIDEO | Include region ALL | A | |
| DVD-R, DVD+R | DVD R | |||
| DVD-RW, DVD+RW | DVD+RWritable DVD+R AVCHD | Video mode, AVCHD format | - | A |
| Super Audio CD | SUPER AUDIO CD | - | - | E |
| CD | COMPACT DIGITAL AUDIO | - | - | E |
| CD-R | COMPACT DIGITAL AUDIO RECOGNIZE | - | ||
| CD-RW | COMPACT DIGITAL AUDIO FRETINATE | - | ||
NOTE
- A disc may not be accessible or may play incorrectly due to audio and video interruptions, etc., depending on the recording conditions when recorded with a BD recorder or DVD recorder.
- Unfinalised DVD-R/-RW/+R/+RW, and CD-R/-RW discs may not play back. Finalize discs before playing.

The following discs will not play back on this unit.
BD-RE Ver1.0 (BD disc with cartridge)
- BD-ROM/BD-R/BD-RE discs containing recorded movie, still image, audio, and/or other, files
- BDXL
HD DVD
DVD-RAM
CDV (Only the audio part can be played)
- CD-G (Only the audio signals can be output)
- Non-standard CD (CD with copy protection, etc.)
- Unauthorised disc (Pirated disc)
- Disc with recording area less than 55 ~mm in diameter
Video Single Disc (VSD) / CVD/ Video CD / Super Video CD / CompactDisc-Interactive (CD-I) / Photo CD
1 BD-Video/DVD-Audio/DVD-Video discs may not operate as described in this manual due to menu structure.
2 BD players and BD-Video discs, and BD/DVD players and DVD-Video discs each have their region codes (codes assigned for each region). Playback is not possible if the codes do not match.
*3 Compatibility of a Blu-ray Disc as the specifications for Blu-ray Discs are new and advance day by day, discs of some types or versions may not be played with the unit.
The firmware of this unit is updated periodically. Be sure to update the firmware to the latest version before using the unit.
USB memory device
- The unit supports the FAT16 and FAT 32 file system. It does not support the NTFS file system.
- The limit of folders and files that can be displayed on the unit is as shown below. (The limit shown includes the root folder.)
| Folder layers | 8 |
| Folders | 999 |
| Files | 999 |
| File names, folder names | 32 |
| Artist names, song titles | 60 |
- If there are too many characters to be displayed on one line, the display becomes scrollable.
- File names/title names/artist names/album names are displayed on the Media player display screen.
NOTE
- Insert and remove a USB memory device with the power set to standby. If it is inserted or removed with the power on, the recorded files cannot be loaded or may be damaged.
- It is not compatible with an MP3 player, digital camera, a USB device for a mobile phone, etc.
- The unit cannot charge a USB device.
- The unit supports high-speed USB file transfer (conforming to USB 2.0).
- The unit does not support a card reader, USB extension cable, or USB hub.
- AVCHD content stored on the USB memory device connected to the unit can also be played.
Files
| Playable files (Extension) | Playable media | File specification | Symbols used in this User guide | ||
| DVD-R/-RW/+R/+RW CD-R/-RW | USB memory device | Network | |||
| MP3 (.mp3) | ○ | ○ | ○ | • Sampling frequency: 32 kHz, 44.1 kHz, 48 kHz • Bit rate: 64 kbps to 320 kbps • Audio type: MPEG1 audio layer 3 | |
| WMA* (.wma) | ○ | ○ | ○ | • Sampling frequency: 32 kHz, 44.1 kHz, 48 kHz • Bit rate: 48 kbps to 192 kbps • Audio type: WMA ver. 9 | |
| AAC* (.m4a) | ○ | ○ | ○ | • Sampling frequency: 32 kHz, 44.1 kHz, 48 kHz • Bit rate: 16 kbps to 320 kbps • Audio type: MPEG4, AAC | |
| LPCM (.wav) | ○ | ○ | ○ | • Sampling frequency: 44.1 kHz, 48 kHz • Number of bits: 16-bits • Number of channels: 2 channels | |
| JPEG (.jpg/.jpeg) | ○ | ○ | ○ | • Maximum resolution: 4,096 x 4,096 pixels • Minimum resolution: 32 x 32 pixels • Maximum file capacity: 12 MB | |
| DivX® (.avi/.divx/.mkv) | ○ | ○ | ○ | • Supporting version: up to DivX® PLUS HD (Except CD-R/-RW) • Maximum capacity: 2 GB | |
| MPEG (.mpg/.mpeg/.mp4/.ts/.m2t) | × | ○ | ○ | • Video: MPEG1, MPEG2, MPEG4 • Audio: MP3, AAC, WMA, AC-3 | |
| WMV (.wmv) | × | ○ | ○ | • Video: WMV9, WMV9AP (VC-1) • Audio: WMA, AAC, AC-3, DTS | |
| AVI (.avi) | × | ○ | ○ | • Video: MPEG1, MPEG2, MPEG4 • Audio: PCM, MP3, AAC, AC-3 | |
- Files with digital rights management (DRM) other than those protected by DivX® and WMDRM of devices on the network cannot be played.

- Depending on recording conditions, these files may not be playable.
- If a file name/title name/artist name/album name includes characters that are not supported for the Media player display, it may not be displayed correctly.
- JPEG pictures recorded in the progressive system cannot be displayed.
Variable Bit Rate (VBR) is not supported (when playback is possible, the time display in the display window will speed up and slow down).
About DivX® Video-on-Demand (VOD)
- When you purchase or rent a DivX® file through the official site of DivX® Video-On-Demand (VOD) services, the unit registration code is required. For details, see "DivX Registration" (12 page 39).
- A DivX® VOD file recorded with a different code from the unit registration code cannot be played back.
- Some DivX® VOD files are restricted to a certain number of playable times. If your DivX® VOD file has such a limit, the number of playable times is displayed on the DivX® VOD display screen.
- Use to select "Yes" if you want to play a file, or to select "No" if you do not want to play it. Then, press ENTER to confirm the selection.
NOTE
- ABOUT DIVX VIDEO: DivX® is a digital video format created by DivX, Inc. This is an official DivX Certified® device that plays DivX video. Visit divx.com for more information and software tools to convert your files into DivX video.
- ABOUT DIVX VIDEO-ON-DEMAND: This DivX Certified® device must be registered in order to play purchased DivX Video-on-Demand (VOD) movies. To obtain your registration code, locate the DivX VOD section in your device setup menu. Go to vod.divx.com for more information on how to complete your registration.
About Discs and Files
BD-Video, DVD-Video
BD/DVD-Video discs are divided into several large sections (titles) and small sections (chapters). These sections are all allotted numbers, called title numbers and chapter numbers.
[Example]
![MARANTZ UD7006 - [Example] - 1](/content/2025/01/166734/images/41352f9dc85afe068a989dbd52a0dabeb4f4acdcd5edb1b624ea719aada71d41.jpg)
Hybrid BD
- Hybrid disc
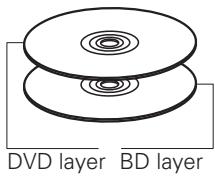
Two-layer Hybrid BD with an BD layer and a DVD layer. The signals on the DVD layer can be played on a regular BD player.
Super Audio CD
[Type of Super Audio CD]
- Single layer disc
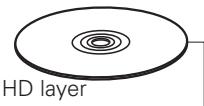
- Dual layer disc
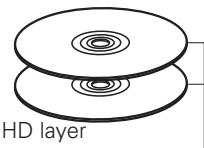
- Hybrid disc
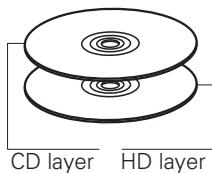
Single layer Super Audio CD with only an HD layer*.
Super Audio CD with a double HD layer*, offering extended playing time and high sound quality.
Two-layer Super Audio CD with an HD layer* and a CD layer. The signals on the CD layer can be played on a regular CD player.
- All Super Audio CD contain an HD (High Density) layer with high density Super Audio CD signals. This layer can contain a stereo channel area, a multi-channel area, or both a stereo channel and multi-channel area.
DVD-Audio
DVD-Audio discs are divided into several large sections (groups) and small sections (tracks). These sections are all allotted numbers, called group numbers and track numbers.
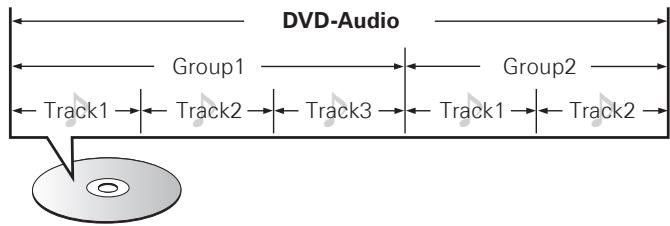
CD
CD is divided into several sections (tracks). These sections are all allotted numbers called track numbers.

File
Files, such as MP3/WMA/AAC/LPCM/JPEG/DivX®, recorded on DVD-R/-RW/+R/+RW, CD-R/-RW and USB memory device are divided into large segments (fileds) and small segments (files). Files are stored in folders, and folders can be placed for storage in a hierarchy. The unit can recognize up to 8 levels of folders.
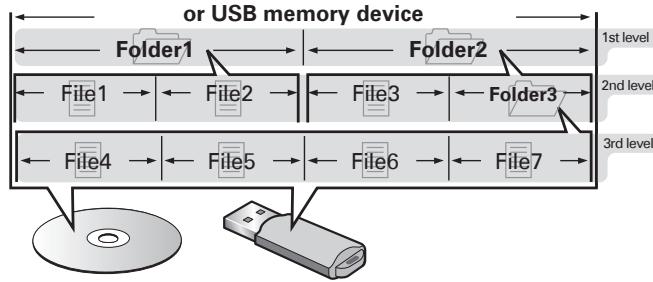
DVD-R/-RW/+R/+RW, CD-R/-RW

When writing MP3/WMA/AAC/JPEG/DivX® files on a CD-R/-RW disc, set the writing software's format to "ISO9660". The files may not play properly if they are recorded in other formats. For details, refer to the instructions of your writing software.
Cautions on using media
Inserting a disc
- Set the disc in the tray label side up.
- Make sure the disc tray is fully open when inserting the disc.
- Place the disc horizontally in the tray, aligned with the tray guide.

If a disc that cannot be played is loaded or the disc is loaded up-sidedown, "NO DISC" is displayed on the player's display.
NOTE
- Only load one disc at a time. Loading two or more discs can damage the unit or scratch the discs.
- Do not use cracked or warped discs or discs that have been repaired with adhesive, etc.
- Do not use discs on which the sticky part of cellophane tape or labels is exposed or on which there are traces of where labels have been removed. Such discs can get caught inside the player and damage it.
- Do not use discs in special shapes, as they may damage the player.


- Do not push the disc tray in by hand when the power is off. Doing so could damage the set.
How to handle media
- Do not get fingerprints, oil or dirt on discs.
- Take special care not to scratch discs when removing them from their cases.
- Do not bend or heat discs.
- Do not enlarge the hole in the center.
- Do not write on the labeled (printed) surface with ball-point pens, pencils, etc., or stick new labels on discs.
- Condensation may form on discs if they are moved suddenly from a cold place (outdoors for example) to a warm place, but do not try to dry discs with a hairdryer, etc.
- Do not eject a USB memory device or turn off the unit while a USB memory device is being played. This may result in malfunction or loss of the USB memory device's data.
- Do not attempt to open or modify USB memory device.
- USB memory device and files can be damaged by static electricity. Do not touch the metal contacts of an USB memory device with your fingers.
- Do not use warped USB memory device.
- After use, be sure to remove any disc or USB memory device, and store it in its proper case, to avoid dust, scratches and deformation.
-
Do not store discs in the following places:
-
Places exposed to direct sunlight for long periods of time
- Dusty or humid places
- Places exposed to heat from heaters, etc.
Cleaning discs
- If there are fingerprints or dirt on a disc, wipe them off before using the disc.
- Use a commercially available disc cleaning set or a soft cloth to clean discs.
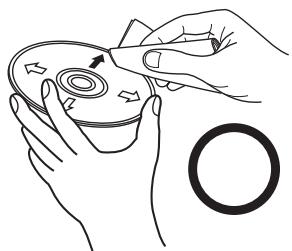
Gently wipe the disc from the inside towards the outside.
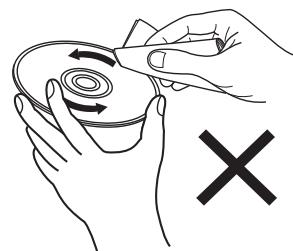
Do not wipe with a circular motion.
NOTE
Do not use record spray, antistatic agents, benzene, thinner or other solvents.
About copyrights
- Unauthorised copying, broadcasting, public performance and lending of discs are prohibited.
- This item incorporates copy protection technology that is protected by U.S. patents and other intellectual property rights of Rovi Corporation. Reverse engineering and disassembly are prohibited.
- Portions of this product are protected under copyright law and provided under license by ARIS/SOLANA/4C.
Cinavia notice
- This product uses Cinavia technology to limit the use of unauthorized copies of some commercially-produced film and videos and their soundtracks.
- When a prohibited use of an unauthorized copy is detected, a message will be displayed and playback or copying will be interrupted.
- More information about Cinavia technology is provided at the Cinavia Online Consumer Information Center at http://www.cinavia.com.
- To request additional information about Cinavia by mail, send a postcard with your mailing address to: Cinavia Consumer Information Center, P.O. Box 86851, San Diego, CA, 92138, USA."
Other information
About digital signal audio output
The unit can convert the format of digital audio signals recorded on media and output them. Make settings for a digital audio signal depending on the specifications of the connected device.
The audio signal from the HDMI output terminal (sampling frequency, number of channels, etc.) may be limited by the HDMI audio specifications of the connected device for permissible inputs. For example, if the HDMI audio specification of the connected device is 5.1 channels, 5.1-channel audio will be automatically output even when playing back 7.1 channels on the unit. In this case, analog audio output will also be 5.1-channel.
- Audio signal input may not be supported depending on the HDMI compatible monitor (projector, etc.) being used.
When the unit is connected to this kind of device, audio signals are not output from the HDMI terminal.
| Media/Files | Audio format | Analog Audio Output Terminal | Digital Audio Output Terminal (Coaxial) | HDMI Output Terminal (*1, *2, *5) | |||
| MIX2channel | Multi-channel | Bit-stream(*2)(Default setting) | PCM | Bit-stream(*2)(Default setting) | PCM | ||
| BD | DOLBY DIGITAL | 2chLinear PCM | Multi Linear PCM | DOLBY DIGITAL | 2chLinear PCM | DOLBY DIGITAL | Multi Linear PCM |
| DOLBY DIGITAL PLUS | DOLBY DIGITAL PLUS | ||||||
| DOLBY TrueHD | DOLBY TrueHD | ||||||
| DTS | DTS Digital Surround | DTS Digital Surround | |||||
| DTS-HD | DTS-HD(*4) | ||||||
| Linear PCM | 2ch Linear PCM | Multi Linear PCM | |||||
| BD-R/-RE | DOLBY DIGITAL | DOLBY DIGITAL | DOLBY DIGITAL | ||||
| MPEG-2 AAC | MPEG-2 AAC | MPEG-2 AAC | |||||
| Linear PCM | 2ch Linear PCM | Multi Linear PCM | |||||
| AVCHD | DOLBY DIGITAL | DOLBY DIGITAL | DOLBY DIGITAL | ||||
| 2ch Linear PCM | 2ch Linear PCM | Multi Linear PCM | |||||
| DVD-Video | DOLBY DIGITAL | DOLBY DIGITAL | DOLBY DIGITAL | ||||
| DTS Digital Surround | DTS Digital Surround | DTS Digital Surround | |||||
| Linear PCM | 2ch Linear PCM | 2ch Linear PCM | 2ch Linear PCM | ||||
| DVD-Audio | Linear PCM / P.PCM | Multi Linear PCM | Multi Linear PCM | ||||
| DivX® | DOLBY DIGITAL | DOLBY DIGITAL | DOLBY DIGITAL | ||||
| MP3, MP2 | 2ch Linear PCM | 2ch Linear PCM | 2ch Linear PCM | ||||
| Super Audio CD | Multi area | DSD(Front L/R)/2ch Linear PCM(*3) | DSD/Multi Linear PCM(*3) | No audio output | DSD(*6) | 2chLinear PCM | |
| Stereo area | DSD/2ch Linear PCM(*3) | ||||||
| CD layer | 2chLinear PCM | 2ch Linear PCM | |||||
| CD, MP3, WMA | |||||||
| AAC | |||||||
| DTS-CD | Multi Linear PCM | DTS Digital Surround | 2chLinear PCM | DTS Digital Surround | 2chLinear PCM | ||
1: The output format is automatically changed depending on the audio format or number of channels that the connected HDMI device supports.
2: If "BD Audio Mode" is set to "MIX Audio Output", second audio and interactive audio are mixed and output (10 page 7, 27).
3: To view the DSD output, set "HDMI" to "Off" (4 page 41).
4: Contents of DTS-HD MA 5.1ch/192 kHz are output as 5.1ch/96 kHz.
5: If the connected HDMI device does not support Dolby Digital Plus, Dolby TrueHD, or DTS-HD, the signal is output as Dolby digital or DTS Digital Surround bit stream. If it does not support the Dolby Digital or DTS Digital Surround bit stream, it is output as multi-linear PCM or 2-channel linear PCM.
6: If the connected HDMI device does not support DSD, the signal is output as Linear PCM.
Copyright protection system (HDCP)
In order to play back digital video and audio such as BD-Video or DVD-Video via HDMI connection, both the player and TV or the AV receiver need to support the copyright protection system known as HDCP (High-bandwidth Digital Content Protection System). HDCP is copyright protection technology comprising data encryption and authentication of the connected AV device. Our this unit supports HDCP.
NOTE
If a device that does not support HDCP is connected, video and audio are not output correctly. Read the user guide of your television or AV receiver for more information.
Trademark information
This product uses the following technologies:
| Blu-rayDiscTM 3D TM | "Blu-ray DiscTM" and "Blu-rayDisc" logo are trademarks of Blu-ray Disc Association. |
| Blu-ray 3D TM | "Blu-ray 3DTM" and "Blu-ray 3DTM" logo are trademarks of Blu-ray Disc Association. |
| BD LIVETM | The "BD-LIVE" logo is a trademark of Blu-ray Disc Association. |
| BONUS VIEWTM | "BONUSVIEW" is the trademark of Blu-ray Disc Association. |
| DVD | DVD is a trademark of the DVD Format / Logo licensing Corporation. |
| HDMI | HDMI, the HDMI Logo and High-Definition Multimedia Interface are trademarks or registered trademarks of HDMI Licensing LLC in the United States and other countries. |
| Java POWERED | Java and all other trademarks and logos are trademarks or registered trademarks of Sun Microsystems, Inc. in the United States and/or other countries. |
| DOLBY TRUEHD | Manufactured under license from Dolby Laboratories. Dolby and the double-D symbol are trademarks of Dolby Laboratories. |
| dts-hd Master Audio Essential | Manufactured under license under U.S. Patent #s: 5,451,942; 5,956,674; 5,974,380; 5,978,762; 6,226,616; 6,487,535; 7,392,195; 7,272,567; 7,333,929; 7,212,872 & other U.S. and worldwide patents issued & pending. DTS and the Symbol are registered trademarks, & DTS-HD, DTS-HD Master Audio | Essential and the DTS logos are trademarks of DTS, Inc. Product includes software. © DTS, Inc. All Rights Reserved. |
| Plays Windows MediaTM | Windows Media and the Windows logo are trademarks or registered trademarks of Microsoft Corporation in the United States and/or other countries. |
| DIVX+HD | DivX®, DivX Certified®, DivX PlusTM HD and associated logos are registered trademarks of DivX, Inc. and are used under license. |
| AVCHD | "AVCHD" and the "AVCHD" logo are trademarks of Panasonic Corporation and Sony Corporation. |
| x.v.Color | "x.v.Color" and the "x.v.Color" logo are trademarks of Sony Corporation. |
| Kodak Picture CD COMPATIBLE | Kodak Picture CD is the trademark of Eastman Kodak Campany. |
| dlna CERTIFIED | DLNA®, the DLNA Logo and DLNA CERTIFIED® are trademarks, service marks, or certification marks of the Digital Living Network Alliance. Device Class: DMP (Digital Media Player) DLNA Certified® Product Function:FINDS, PLAYS Content Type: audio, images, videos (Check supported media formats.) DLNA consumer website: www.dlna.org Some content may not be compatible with other DLNA Certified® products (example: optional media formats). |
| YouTube VIDEOS | YouTube and the YouTube logo are the registered trademarks of Google Inc. |
| NETFLIX US only. | Netflix and Netflix logo are the registered trademarks of Netflix, Inc. |
Explanation of Terms
Numerics
4:3 letterbox
When a wide (16:9) disc is played on the unit while connected to a 4:3 TV, this function displays the image with a black area at the top and bottom.
4:3 pan-and-scan
When a wide (16 : 9) disc is played on the unit while connected to a 4:3 TV, this function cuts the left and right of the displayed image to the 4:3 size according to the disc's control information.
A
AAC (Advanced Audio Coding)
This is an internationally standardized audio data compression scheme. It has a compression ratio 1.4 times higher than the "MP3 audio compression scheme adopted for MPEG-1.
Aspect ratio
This is the length and width ratio of the TV screen. The conventional TV screen's ratio is 4:3 and a wide screen TV's screen ratio is 16:9.
Audio commentary
This is an audio program included as a bonus feature in a DVD-Video or BD-Video. It uses a multi-audio function to provide an audio explanation or commentary by members of the crew or director, etc. to accompany the video.
B
BD-J (Java)
BD-Video offer fun software with more interactive functions (games) that use Java applications.
BD-LIVE
The unit can be connected to the Internet to enjoy a number of features, including additional contents such as special video or subtitles, network games, etc.
Bit rate
This is the amount of video or audio data recorded on a disc that is read in one second.
Blu-ray disc
This is a one-sided, one-layer disc with 25 GB capacity for recording high vision video movie and games.
Bonus View
Special images for BD-Video. It includes comments from the movie director, simultaneously developing sub-stories, and images from different angles.
C
Chapter
This is a break intended by the producer, who organizes the titles of BD or DVD-Video. The chapter search function searches for the beginning of this break.
D
Deep Color
This technology allows expression of more colors than the conventional 8-bit and can reproduce more natural colors without any color streaking.
Default Gateway
This device is the entry and exit point between an internal network and an external network (Internet, etc.).
DHCP (Dynamic Host Configuration Protocol)
This function assigns IP addresses automatically to network devices.
DivX
This is a video codec (video compression/decompression software) developed by DivX, Inc.
The compression technology is based on "MPEG-4 Part 2" (known as "MPEG-4 ASP"). It allows along video to be compressed into a small file while maintaining a high-quality image.
It is available in the free "DivX" version or the paid "DivX PRO" version.
DLNA
An abbreviation of Digital Living Network Alliance.
An industry group that was established to decide specifications for the mutual connection of audio visual devices and computers in a home network and the mutual utilization of music, photo and video data.
This unit is based on DLNA Home Networked Device Interoperability Guidelines v1.0.
DNS (Domain Name System)
A system that matches host names on the Internet to IP addresses.
Dolby Digital (5.1-ch Surround)
This is a stereophonic effect developed by Dolby Laboratories. This is a maximum of 5.1 channels, independent multi-channel audio system.
Dolby Digital Plus
This is an extended version of Dolby Digital and is a high sound quality, digital audio technology adopted as an optional audio for Blu-ray discs.
Dolby TrueHD
This lossless coding technology is adopted as an optional audio for Blu-ray disc and supports 7.1 channels.
Downmix
This function converts the number of channels of surround audio to less channels for playback.
DTS
This is an abbreviation of Digital Theater System, which is a digital audio system developed by DTS. When playing audio on this system while connected to a device such as a DTS amplifier, accurate sound field position and realistic sound effects can be obtained, making you feel like you are in a movie theater.
DTS-HD
This audio technology provides an enhanced functionality and a higher quality of sound than conventional DTS and is adopted as an optional audio for Blu-ray disc. This technology supports multi-channel, high data transfer speed, high sampling-frequency, and lossless audio playback. A maximum of 7.1 channels are supported on Blu-ray discs.
Dynamic range
The difference between the maximum, undistorted sound level and the minimum sound level that is discernible above the noise emitted by the device.
F
Finalizing
This process enables BD/DVD/CD recorded with a recorder to be played by other players.
H
HDCP
When transmitting digital signals between devices, this copyright protection technology encrypts the signals to prevent content from being copied without authorization.
HDMI
This is an abbreviation of High-Definition Multimedia Interface, which is an AV digital interface that can be connected to a TV or amplifier. Video signal and audio signal can be connected with 1 cable.
1
Interlacing (interlaced scanning)
This conventional method used to project images on a TV displays 1 frame of image in half and half, respectively as 2 fields.
Interactive audio
This is audio recorded in the titles of BD-Video, such as clicking sounds made during operations.
IP Address
An identification number that is assigned to each network device.
J
JPEG (Joint Photo graphic Experts Group)
This is a still picture data compression standard. Its ability to reduce the size of a file with relatively little deterioration in image quality means that it is widely used for storing images in video cameras, etc.
L
LAN (Local Area Network)
A wired or wireless network that connects devices together.
LFE
This is an abbreviation of Low Frequency Effect, which is an output channel that emphasizes low-frequency effect sounds. Surround audio is intensified by outputting 20 Hz to 120 Hz deep bass.
Linear PCM
This is an uncompressed PCM (Pulse Code Modulation) signal. This is the same system as the CD audio but uses 192 kHz, 96 kHz, and 48 kHz sampling frequencies on BD or DVD and provides higher sound quality than CD.
Explanation of Terms
M
MAC Address
A unique identification number for network devices such as LAN cards.
MP3 (MPEG AudioPlayer 3)
This is an internationally standardized audio data compression scheme, using the "MPEG-1" video compression standard. It compresses the data volume to about one eleventh its original size while maintaining sound quality equivalent to a music CD.
MPEG
This is an abbreviation of Moving Picture Experts Group, which is an international standard of the moving picture audio compression method. Images on BD and DVD are recorded using this method.
N
Netflix
This is a video streaming distribution service offered by Netflix Inc. in the United States.
P
Picture-in-picture
This BD-Video function allows you to view scenes, such as the making of or commentary on the movie, in the secondary video while viewing the main story in the primary video.
Pop up menu
This type of menu is recorded with BD software. While playing back a BD, this menu can be displayed on the front of the screen and can be operated.
Primary audio
This audio signal is recorded in the main story in BD-Video.
Primary subtitle
This subtitle is recorded in the main story in BD-Video.
Primary video
This video signal is recorded in the main story in BD-Video.
Progressive (sequential scanning)
This is a system for scanning the video signal that displays 1 frame of video as one image. Compared to the interlace system, this system provides images with less flickering and bleeding.
Proxy
This is a hookup to secure high-speed access and safe transmission for connecting to the Internet from the internal network.
R
Rating
Depending on the age of the viewer, this function restricts the playing of BD-Video or DVD-Video. The unit can be set to restrict viewing in 0 to 254 levels for BD-Video, and 1 to 8 levels for DVD-Video.
Region code
This code indicates the country or region where the BD or DVD-Video can be played back.
s
Sampling frequency
Sampling involves taking a reading of a sound wave (analog signal) at regular intervals and expressing the height of the wave at each reading in digitized format (producing a digital signal).
The number of readings taken in one second is called the "sampling frequency". The larger the value, the closer the reproduced sound is to the original.
Secondary audio
This is audio content, such as the director's comments, and other data recorded in the bonus view of BD-Video.
Secondary subtitle
This subtitle, such as the director's comments and other data recorded in the bonus view of BD-Video.
Subnet Mask
A 32-bit value that defines which bits in an IP address are reserved for a network address for identifying the network.
T
Title
This is the unit of content that consists of chapters of BD or DVD-Video. Some BD or DVD-Video may include multiple titles.
W
WMA (Windows Media Audio)
This is audio compression technology developed by Microsoft Corporation.
WMA data can be encoded using Windows Media® Player Ver.7, 7.1, Windows Media® Player for Windows XP and Windows Media® Player 9 Series.
To encode WMA files, only use applications authorized by Microsoft Corporation. If you use an unauthorized application, the file may not work properly.
X
x.v.Color
This function lets HDTVs display colors more accurately. It enables display with natural, vivid colors. "x.v.Color" is a Sony registered trademark.
Y
YouTube
This is the video-content sharing site managed by YouTube Inc.
Troubleshooting
If a problem occurs, firstly check the following:
- Are the connections correct?
- Is the set being operated as described in the user guide?
- Are other components operating properly?
If this unit does not operate properly, check the items listed in the table below. If the problem continues there may be a malfunction.
In this case, disconnect the power immediately and contact your retail outlet.
[General]
| Symptom | Cause/Solution | Page |
| Power does not turn on. | ·Check if the power cord is properly connected. ·Plug the power supply cord into the power outlet. ·The safety protection device may be activated. Unplug the power cord once, and wait for 5-10 seconds and then plug it in again. | 6 6 6 |
| Playback does not start even when ▷ is pressed, or starts but stops immediately. | ·Is there condensation inside the player or on the disc? (Let it sit for 1 to 2 hours with the power off.) ·When the disc is scratched or contaminated with fingerprints, the disc may not play correctly. Clean the disc or replace with a non-scratched disc. ·Is the disc loaded upside-down? Load the disc properly, with the side to be played face down. ·Is an unplayable disc loaded? ·No disc is inserted. Insert a disc. | 3 51 7 48 7 |
| No return to start-up screen when a disc is removed. | ·There may be an internal error. Set the power to standby, wait awhile, then turn the power back on. | 6 |
| Buttons do not work or the unit stops responding. | ·Operations may not be permitted by the disc. ·The safety protection device may be activated. Unplug the power cord once, and wait for 5-10 seconds and then plug it in again. ·Refer to the instructions of the disc. | 16 6 - |
| The camera angle does not switch. | ·If the multiple angles are not recorded in a BD-Video or DVD-Video, the camera angle cannot be switched. Also, multiple angles may only be recorded for specific scenes. | 23 |
| Playback does not start when a title is selected. | ·Playback may be prohibited by the viewing restriction setting. Check the "Ratings" setting on the GUI menu. | 38 |
| I have forgotten the password for the rating level. | ·On the GUI menu, perform the "System" - "Initialize" procedure. | 37 |
[Video]
| Symptom | Cause/Solution | Page |
| No picture appears. | • Switch the TV's input setting to the external input connected to the player. • Is the Pure Direct function set to “Pure Direct 1” or “Pure Direct 2”? Set it to “Off”. • Check the connection of the video/component video cable. • Is it set to “24p Output On” by pressing HDMI MODE on the remote control? If so, no video signals are output from the video and component video terminals during playback of certain discs. • Does the setting of resolution on the match the connected device's resolution? • Is the resolution is set according to the connected device by pressing RESOLUTION on the remote control? Make settings for resolution. • The video cable is not connected securely. Connect the video cable securely. • The HDMI OUT connector is probably connected to a DVI IN connector of equipment. DVI connection does not support HDCP and the video is not output correctly. | 6 24 11, 12 25 25 25 11 - 13 13, 53 |
| The picture is not displayed or is disrupted. The picture of a BD-Video or DVD-Video disc is in black and white. | • The picture may be slightly disturbed right after fast-forwarding or reversing. This is not a malfunction. • Connect the unit's video/component video output either directly to the TV or to the TV via the AV receiver. Do not connect via a VCR, (video cassette recorder). Some discs include copy prohibit signals, and when such discs are played via a VCR the copy guard system may disrupt the picture. • Is a disc that is not compatible with the player or a disc with a different region number loaded? (This player supports region code “A” for BD-Video discs, “1” or “ALL” for DVD-Video discs.) | 20 13 48 |
| The picture freezes momentarily during playback. | • If a disc is scratched or contaminated with fingerprints, the disc may not play correctly. Clean the disc or replace with a non-scratched disc. • There may be a problem with the data recorded on the disc. | 51 48 |
| Subtitles are not displayed. | • Subtitles cannot be displayed for BD-Video, DVD-Video or DivX® files that do not contain subtitles. • Is the subtitle setting “Off”? Use the disc menu or SUBTITLE to set the subtitles to display. | 23 23 |
[Audio]
| Symptom | Cause/Solution | Page |
| HD audio is not output. | ·Set “BD Audio Mode” to “HD Audio Output”. | 7, 27 |
| No sound or the sound is hard to hear. | ·Check the audio connections of connected devices and speakers. ·Is the power connected audio devices turned on? Is the input selection set to the input to which the unit is connected? ·Is the audio output properly selected? | 11 – 14 - 7, 22, 52 |
| No sound. | ·The unit is in reverse play, fast forward, fast reverse, slow forward, slow reverse or pause mode. Return to the normal playback. ·The HDMI OUT connector is probably connected to a DVI IN connector of equipment. DVI connection does not support HDCP and the audio is not output correctly. ·Is the Pure Direct function set to “Pure Direct 1” or “Pure direct 2”? Set it to “Off”. | 22 13, 53 24 |
| Interactive audio is not output. | ·Set “BD Audio Mode” to “Mix Audio Output” using the Mode setting menu. | 7, 27 |
| Multi-channel audio is not output. | ·Is the multi-channel audio selected? Press AUDIO of the remote control to switch from audio supported by a disc to multi-channel audio. ·Is the unit connected to the multi-channel audio input terminal of the AV receiver? ·If it is connected, perform settings that match with the connected speakers using the “Speaker Setting” – “Configuration” on the GUI menu. | 22 10 42 |
| The 192 kHz digital audio is not output from the DIGITAL OUT COAXIAL connector. | ·“Audio Output” – “Down Sampling” on the GUI menu is not set to 192 kHz. Set “Down Sampling” to 192 kHz. ·The content stored in a disc to be played back is copyright protected. Even if “Down Sampling” is set to 192 kHz, the audio signal is output using 48 kHz. | 41 41 |
[HDMI]
| Symptom | Cause/Solution | Page |
| Video and audio are not output via the HDMI connection. | ·Check the connection of the HDMI cable. | 5 |
| ·Is the “HDMI” indicator on the display of the unit lit? | 24 | |
| ·Is the Pure Direct function set to “Pure Direct 1” or “Pure Direct 2”? Set it to “Off”. | 24 | |
| ·Check whether the connected display device or other device supports HDCP. This unit will not output a video signal unless the other device supports HDCP. See the user guide of your TV, AV receiver, etc. | 53 | |
| ·Check that the setting of the HDMI video resolution supports the resolution of the connected device. When set to “Auto”, this unit makes the setting automatically. | 25 | |
| Video and audio are not output via the HDMI connection. | ·Turn off power of the unit and then turn it back on. | 6,7 |
| ·Turn off power of the connected device and then turn it back on. | 6,7 | |
| ·Unplug the HDMI cable and then plug it in again. | 6,7 | |
| ·When you connect the unit to an AV receiver, first connect the unit directly to a television and check the video and audio output. If output is performed properly, connect the unit to the AV receiver again and check the AV receiver setting. | - |
[USB memory device]
| Symptom | Cause/Solution | Page |
| My USB memory device cannot be read. | ·The format of the USB memoy device does not match this unit or the USB memory device is not compatible. ·Is the playback media mode set to “USB MODE”? Select “USB” with USB/DISC. | 37 31, 32 |
| Data stored in a USB memory device cannot be displayed (read). | ·Has the unit initialized the USB memory device with applicable formats? (FAT16/FAT32) ·Are you using a USB hub? If so, directly connect the USB memory device to a USB port on the front panel of the unit. ·Are you using a USB extension cable? If so, directly connect the USB memory device to the USB port on the front panel of the unit. ·Are the USB memory device contents applicable to this unit? Use the “Files” menu to confirm whether the contents are applicable to the unit. ·When a USB memory device of 192 MB or less is formatted with FAT32, this unit may not be able to read it. If that is the case, format it with FAT16. ·This unit does not support a USB memory device containing encrypted data. | 29, 37 29 29, 48 49 29, 48 - |
| The USB memory device is not recognized. | ·Some USB memory devices cannot be operated by the power supplied from this unit. The unit supplies 5V/1A to a USB memory device. Use a USB memory device that is compatible with the specifications of this unit. ·Check if the USB memory device is firmly connected to the USB port. | - |
| 29 | ||
| Files that begin with“..” cannot be played. | ·When content created by Mac OS X is copied into a USB memory device, all contents as well as hidden files are copied. Although the extension of this file is the same as the extension of the content, it is actually not the content. Delete this file using another OS such as Windows. | - |
| Unable to play back BD-LIVE / bonus view. | ·Does the USB memory device have more than 1 GB of available space? ·Has the USB memory device been initialized by the unit? ·Was the USB memory device inserted while the power of the unit was on? (Insert the USB memory device while the unit is in the standby status.) | 18 37 29 |
[Disc]
| Symptom | Cause/Solution | Page |
| A playable disc is not read. | ·The pickup lens may be dirty. Before requesting servicing, try cleaning the laser pickup with a commercially available lens cleaner. (Do not use a cleaner with a brush because it may damage the lens.) | - |
| A disc cannot be played back. | ·The finalizing procedure after recording has not been performed correctly. Finalize a disc properly. | 48 |
[Network]
| Symptom | Cause/Solution | Page |
| Cannot connect to the network. | ·The LAN cable is not connected. Correct the network connections. ·The IP address is incorrect. Correct the network settings. ·The connection has been blocked by the firewall. Allow communication with the unit. | 30 39 30 |
| Can not find the server | ·The server is not running. Start the server. ·The server has not authenticated the unit. authenticate the unit on the server side. ·The unit does not recognize the server. Obtain the server list again. | 32 30 32 |
| The media player does not respond. | ·There is a large number of files in the list and processing takes time. Wait until the process finishes. ·Multiple servers are starting or updating information. Wait until the process finishes. ·The media player no longer responds to operations. Press dlna search on the media player menu. | 49 - |
| 32 | ||
| Cannot obtain the file list. | ·The server is creating the file list. It may take some time for the server to create the file list. If that is the case, wait until the list creation has finished. ·The number of files that can be registered by the server has been exceeded. Limit the number of files formats to the range that can be registered by the server. For details, see the server's user guide. ·Characters that are not supported by the server are used in areas such as the file name. Limit the number of files formats to the range that can be registered by the server. For details, see the server's user guide. | - |
| - | ||
| - | ||
| Can not play DRM-protected files. | ·The server does not support DRM. Connected to a server that does support DRM. ·The server has not obtained the DRM license. Obtain the DRM license on the server side in advance. | 49 49 |
| Takes time to play or change to the next file. | ·The file size is large. This is not a malfunction. ·DRM-protected content is being played. This is not a malfunction. | 49 49 |
| Takes time for the file list to display. | ·There is a large number of files in the list. During random play, the larger the number of files in the server, the longer it takes to display the file list. Reduce the number of connected servers or reduce the number of files registered on the server. | - |
| Symptom | Cause/Solution | Page |
| Cannot play even though the file format is supported for playback. | ·The server does not support this file format. Only files whose formats are supported by both the unit and the server can be played. See the server's user guide. ·There is not enough network bandwidth. Communication in a network may become congested, Stop the communication of the other devices, or redesign your network environment. | 49 30, 34 |
| Playback breaks up. | ·The file bit rate is too high. Communication in a network may become congested, Stop the communication of the other devices, or redesign your network environment. | 49 |
[BD-Live]
| Symptom | Cause/Solution | Page |
| BD-Live function does not work. | Network connection is not established. Perform the connection test. If “Network is Failed.” is displayed in the test, check the network cable connection and settings. When the BD-LIVETM function is used, the line speed of the broadband being used is not sufficient. Consult with the Internet Service Provider (ISP) and change it to the speed recommended for using a broadband line. Check if the disc has support for BD-LIVETM. If the BD-LIVETM function does not work even after data is downloaded into a USB memory device, reformat the USB memory device on this unit. The “BD-LIVE Connection” setting of “Network” menu is set to “Prohibited”. Set it to “Permitted”. | 39 18 - 37 39 |
| Cannot play BD-LIVETM video. | The content downloaded to the built-in memory or USB memory device are provided as a part of the BD-Video content by the video company who recorded the disc. You cannot copy BD-LIVETM video or audio content into a USB memory device and play that USB memory device independently on equipment other than this unit. | 18 |
[Netflix/YouTube]
| Symptom | Cause/Solution | Page |
| Playback stops from time to time during playback of the video streaming distribution service | ·When Netflix or YouTube function is used, the line speed of the broadband being used is not sufficient. Consult with the Internet Service Provider (ISP) and change it to the speed recommended for using a broadband line. | 34 |
[Remote control]
| Symptom | Cause/Solution | Page |
| The set cannot be operated with the remote control. | • Aim the remote control directly at the infrared sensor window on the front of the unit. • Operate within a distance of 23 ft / 7 m from the remote control sensor. • Remove any obstacles. • Replace the batteries with new ones. • Insert the batteries in the proper direction, checking the ⊕ and Ⓞ marks. • Match the signal code of the remote control to the signal code of the unit. • Check whether the remote sensor of the unit is exposed to direct sunlight or strong light of a fluorescent lamp. Be sure to avoid exposing the remote sensor to strong light. | 47 47 47 47 47 47 47 47 47 47 |

- Some functions may not be used under certain operating conditions, but this is not failure of the unit. Read the description in this User Guide for details on correct operations.
- The volume may differ from disc to disc. This is due to the differences in how the signals are recorded on the disc and is not a malfunction.
- During programmed playback, it is not possible to perform random playback or to start playback from a desired track or file.
- Some functions are prohibited on some discs.
Specifications
Audio performance
Signal format :
Applicable discs /memory device :
NTSC, PAL
(1) BD-Video disc :
12 cm, 1 side, 1 layer; 12 cm, 1 side, 2 layers
(2) DVD-Video / DVD-Audio disc :
12 cm, 1 side, 1 layer; 12 cm, 1 side, 2 layers /
12 cm, 2 sides, 2 layers (1 side, 1 layer)
8 cm, 1 side, 1 layer; 8 cm, 1 side, 2 layers /
8 cm, 2 sides, 2 layers (1 side, 1 layer)
(3) Super Audio CD :
12 cm, 1 layer / 12 cm, 2 layer / 12 cm, Hybrid
(4) Compact Disc (CD-DA):
12 cm / 8 cm disc
(5) Memory device :
USB memory device
Video output :
Component video output :
HDMI output :
Analog audio output :
Audio output characteristics :
Output level: 1 Vp-p (75 Ω)
Output terminal: Pin-jack, 1 set
Y output level : 1 Vp-p (75 Ω)
Pb/Cb output level / Pr/Cr output level : 0.648 Vp-p (75 Ω)
Output terminal: Pin-jack, 1 set
Output terminal : 19-pin HDMI terminals, 1 set
HDMI ver. 1.4a
(Deep Colour, Dolby Digital Plus, Dolby TrueHD, DTS-HD, 3D)
Output level : 2 Vrms (10 kΩ)
2 channels output terminal : Pin-jack, 1 set
7.1 channels output terminal: Pin-jack, 1 set
(1) Frequency response
① BD (Linear PCM) : 2 Hz - 22 kHz (48 kHz sampling)
: 2 Hz - 44 kHz (96 kHz sampling)
: 2 Hz - 88 kHz (192 kHz sampling
② DVD (Linear PCM) : 2 Hz - 22 kHz (48 kHz sampling)
: 2 Hz - 44 kHz (96 kHz sampling)
: 2 Hz - 88 kHz (192 kHz sampling)
③ Super Audio CD : 2 Hz - 40 kHz
④ CD : 2 Hz - 20 kHz
(2) S/N ratio : 125 dB
(3) Total harmonic distortion : 1 kHz, 0.0008 % (BD mix channel)
(4) Dynamic range : 110 dB (BD)
Coaxial digital output: Pin-jack, 1 set
General
Power supply :
Power consumption :
page 37 "Power Saving"
AC 120 V, 60 Hz
39W
- When in Power Saving Standby: 0.3 W
- When in Normal Standby: 0.5 W
440 (W) x 109 (H) x 330 (D) mm (17-3/8" x 4-5/16" x 13")
4.8kg (10.5 lbs)
440 (W) x 109 (H) x 330 (D) mm (17-3/8" x 4-5/16" x 13")
4.8kg (10.5 lbs)
Maximum external dimensions :
Weight :
Index
Num
3D
3D Output Setting 40
TV Screen Size Setting 40
4:3 LB (letter box) 40, 54
4:3 PS (pan-and-scan) 40, 54
A
AAC 49,52,54
Accessories 1
Adjusting the picture quality 26
Aspect ratio 40,54
Audio commentary 18,54
Audio format 52
Audio Output Coaxial 41 Down Sampling 41 DRC 41 HDMI 41 Audio Setting 41 AVCHD 48,52
B
BD 50, 52
BD-J (Blu-ray Disc Java) 20, 54
BD-LIVE 18, 54
BD-Video 48, 50
Bit rate 49, 54
Blu-ray Disc 17, 48, 54
Bonus View 18, 54
C
Audio and video cable 11, 12, 13, 14, 29
Coaxial digital cable 12, 15
Component video cable 11, 12, 13, 29
Ethernet cable 20
HDMI cable 5, 13, 29
Power cord 6
Remote control cable 31
CD 48,50
CD-R/-RW 48,50
Chapter 50,54
Connection
2-channel audio amplifier 14
Analog multi-channel audio amplifier 10
AV receiver 10
Digital recording device 15
HDMI 5
Network 29
Power cord. 6
Remote control 31
TV. 13
USB memory device 29
D
Deep Color 54
Default Gateway 38,54
DHCP 38,54
Dimmer control 24
Disc menu 8,17
DISC MODE 33
Display 44
DivX 49,54
DLNA 30, 32, 54
DNS 38,54
Dolby Digital 52, 54
Dolby Digital Plus 54
Dolby TrueHD 54
Downmix 44,54
DTS 52, 54
DTS-HD 52,54
DVD-Audio 48,50
DVD-R/-RW/+R/+RW 48,50
DVD-Video 48,50
DVI-D connector 13
Dynamic Range 41, 54
F
File 49, 50
Finalizing 48,54
Folder 50
Front panel 44
G
General Setting 37
Group 50
GUI menu operation 36
H
HDCP 53,54
HD Layer 18, 50
HDMI 5,25,40,54
Color Space 40
HDMI Deep Color 40
HDMI control 24
HDMI output settings 25
HOME menu screen 31
MEDIA PLAYER 32
NETFLIX 31
Setup 35
YouTube 34
#
Information bar display 16
Interactive audio 7,27,54
Interlacing 54
IP Address 38,54
道J
JPEG 49,54
道L
LAN 30,54
Language Dialog 38
Disc Menu 38
GUI Language 38
Subtitle 38
LFE 54
Linear PCM (LPCM) 52, 54
M
MAC Address 42,55
Marker function 21
Media player display 16
Menu map 35
Mode setting 27
Audio/Video Sync 27
BD Audio Mode 27
Secondary Audio 27
Secondary Subtitle 27
Secondary Video 27
Subtitle Style 27
MP3 49,52,55
MPEG 49,55
Multi linear PCM 52
N
Netflix 55
Network
BD-LIVE Connection 38
Connection Test 38
DHCP 38
Information 38
Internet Connection 38
Proxy Setting 39
#
Operation
A-B repeat 22
Angle 23
Chapter/track/file 20
Fast-forward/fast-reverse 20
Frame by frame 22
Maker function 21
Pausing 20
Primary audio 22
Primary subtitle 23
Program 23
Random 23
Repeat 22
Search mode 21
Slow-forward/slow-reverse 22
Stopping 20
Others
Angle Mark 39
Closed Caption 39
DivX Registration 39
Netflix Deactivate 39
PIP Mark 39
Remote ID (Unit side) 39
Secondary Audio Mark 39
道P
Picture control 26
Picture-in-Picture 18,27,55
Playback
BD and DVD-Video 17
CD 19
DVD-Audio 19
Files 32
Kodak Picture CD 34
33
Super Audio CD 18
Pop up menu 8, 17, 33, 55
Primary audio 22, 55
Primary subtitle 23, 55
Primary video 18, 55
Progressive 25,40,55
Proxy 39, 55
Pure direct 24
道R
Ratings 38,55
BD Rating Level 38
Change Password 38
Country Code 38
DVD Rating Level 38
Rear panel 45
Region code 48, 55
Remote control 46
Inserting the batteries 47
Remote control setting 47
Repeat mode 22
Resume function 20
S
Sampling frequency 49, 55
Secondary audio 27, 55
Secondary subtitle 27, 55
Speaker Setting 42
Configuration 42
Test Tone 42
Subnet Mask 38,55
Super Audio CD 48, 50
System
Auto Power Mode 37
BD Data Utility 37
Firmware Update 37
HDMI Control 37
HDMI Power Off Control 37
Initialize 37
Power Saving 37
Screen Saver 37
Update Notification 37
System Information 42
MAC Address 42
T
Title 50, 55
Track 50
TV
Progressive Mode 40
TV Aspect 40
Wallpaper 40
U
USB memory device 18, 29, 48
V
Video resolution 25
Video Setting 40
W
WMA 49,55
X
x.v.Color 55
道Y
YouTube 34,55

This section describes software license used for UD7006. To maintain the correct content, the original (English) is used.
Exhibit-A GNU GENERAL PUBLIC LICENSE
Version 2, June 1991
Copyright (C) 1989, 1991
Free Software Foundation, Inc., 51 Franklin Street, Fifth Floor, Boston, MA 02110-1301 USA
Everyone is permitted to copy and distribute verbatim copies of this license document, but changing it is not allowed.
Preamble
The licenses for most software are designed to take away your freedom to share and change it. By contrast, the GNU General Public License is intended to guarantee your freedom to share and change free software--to make sure the software is free for all its users. This General Public License applies to most of the Free Software Foundation's software and to any other program whose authors commit to using it. (Some other Free Software Foundation software is covered by the GNU Library General Public License instead.) You can apply it to your programs, too.
When we speak of free software, we are referring to freedom, not price. Our General Public Licenses are designed to make sure that you have the freedom to distribute copies of free software (and charge for this service if you wish), that you receive source code or can get it if you want it, that you can change the software or use pieces of it in new free programs; and that you know you can do these things.
To protect your rights, we need to make restrictions that forbid anyone to deny you these rights or to ask you to surrender the rights. These restrictions translate to certain responsibilities for you if you distribute copies of the software, or if you modify it.
For example, if you distribute copies of such a program, whether gratis or for a fee, you must give the recipients all the rights that you have. You must make sure that they, too, receive or can get the source code. And you must show them these terms so they know their rights.
We protect your rights with two steps: (1) copyright the software, and (2) offer you this license which gives you legal permission to copy, distribute and/or modify the software.
Also, for each author's protection and ours, we want to make certain that everyone understands that there is no warranty for this free software. If the software is modified by someone else and passed on, we want its recipients to know that what they have is not the original, so that any problems introduced by others will not reflect on the original authors' reputations.
Finally, any free program is threatened constantly by software patents. We wish to avoid the danger that redistributors of a free program will individually obtain patent licenses, in effect making the program proprietary. To prevent this, we have made it clear that any patent must be licensed for everyone's free use or not licensed at all.
The precise terms and conditions for copying, distribution and modification follow.
GNU GENERAL PUBLIC LICENSE TERMS AND CONDITIONS FOR COPYING, DISTRIBUTION AND MODIFICATION
- This License applies to any program or other work which contains a notice placed by the copyright holder saying it may be distributed under the terms of this General Public License. The "Program", below, refers to any such program or work, and a "work based on the Program" means either the Program or any derivative work under copyright law: that is to say, a work containing the Program or a portion of it, either verbatim or with modifications and/or translated into another language. (Hereinafter, translation is included without limitation in the term "modification".) Each licensee is addressed as "you".
Activities other than copying, distribution and modification are not covered by this License; they are outside its scope. The act of running the Program is not restricted, and the output from the Program is covered only if its contents constitute a work based on the Program (independent of having been made by running the Program). Whether that is true depends on what the Program does.
- You may copy and distribute verbatim copies of the Program's source code as you receive it, in any medium, provided that you conspicuously and appropriately publish on each copy an appropriate copyright notice and disclaimer of warranty; keep intact all the notices that refer to this License and to the absence of any warranty; and give any other recipients of the Program a copy of this License along with the Program.
You may charge a fee for the physical act of transferring a copy, and you may at your option offer warranty protection in exchange for a fee.
- You may modify your copy or copies of the Program or any portion of it, thus forming a work based on the Program, and copy and distribute such modifications or work under the terms of Section 1 above, provided that you also meet all of these conditions:
a) You must cause the modified files to carry prominent notices stating that you changed the files and the date of any change.
b) You must cause any work that you distribute or publish, that in whole or in part contains or is derived from the Program or any part thereof, to be licensed as a whole at no charge to all third parties under the terms of this License.
c) If the modified program normally reads commands interactively when run, you must cause it, when started running for such interactive use in the most ordinary way, to print or display an announcement including an appropriate copyright notice and a notice that there is no warranty (or else, saying that you provide a warranty) and that users may redistribute the program under these conditions, and telling the user how to view a copy of this License.
(Exception: if the Program itself is interactive but does not normally print such an announcement, your work based on the Program is not required to print an announcement.)
These requirements apply to the modified work as a whole. If identifiable sections of that work are not derived from the Program, and can be reasonably considered independent and separate works in themselves, then this License, and its terms, do not apply to those sections when you distribute them as separate works. But when you distribute the same sections as part of a whole which is a work based on the Program, the distribution of the whole must be on the terms of this License, whose permissions for other licensees extend to the entire whole, and thus to each and every part regardless of who wrote it.
Thus, it is not the intent of this section to claim rights or contest your rights to work written entirely by you; rather, the intent is to exercise the right to control the distribution of derivative or collective works based on the Program.
In addition, mere aggregation of another work not based on the Program with the Program (or with a work based on the Program) on a volume of a storage or distribution medium does not bring the other work under the scope of this License.
- You may copy and distribute the Program (or a work based on it, under Section 2) in object code or executable form under the terms of Sections 1 and 2 above provided that you also do one of the following:
a) Accompany it with the complete corresponding machine-readable source code, which must be distributed under the terms of Sections 1 and 2 above on a medium customarily used for software interchange; or,
b) Accompany it with a written offer, valid for at least three years, to give any third party, for a charge no more than your cost of physically performing source distribution, a complete machine-readable copy of the corresponding source code, to be distributed under the terms of Sections 1 and 2 above on a medium customarily used for software interchange; or,
c) Accompany it with the information you received as to the offer to distribute corresponding source code. (This alternative is allowed only for noncommercial distribution and only if you received the program in object code or executable form with such an offer, in accord with Subsection b above.)
The source code for a work means the preferred form of the work for making modifications to it. For an executable work, complete source code means all the source code for all modules it contains, plus any associated interface definition files, plus the scripts used to control compilation and installation of the executable.
However, as a special exception, the source code distributed need not include anything that is normally distributed (in either source or binary form) with the major components (compiler, kernel, and so on) of the operating system on which the executable runs, unless that component itself accompanies the executable.
If distribution of executable or object code is made by offering access to copy from a designated place, then offering equivalent access to copy the source code from the same place counts as distribution of the source code, even though third parties are not compelled to copy the source along with the object code.
-
You may not copy, modify, sublicense, or distribute the Program except as expressly provided under this License. Any attempt otherwise to copy, modify, sublicense or distribute the Program is void, and will automatically terminate your rights under this License. However, parties who have received copies, or rights, from you under this License will not have their licenses terminated so long as such parties remain in full compliance.
-
You are not required to accept this License, since you have not signed it. However, nothing else grants you permission to modify or distribute the Program or its derivative works. These actions are prohibited by law if you do not accept this License. Therefore, by modifying or distributing the Program (or any work based on the Program), you indicate your acceptance of this License to do so, and all its terms and conditions for copying, distributing or modifying the Program or works based on it.
-
Each time you redistribute the Program (or any work based on the Program), the recipient automatically receives a license from the original licensor to copy, distribute or modify the Program subject to these terms and conditions. You may not impose any further restrictions on the recipients' exercise of the rights granted herein.
You are not responsible for enforcing compliance by third parties to this License.
- If, as a consequence of a court judgment or allegation of patent infringement or for any other reason (not limited to patent issues), conditions are imposed on you (whether by court order, agreement or otherwise) that contradict the conditions of this License, they do not excuse you from the conditions of this License. If you cannot distribute so as to satisfy simultaneously your obligations under this License and any other pertinent obligations, then as a consequence you may not distribute the Program at all. For example, if a patent license would not permit royalty-free redistribution of the Program by all those who receive copies directly or indirectly through you, then the only way you could satisfy both it and this License would be to refrain entirely from distribution of the Program. If any portion of this section is held invalid or unenforceable under any particular circumstance, the balance of the section is intended to apply and the section as a whole is intended to apply in other circumstances.
It is not the purpose of this section to induce you to infringe any patents or other property right claims or to contest validity of any such claims; this section has the sole purpose of protecting the integrity of the free software distribution system, which is implemented by public license practices. Many people have made generous contributions to the wide range of software distributed through that system in reliance on consistent application of that system; it is up to the author/donor to decide if he or she is willing to distribute software through any other system and a licensee cannot impose that choice.
This section is intended to make thoroughly clear what is believed to be a consequence of the rest of this License.
- If the distribution and/or use of the Program is restricted in certain countries either by patents or by copyrighted interfaces, the original copyright holder who places the Program under this License may add an explicit geographical distribution limitation excluding those countries, so that distribution is permitted only in or among countries not thus excluded. In such case, this License incorporates the limitation as if written in the body of this License.
- The Free Software Foundation may publish revised and/or new versions of the General Public License from time to time. Such new versions will be similar in spirit to the present version, but may differ in detail to address new problems or concerns.
Each version is given a distinguishing version number. If the Program specifies a version number of this License which applies to it and "any later version", you have the option of following the terms and conditions either of that version or of any later version published by the Free Software Foundation. If the Program does not specify a version number of this License, you may choose any version ever published by the Free Software Foundation.
- If you wish to incorporate parts of the Program into other free programs whose distribution conditions are different, write to the author to ask for permission. For software which is copyrighted by the Free Software Foundation, write to the Free Software Foundation; we sometimes make exceptions for this. Our decision will be guided by the two goals of preserving the free status of all derivatives of our free software and of promoting the sharing and reuse of software generally.
NO WARRANTY
- BECAUSE THE PROGRAM IS LICENSED FREE OF CHARGE, THERE IS NO WARRANTY FOR THE PROGRAM, TO THE EXTENT PERMITTED BY APPLICABLE LAW. EXCEPT WHEN OTHERWISE STATED IN WRITING THE COPYRIGHT HOLDERS AND/OR OTHER PARTIES PROVIDE THE PROGRAM "AS IS" WITHOUT WARRANTY OF ANY KIND, EITHER EXPRESSED OR IMPLIED, INCLUDING, BUT NOT LIMITED TO, THE IMPLIED WARRANTYES OF MERCHANTABILITY AND FITNESS FOR A PARTICULAR PURPOSE. THE ENTIRE RISK AS TO THE QUALITY AND PERFORMANCE OF THE PROGRAM IS WITH YOU. SHOULD THE PROGRAM PROVE DEFECTIVE, YOU ASSUME THE COST OF ALL NECESSARY SERVICING, REPAIR OR CORRECTION.
- IN NO EVENT UNLESS REQUIRED BY APPLICABLE LAW OR AGREED TO IN WRITING WILL ANY COPYRIGHT HOLDER, OR ANY OTHER PARTY WHO MAY MODIFY AND/OR REDISTRIBUTE THE PROGRAM AS PERMITTED ABOVE, BE LIABLE TO YOU FOR DAMAGES, INCLUDING ANY GENERAL, SPECIAL, INCIDENTAL OR CONSEQUENTIAL DAMAGES ARISING OUT OF THE USE OR INABILITY TO USE THE PROGRAM (INCLUDING BUT NOT LIMITED TO LOSS OF DATA OR DATA BEING RENDERED INACCURATE OR LOSSES SUSTAINED BY YOU OR THIRD PARTIES OR A FAILURE OF THE PROGRAM TO OPERATE WITH ANY OTHER PROGRAMS), EVEN IF SUCH HOLDER OR OTHER PARTY HAS BEEN ADVISED OF THE POSSIBILITY OF SUCH DAMAGES.
END OF TERMS AND CONDITIONS
How to Apply These Terms to Your New Programs
If you develop a new program, and you want it to be of the greatest possible use to the public, the best way to achieve this is to make it free software which everyone can redistribute and change under these terms.
To do so, attach the following notices to the program. It is safest to attach them to the start of each source file to most effectively convey the exclusion of warranty; and each file should have at least the "copyright" line and a pointer to where the full notice is found.
Copyright (C)
This program is free software; you can redistribute it and/or modify it under the terms of the GNU General Public License as published by the Free Software Foundation; either version 2 of the License, or (at your option) any later version.
This program is distributed in the hope that it will be useful, but WITHOUT ANY WARRANTY; without even the implied warranty of MERCHANTABILITY or FITNESS FOR A PARTICULAR PURPOSE. See the GNU General Public License for more details.
You should have received a copy of the GNU General Public License along with this program; if not, write to the Free Software Foundation, Inc., 51 Franklin Street, Fifth Floor, Boston, MA 02110-1301 USA
Also add information on how to contact you by electronic and paper mail.
If the program is interactive, make it output a short notice like this when it starts in an interactive mode:
Gnomovision version 69, Copyright (C) year name of author
Gnomovision comes with ABSOLUTELY NO WARRANTY; for details type 'show w'. This is free software, and you are welcome to redistribute it under certain conditions; type 'show c' for details.
The hypothetical commands 'show w' and 'show c' should show the appropriate parts of the General Public License. Of course, the commands you use may be called something other than 'show w' and 'show c'; they could even be mouse-clicks or menu items--whatever suits your program.
You should also get your employer (if you work as a programmer) or your school, if any, to sign a "copyright disclaimer" for the program, if necessary. Here is a sample; alter the names:
Yoyodyne, Inc., hereby disclaims all copyright interest in the program 'Gnomovation' (which makes passes at compilers) written by James Hacker.
Ty Coon, President of Vice
This General Public License does not permit incorporating your program into proprietary programs. If your program is a subroutine library, you may consider it more useful to permit linking proprietary applications with the library. If this is what you want to do, use the GNU Library General Public License instead of this License.
Exhibit-B
GNU LESSER GENERAL PUBLIC LICENSE
Version 2.1, February 1999
Copyright (C) 1991, 1999 Free Software Foundation, Inc.
51 Franklin Street, Fifth Floor, Boston, MA 02110-1301 USA
Everyone is permitted to copy and distribute verbatim copies of this license document, but changing it is not allowed.
[This is the first released version of the Lesser GPL. It also counts as the successor of the GNU Library Public License, version 2, hence the version number 2.1.]
Preamble
The licenses for most software are designed to take away your freedom to share and change it. By contrast, the GNU General Public Licenses are intended to guarantee your freedom to share and change free software—to make sure the software is free for all its users.
This license, the Lesser General Public License, applies to some specially designated software packages—typically libraries—of the Free Software Foundation and other authors who decide to use it. You can use it too, but we suggest you first think carefully about whether this license or the ordinary General Public License is the better strategy to use in any particular case, based on the explanations below.
When we speak of free software, we are referring to freedom of use, not price. Our General Public Licenses are designed to make sure that you have the freedom to distribute copies of free software (and charge for this service if you wish); that you receive source code or can get it if you want it; that you can change the software and use pieces of it in new free programs; and that you are informed that you can do these things.
To protect your rights, we need to make restrictions that forbid distributors to deny you these rights or to ask you to surrender these rights. These restrictions translate to certain responsibilities for you if you distribute copies of the library or if you modify it.
For example, if you distribute copies of the library, whether gratis or for a fee, you must give the recipients all the rights that we gave you. You must make sure that they, too, receive or can get the source code. If you link other code with the library, you must provide complete object files to the recipients, so that they can relink them with the library after making changes to the library and recomilling it. And you must show them these terms so they know their rights. We protect your rights with a two-step method: (1) we copyright the library, and (2) we offer you this license, which gives you legal permission to copy, distribute and/or modify the library.
To protect each distributor, we want to make it very clear that there is no warranty for the free library. Also, if the library is modified by someone else and passed on, the recipients should know that what they have is not the original version, so that the original author's reputation will not be affected by problems that might be introduced by others.
Finally, software patents pose a constant threat to the existence of any free program. We wish to make sure that a company cannot effectively restrict the users of a free program by obtaining a restrictive license from a patent holder. Therefore, we insist that any patent license obtained for a version of the library must be consistent with the full freedom of use specified in this license.
Most GNU software, including some libraries, is covered by the ordinary GNU General Public License. This license, the GNU Lesser General Public License, applies to certain designated libraries, and is quite different from the ordinary General Public License. We use this license for certain libraries in order to permit linking those libraries into non-free programs.
When a program is linked with a library, whether statically or using a shared library, the combination of the two is legally speaking a combined work, a derivative of the original library. The ordinary General Public License therefore permits such linking only if the entire combination fits its criteria of freedom. The Lesser General Public License permits more lax criteria for linking other code with the library.
We call this license the "Lesser" General Public License because it does Less to protect the user's freedom than the ordinary General Public License. It also provides other free software developers Less of an advantage over competing non-free programs. These disadvantages are the reason we use the ordinary General Public License for many libraries. However, the Lesser license provides advantages in certain special circumstances.
For example, on rare occasions, there may be a special need to encourage the widest possible use of a certain library, so that it becomes a de-facto standard. To achieve this, non-free programs must be allowed to use the library. A more frequent case is that a free library does the same job as widely used non-free libraries. In this case, there is little to gain by limiting the free library to free software only, so we use the Lesser General Public License.
In other cases, permission to use a particular library in non-free programs enables a greater number of people to use a large body of free software. For example, permission to use the GNU C Library in non-free programs enables many more people to use the whole GNU operating system, as well as its variant, the GNU/Linux operating system.
Although the Lesser General Public License is Less protective of the users' freedom, it does ensure that the user of a program that is linked with the Library has the freedom and the wherewithal to run that program using a modified version of the Library.
The precise terms and conditions for copying, distribution and modification follow. Pay close attention to the difference between a "work based on the library" and a "work that uses the library".
The former contains code derived from the library, whereas the latter must be combined with the library in order to run.
GNU LESSER GENERAL PUBLIC LICENSE TERMS AND CONDITIONS FOR COPYING, DISTRIBUTION AND MODIFICATION
- This License Agreement applies to any software library or other program which contains a notice placed by the copyright holder or other authorized party saying it may be distributed under the terms of this Lesser General Public License (also called "this License"). Each licensee is addressed as "you".
A "library" means a collection of software functions and/or data prepared so as to be conveniently linked with application programs (which use some of those functions and data) to form executables.
The "Library", below, refers to any such software library or work which has been distributed under these terms. A "work based on the Library" means either the Library or any derivative work under copyright law: that is to say, a work containing the Library or a portion of it, either verbatim or with modifications and/ or translated straightforwardly into another language. (Hereinafter, translation is included without limitation in the term "modification".)
"Source code" for a work means the preferred form of the work for making modifications to it. For a library, complete source code means all the source code for all modules it contains, plus any associated interface definition files, plus the scripts used to control compilation and installation of the library.
Activities other than copying, distribution and modification are not covered by this License; they are outside its scope. The act of running a program using the Library is not restricted, and output from such a program is covered only if its contents constitute a work based on the Library (independent of the use of the Library in a tool for writing it). Whether that is true depends on what the Library does and what the program that uses the Library does. - You may copy and distribute verbatim copies of the Library's complete source code as you receive it, in any medium, provided that you conspicuously and appropriately publish on each copy an appropriate copyright notice and disclaimer of warranty; keep intact all the notices that refer to this License and to the absence of any warranty; and distribute a copy of this License along with the Library. You may charge a fee for the physical act of transferring a copy, and you may at your option offer warranty protection in exchange for a fee.
- You may modify your copy or copies of the Library or any portion of it, thus forming a work based on the Library, and copy and distribute such modifications or work under the terms of Section 1 above, provided that you also meet all of these conditions:
a) The modified work must itself be a software library.
b) You must cause the files modified to carry prominent notices stating that you changed the files and the date of any change.
c) You must cause the whole of the work to be licensed at no charge to all third parties under the terms of this License.
d) If a facility in the modified Library refers to a function or a table of data to be supplied by an application program that uses the facility, other than as an argument passed when the facility is invoked, then you must make a good faith effort to ensure that,
in the event an application does not supply such function or table, the facility still operates, and performs whatever part of its purpose remains meaningful.
(For example, a function in a library to compute square roots has a purpose that is entirely well-defined independent of the application. Therefore, Subsection 2d requires that any applicationsupplied function or table used by this function must be optional: if the application does not supply it, the square root function must still compute square roots.)
These requirements apply to the modified work as a whole. If identifiable sections of that work are not derived from the Library, and can be reasonably considered independent and separate works in themselves, then this License, and its terms, do not apply to those sections when you distribute them as separate works. But when you distribute the same sections as part of a whole which is a work based on the Library, the distribution of the whole must be on the terms of this License, whose permissions for other licensees extend to the entire whole, and thus to each and every part regardless of who wrote it.
Thus, it is not the intent of this section to claim rights or contest your rights to work written entirely by you; rather, the intent is to exercise the right to control the distribution of derivative or collective works based on the Library.
In addition, mere aggregation of another work not based on the Library with the Library (or with a work based on the Library) on a volume of a storage or distribution medium does not bring the other work under the scope of this License.
- You may opt to apply the terms of the ordinary GNU General Public License instead of this License to a given copy of the Library. To do this, you must alter all the notices that refer to this License, so that they refer to the ordinary GNU General Public License, version 2, instead of to this License. (If a newer version than version 2 of the ordinary GNU General Public License has appeared, then you can specify that version instead if you wish.) Do not make any other change in these notices.
Once this change is made in a given copy, it is irreversible for that copy, so the ordinary GNU General Public License applies to all subsequent copies and derivative works made from that copy.
This option is useful when you wish to copy part of the code of the Library into a program that is not a library.
- You may copy and distribute the Library (or a portion or derivative of it, under Section 2) in object code or executable form under the terms of Sections 1 and 2 above provided that you accompany it with the complete corresponding machine-readable source code, which must be distributed under the terms of Sections 1 and 2 above on a medium customarily used for software interchange.
If distribution of object code is made by offering access to copy from a designated place, then offering equivalent access to copy the source code from the same place satisfies the requirement to distribute the source code, even though third parties are not compelled to copy the source along with the object code.
- A program that contains no derivative of any portion of the Library, but is designed to work with the Library by being compiled or linked with it, is called a "work that uses the Library". Such a work, in isolation, is not a derivative work of the Library, and therefore falls outside the scope of this License.
However, linking a "work that uses the Library" with the Library creates an executable that is a derivative of the Library (because it contains portions of the Library), rather than a "work that uses the library". The executable is therefore covered by this License.
Section 6 states terms for distribution of such executables.
When a "work that uses the Library" uses material from a header file that is part of the Library, the object code for the work may be a derivative work of the Library even though the source code is not.
Whether this is true is especially significant if the work can be linked without the Library, or if the work is itself a library. The threshold for this to be true is not precisely defined by law.
If such an object file uses only numerical parameters, data structure layouts and accessors, and small macros and small inline functions (ten lines or less in length), then the use of the object file is unrestricted, regardless of whether it is legally a derivative work. (Executables containing this object code plus portions of the Library will still fall under Section 6.)
Otherwise, if the work is a derivative of the Library, you may distribute the object code for the work under the terms of Section 6. Any executables containing that work also fall under Section 6, whether or not they are linked directly with the Library itself.
- As an exception to the Sections above, you may also combine or link a "work that uses the Library" with the Library to produce a work containing portions of the Library, and distribute that work under terms of your choice, provided that the terms permit modification of the work for the customer's own use and reverse engineering for debugging such modifications.
You must give prominent notice with each copy of the work that the Library is used in it and that the Library and its use are covered by this License. You must supply a copy of this License. If the work during execution displays copyright notices, you must include the copyright notice for the Library among them, as well as a reference directing the user to the copy of this License. Also, you must do one of these things:
a) Accompany the work with the complete corresponding machine-readable source code for the Library including whatever changes were used in the work (which must be distributed under Sections 1 and 2 above); and, if the work is an executable linked with the Library, with the complete machine-readable "work that uses the Library", as object code and/or source code, so that the user can modify the Library and then relink to produce a modified executable containing the modified Library. (It is understood that the user who changes the contents of definitions files in the Library will not necessarily be able to recompile the application to use the modified definitions.)
b) Use a suitable shared library mechanism for linking with the Library. A suitable mechanism is one that (1) uses at run time a copy of the library already present on the user's computer system, rather than copying library functions into the executable, and (2) will operate properly with a modified version of the library, if the user installs one, as long as the modified version is interface-compatible with the version that the work was made with.
c) Accompany the work with a written offer, valid for at least three years, to give the same user the materials specified in Subsection 6a, above, for a charge no more than the cost of performing this distribution.
d) If distribution of the work is made by offering access to copy from a designated place, offer equivalent access to copy the above specified materials from the same place.
e) Verify that the user has already received a copy of these materials or that you have already sent this user a copy.
For an executable, the required form of the "work that uses the Library" must include any data and utility programs needed for reproducing the executable from it. However, as a special exception, the materials to be distributed need not include anything that is normally distributed (in either source or binary form) with the major components (compiler, kernel, and so on) of the operating system on which the executable runs, unless that component itself accompanies the executable.
It may happen that this requirement contradicts the license restrictions of other proprietary libraries that do not normally accompany the operating system. Such a contradiction means you cannot use both them and the Library together in an executable that you distribute.
- You may place library facilities that are a work based on the Library side-by-side in a single library together with other library facilities not covered by this License, and distribute such a combined library, provided that the separate distribution of the work based on the Library and of the other library facilities is otherwise permitted, and provided that you do these two things:
a) Accompany the combined library with a copy of the same work based on the Library, uncombined with any other library facilities. This must be distributed under the terms of the Sections above.
b) Give prominent notice with the combined library of the fact that part of it is a work based on the Library, and explaining where to find the accompanying uncombined form of the same work. -
You may not copy, modify, sublicense, link with, or distribute the Library except as expressly provided under this License. Any attempt otherwise to copy, modify, sublicense, link with, or distribute the Library is void, and will automatically terminate your rights under this License. However, parties who have received copies, or rights, from you under this License will not have their licenses terminated so long as such parties remain in full compliance.
-
You are not required to accept this License, since you have not signed it. However, nothing else grants you permission to modify or distribute the Library or its derivative works. These actions are prohibited by law if you do not accept this License. Therefore, by modifying or distributing the Library (or any work based on the Library), you indicate your acceptance of this License to do so, and all its terms and conditions for copying, distributing or modifying the Library or works based on it.
-
Each time you redistribute the Library (or any work based on the Library), the recipient automatically receives a license from the original licensor to copy, distribute, link with or modify the Library subject to these terms and conditions. You may not impose any further restrictions on the recipients' exercise of the rights granted herein. You are not responsible for enforcing compliance by third parties with this License.
-
If, as a consequence of a court judgment or allegation of patent infringement or for any other reason (not limited to patent issues), conditions are imposed on you (whether by court order, agreement or otherwise) that contradict the conditions of this License, they do not excuse you from the conditions of this License. If you cannot distribute so as to satisfy simultaneously your obligations under this License and any other pertinent obligations, then as a consequence you may not distribute the Library at all. For example, if a patent license would not permit royalty-free redistribution of the Library by all those who receive copies directly or indirectly through you, then the only way you could satisfy both it and this License would be to refrain entirely from distribution of the Library. If any portion of this section is held invalid or unenforceable under any particular circumstance, the balance of the section is intended to apply, and the section as a whole is intended to apply in other circumstances.
It is not the purpose of this section to induce you to infringe any patents or other property right claims or to contest validity of any such claims; this section has the sole purpose of protecting the integrity of the free software distribution system which is implemented by public license practices. Many people have made generous contributions to the wide range of software distributed through that system in reliance on consistent application of that system; it is up to the author/donor to decide if he or she is willing to distribute software through any other system and a licensee cannot impose that choice.
This section is intended to make thoroughly clear what is believed to be a consequence of the rest of this License.
-
If the distribution and/or use of the Library is restricted in certain countries either by patents or by copyrighted interfaces, the original copyright holder who places the Library under this License may add an explicit geographical distribution limitation excluding those countries, so that distribution is permitted only in or among countries not thus excluded. In such case, this License incorporates the limitation as if written in the body of this License.
-
The Free Software Foundation may publish revised and/or new versions of the Lesser General Public License from time to time. Such new versions will be similar in spirit to the present version, but may differ in detail to address new problems or concerns.
Each version is given a distinguishing version number. If the Library specifies a version number of this License which applies to it and "any later version", you have the option of following the terms and conditions either of that version or of any later version published by the Free Software Foundation. If the Library does not specify a license version number, you may choose any version ever published by the Free Software Foundation.
- If you wish to incorporate parts of the Library into other free programs whose distribution conditions are incompatible with these, write to the author to ask for permission. For software which is copyrighted by the Free Software Foundation, write to the Free Software Foundation; we sometimes make exceptions for this. Our decision will be guided by the two goals of preserving the free status of all derivatives of our free software and of promoting the sharing and reuse of software generally.
NO WARRANTY
-
BECAUSE THE LIBRARY IS LICENSED FREE OF CHARGE, THERE IS NOW WARRANTY FOR THE LIBRARY, TO THE EXTENT PERMITTED BY APPLICABLE LAW. EXCEPT WHEN OTHERWISE STATED IN WRITING THE COPYRIGHT HOLDERS AND/OR OTHER PARTIES PROVIDE THE LIBRARY "AS IS" WITHOUT WARRANTY OF ANY KIND, Either EXPRESSED OR IMPLIED, INCLUDING, BUT NOT LIMITED TO, THE IMPLIED WARRANTY OF MERCHANTABILITY AND FITNESS FOR A PARTICULAR PURPOSE. THE ENTIRE RISK AS TO THE QUALITY AND PERFORMANCE OF THE LIBRARY IS WITH YOU. SHOULD THE LIBRARY PROVE DEFECTIVE, YOU ASSUME THE COST OF ALL NECESSARY SERVICING, REPAIR OR CORRECTION.
-
IN NO EVENT UNLESS REQUIRED BY APPLICABLE LAW OR AGREED TO IN WRITING WILL ANY COPYRIGHT HOLDER, OR ANY OTHER PARTY WHO MAY MODIFY AND/OR REDISTRIBUTE THE LIBRARY AS PERMITTED ABOVE, BE LIABLE TO YOU FOR DAMAGES, INCLUDING ANY GENERAL, SPECIAL, INCIDENTAL OR CONSEQUENTIAL DAMAGES ARISING OUT OF THE USE OR INABILITY TO USE THE LIBRARY (INCLUDING BUT NOT LIMITED TO LOSS OF DATA OR DATA BEING RENDERED INACCURATE OR LOSSES SUSTAINED BY YOU OR THIRD PARTIES OR A FAILURE OF THE LIBRARY TO OPERATE WITH ANY OTHER SOFTWARE), EVEN IF SUCH HOLDER OR OTHER PARTY HAS BEEN ADVISED OF THE POSSIBILITY OF SUCH DAMAGES.
END OF TERMS AND CONDITIONS
How to Apply These Terms to Your New Libraries
If you develop a new library, and you want it to be of the greatest possible use to the public, we recommend making it free software that everyone can redistribute and change. You can do so by permitting redistribution under these terms (or, alternatively, under the terms of the ordinary General Public License).
To apply these terms, attach the following notices to the library. It is safest to attach them to the start of each source file to most effectively convey the exclusion of warranty; and each file should have at least the "copyright" line and a pointer to where the full notice is found.
Copyright (C)
This library is free software; you can redistribute it and/or modify it under the terms of the GNU Lesser General Public License as published by the Free Software Foundation; either version 2.1 of the License, or (at your option) any later version.
This library is distributed in the hope that it will be useful, but WITHOUT ANY WARRANTY; without even the implied warranty of MERCHANTABILITY or FITNESS FOR A PARTICULAR PURPOSE. See the GNU Lesser General Public License for more details.
You should have received a copy of the GNU Lesser General Public License along with this library; if not, write to the Free Software Foundation, Inc., 51 Franklin Street, Fifth Floor, Boston, MA 02110-1301 USA
Also add information on how to contact you by electronic and paper mail.
You should also get your employer (if you work as a programmer) or your school, if any, to sign a "copyright disclaimer" for the library, if necessary. Here is a sample; alter the names:
Yoyodyne, Inc., hereby disclaims all copyright interest in the library 'Frob' (a library for tweaking knobs) written by James Random Hacker.
Ty Coon, President of Vice
That's all there is to it!
Exhibit-C
/* zlib.h -interface of the 'zlib' general purpose compression library version 1.2.3, July 18th, 2005
Copyright (C) 1995-2005 Jean-loup Gailly and Mark Adler
This software is provided 'as-is', without any express or implied warranty. In no event will the authors be held liable for any damages arising from the use of this software.
Permission is granted to anyone to use this software for any purpose, including commercial applications, and to alter it and redistribute it freely, subject to the following restrictions:
- The origin of this software must not be misrepresented; you must not claim that you wrote the original software. If you use this software in a product, an acknowledgment in the product documentation would be appreciated but is not required.
- Altered source versions must be plainly marked as such, and must not be misrepresented as being the original software.
- This notice may not be removed or altered from any source distribution.
Jean-loup Gailly jloup@gzip.org
Mark Adler madler@alumni.caltech.edu
*/
Exhibit-D
Copyright (c) 1998, 1999, 2000 Thai Open Source Software Center Ltd and Clark Cooper
Copyright (c) 2001, 2002, 2003, 2004, 2005, 2006 Expat.
maintainers.
Permission is hereby granted, free of charge, to any person obtaining a copy of this software and associated documentation files (the Software), to deal in the Software without restriction, including without limitation the rights to use, copy, modify, merge, publish, distribute, sublicense, and/or sell copies of the Software, and to permit persons to whom the Software is furnished to do so, subject to the following conditions:
The above copyright notice and this permission notice shall be included in all copies or substantial portions of the Software.
THE SOFTWARE IS PROVIDED "AS IS", WITHOUT WARRANTY OF ANY KIND, EXPRESS OR IMPLIED, INCLUDING BUT NOT LIMITED TO THE WARRANTYES OF MERCHANTABILITY, FITNESS FOR A PARTICULAR PURPOSE AND NONINFRINGEMENT.
IN NO EVENT SHALL THE AUTHORS OR COPYRIGHT HOLDERS BE LIABLE FOR ANY CLAIM, DAMAGES OR OTHER LIABILITY, WHETHER IN AN ACTION OF CONTRACT, TORT OR OTHERWISE, ARISING FROM, OUT OF OR IN CONNECTION WITH THE SOFTWARE OR THE USE OR OTHER DEALINGS IN THE SOFTWARE.
Exhibit-E
The FreeType Project LICENSE
2006-Jan-27
Copyright 1996-2002, 2006 by
David Turner, Robert Wilhelm, and Werner Lemberg
Introduction
The FreeType Project is distributed in several archive packages; some of them may contain, in addition to the FreeType font engine, various tools and contributions which rely on, or relate to, the FreeType Project.
This license applies to all files found in such packages, and which do not fall under their own explicit license. The license affects thus the FreeType font engine, the test programs, documentation and makefiles, at the very least. This license was inspired by the BSD, Artistic, and IJG (Independent JPEG Group) licenses, which all encourage inclusion and use of free software in commercial and freeware products alike. As a consequence, its main points are that:
- We don't promise that this software works. However, we will be interested in any kind of bug reports. ('as is' distribution)
- You can use this software for whatever you want, in parts or full form, without having to pay us. ('royalty-free'usage)
- You may not pretend that you wrote this software. If you use it, or only parts of it, in a program, you must acknowledge somewhere in your documentation that you have used the FreeType code. ('credits')
We specifically permit and encourage the inclusion of this software, with or without modifications, in commercial products.
We disclaim all warranties covering The FreeType Project and assume no liability related to The FreeType Project.
Finally, many people asked us for a preferred form for a credit/disclaimer to use in compliance with this license.
We thus encourage you to use the following text:
11 11
Portions of this software are copyright c
FreeType Project (www.freetype.org). All rights reserved.
11
Please replace
Legal Terms
0. Definitions
Throughout this license, the terms 'package', 'FreeType Project', and 'FreeType archive' refer to the set of files originally distributed by the authors (David Turner, Robert Wilhelm, and Werner Lemberg) as the 'FreeType Project', be they named as alpha, beta or final release.
'You' refers to the licensee, or person using the project, where 'using' is a generic term including compiling the project's source code as well as linking it to form a 'program' or 'executable'.
This program is referred to as 'a program using the FreeType engine'.
This license applies to all files distributed in the original FreeType Project, including all source code, binaries and documentation, unless otherwise stated in the file in its original, unmodified form a distributed in the original archive.
If you are unsure whether or not a particular file is covered by this license, you must contact us to verify this.
The FreeType Project is copyright (C) 1996-2000 by David Turner,
Robert Wilhelm, and Werner Lemberg. All rights reserved except as specified below.
1. No Warranty
THE FREETYPE PROJECT IS PROVIDED 'AS IS' WITHOUT WARRANTY OF ANY KIND, Either EXPRESS OR IMPLIED, INCLUDING, BUT NOT LIMITED TO, WARRANTY OF MERCHANTABILITY AND FITNESS FOR A PARTICULAR PURPOSE. IN NO EVENT WILL ANY OF THE AUTHORS OR COPYRIGHT HOLDERS BE LIABLE FOR ANY DAMAGES CAUSED BY THE USE OR THE INABILITY TO USE, OF THE FREETYPE PROJECT.
2. Redistribution
This license grants a worldwide, royalty-free, perpetual and irrevocable right and license to use, execute, perform, compile, display, copy, create derivative works of, distribute and sublicense the FreeType Project (in both source and object code forms) and derivative works thereof for any purpose; and to authorize others to exercise some or all of the rights granted herein, subject to the following conditions:
-
Redistribution of source code must retain this license file ('FTL.TXT') unaltered; any additions, deletions or changes to the original files must be clearly indicated in accompanying documentation. The copyright notices of the unaltered, original files must be preserved in all copies of source files.
-
Redistribution in binary form must provide a disclaimer that states that the software is based in part of the work of the FreeType Team, in the distribution documentation. We also encourage you to put an URL to the FreeType web page in your documentation, though this isn't mandatory.
These conditions apply to any software derived from or based on the FreeType Project, not just the unmodified files. If you use our work, you must acknowledge us. However, no fee need be paid to us.
3. Advertising
Neither the FreeType authors and contributors nor you shall use the name of the other for commercial, advertising, or promotional purposes without specific prior written permission.
We suggest, but do not require, that you use one or more of the following phrases to refer to this software in your documentation or advertising materials: 'FreeType Project', 'FreeType Engine', 'FreeType library', or 'FreeType Distribution'.
As you have not signed this license, you are not required to accept it. However, as the FreeType Project is copyrighted material, only this license, or another one contracted with the authors, grants you the right to use, distribute, and modify it.
Therefore, by using, distributing, or modifying the FreeType Project, you indicate that you understand and accept all the terms of this license.
4. Contacts
There are two mailing lists related to FreeType:
- freetype=freetype.org
Discusses general use and applications of FreeType, as well as future and wanted additions to the library and distribution.
If you are looking for support, start in this list if you haven't found anything to help you in the documentation.
- freetype-devel@nongnu.org
Discusses bugs, as well as engine internals, design issues, specific licenses, porting, etc.
Our home page can be found at
http://www.freetype.org
-- end of FTLXT --
Exhibit-F Licensee ISSUES
The OpenSSL toolkit stays under a dual license, i.e. both the conditions of the OpenSSL License and the original SSLeav license apply to the toolkit.
See below for the actual license texts. Actually both licenses are BSD-style Open Source licenses. In case of any license issues related to OpenSSL please contact openssl-core@openssl.org.
OpenSSL License
Copyright (c) 1998-2008 The OpensSL Project. All rights reserved.
Redistribution and use in source and binary forms, with or without modification, are permitted provided that the following conditions are met:
- Redistributions of source code must retain the above copyright notice, this list of conditions and the following disclaimer.
- Redistributions in binary form must reproduce the above copyright notice, this list of conditions and the following disclaimer in the documentation and/or other materials provided with the distribution.
- All advertising materials mentioning features or use of this software must display the following acknowledgment:
"This product includes software developed by the OpenSSL Project for use in the OpenSSL Toolkit. (http://www.openssll.org)" - The names "OpenSSL Toolkit" and "OpenSSL Project" must not be used to endorse or promote products derived from this software without prior written permission. For written permission, please contact openssI-core@openssI.org.
- Products derived from this software may not be called "OpenSSL" nor may "OpenSSL" appear in their names without prior written permission of the OpenSSL Project.
- Redistributions of any form whatsoever must retain the following acknowledgment:
"This product includes software developed by the OpensSL Project for use in the OpensSL Toolkit (http://www.openssll.org/)
THIS SOFTWARE IS PROVIDED BY THE OpenSSL PROJECT "AS IS" AND ANY EXPRESSED OR IMPLIED WARRANTY, INCLUDING, BUT NOT LIMITED TO, THE IMPLIED WARRANTY OF MERCHANTABILITY AND FITNESS FOR A PARTICULAR PURPOSE ARE DISCLAIMED.
IN NO EVENT SHALL THE OpenssL Project OR ITS CONTRIBUTORS BE LIABLE FOR ANY DIRECT, INDIRECT,INCIDENTAL,SPECIAL,EXEMPLARY,OR CONSEQUENTIAL DAMAGES (INCLUDING,BUT NOT LIMITED TO,PROCUREMENT OF SUBSTITUTE GOODS OR SERVICES;LOSS OF USE,DATA,OR PROFITS;OR BUSINESS INTERRUPTION)HOWEVER CAUSED AND ON ANY THEORY OF LIABILITY,WHETHER IN CONTRACT, STRICT LIABILITY,OR TORT (INCLUDING NEGLIGENCE OR OTHERWISE)ARISING IN ANY WAY OUT OF THE USE OF THIS SOFTWARE,EVEN IF ADVISED OF THE POSSIBILITY OF SUCH DAMAGE
This product includes cryptographic software written by Eric Young (eay@cryptsoft.com). This product includes software written by Tim Hudson (tjh@cryptsoft.com).
*/
Original SSLeay License
/
Copyright (C) 1995-1998 Eric Young (eay@cryptsoft.com) All rights reserved.
This package is an SSL implementation written by Eric Young (eay@cryptsoft.com).
The implementation was written so as to conform with Netscapes SSL.
This library is free for commercial and non-commercial use as long as the following conditions are ahaared to. The following conditions apply to all code found in this distribution, be it the RC4, RSA, Ihash, DES, etc., code; not just the SSL code. The SSL documentation included with this distribution is covered by the same copyright terms except that the holder is Tim Hudson (tjh@cryptsoft.com). Copyright remains Eric Young's, and as such any Copyright notices in the code are not to be removed.
If this package is used in a product, Eric Young should be given attribution as the author of the parts of the library used.
This can be in the form of a textual message at program startup or in documentation (online or textual) provided with the package.
Redistribution and use in source and binary forms, with or without modification, are permitted provided that the following conditions are met:
- Redistributions of source code must retain the copyright notice, this list of conditions and the following disclaimer.
- Redistributions in binary form must reproduce the above copyright notice, this list of conditions and the following disclaimer in the documentation and/or other materials provided with the distribution.
- All advertising materials mentioning features or use of this software must display the following acknowledgement:
"This product includes cryptographic software written by Eric Young (eay@cryptsoft.com)"
The word 'cryptographic' can be left out if the routines from the library being used are not cryptographic related .
- If you include any Windows specific code (or a derivative thereof) from the apps directory (application code) you must include an acknowledgement:
"This product includes software written by Tim Hudson (tjh@cryptsoft.com)
THIS SOFTWARE IS PROVIDED BY ERIC YOUNG "AS IS" AND ANY EXPRESS OR IMPLIED WARRANTYES, INCLUDING, BUT NOT LIMITED TO, THE IMPLIED WARRANTYES OF MERCHANTABILITY AND FITNESS FOR A PARTICULAR PURPOSE ARE DISCLAIMED. IN NO EVENT SHALL THE AUTHOR OR COLLECTORS BE LIABLE FOR ANY DIRECT, INDIRECT, INCIDENTAL, SPECIAL, EXEMPLARY, OR CONSEQUENTIAL DAMAGES (INCLUDING, BUT NOT LIMITED TO, PROCEDURE OF SUBSTITUTE GOODS OR SERVICES; LOSS OF USE, DATA, OR PROFITS; OR BUSINESS INTERRUPTION) HOWEVER CAUSED AND ON ANY THEORY OF LIABILITY, WHETHER IN CONTRACT, STRICT LIABILITY, OR TORT (INCLUDING NEGLIGENCE OR OTHERWISE) ARISING IN ANY WAY OUT OF THE USE OF THIS SOFTWARE, EVEN IF ADVISED OF THE POSSIBILITY OF SUCH DAMAGE. "The licence and distribution terms for any publicly available version or derivative of this code cannot be changed. i.e. this code cannot simply be copied and put under another distribution licence [including the GNU Public Licence.]
Exhibit-G LibJPEG
In plain English:
- We don't promise that this software works. (But if you find any bugs, please let us know!)
- You can use this software for whatever you want. You don't have to pay us.
- You may not pretend that you wrote this software. If you use it in a program, you must acknowledge somewhere in your documentation that you've used the IJG code.
In legalese:
The authors make NO WARRANTY or representation, either express or implied, with respect to this software, its quality, accuracy, merchantability, or fitness for a particular purpose.
This software is provided "AS IS", and you, its user, assume the entire risk as to its quality and accuracy.
This software is copyright (C) 1991-1998, Thomas G. Lane. All Rights Reserved except as specified below.
Permission is hereby granted to use, copy, modify, and distribute this software (or portions thereof) for any purpose, without fee, subject to these conditions:
(1) If any part of the source code for this software is distributed, then this README file must be included, with this copyright and no-warranty notice unaltered; and any additions, deletions, or changes to the original files must be clearly indicated in accompanying documentation.
(2) If only executable code is distributed, then the accompanying documentation must state that "this software is based in part on the work of the Independent JPEG Group".
(3) Permission for use of this software is granted only if the user accepts full responsibility for any undesirable consequences; the authors accept NO LIABILITY for damages of any kind.
These conditions apply to any software derived from or based on the IJG code, not just to the unmodified library. If you use our work, you ought to acknowledge us. Permission is NOT granted for the use of any IJG author's name or company name in advertising or publicity relating to this software or products derived from it.
This software may be referred to only as "the Independent JPEG Group's software".
We specifically permit and encourage the use of this software as the basis of commercial products, provided that all warranty or liability claims are assumed by the product vendor.
ansi2knr.c is included in this distribution by permission of L. Peter Deutsch, sole proprietor of its copyright holder, Aladdin Enterprises of Menlo Park, CA.
ansi2knr.c is NOT covered by the above copyright and conditions, but instead by the usual distribution terms of the Free Software Foundation; principally, that you must include source code if you redistribute it. (See the file ANSI2knr.c for full details.)
However, since ANSI2knr.c is not needed as part of any program generated from the IJG code, this does not limit you more than the foregoing paragraphs do.
The Unix configuration script "configure" was produced with GNU Autoconf.
It is copyright by the Free Software Foundation but is freely distributable.
The same holds for its supporting scripts (config, guess, config.sub, lconfig, ltmain.sh). Another support script, install-sh, is copyright by M.I.T. but is also freely distributable.
It appears that the arithmetic coding option of the JPEG spec is covered by patents owned by IBM, AT&T, and Mitsubishi.
Hence arithmetic coding cannot legally be used without obtaining one or more licenses.
For this reason, support for arithmetic coding has been removed from the free JPEG software.
(Since arithmetic coding provides only a marginal gain over the unpatented Huffman mode, it is unlikely that very many implementations will support it.)
So far as we are aware, there are no patent restrictions on the remaining code.
The IJG distribution formerly included code to read and write GIF files.
To avoid entanglement with the Unisys LZW patent, GIF reading support has been removed altogether, and the GIF writer has been simplified to produce uncompressed GIFs.
This technique does not use the LZW algorithm; the resulting GIF files are larger than usual, but are readable by all standard GIF decoders.
We are required to state that
"The Graphics Interchange Format(c) is the Copyright property of CompuServe Incorporated.
GIF(sm) is a Service Mark property of CompuServe Incorporated."
Exhibit-H
COPYRIGHT AND PERMISSION NOTICE
Copyright (c) 1996 - 2008, Daniel Stenberg, daniel@haxx.se.
All rights reserved.
Permission to use, copy, modify, and distribute this software for any purpose with or without fee is hereby granted, provided that the above copyright notice and this permission notice appear in all copies.
THE SOFTWARE IS PROVIDED "AS IS", WITHOUT WARRANTY OF ANY KIND, EXPRESS OR IMPLIED, INCLUDING BUT NOT LIMITED TO THE WARRANTY OF MERCHANTABILITY, FITNESS FOR A PARTICULAR PURPOSE AND NONINFRINGEMENT OF THIRD PARTY RIGHTS. IN NO EVENT SHALL THE AUTHORS OR COPYRIGHT HOLDERS BE LIABLE FOR ANY CLAIM, DAMAGES OR OTHER LIABILITY, WHETHER IN AN ACTION OF CONTRACT, TORT OR OTHERWISE, ARISING FROM, OUT OF OR IN CONNECTION WITH THE SOFTWARE OR THE USE OR OTHER DEALINGS IN THE SOFTWARE.
Except as contained in this notice, the name of a copyright holder shall not be used in advertising or otherwise to promote the sale, use or other dealings in this Software without prior written authorization of the copyright holder.
Exhibit-I
ICU License - ICU 1.8.1 and later
COPYRIGHT AND PERMISSION NOTICE
Copyright (c) 1995-2010 International Business Machines Corporation and others
All rights reserved.
Permission is hereby granted, free of charge, to any person obtaining a copy of this software and associated documentation files (the "Software"), to deal in the Software without restriction, including without limitation the rights to use, copy, modify, merge, publish, distribute, and/or sell copies of the Software, and to permit persons to whom the Software is furnished to do so, provided that the above copyright notice(s) and this permission notice appear in all copies of the Software and that both the above copyright notice(s) and this permission notice appear in supporting documentation.
THE SOFTWARE IS PROVIDED "AS IS", WITHOUT WARRANTY OF ANY KIND, EXPRESS OR IMPLIED, INCLUDING BUT NOT LIMITED TO THE WARRANTY OF MERCHANTABILITY, FITNESS FOR A PARTICULAR PURPOSE AND NONINFRINGEMENT OF THIRD PARTY RIGHTS. IN NO EVENT SHALL THE COPYRIGHT HOLDER OR HOLDERS INCLUDED IN THIS NOTICE BE LIABLE FOR ANY CLAIM, OR ANY SPECIAL INDIRECT OR CONSEQUENTIAL DAMAGES, OR ANY DAMAGES WHATSOEVER RESULTING FROM LOSS OF USE, DATA OR PROFITS, WHETHER IN AN ACTION OF CONTRACT, NEGLIGENCE OR OTHER TORTIOUS ACTION, ARISING OUT OF OR IN CONNECTION WITH THE USE OR PERFORMANCE OF THIS SOFTWARE.
Except as contained in this notice, the name of a copyright holder shall not be used in advertising or otherwise to promote the sale, use or other dealings in this Software without prior written authorization of the copyright holder. All trademarks and registered trademarks mentioned herein are the property of their respective owners.
Exhibit-J
Alternatively, this software may be distributed, used, and modified under the terms of BSD license:
Redistribution and use in source and binary forms, with or without modification, are permitted provided that the following conditions are met:
- Redistributions of source code must retain the above copyright notice, this list of conditions and the following disclaimer.
- Redistributions in binary form must reproduce the
above copyright notice, this list of conditions and the following disclaimer in the documentation and/or other materials provided with the distribution.
- Neither the name(s) of the above-listed copyright holder(s) nor the names of its contributors may be used to endorse or promote products derived from this software without specific prior written permission.
THIS SOFTWARE IS PROVIDED BY THE COPYRIGHT HOLDERS AND COLNTRIBUTORS AS IS AND ANY EXPRESS OR IMPLIED WARRANTY, INCLUDING, BUT NOT LIMITED TO, THE IMPLIED WARRANTY OF MERCHANTABILITY AND FITNESS FOR A PARTICULAR PURPOSE ARE DISCLAIMED. IN NO EVENT SHALL THE COPYRIGHT OWNER OR COLNTRIBUTORS BE LIABLE FOR ANY DIRECT, INDIRECT, INCIDENTAL, SPECIAL, EXEMPLARY, OR CONSEQUENTIAL DAMAGES (INCLUDING, BUT NOT LIMITED TO, PROCEDURE OF SUBSTITUTE GOODSOR SERVICES;LOSS OF USE, DATA, OR PROFITS; OR BUSINESS INTERRUPTION) HOWEVER CAUSED AND ON ANY THEORY OF LIABILITY, WHETHER IN CONTRACT, STRICT LIABILITY, OR TORT (INCLUDING NEGLIGENCE OR OTHERWISE)ARISING IN ANY WAY OUT OF THE USE OF THIS SOFTWARE, EVEN IF ADVISED OF THE POSSIBILITY OF SUCH DAMAGE.
Exhibit-K
COPYRIGHT
Copyright 1992, 1993, 1994, 1997 Henry Spencer. All rights reserved.
This software is not subject to any license of the American Telephone and Telegraph Company or of the Regents of the University of California.
Permission is granted to anyone to use this software for any purpose on any computer system, and to alter it and redistribute it, subject to the following restrictions:
- The author is not responsible for the consequences of use of this software, no matter how awful, even if they arise from flaws in it.
- The origin of this software must not be misrepresented, either by explicit claim or by omission. Since few users ever read sources, credits must appear in the documentation.
- Altered versions must be plainly marked as such, and must not be misrepresented as being the original software. Since few users ever read sources, credits must appear in the documentation.
- This notice may not be removed or altered
Exhibit-L
The author of this software is David M. Gay.
Copyright (c) 1991, 2000, 2001 by Lucent Technologies.
Permission to use, copy, modify, and distribute this software for any purpose without fee is hereby granted, provided that this entire notice is included in all copies of any software which is or includes a copy or modification of this software and in all copies of the supporting documentation for such software.
THIS SOFTWARE IS BEING PROVIDED "AS IS", WITHOUT ANY EXPRESS OR IMPLIED WARRANTY. IN PARTICULAR, NEITHER THE AUTHOR NOR LUCENT MAKES ANY REPRESENTATION OR WARRANTY OF ANY KIND CONCERNING THE MERCHANTABILITY OF THIS SOFTWARE OR ITS FITNESS FOR ANY PARTICULAR PURPOSE.
License Information for the Software Used in the Unit
About GPL (GNU-General Public License), LGPL (GNU Lesser General Public License) License
This product uses GPL/LGPL software and software made by other companies.
After you purchase this product, you may procure, modify or distribute the source code of the GPL/ LGPL software that is used in the product.
Marantz provides the source code based on the GPL and LPGL licenses at the actual cost upon your request to our customer service center. However, note that we make no guarantees concerning the source code. Please also understand that we do not offer support for the contents of the source code.
unit: inches (mm)
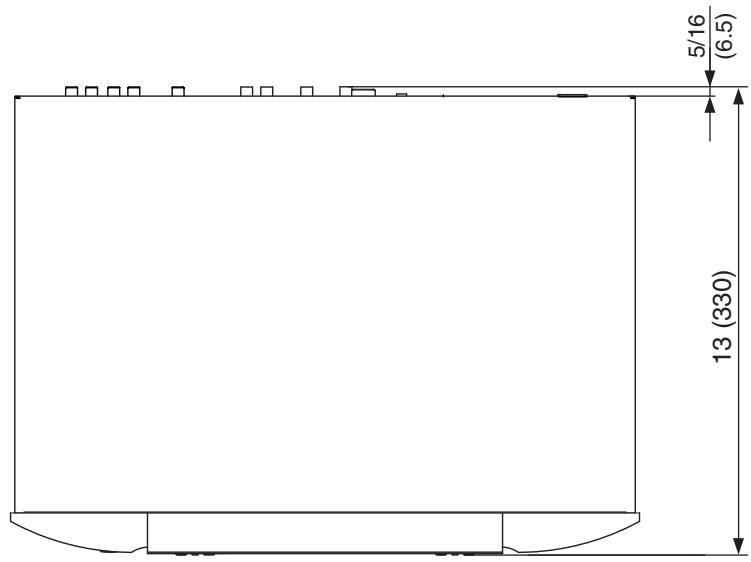
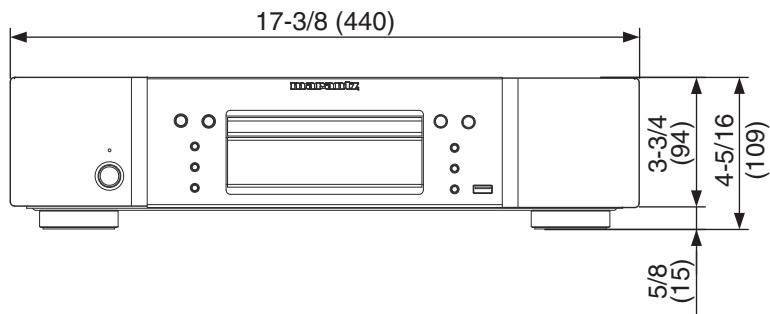
Weight : 10.5 lbs (4.8 kg)
www.marantz.com
You can find your nearest authorized distributor or dealer on our website.
marantz® is a registered trademark.