
NA7004SG - Media player MARANTZ - Free user manual and instructions
Find the device manual for free NA7004SG MARANTZ in PDF.


| Product Type | Network Audio Player |
| Brand | Marantz |
| Model | NA7004SG |
| Dimensions (W x H x D) | 440 x 107 x 353 mm |
| Weight | 8.5 kg |
| Power Supply | AC 230V, 50/60 Hz |
| Power Consumption | 45 W (standby: 0.3 W) |
| Supported Audio Formats | MP3, WMA, AAC, FLAC, WAV, AIFF |
| Network Connectivity | Ethernet (10/100), Wi-Fi (802.11b/g) |
| Streaming Services | Internet Radio, Pandora, Last.fm, Napster |
| AirPlay | Yes (via firmware update) |
| DLNA Certified | Yes (version 1.5) |
| Analog Audio Outputs | 2 x RCA (L/R) |
| Digital Audio Outputs | 1 x Optical, 1 x Coaxial |
| USB Input | 1 x USB-A (for storage devices) |
| Maintenance | Clean with soft dry cloth; avoid solvents; ensure ventilation |
| Safety | Do not expose to moisture; place on stable surface; unplug during storms |
| Spare Parts & Reparability | Contact authorized Marantz service center; no user-serviceable parts inside |
| General Information | Designed for high-quality network streaming; compatible with Marantz remote control |
Frequently Asked Questions - NA7004SG MARANTZ
User questions about NA7004SG MARANTZ
0 question about this device. Answer the ones you know or ask your own.
Ask a new question about this device
Download the instructions for your Media player in PDF format for free! Find your manual NA7004SG - MARANTZ and take your electronic device back in hand. On this page are published all the documents necessary for the use of your device. NA7004SG by MARANTZ.
USER MANUAL NA7004SG MARANTZ
natural_image
Pure electrical circuit lines without any symbolsESPAÑOLFRANÇAISENGLISH
marantz®
Network Audio Player NA7004
User Guide
ENGLISH
FRANÇAIS
ESPAÑOL
□ SAFETY PRECAUTIONS

CAUTION RISK OF ELECTRIC SHOCK DO NOT OPEN

CAUTION:
TO REDUCE THE RISK OF ELECTRIC SHOCK, DO NOT REMOVE COVER (OR BACK). NO USER-SERVICEABLE PARTS INSIDE. REFER SERVICING TO QUALIFIED SERVICE PERSONNEL.

The lightning II ash with arrowhead symbol, within an equilateral triangle, is intended to alert the user to the presence of uninsulated "dangerous voltage" within the product's enclosure that may be of sufficient magnitude to constitute a risk or electric shock to persons.

The exclamation point within an equilateral triangle is intended to alert the user to the presence of important operating and maintenance (servicing) instructions in the literature accompanying the appliance.
WARNING:
TO REDUCE THE RISK OF FIRE OR ELECTRIC SHOCK, DO NOT EXPOSE THIS APPLIANCE TO RAIN OR MOISTURE.
IMPORTANT SAFETY INSTRUCTIONS
- Read these instructions.
- Keep these instructions.
- Heed all warnings.
- Follow all instructions.
- Do not use this apparatus near water.
- Clean only with dry cloth.
-
Do not block any ventilation openings.
Install in accordance with the manufacturer's instructions. -
Do not install near any heat sources such as radiators, heat registers, stoves, or other apparatus (including amplifiers) that produce heat.
-
Do not defeat the safety purpose of the polarized or grounding-type plug. A polarized plug has two blades with one wider than the other. A grounding type plug has two blades and a third grounding prong. The wide blade or the third prong are provided for your safety. If the provided plug does not fit into your outlet, consult an electrician for replacement of the obsolete outlet.
-
Protect the power cord from being walked on or pinched particularly at plugs, convenience receptacles, and the point where they exit from the apparatus.
-
Only use attachments/accessories specified by the manufacturer.
-
Use only with the carl, stand, tripod, bracket, or table specified by the manufacturer, or sold with the apparatus. When a carl is used, use caution when moving the carl/ apparatus combination to avoid injury from tip-over.
-
Unplug this apparatus during lightning storms or when unused for long periods of time.
-
Refer all servicing to qualified service personnel. Servicing is required when the apparatus has been damaged in any way, such as power-supply cord or plug is damaged, liquid has been spilled or objects have fallen into the apparatus, the apparatus has been exposed to rain or moisture, does not operate normally, or has been dropped.
-
Batteries shall not be exposed to excessive heat such as sunshine, fire or the like.
CAUTION:
To completely disconnect this product from the mains, disconnect the plug from the wall socket outlet.
The mains plug is used to completely interrupt the power supply to the unit and must be within easy access by the user.
PRECAUTION:
FCC INFORMATION (For US customers)
1. COMPLIANCE INFORMATION
Product Name: Network Audio Player
Model Number: NA7004
This product complies with Part 15 of the FCC Rules. Operation is subject to the following two conditions: (1) this product may not cause harmful interference, and (2) this product must accept any interference received, including interference that may cause undesired operation.
Marantz America, Inc.
(a D & M Holdings Company)
100 Corporate Drive.
Mahwah, NJ, 07430, U.S.A.
Tel. (630) 741-0300
2. IMPORTANT NOTICE: DO NOT MODIFY THIS PRODUCT
This product, when installed as indicated in the instructions contained in this manual, meets FCC requirements. Modification not expressly approved by Marantz may void your authority, granted by the FCC, to use the product.
3. IMPORTANT
When connecting this product to network hub or router, use only shielded STP or SCTP LAN cables which is available at retailer.
Follow all installation instructions. Failure to follow instructions could void your authority, granted by the FCC, to use the product.
4. NOTE
This product has been tested and found to comply with the limits for a Class B digital device, pursuant to Part 15 of the FCC Rules. These limits are designed to provide reasonable protection against harmful interference in a residential installation.
This product generates, uses and can radiate radio frequency energy and, if not installed and used in accordance with the instructions, may cause harmful interference to radio communications. However, there is no guarantee that interference will not occur in a particular installation. If this product does cause harmful interference to radio or television reception, which can be determined by turning the product OFF and ON, the user is encouraged to try to correct the interference by one or more of the following measures:
• Recrient or relocate the receiving antenna.
- Increase the separation between the equipment and receiver.
- Connect the product into an outlet on a circuit different from that to which the receiver is connected.
- Consult the local retailer authorized to distribute this type of product or an experienced radio/TV technician for help.
For Canadian customers:
This Class B digital apparatus complies with Canadian ICES-003.
* For proper heat dispersal, do not install this unit in a confined space, such as a bookcase or similar enclosure.
- More than 0.1 m (4 in.) is recommended.
- Do not place any other equipment on this unit
Cautions on handling
About this guide....2
About the remote control....3
Inserting the batteries....3
Operating range of the remote control 3
Connections
Analog connections
Digital connection 4
Digital audio output 4
Digital audio input 5
PC connection 5
Connecting to a home network (LAN) 6
Required system....6
Connecting an iPod 6
iPod stand 7
Connecting a USB memory device 8
Connecting other equipment 8
Connecting the power cord 8
Basic operations
Preparations
Turning the power on 9
Turning the power off 9
Operations possible during playback....9
Input source switching 9
M-DAX (Marantz Dynamic Audio eXpander) 9
Switching the display's brightness 10
Listening with headphones 10
Setting the digital output 10
iPod® playback 1
Before playing a USB or an iPod 11
Playing an iPod....11
Playing repeatedly (Repeat playback) 11
Playing random order (Random playback) 12
Disconnecting the iPod 12
USB memory device playback 12
Playing files stored on USB memory devices 12
Network audio playback 13
Listening to internet radio 13
Playing fi les stored on a music server 14
Listening to Napster 14
Listening to Pandora 15
Listening to Rhapsody 17
Using as a D/A converter 19
Connect and playback from a digital device (Opt/Coax) 19
Connecting and playing back from a computer (USB) 19
Favorite function 20
Registering Internet radio stations and music servers
in Favorite List 20
Calling Internet radio stations or files registered
in Favorite List 20
Deleting Internet radio stations or files registered
in Favorite List 20
Advanced operations
Menu map 21
The wireless receiver connection 22
Remote control jacks connection 22
Remote control connection 22
Setting the remote control 22
Setting the network [Network] 23
Network connecting 23
Network connecting (DHCP=Off) 23
Proxy Settings....24
Network Standby 24
PC Language....24
Friendly Name Edit 24
Setting the others [Other]
Auto standby 25
Screen saver 25
Firmware update....25
Other functions 26
Inputting characters 26
Web control function 27
Last function memory 27
Resetting the microprocessor 27
Information
Part names and functions
Front panel 28
Rear panel 29
Remote control 29
iPod ^® 30
USB memory 30
Important information 30
Network audio....31
Important information 31
Explanation terms
Troubleshooting
Specifications
Index
36
Getting started
Thank you for purchasing this Marantz product. To ensure proper operation, please read this user guide carefully before using the product.
After reading the guide, be sure to keep it for future reference.
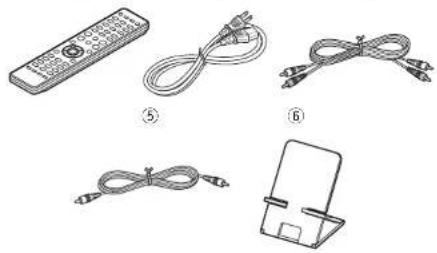
Accessories
Check that the following parts are supplied with the product.
① Remote control
② R03/AAA batteries 2
③ AC power cord (Cord length: Approx. 4.9 ft / 1.5 ml)....1
④ Audio connecting cable (Cord length: Approx. 3.3 ft / 1.0 ml) ... 1
⑤ Remote control connecting cable....1
⑥ iPod stand....1
⑦ User guide....1
⑧ Warranty card (U.S.A.) 1
⑨ Warranty card (Canada) 1
① ③ ④
natural_image
Illustration of four different cable types: remote control, coiled cable, connected plug-in connector, and battery pack (no text or symbols)Main features
Low-noise low-distortion fi Iter circuit and high-speed HDAMSA2-type output amplifi er with the differential input type HDAM.
Incorporates a Cirrus Logic advanced D/A converter CS4398.
Can be used as a D/A converter via digital input (USB/COAXIAL/OPTICAL).
High grade headphone circuit.
DLNA ver. 1.5 supported for Audio Network.
Internet radio by vTuner.
USB input "Made for iPod" and "Made for iPhone".
M-XPort for Bluetooth wireless connection (with Optional RX101).
3Lines OELD (Organic Electroluminescence Display).
Double-layered chassis.
Cautions on handling
• Before turning the power switch on
Check once again that all connections are correct and that there are no problems with the connection cables.
- Power is supplied to some of the circuitry even when the unit is set to the standby mode. When going on vacation or leaving home for long periods of time, be sure to unplug the power cord from the power outlet.
- About condensation
If there is a major difference in temperature between the inside of the unit and its surroundings, condensation may form on parts inside the unit, causing it to fail to operate properly.
If this happens, let the unit sit for an hour or two with the power turned off and wait until there is little difference in temperature before using the unit.
• Cautions on using mobile phones
Using a mobile phone near this unit may result in noise. If that occurs, move the mobile phone away from the unit when it is in use. - Moving the unit
Turn off the power and unplug the power cord from the power outlet. Next, disconnect the cables connected to other system units before moving the unit.
About this guide
Operation buttons
The operations described in this guide are based mainly on remote control operation.
Symbols
This symbol indicates a reference page on which related information is described.
This symbol indicates a supplementary information and tips for operations.
NOTE This symbol indicates points to remember operations or function limitations.
Illustrations
Note that the illustrations in these instructions may differ from the actual unit for explanation purposes.
ENGLISH
About the remote control
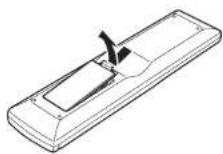
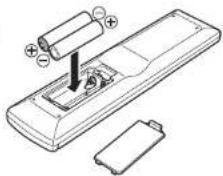
Inserting the batteries
① Remove the rear cover of the ② Set two R03/AAA batteries in remote control. The battery compartment in the indicated direction.
natural_image
Line drawing of a remote control with battery and battery stack (no text or symbols)③ Put the rear cover back on.
NOTE
- Insert the specified batteries in the remote control unit.
- Replace the batteries with new ones if the set does not operate even when the remote control unit is operated close to the unit. (The supplied batteries are only for verifying operation.)
- When inserting the batteries, be sure to do so in the proper direction, following the and marks in the battery compartment.
- To prevent damage or leakage of battery fluid:
- Do not use a new battery together with an old one,
- Do not use two different types of batteries.
- Do not attempt to charge dry batteries.
- Do not short-circuit, disassemble, heat or dispose of batteries in flames.
- Do not keep the battery in a place exposed to direct sunlight or in places with extremely high temperatures, such as near a heater.
- If the battery fluid should leak, carefully wipe the fluid off the inside of the battery compartment and insert new batteries.
- Remove the batteries from the remote control unit if it will not be in use for long periods.
- Used batteries should be disposed of in accordance with the local regulations regarding battery disposal.
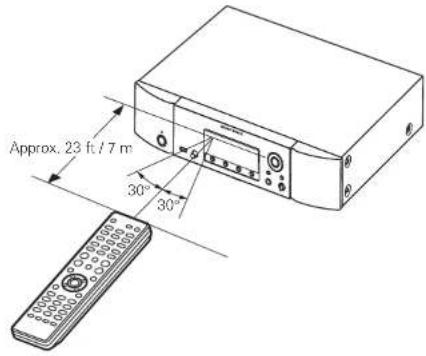
Operating range of the remote control
Operate the remote control while pointing it at the remote sensor.
NOTE
The set may function improperly or the remote control may not operate if the remote control sensor is exposed in direct sunlight or strong artificial light such as a fluorescent or infrared light.
Connections
This section explains how to connect speakers, recording equipment, antennas and network. For other connections, see the sections below.
☐ The wireless receiver connection (page 22)
NOTE
- Do not plug in the power cord until all connections have been completed.
- When making connections, also refer to the user guide of the other components.
- Be sure to connect the left and right channels properly (left with left, right with right).
- Do not bundle power supply cords together with connection cables. Doing so can result in humming or noise.
- Do not connect the unit to the PHONO input connectors on the amplifier.
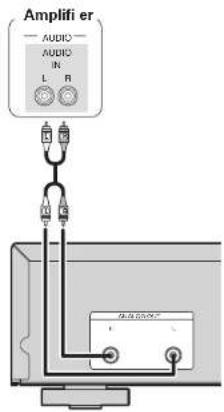
Analog connections
Cables used for connections

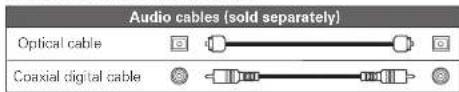
Digital connection
When connecting, use a commercially available optical digital cable or coaxial digital cable.
Cables used for connections
Digital audio output
You can enjoy digital recording when the player is connected to a CD recorder or other digital recording component.
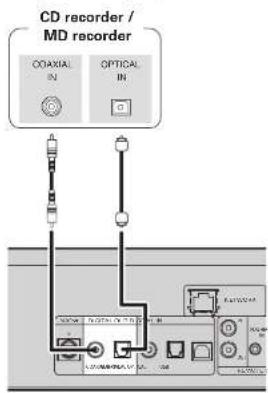
NOTE
Signals on the M-XPort cannot be output in digital output. Signals that can be output using digital output are digital audio signals from USB, iPod, internet radio, music server, online music, PC, COAXIAL, and OPTICAL.
ENGLISH
Digital connection
When connecting the optical digital output connector with an optical transmission cable (sold separately)
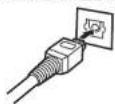
Match the shapes then insert firmly.
Digital audio input
If a device equipped with CD transport or digital audio output is connected to this unit, this unit can be used as a D/A converter. ("Using as a D/A converter" (page 19))
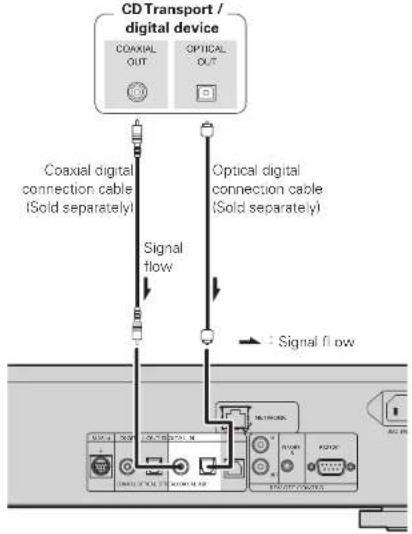
flowchart
graph TD
    A["CD Transport / digital device"] --> B["Coaxial digital connection cable (Sold separately)"]
    A --> C["Optical digital connection cable (Sold separately)"]
    B --> D["Signal flow"]
    C --> E["Signal flow"]
    D --> F["DC/DC-100"]
    E --> G["DC/DC-200"]
    F --> H["AC/AC-100"]
    G --> I["AC/AC-200"]
NOTE
- Linear PCM signals with a sampling frequency of 32kHz, 44.1kHz, 48kHz, 64kHz, 88.2kHz, 96kHz, 176.4kHz, or 192kHz can be input into this device.
- Do not input signals other than linear PCM signals, such as Do by digital, DTS, AAC etc. into this device. Doing so may cause noise, which may cause damage to the speakers.
PCconnection
By connecting a computer to the USB port on the rear panel of this unit using a commercially available USB connecting cable, this unit can be used as a D/A converter. ("Using as a D/A converter" (12 page 19)
Cables used for connections

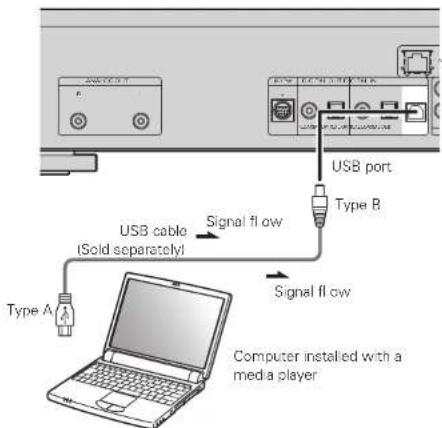
Plug that fi is the shape of the connection device connector
Connecting to a home network (LAN)
- This unit lets you play via your home network (LAN) music files stored on a computer and music content such as that from Internet radio.
You can also operate this unit from a computer using the Web control function. - You can update by downloading the latest firmware from the Marantz website.
- See "Setting the network [Network]" (page 23) on the menu for more information on network setting.
Cables used for connections
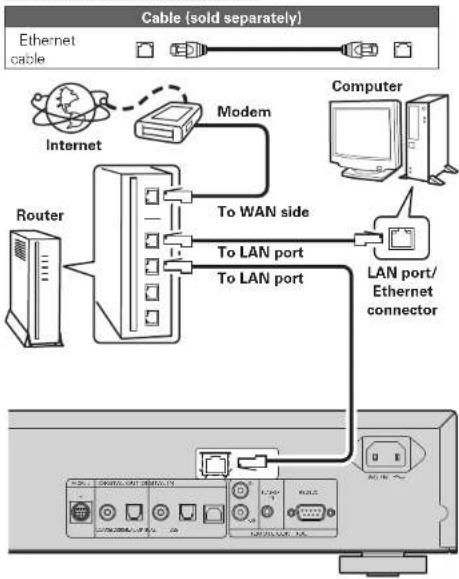
flowchart
graph TD
    A["Ethernet cable"] --> B["Modem"]
    B --> C["Internet"]
    C --> D["Router"]
    D --> E["To WAN side"]
    E --> F["To LAN port"]
    F --> G["To LAN port"]
    G --> H["LAN port/ Ethernet connector"]
    H --> I["Computer"]
For connections to the Internet, contact an ISP (Internet Service Provider) or a computer shop.
Required system
□ Broadband internet connection
□ Modem
Device that connects to the broadband circuit and conducts communications on the Internet.
A type that is integrated with a router is also available.
Router
When using this unit, we recommend you use a router equipped with the following functions:
• Built-in DHCP server
This function automatically assigns IP addresses on the LAN.
• Built-in 100BASE-TX switch
When connecting multiple devices, we recommend a switching hub with a speed of 100 Mbps or greater.
☐ Ethernet cable (CAT-5 or greater recommended)
- Use only shielded STP or ScTP LAN cable which is available at retailer.
- Some flat at type Ethernet cables are easily affected by noise.
We recommend using a normal type cable.

- If you have an Internet provider contract for a line on which network settings are made manually, make the settings at "Network connecting IDHCP=Off!" (page 23).
- With this unit, it is possible to use the DHCP and Auto IP functions to make the network settings automatically.
- When using this unit with the broadband router's DHCP function enabled, this unit automatically performs the IP address setting and other settings.
When using this unit connected to a network with no DHCP function, make the settings for the IP address, etc., at "Network connecting (DHCP=Off)" (12 page 23). - When setting manually, check the setting contents with the network administrator.
NOTE
• A contract with an ISP is required to connect to the Internet.
No additional contract is needed if you already have a broadband connection to the Internet.
- The types of routers that can be used depend on the ISP. Contact an ISP or a computer shop for details.
- Marantz assumes no responsibility whatsoever for any communication errors or troubles resulting from customer's network environment or connected devices.
- This unit is not compatible with PPPoE. A PPPoE-compatible router is required if you have a contract for a type of line set by PPPoE.
- Do not connect an ETHERNET connector directly to the LAN port/Ethernet connector on your computer.
Connectingan iPod
Cables used for connections
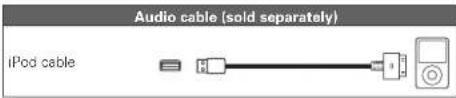
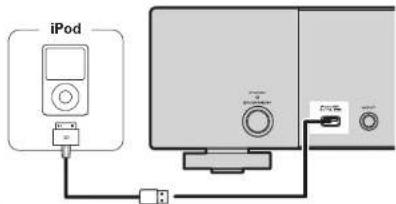

To connect an iPod to this unit, use the iPod cable supplied with the iPod.
□ Supported iPod models
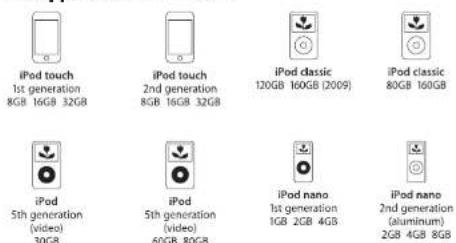
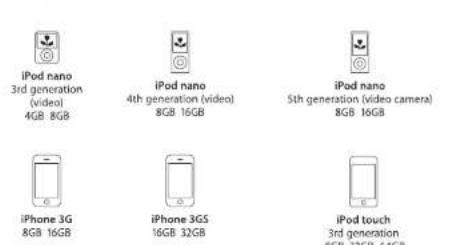
ENGLISH
iPodstand
You can set your iPod or iPhone on the supplied iPod stand.
Setting up the iPod stand
Use the procedure below to set up the iPod stand.
①
②
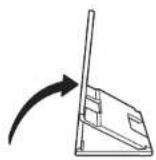
③
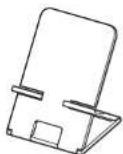
Setting your iPod on the iPod stand
1 Pass the iPod cable through the opening on the iPod stand.
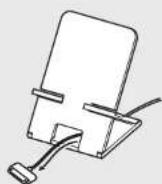
2 Connect the iPod to the iPod cable.
3 Set your iPod on the iPod stand.
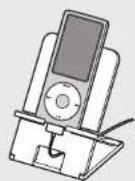
NOTE
- Make sure to place the iPod stand on a flat surface.
- Do not operate the iPod or iPhone while it is set on the iPod stand. Doing so could cause the iPod or iPhone to fall off from the stand.
- Some iPod models cannot be set on the iPod stand because the underside of the iPod is blocked when the iPod cable is connected.
- Make sure to disable the iPhone vibration function before you set it on the iPod stand. If the iPhone vibrates when it is set on the stand, it could fall off from the stand and be damaged.
- Do not use the iPod stand for purposes other than the one it is intended to perform.
- Marantz will accept no responsibility whatsoever for any damage of equipment connected to this unit while it is used.
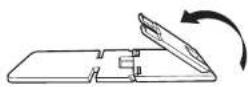
☐ If the iPod stand becomes detached
Assemble as shown below
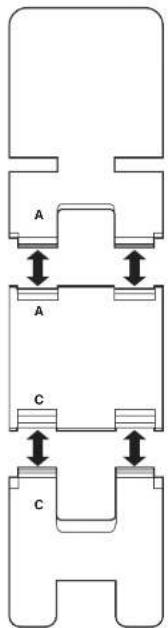
ENGLISH
Connecting a USB memory device
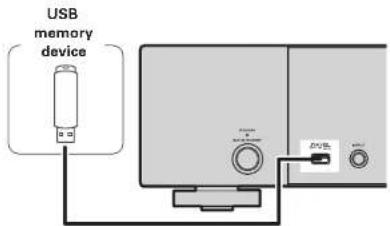
NOTE
- A computer can not be connected to and operate the unit via its USB port.
- Do not use an extension cable when connecting a USB memory device.
- For details about USB memory devices, see "USB memory" (K5 page 30).
Connectingotherequipment
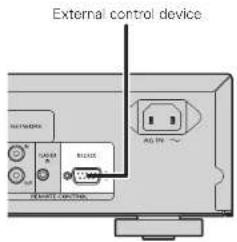
RS-232C
Connect an external control device or other device for servicing. (Use a straight cable for the connection.)
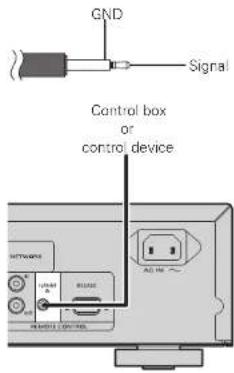
FLASHER IN
This unit can be controlled by connecting a control box or other control device to this unit.
Connecting the power cord
Do not plug in the power cord until all connections have been completed.
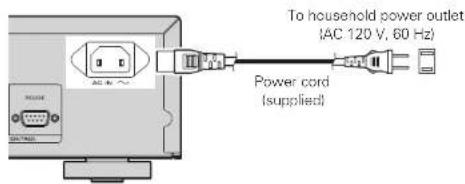
NOTE
- Insert the plugs securely. Loose connections will result in the generation of noise.
- Do not unplug the power cord while the unit is operating.
- Do not use a power cord other than the cord supplied with this unit.
ENGLISH
Basic operations

Symbols used to indicate buttons in this guide
| Button located on both the main unit and the remote control | |
| → BUTTON | |
| Button only on the main unit | → <BUTTON> |
| Button only on the remote control | → [BUTTON] |
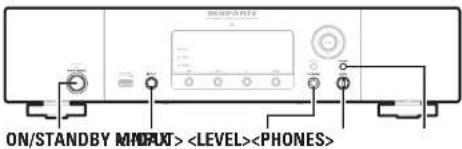
![[DIMMER] ON/STANDBY [Input source select] M-DAX [DIG.OUT]](/content/2026/05/1027350/images/33f9d0aabfa2ff885bde326ef44b6b2528eb897dd5d2309b1555aa30492ef111.jpg)
This section provides information on basic operations such as settings and playback procedures. For other operations, see the sections below.
Setting the others [Other] (page 25)
Preparations
Turning the power on
Press ON/STANDBY.
Power is turned on and the power indicator goes off.
NOTE
- Power continues to be supplied to some of the circuitry even when the power is in the standby mode. When leaving home for long periods of time, either press ON/STANDBY to turn off the power, or unplug the power cord from the power outlet.
- Be sure to stop playback before turning the power off.
□ Completely turning off the power
Unplug the power cord from the wall outlet
- The settings made for the various functions may be cleared if the power cord is left unplugged from a power outlet for an extended period of time.
Turning the power off
Press ON/STANDBY.
power is set to standby and the power indicator lights.
NOTE
- Be sure to stop playback before turning the power off.
Operations possible during playback
Inputsourceswitching
Turn to select the input source.

Internet Radio

Rhapsody

Digital In OPT

Music Server

iPod/USB

Digital In COAX

Vapster

M-XPort *1

Menu

Pandora

Digital In USB

Favorite
*1 "M-XPort" appears only when an RX101 wireless receiver is connected to M-XPort.
Press [Input source select] ([INTERNET RADIO], [MUSIC SERVER], [ONLINE MUSIC], [iPod/USB], [M-XPort], [USB], [OPT/COAX] or [FAVORITE]).
M-DAX
(Marantz Dynamic Audio eXpander)
This function makes up for lost audio content in MP3 or AAC sources (from lossy compression) during playback. Choose one of the following levels for this effect as desired.
"High": Stronger effect
"Mid": Medium effect
"Low": Weaker effect
"Off": Deactivated
ENGLISH
[Using the remote controller]
Press the M-DAX button.
Each time this button is pressed, M-DAX changes as follows.
![MARANTZ NA7004SG - [Using the remote controller] - 1](/content/2026/05/1027350/images/eed997ad437b1f1513f0b2a7608f8c5f6a8436ef8f1b8fc3fffb49be2a7bf5df.jpg)
The "M-DAX" indicator on the front display lights when M-DAX mode is Low, Mid or High. (12 page 28)
NOTE
M-DAX is compatible with PCM (48 kHz or lower), MP3, WMA, AAC and two-channel analog sources.
Switching the display's brightness
Press [DIMMER].

- The display's brightness switches each time the button is pressed.

- If you operate the buttons when the display's brightness is set to "Off", the display temporarily lights at 25% brightness level.
- The "DISPLAY OFF" indicator on the front display lights when Dimmer is set to "Off".
Listening with headphones
Plug the headphones into the headphone jack (PHONES).
Adjusting the Volume
Turn
NOTE
To prevent hearing loss, do not raise the volume level excessively when using headphones.
Setting the digital output
Set to output from the rear panel DIGITAL OUT terminal (COAXIAL, OPTICAL).
During stop mode, press [DIG. OUT].
Each time [DIG.OUT] is pressed, output from the DIGITAL OUT terminal ICOAXIAL, OPTICAL on the rear panel is switched between "On" and "Off".
[Selectable items]
On : Outputs the digital signal.
Off : Digital signal is not output
![MARANTZ NA7004SG - [Selectable items] - 1](/content/2026/05/1027350/images/f88e0bb5b1f5b94e4a4c21955cfc6b34346057224dd7eafd34e61221d43086a1.jpg)
- When digital output is turned off, the "DIG.OUT OFF" indicator lights.
- When digital output is turned off, you can enjoy high quality audio output from the ANALOG OUT terminal.
- The "digital output off" has a memory retention function where the settings remain stored and unchanged even when the power is turned off.
ENGLISH

Symbols used to indicate buttons in this guide
Button located on both the main unit and the remote control
→ BUTTON
Button only on the main unit →
Button only on the remote control → [BUTTON]

iPod® playback
With this unit, you can listen to music on an iPod. It is also possible to operate the iPod from the main unit or remote control.
For the supported iPod models, see "Connecting an iPod" (page 6).
iPod(page 30)
NOTE
- iPod nano 1G and iPod video do not have Direct mode support.
- Marantz will accept no responsibility whatsoever for any loss of iPod data.
- Depending on the type of iPod and the software version, some functions may not operate.
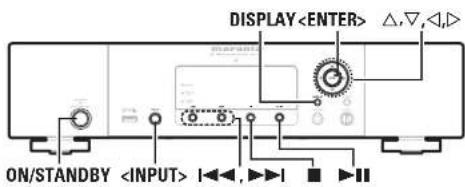
![[iPod/USB] [←, ►] [←, ►] [ENTER/MEMO] [SEARCH] [RANDOM] ON/STANDBY ►II [MODE] △,▽,◄,► [HOME] DISPLAY [REPEAT]](/content/2026/05/1027350/images/3c9e870383bef8f2fa40591121ab99136a84faa89d68b143d0cf352a8e30e70a.jpg)
Before playing a USB or an iPod
1 Press ON/STANDBY.
2 Connect USB memory device or iPod connection cable, then turn or press [iPod/USB].
NOTE
This function is activated around 1 or 2 minutes after the power is turned on.
Playing an iPod
1 Press [MODE] to select the display mode. The mode switches each time the button is pressed.
- There are two modes for displaying the contents recorded on the iPod.
Remote mode Display iPod information on the display of this unit.
Direct mode Display iPod information on the iPod screen.
- "Direct iPod" is displayed on the display of this unit.
| [Selectable mode] | Remote mode | Direct mode | |
| Display location Main unit display | |||
| Playable files | Audio file | √ | √ |
| Video file | √ | ||
| Active buttons | Remote control and main unit | √ | √ |
| iPod® | √ | ||
![MARANTZ NA7004SG - Press [MODE] to select the display mode. The mode switches each time the button is pressed. - 1](/content/2026/05/1027350/images/0358bbc5fb2094d13bd4eedda3a43464e867d7e8b4880aaa1c97c624f207477e.jpg)
The default display mode setting is "Direct mode".
2 Use △▽ to select the item, then press [ENTER/MEMO] or to select the music file to be played.
3 Press ▶II. Playback starts.
☐ Remote control and iPod button relations
| Remote control buttons | iPod buttons | Operation on this unit |
| ▶▶▶ | ▶▶▶ | Play the track / Pause the track. |
| ▶◀◀, ▶▶▶▶▶ | ▶◀◀, ▶▶▶▶▶ | Play the track from the beginning/Play the next track. |
| ◀◀◀, ▶▶▶▶Press and hold | ▶◀◀, ▶▶▶▶▶▶▶▶▶▶▶▶▶▶▶▶▶▶▶▶▶▶▶▶▶▶▶▶▶▶▶▶▶▶▶▶▶▶▶▶▶▶▶▶▶▶▶▶▶▶▶▶▶▶▶▶▶▶▶▶▶▶▶▶▶▶▶▶▶▶▶▶▶▶▶▶▶▶▶▶▶▶▶▶▶▶▶▶▶▶▶▶▶▶▶▶▶▶▶▶▶> | Fast-reverse the track/Fast-forward the track. |
| △, ▽ | Click Wheel | Select an item. |
| ENTER/MEMO or ▶ | Select | Enter the selection or plays the track. |
| MODE | - | Switch between the Direct mode and the Remote mode. |
| REPEAT | - | Switch the repeat function. |
| RANDOM | - | Switch the shuffle function. |
| ◀ | MENU | Display the menu or return to the previous menu. |
| ■ | - | Stop the track. |
| HOME | - | Return to top menu (Remote mode only) |
Playing repeatedly (Repeat playback)
Press [REPEAT].
Playback in the respective repeat mode starts.
![MARANTZ NA7004SG - Press [REPEAT]. - 1](/content/2026/05/1027350/images/a662a5832751b52de55b91136ef2e8c64da97f211198d489fc64874e0ef741f3.jpg)
flowchart
graph LR
    A["Single-track repeat"] --> B["All-track repeat"]
    B --> C["Repeat off (indicator turns off)"]
    C --> A
[Selectable items]
![MARANTZ NA7004SG - [Selectable items] - 1](/content/2026/05/1027350/images/c8089ce32f58009081269251d000372e6add5cd426fd1ea1f548b203a88ed882.jpg)
1 (Single-track repeat)
Only 1 track plays repeatedly.
![MARANTZ NA7004SG - [Selectable items] - 2](/content/2026/05/1027350/images/f10fe2c60e4c26cac1c7fbc1b40f5bc7527cfdc10f0cd3cae595701a8b46ad27.jpg)
ALL (All-track repeat)
All tracks play repeatedly.
Repeat off (indicator turns off)
Normal playback resumes.
iPod® playback
Playing random order (Random playback)
1 In the stop mode, press [RANDOM]. The "×" is displayed.
2 Press ▶II. The tracks start playing in random order.

If [REPEAT] is pressed during random playback, after the current session of random playback is fi nished, another session in a different order of tracks starts. (Direct mode only)
□ Canceling random playback
While stopped, press [RANDOM].
The "×" turns off.
☐ To switch the display
During playback, press DISPLAY.
The display switches each time the button is pressed.
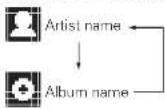
Disconnecting the iPod
1 Press ON/STANDBY to set the standby mode.
2 Disconnect the iPod cable from the USB port.
USB memory device playback
Playing back music or files recorded on a USB memory device.
□ USB memory (page 30)
Playing fi les stored on USB memory devices
1 Playback preparation ( page 11 "Before playing a USB or an iPod").
2 Use △▽ to select the search item or folder, then press [ENTER/MEMO],
3 Use △▽ to select the file, then press [ENTER/MEMO],

- If the USB memory device is divided into multiple partitions, only the top partition can be selected.
- This unit is compatible with MP3 files conforming to "MPEG-1 Audio Layer-3" standards.
NOTE
- Note that Marantz will accept no responsibility whatsoever for any problems arising with the data on a USB memory device when using this unit in conjunction with the USB memory device.
• USB memory devices will not work via a USB hub. - Marantz does not guarantee that all USB memory devices will operate or be supplied power. When using a USB portable hard disk that can draw power from an AC adapter, we recommend using the AC adapter.
- It is not possible to connect and use a computer via the USB port (Type AI of this unit using a USB cable.
USB operation
| Operation buttons | Operation on this unit |
| ▶▶▶ | Play the track / Pause the track. |
| |◀◀, ▶▶▶| | Play the track from the beginning/Play the next track. |
| △, ▽ | Select an item. |
| ENTER/MEMO or ▷ | Enter the selection or plays the track. |
| REPEAT | Switch the repeat function |
| ◀ | Display the menu or return to the previous menu. |
| ■ | Stop the track. |
| SEARCH | Character search * |
| HOME | Return to top menu |
- Playing repeatedly (Repeat playback) [icon: page 11]
* Press [SEARCH], then press ◀ ▷ to select the first letter you want to search mode.
If the list is not in alphabetical order, you may not be able to perform a character search.
To switch the display
During playback, press DISPLAY.
ENGLISH

Symbols used to indicate buttons in this guide
Button located on both the main unit and the remote control
BUTTON
Button only on the main unit →
Button only on the remote control→[BUTTON]
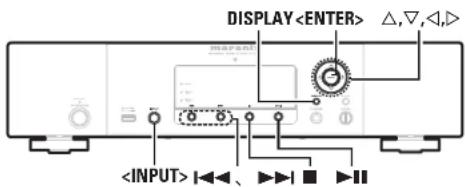
![[INTERNET RADIO] [MUSIC SERVER] [ONLINE MUSIC] [FAVORITE] [MENU] [ENTER/MEMO] [SEARCH] △, ▽, ◀, ▶ [HOME] DISPLAY](/content/2026/05/1027350/images/bbb2e65de771c0b2e0bda933d42fdd4f88c2233488261b97b3e6e31173afd052.jpg)
Networkaudioplayback
Follow this procedure to play Internet radio stations or music files stored on a computer.
☐ About the internet radio function (page 31)
Music server (page 31)
About Napster (page 31)
□ About Pandora (page 31)
☐ About Rhapsody (page 31)
Listeningtointernetradio

1 Prepare for playback.
① Check the network environment, then turn on this unit's power ( page 9 "Turning the power on").
② If settings are required, make the "Setting the network [Network]" (page 23).
2 Turn or press [INTERNET RADIO].
3 Use △▽ to select the item you want to play, then press [ENTER/MEMO],
4 Repeat step 3 until the station list is displayed. The station list is displayed.
5 Use △▽ to select the station, then press [ENTER/MEMO],
Playback starts once buffering reaches "100%".

- There are many Internet radio stations on the Internet, and the quality of the programs they broadcast as well as the bit rate of the tracks varies widely.
Generally, the higher the bit rate, the higher the sound quality, but depending on the communication lines and server traffic c, the music or audio signals being streamed may be interrupted. Inversely, lower bit rates mean a lower sound quality but less tendency for the sound to be interrupted. - "Server Full" or "Connection Down" is displayed if the station is busy or not broadcasting.
- On this unit, folder and file names can be displayed as titles. Any characters that cannot be displayed are replaced with “.” (period).
- When DISPLAY is pressed, the display can be switched between the file type / bitrate and radio station name.
□ Switching the display
1 Press DISPLAY during Internet radio reception.
2 The broadcast station information and signal format bit rate are displayed.
Recently played internet radio stations
Recently played internet radio stations can be selected from "Recently Played".
Up to 20 stations stored in "Recently Played".
1 Use △▽ to select “Recently Played”, then press [ENTER/MEMO],
2 Use △▽ to select the item you want to play, then press [ENTER/MEMO],
☐ Searching stations by keyword
(Alphabetic strings)
1 Use △▽ to select "Search by Keyword", then press
- For character input, see page 26.
2 Input the characters, then press [ENTER/MEMO] or
☐ Registering internet radio stations as your favorites
You can register your favorite broadcast stations in Favorite List. ( page 20)
□ Internet radio operation
| Operation buttons Function | |
| MENU Menu | |
| Cursor operation | |
| ENTER/MEMO Enter | |
| SEARCH | Character search * |
| HOME | Return to top page |
| ■ | Stop |
| FAVORITE | Register or call your favorite broadcast station in Favorite List, and delete the station from the list. |
* Press[SEARCH], then press ◀ ▷ to select the first letter you want to search mode.
If the list is not in alphabetical order, you may not be able to perform a character search.
Playing files stored on a music server
Use this procedure to play music files or playlists.
1 Prepare for playback.
① Check the network environment, then turn on this unit's power ( page 9 "Turning the power on").
② If settings are required, make the "Setting the network [Network]" (1 page 23).
③ Prepare the computer ( page 31 "Music server").
2 Turn or press [MUSIC SERVER].
3 Use △▽ to select the server including the file to be played, then press [ENTER/MEMO],
4 Use △▽ to select the search item or folder, then press [ENTER/MEMO],
5 Repeat step 4 until the file is displayed.
6 Use △▽ to select the file, then press [ENTER/MEMO],
![MARANTZ NA7004SG - Turn or press [MUSIC SERVER]. - 1](/content/2026/05/1027350/images/5fbecad5d343ebcf81aa313e5e06c36b809f018f2a41b11310bbfc4a42c09f0c.jpg)
- Connections to the required system and specific settings must be made in order to play music files (1 page 6).
- Before starting, you must launch the computer's server software and set the files as server contents. For details, see the operating instructions of your server software.
- The order in which the tracks/files are displayed depends on the server specifications. If the tracks/files are not displayed in alphabetical order due to the server specifications, searching by the first letter may not work properly.
- WMA Lossless files can be played when using a server supporting transcoding, such as Windows Media Player Ver. 11.
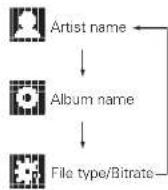
- Use DISPLAY to switch between displaying the artist name, file type/bitrate or album name.
□ Playing files that have been registered in your favorites
Files can be preset, registered in your favorites and played using the same operations as for Internet radio stations ( page 20).
NOTE
- When the operations described below is performed, the music server's database is updated and it may no longer be possible to play preset or favorite music files.
- When you quit the music server and then restart it.
- When music files are deleted or added on the music server.
- When using an ESCIENT server, place "ESCIENT" before the server name.
- You cannot perform the preset registration.
□ Music server operation
| Operation buttons Function | |
| MENU Menu | |
| Cursor operation /Auto search {cue, } | |
| ENTER/MEMO Enter | |
| SEARCH | Character search * |
| HOME | Return to top page |
| ▶II | Playback / Pause |
| I◀◀ ▶▶I | Auto search {cue} |
| ■ | Stop |
| FAVORITE | Register or call your favorite file in Favorite List, and delete file from the list. |
- Playing repeatedly (Repeat playback) (含 page 11)
- Playing random order (Random playback) ( page 12)
* Press[SEARCH], then press ◀ ▷ to select the first letter you want to search mode.
If the list is not in alphabetical order, you may not be able to perform a character search.
Listening to Napster
Napster is not available in all countries.
1 Prepare for playback.
① Check the network environment, then turn on this unit's power ( page 9 "Turning the power on").
② If settings are required, make the "Setting the network [Network]" (page 23).
2 Turn or press [ONLINE MUSIC] and select "Napster".
3 Use △▽▷ to input "Username" and "Password".
- For character input, see page 26.
4 After inputting the "Username" and "Password", select "login", then press [ENTER/MEMO] or.
If the "Username" and "Password" match, the top menu for Napster is displayed.
NOTE
• The password should be no longer than 99 characters.
- Press [HOME] to cancel the input.
□ Searching from Napster menu
1 Use △▽ to select search item or folder, then press [ENTER/MEMO],
2 Repeat step 1 until the track is displayed.
3 Use △▽ to select the track item, then press [ENTER/MEMO],
ENGLISH

Symbols used to indicate buttons in this guide
Button located on both the main unit and the remote control
BUTTON
Button only on the main unit →
Button only on the remote control→[BUTTON]
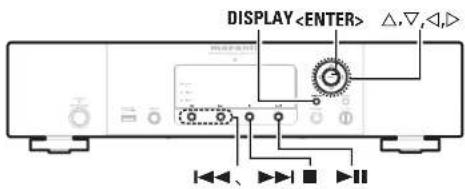
![[ONLINE MUSIC] [MENU] [ENTER/MEMO] [SEARCH] △,▽,◀,◀ [HOME] DISPLAY](/content/2026/05/1027350/images/4649b10d318e38ad6690cf04a423618057af0125b7d304973cc2098e71878e75.jpg)
Network audio playback
☐ Entering a character search for the track you want to listen to
1 Press [SEARCH].
- You can search by artist name, album name or track name in menu list.
- You cannot perform search on the playback screen.
2 Use △▽ to select the search item, then press [ENTER/MEMO], .
The search display appears.
• For character input, see page 26.
3 Input the characters, then press [ENTER/MEMO] or .
☐ Registering tracks in my Napster library
1 Press ▷ while the track you wish to register is playing. "Add to my library?" is displayed.
2 Press [ENTER/MEMO], or ▷. The track is entered in the Library. When you press ◀, the registration is cancelled and the display returns to the previous page.
Listening to tracks registered in my Napster library
1 Use △▽ to select "My Napster Library", then press [ENTER/MEMO], or ▷.
2 Use △▽ to select the information or track, then press [ENTER/MEMO], .
![MARANTZ NA7004SG - Use △▽ to select the information or track, then press [ENTER/MEMO], . - 1](/content/2026/05/1027350/images/2b9827c3b8c4bb14ac80401c73297eb9e7d8f69587a3f2b3c50f8245962d4dd9.jpg)
Use DISPLAY to switch between displaying the artist name, file type/bitrate or album name.
□ Napster operation
| Operation buttons Function | |
| MENU Menu | |
| Cursor operation /Auto search (cue, ) | |
| ENTER/MEMO Enter | |
| SEARCH Search menu | |
| HOME Return to top page | |
| ▶II | Playback |
| I◀◀ ▶▶▶I | Auto search (cue) |
| ■ | Stop |
- Playing repeatedly (Repeat playback) (page 11)
- Playing random order (Random playback) (1 page 12)
ListeningtoPandora

Pandora is not available in all countries.
1 Prepare for playback.
① Confirm that your unit is connected to your network then turn on this unit's power. (2) page 9 "Turning the power on".
② If settings are required, select "Setting the network [Network]". (12 page 23).
2 Press [ONLINE MUSIC], then select "Pandora".
- If you do not have a Pandora account, press to select "I am new to Pandora", then press [ENTER/MEMO],
The URL needed to activate Pandora and the activation code will be displayed.
Browse to the Pandora activation URL from your PC and follow the on-screen instructions for creating a new account.
3 If you have a Pandora account, press to select "I have a Pandora account", then press [ENTER/MEMO], or ▷.
4 Input "Email address" and "Password".
- For character input, see page 26.
ENGLISH
Network audio playback
5 After inputting the "Email address" and "Password", select "login", then press [ENTER/MEMO],
If the "Email address" and "Password" match, the top menu for Pandora is displayed.
NOTE
- Press [HOME] to cancel the input.
□ Creating a Personalized radio station
You can create up to 100 personalized radio stations.
1 Use △▽ to select "New Station", then press [ENTER/MEMO],
2 Input a "Track Name" or "Artist Name", then press [ENTER/MEMO],
• For character input, see page 26.
3 Use △▽ to select "Search by artist" or "Search by track", then press [ENTER/MEMO],
4 Use △▽, select a file (e.g. D&M2) from the list, and press [ENTER/MEMO],
□ Listening to a personalized radio station
Listening to a personalized radio station (e.g. D&M2 Radio)
By specifying your favorite track or artist name, Pandora will create a radio station that plays similar music to your favorite.
- Use [DISPLAY] to switch between displaying the artist name, album name, station name or file type/bitrate.
Listening to created radio stations at random
1 Use △▽ and select the radio station ("D&M2 Radio") that you want to listen to, and press [ENTER/MEMO],
In Pandora, you can search for the track name or artist name using "D&M2" as a keyword.
When the search is complete, tracks that have a similar rhythm or sound are streamed.
2 Use △▽ to select "Quick Mix", then press [ENTER/MEMO],
Created radio stations are selected at random, and tracks are streamed.
☐ Providing feedback on tracks within radio stations
You can provide feedback on track tracks by opening the Pandora menu screen while a track is playing.
Press ▷ while a track is playing.
The Pandora menu is displayed.
| I like this track | Press when you like the track that is being played.It will return to the Play Screen. And (Thumbs up icon is displayed. |
| I don't like this track | Press when you don't like the track that is being played.It will return to the Play Screen, (Thumbs down icon) is displayed and Pandora will skip to the next track. |
| Create station | Creates a Station for the Track or Artist being played. |
| Bookmark this track | Bookmarks the track currently being played.You can check view your bookmarks at Pandora.com.For details, see the Pandora FAQ at http://blog.pandora.com/facy. |
| Delete this station | Press when you want to delete the station that is being played. |
NOTE
- You can Skip up to 6 Tracks that are being played back within 1 hour.
- You can create up to 100 New Stations (radio stations).
Sign out
Disassociate this unit from your Pandora account.
1 While the Pandora top menu is displayed, press ◀.
2 When the popup menu appears, use △▽ to select "Yes".
□ Pandora operation
| Operation buttons | Function |
| MENU | System menu |
| Auto search (cue, ) | |
| ENTER/MEMO | Enter |
| HOME | Return to Pandora's root |
| ▶▶ | Play / Pause |
| ▶▶▶ | Auto search (cue) |
| ■ | Stop |
ENGLISH

Symbols used to indicate buttons in this guide
Button located on both the main unit and the remote control
BUTTON
Button only on the main unit →
Button only on the remote control→[BUTTON]
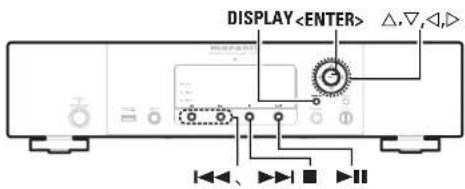
Rhapsody is not available in all countries.

Prepare for playback.
① Check the network environment, then turn on this unit's power page 9 "Turning the power on".
② If settings are required, make the "Setting the network [Network]" (page 23).

Press [ONLINE MUSIC], then select "Rhapsody".

Use to select "Sign in to your account", then press [ENTER/MEMO],

Input Username and Password.

r character input, see page 26.

After inputting the "Username" and "Password", select "OK", then press [ENTER/MEMO] or
NOTE
- The password should be no longer than 99 characters.
- Press [HOME] to cancel the input.
Select the search mode
① Search from Rhapsody latest information

Use △▽ to select “Rhapsody Music Guide”, then press [ENTER/MEMO],

Use to select the information for track selection, then press [ENTER/MEMO],

r character input, see page 26

Repeat step 2 until the track is displayed.

Use △▽ to select the track, then press [ENTER/MEMO],

Enter a character search for the track you want to listen to

Use △▽ to select "Search", then press [ENTER/MEMO],

Use △▽ to select the search item, then press [ENTER/MEMO],

u can search by artist name, album name, track name or keyword.

Enter the characters, then press [ENTER/MEMO] or

Search from the Rhapsody internet radio station

Use △▽ to select “Rhapsody Channels”, then press [ENTER/MEMO],

Repeat step 1 until the radio station is displayed.

Use △▽ to select radio station, then press [ENTER/MEMO],

Listening to tracks registered in my library

Use △▽ to select "My Library", then press [ENTER/MEMO],

Repeat step 1 until the track is displayed.

Use to select the information or track, then press [ENTER/MEMO],
| Operation buttons | Function |
| MENU | Menu |
| △▽◀▶ | Cursor operation / Auto search (cue, △▽) |
| ENTER | Enter |
| SEARCH | Character search* |
| HOME | Return to top page |
| ▶II | Playback / Pause |
| |◀◀▶▶| | Auto search (cue) |
| ■ | Stop |
ENGLISH
ENGLISH

Symbols used to indicate buttons in this guide
Button located on both the main unit and the remote control
→ BUTTON
Button only on the main unit →
Button only on the remote control→[BUTTON]
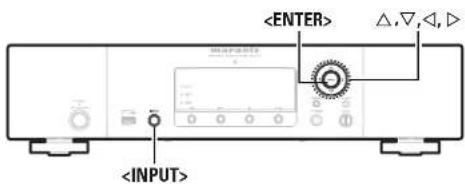
![[USB] [OPT/COAX] [FAVORITE] [ENTER/MEMO] △,▽,◀,▶](/content/2026/05/1027350/images/24f381f4df32b8f7a6ad73ae7b6c268c7844821c4a06f8a55a4baaa326a4acbe.jpg)
Using as a D/A converter
Digital audio signals input from an external device or computer into this unit can be converted and output as analog signals using this unit. (D/A converter)
Connect and playback from a digital device (Opt/Coax)
Press [OPT/COAX] or turn to change the input source to "Digital In OPT" or "Digital In COAX".
- If the sampling frequency cannot be detected, "Signal Unlock" is displayed.
NOTE
- Linear PCM signals with sampling frequencies of 32 kHz, 44.1 kHz, 48 kHz, 64 kHz, 88.2 kHz, 96 kHz, 176.4 kHz and 192 kHz can be input in the unit.
- Do not input non-PCM signals, such as Doloy Digital, and DTS. This causes noise and could damage the speakers.
- If the sampling frequency switches, such as from A mode to B mode in a CS broadcast, muting may operate for 1-2 seconds, cutting the sound.
Connecting and playing back from a computer (USB)
Connect a computer to the USB port on the rear panel of this unit in advance. For details on how to connect the computer, see "PC connection" (page 5).
Press [USB] or turn to change the input source to "Digital In USB".
When "Digital In USB" is displayed on this unit, wait for approximately 10 seconds, and then start and operate the music playback software on the computer.
This unit functions as a D/A converter.
NOTE
- Perform operations such as playback and pause on the computer. At this time, you cannot operate the computer with the unit's keys or remote control.
- You can also control the volume and equalizer on the computer. Enjoy playing music at the desired volume.
- When this unit is functioning as a D/A converter, sound is not output from the computer's speakers.
- If the computer is disconnected from this unit while the computer music playback software is running, the playback software may freeze Always exit the playback software before disconnecting the computer.
- If an error occurs on the computer, restart the computer while it is still connected to the USB port of this unit.
• The supported sampling frequencies are 32/44.1/48/96 kHz. - The sampling frequency of the music playback software and sampling frequency displayed on this unit may differ.

Computer (recommended system)
OS
- Windows® XP Service Pack2 or more, Windows Vista or Windows 7
• Macintosh OSX 10.6.3
Software
• Server software supporting Windows Media Player and iTunes.
USB
• USB 2.0: USB Full speed/USB Audio Class1

Favoritefunction
This section provides information on the Favorite function.
- The Favorite function allows you to register your favorite broadcast stations and fi les in Favorite List in advance so that you can call and listen to the stations or fi les right away, whenever you want.
- The contents that you can register and call are Internet radio station and music server.
- You can register up to 50 items in Favorite List.
- When you attempt to register the 51st station in Favorite List, the last station (station that is accessed least frequently) is automatically deleted.
- When you select a station from Favorite List, the top of the list is displayed.
Registering Internet radio stations and music servers in Favorite List
1 Press [FAVORITE] while the Internet radio station or file to register is played back.
"Favorite" menu appears.
2 Use △▽ to select "Add to Favorite", then press [ENTER/MEMO],
Calling Internet radio stations or files registered in Favorite List
1 Press [FAVORITE]. "Favorite" menu appears.
2 Use △▽ to select "Call Favorite", then press [ENTER/MEMO],
3 Use △▽ to select Favorite List, then press [ENTER/MEMO],
Deleting Internet radio stations or files registered in Favorite List
1 Press [FAVORITE]. "Favorite" menu appears.
2 Use △▽ to select "Delete Favorite", then press [ENTER/MEMO],
3 Use △▽ to select Favorite List, then press [ENTER/MEMO],
4 When the prompt "Delete?" appears, press [ENTER/MEMO] or
ENGLISH
ENGLISH
Advanced operations

Symbols used to indicate buttons in this guide
| Button located on both the main unit and the remote control | |
| → BUTTON | |
| Button only on the main unit | → <BUTTON> |
| Button only on the remote control | → [BUTTON] |
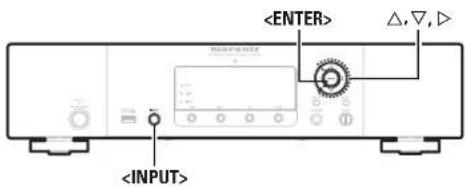
![[MENU] [ENTER/MEMO] △,▽,▷](/content/2026/05/1027350/images/28cb940ced7d0da45bf3c29954df890747b9755d7f202fe0ee70c387b970ae60.jpg)
Menumap
| Setting items Detailed items Description Page | ||||
| Network[Network] 1/7ConnectingNapster Account | Connecting | Performs the wired connection settings. 23 | ||
| DHCP Performs the DHCP setting. 23 | ||||
| IP Address Performs the IP address setting. 23 | ||||
| Subnet Mask Performs the subnet mask setting. 23 | ||||
| Gateway Performs the gateway setting. 23 | ||||
| Primary DNS Performs the primary DNS setting. 23 | ||||
| Secondary DNS Performs the secondary DNS setting. 23 | ||||
| Proxy | Performs the proxy setting. | 24 | ||
| Connection | Performs the connection test. | 23 | ||
| Napster Account | Performs the Napster account setting again. | 14 | ||
| Pandora Account | Performs the Pandora account setting again. | 15 | ||
| Rhapsody Account | Performs the Rhapsody account setting again. | 17 | ||
| Other | Network Standby | Performs other network settings. | 24 | |
| PC Language | Sets the network function on during standby. | 24 | ||
| Friendly Name Edit | Selects the language to be used for displaying the internet sites. | 24 | ||
| Edits a name displayed on the Internet. | 24 | |||
| Network Info. | Displays various setting values of the network. | - | ||
| Other[Other] 1/5Auto StandbyScreen Saver | Auto Standby | Sets the Auto Standby mode to automatically enter standby when no operation is performed. | 25 | |
| Screen Saver | Activates the screen saver. | 25 | ||
| IR Setting | Disables reception on the remote control. | 22 | ||
| Firmware Update | Starts the firmware update. | 25 | ||
ENGLISH
The wireless receiver connection
By connecting a wireless receiver RX101 (sold separately) to this unit, you can receive and playback audio signals from other devices using the Bluetooth Communication Function.
- Use a Bluetooth device that is A2DP compatible.
- You can also use wireless receiver RX101 as an external IR receiver.
- For instructions on the wireless receiver settings, refer to the RX101's operating instructions.
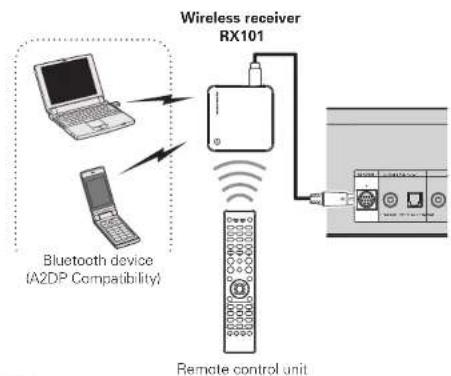
flowchart
graph TD
    A["Bluetooth device (A2DP Compatibility)"] --> B["Remote control unit"]
    C["Wireless receiver RX101"] --> B
    B --> D["Mobile Device"]
    style A fill:#f9f,stroke:#333
    style C fill:#f9f,stroke:#333
    style B fill:#ccf,stroke:#333
    style D fill:#cfc,stroke:#333

When you connect RX101 to M-XPort on this unit, the function switches to M-XPort.
Remote control jacks connection
When you use this unit connected to a Marantz amplifier, this unit receives operation signals sent from the amplifier and operates accordingly.
Connection
Use the supplied remote connection cable to connect the REMOTE CONTROL IN terminal of this unit to REMOTE CONTROL OUT terminal of the amplifier.
Setting
To use this function, set the "IR Setting" to "Disable" (page 22 "Remote control connection")
- This setting will disable remote sensor reception of this unit.
- To operate the unit, point the remote control at the remote sensor of the amplifier.
- This setting will disable remote sensor reception of this unit.
- To operate the unit, point the remote control at the remote sensor of the amplifier.

To use this unit without connecting it to the amplifier, set the IR setting to "Enable".
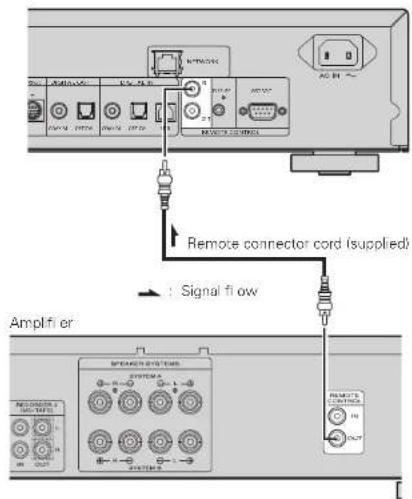
Remotecontrol connection
The unit can be controlled using the remote sensor of RX101 connected to the unit and the Marantz amplifier. Be sure to set "IR=Disable" when controlling in this way.
NOTE
When making this remote control connection, be sure to set the IR switch of RX101 and the Marantz amplifier that are connected to the unit, to ON.
Setting the remote control
1 Turn or press [MENU].
Turns on the Menu settings mode and the Menu appears on the display. ( page 21 "Menu map")
2 Use △▽ to select "Other"-“IR Setting”-“Disable”, then press [ENTER/MEMO], or ▷.
![MARANTZ NA7004SG - Use △▽ to select "Other"-“IR Setting”-“Disable”, then press [ENTER/MEMO], or ▷. - 1](/content/2026/05/1027350/images/99e5cef372e5d8e9d5069aafb7fd504b6c7172a24b1a1c66f20de13d5eb5d469.jpg)
To restore original settings, repeat steps 1 and 2, select "Enable" and press
NOTE
The unit cannot be controlled using the remote controller while "Disable" is set.
ENGLISH

Symbols used to indicate buttons in this guide
Button located on both the main unit and the remote control
→ BUTTON
Button only on the main unit →
Button only on the remote control → [BUTTON]
![[MENU] [ENTER/MEMO] △,▽,▷ [NUMBER] (0-9)](/content/2026/05/1027350/images/4be6d33a498ff7c053be102adeb1235a8e1b2e6c53515619261bc52f20dfc388.jpg)

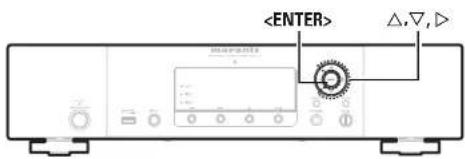
Setting the network [Network]
When using this unit with the broadband router's DHCP function enabled, this unit automatically performs the IP address setting and other settings.
When using this unit connected to a network with no DHCP function, make the settings for the IP address, etc., at "Network connecting (DHCP=Off)" (page 23).
NOTE
When setting manually, check the setting contents with the network administrator.
Networkconnecting
1 Connect the LAN cable.
page 6 "Connecting to a home network {LAN}")
Turn on this unit.
page 9 "Turning the power on"
Press [MENU].
Turns on the Menu settings mode and the Menu appears on the display. ( page 21 "Menu map")
Use △▽ to select "Network"- "Connecting"- "DHCP
(Off)", then press [ENTER/MEMO],
- When the network connection is set to "DHCP (OnI)", go to step 6.
5 Use △▽ to select "On", then press [ENTER/MEMO].
"Connecting" menu appears.
6 Use △▽ to select "Conn MEMO],
The connection starts.
- When the connection is made successfully, "Succeeded" appears.
If the connection fails, "Failed" appears.
NOTE
You may need to set the network connection manually, depending on the provider you use. To set the connection manually, use the setting procedure of "Network connecting (DHCP=Off)".
Network connecting (DHCP=Off)
1 Perform steps 1 to 4 of the "Network connecting" procedure and select "Off" in step 5.
"Connecting" menu appears.
2 Use △▽ to select "IP Address", then press [ENTER/MEMO],
"IP Address" input menu appears.
3 Use △▽▷ or [NUMBER] (0-9) to input the address and press [ENTER/MEMO] or
4 Use or [NUMBER] (0 - 9) to input the address for Subnet Mask, Gateway, Primary DNS, and Secondary DNS.
5 After you input all required addresses, perform step 6 of "Network connecting" to connect to the Internet.
ProxySettings
| Make this setting when connecting to the Internet via to proxy server. |
| 1 | Press [MENU].Turns on the Menu settings mode and the Menu appears on the display. ( page 21 "Menu map" ) |
| 2 Use △▽ to select "Network"-“Connecting"-“Proxy”, then press [ENTER/MEMO], <ENTER> or ▷. |
| "Proxy" setting menu appears. |
| 3 | If "Proxy(On)" appears, go to step 5. If "Proxy(Off)" appears, press [ENTER/MEMO], <ENTER>, or ▷. The "Proxy" (On/Off) setting menu appears. |
| 4 | Use △▽ to select "On", then press [ENTER/MEMO],<ENTER> or ▷. |
| "Proxy" setting menu appears. |
| 5 | Use △▽ to select "Proxy(Address)" or "Proxy(Name)", then press [ENTER/MEMO],<ENTER> or ▷. |
| "Select Type" setting menu appears. |
| • Select whether Proxy is a server address or domain name. |
| 6 Use △▽ to select "Address" or "Name", then press [ENTER/MEMO], <ENTER> or ▷. |
| "Proxy" setting menu appears. |
| 7 Use △▽ to select "Address" or "Name", then press [ENTER/MEMO], <ENTER> or ▷. |
| "Address" or "Name" input menu appears. |
| • Input a server address or domain name. |
| 8 | Use △▽▷ or [NUMBER] (0-9) to input the address or name, then press [ENTER/MEMO] or <ENTER>. |
| "Proxy" setting menu appears. |
| 9 Use △▽ to select "Port", then press [ENTER/MEMO], <ENTER> or ▷. |
| "Port" input menu appears. |
| 10 | Use △▽▷ or [NUMBER] (0 - 9) to input the port, then press [ENTER/MEMO] or |
| The Proxy settings are completed. |
NetworkStandby
| Set the network function On/Off during standby. |
| 1 | Press [MENU].Turns on the Menu settings mode and the Menu appears on the display. ( page 21 "Menu map") |
| 2 Use △▽ to select "Network"-“Other"-“Network Standby”, then press [ENTER/MEMO], <ENTER> or ▷. |
| "Network Standby" menu appears. |
| 3 Use △▽ to "On", then press [ENTER/MEMO],<ENTER> or ▷. |
| On | Shortens the time before the network connection is completed. |
| Power consumption during the standby mode will be higher. |
| Off | Power consumption during the standby mode will be minimized. |
| It will take slightly longer till the network connection is completed. | |
| This is the default setting. |

Set to "On" when the web control function.
PCLanguage
Select computer environment language
| 1 | Press [MENU].Turns on the Menu settings mode and the Menu appears on the display. (含 page 21 "Menu map") |
| 2 Use △▽ to select "Network"-“Other"-“PC Language”, then press [ENTER/MEMO], <ENTER> or ▷. |
| "PC Language" setting menu appears. |
| 3 Use △▽ to select your computer environment language, then press [ENTER/MEMO], <ENTER> or ▷. |
FriendlyNameEdit
| The Friendly Name is the name of this unit displayed on the network. |
| 1 | Press [MENU].Turns on the Menu settings mode and the Menu appears on the display. ( page 21 "Menu map") |
| 2 Use △▽ to select "Network"-“Other"-“Friendly Name Edit”, then press [ENTER/MEMO], <ENTER> or ▷. |
| "Friendly Name Edit" menu appears. |
| 3 | Edit a friendly name. |
| For the character input method, see "Inputting characters" ( page 26) |
ENGLISH

Symbols used to indicate buttons in this guide
Button located on both the main unit and the remote control
→ BUTTON
Button only on the main unit →
Button only on the remote control → [BUTTON]
![[MENU] [ENTER/MEMO] [MODE] △,▽,◀,◀ [NUMBER] (0-9) [CLEAR]](/content/2026/05/1027350/images/0d6275d4f1037a11699cc4c03bbe716b091c4a0eff91c644836404388c2403ab.jpg)

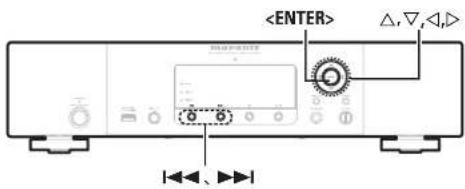
Setting the others [Other]
Autostandby
With the Auto standby ON, this unit will automatically enter the standby mode after about 30 continuous minutes of stop mode with no operation.
• The default setting is "OFF".
1 Press [MENU]. Turns on the Menu settings mode and the Menu appears on the display. It page 21 "Menu map")
2 Use △▽ to select "Other"- "Auto Standby", then press [ENTER/MEMO],
3 Use △▽ to select "On", then press [ENTER/MEMO],
NOTE
In the following situations, the Auto standby function does not operate:
- When an iPod or USB memory device is connected to the USB port on the unit.
- When the input source is "Digital In USB", "Digital In OPT" or "Digital In COAX".
- When the input source is "M-XPort" and an RX101 wireless receiver is connected to M-XPort.
- When the input source is "INTERNET RADIO", "MUSIC SERVER" or "ONLINE MUSIC", and a ethernet cable is connected to NETWORK connector.
Screensaver
Use the following procedure to set the screen saver.
1 Press [MENU].
Turns on the Menu settings mode and the Menu appears on the display. ( page 21 "Menu map")
2 Use △▽ to select "Other"-Screen Saver", then press [ENTER/MEMO],
3 Use △▽ to select "ON", then press [ENTER/MEMO],
Firmwareupdate
- In order to use these functions, you must have the correct system requirements and settings for a broadband Internet connection ( page 6).
- Perform the Firmware update after more than 2 minutes since the power is turned on.
1 Press [MENU]. Turns on the Menu settings mode and the Menu appears on the display. ( page 21 "Menu map")
2 Use △▽ to select "Other"- "Firmware Update", then press [ENTER/MEMO],
[Selectable items]
Check for Update : Check for firmware updates. You can also check approximately how long it will take to complete an update.
Start : Execute the update process.
- If updating fails, the set automatically retries, but if updating is still not possible, one of the messages shown below is displayed. If the display reads as shown below, check the settings and network environment, then update again.
Display Description
Updating fail Updating failed.
Login failed Failure to log into server.
Server is busy Server is busy. Wait a while then try again.
Connection fail Failure in connecting to server.
Download fail Downloading of the firmware has failed
[Notes concerning use of "Firmware Update"]
- Do not turn off the power until updating is completed.
• Even with a broadband connection to the Internet, approximately 20 minutes is required for the updating procedure to be completed - Once updating starts, normal operations on this unit cannot be performed until updating is completed.
- Furthermore, updating the firmware may reset the backup data for the parameters, etc. set for this unit.
- If the update fails, remove and re-insert the power cord, "Update retry" appears on the display and update restarts from the point at which update failed. If the error continues despite this, check the network environment.
Other functions
Inputtingcharacters
You can change the names as desired using the "Napster Account" ( page 14), "Pandora account" ( page 15), "Rhapsody account" ( page 17) and character input for the network functions. For inputting characters, there are two methods, as shown below.
| Method Operations | |
| Using the number buttons | ·Operating with the remote control unit ·Multiple characters are assigned to a button, and each time the button is pressed, a character is switched. |
| Using the cursor buttons | ·Operating with the remote control unit or the main unit. ·Use △▽◀▷ and [ENTER/MEMO] orto input characters. |
□ Display of an input screen
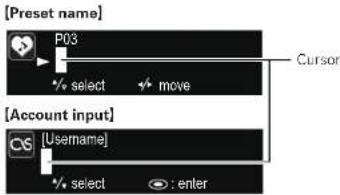
flowchart
graph TD
    A["Preset name"] --> B["P03"]
    B --> C["select move"]
    C --> D["Cursor"]
    E["Account input"] --> F["Username"]
    F --> G["select : enter"]
Using the number buttons
![1 Display the screen for inputting characters. 2 Place the cursor at the character to be changed with ◀ ▷ and press [NUMBER] (0 - 9) until the desired character is displayed. • The types of characters that can be input are as shown below. ① 1. @ - _ /:~ ② abcABC2 ③ defDEF3 ④ g h i G H I4 ⑤ j k l J K L5 6 m n o M N O 6 7 p q r s P Q R S 7 8 t u v T U V 8 9 w x y z W X Y Z 9 0 !$ % & '() * +, ; <= > ? [ \ ] ^ { |}](/content/2026/05/1027350/images/afaf2ccf5e6a0536bad27840611a8dda8d2a10b4f542ddb0fc0eba9024d082cf.jpg)
- The input character type can be switched by pressing [MODE] while the display name is being changed.
- For entering the characters assigned to one number button continuously, press ▷ to move the cursor to the right after entering a character then enter the next character.
- For entering characters assigned to separate buttons, press the number button continuously. The cursor automatically moves to the next position, and the entered character is registered.
3 Repeat step 2 to change the name then press [ENTER/MEMO] or to register it.
Using the cursor buttons
1 Display the screen for inputting characters.
2 Use ◀▷ to set the cursor to the character you want to change.
3 Use to change the character.
• The types of characters that can be input are as shown below.
[ Upper case characters] ABCDEFGHIJKLMNOPQRSTUVWXYZ [Lower case characters] abcdefghijklmnopqrstuvwxyz [Symbols] ! " # \$ % & ' } * +, -, :; < = > ? @ [ \ ] ^ _ { } \~ [Numbers] 0123456789 (Space)
- The input character type can be switched by pressing [MODE] while the display name is being changed.
Other buttons
- Press ◀◀◀ or [CLEAR] to delete the character.
- Press ▶▶▶ I to insert a space.
4 Repeat steps 2 and 3 to change the name then press [ENTER/MEMO] or
ENGLISH
ENGLISH

Symbols used to indicate buttons in this guide
Button located on both the main unit and the remote control
BUTTON
Button only on the main unit →
Button only on the remote control → [BUTTON]
natural_image
Front view of a portable electronic device with control buttons and a display screen (no visible text or symbols)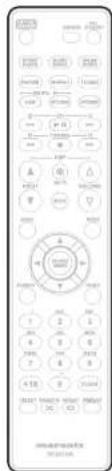
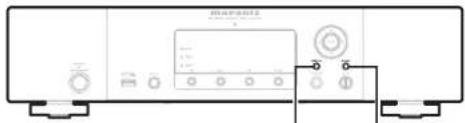
Web control function
You can operate this unit using a browser of PC.
1 Switch the "Network Standby" setting to "ON". ( page 24).
2 Check the IP address of this unit with "Menu"- "Network"- "Network Info".
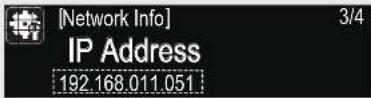
3 Enter the IP address of this unit in browser's address box.
For example, if the IP address of this unit is "192.168.011.051", enter "http://192.168.011.051".
Operate.
[Example 1] Start Menu control screen
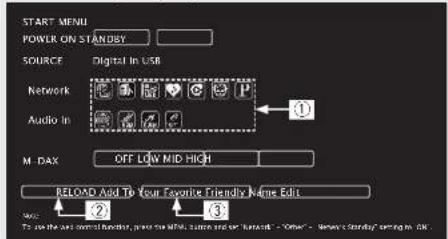
① Click to perform individual operations.
Changes to individual operation screens.
② Click when you update to the latest information.
Normally, there is a change to the latest information each time you operate. When operating from the main unit, click this or else the screen will not be updated.
③ Click to add a setting to "Favorites" in your browser.
Other functions
Last function memory
This stores the settings as they were immediately before going into the standby mode.
When the power is turned back on, the settings are restored to as they were immediately before going into the standby mode.
Resettingthemicroprocessor
Perform this procedure if the display is abnormal or if operations cannot be performed.
When the microprocessor is reset, all the settings are reset to their default values.
1 Unplug the power cord.
2 Plug the power cord into a power outlet while pressing

If "Initialized" does not display in step 2, start over from step 1.
ENGLISH
Information
Part names and functions
For buttons not explained here, see the page indicated in parentheses ( ).
Frontpanel
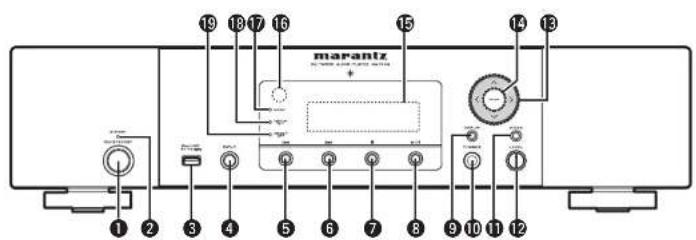
① Power operation switch (ON/STANDBY) ...... (9)
② Power indicator (STANDBY) ..... 19
The two-colored light indicates the player operating status as follows:
- Power "ON" Turn off
- Standby....Red
• Network Standby....Orange
③ USB port (Type A) (iPod/USB) ...... (8)
Used to connect USB devices.
④ INPUT knob …… (9)
Selects the input source
⑤ Reverse-skip button (1◀◀) ..... (11)
⑥ Forward-skip button (▶▶) ..... (11)
⑦ Stop button (■) ..... (11)
⑧ Play/Pause button (▶/II) ..... (11)
9 DISPLAY button....(12)
10 Headphones jack (PHONES)....(10)
M-DAX button (9)
⑫ Headphone volume control knob (LEVEL)....(11)
⑬ Cursor buttons (△▽◀ ▷) …… (12)
⑭ ENTER button (11)
Used to confirm an item.
15 Display
⑯ Remote control sensor …… (3)
⑰ M-DAX indicator (M-DAX) …… (10)
18 DISPLAY OFF indicator (DISPLAY OFF)....(10)
⑲ DIGITAL OUT OFF indicator (DIG.OUT OFF) ...... (10)
Rearpanel
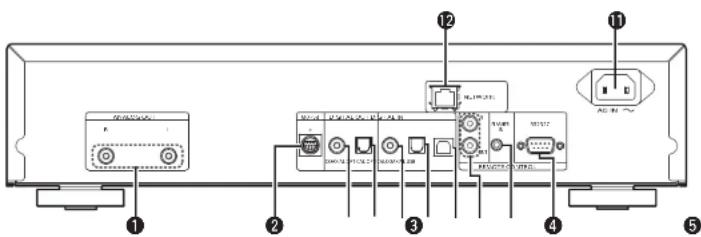
① ANALOG OUT connectors …… (4)
② M-XPort (22)
Connect to RX101 wireless receiver
③ DIGITAL OUT COAXIAL connector ..... (4)
④ DIGITAL OUT OPTICAL connector …… (4)
⑤ DIGITAL IN COAXIAL connector ..... (5)
⑥ DIGITAL IN OPTICAL connector....(5)
⑦ USB port (Type B) ..... (5)
8 REMOTE CONTROL IN /
OUT connectors....(22)
9 FLASHER IN connector ...... (8)
10 RS-232C terminal (8)
⑪ AC inlet (AC IN)....(8)
⑫ NETWORK connector ...... (6)
Remotecontrol
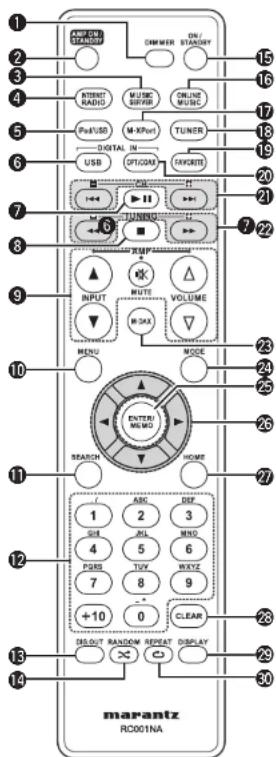

- The supplied remote control can operate Marantz amplifiers.
- When using it, also refer to the operating instructions of the other devices.
NOTE
The remote control may not operate some devices.
① DIMMER button....(10)
② AMP ON/STANDBY button (Amplifier operation buttons)
③ MUSIC SERVER button....(14)
4 INTERNET RADIO button....(13)
⑤ iPod/USB button (11)
6 DIGITAL IN USB button (19)
⑦ Play/Pause button (▶II) ..... (11)
⑧ Stop button (■) ...... (11)
9 A plifier operation buttons
INPUT button (▲▼)
VOLUME button (△▽)
MUTE button
⑩ MENU button....(14)
⑪ SEARCH buttons ...... (12)
12 Number buttons ...... (23)
13 Digital out button (DIG. OUT) ...... (10)
14 RANDOM button (12)
15 ON/STANDBY button ...... (9)
16 ONLINE MUSIC button ...... (14)
⑰ M-XPort button ......(9)
⑱ TUNER button
Not used for this unit.
19 FAVORITE button (20)
20 DIGITAL IN OPT/COAX button....(19)
② Skip buttons (I◄◄, ►►I) ...... (11)
② Search buttons (◀◀, ▶▶) ...... (11)
23 M-DAX button (9)
24 MODE button (11)
25 ENTER/MEMO button (12)
26 Cursor buttons (△▽◀ ▷)……(11)
27 HOME button....(11)
28 CLEAR button ..... (26)
29 DISPLAY button....(12)
30 REPEAT button (11)
iPod®
Made for iPod iPhone
"Made for iPod" and "Made for iPhone" mean that an electronic accessory has been designed to connect specifically to iPod, or iPhone, respectively, and has been certified by the developer to meet Apple performance standards.
Apple is not responsible for the operation of this device or its compliance with safety and regulatory standards.
Please note that the use of this accessory with iPod or iPhone may affect wireless performance.
iPhone, iPod, iPod classic, iPod nano, iPod shuffle, and iPod touch are trademarks of Apple Inc., registered in the U.S. and other countries.
- Individual users are permitted to use iPhone, iPod, iPod classic, iPod nano, iPod shuffle, and iPod touch for private copy and playback of non-copyrighted contents and contents whose copy and playback is permitted by law. Copyright infringement is prohibited by law.
NOTE
- Marantz will accept no responsibility whatsoever for any loss of iPod data.
- Depending on the type of iPod and the software version, some functions may not operate.
- When connecting an iPhone to this unit, keep the iPhone at least 20cm away from this unit. If the iPhone is kept closer to this unit and a telephone call is received by the iPhone, noise may be output from this device.
USBmemory
Importantinformation
□ USB memory devices
A USB memory device can be connected to the USB port (Type A) of this unit to play music files stored on the USB memory device. Also, files stored on an iPod can be played when the iPod is connected directly to the USB port (Type A) of this unit. See "Connecting an iPod" to page 6i.
- Only USB memory devices conforming to mass storage class and MTP (Media Transfer Protocol) standards can be played on this unit.
- This unit is compatible with USB memory devices in "FAT16" or "FAT32" format.

If the number of files stored in a USB memory device exceeds 1,000, the access speed may become slower.
[Compatible formats]
| USB memory devices *1 | |
| WMA (Windows Media Audio) | √*2 |
| MP3 (MPEG-1 Audio Layer-3) | √ |
| WAV | √ |
| MPEG-4 AAC | √*3 |
| FLAC (Free Lossless Audio Codec) | √ |
*1 USB
- This unit is compatible with MP3 ID3-Tag (Ver. 2) standard.
• This unit is compatible with WMA META tags.
• WAV format Quantization bit rate: 16 bits.
*2 Copyright-protected files can be played on certain portable players compatible with MTP.
*3 Only files that are not protected by copyright can be played on this unit.
Content downloaded from pay sites on the Internet are copyright protected. Also, files encoded in WMA format when ripped from a CD, etc. on a computer may be copyright protected, depending on the computer's settings.
[Compatible formats]
| Sampling frequency | Bit rate | Extension | |
| WMA (Windows Media Audio) | 32/44.1/48 kHz | 48 – 192 kbps | .wma |
| MP3 (MPEG-1 Audio Layer-3) | 32/44.1/48 kHz | 32 – 320 kbps | .mp3 |
| WAV | 32/44.1/48 kHz | - | .wav |
| MPEG-4 AAC | 32/44.1/48 kHz | 16 – 320 kbps | .aac/.m4a/.mp4 |
| FLAC (Free Lossless Audio Codec) | 32/44.1/48/96 kHz | - | .flac |
"Windows Media" and "Windows" are registered trademarks or trademarks in the United States and other countries of Microsoft Corporation of the United States.
ENGLISH
Networkaudio
Importantinformation
☐ About the internet radio function
- Internet radio refers to radio broadcasts distributed over the Internet.
Internet radio stations from around the world can be received.
- This unit is equipped with the following Internet radio functions:
• Stations can be selected by genre and region.
- Up to 56 Internet radio stations can be preset
- Internet radio stations in MP3 and WMA (Windows Media Audio) format can be listened to.
- Your favorite radio stations can be registered by accessing an exclusive Marantz Internet radio URL from a Web browser on a computer.
- The function is managed for individual users, so you must provide your MAC or e-mail address.
Exclusive URL: http://www.radiomarantz.com
- The radio station database service may be suspended without notice.
- This unit's Internet radio station list is created using a radio station database service (vTuner). This database service provides a list edited and created for this unit.
□ Musicserver
This function lets you play music fi les and playlists (m3u, wpl) stored on a computer (music server) connected to this unit via a network.
With this unit's network audio playback function, connection to the server is possible using one of the technologies below.
• Windows Media Player Network Sharing Service
- Windows Media DRM10
[Compatible formats]
| Internet radio Music server | *1 | |
| WMA (Windows Media Audio) | √ | √ |
| MP3 (MPEG-1 Audio Layer-3) | √ | √ |
| WAV | √ | |
| MPEG-4 AAC | √*2 | |
| FLAC (Free Lossless Audio Codec) | √ |
A server or server software compatible with distribution in the corresponding formats is required to play music files via a network.
*1 Music server
- This unit is compatible with MP3 ID3-Tag (Ver. 2) standard.
- This unit is compatible with WMA META tags.
- WAV format Quantization bit rate: 16 bits.
*2 Only files that are not protected by copyright can be played on this unit.
Content downloaded from pay sites on the Internet are copyright protected. Also, files encoded in WMA format when ripped from a CD, etc. on a computer may be copyright protected, depending on the computer's settings.
[Compatible formats]
| Sampling frequency | Bit rate Extension | ||
| WMA (Windows Media Audio) | 32/44.1/48 kHz | 48 – 192 kbps .wma | |
| MP3 (MPEG-1 Audio Layer-3) | 32/44.1/48 kHz | 82 – 320 kbps .mp3 | |
| WAV 32/44.1/48 kHz | - | .wav | |
| MPEG-4 AAC | 32/44.1/48 kHz | 16 – 320 kbps | .aac/.m4a/.mp4 |
| FLAC (Free Lossless Audio Codec) | 32/44.1/48/96 kHz | - | .flac |
AboutNapster
Napster is a monthly subscription music distribution service provided by Napster LLC. This service allows users to download and play pieces of music they want to hear on this unit. Before you can use Napster, you will need to visit the Napster website on your PC to create an account and register as a member. For details, access the following site:
http://www.napster.com/choose/index_default.html
AboutPandora
Pandora is a free, personalized radio service. Simply enter in the name of your favorite song, artist or classical composer and Pandora will create a radio station that plays music you love.
Before you first listen to Pandora on your Marantz device, you will either need to associate your device with an existing Pandora account or create a new Pandora account for use on the device.
Please launch the Pandora service on your Marantz device for more information about how to complete the device association process. For more general information about Pandora please visit the Pandora FAQ at http://blog.pandora.com/faq/
AboutRhapsody
Rhapsody is a paid music broadcast service of RealNetworks. When you fi rst listen to Rhapsody, it is necessary to subscribe to a Rhapsody account at the Rhapsody homepage by your PC and register this machine. See the Rhapsody homepage for details. http://www.rhapsody.com/marantz
Explanation terms
A
A2DP
A2DP is one profile of Bluetooth defined for in-car devices or AV devices that use wireless communication instead of a cable.
B
Bit rate
This expresses the read amount per 1 second of video/audio data recorded in a disc.
Bluetooth
Bluetooth is a short-distance wireless communication technology used for connecting handheld devices several meters apart. This enables notebook computers, PDA s, mobile phones, etc. to connect without a cable for transmitting audio and data.
D
DLNA
DLNA and DLNA CERTIFIED are trademarks and/or service marks of Digital Living Network Alliance. Some contents may not be compatible with other DLNA CERTIFIED™ products.
Dynamic range
The difference between the maximum undistorted sound level and the minimum sound level that is discernible above the noise emitted by the device.
M
MP3 (MPEG Audio Layer-3)
This is an internationally standardized audio data compression scheme, using the "MPEG-1" video compression standard. It compresses the data volume to about one eleventh its original size while maintaining sound quality equivalent to a music CD.
MPEG (Moving Picture Experts Group), MPEG-2, MPEG-4
These are the names for digital compression format standards used for the encoding of video and audio. Video standards include "MPEG-1 Video", "MPEG-2 Video", "MPEG-4 Visual", "MPEG-4 AVC". Audio standards include "MPEG-1 Audio", "MPEG-2 Audio", "MPEG-4 AAC".
\$
Sampling frequency
Sampling involves taking a reading of a sound wave (analog signal) at regular intervals and expressing the height of the wave at each reading in digitized format (producing a digital signal).
The number of readings taken in one second is called the "sampling frequency". The larger the value, the closer the reproduced sound is to the original.
Speaker impedance
This is an AC resistance value, indicated in (ohms), Greater power can be obtained with this value smaller.
y
vTuner
This is a free online content server for Internet radio. Note that usage fees are included in upgrade costs.
For inquiries about this service, visit the vTuner site below.
vTuner website: http://www.radiomarantz.com This product is protected by certain intellectual property rights of Nothing Else Matters Software and BridgeCo. Use or distribution of such technology outside of this product is prohibited without a license from Nothing Else Matters Software and BridgeCo or an authorized subsidiary.
W
Windows Media DRM
This is a copyright protection technology developed by Microsoft.
Content providers are using the digital rights management technology for Windows Media contained in this device (WM-DRM) to protect the integrity of their content (Secure Content) so that their intellectual property, including copyright, in such content is not misappropriated. This device uses WM-DRM software to play Secure Content (WM-DRM Software). If the security of the WM-DRM Software in this device has been compromised, owners of Secure Content (Secure Content Owners) may request that Microsoft revoke the WM-DRM Software's right to acquire new licenses to copy, display and/or play Secure Content. Revocation does not alter the WM-DRM Software's ability to play unprotected content.
Software's ability to play unprotected content. A list of revoked WM-DRM Software is sent to your device whenever you download a license for Secure Content from the Internet or from a PC.
Microsoft may, in conjunction with such license, also download revocation list onto your device on behalf of Secure Content Owners.
Windows Media Player Ver. 11
This is a media player distributed free of charge by Microsoft Corporation.
It can be used to play playlists created with Windows Media Player Ver. 11 as well as files in such formats as WMA, DRM WMA, MP3 and WAV.
WMA (Windows Media Audio)
This is audio compression technology developed by Microsoft Corporation.
WMA data can be encoded using Windows Media ^® Player Ver.7, 7.1, Windows Media ^® Player for Windows ^® XP and Windows Media ^® Player 9 Series.
To encode WMA fi les, only use applications authorized by Microsoft Corporation. If you use an unauthorized application, the fi le may not work properly.
ENGLISH
ENGLISH
Troubleshooting
If a problem occurs first check the following:
1. Are the connections correct?
2. Is the set being operated as described in the user guide?
3. Are the other components operating properly?
If this unit does not operate properly, check the items listed in the table below. If the problem persists, there may be a malfunction.
In this case, disconnect the power immediately and contact your retail outlet.
【General】
| Symptom Cause | Countermeasure Page | ||
| Set does not operate properly. | External noise or interference is causing the set to malfunction. | Reset the microprocessor. 27 | |
| Display not lit and sound not produced when power switched to on. | Power cord not plugged in securely. | Check the connections on the set's rear panel and the connection of the power plug to the power outlet. | 8 |
| Display lit but sound not produced. | Wrong input source selected. Select the appropriate input source. | 9 | |
| Display is off. The Dimmer setting is set to "OFF". | Set to something other than "OFF". | 10 | |
[Remote control]
| Symptom Cause | Countermeasure Page | ||
| Set does not work properly when remote control operated. | Batteries are worn.You are operating outside of the specified range.Obstacle between main unit and remote control.The batteries are not inserted in the proper direction, as indicated by the polarity marks in the battery compartment.The set's remote control sensor is exposed to strong light (direct sunlight, fluorescent light, etc.). | Replace with new batteries.Operate within the specified range.Remove the obstacle.Insert the batteries in the proper direction, following the polarity marks in the battery compartment.Move the set to a place in which the remote control sensor will not be exposed to strong light. | 33-33 |
【Internet radio/Media server/iPod/USB memory device】
| Symptom Cause | Countermeasure Page | ||
| When a USB memory device is connected, "USB" is not displayed. | The set cannot recognize a USB memory device.A USB memory device not conforming to mass storage class or MTP standards is connected.A USB memory device that the set cannot recognize is connected.USB memory device is connected via USB hub. | Check the connection.Connect a USB memory device conforming to mass storage class or MTP standards.This is not a malfunction.Marantz does not guarantee that all USB memory devices will operate or receive power.Connect the USB memory device directly to the USB port. | 8-- |
| iPod cannot be played. | Input source other than "iPod/USB" is selected.Cable is not properly connected. | Switch the INPUT to "iPod/USB".Reconnect. | 116 |
| Files on a USB memory device cannot be played. | USB memory device is in a format other than FAT16 or FAT32.USB memory device is divided into multiple partitions.Files are stored in a non-compatible format.You are attempting to play a file that is copyright protected. | Set the format to FAT16 or FAT32. For details, refer to the USB memory device's operating instructions.When divided into multiple partitions, only files stored in the top partition can be played.Record the files in a compatible format.Files that are copyright protected cannot be played on this set. | --3030 |
| Internet radio cannot be played. | Ethernet cable is not properly connected or network is disconnected.Program is being broadcast in non-compatible format.The computer's or router's fi rewall is activated.Radio station is not currently broadcasting.IP address is wrong. | Check the connection status.Only Internet radio programs in MP3 and WMA can be played on this set.Check the computer's or router's fi rewall settings.Choose a radio station that is currently broadcasting.Check the set's IP address. | 631--1321 |
ENGLISH
| Symptom Cause Countermeasure Page | |||
| Files stored on a computer cannot be played. | • Files are stored in a non-compatible format.• You are attempting to play a fi le that is copyright protected.• Set and computer are connected by USB cable. | • Record in a compatible format.• Files that are copyright protected cannot be played on this set.• The set's USB port cannot be used for connection to a computer. | 3131- |
| Sound is too quiet when signals are output from a PC. | • The PC volume is turned down. | Turn the PC volume up. | 19 |
| Server is not found, or it is not possible to connect to the server. | • The computer's or router's fi rewall is activated.• Computer's power is not turned on.• Server is not running.• Set's IP address is wrong. | • Check the computer's or router's fi rewall settings.• Turn on the power.• Launch the server.• Check the set's IP address. | --21 |
| Cannot connect to preset or favorite radio stations. | • Radio station is not currently broadcasting.• Racio station is not currently in service. | • Wait a while before trying again.• It is not possible to connect to radio stations that are no longer in service. | |
| For some radio stations, "Server Full" or "Connection Down" is displayed and station cannot be connected to. | • Station is congested or not currently broadcasting. | • Wait a while before trying again. | - |
| Sound is broken during playback. | • Network's signal transfer speed is slow or communications lines or radio station is congested. | • This is not a malfunction. When playing broadcast data with a high bit rate, the sound may be broken, depending on the communications conditions. | - |
| Sound quality is poor or played sound is noisy. | • File being played has a low bit rate. | • This is not a malfunction. | - |
[Pandora]
| Symptom Cause Countermeasure Page | |||
| Cannot login to Pandora. (“Email address” or “Password” is displayed.) | • Login information is incorrect. | • Check if the “Email address” for Pandora has been properly entered. Re-enter the “Password”. (Password is not displayed.) | 15 |
| “Account is no longer active” is displayed. | • Your account is expired. | • Obtain a new account.• Contact Pandora Listener Support at pandora-support@ pandora.com. | - |
| “Pandora is only available for use in United States” is displayed. | • You are trying to access from a country where Pandora is not available. | • Pandora is not available in all countries. Please check http:// blog.pandora.com/faq/ | - |
| “Incorrect Email or Password” is displayed. | • You entered an incorrect account or password for the login authentication. | • Enter them again. | 15 |
| “No skips remaining” is displayed. | • You repeatedly performed the forward skip operation for tracks within the same station. No more forward skip operation is available. | • Unfortunately, our music licenses force us to limit the amount of tracks you can skip in an hour. | - |
| “100 Station Limit” is displayed. | • You have already registered 100 stations. You can not register a new station. | • Reduce the number of stations to less than 100. | - |
| “Please Try Again Later” is displayed. | • Pandora is performing system maintenance. | • Please try again later. | - |
[Rhapsody]
| Symptom Cause Countermeasure Page | |||
| Cannot login to Rhapsody. (“Incorrect Username or Password” is displayed.) | • Login information is incorrect. | • Check if the Username for Rhapsody has been properly entered. Re-enter the Password. (Password is not displayed.) www.rhapsody.com/marantz | 17 |
ENGLISH
[Napster]
| Symptom Cause Countermeasure Page | |||
| Cannot login to Napster. (“Subscription required” is displayed.) | An error occurred during login verification.If a nonsubscriber user accesses it. Or when the listening limitation exceeds it. | Enter the correct username and password to try to login again. | - |
| Cannot login to Napster. (“Incorrect Username or Password” is displayed.) | A wrong username or password was entered at the login verification. | Enter the correct username and password to try to login again.Check if the Username for Napster has been properly entered. Re-enter the Password. (Password is not displayed.)http://www.napster.com/choose/index_default.html | -- |
[M-XPort]
| Symptom Cause Countermeasure Page | |||
| No sound. • Pairing for Bluetooth communication has not been properly completed. | • Perform pairing for Bluetooth (wireless) communication again. | - | |
| The sound is distorted or breaks up. | • There is a device, such as a wireless LAN or microwave, that uses radio waves in the same frequency band (2.4 GHz) as this unit. | • Move the unit or Bluetooth device from where it has been installed. | - |
| Cannot operate Bluetooth device. | • AVRCP commands are not supported. | • Consult the user guide of the Bluetooth device you are using to find out whether the device supports AVRCP commands. | - |
Specifications
□ Audio performance
Analog output
Channels 2 channels
Plavable frequency range 2 Hz - 96 kHz
Playable frequency response 2 Hz - 50 kHz (-3 dB)
(Sampling frequency: 192 kJ/2)
2 Hz - 20 kHz
(Sampling frequency: 44.1 kHz)
S/N 110 dB
Dynamic Range
Dynamie Range
Harmonia Distortion
Harmonic Distortion
Output Level
Unbalanced
Headphone output
Digital output
Output level (cinch JACK)
Output level (optical)
Output level: Digital input
Digital input Signal format
Signal format
Input level (cinch JACK)
Input level (optical)
Emission wavelength (optical)
110 dB (Audible Range)
0.001 % (1 kHz Audible Ragonel
B. BQ + 10 (1 kHz, Analog-100Hz)
2.35 V RMS Stereo
18 mW/32 Ω (variable maximum)
0.5 Vo-p
-19 dBm
-15.62m
DIGITAL AUDIO INTERFACE (linear PCM)
0.5 Vp-n
-27 dBm or later
27.02m of 1500
860 mm
Power supply
Power supply voltage/frequency
Power consumption
Power consumption in standby mode
General
External dimensions (width x height x depth)
Weight
(Sampling frequency: 192 kHz)
2 Hz - 20 kHz
(Sampling frequency: 44.1 kHz)
- For purposes of improvement, specifications and design are subject to change without notice.
Index
| A | |
| A2DP | 22, 32 |
| Accessories | 2 |
| Auto standby | 25 |
| B | |
| Bit rate | 30, 31, 32 |
| Bluetooth | 22, 32 |
| C | |
| Cable | |
| Audio cable | 4, 5, 6 |
| Ethernet cable | 6 |
| Optical cable | 4 |
| Pin-plug cable | 4 |
| Characters | 26 |
| Connection | |
| iPod | 6 |
| Network | 6, 23 |
| Other equipment | 8 |
| PC | 5 |
| Power cord | 8 |
| Remote control jacks | 22 |
| USB memory device | 8 |
| Wireless receiver | 22 |
| D | |
| D/A converter | 19 |
| Direct mode | 11 |
| Display's brightness | 10 |
| DLNA | 2,32 |
| Dynamic range | 32 |
| F | |
| Firmware update | 25 |
| Front panel | 28 |
| H | |
| Headphones | 10 |
| I | |
| Input source | 9 |
| Inputting characters | 26 |
| Internet radio | 13 |
| iPod stand | 7 |
| M | |
| Menu map | 21 |
| MP3 | 30, 31, 32 |
| MPEG-4 | 30, 32 |
| Music server | 14 |
| N | |
| Napster | 14 |
| P | |
| Pandora | 15 |
| Playback | |
| Internet radio | 13 |
| iPod | 11 |
| Napster | 14 |
| Network audio | 13, 31 |
| Pandora | 15 |
| Random | 12 |
| Repeat | 11 |
| Rhapsody | 17 |
| USB memory device | 12, 30 |
| R | |
| Rear panel | 29 |
| Remote control | 3, 29 |
| Batteries | 3 |
| Remote mode | 11 |
| Resetting the microprocessor | 27 |
| Rhapsody | 17, 31 |
| S | |
| Sampling frequency | 30, 31, 32 |
| Screen saver | 25 |
| Setting | |
| Network | 23, 24 |
| Other | 25 |
| Speaker impedance | 32 |
| V | |
| vTuner | 32 |
| W | |
| Web control | 27 |
| Windows Media DRM | 31, 32 |
| Windows Media Player | 14, 32 |
| WMA | 30, 31, 32 |
ENGLISH
www.marantz.com
You can find your nearest authorized distributor or dealer on our website.
marantz®
is a registered trademark.
- marantz®
- Network Audio Player NA7004
- □ SAFETY PRECAUTIONS
- CAUTION RISK OF ELECTRIC SHOCK DO NOT OPEN
- CAUTION:
- WARNING:
- IMPORTANT SAFETY INSTRUCTIONS
- PRECAUTION:
- FCC INFORMATION (For US customers)
- COMPLIANCE INFORMATION
- IMPORTANT NOTICE: DO NOT MODIFY THIS PRODUCT
- IMPORTANT
- NOTE
- For Canadian customers:
- Connections
- Basic operations
- Advanced operations
- Information
- Explanation terms
- Troubleshooting
- Specifications
- Index
- 36
- Getting started
- Accessories
- Main features
- Cautions on handling
- About this guide
- ENGLISH
- About the remote control
- Inserting the batteries
- NOTE
- Operating range of the remote control
- Analog connections
- Digital connection
- Digital audio output
- When connecting the optical digital output connector with an optical transmission cable (sold separately)
- Digital audio input
- PCconnection
- Connecting to a home network (LAN)
- Required system
- □ Broadband internet connection
- □ Modem
- Router
- ☐ Ethernet cable (CAT-5 or greater recommended)
- Connectingan iPod
- iPodstand
- Setting up the iPod stand
- Setting your iPod on the iPod stand
- ☐ If the iPod stand becomes detached
- Connectingotherequipment
- RS-232C
- FLASHER IN
- Connecting the power cord
- Preparations
- Turning the power on
- □ Completely turning off the power
- Turning the power off
- Operations possible during playback
- Inputsourceswitching
- M-DAX
- (Marantz Dynamic Audio eXpander)
- [Using the remote controller]
- Switching the display's brightness
- Listening with headphones
- Adjusting the Volume
- Setting the digital output
- During stop mode, press [DIG. OUT].
- [Selectable items]
- iPod® playback
- Before playing a USB or an iPod
- Press ON/STANDBY.
- Connect USB memory device or iPod connection cable, then turn or press [iPod/USB].
- Playing an iPod
- Press [MODE] to select the display mode. The mode switches each time the button is pressed.
- Use △▽ to select the item, then press [ENTER/MEMO] or to select the music file to be played.
- Press ▶II. Playback starts.
- Playing repeatedly (Repeat playback)
- Press [REPEAT].
- Playing random order (Random playback)
- □ Canceling random playback
- ☐ To switch the display
- Disconnecting the iPod
- USB memory device playback
- Playing fi les stored on USB memory devices
- To switch the display
- Symbols used to indicate buttons in this guide
- Networkaudioplayback
- Listeningtointernetradio
- □ Switching the display
- (Alphabetic strings)
- Playing files stored on a music server
- Prepare for playback.
- Turn or press [MUSIC SERVER].
- □ Playing files that have been registered in your favorites
- Listening to Napster
- Turn or press [ONLINE MUSIC] and select "Napster".
- Use △▽▷ to input "Username" and "Password".
- □ Searching from Napster menu
- Network audio playback
- ☐ Entering a character search for the track you want to listen to
- Press [SEARCH].
- Use △▽ to select the search item, then press [ENTER/MEMO], .
- Input the characters, then press [ENTER/MEMO] or .
- ☐ Registering tracks in my Napster library
- Press ▷ while the track you wish to register is playing. "Add to my library?" is displayed.
- Press [ENTER/MEMO], or ▷. The track is entered in the Library. When you press ◀, the registration is cancelled and the display returns to the previous page.
- Listening to tracks registered in my Napster library
- Use △▽ to select "My Napster Library", then press [ENTER/MEMO], or ▷.
- Use △▽ to select the information or track, then press [ENTER/MEMO], .
- ListeningtoPandora
- Press [ONLINE MUSIC], then select "Pandora".
- If you have a Pandora account, press to select "I have a Pandora account", then press [ENTER/MEMO], or ▷.
- Input "Email address" and "Password".
- Listening to a personalized radio station (e.g. D&M2 Radio)
- Listening to created radio stations at random
- Sign out
- Select the search mode
- ① Search from Rhapsody latest information
- Using as a D/A converter
- Connect and playback from a digital device (Opt/Coax)
- Connecting and playing back from a computer (USB)
- Press [USB] or turn to change the input source to "Digital In USB".
- Computer (recommended system)
- OS
- Software
- USB
- Favoritefunction
- Registering Internet radio stations and music servers in Favorite List
- Calling Internet radio stations or files registered in Favorite List
- Deleting Internet radio stations or files registered in Favorite List
- The wireless receiver connection
- Remote control jacks connection
- Connection
- Setting
- Remotecontrol connection
- Setting the remote control
- Turn or press [MENU].
- Use △▽ to select "Other"-“IR Setting”-“Disable”, then press [ENTER/MEMO], or ▷.
- Setting the network [Network]
- Networkconnecting
- Network connecting (DHCP=Off)
- PCLanguage
- Setting the others [Other]
- Autostandby
- Screensaver
- Firmwareupdate
- Display Description
- [Notes concerning use of "Firmware Update"]
- Other functions
- Inputtingcharacters
- Repeat step 2 to change the name then press [ENTER/MEMO] or to register it.
- Using the cursor buttons
- Other buttons
- Web control function
- Operate.
- Last function memory
- Resettingthemicroprocessor
- Part names and functions
- Frontpanel
- Rearpanel
- Remotecontrol
- iPod®
- Made for iPod iPhone
- USBmemory
- Importantinformation
- □ USB memory devices
- Networkaudio
- ☐ About the internet radio function
- □ Musicserver
- AboutNapster
- AboutPandora
- AboutRhapsody
- A
- A2DP
- B
- Bit rate
- Bluetooth
- D
- DLNA
- Dynamic range
- M
- MP3 (MPEG Audio Layer-3)
- MPEG (Moving Picture Experts Group), MPEG-2, MPEG-4
- \$
- Sampling frequency
- Speaker impedance
- y
- vTuner
- W
- Windows Media DRM
- Windows Media Player Ver. 11
- WMA (Windows Media Audio)
- □ Audio performance
- Power supply
- General
Brand : MARANTZ
Model : NA7004SG
Category : Media player